REC Blade-900 User manual

Blade-900_1
http://www.rec-dvr.com
English
(PAL/NTSC-System)
Installation Instructions

Blade-900_2

Blade-900_3
Preface
Dear Customer,
Thank you for purchasing this REC 1-channel digital recorder. You made the right decision in choosing
this state-of-the-art technology, which complies with the current standards of domestic and European
regulations. The CE has been proven and all related certications are available from the manufacturer upon
request.
To maintain this status and to guarantee safe operation, it is your obligation to observe these operating
instructions! In the event of questions, please contact your local specialist dealer.
This REC 1-channel digital recorder is used in combination with connected video signal sources (B/W
and colour cameras) and video output devices (monitors, LCD screens) for object surveillance. Data storage
is subject to local national data-protection guidelines. During installation, draw your customers’ attention to
the existence of these guidelines. Via the serial 9-pole D-Sub connector, you can transfer picture data to a
computer and open it with special software. You can also view and archive complete video sequences at
your PC.
Precautions
The REC 1-channel digital recorder and connected components must be kept free of moisture (cellars
and similar surroundings are to be strictly avoided). Use of this product for other than the described purpose
may lead to damage of the product. Other hazards such as short-circuiting, re, electric shock, etc., are also
possible. The recorder is designed for operation with mains electricity at 100-240 Volt AC / 50/60 Hz.
No part of the product may be changed or modied in any way. Connection to the public power network is
subject to country-specic regulations. Please be aware of applicable regulations in advance.
To avoid fire and
injury,
please observe the
following:
Please observe the
following regulations
to ensure trouble-free
operation of your
device.
General:
• Securely fasten the device at a
dry location in the building.
• Make sure there is sufcient
ventilation.
• Do not expose the device to
temperatures less than -10°C
or more than 50°C.
• The device is designed for
indoor use only.
• Humidity must not exceed
90% (non-condensed).
• Ensure that the voltage is
disconnected when performing
work on the device.
• The REC 1-channel
digital recorder is connected
to 100-240V / 50/60Hz.
• The recorder should be
connected to the 100-240V AC
building mains by means of a
separate, electrically protected
line.
• Connection work to the building
mains is subject to
country-specic regulations.
Improper or careless installation
work may lead to faults and poor
image quality. Therefore please
read the instructions very
carefully
and follow the installation
instructions for lines and
components precisely.
The manufacturer reserves
the right to make technical
modications at any time.

Blade-900_4
Contents
SCOPE OF DELIVERY........................................................................................................................ 5
OVERVIEW........................................................................................................................................ 6
DESCRIPTION................................................................................................................................... 6
SYSTEM DESIGN ............................................................................................................................... 7
Single video source (camera) ............................................................................................... 7
Combination with multiplexer.............................................................................................. 7
REAR CONNECTIONS...................................................................................................................... 8
Description of alarm input ................................................................................................... 8
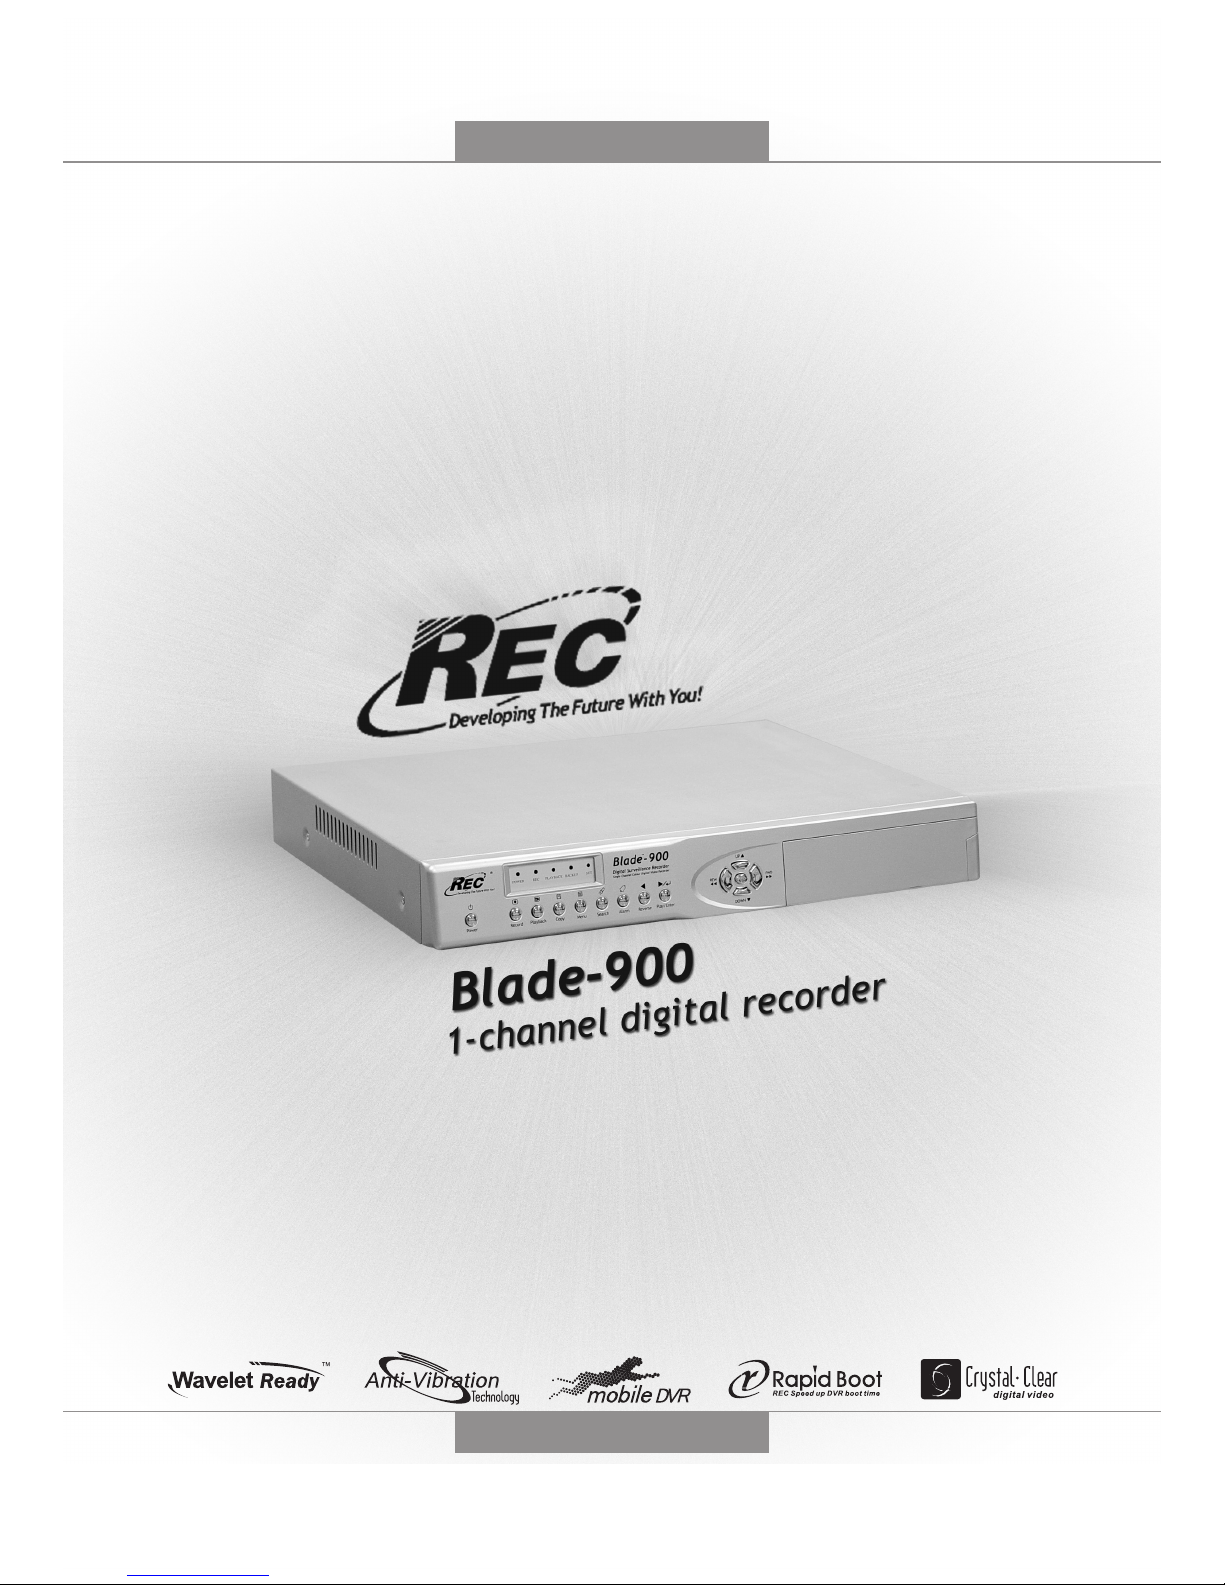
DESCRIPTION OF OPERATING CONTROLS...................................................................................... 9
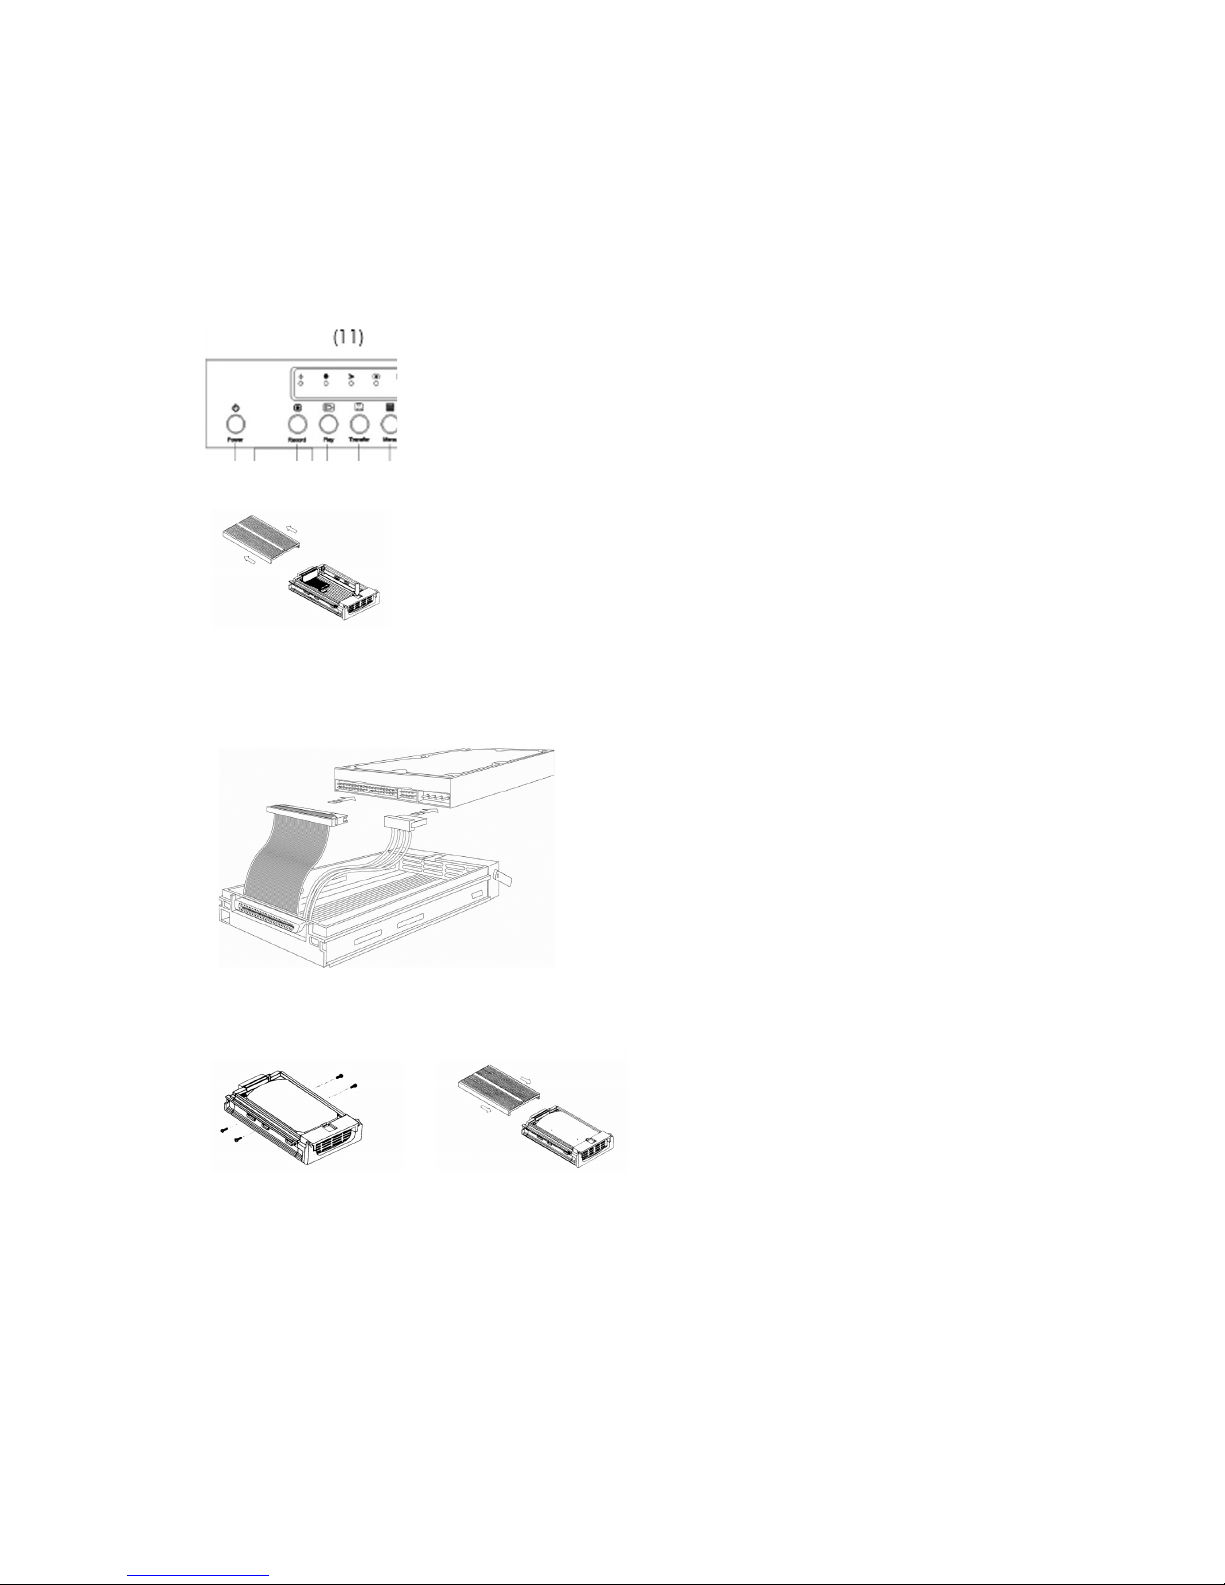
HARD DISK..................................................................................................................................... 10
Fitting the hard disk supplied............................................................................................. 11
FIRST STEPS WITH THE 1-CHANNEL DIGITAL RECORDER............................................................... 11
PROGRAMMING THE 1-CHANNEL DIGITAL RECORDER................................................................. 11
Alarm menu...................................................................................................................... 12
Main menu ....................................................................................................................... 13
Setting the schedule .......................................................................................................... 14
Notes on using the 1-channel digital recorder with a multiplexer ....................................... 15
OPERATING THE 1-CHANNEL DIGITAL RECORDER........................................................................ 16
Manual data recording...................................................................................................... 16
Locking the operating controls........................................................................................... 17
Scheduled recording.......................................................................................................... 18
Event-controlled recording................................................................................................. 18
Playback........................................................................................................................... 19
Playback – event search..................................................................................................... 21
Playback – time search ...................................................................................................... 21
TRANSFERRING IMAGE DATA TO THE PC....................................................................................... 23
Installing the software for single-frame display .................................................................. 23
Operating the PC program ................................................................................................ 23
TRANSFERRING PICTURE SEQUENCES TO THE PC......................................................................... 24
ADDITIONAL FEATURES OF THE 1-CHANNEL DIGITAL RECORDER ............................................... 24
Display of remaining recording capacity ............................................................................ 24
RECOMMENDED HARD DISKS........................................................................................................ 24
TECHNICAL DATA........................................................................................................................... 25
TROUBLESHOOTING ...................................................................................................................... 26
LIST OF COMPATIBLE MULTIPLEXERS.............................................................................................. 27

Blade-900_5
Scope of delivery
Packaging
1-Channel Digital Recorder
Connection cable
Installation Guide
Data cable

Blade-900_6
Overview
• Modern Wavelet reference picture technique
• Multiplexer compatibility permits recording of up to 16 camera signals (B/W and colour)
• High resolution of:NTSC:720 × 486 PAL:720 × 576
• Adjustable recording quality level
• Adjustable recording speed :NTSC:60,30,15,8,4,2,1,0.5P elds / second
PAL:50,25,12,6,3,2,1,0.5P elds / second
• Portable 3.5” quality hard drive
• Manual, scheduled and event-controlled recording
• Video signal loss display
• 1 alarm inputs, 1 alarm output
Description
The REC 1-channel digital recorder is the ideal substitute for an existing video recording system
consisting of an analogue video long-play recorder and quad/multiplexer. The user-friendly operation
and simple programming enable fast installation of the equipment and simple, intuitive handling.
The 1-channel digital recorder processes video signals sent by multiplexers. The data isstored on the
built-in, portable hard disk. The hard disk is automatically overwritten if this feature isselected. This enables
continuous, loss-free recording of video data in constant high quality over severalyears. No tape-changing
is necessary. If required, individual pictures and complete video sequences canbe transferred to a PC and
archived for later use.

VIDEO IN VIDEO OUT RS-232C NTSC/PAL
Blade-900_7
System design
Single video source (camera)
Combination with multiplexer
VIDEO IN VIDEO OUT RS-232C NTSC/PAL

(1) (2) (3) (4) (5) (6) (7)
Ground
1 2 3 4 5
ALM OUT-NO
ALM IN-NO
Ground
ALM OUT-NC
ALARM
Blade-900_8
Rear connections
Important: Make sure you use the correct power cable for your country.
Important: The RS232-C port is not for connecting a modem.
Important: During long-term operation, the integrated ventilator fan sometimes generates noise that may be
slightly disturbing. Remember this when choosing a location for the recorder.
(1) Voltage supply 100–240 V AC
(2) Fan/Ventilator Never touch this!
(3) Alarm Connections for alarm input and output
(4) VIDEO IN BNC video connection (composite video signal)
(5) VIDEO OUT BNC video output (composite video signal)
(6) COM RS-232C (serial connection) For connecting a PC
(7) NTSC/PAL video norm toggle switch NTSC / PAL
Description of alarm input
Sockets for alarm input and output are on the rear of the recorder. Connect the alarm output of a
multiplexer, a video sensor or a PIR sensor to the alarm input. You can connect a contact for a siren or light
control (for example) to the alarm output.
PIN Denition Description
1 Alarm input NO (normally open)
2 Alarm input ground GND
3 Alarm output NC (normally closed)
4 Alarm output NO (normally open)
5 Alarm output GND

(a) (b)(c) (d) (e)(1) (2) (3) (4) (5) (6) (7) (8) (9)
(10)
(11)
Blade-900_9
Description of operating controls
(1) Power[On/Off] Press to switch the digital recorder on or off.
(2) Record Press to start recording.
(3) Playback Press to switch to playback mode.
(4) Copy Press to start transferring a picture via the RS-232
(5) Menu Press to switch to the OSD of the digital recorder.
(6) Search Press to search for date and time.
(7) Alarm Press to search for alarm events.
(8) Reverse Press to rewind at normal speed.
(9) Play/Enter Press to conrm selection or input.
(a) REW Press for fast rewind.
(b) Down Press to select specic menu items.
(c) Pause/Stop Press to stop recording or playback.
(d) FWD Press to wind forward at normal speed.
(e) Up Press to select specic menu items.
(10) Hard disk Slot for portable hard disk.
(11) LEDs Show the current state of the digital recorder.
IMPORTANT: To lock the operating controls to prevent operation of the digital recorder, press the
Down and Up controls (b and e) simultaneously. If these controls are pressed again,
the user is asked to enter a password. If the password is accepted, the recorder is
unlocked.

Blade-900_10
Hard disk
Use only the hard-disk models recommended for this purpose.
Fitting the hard disk
1.Switch off the digital recorder and open the hard disk slot.
2.Turn the handle to face upwards and pull the HDD frame carefully out of the slot.
(Keys and tting screws are contained in the HDD frame.)
3.Push the plastic lock of the HDD frame cover down and push the upper cover of the HDD frame back.
4.Change the hard disk jumper so that the hard disk works as MASTER.
5.Connect the hard disk supplied to the HDD frame using a 4-pole power cable and a at ribbon data cable.
6.Fix the hard disk with two screws on the left and two screws on the right of the HDD frame and then close
the frame with the upper cover.
7.Insert the HDD frame back into the slot, push it until engages, and turn the handle to face down.
Now lock the hard disk with the key.

Blade-900_11
First steps with the 1-channel digital recorder
To start the 1-channel digital recorder:
1. Insert the hard disk as described and lock the HDD frame.
2. Connect the video signal sources (camera or multiplexer) with the video input on the rear of the
digital recorder.
3. Connect the video output of the digital recorder with the monitor input of your monitor (digital
recorder with camera or Quad) or with the recorder input of your multiplexer.
4. If necessary, set the switch on the monitor according to the terminal resistance.
5. Connect the cold device cable with the digital recorder and a 110-240V AC power socket.
6. Switch on the digital recorder by briey pressing the on/off switch (1).
The digital recorder now checks that the hard disk is correctly installed. The recorder during this time.
7. After about 5 seconds, conrm correct installation of the hard disk and the cameras by briey
pressing Enter (9).
The digital recorder ends the test.
The 1-channel digital recorder is now ready for programming.
IMPORTANT: If you want to use the digital recorder with a multiplexer, you have to connect the
recorder direct to a monitor for the initial installation and set the monitor to
multiplexer mode. Once it has been programmed, you can make all further changes
via the multiplexer structure.
Programming the 1-channel digital recorder
The programming menu of the digital recorder is divided into two parts – the main menu and an alarm
menu.
To open the programming menu, the recorder must be in standby mode :
1. Press Stop (c) to end any functions that may be active.
If the keys are locked, unlock them.
2. Press the menu button (5) and keep it pressed until the monitor display asks you to enter your
password.
The red menu LED lights up.
Enter your password using the direction keys (a,b,d,e). The left (a) and right (d) keys change the
cursor position, and the down (b) and up (e) keys change the value of the selected position.
You are now in the alarm menu. Use the direction keys to navigate through the programming menu. To
select a menu option, press Enter (9). To exit a selected menu option, press Stop (c).
IMPORTANT: The factory-set password is 0000. You can change the password at any time. If you do
not want to change the password, conrm the password query twice with the Enter
button (9).

ALARM FPS
ALARM REC
ALARM SIGNAL
LANGUAGE
EXIT
:
60P
CONTINUOUS
CONTINUOUS
ENGLISH
:
2004-01-01 12:00:00
Blade-900_12
Alarm menu
The alarm menu gives you the following options:
ALARM FPS
ALARM REC
ALARM SIGNAL
LANGUAGE
EXIT
Use the direction keys (a,b,d,e) to select a menu option.
To conrm your selection, press Enter (9). Change the
value using the down (b) and up (e) keys.
SET MENU: If you conrm this menu option with Enter (9), you go to the main menu of the
programming menu of the digital recorder.
ALARM FPS: The number of frames per second used for recording an alarm.
(Possible values are: NTSC:60,30,15,8,4,2,1,0.5P elds / second
PAL:50,25,12,6,3,2,1,0.5P elds / second)
ALARM REC: The length of time the recording is to run in the event of an alarm.
(Possible values are: Continuous/30MIN/25MIN/20MIN/15MIN/10MIN/5MIN/1MIN)
ALARM SIGNAL: Species how long the alert message is to be displayed on the monitor and how long
the alarm output is active.
(Possible values are: Continuous/30MIN/25MIN/20MIN/15MIN/10MIN/5MIN/1MIN)
IMPORTANT: If the setting is Continuous, you can end an alarm by pressing Enter (9).
LANGUAGE: Select the desired language.
(Possible values are: English, German, French)
EXIT: Conrm this menu option with Play/Enter (9) to exit the programming menu.

EXIT:SET MENU
DATE:
REC MODE:
REC FPS:
REC QUALITY:
SCHEDULE:
AUTO REVERSE:
MULTIPLEXER:
CLEAR HD:
2004-01-01 12:00:00
FIELD
60P
HIGH
NONE
ON(ON.OFF)
1(CH) 1P
OFF(ON.OFF)
2004-01-01 12:00:00
Blade-900_13
Main menu
The main menu gives you the following options:
DATE
REC MODE
REC FPS
REC QUALITY
SCHEDULE
AUTO REVERSE
MULTIPLEXER
CLEAR HDD
EXIT
Use the direction keys (a,b,d,e) to select a menu option. To
conrm your selection, press Enter (9). Change the value
using
the down (b) and up (e) keys.
DATE: Conrm this menu option with Ply/Enter (9). Use the direction keys (a,b,d,e) to enter the
date and time. Conrm your play input again with Play/Enter (9).
REC MODE: Conrm this menu option with Enter (9). Select one of the two options:
FIELD: 50/60 frames per second are recorded
(recommended setting).
FRAME: 25/30 frames per second are recorded In fast motion sequences, the pictures
may icker (paling fence effect).
REC FPS: Species how many frames per second are to be used for manual and scheduled
recording.(Possible values are: 50B/25B/12B/6B/3B/2B/1B/0.5B)
REC QUALITY: Species how much the picture data is to be compressed. The values and their
meanings:
HIGH: Low compression of picture data. High picture quality, shorter recording time.
NORMAL: Average compression of picture data. High picture quality, average recording time.
(recommended setting).
LOW: High compression of picture data. Sufcient picture quality, increased recording
time.
SCHEDULE: In addition to event-controlled and manual recording, the 1-channel digital recorder
can make scheduled recordings. Select one of the following:
NONE: Manual or event-controlled recording only.
DAILY: Select this item to open a submenu in which you can set the schedule for
each day.
MULTIPLEXER: In connection with a compatible multiplexer, the 1-channel digital recorder can also
record up to 16 cameras in multiplex mode. If you use the digital recorder with a
multiplexer, read the relevant notes in these instructions and make the settings as
described there.

2004-01-01 12:00:00
SUN:
MON:
TUE:
WED:
THU:
FRI:
S A T :
_____.
_____.
_____.
_____.
_____.
_____.
_____.
_____.
_____.
_____.
_____.
_____.
_____.
_____.
______
______
______
______
______
______
______
DAILY WED
EXIT START-END TIME
Blade-900_14
AUTO REVERSE: As opposed to an analogue tape recorder, the digital recorder has no tape to rewind
when it is full. The digital recorder has a so-called FIFO (rst in rst out) memory. The
oldest data is overwritten by new data, so that the latest events (depending on the
memory capacity) are always present on the hard disk. Conrm the menu option with
Play/Enter (9) and select one of the two options:
ON: Old data is automatically overwritten by new data when the hard disk is full.
OFF: When the hard disk is full, recording stops automatically and an acoustic warning and
a visual warning are issued to indicate that the hard disk is full. You now have to delete
the data on the hard disk manually to make another recording.
CLEAR HDD: Conrm this menu option with Enter (9). There are two ways of deleting data.
1. Data is deleted until the next switch-on.
Select ON and press Enter (9).
2. All data is deleted.
Select ON and press Enter (9). After exiting the on-screen menu, press Record (2) for 3
seconds.
EXIT: Conrm the menu option with Enter (9), exit the main menu and return to the alarm
menu:
Setting the schedule
The SCHEDULE submenu gives you the following options:
DAILY SET
START time (of recording)
END time (of recording)
You can dene up to three time windows a day.
Use the direction keys (a,b,d,e) to select a day. To conrm your
selection, press Enter (9). Change the value using the down
(b) and up (e) keys.
The 1-channel digital recorder automatically starts recording at the specied times.
The operating controls are locked during the scheduled recording time and can only be unlocked
by simultaneously pressing the up/down keys and entering the user password.
Important: The operating controls are locked during the programmed recording time and can only be
unlocked if you enter the valid user password.
IMPORTANT: Make sure that the date set corresponds to the day.
To synchronise day and date, rst enter the current date in the main menu.
Then change to the schedule menu and change the day accordingly.
Select EXIT.
When EXIT ashes, press FWD until the correct day appears at the top.
Conrm this display with Play/Enter (9).

Blade-900_15
Notes on using the 1-channel digital recorder with a multiplexer
1. Before connecting the digital recorder with the multiplexer, connect the digital recorder direct to a onitor.
2. Open the main menu of the digital recorder.
3. In the main menu, under REC MODE, set the value to: FRAME:
4. In the main menu, under REC FPS, set the value to: 60.
This input is very important for correct synchronisation between recorder and ultiplexer.
If you want to extend the recording duration, do this under MULTIPLEXER.
5. In the main menu, under MULTIPLEXER, set the multiplexer: Select 4, 9 or 16 channels.
6. To extend the recording duration in multiplexer mode in this menu item, select between recording every
frame, every other frame, every fourth or every eighth frame. Select 1B/P, 2B/P, 4B/P, or 8B/P.
The recording duration is extended accordingly. Do not change the setting under REC FPS.
7. Now exit the menu.
8. Connect the 1-channel digital recorder with the multiplexer as shown in the connection diagram.
9. Connect the cameras and the monitor with the multiplexer.
10. You may also have to make a corresponding setting on the multiplexer. Read the operating instructions of
the multiplexer for this.

100% 2004-01-01 12:00:00
REC A 60P
Blade-900_16
Operating the 1-channel digital recorder
Operating the digital recorder is user-friendly and almost intuitive.
Manual data recording
To start manual recording of video data, briey press Record (2).
The red recording LED lights up.
The monitor displays the following:
The percentage refers to how much of the hard disk has
already
been used.
REC A under the percentage shows that this is a manual
recording.
The number under the date is the frame rate (elds per
seconds)
used for this recording.
To stop recording, briey press Stop (c).
The red recording LED switches off. The monitor display disappears.

Blade-900_17
Locking the operating controls
To prevent unintentional or unauthorised operation of the digital recorder during recording, you can lock the
operating controls. To do this, press the direction keys b and e simultaneously.
The monitor displays LOCK:
To unlock the operating controls:
1. Press the direction keys b and e simultaneously again.
2. When prompted, enter the password using the direction keys.
3. Conrm your input with Play/Enter (9).
The word LOCK is no longer displayed. The operating controls function again.
IMPORTANT: The factory-set password is 0000. If a user forgets the digital recorder password, do
the following:
Make a note of the hour and minute displayed in the top right corner of the screen.
Add 2158 to this number.
For example, if the time is 14:21, add 1421 and 2158 (=3579).
This result is your correct password for this time. You can now enter the menu and

100% 2004-01-01 12:00:00
REC A LOCK 60P
DAILY
100% 2004-01-01 12:00:00
REC A LOCK 60P
ALARM
Blade-900_18
Scheduled recording
At the time you programmed, the digital recorder automatically starts recording.
The red recording LED lights up.
The monitor displays the following:
The word DAILY under the percentage shows that this is a
scheduled recording.
The word LOCK means that the operating controls are locked.
The scheduled recording ends at the programmed time. The operating controls are then unlocked. To stop
recording manually:
1. Unlock the controls as described above.
2. Stop recording by briey pressing Pause (c).
The red recording LED switches off. The recording is stopped.
To restart the scheduled recording:
1. In the main menu of the digital recorder, go to the SCHEDULE option.
2. Using the direction keys, change the setting to DAILY.
3. Exit the programming menu of the digital recorder.
The digital recorder continues the scheduled recording.
Event-controlled recording
If triggered by an event (such as an external alarm contact), the digital recorder automatically records
according to the parameters programmed in the alarm menu (frame rate, recording duration, etc.).
The red recording LED lights up. The alarm output is switched.
The monitor displays the following:
The word ALARM means that the alarm input was activated.
The event-controlled recording ends at the programmed time. To stop recording manually:
1. : Stop recording by briey pressing Stop (c).
The red recording LED switches off. The recording is stopped. This alarm is not recorded in the alarm list.
IMPORTANT:As soon as the alarm input on the rear of the recorder is closed, recording starts,
regardless of dened schedules.

2004-01-01 12:00:00
PLAY -> STOP 60P
Blade-900_19
Playback
To start playback on the digital recorder, make sure that it is in standby mode. First stop recording if active
(only the green ON/OFF LED should be on). Proceed as follows:
1. Briey press Playback (3).
The red playback LED lights up.
2. Briey press Enter (9).
Playback ends after a few seconds.
3. Press Enter (9) again.
Playback starts with the oldest recorded data.
The monitor displays the following:
The arrow (< - >) next to PLAY shows the playback direction.
The number in the top right corner shows the playback speed.
To change the playback direction, briey press Reverse or Enter (8 or 9). To stop playback, briey press Stop
(c).
The red playback LED switches off. The live picture is displayed.

Blade-900_20
Fast forward and rewind
To rewind or wind forward, press REW or FWD (a) or (d). Keep the respective key pressed. The longer the key
is pressed, the faster the rewind/fast forward. To stop, release the direction key.
Single-frame playback
Single-frame playback simplies the search for a specic event. To activate single-frame playback, check that
playback is paused. To do this, press the Pause key (c). You can now press the direction keys (b) and (e) to
move either one frame backwards or one frame forwards.
Changing playback speed.
Press Playback (3) to switch between playback speeds. Possible values: 0.5f/s, 1f/s, 2f/s, 4f/s, 8f/s, 16f/s,
30f/s, 60f/s, and 2x, 4x, 8x playback speed.
Changing playback direction
If you press Enter (9), forward playback starts. If you press Reverse (8), reverse playback starts. You can
change the playback direction at any time.
Table of contents
Popular Voice Recorder manuals by other brands

Philips
Philips Pocket Memo DPM8900 user manual

Fostex
Fostex DV-40 Supplement owner's manual

Mini Gadgets
Mini Gadgets VC300 user manual

Philips
Philips Pocket Memo Digital Recorder user manual

Lumens
Lumens CaptureVision VS-LC101 Quick installation manual

Sony
Sony ICD-P530F - Ic Recorder operating instructions