manuals.online logo
Brands
  1. Home
  2. •
  3. Brands
  4. •
  5. Red Arrow
  6. •
  7. Outdoor Light
  8. •
  9. Red Arrow LF13PIR User manual

Red Arrow LF13PIR User manual

Energy Saving Bulkhead
with PIR
Installation Instructions P.1
Red Arrow Trading
Elsworth House, Herries Road South, Sheffield,
S6 1QS
T: 0800 195 0006 F: 0870 043 3946
E: [email protected] www.redarrowtrading.com
For models: LF13PIR
Introduction
The bulkhead light incorporates a PIR (Passive Infra
Red) sensing device which continuously scans a preset
operating zone and immediately switches the lamp on
when it detects movement in that area.
This means that whenever movement is detected
within the range of the sensor the lamp will switch on
automatically to illuminate pathways, steps, patios,
porches, or whatever area you have selected to light
for reasons of safety, convenience or security.
While there is movement within range of the unit the
lamp will remain on.
Where To Fit Your Bulkhead Light
For the best results, we suggest you take into account
the following points:
• Do not mount on a vibrational surface.
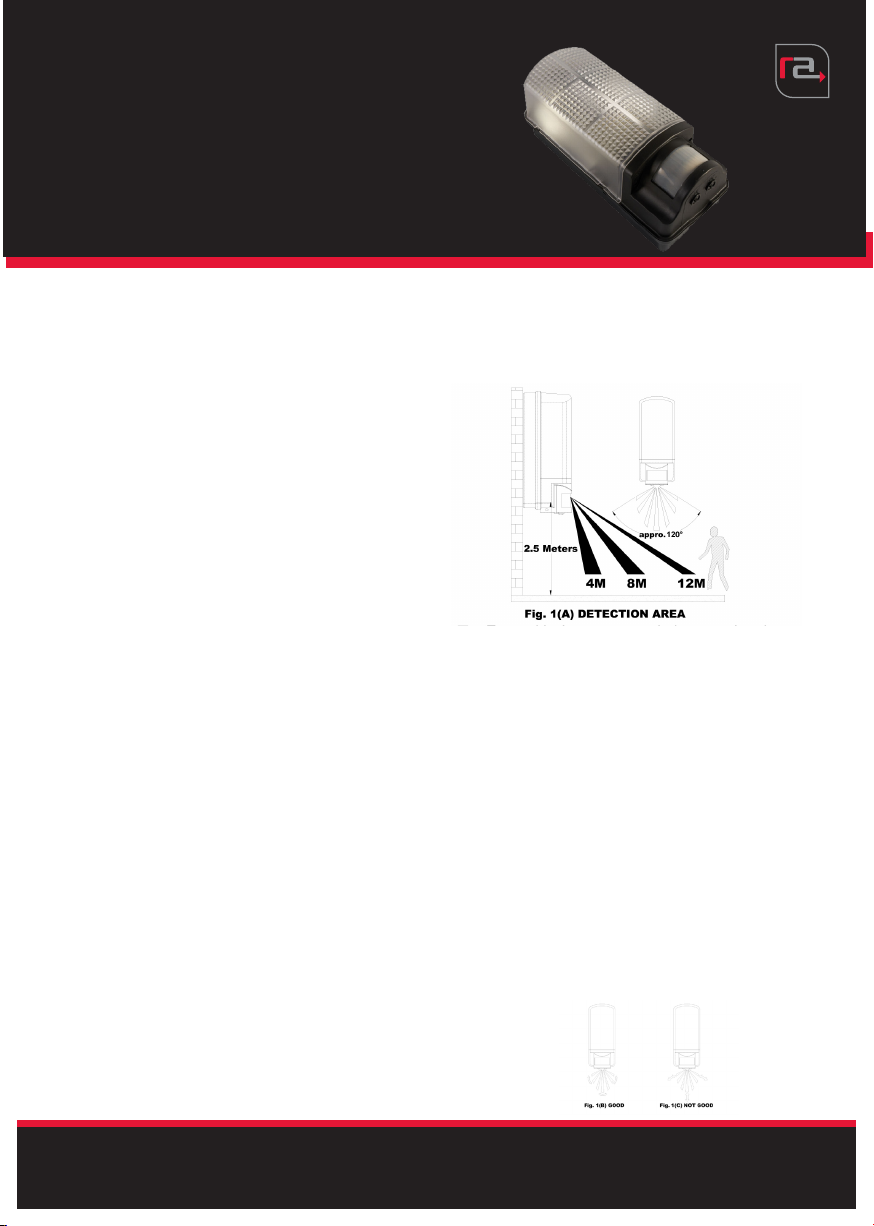
• Ideally the Bulkhead light should be mounted 1.8
to 2.5 metres (6 to 8ft) above the area to be
scanned (refer Fig.1A).
Specification
•Energy Saving Bulkhead with PIR
• Wattage: Max. 60W
• Dectection range: Approx. 110° (horizontal),
max. 10 metres
• Supply voltage: 240V AC 50Hz
• IP Rating: IP44
• Material: Polycarbonate
• Duration time: from (10±5) seconds to (4±1) minutes
adjustable
• 426 Lumen output
• To avoid damage to unit, do not aim the sensor towards the
sun.
• To avoid nuisance triggering, the sensor should be directed
away from heat sources such as barbecues, air-conditioners,
other outside lighting, moving cars and flue vents.
• To avoid nuisance triggering, keep away from areas of
strong electromagnetic disturbance.
• Do not aim towards reflective surfaces such as smooth
white walls, swimming pools, etc. The PIR Sensor scanning
specifications (approx. 12 metres at approx. 120°
horizontal) may vary slightly depending on the mounting
height and location. The detection range of the unit may
also alter with temperature change. Before selecting a place
to install your fitting you should note that movement directly
towards or away from the sensor (refer Fig 1B).
If movement is made walking directly towards or away from
the sensor and not across, the aparent detection range will be
substantially reduced. (Refer Fig. 1C).
This installation must be carried out by an electrician. Please read these instructions carefully
before installation. Leave a copy for the user/maintenance engineer for future reference.
T: 0800 195 0006 F: 0870 043 3946
E: [email protected] www.redarrowtrading.com
Energy Saving Bulkhead
with PIR
Installation Instructions P.2
For models: LF13PIR
Installation
Installation of the Bulkhead light, please refer to the Fig.2.
1. Installation by a licensed electrician and according to IEC Wiring Regulation.
2. Switch the power off at the mains supply and ensure that there is no power to the lamp.
3. Remove the Diffuser using a Screwdriver, see figure.
4. Unscrew the Screw (A) and remove the Transparent Plate.
5. Mark the mounting hole positions on the wall. Drill and plug the wall at the marked positions. Screw the lamp body to
the wall with suitable mounting screws (supplied).
6. Connecting the main power wires to the Terminal Block (see the relative symbols - Fig.2), the Cable must pass through
the Wiring Rubber Gasket.
7. Insert the Max. 60W / 230V~50Hz incandescent Bulb into the Lamp holder (E27).
8. Re-screw Transparent Plate.
9. Re-fit the Diffuser by hand.
10. After finishing the mounting, you can adjust the detection area and working state of the PIR Sensor.
Fig.2. Mounting & Wiring to Terminal
NOTES FOR ELECTRICIAN - Installation must be carried out by a qualified
Electrician
1. The Bulkhead Light should be wired to its own lamp switch. Do not interconnect with other lights on the same switch.
2. Do not connect to Dimmer.
Red Arrow Trading
Elsworth House, Herries Road South, Sheffield,
S6 1QS
Understanding The Controls
Referring to Fig. below.
Setting The Controls
1. Put the Lux control knob to daylight ( ) position, turn the wall switch on and wait half a minute for the control circuit
to stabilize. At this stage ensure that the TIME control knob is set at minimum duration time (-) position. The
Bulkhead light will now switch on and remain on for about 30 seconds (within 60 seconds).
2. Direct the Sensor towards the desired area to be scanned by adjusting the PIR Sensor.
3. Have another person move across the center of the area to be scanned and slowly adjust the PIR Sensor until the unit
sensors the presence of the moving person, causing the lamp to switch on. (refer Fig 1B).
4. Adjust time control to required setting.
5. To set the Lux level at which the lamp will automatically switch “on” at night, please turn the LUX control knob from
daylight to night, if the lamp is required to switch on earlier, e.g. Dusk, wait for the desired environment light level,
then slowly turn the LUX control knob towards the daylight ( ) while someone walks across the center of the area
to be detected. When the lamp switches on, release the LUX control knob. You may need to make further adjustments
to achieve your ideal light level setting.
IMPORTANT 1. To avoid dust build-up and ensure proper functioning of the global lamp, wipe the sensor lens lightly with
a damp cloth every 3 months. But never modify the unit, there are no user serviceable parts inside.
2. Before touching the lamp or replacement of the bulb, please switch off first and then let it cool.
3. Any replacement of bulb, please switch power off.
Energy Saving Bulkhead
with PIR
Installation Instructions P.3
For models: LF13PIR
T: 0800 195 0006 F: 0870 043 3946
E: [email protected] www.redarrowtrading.com
Guarantee
This product is guaranteed for a period of 1 year from the date of purchase. The guarantee is invalid in the case of improper use, tampering, removal of the Q.C. date label, installation in
an improper working environment or installation not according to the current edition of the I.E.E. Wiring Regulations (BS7671). The guarantee is also invalidated if the luminaire has
been Mega tested. Should this product fail during the guarantee period it will be replaced free of charge, subject to correct installation and return of the faulty unit. We do not accept
responsibility for any installation costs associated with the replacement of this product. We reserve the right to alter specifications without prior notice.
Product complies with
all relevant European
standards
Product is suitable for
mounting on flammable
material
F
ADJUSTING THE DURATION TIME: The length of time that remains switched on
after activation can be adjusted from (10±5) seconds to (4±1) minutes. Rotating the
TIME knob from (+) to (-) will reduce the duration time.
NOTE: Once the light has been triggered by the PIR Sensor any subsequent detection
will start the timed period again from the beginning.
ADJUSTING THE LUX CONTROL LEVEL: The Lux control module has a built-in
sensing device (photocell) that detects daylight and darkness. The ( ) position denotes
that the Bulkhead light can work at day and night, and the ( ) position only work at
night. You can set to operate the unit at the desired level by adjusting the LUX knob.
Red Arrow Trading
Elsworth House, Herries Road South, Sheffield,
S6 1QS
PRN WEE/BJ1331XR

Other Red Arrow Outdoor Light manuals

Red Arrow POL14LEDMS User manual

Red Arrow

Red Arrow POL14LEDMS User manual

Red Arrow ORN20/T3/N3/740 User manual

Red Arrow

Red Arrow ORN20/T3/N3/740 User manual

Popular Outdoor Light manuals by other brands

LIGMAN KI-60785 installation manual

LIGMAN

LIGMAN KI-60785 installation manual

Quoizel MOI8408EK installation guide

Quoizel

Quoizel MOI8408EK installation guide

BEGA 84 715 Instructions for use

BEGA

BEGA 84 715 Instructions for use

RH CHARLEROI Assembly instructions

RH

RH CHARLEROI Assembly instructions

kobi LED NEXPRO 100W manual

kobi

kobi LED NEXPRO 100W manual

IKEA tradfri manual

IKEA

IKEA tradfri manual

Maxim Lighting Morrow Bay VX 40285WGET installation instructions

Maxim Lighting

Maxim Lighting Morrow Bay VX 40285WGET installation instructions

Nemo NQ manual

Nemo

Nemo NQ manual

Luce Plan Costanzina D13 pi. manual

Luce Plan

Luce Plan Costanzina D13 pi. manual

Iridium AV-OL-310 quick start guide

Iridium

Iridium AV-OL-310 quick start guide

LIGMAN HAMILTON4 installation manual

LIGMAN

LIGMAN HAMILTON4 installation manual

Portfolio 00737 Install

Portfolio

Portfolio 00737 Install

TVILIGHT CitySense Plus installation manual

TVILIGHT

TVILIGHT CitySense Plus installation manual

Paradise Datacom GL28637SS quick start guide

Paradise Datacom

Paradise Datacom GL28637SS quick start guide

V-TAC 80133970 Installation instruction

V-TAC

V-TAC 80133970 Installation instruction

Lucci LEDlux Macedon Wall Light installation instructions

Lucci LEDlux

Lucci LEDlux Macedon Wall Light installation instructions

Designplan ACQUASTOP BRIGHT 2.6 installation instructions

Designplan

Designplan ACQUASTOP BRIGHT 2.6 installation instructions

Adam Hall SLED1ULTRAXLR3A quick start guide

Adam Hall

Adam Hall SLED1ULTRAXLR3A quick start guide

manuals.online logo
manuals.online logoBrands
  • About & Mission
  • Contact us
  • Privacy Policy
  • Terms and Conditions

Copyright 2025 Manuals.Online. All Rights Reserved.