Redkey P8 Specification sheet

Cordless Vacuum Cleaner
Please read the manual carefully before using the vacuum cleaner
and keep it in case you need it in the future.
Product
Instruction Manual
P8

Preface Catalog
Special Declaration
Guidelines for Safe Use
Product Components Introduction
Main Machine and Accessories
Product Installation and Disassembly
Installing the brush head
Installation of the metal tube
Installation of the long flat nozzle
Installation, disassembly and use of the product
Opening and closing the dust cover
Suction power adjustment
Charging status and indicator
Use of accessories
Introduction and use of accessories
Precautions and product maintenance
Daily storage
Machine cleaning
Trouble clearing and product parameters
6
1
2
3
4
5
9
7
8
12
10
11
15
13
14
18
16
17
Thank you for your trust in the Iunion brand and for purchasing
our cordless vacuum cleaners. Hope you have a great time with
our product! Please read this instruction manual carefully to fully
understand the operating performance of this product. We have
ownership rights to revisions and modifications to this manual.
Our company's strategy is to continually upgrade our products
to meet our customers' needs, so we reserve the right to change
our products after printing without notice. If there is any problem
or malfunction with our products, please feel free to contact
customer service.
The instruction manual and warranty card specify the
agreement between the company and the user regarding
the creation and termination of quality assurance responsi-
bilities and the rights and obligations in the course of af-
ter-sales service. Please read the instruction manual care-
fully before using this product. If the vacuum cleaner is
damaged by abuse, negligence, improper use or lack of
manufacturer's parts, the user will be deprived of any right
to after-sales service and all warranty claims will be reject-
ed by our company. In addition, this publication may not
be reproduced, stored in any retrieval system or transmit-
ted in any form without the permission and authorization
of our company.
Do not use the machine outdoors or in wet places, or grasp the machine
with wet hands.
Do not bump or drop the machine, place it outdoors or drop it into water.
To avoid clogging, do not put large objects into the nozzle of the vacuum
cleaner. Keep the nozzle away from lint, hair and other objects that may
cause clogging.
To avoid injury during the use, keep hair, clothing, fingers and other body
parts away from the nozzle and the moveable parts.
Avoid inhaling any burning or smoking debris such as cigarette butts,
matches, soot and other objects.
Do not use the vacuum cleaner to clean flammable substances or liquids,
such as gasoline or where there may be gasoline, kerosene, paint, alcohol,
cleaning agents, etc.
Do not use the vacuum cleaner before installing the filter.
Turn off the machine before connecting or replacing any accessories.
Keep the vacuum cleaner indoors and use it only in a dry room.
Do not use it for other purposes unless otherwise stated in the manual.
Do not use the vacuum cleaner as a toy. If there are children in the environ-
ment where it is used, please pay special attention to the safety of use.
Be careful when cleaning stairs.
Please use the machine correctly according to the instructions. Use only
the manufacturer's recommended accessories for this product.
12
Special Announcement
Note The vacuum cleaner here is for home use only and should
not be used in any factory or other commercial premises.
Safe Use Guide
This product is powered by a high-end DC lithium battery and should be
avoided with all other battery models.
When inserting or removing the power cord, please hold the power plug of
the charging cradle and avoid pulling or twisting it with force.
Battery Description
During the use
Please observe basic safety precautions during use, including but not
limited to the following
(please read all of the following safety tips carefully before use):
WARNING
To reduce the potential risk of fire,
electric shock or injury, please follow
these rules
1.
2.
3.
4.
5.
6.
7.
8.
9.
10.
11.
12.
13.
As shown in the picture, align the electric floor brush
with the extension tube connector and gently push it
in. When you hear the "click" sound, the installation is
complete.
(To remove, simply press the locking button shown
below and pull down).
Connect the machine to one end of the extended aluminum tube (hear a
click" to indicate successful installation) and the other end is connected to a
floor brush or other accessory (as shown in the picture) and can be used as
an upright vacuum cleaner. (Figure): or connect the machine to a floor brush
to clean floors, tiles or carpets, etc. It's hard to clean. (To disassemble, simply
press the locking button in the figure to pull it apart)
As shown in the picture, align the slit nozzle with the body connector and
gently push it in. When you hear a "click", the installation is complete (to
remove, simply press the locking button shown in the figure below and pull
down).
34
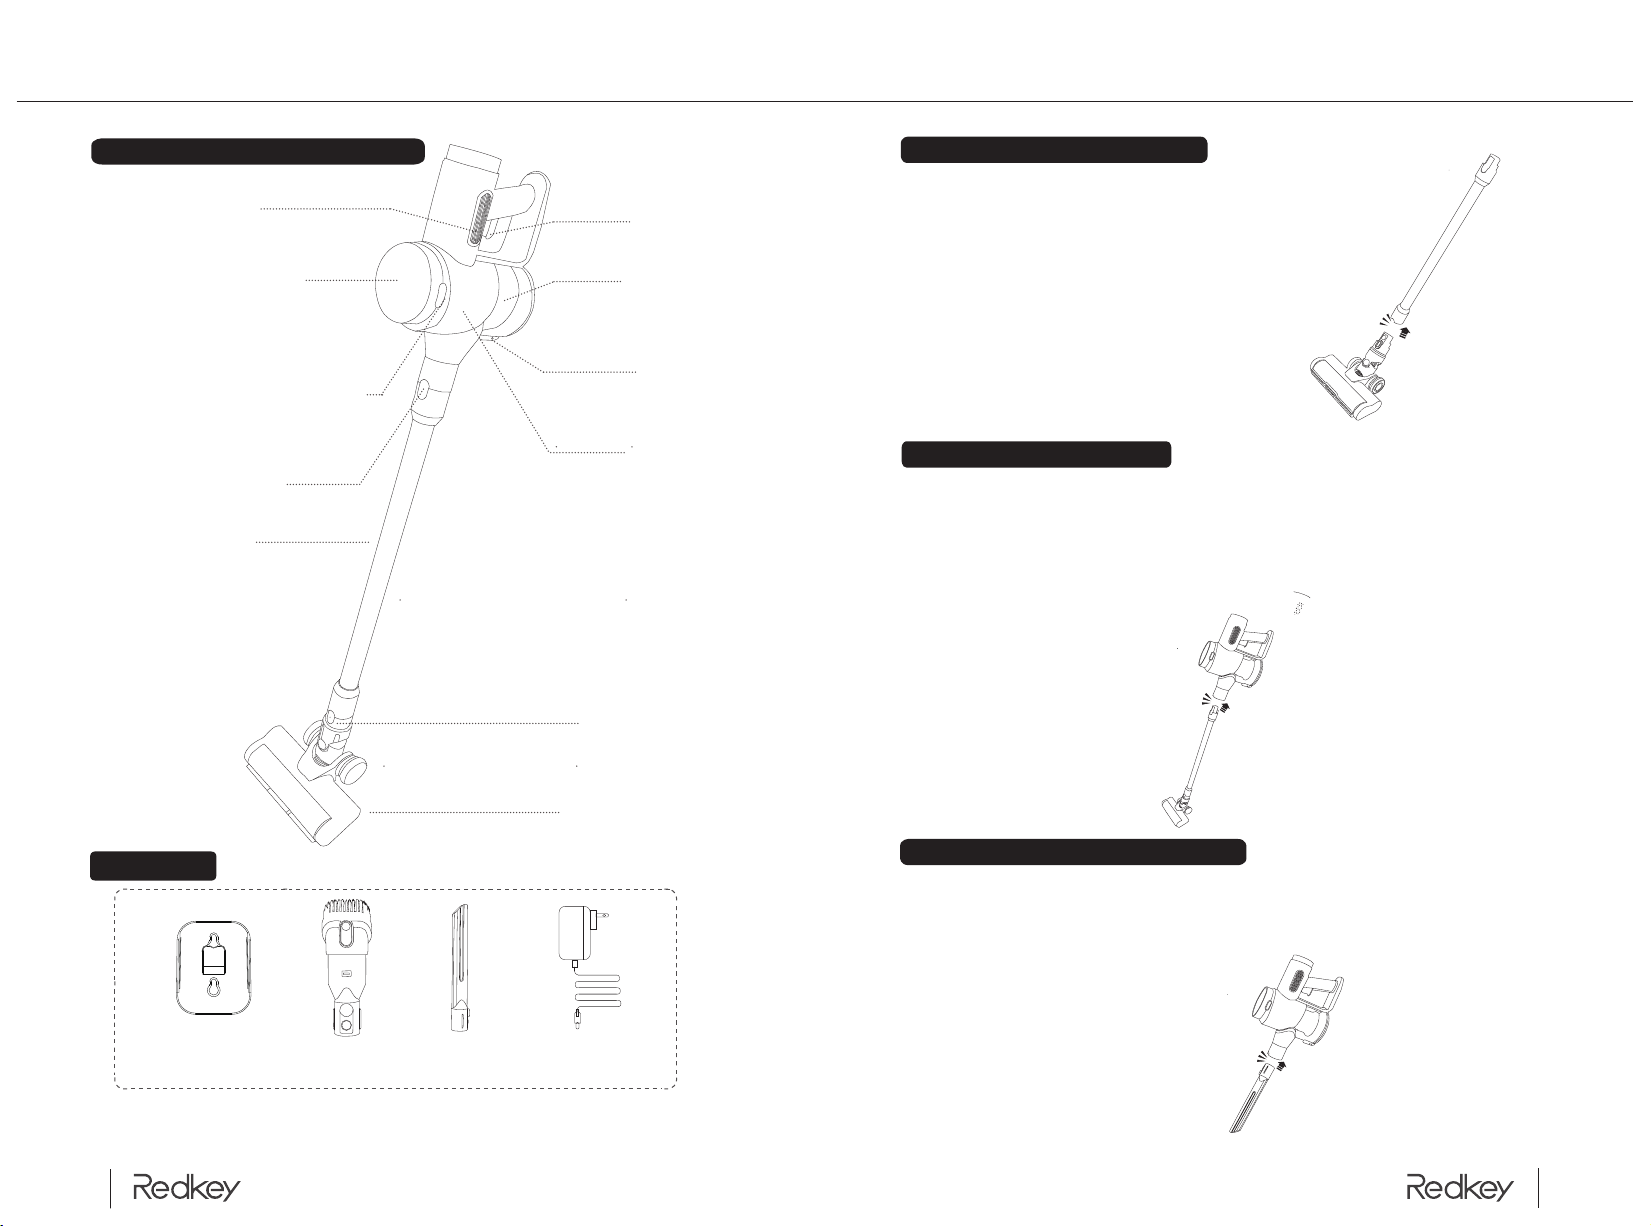
Product Components Introduction
Battery pack release button
Metal tube lock
Display screen
Air Outlet Switch
Dust Cup
Floor brush
Bracket
Accessories
Multi-function
brush
Battery chargerLong flat nozzle
Brush release button
Body
Dust Cup Button
Metal tube
Installation of the floor brush
Installation of metal pipes
扁吸安装
Installation of the long flat nozzle
Product Installation and Disassembly
Main Machine and Accessories
56
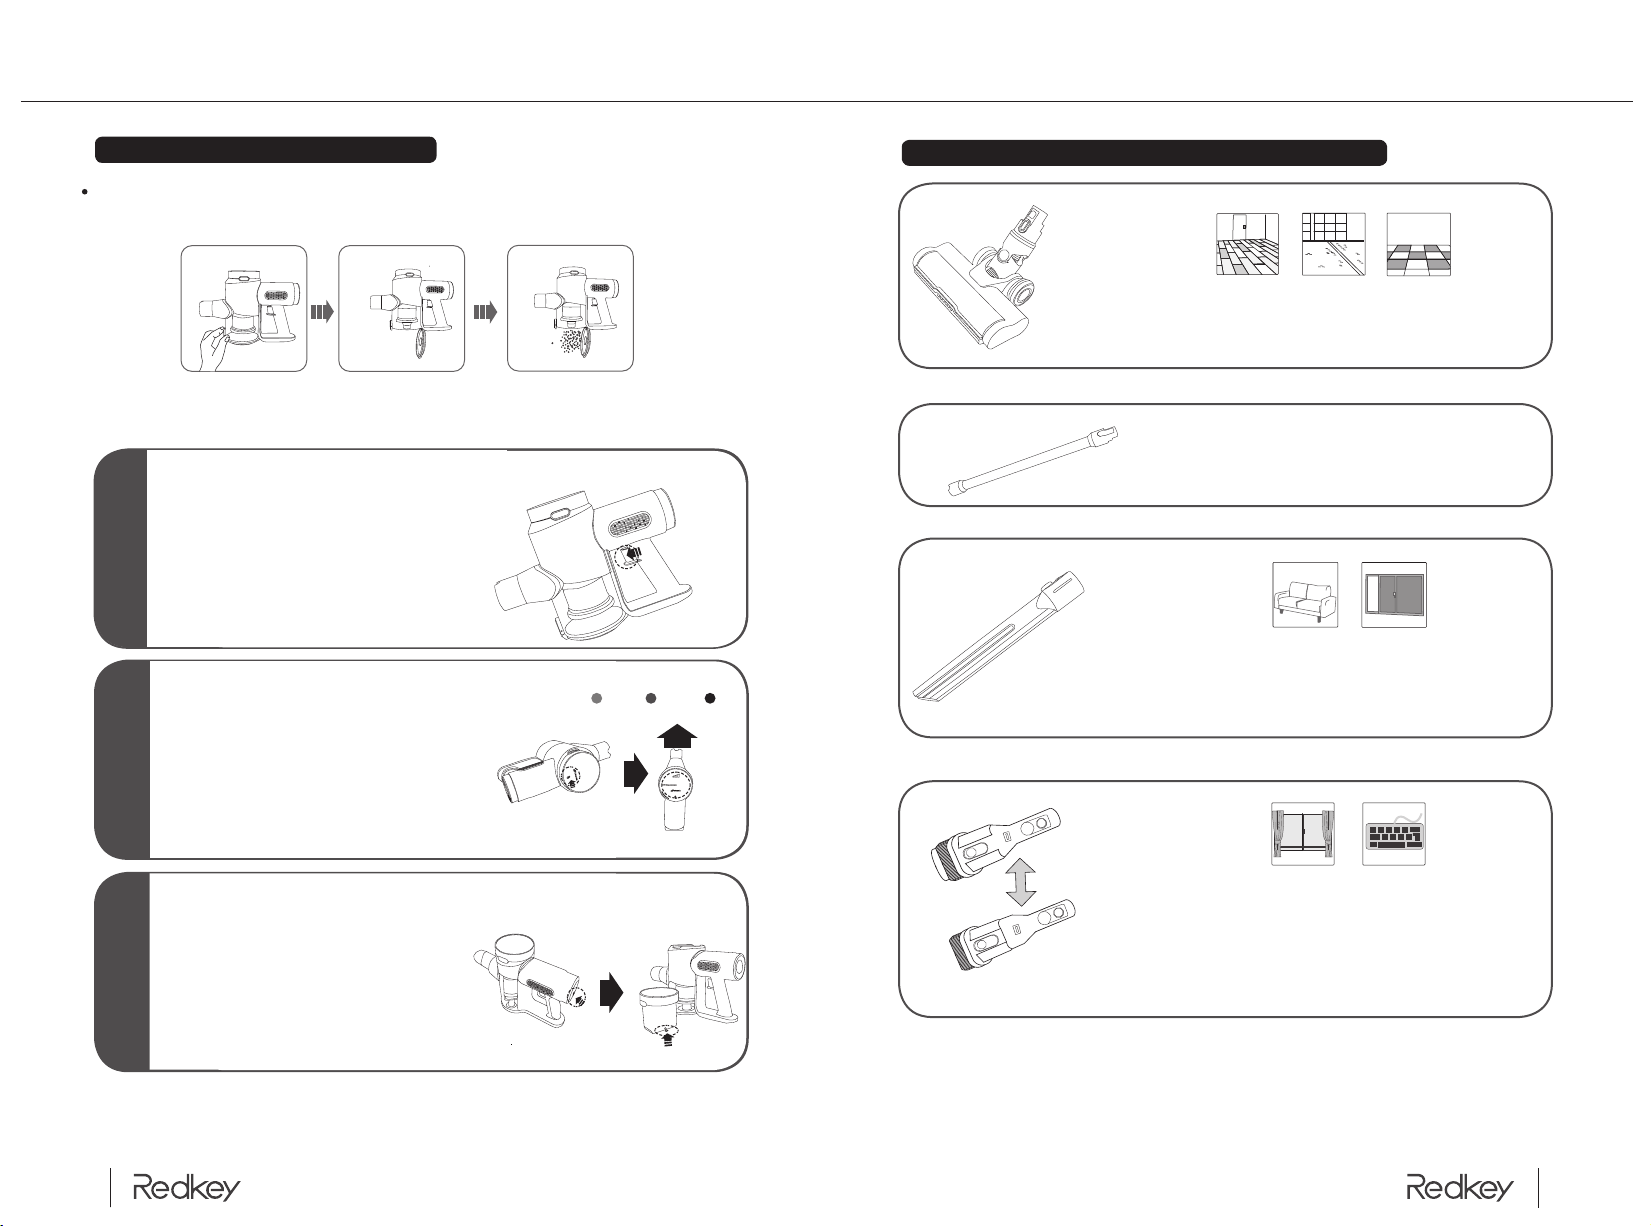
Opening and closing the dust cup
Pull the button on the dust cup to open it. Tap the button on the dust cup
upward and the dust cup is loaded.
Installation, disassembly and use of products
low gear
AUTO
middle gear
MIN
high gear
MAX
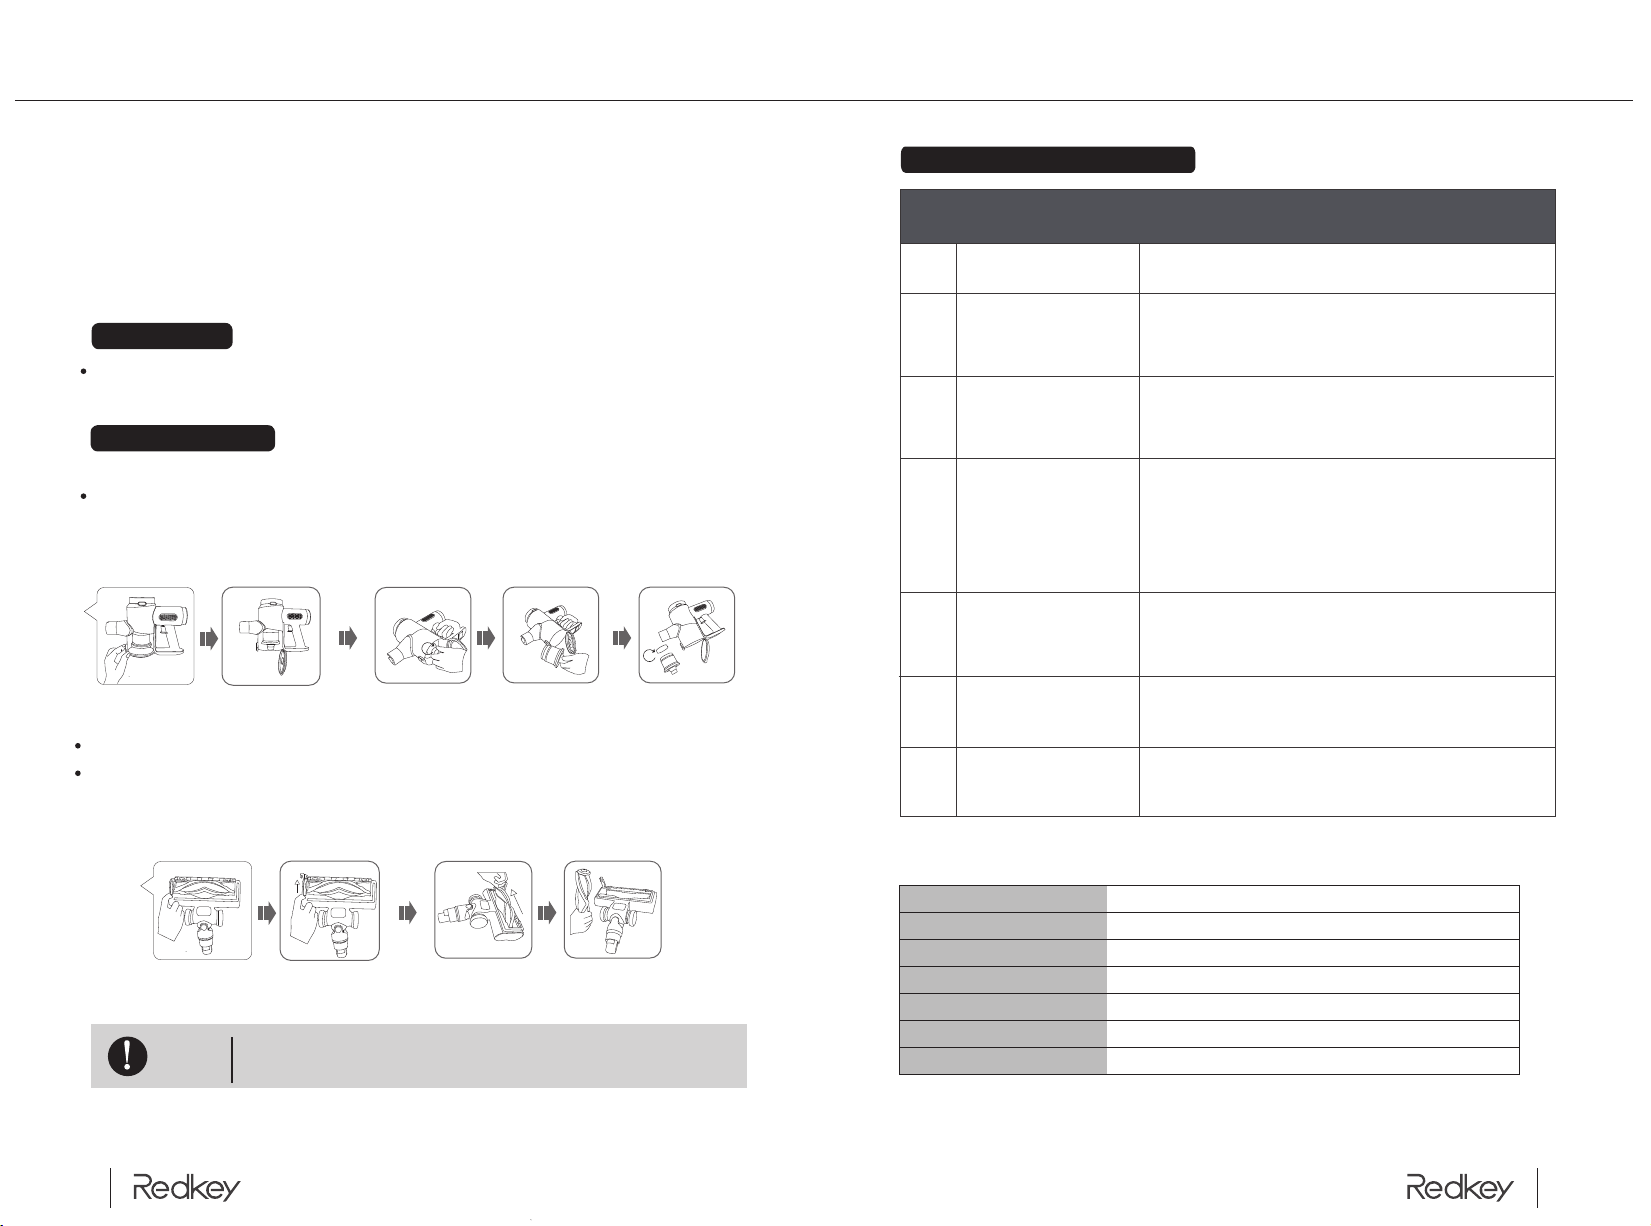
Use of accessories
Suitable for cleaning hard surfaces such as floors, tiles and carpets
Suitable for cleaning all kinds of household joints and narrow
locations in the car.
Suitable for cleaning curtains, car interiors, air conditioners
and other areas that require brushing.
※Example usage scenarios ※
※Example of usage scenarios ※
※Example of usage scenarios ※
Introduction to accessories and how to use them
①
②
③
Get Started
AUTO
After installing all parts, turn on the on/off
button at the handle and start the vacuum
cleaner (button in the picture).
Suction power adjustment
When the machine is turned on, it will be in
automatic mode. It will adjust the vacuuming
power according to the dust capacity. Touch
screen to adjust the suction power, and the
low display will show "MIN", "MID" and "MAX"
three suction power modes, the high level
display will show "AUTO", "MIN" and "MAX"
three suction power modes.
Charging status and
indicator light
Connect the power adapter to the
charging connector in the battery pack,
connect the power to start charging. (As
shown) There is a progress bar while
charging on the LED screen.
High-speed rotation of large plush roller brush, fast dust removal. Front
high bright LED light helps to clean the bottom of the sofa, other dark
corners and dead ends.
Easy to install and clean vertically, and one-touch snap is
good for lumbar spine health. With different brush heads,
it is easy to clean high places such as roofs, air condition-
ers and curtains.
Deep clean sofa seams, brackets, window corners, car interiors and
other hard-to-reach seams and other dead spots in the home.
One-touch retractable brush, simultaneous vacuuming and
sweeping, efficient dust removal. Slim and soft brushes for deep
cleaning of fibers and soft home decorations such as curtains and
sofas. Fine bristle brush for deep cleaning of keyboards, door
cracks and other small crevices. Refined cleaning requirements.
①
②
③
7 8
Daily storage
Machine cleaning
Dump dust, clean the dust collection cup and replace the cleaning filter
Disassembly of the floor brush roller
Before the use, make sure all filters and floor brushes
are installed in the correct location.
During the use
Please do not come close to the radiator.
Before the use
Cautions and product maintenance
Troubleshooting instructions
※ Product Parameter
Trouble clearing and product parameters
※
※When the product does not work properly,
please refer to the instructions.
Fault conditions
Indicator status
flashing
Host does not turn
Electric floor brush
does not turn
Decreased suction
power
LED indicator
does not light up
when charging
Too slow to charge
Settlement Solutions
1
2
3
4
5
6
①
To prevent damage caused by collision, please move away from large and
sharp objects. Do not use it on any flammable items or liquids,
such as gasoline, cigarettes or alcohol.
For long-term storage, please keep the machine in a cool and dry place
away from direct sunlight or humidity.
Pull the button on the dust collection cup and dump the dust. Use a tool or
dry cloth to clean the dust collection cup. After the cyclone body is
removed, the filter, sponge and cyclone body can be washed in water, but
must be completely dried before use.
As shown in the picture, press the floor brush roller switch, go to remove
the roller floor brush for cleaning. For installation, please install in the
reverse order of disassembly.
Open the floor brush roller
Note
1. The indicator light flashes at the current power level when charging;
2. When fully charged, the indicator light is fully lit and goes off after
10min;
3. When the battery power is too low, the last cell indicator flashes.
1. Battery power is insufficient, please use after charging;
2. Excessive use time will cause high temperature protection, leave to
cool, then turn on again and use.
1. When it's stucked with foreign object, please continue to use after
timely cleaning foreign body;
2. Motor high temperature protection, please wait for the brush head
temperature is normal before use;
3. Electric brush head conductive contact point dirty, please wipe the
surface of the contact point with a dry and soft cloth, and then retry.
1. Dust cup dust collected full, clogged filter, please timely clean dust cup
and filter before use;
2. The ground brush head is clogged, please clean it before use.
1. Check whether the power adapter is connected well;
2. The battery is fully charged and the battery is in the hibernation state.
If the battery temperature is high or low, please wait until the battery
temperature returns to normal before charging.
Brand
Model
Power Rating
Battery Configuration
Dust Cup Capacity
Weight (Net/Gross)
Dimension
Redkey
P8
250W
Li-ion 2200mAh 22.2V
500ml
2.8kg/3.9kg
706*294*129mm

Table of contents


