RedMax RA-EX850 User manual

RA-EX850
EN Operator's manual 2-11
ES-MX Manual del usuario 12-22
FR-CA Manuel d’utilisation 23-33

Contents
Introduction..................................................................... 2
Safety..............................................................................3
Operation........................................................................ 7
Assembly........................................................................ 8
Maintenance................................................................... 8
Transportation, storage and disposal........................... 11
Technical data.............................................................. 11
Introduction
Product description
We have a policy of continuous product development
and therefore reserve the right to modify the design and
appearance of the products without prior notice.
Note: This manual cover gasoline operated power units.
Intended use
WARNING: The cutting attachment must
only be used together with compatible
products. Refer to the operator’s manual of
the product.
The cutting attachment is used to cut grass and twigs.
Note: National regulations can set limit to the operation
of the product.
Cutting attachment overview
2
1
8
9
12
4
3
5
7
10
6
11
1. Blade 2. Gear housing
21139 - 001 - 03.04.2019

3. Top grease plug
4. Socket to move the blades manually
5. Bottom grease plug
6. Cutting attachment guard
7. Shaft
8. Support cup
9. Transport guard
10. Combination wrench
11. Information and warning decal
12. Operator's manual
Symbols on the attachment and on the
power unit
Careless or incorrect use of this attachment
can result in serious or fatal injury to the
operator or others.
Read the operator’s manual carefully and
make sure you understand the instructions
before you use the attachment.
Use a protective helmet in locations where
objects can fall on you. Use approved
hearing protection. Use approved eye
protection.
Always wear approved protective gloves.
Wear sturdy, non-slip boots.
Maximum cuts per minute.
The arrows show the limits for the position of
the handle.
The product can cause objects to eject,
which can cause injury.
Keep a minimum of 15 m / 50 ft distance to
persons and animals during operation of the
product.
yyyywwxxxx The serial label shows serial number.
yyyy is the production year and ww is
the production week.
Note: Other symbols/decals on the attachment refer to
special certification requirements for certain markets.
California Proposition 65
WARNING
The engine exhaust from this product
contains chemicals known to the State of
California to cause cancer, birth defects
or other reproductive harm.
Safety
Safety definitions
Warnings, cautions and notes are used to point out
specially important parts of the operator's manual.
WARNING: Used if there is a risk of injury or
death for the operator or bystanders if the
instructions in the manual are not obeyed.
CAUTION: Used if there is a risk of damage
to the product and/or the attachment, other
materials or the adjacent area if the
instructions in the manual are not obeyed.
Note: Used to give more information that is necessary in
a given situation.
1139 - 001 - 03.04.2019 3

General safety instructions
WARNING: Read the safety instructions that
follow before you use the attachment.
• Please read the operator’s manual carefully and
make sure you understand the instructions before
using the attachment.
• These instructions supplement the instructions that
were included with the product. For other
procedures, please refer to the operating instructions
for the product.
• Under no circumstances may the design of the
attachment be modified without the permission of the
manufacturer. Do not use an attachment that
appears to have been modified by others and always
use original accessories. Non-authorized
modifications and/or accessories can result in
serious personal injury or the death of the operator
or others.
• Overexposure to vibration can lead to circulatory
damage or nerve damage in people who have
impaired circulation. Contact your doctor if you
experience symptoms of overexposure to vibration.
Such symptoms include numbness, loss of feeling,
tingling, pricking, pain, loss of strength, changes in
skin color or condition. These symptoms normally
appear in the fingers, hands or wrists. These
symptoms may be increased in cold temperatures.
Safety instructions for operation
WARNING: Read the warning instructions
that follow before you use the product.
• Only use the product for operations that are given in
this manual. Refer to
Recommended use for the
cutting attachment on page 7
.
• Do not use the product if you are not sure about if
you can operate it.
• Do not operate this product when you are tired, ill, or
if you use alcohol, drugs or medicine. This can
decrease your vision, your judgment or your
coordination.
• Do not use the product if you cannot get aid if an
accident occurs.
• Do not use the product if there are signs of damage.
• Make sure that the cutting attachment always stops
when the engine is at idle speed.
• Make sure that no one comes nearer than 15 m / 50
ft when you cut. Make sure that only approved
persons are in the work area.
• Do not let children use or come near the product.
• Keep the work area clean and bright. Do not use the
product in bad weather, for example in fog, heavy
rain, strong winds, intense cold, risk of lightning.
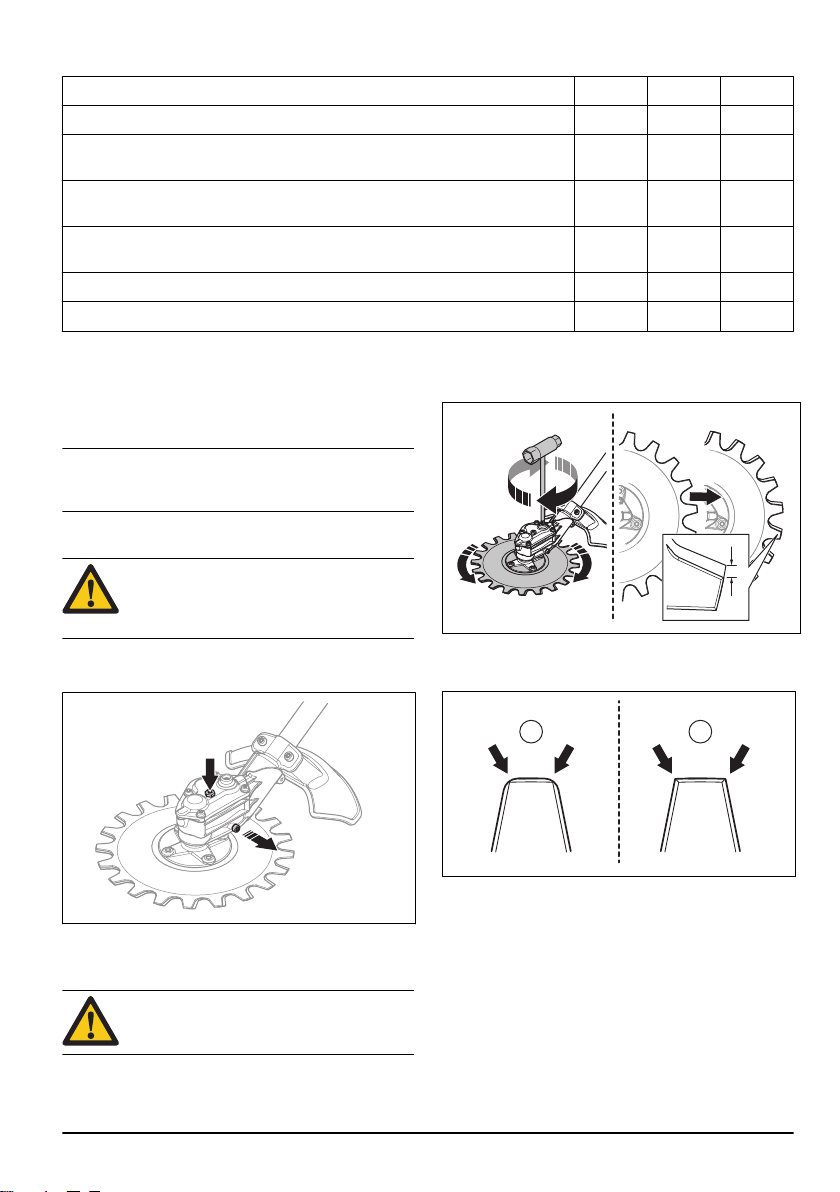
• If something gets caught in the blades during
operation, stop the engine and wait until the blades
do not move. Remove the spark plug cap from the
spark plug. Put the combination wrench in the gear
housing socket to move the blades, refer to
To
sharpen the blades on page 9
.
• If the blades are damaged during operation, the top
blade and lower blade can get caught in each other.
Do not touch the blades, they can move suddenly
and cause injury.
• Make sure that you are in a safe and stable position
during operation.
• The product can cause objects to eject at high
speed. Make sure that all persons in the work area
use approved personal protective equipment.
Remove loose objects from the work area.
• Monitor the work area when you wear hearing
protection. Always remove your hearing protection
when the engine stops.
• If the product has unusual vibration, stop the engine
and remove the spark plug cap from the spark plug.
Check immediately for the cause. Vibration is usually
a warning of damage.
• Do not go away from the product when the engine is
on.
• Hold the product with 2 hands. Hold the product on
the right of your body. Operate the product with the
cutting attachment below your waist.
• The cutting attachment must cut away from the
operator. To cut in the direction the operator can
cause serious injury.
• Make sure your hands and feet do not come near
the blades when the engine is on.
Personal protective equipment
WARNING: Read the warning instructions
that follow before you use the product.
• Always use approved personal protective equipment
when you use the product. Personal protective
equipment cannot fully prevent injury but it
decreases the degree of injury if an accident does
occur. Let your dealer help you select the right
equipment.
41139 - 001 - 03.04.2019

• Use a protective helmet where there is a risk of
falling objects.
• Use approved hearing protection that provides
adequate noise reduction. Long-term exposure to
noise can result in permanent hearing impairment.
RedMax recommends that operators use hearing
protectors when using products for a longer coherent
time of a day. Continual and regular users should
have their hearing checked regularly. Note that
hearing protectors limit the ability to hear sounds and
warning signals.
• Use approved eye protection. If you use a visor, you
must also use approved protective goggles.
Approved protective goggles must agree with the
ANSI Z87.1 standard in the USA or EN 166 in EU
countries.
• Use gloves when it is necessary, for example, when
you examine or clean the product.
• Use protective boots, or shoes, with non-slip soles.
• Use clothing made of a strong fabric. Always use
heavy, long pants and long sleeves. Do not use
loose clothing that can catch on twigs and branches.
Do not wear jewelry, short pants, open shoes or go
with bare feet. Put your hair up safely above your
shoulders.
• Use breathing protection when there is a risk of dust.
• Keep first aid equipment close at hand.
Safety devices on the attachment
WARNING: Read the warning instructions
that follow before you use the attachment.
This section contains the attachment’s safety features,
its purpose and how checks and maintenance should be
carried out to ensure that it operates correctly. See
instructions under the heading
Cutting attachment
overview on page 2
to find where these parts are
located on your attachment.
The life span of the attachment can be reduced and the
risk of accidents can increase if attachment
maintenance is not carried out correctly and if service
and/or repairs are not carried out professionally. If you
need further information please contact your nearest
servicing dealer.
1139 - 001 - 03.04.2019 5

WARNING: Never use an attachment with
defective safety components. The
attachment's safety equipment must be
inspected and maintained as described in
this section. If your attachment fails any of
these checks, contact your service agent to
get it repaired.
WARNING: All servicing and repair work on
the product requires special training. This is
especially true of the product′s safety
equipment. If your product fails any of the
checks described below you must contact
your service agent. When you buy any of
our products we guarantee the availability of
professional repairs and service. If the
retailer who sells your product is not a
servicing dealer, ask him for the address of
your nearest service agent.
To do a check of the cutting attachment and
the cutting attachment guard
WARNING: Do not use a cutting attachment
without an approved cutting attachment
guard. If an incorrect or defective cutting
attachment guard is installed, it can cause
injury.
1. Stop the engine and make sure that the cutting
attachment stops.
2. Remove the spark plug cap from the spark plug.
3. Put on protective gloves.
4. Make sure that the blades are not damaged.
Replace the blades if they are damaged. Refer to
To
replace the blades on page 10
.
5. Examine the blades. Make sure that there is no
clearance between the blades. If there is a clearance
between the blades, the blades must be adjusted.
Refer to
To adjust the clearance between the blades
on page 10
.
6. Make sure that the support cup is not damaged.
Replace the support cup if it is damaged.
7. Make sure that the screws on the cutting attachment
are tightened.
8. Make sure that the blades and the cutting
attachment guard is not damaged. Replace
damaged parts.
Safety instructions for maintenance
WARNING: The cutting attachment can
continue to rotate after the throttle trigger
has been released. Remove the spark plug
cap from the spark plug. Make sure that the
cutting attachment has stopped fully before
you do maintenance.
WARNING: The gear housing gets hot
during operation of the product. Hot surfaces
can burn you, do not touch the gear
housing.
61139 - 001 - 03.04.2019

• Always wear heavy-duty gloves when you repair the
cutting attachment. The cutting equipment is very
sharp and can easily cause cuts.
• Use only original spare parts for repairs.
Operation
The working technique
WARNING: Branches or grass can get
caught between the cutting attachment
guard and the cutting attachment. Always
stop the engine before you clean the cutting
attachment.
• Use full throttle when you cut and decrease to idle
speed after each cut.
CAUTION: Engine damage can occur if
the engine runs for too long at full throttle
without load.
Recommended use for the cutting
attachment
The cutting attachment blades moves with a small angle
and can cut in all directions. Move the cutting
attachment along the ground at a height where the
support cup touches the ground. Use the cutting
attachment to cut:
• Park areas and road edges.
• Road side and near fences.
• Around stones and trees.
• Near water.
CAUTION: Do not put the gear housing
in water.
1139 - 001 - 03.04.2019 7

Assembly
To assemble the two-piece shaft
1. Turn the knob to loosen the coupling.
2. Align the tab of the cutting attachment (A) with the
arrow of the coupling (B).
A
B
3. Carefully push the shaft into the coupling until you
hear a click.
4. Tighten the knob fully.
To disassemble the two-piece shaft
1. Turn the knob 3 turns or more to loosen the
coupling.
2. Push and hold the button (C).
3. Hold tight in the end of the shaft that the engine is
attached to.
4. Pull the attachment straight out of the coupling.
C
Maintenance
Introduction
Below you will find some general maintenance
instructions. If you need further information please
contact your service workshop.
Maintenance schedule
Below is a list of the maintenance steps that must be
done on the cutting attachment.
Note: The operator must only do the maintenance and
service on the cutting attachment that is given in this
operator's manual. Other maintenance and service must
be done by an approved service workshop.
81139 - 001 - 03.04.2019

Maintenance Daily Weekly Monthly
Clean the external parts of the product. X
Make sure that the blades are not damaged. Replace the blades if they are dam-
aged. X
Make sure that the cutting attachment guard is not damaged. Replace the cut-
ting attachment guard if it is damaged. X
Make sure that the support cup is not damaged. Replace the support cup if it is
damaged. X
Make sure that the screws and nuts are tight. X
Fill the gear housing with grease, approximately each 100 work hours. X
To clean and lubricate the blades
1. Clean the blades from unwanted materials before
and after you use the product.
2. Lubricate the blades before long periods of storage.
Note: Speak to your servicing dealer for more
information about recommended cleaning agents and
lubricants.
To lubricate the gear housing
CAUTION: Do not fill the gear housing fully.
If the gear housing is full, the grease can
cause damage to the seals and cause
leakage.
1. Remove the grease plugs.
2. Add grease to the top hole.
3. Install the grease plugs.
To sharpen the blades
WARNING: Use protective gloves when you
hold the blades.
1. Put the combination wrench in the socket on the
gear housing.
2. Turn the combination wrench until there is a 3 mm/
0.12 in. difference between the top blade and the
lower blade.
3. Sharpen the edges (B) that you can access with a
grinder. Make sure not to make the edges rounded
(A).
A B
4. Turn the combination wrench in the opposite
direction to get access to the opposite edges.
5. Sharpen the edges that you can access with a
grinder.
1139 - 001 - 03.04.2019 9

6. Replace the blades when the width of the tooth is
less than 8 mm/0.32 in. (C).
C
To replace the blades
WARNING: Use protective gloves when you
hold the blades.
WARNING: To prevent unbalance and
vibrations in the product, clean the cutting
attachment when you replace the blades.
Note: The blades are interchangeable.
1. Remove the center screw (A), the washer (B) and
the support cup (C).
A
B
C
Note: The center screw has a left hand thread
2. Remove the 4 screws (D), the lower blade (E) and
the shim (F).
D
E
F
3. Remove the 4 screws (G) and the top blade (H).
G
H
4. Install the blades in opposite sequence. Tighten the
screws equally when you install the blades.
To adjust the clearance between the
blades
WARNING: Use protective gloves when you
hold the blades.
10 1139 - 001 - 03.04.2019

1. Remove the lower blade, refer to
To replace the
blades on page 10
.
2. Remove the shim.
Note: Save the shim until it is time to replace the
blades.
3. Install the lower blade. Tighten the screws equally
when you install the blades.
To replace the cutting attachment
guard
WARNING: Use protective gloves when you
hold the blades
• Remove the 2 screws (B) and the cutting attachment
guard (A).
• Install the new cutting attachment guard (A) with the
2 screws (B). Tighten the screws equally.
A
B
Transportation, storage and disposal
Transport and storage
• Make sure that the transport guard is attached
correctly to the cutting attachment when the product
is not in use, is transported or is in storage.
• Keep the cutting attachment in a locked area to
prevent access for children or persons that are not
approved.
• Attach the cutting attachment safely during
transportation to prevent damage and accidents.
• Make sure that the cutting attachment is clean and
that a complete service is done before long time
storage.
Technical data
Technical data
RA-EX850
Weight
Weight, lbs/kg 5.5/2.5
Blades
Diameter, inch/mm 9/230
Blade speed, cuts/min 4600
1139 - 001 - 03.04.2019 11

Contenido
Introducción.................................................................. 12
Seguridad..................................................................... 14
Funcionamiento............................................................ 18
Montaje......................................................................... 19
Mantenimiento.............................................................. 19
Transporte, almacenamiento y eliminación de
residuos........................................................................ 22
Datos técnicos.............................................................. 22
Introducción
Descripción de la máquina
Husqvarna AB tiene una política de desarrollo continuo
de productos y, por lo tanto, se reserva el derecho de
modificar el diseño y el aspecto de los productos sin
previo aviso.
Tenga en cuenta: Este manual abarca las unidades de
alimentación que funcionan con gasolina.
Uso previsto
ADVERTENCIA: El equipo de corte solo se
debe utilizar en conjunto con productos
compatibles. Consulte el manual de usuario
del producto.
El equipo de corte se utiliza para cortar césped y ramas
pequeñas.
Tenga en cuenta: Las normativas nacionales pueden
establecer un límite para el funcionamiento del
producto.
12 1139 - 001 - 03.04.2019

Descripción general del equipo de corte
2
1
8
9
12
4
3
5
7
10
6
11
1. Hoja
2. Caja de engranajes
3. Tapón de engrase superior
4. Cavidad para mover las cuchillas manualmente
5. Tapón de engrase inferior
6. Protección del equipo de corte
7. Eje
8. Cazoleta de apoyo
9. Protección para transporte
10. Llave combinada
11. Etiqueta de información y advertencia
12. Manual del usuario
Símbolos que aparecen en el accesorio
y en la unidad de alimentación
El uso incorrecto o descuidado de este
accesorio puede ocasionar daños graves o
mortales al operador u otras personas.
Lea el manual de instrucciones atentamente
y asegúrese de entender las instrucciones
antes de utilizar el accesorio.
Utilice un casco protector en lugares donde
puedan caer objetos sobre usted. Use
protección auricular aprobada. Use
protección ocular aprobada.
Use siempre guantes protectores
aprobados.
Use botas antideslizantes y resistentes.
Cortes máximos por minuto.
Las flechas muestran los límites de la
posición de la palanca.
El producto puede provocar que los objetos
salgan expulsados, lo que puede causar
lesiones.
1139 - 001 - 03.04.2019 13

Manténgase a un mínimo de 15 m/50 pies
de distancia de las personas y los animales
mientras el producto esté funcionando.
yyyywwxxxx La etiqueta con el número de serie
muestra el número de serie. yyyy es
el año de fabricación y ww es la sem-
ana de producción.
Tenga en cuenta: Otros símbolos o etiquetas en el
equipo hacen referencia a requisitos de certificación
especiales para ciertos mercados.
Propuesta 65 de California
¡ADVERTENCIA!
Seguridad
Definiciones de seguridad
Las advertencias, precauciones y notas se utilizan para
señalar las piezas particularmente importantes del
manual del usuario.
ADVERTENCIA: Se utilizan para señalar el
riesgo de lesiones graves o mortales para el
operador o para aquellos que se encuentren
cerca si no se siguen las instrucciones del
manual.
AVISO: Se utilizan para señalar el riesgo de
dañar el producto o accesorio, otros
materiales o el área adyacente si no se
respetan las instrucciones del manual.
Tenga en cuenta: Se utilizan para entregar más
información necesaria en situaciones particulares.
Instrucciones generales de seguridad
ADVERTENCIA: Lea las siguientes
instrucciones de seguridad antes de usar el
accesorio.
• Lea cuidadosamente el manual de usuario y
asegúrese de que entiende las instrucciones antes
de utilizar el accesorio.
• Estas instrucciones son un complemento de las
instrucciones que se incluyen con el producto. Para
otros procedimientos, consulte las instrucciones de
operación del producto.
• Bajo ninguna circunstancia podrá modificar el diseño
del accesorio sin el permiso del fabricante. No utilice
un accesorio que parezca haber sido modificado por
otras personas y utilice siempre los accesorios
originales. Las modificaciones o accesorios no
autorizados pueden provocar daños personales o la
muerte del operador u otras personas.
• La sobreexposición a las vibraciones puede producir
trastornos vasculares o nerviosos en personas que
padecen de trastornos circulatorios. Póngase en
contacto con su médico si experimenta síntomas de
la sobreexposición a las vibraciones. Estos síntomas
son entumecimiento, pérdida de sensibilidad,
hormigueo, ardor, dolor, pérdida de fuerza, cambios
en el color o el estado de la piel. Normalmente,
estos síntomas se presentan en los dedos, manos o
muñecas. Estos síntomas pueden empeorar con
bajas temperaturas.
Instrucciones de seguridad para el
funcionamiento
ADVERTENCIA: Lea atentamente las
instrucciones de advertencia siguientes
antes de usar el producto.
• Solo utilice el producto para las operaciones que se
describen en este manual. Consulte
Uso
recomendado del equipo de corte en la página 18
.
14 1139 - 001 - 03.04.2019

• No utilice el producto si no está seguro de que es
capaz de utilizarlo.
• No utilice este producto cuando esté cansado,
enfermo, o si consume alcohol, drogas o
medicamentos. Esto puede disminuir su visión, su
capacidad de discernimiento o su coordinación.
• No utilice el producto si no puede recibir ayuda en
caso de que ocurra accidente.
• No utilice el producto si observa signos de daños.
• Asegúrese de que el equipo de corte siempre se
detenga cuando el motor se encuentre en régimen
de ralentí.
• Asegúrese de que nadie se aproxime a menos de
15 m/50 pies cuando realice cortes. Asegúrese de
que solo personas autorizadas estén en la zona de
trabajo.
• No deje que los niños se acerquen al producto ni
que lo usen.
• Mantenga el área de trabajo limpia y despejada. No
utilice el producto en condiciones meteorológicas
adversas, por ejemplo, en caso de niebla, lluvia
intensa, vientos fuertes, frío intenso o riesgo de
relámpagos.
• Si algo se atasca en las cuchillas durante el
funcionamiento, detenga el motor y espere hasta
que las cuchillas dejen de moverse. Quite el
sombrerete de bujía de la bujía. Inserte la llave
combinada en la cavidad de la caja de engranajes
para mover las cuchillas, consulte
Para afilar las
cuchillas en la página 20
.
• Si las cuchillas se dañan durante el funcionamiento,
la cuchilla superior y la inferior pueden quedar
atascadas entre sí. No toque las cuchillas, ya que
pueden moverse repentinamente y causar lesiones.
• Asegúrese de encontrarse en una posición segura y
estable durante la operación.
• El producto puede hacer que los objetos salgan
eyectados a alta velocidad. Asegúrese de que todas
las personas en el área de trabajo utilicen equipos
de protección personal aprobados. Retire los objetos
sueltos del área de trabajo.
• Supervise el área de trabajo cuando utilice
protectores auriculares. Siempre retire sus
protectores auriculares cuando se detenga el motor.
• Si el producto presenta vibraciones inusuales,
apague el motor y retire el sombrerete de bujía de la
bujía. Revise de inmediato para encontrar la causa.
La vibración suele ser una advertencia de daños.
• No se aleje del producto cuando el motor esté en
marcha.
• Sostenga el producto con ambas manos. Mantenga
el producto a la derecha de su cuerpo. Utilice el
producto con el equipo de corte por debajo de la
cintura.
• El equipo de corte debe usarse en dirección opuesta
al operador. Cortar en la dirección en la que se
encuentra el operador puede causar daños graves.
• Asegúrese de que las manos y los pies no se
acerquen a las cuchillas cuando el motor esté en
funcionamiento.
Equipo de protección personal
ADVERTENCIA: Lea atentamente las
instrucciones de advertencia siguientes
antes de usar el producto.
• Utilice siempre el equipo de protección personal
adecuado cuando use el producto. El equipo de
protección personal no puede impedir el riesgo de
lesiones, pero disminuirá el grado de lesión si ocurre
un accidente. Permita que su distribuidor le ayude
seleccionar el equipo adecuado.
• Utilice un casco protector cuando exista el riesgo de
caída de objetos.
• Utilice protectores auriculares aprobados que
proporcionen una reducción de ruido adecuada. La
exposición prolongada al ruido puede causar la
pérdida permanente de la audición. RedMax
recomienda que los operadores utilicen protectores
auriculares cuando utilicen productos durante días
enteros. Los usuarios recurrentes y habituales
deben procurar acudir a examinaciones auditivas
con regularidad. Tenga en cuenta que los
1139 - 001 - 03.04.2019 15

protectores auriculares limitan la capacidad de
escuchar sonidos y señales de advertencia.
• Use protección ocular homologada. Si utiliza un
visor, también debe usar gafas protectoras
homologadas. Las gafas protectoras homologadas
deben cumplir con la norma ANSI Z87.1 de EE. UU.
o con EN 166 en los países de la UE.
• Utilice guantes cuando sea necesario, por ejemplo,
cuando examine o limpie el producto.
• Utilice botas o zapatos de protección con suelas
antideslizantes.
• Utilice ropa de material resistente. Use siempre
pantalones largos y gruesos, y mangas largas. Evite
usar ropas holgadas que se puedan enganchar con
ramas. No trabaje con joyas, pantalones cortos,
calzado con aberturas ni con los pies descalzos. Ate
su cabello por encima de sus hombros.
• Utilice una protección respiratoria cuando haya
riesgo de polvo.
• Mantenga un equipo de primeros auxilios a mano.
Dispositivos de seguridad en el
accesorio
ADVERTENCIA: Lea cuidadosamente las
siguientes instrucciones de advertencia
antes de usar el accesorio.
En esta sección se describen las características de
seguridad del accesorio y su propósito y cómo deben
llevarse a cabo las comprobaciones y el mantenimiento
para asegurarse de que funciona correctamente.
Consulte las instrucciones bajo el título
Descripción
general del equipo de corte en la página 13
para ver
dónde están situadas estas piezas en el accesorio.
La vida útil del accesorio se puede reducir y el riesgo de
accidentes puede aumentar si el mantenimiento del
accesorio no se realiza correctamente y si el servicio o
las reparaciones no se llevan a cabo de forma
profesional. Si necesita más información, comuníquese
con su taller de servicio más cercano.
ADVERTENCIA: No utilice nunca un
accesorio con componentes de seguridad
defectuosos. El equipo de seguridad del
accesorio se debe inspeccionar y mantener
tal como se describe en esta sección. Si el
accesorio no pasa exitosamente alguna de
estas comprobaciones, póngase en
contacto con el taller de servicio para que lo
reparen.
ADVERTENCIA: Todos los trabajos de
mantenimiento y reparación del producto
requieren una formación especial. Esto
aplica especialmente al equipo de seguridad
16 1139 - 001 - 03.04.2019

del producto. Si el producto no pasa
exitosamente alguna de las comprobaciones
indicadas a continuación, póngase en
contacto con el taller de servicio. La compra
de alguno de nuestros productos le
garantiza la disponibilidad de mantenimiento
y servicio profesionales. Si el comerciante
que vende el producto no es un
concesionario de servicio, pídale la
dirección del taller de servicio más cercano.
Para revisar el equipo de corte y la protección
del equipo de corte
ADVERTENCIA: No utilice un equipo de
corte sin una protección aprobada. Si se
instala una protección del equipo de corte
incorrecta o defectuosa, puede provocar
lesiones.
1. Detenga el motor y asegúrese de que el equipo de
corte se detenga.
2. Quite el sombrerete de bujía de la bujía.
3. Utilice guantes protectores.
4. Asegúrese de que las cuchillas no estén dañadas.
Reemplace las cuchillas si están dañadas. Consulte
Para sustituir las hojas en la página 21
.
5. Examine las cuchillas. Asegúrese de que no haya
separación entre las cuchillas. Si existe una
separación entre las cuchillas, estas se deben
ajustar. Consulte
Para ajustar la separación entre
las cuchillas en la página 21
.
6. Asegúrese de que la cazoleta de apoyo no presente
daños. Reemplácela si está dañada.
7. Asegúrese de que los tornillos del equipo de corte
estén apretados.
8. Asegúrese de que las cuchillas y la protección del
equipo de corte no presenten daños. Cambie las
piezas dañadas.
Instrucciones de seguridad para el
mantenimiento
ADVERTENCIA: El equipo de corte puede
seguir girando después de soltar el
acelerador. Quite el sombrerete de bujía de
la bujía. Asegúrese de que el equipo de
corte se haya detenido completamente
antes de realizar tareas de mantenimiento.
ADVERTENCIA: La caja de engranajes se
calienta durante el funcionamiento del
producto. Las superficies calientes le
pueden ocasionar quemaduras, por ende,
se recomienda que no toque la caja de
engranajes.
1139 - 001 - 03.04.2019 17

• Siempre utilice guantes para trabajo pesado cuando
repare el equipo de corte. El equipo de corte es muy
afilado y puede provocar cortes fácilmente.
• Utilice únicamente piezas de repuesto originales
para las reparaciones.
Funcionamiento
Técnica de trabajo
ADVERTENCIA: Las ramas o el césped
pueden quedar atrapados entre el equipo de
corte y su protección. Siempre detenga el
motor antes de limpiar el equipo de corte.
• Utilice la aceleración máxima cuando corte y
disminuya a régimen de ralentí después de cada
corte.
AVISO: El motor puede sufrir daños si
funciona durante demasiado tiempo en
aceleración máxima sin carga.
Uso recomendado del equipo de corte
Las cuchillas del equipo de corte se mueven en un
ángulo pequeño y pueden realizar cortes en todas las
direcciones. Mueva el equipo de corte por el suelo a una
altura en que la cazoleta de apoyo toque el suelo. Utilice
el equipo de corte para cortar en:
• Zonas de parques y orillas de caminos.
• Orillas de caminos y vallas cercanas.
• Alrededor de piedras y árboles.
• Cerca del agua.
AVISO: No sumerja en agua la caja de
engranajes.
18 1139 - 001 - 03.04.2019

Montaje
Montaje del eje de dos piezas
1. Gire la perilla para aflojar el acoplamiento.
2. Alinee la lengüeta del equipo de corte (A) con la
flecha en el acoplamiento (B).
A
B
3. Empuje cuidadosamente el eje en el acoplamiento
hasta que se escuche un clic.
4. Apriete la perilla hasta el fondo.
Para desmontar el eje de dos piezas
1. Gire la perilla unas 3 vueltas o más para aflojar el
acoplamiento.
2. Mantenga presionado el botón (C).
3. Apriete fuertemente hacia abajo el extremo del eje al
que está conectado el motor.
4. Tire del accesorio para sacarlo del acoplamiento.
C
Mantenimiento
Introducción
A continuación encontrará algunas instrucciones
generales de mantenimiento. Si necesita más
información, comuníquese con su taller de servicio.
Programa de mantenimiento
A continuación, se presenta una lista de pasos de
mantenimiento que se deben realizar en el equipo de
corte.
Tenga en cuenta: El operador solo debe realizar el
mantenimiento y el servicio al equipo de corte que se
indica en este manual de usuario. Otras tareas de
mantenimiento y de servicio se deben realizar en un
taller de servicio autorizado.
1139 - 001 - 03.04.2019 19

Mantenimiento
Diario
Una vez
por sem-
ana
Una vez
al mes
Limpie las partes exteriores del producto. X
Asegúrese de que las cuchillas no estén dañadas. Reemplace las cuchillas si
están dañadas. X
Asegúrese de que la protección del equipo de corte no esté dañada. Reemplace
la protección del equipo de corte si está dañada. X
Asegúrese de que la cazoleta de apoyo no presente daños. Reemplácela si está
dañada. X
Asegúrese de que las tuercas y los tornillos estén apretados. X
Llene la caja de engranajes con grasa, aproximadamente cada 100 horas de
trabajo. X
Para limpiar y lubricar las hojas
1. Retire materiales no deseados de las hojas antes y
después de utilizar el producto.
2. Lubrique las cuchillas antes de períodos
prolongados de almacenamiento.
Tenga en cuenta: Comuníquese con su taller de servicio
para obtener más información sobre los agentes de
limpieza y lubricantes recomendados.
Para lubricar la caja de engranajes
AVISO: No llene la caja de engranajes
completamente. Si la caja de engranajes
está llena, la grasa puede provocar daños a
los sellos y ocasionar fugas.
1. Quite los tapones de engrase.
2. Agregue grasa al orificio superior.
3. Instale los tapones de engrase.
Para afilar las cuchillas
ADVERTENCIA: Utilice guantes protectores
cuando sostenga las cuchillas.
1. Coloque la llave combinada en la cavidad de la caja
de engranajes.
2. Gire la llave combinada hasta que quede una
diferencia de 3 mm/0,12” entre la cuchilla superior y
la cuchilla inferior.
3. Afile con una amoladora los bordes (B) a los que
pueda acceder. Asegúrese de que los bordes no
queden redondos (A).
A B
20 1139 - 001 - 03.04.2019
Table of contents
Languages:
Other RedMax Garden Machinery Accessories manuals