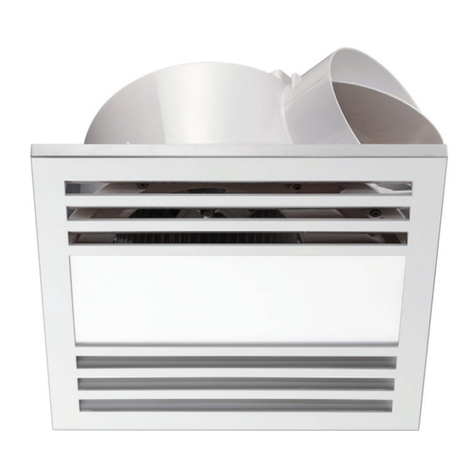
Reece Kado Aspect User manual

Electricians, please ensure a copy of the Installation
Instructions are left with the end user for future reference
Installation Instructions
Please read these instructions carefully before installing and using the product. Keep the instructions handy for future reference.
Electrical wiring must only be done by a licensed electrician and a “Certicate of Compliance” must be issued on completion of the
installation.
WHAT’S IN THE BOX
• Inline Exhaust Fan.
• Intake Fascia.
• Outlet Grille .
• 6m x Ø150mm Aluminium Ducting.
• Operating and Installation Instructions.
• Cutout Template.
• 4 Cable ties for attaching duct.
SAFETY INSTRUCTIONS
During use of the product, it is necessary to observe some precautions. Improper operation with disregard of precautions may result in
iniction of harm to health of the user and other people, as well as iniction of damage to their property.
• Use only the voltage specied on the rating plate of the fan.
• This item should only be installed by a licensed tradesperson.
• The fan should be connected to the electric mains equipped with an automatic circuit breaker.
• The unit must be handled with care avoiding any sudden impacts or vibrations.
WARNING: DO NOT CONNECT POWER SUPPLY UNTIL FAN IS COMPLETELY INSTALLED. MAKE SURE ELECTRICAL
SERVICE TO THE FAN IS LOCKED IN AN OFF POSITION.
• Read all instructions before installing or using exhaust fan.
• If the fan is defective, it must be checked and repaired by the manufacturer, its service agent or similarly qualied persons for repair.
• Do not operate appliance with wet hands.
• Use this appliance only as described in this manual. Any other use is not recommended by the manufacturer and may cause re,
electric shock or injury.
• Do not use abrasive cleaning products on this appliance. If the body becomes dirty, wipe off dust with a cloth. Always remove plug
from the mains supply before cleaning.
• Do not connect the appliance to the mains source until it has been installed in its nal location and adjusted to the position it will be
used in.
• Do not operate with the cord coiled up as this could cause a build-up of heat, which could pose a hazard.
• The use of an extension cord with this appliance is not recommended.
• This appliance is not intended for use by persons (including children) with reduced physical, sensory or mental capabilities, or lack
of experience and knowledge, unless they have been given supervision or instruction concerning use of the appliance by a person
responsible for their safety.
• Children should be supervised to ensure that they do not play with the appliance
• The appliance is only intended for the purpose described in user manual.
• Do not use appliance or any part of the appliance out of the intended use to avoid risk.
• The use of attachments which are not recommended or sold by the appliance manufacturer may cause a risk of injury to persons.
• CAUTION — For general ventilation use only. Do not use to exhaust hazardous or explosive materials and vapors.
Page 1 of 6
Kado Aspect Flush Mount Inline Exhaust

Electricians, please ensure a copy of the Installation
Instructions are left with the end user for future reference
Installation Instructions
• To protect against the risk of electrical shock, do not immerse the unit, cord or plug in water or other liquid.
• When cutting or drilling into wall or ceiling, do not damage electrical wiring and other hidden utilities.
• This unit has rotating parts and safety precautions should be exercised during installation, operation and maintenance.
• Guards must be installed when fan is within reach of personnel or within 2.3 metres of working level or when deemed advisable for
safety.
• To prevent re or shock hazard, DO NOT expose this appliance to rain or moisture.
• Dangerous high voltages are present inside the motor enclosure. To avoid electrical shock, DO NOT open the motor enclosure.
Refer all servicing to qualied personnel only.
• To protect against re, electrical shock and injury to persons, do not immerse the unit, plug or cord in water or spray it with liquids.
• No naked ame sources, such as candles, should be placed on or near the product.
• Ventilation should not be impeded by covering the ventilation openings. Slots and openings are provided for ventilation to ensure
reliable operation of the product and to protect it from overheating.
• Place the fan on a stable level service when operating to avoid overturning.
• Only connect to a suitable AC 220-240V ~50Hz mains socket.
• Do not operate the fan in the presence of explosive and/or ammable fumes. Do not place the fan or any parts near an open ame,
cooking or other heating appliance.
• Do not operate the fan with a damaged cord or plug, after a malfunction, or if it was dropped or damaged in any way.
LOCATION
• The unit must be located and installed in accordance with AS/NZS 3000 and local building codes relating to damp situations.
• Ensure adequate air intake into the room exists through windows, vents or under the door to replace the displaced air.
• Regulations concerning the discharge of air must be fullled.
• Ensure the fan is not placed near drapes, curtains, or any objects that may be drawn into the fan.
POWER
AC220-240V ~50Hz electrical supply is required. The unit can be connected to a lighting or power circuit if loading permits. All
electrical work must be carried out in accordance with AS/NZS 3000 or latest edition thereof, and local building codes and regulations.
Ensure the power supply is isolated before commencing installation. Electrical wiring must only be done by a licensed electrician and a
“Certicate of Compliance” must be issued at completion of the installation.
Page 2 of 6
Kado Aspect Flush Mount Inline Exhaust

Electricians, please ensure a copy of the Installation
Instructions are left with the end user for future reference
Installation Instructions
Page 3 of 6
INSTALLING THE FAN
CAUTION: MAKE SURE POWER IS SWITCHED OFF AT THE SERVICE PANEL
BEFORE STARTING INSTALLATION.
1. This exhaust fan is tted with a supply cable and plug. There is no need to open the fan for wiring. The location of installation must
be near a socket outlet. A licensed electrician will be required to install the socket outlet. For best performance, the location of the
inlet and outlet should be within 6 metres of duct length.
2. Ensure the mounting location of the fan is in a position that:
a) is as far as possible from the intake point to minimise fan operating noise from being transmitted back through the duct work. If
the fan is to be used as a booster for moving the air between two rooms, a central point along the duct may be optimal, and
b) allows for sufcient access for servicing.
3. This exhaust fan can be mounted in any orientation, horizontal or vertical, and is suitable for numerous types of applications. See
below for illustrations for some typical applications and mounting possibilities:
Single-Point Intake:
Kado Aspect Flush Mount Inline Exhaust
Multi-Point Intake:

Page 4 of 6
Electricians, please ensure a copy of the Installation
Instructions are left with the end user for future reference
Installation Instructions
INSTALLATION
4. To start the installation, the motor wheel assembly must rst be removed. Loosen the two spring clips around the casing and
remove. (Diagrams 1-3 below)
5. Secure the mounting bracket fan ange assembly to a xed structure. (Diagrams 4-5 below)
NOTE: To maximise fan performance, install as near to air outlet point as possible.
6. Replace the fan motor wheel assembly and tighten the two spring clips to secure the product. Please pay attention to the Air
Direction when replacing the motor wheel assembly. (Diagrams 6-8 below)
Kado Aspect Flush Mount Inline Exhaust
7. Select desired airow rate by choosing 'High' (561m3H) or 'Low' (438m3H) on the speed switch located on the top of the control box of
the fan motor.
9
High
Low

Page 5 of 6
Installation Instructions
INSTALLING THE DUCT
1. Cut the required two duct lengths: from the inlet vent to the fan and from the fan to the outlet vent.
2. Secure the duct to inlet side of fan motor with cable ties provided. Attach other end of this duct to outlet on Flush Mount Fascia kit
housing.
3. Repeat step 2 for the fan outlet to the vent outlet.
It is recommended the duct be used in a fully extended position and with minimal amount of bends or turn. This will reduce any
unnecessary friction pressure resulting in reduction of airow.
Electricians, please ensure a copy of the Installation
Instructions are left with the end user for future reference
ELECTRICAL CONNECTION
WARNING: All electrical work must be carried out by a licensed electrician. All electrical wiring must be in accordance with the latest
national wiring rules AS/NZS 3000.
WARNING: Ensure the power supply to the exhaust fan is switched OFF before carrying out any installation and maintenance.
Note: A double switch must be included in the electrical wiring of the exhaust fan.
Kado Aspect Flush Mount Inline Exhaust
INSTALLING THE OUTLET VENTS
1. Locate a suitable location for the inlet and outlet vents. For best performance, duct length between inlet and outlet must not be
more than six metres.
2. Cut a 150mm diameter hole into the vents mounting surface. Ensure the area behind cut-out section is clear of electrical wiring,
joists, and structural beams.
3. Remove the grille cover and then insert the vent into the cut out and secure with screws. It is suggested that the duct be secured
prior to xing the vent into position.
4. Click vent louvres back into position, making sure louvres are facing downwards.
Louvres facing
downwards.
Fig. 1. Fig. 2.

Page 6 of 6
Installation Instructions
Electricians, please ensure a copy of the Installation
Instructions are left with the end user for future reference
INSTALLING THE FLUSH MOUNT FASCIA KIT
1. Locate a suitable location for the Flush Mount Fascia. Use the template card provided for marking the cut-out hole.
2. Cut a rectangle hole 583 x 153mm into the vents mounting surface.
3. Connect ducting then insert unit into cut-out hole. Ensure the four metal xing springs on side have popped back into position on
the backside of the ceiling board. Fascia may need to be removed to ensure Metal xing springs have fully extended outward onto
back of ceiling board.
cutout template
Metal
xing
springs
Note: To remove Fascia, pull downwards on fascia plate then reach in behind to disengage the spring xing wires.
Spring
xing wires.
Kado Aspect Flush Mount Inline Exhaust
CLEANING AND MAINTENANCE
Before carrying out any maintenance, ensure the power is switched OFF from the mains power supply.
1. Wipe down the fascia and grilles with a wet soapy cloth only. Fascia may be removed for cleaning but do not immerse fascia in
water. Never use petrol, benzene, thinner or any other such chemicals for cleaning.
2. Do not immerse resin parts into hot water over 60oC.
Table of contents
Other Reece Fan manuals
Popular Fan manuals by other brands

Sulion
Sulion LOLLIPOP 075157 instruction manual

Monte Carlo Fan Company
Monte Carlo Fan Company 5GIR54XXD-L Series Owner's guide and installation manual

BALMUDA
BALMUDA The GreenFan EGF-1700 Series instruction manual

EDM
EDM 33935 instruction manual

Monte Carlo Fan Company
Monte Carlo Fan Company 5HDR52D Series quick start guide

Minka Group
Minka Group F516L-WH Instruction manual warranty certificate

Kichler Lighting
Kichler Lighting Verdi instruction manual

LUMIT
LUMIT MARINO instruction manual

Suntec Wellness
Suntec Wellness Klimatronic CoolBreeze 5000 SVM manual

UFESA
UFESA Oregon instruction manual

Broan
Broan InVent AE110S Installation and Use & Care Instructions

Craftmade
Craftmade Burke BRK60 installation guide