manuals.online logo
Brands
  1. Home
  2. •
  3. Brands
  4. •
  5. Reece
  6. •
  7. Fan
  8. •
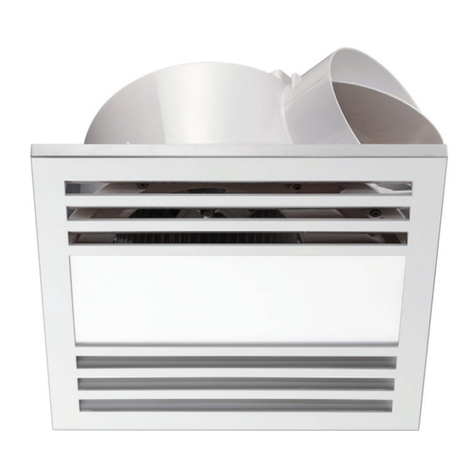
  9. Reece KADO REX200WH User manual

Reece KADO REX200WH User manual

KADO
SPECIFICATIONS
Recommended use Domestic, Hotel and Commercial
Fascia Material ABS Plastic/Stainless Steel
Colour availability White, Silver
Grille Size 272 x 272mm
Weight 2.2kg
Exhaust 30w side ducted
Air Movement 42 L/sec (171m3/H)*
Air Outlet Size 100mm
Cutout Size 240mm diameter round
Min Install Depth 200mm
Install Type AC Plug and lead included
IP Rating IPX4
CLEANING RECOMMENDATIONS
To see the complete KADO range go to
www.reece.com.au/bathrooms
LUX EXHAUST FAN 200
We recommend the use of soapy water or approved cleaners.
This product should not be cleaned with abrasive materials.
Damage caused by any improper treatment is not covered by the
product warranty. Refer to Warranty Conditions.
Dimensions are nominal measurements only.
Disclaimer: Products in this specication manual must by regulation be installed by licensed and registered trade people. The manufacturer/distributor
reserves the right to vary specications or delete models from their range without prior notication. Dimensions are nominal measurements only.
Dimensions and set-outs listed are correct at time of publication however the manufacturer/distributor takes no responsibility for printing errors.
Tech Page Version 1
*All Airow data has been gathered in accordance
with International Industry Standards ISO 5801. PART NO. REECE CODE
REX200WH White 2053294
REX200SS Silver 2053296
Also see:
•REX250WH/SS for higher airow
• REX200WHL/SSL for LED Light version
272mm
272mm
221mm
240mm 170mm
98mm
page 1 of 4
KADO
LUX EXHAUST FAN 200
AVAILABLE SPARE PARTS AND ACCESSORIES
Part Number Supplier Description
V100DKIT Ventair Ducting Kit with 1 x Ø100mm Grille and 3m Aluminium ducting.
VAD100 Ventair Ø100mm x 3m Aluminium Ducting.
V150PALG Ventair Premium Aluminium External Vent
VTROTIMER Ventair 1-25min adjustable exhaust fan run-on timer.
VTMSENSOR Ventair Infrared motion sensor with 1-5m detection range and 1-20min run-
on timer.
TECHNICAL SPECIFICATIONS
EXHAUST
Air Delivery 42 L/sec (171m3/H)*
Motor Power 30 watts
Noise Level 38dB(A)
Ball Bearing Yes
Duct Outlet Size 100mm
Draft Stopper Yes
INSTALLATION
Cut Out Size 240mm Diameter Round
Fascia Size 272 x 272mm
Rec Min Install Depth 200mm
IP Rating IPX4 Splash Resistant
Installation Type AC Plug and Lead Included
PACKAGING
Packaging Size 290 x 290 x 225mm
Gross Weight 2.3kg
0
30
50
70
90
110
130
150
170
190
210
Static Pressure (pa)
m3/H 30 60 90 120 150 180 210 240 270 300 330
4m
2m
REX250
L/sec 8 17 25 33 42 50 58 67 75 83 92
Airflow
Duct Length in
relation to airflow
(approx only)
360
100
10m 8m
6m
REX200
2m
4m
6m
*All Airow data has been gathered in accordance with International
Industry Standards ISO 5801.
INCLUDES
1 x Exhaust Unit
1 x Cutout Template
page 2 of 4
INSTALLATION INSTRUCTIONS
KADO
LUX EXHAUST FAN 200
Please read these instructions carefully before installing and using the product. Keep the instructions handy for future
reference.
LOCATION
The unit must be located and installed in accordance with AS/NZS 3000 and local building codes relating to damp situations.
The unit can be installed in at ceilings with a minimum height of 2 metres. At least 200mm height clearance in the ceiling
cavity is required to ensure sufcient ventilation for moisture to disperse.
Ensure adequate inlets exist through windows, vents or under the door for airow.
Regulations concerning the discharge of air must be fullled.
POWER
AC220~240V, 50Hz electrical supply is required. The unit can be connected to a lighting or power circuit if loading permits.
All electrical work must be carried out in accordance with AS/NZS 3000 or latest edition thereof, and local building codes and
regulations. Ensure that supply power is isolated before commencing installation.
IMPORTANT CONSIDERATIONS
1. This appliance is not intended for use by persons (including children) with reduced physical, sensory or mental capabilities.
Or lack of experience and knowledge, unless they have been given supervision or instruction concerning use of the appliance
by a person responsible for their safety.
2. Children should be supervised to ensure that they do not play with the appliance.
3. Fan must be installed at least 1200mm above any hotplate and must have at least 500cm clearance at the exhaust outlet.
4. Do not install fan in locations that may get extremely hot.
5. Ensure the fan has at least 20mm clearance in the ceiling space before installing.
6. Minimum installation height is 2100mm from the oor to the bottom of the exhaust fan.
7. If the room where the fan is to be installed already contains a stove, water heater or a gas re, it is essential to ensure that
air supply to the room is enough for both the fan and the combustion appliance.
8. Please check the appliance has not been damaged during transportation.
9. Check the electrical specications label corresponds to your electrical supply.
10. When using double pole switch connection, the switch must have a minimum 3mm separation on all poles.
11. If the supply cord is damaged, it must be replaced by the manufacturer, its service agent, or similar qualied person in
order to avoid a hazard.
12. When adding duct, avoid bending the duct in the following shapes:
13. Adhere to the latest national wiring rules AS/NZS3000, for wiring and when installing in bathrooms, nearby sinks and water
taps.
14. For the exhaust fan to work effectively, replacement air of volume equivalent to what is being extracted must be able to
enter the room. In general, this air would be drawn under the door or through a slightly open window. If the room is air tight, the
fan will function poorly.
15. Before commencing any cutting, check in the mounting location so that there is no obstruction such as ceiling frames or
joints, and that there is sufcient height clearance for the housing. Check the electrical wiring can be routed from the wall
switch to the mounting location.
16. This fan is not intended for mounting in outside windows or walls.
page 3 of 4
INSTALLATION INSTRUCTIONS
KADO
LUX EXHAUST FAN 200
Warning: Ensure the power supply to the exhaust fan is switch OFF before carrying out any
installation and maintenance.
Note: A double pole disconnection switch must be included in the electrical wiring of the
exhaust fan.
1. Check the fan is free to rotate.
2. Cut the hole for the fan according to the template provided.
3. Plug into socket outlet and secure fan body using the three clips when tightening to secure the fan.
Note: A socket outlet and electrical wiring to an ON/OFF wall switch must be pre-installed. Please arrange a Licensed
Electrician to prepare the socket outlet and ON/OFF wall switch before carrying out the installation of this exhaust fan.
4. Secure the panel/fascia by squeezing the spring fasteners and insert into the slot in the fan body. Check that the panel is
secured rmly and closely to the fan body.
Note: Switch ON the fan and check for
excessive vibration in the fan. If the fan
runs in a sound way without abnormal
noise, then install the panel.
The vent duct should be declined
downwards by about 10 degrees.
•Make sure the fan is always switched off before cleaning.
•Make sure to use the fan with the specied voltage as
stated on the rating label.
•Use the fan in a dry place, avoid excess humidity and
water.
•Never immerse any part of the fan in water or other liquids.
•Never use petrol benzene or other such chemicals.
•Never allow water to contact the electrical parts such as
switch and motor.
•Never immerse blades or other resin parts in hot water over
60oC.
•Never install the fan in extremely hot environments.
CARE AND MAINTENANCE
WARNING: AN ALL-POLE DISCONNECTION MUST BE INCORPORATED INTO THE FIXED WIRING IN ACCORDANCE
WITH THE WIRING RULES AS OUTLINE IN CLAUSE 7.12.2 OF AS/NZS 60335-1 FOR
MEETING THE MINIMUM ELECTRICAL SAFETY OF THIS STANDARD.
ELECTRICAL WIRING
Power ~
Grounding
Brown
Blue
Yellow/Green Terminal
Fuse
Blue
Yellow/Green
Motor
Black or Purple
Brown
Supply N
240VAC L
Earth
page 4 of 4
Electricians, please ensure a copy of the installation instructions
is left with the end user for future reference

This manual suits for next models

3

Other Reece Fan manuals

Reece KADO 250 User manual

Reece

Reece KADO 250 User manual

Reece KADO LUX EXHAUST FAN 250 Quick start guide

Reece

Reece KADO LUX EXHAUST FAN 250 Quick start guide

Reece KADO REX200WHL User manual

Reece

Reece KADO REX200WHL User manual

Reece Kado Aspect User manual

Reece

Reece Kado Aspect User manual

Popular Fan manuals by other brands

Sulion LOLLIPOP 075157 instruction manual

Sulion

Sulion LOLLIPOP 075157 instruction manual

Monte Carlo Fan Company 5GIR54XXD-L Series Owner's guide and installation manual

Monte Carlo Fan Company

Monte Carlo Fan Company 5GIR54XXD-L Series Owner's guide and installation manual

BALMUDA The GreenFan EGF-1700 Series instruction manual

BALMUDA

BALMUDA The GreenFan EGF-1700 Series instruction manual

EDM 33935 instruction manual

EDM

EDM 33935 instruction manual

Monte Carlo Fan Company 5HDR52D Series quick start guide

Monte Carlo Fan Company

Monte Carlo Fan Company 5HDR52D Series quick start guide

Minka Group F516L-WH Instruction manual warranty certificate

Minka Group

Minka Group F516L-WH Instruction manual warranty certificate

Vornado 693DC user manual

Vornado

Vornado 693DC user manual

Fanimation BREWMASTER FP1280-220 manual

Fanimation

Fanimation BREWMASTER FP1280-220 manual

Goobay 59509 user manual

Goobay

Goobay 59509 user manual

Renson Healthbox II Handbuch Manual

Renson

Renson Healthbox II Handbuch Manual

GERMANICA KF16 instruction manual

GERMANICA

GERMANICA KF16 instruction manual

Broan 670 instructions

Broan

Broan 670 instructions

Kichler Lighting Verdi instruction manual

Kichler Lighting

Kichler Lighting Verdi instruction manual

LUMIT MARINO instruction manual

LUMIT

LUMIT MARINO instruction manual

Suntec Wellness Klimatronic CoolBreeze 5000 SVM manual

Suntec Wellness

Suntec Wellness Klimatronic CoolBreeze 5000 SVM manual

UFESA Oregon instruction manual

UFESA

UFESA Oregon instruction manual

Broan InVent AE110S Installation and Use & Care Instructions

Broan

Broan InVent AE110S Installation and Use & Care Instructions

Craftmade Burke BRK60 installation guide

Craftmade

Craftmade Burke BRK60 installation guide

manuals.online logo
manuals.online logoBrands
  • About & Mission
  • Contact us
  • Privacy Policy
  • Terms and Conditions

Copyright 2025 Manuals.Online. All Rights Reserved.