Reer MyMagicSmartLight Sleeplight User manual

PL Lampka do zasypiania MyMagicSmartLight
Instrukcja obsługi, Nr art.: 52470
Luz para dormir MyMagicSmartLight
Instrucciones de uso, N.º de art.: 52470
Veilleuse MyMagicSmartLight
Mode d‘emploi, Réf.art.: 52470
MyMagicSmartLight Einschlaflicht
Gebrauchsanleitung, Art.Nr.: 52470
Uspávací světlo MyMagicSmartLight
Návod k použití, Artikl č: 52470
MyMagicSmartLight nachtlampje
Gebruiksaanwijzing, Art.nr.: 52470
Luce per dormire MyMagicSmartLight
Istruzioni per l‘uso, Cod.art.: 52470
MyMagicSmartLight Sleeplight
Instruction manual, item no.: 52470
M
30´
60´
120´
240´
+
z
z
z
-

MyMagicSmartLight
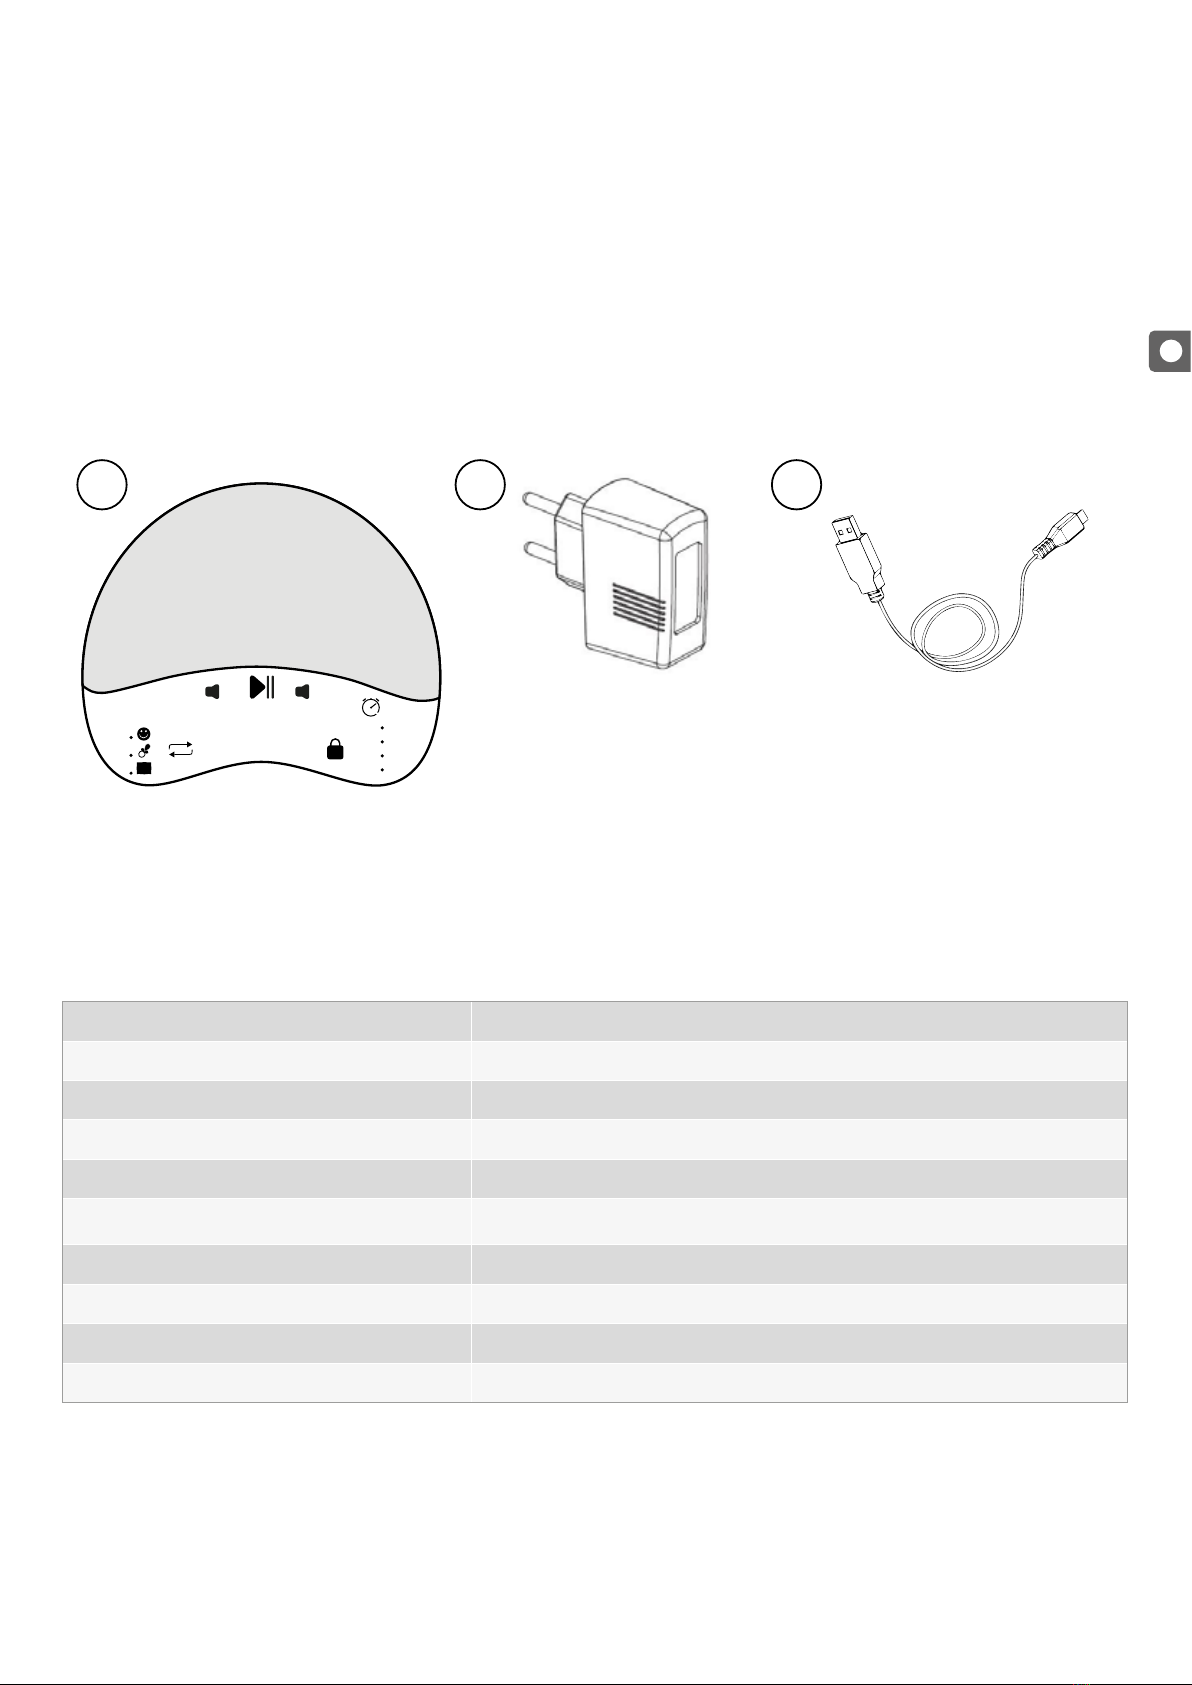
Lieferumfang. . . . . . . . . . . . . . . . . . . . . . . . . . . . . . . . . . . . . . . . . . 03
Technische Daten. . . . . . . . . . . . . . . . . . . . . . . . . . . . . . . . . . . . . . . 03
Allgemeine Sicherheitshinweise. . . . . . . . . . . . . . . . . . . . . . . . . . . . . . 04
Sicherheitshinweise zur Installation. . . . . . . . . . . . . . . . . . . . . . . . . . . . 04
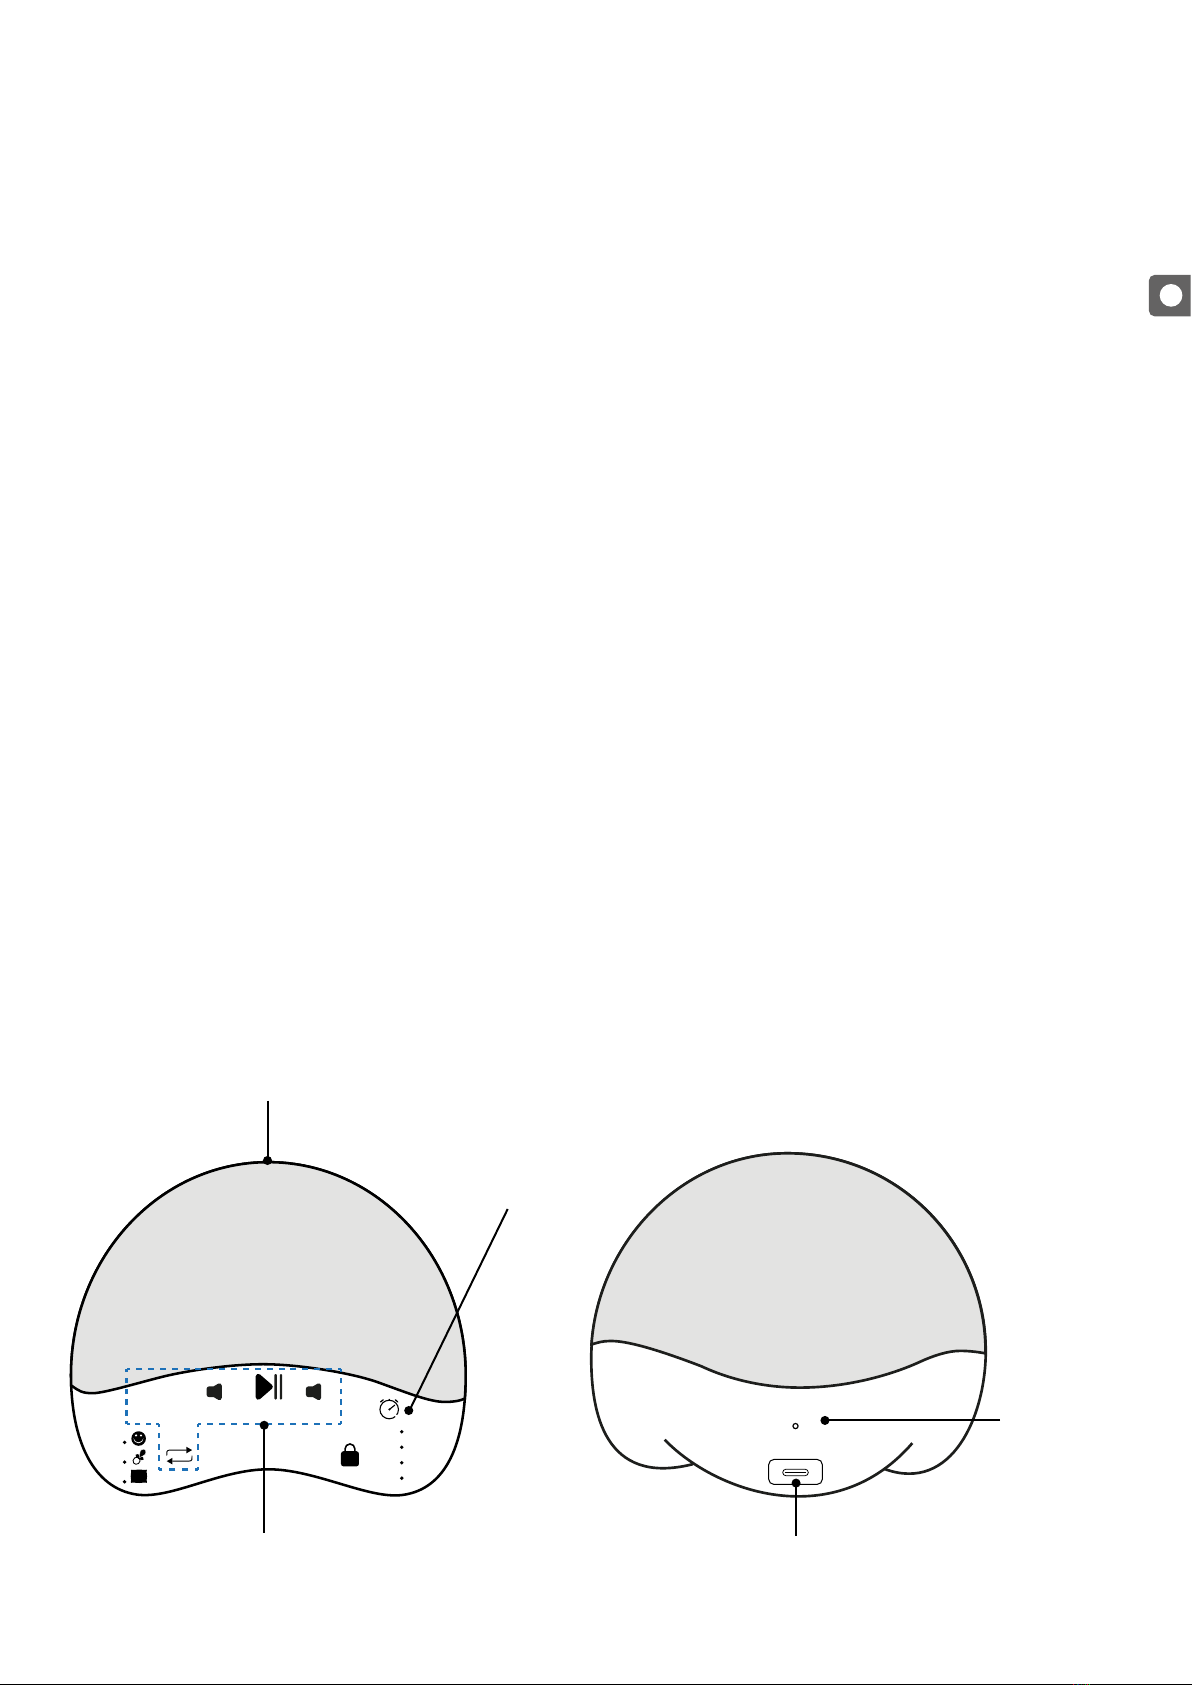
Gerätebeschreibung . . . . . . . . . . . . . . . . . . . . . . . . . . . . . . . . . . . . . 04
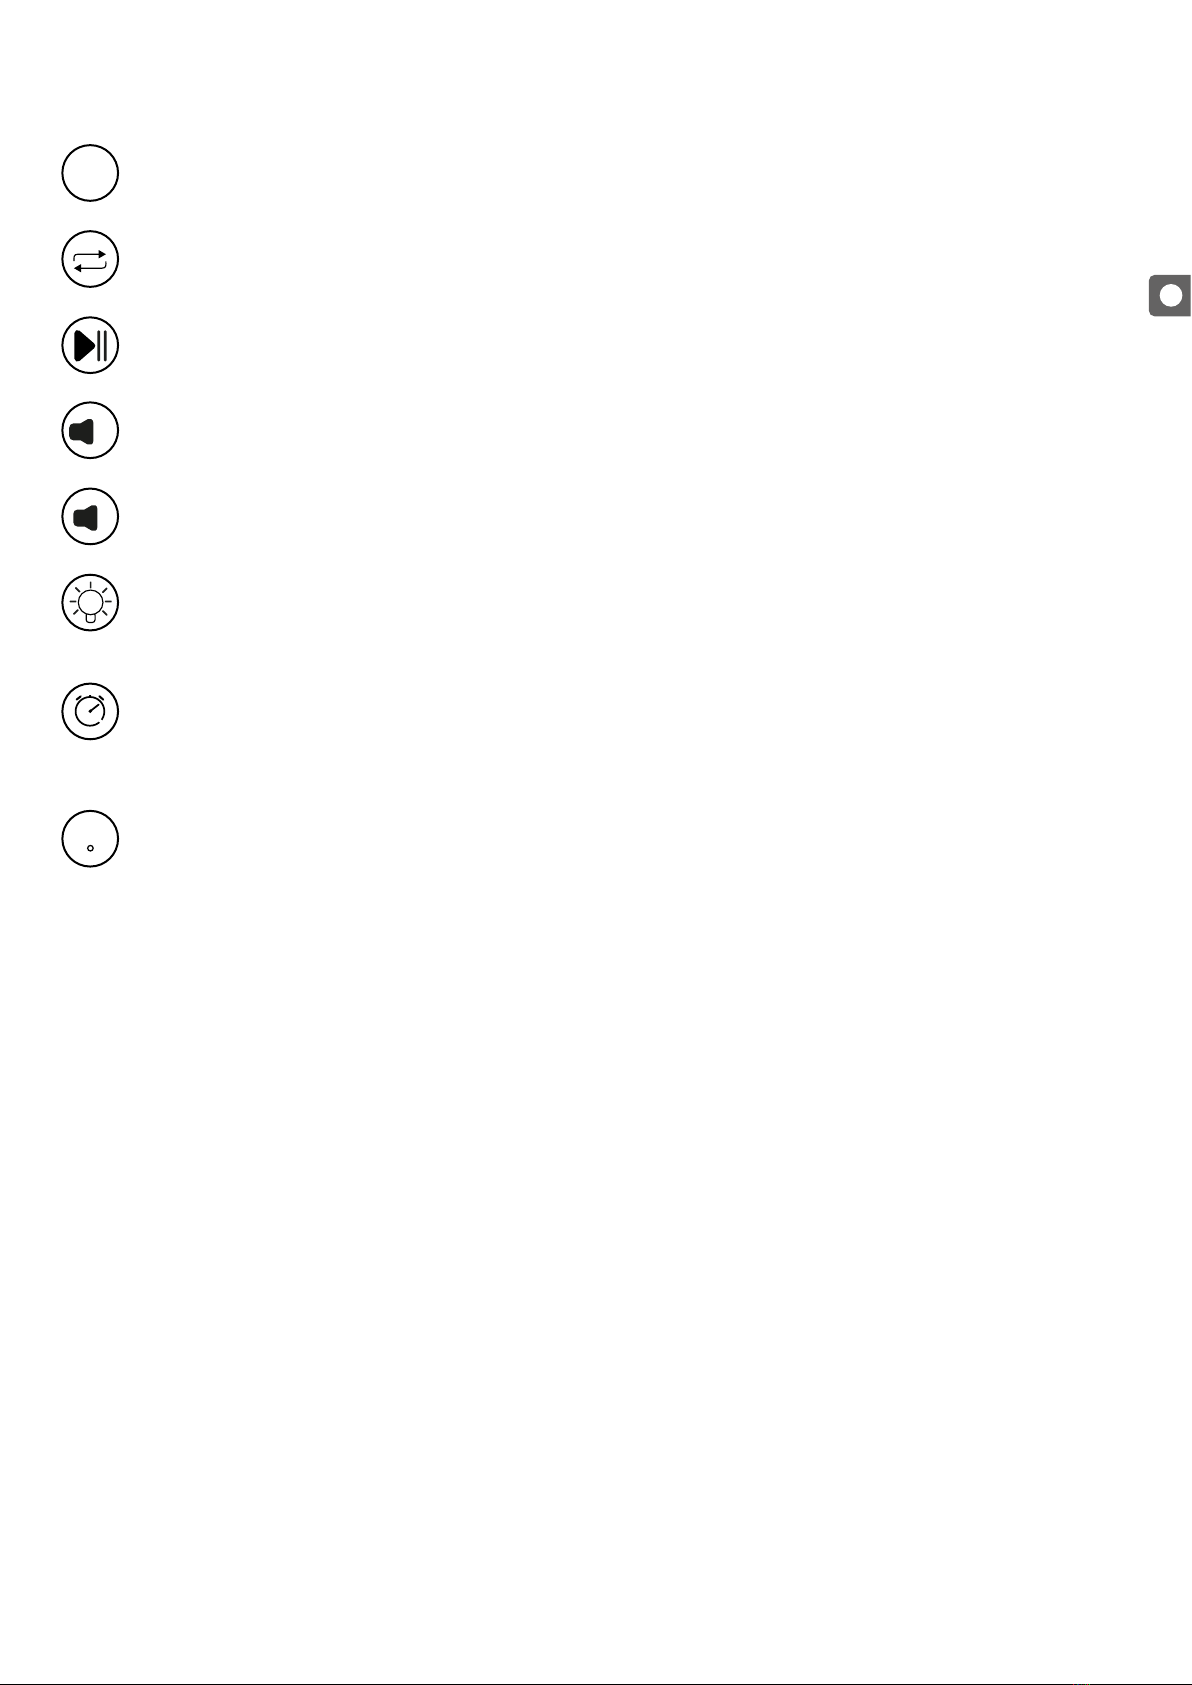
Steuerung und Funktion. . . . . . . . . . . . . . . . . . . . . . . . . . . . . . . . . . . . 05
Verbindung mit dem Smart Device . . . . . . . . . . . . . . . . . . . . . . . . . . . . 05
Contents. . . . . . . . . . . . . . . . . . . . . . . . . . . . . . . . . . . . . . . . . . . . . 08
Technical data . . . . . . . . . . . . . . . . . . . . . . . . . . . . . . . . . . . . . . . . . 08
General safety instructions . . . . . . . . . . . . . . . . . . . . . . . . . . . . . . . . . 09
Safety instructions for installation . . . . . . . . . . . . . . . . . . . . . . . . . . . . . 09
Device description . . . . . . . . . . . . . . . . . . . . . . . . . . . . . . . . . . . . . . 09
Control and functions . . . . . . . . . . . . . . . . . . . . . . . . . . . . . . . . . . . . . 10
Connection with a smart device . . . . . . . . . . . . . . . . . . . . . . . . . . . . . . 10
Contenu . . . . . . . . . . . . . . . . . . . . . . . . . . . . . . . . . . . . . . . . . . . . . 13
Données techniques. . . . . . . . . . . . . . . . . . . . . . . . . . . . . . . . . . . . . 13
Consignes générales de sécurité . . . . . . . . . . . . . . . . . . . . . . . . . . . . . 14
Consignes de sécurité concernant l‘installation . . . . . . . . . . . . . . . . . . . . 14
Description de l‘appareil. . . . . . . . . . . . . . . . . . . . . . . . . . . . . . . . . . . 14
Paramétrage et fonctions . . . . . . . . . . . . . . . . . . . . . . . . . . . . . . . . . . . 15
Connexion avec Smart Device. . . . . . . . . . . . . . . . . . . . . . . . . . . . . . . . 15
Contenuto . . . . . . . . . . . . . . . . . . . . . . . . . . . . . . . . . . . . . . . . . . . 18
Dati tecnici . . . . . . . . . . . . . . . . . . . . . . . . . . . . . . . . . . . . . . . . . . . 18
Avvertenze di sicurezza generali. . . . . . . . . . . . . . . . . . . . . . . . . . . . . . 19
Istruzioni di sicurezza per l‘installazione . . . . . . . . . . . . . . . . . . . . . . . . . 19
Descrizione dell‘apparecchio. . . . . . . . . . . . . . . . . . . . . . . . . . . . . . . . 19
Comando e funzioni . . . . . . . . . . . . . . . . . . . . . . . . . . . . . . . . . . . . . . 20
Connessione con il dispositivo smart . . . . . . . . . . . . . . . . . . . . . . . . . . . 20
Contenido. . . . . . . . . . . . . . . . . . . . . . . . . . . . . . . . . . . . . . . . . . . . 23
Datos técnicos . . . . . . . . . . . . . . . . . . . . . . . . . . . . . . . . . . . . . . . . . 23
Indicaciones generales de seguridad . . . . . . . . . . . . . . . . . . . . . . . . . . 24
Indicaciones de seguridad para la instalación . . . . . . . . . . . . . . . . . . . . . 24
Descripción del dispositivo . . . . . . . . . . . . . . . . . . . . . . . . . . . . . . . . . 24
Control y funciones . . . . . . . . . . . . . . . . . . . . . . . . . . . . . . . . . . . . . . . 25
Conexión con el dispositivo inteligente . . . . . . . . . . . . . . . . . . . . . . . . . 25
Inhoud . . . . . . . . . . . . . . . . . . . . . . . . . . . . . . . . . . . . . . . . . . . . . . 28
Technische gegevens . . . . . . . . . . . . . . . . . . . . . . . . . . . . . . . . . . . . 28
Algemene veiligheidsaanwijzingen . . . . . . . . . . . . . . . . . . . . . . . . . . . 29
Veiligheidsinstructies voor installatie . . . . . . . . . . . . . . . . . . . . . . . . . . . 29
Beschrijving van het . . . . . . . . . . . . . . . . . . . . . . . . . . . . . . . . . . . . . 29
Bediening en functies . . . . . . . . . . . . . . . . . . . . . . . . . . . . . . . . . . . . . 30
Verbinding met het Smart Device . . . . . . . . . . . . . . . . . . . . . . . . . . . . . 30
Zawartosc. . . . . . . . . . . . . . . . . . . . . . . . . . . . . . . . . . . . . . . . . . . . 33
Dane techniczne . . . . . . . . . . . . . . . . . . . . . . . . . . . . . . . . . . . . . . . 33
Wskazówki dotyczące bezpieczeństwa . . . . . . . . . . . . . . . . . . . . . . . . . 34
Wskazówki dotyczące bezpieczeństwa podczas instalacji . . . . . . . . . . . . . 34
Opis urządzenia . . . . . . . . . . . . . . . . . . . . . . . . . . . . . . . . . . . . . . . . 34
Sterowanie i funkcje. . . . . . . . . . . . . . . . . . . . . . . . . . . . . . . . . . . . . . . 35
Połączenie ze smartfonem . . . . . . . . . . . . . . . . . . . . . . . . . . . . . . . . . . 35
Obsah . . . . . . . . . . . . . . . . . . . . . . . . . . . . . . . . . . . . . . . . . . . . . . 38
Technické údaje . . . . . . . . . . . . . . . . . . . . . . . . . . . . . . . . . . . . . . . . 38
Wskazówki dotyczące bezpieczeństwa . . . . . . . . . . . . . . . . . . . . . . . . . 39
Wskazówki dotyczące bezpieczeństwa podczas instalacji . . . . . . . . . . . . . 39
Opis urządzenia . . . . . . . . . . . . . . . . . . . . . . . . . . . . . . . . . . . . . . . . 39
Ovládání a funkce . . . . . . . . . . . . . . . . . . . . . . . . . . . . . . . . . . . . . . . . 40
Připojení k chytrému zařízení. . . . . . . . . . . . . . . . . . . . . . . . . . . . . . . . . 40
Steuerung per Smart Life App . . . . . . . . . . . . . . . . . . . . . . . . . . 06
Reinigung und Wartung . . . . . . . . . . . . . . . . . . . . . . . . . . . . 07
Problembehebung . . . . . . . . . . . . . . . . . . . . . . . . . . . . . . . . 07
Datenschutz . . . . . . . . . . . . . . . . . . . . . . . . . . . . . . . . . . . . 07
Garantie . . . . . . . . . . . . . . . . . . . . . . . . . . . . . . . . . . . . . . . 07
Hinweis zum Umweltschutz . . . . . . . . . . . . . . . . . . . . . . . . . . . . 07
Konformitätserklärung . . . . . . . . . . . . . . . . . . . . . . . . . . . . . . . . 07
Control via the Smart Life app. . . . . . . . . . . . . . . . . . . . . . . . . 11
Cleaning and maintenance . . . . . . . . . . . . . . . . . . . . . . . . . . 12
Troubleshooting. . . . . . . . . . . . . . . . . . . . . . . . . . . . . . . . . . 12
Privacy . . . . . . . . . . . . . . . . . . . . . . . . . . . . . . . . . . . . . . . . 12
Warranty . . . . . . . . . . . . . . . . . . . . . . . . . . . . . . . . . . . . . . . 12
Environmental protection. . . . . . . . . . . . . . . . . . . . . . . . . . . . . . 12
Declaration of Conformity. . . . . . . . . . . . . . . . . . . . . . . . . . . . . . 12
Gestion par l‘application Smart Life . . . . . . . . . . . . . . . . . . . . . 16
Nettoyage et entretien . . . . . . . . . . . . . . . . . . . . . . . . . . . . . 17
Résolution des problèmes . . . . . . . . . . . . . . . . . . . . . . . . . . . 17
Protection des données . . . . . . . . . . . . . . . . . . . . . . . . . . . . . 17
Garantie . . . . . . . . . . . . . . . . . . . . . . . . . . . . . . . . . . . . . . . 17
Informations sur la protection de l‘environnement . . . . . . . . . . . . . 17
Déclaration de conformité . . . . . . . . . . . . . . . . . . . . . . . . . . . . . 17
Comando tramite Smart Life App . . . . . . . . . . . . . . . . . . . . . . 21
Pulizia e manutenzione . . . . . . . . . . . . . . . . . . . . . . . . . . . . . 22
Risoluzione dei problemi . . . . . . . . . . . . . . . . . . . . . . . . . . . . 22
Protezione dati . . . . . . . . . . . . . . . . . . . . . . . . . . . . . . . . . . . 22
Garanzia . . . . . . . . . . . . . . . . . . . . . . . . . . . . . . . . . . . . . . . 22
Prescrizioni in materia di tutela ambientale . . . . . . . . . . . . . . . . . . 22
Dichiarazione di conformità . . . . . . . . . . . . . . . . . . . . . . . . . . . . 22
Controlar la luz nocturna mediante la app Smart Life . . . . . . . . . . 26
Limpieza y mantenimiento . . . . . . . . . . . . . . . . . . . . . . . . . . 27
Solución de problemas . . . . . . . . . . . . . . . . . . . . . . . . . . . . . 27
Privacidad . . . . . . . . . . . . . . . . . . . . . . . . . . . . . . . . . . . . . . 27
Garantía . . . . . . . . . . . . . . . . . . . . . . . . . . . . . . . . . . . . . . . 27
Indicaciones sobre la protección medioambiental . . . . . . . . . . . . . 27
Declaración de conformidad. . . . . . . . . . . . . . . . . . . . . . . . . . . . 27
Bediening via de Smart Life app . . . . . . . . . . . . . . . . . . . . . . . 31
Reiniging en onderhoud . . . . . . . . . . . . . . . . . . . . . . . . . . . . 32
Problemen oplossen . . . . . . . . . . . . . . . . . . . . . . . . . . . . . . . 32
Gegevensbescherming . . . . . . . . . . . . . . . . . . . . . . . . . . . . . 32
Waarborg . . . . . . . . . . . . . . . . . . . . . . . . . . . . . . . . . . . . . . 32
Aanwijzingen betreende milieubescherming . . . . . . . . . . . . . . . 32
Conformiteitsverklaring . . . . . . . . . . . . . . . . . . . . . . . . . . . . . . . 32
Sterowanie za pomocą aplikacji Smart Life 33
Czyszczenie i konserwacja . . . . . . . . . . . . . . . . . . . . . . . . . . . 33
Usuwanie problemów . . . . . . . . . . . . . . . . . . . . . . . . . . . . . . 34
Ochrona danych. . . . . . . . . . . . . . . . . . . . . . . . . . . . . . . . . . 34
Gwarancja . . . . . . . . . . . . . . . . . . . . . . . . . . . . . . . . . . . . . . 34
Wskazówki dotyczące ochrony środowiska . . . . . . . . . . . . . . . . . . 35
Deklaracja zgodności . . . . . . . . . . . . . . . . . . . . . . . . . . . . . . . . . 35
Ovládání pomocí aplikace Smart Life . . . . . . . . . . . . . . . . . . . . 41
Czyszczenie i konserwacja . . . . . . . . . . . . . . . . . . . . . . . . . . . 42
Usuwanie problemów . . . . . . . . . . . . . . . . . . . . . . . . . . . . . . 42
Ochrona danych. . . . . . . . . . . . . . . . . . . . . . . . . . . . . . . . . . 42
Gwarancja . . . . . . . . . . . . . . . . . . . . . . . . . . . . . . . . . . . . . . 42
Wskazówki dotyczące ochrony środowiska . . . . . . . . . . . . . . . . . . 42
Prohlášení o shodě . . . . . . . . . . . . . . . . . . . . . . . . . . . . . . . . . . 42
Inhaltsverzeichnis
Contents
Content
Contenuto
Índice
Spis treści
Obsah
Inhoudsopgave
DE
GB
ES
IT
NL
PL
CZ
FR
2

Input 100-240V~50/60Hz
Output 5V/ 600mA max.
Wifi Protokoll IEEE 802.11 b/g/n 2.4GHz
Frequenz 2,412~2,484GHz
Bluetooth Standard Bluetooth 4.0
Unterstützte Betriebssysteme Android 5.0 oder höher
iOS 9.0 oder höher
Lumen 145lm ± 10%
Reichweite Unbegrenzt
Kabellänge 1,50 m
Betriebstemperatur -9°C – +40°C
Technische Daten
Smartes Nachtlicht
Herzlichen Glückwunsch zum Erwerb Deines neuen reer MyMagicSmartLight mit Geräuschen und Schlafliedern.
Dein Smartes Nachtlicht kannst Du direkt am Gerät, per Handy-App und mit verschiedenen Sprachassistenten wie Alexa steuern. In der App kannst Du individuelle
Einschlaf- und Aufwach-Pläne festlegen sowie aus einer Vielzahl unterschiedlicher Leuchtfarben wählen. Zusätzlich siehst Du jederzeit, welche Sounds Dein kleiner
Liebling gerade anhört.
Wir sind sicher, Du wirst lange Zeit Freude an der Qualität unseres Produktes haben. Bitte nimm Dir ein paar Minuten Zeit, um die Sicherheitshinweise gründlich zu
lesen. Nur wenn alle der hier aufgeführten Punkte gewährleistet sind, kann das MyMagicSmartLight bedenkenlos verwendet werden. Bewahre die Bedienungs-
anleitung für späteres Nachschlagen sorgfältig auf.
Lieferumfang
a. MyMagicSmartLight Nachtlicht
b. 5V AC Netzteil
c. USB-C Kabel
M
30´
60´
120´
240´
+
z
z
z
-
a b c
DE
3

Gerätebeschreibung
Allgemeine Sicherheitshinweise
!Überprüfe vor jeder Benutzung das Gerät auf offensichtliche Beschädigungen. Solltest Du Schäden feststellen, darf dieses Gerät nicht verwendet werden.
!Stelle sicher, dass die Betriebsspannung der Steckdose, der des Netzteils entspricht. Prüfe, insbesondere auf einer Auslandsreise, ob die lokale Netzspannung mit
der angegebenen Spannung auf dem Gerät bzw. dem Netzteil übereinstimmt.
!Das Gerät und das Netzteil dürfen nicht geöffnet werden, da dies zu Stromschlägen führen kann. Sollte das Gerät fehlerhaft arbeiten, versuche bitte NICHT das
Problem selbst zu beheben. In diesem Fall wende dich bitte an deinen Händler.
!Vermeide die Berührung von metallischen Gegenständen mit den Stromanschlusskontakten am Gerät.
!Dieses Produkt ist kein Spielzeug! Kinder dürfen nicht mit dem Gerät spielen.
Sicherheitshinweise zur Installation
!Um eine Strangulation mit dem Netzkabel zu verhindern, sicher die Kabel außerhalb der Reichweite von Kindern aufbewahren.
Verwende keine Verlängerungskabel.
!Platziere das Gerät NICHT in der Nähe von Funkgeräten oder Mikrowellen. Die Abstrahlung dieser Geräte kann den Empfang stark beeinträchtigen.
!Verwende das Gerät nicht in Wassernähe oder an feuchten Orten. Tauch das Gerät nicht ins Wasser.
!Spüle das Gerät nicht unter fließendem Wasser ab.
!Vermeide extreme Hitze und direkte Sonneneinstrahlung.
!Die Steckdose für den Anschluss des Netzteils muss nahe dem Gerät liegen und zu jeder Zeit frei zugänglich sein.
!Die Trennung vom Versorgungsnetz ist nur gewährleistet, wenn das Netzteil aus der Steckdose gezogen ist.
!Die Lichtquelle dieser Leuchte ist nicht ersetzbar; wenn die Lichtquelle ihr Lebensdauerende erreicht hat, ist die gesamte Leuchte zu ersetzen.
!Verwende NUR das beiliegende USB-C-Kabel und AC-Netzteil. Um eine ausreichende Helligkeit zu gewährleisten, stelle eine Ausgangsleistung von DC5V und
Minimum 1.5A am Netzteil sicher.
!NICHT in der Nähe von extremen Wärmequellen, Feuchtigkeit oder korrosiven Substanzen aufstellen oder betreiben.
!Benutze keine Lampe mit beschädigtem Kabel oder anderweitigen Schäden oder nach aufgetretener Fehlfunktion.
!Platziere das Nachtlicht immer außer Reichweite des Kindes (Mindestabstand 1 Meter).
!Leg das Nachtlicht niemals in das Baby- oder Kinderbett bzw. Laufstall.
M
30´
60´
120´
240´
+
z
z
z
-
WiFi Reset
Nachtlicht-
Steuerung
WiFi AN/AUS/
koppeln
Sound-
Steuerung
Automatischer
Abschalt-Timer
USB-C
Eingang
DE
4

Steuerung und Funktionen
Verbindung mit dem Smart Device
Die komplette Steuerung kann in der Smart Life App angepasst werden.
Stelle sicher, dass Dein mobiles Endgerät mit einem sicheren 2.4GHz Netzwerk verbunden ist und das Dein Bluetooth aktiviert ist.
1. Lade Dir die „Smart Life“ App aus dem App Store oder dem Google Play Store herunter und installiere sie.
2. Öffne die App und tippe auf „Erstellen eines neuen Kontos“ falls Du noch kein Konto besitzt, oder melde dich mit Deinem bestehenden Account an.
3. Schließe die Lampe mit dem mitgelieferten Netzteil an. Sie wechselt automatisch in den Kopplungsmodus (WiFi-Anzeige blinkt Blau).
4. Drücke nun rechts oben in der App auf das Blaue Plus, um das Gerät hinzuzufügen.
5. Die Lampe wurde hier nun erkannt und kann hinzugefügt werden. Drücke nun auf Hinzufügen.
6. Gebe nun das WiFi-Netzwerk, in dass das Gerät eingebunden werden soll, und das dazugehörige Passwort ein.
7. Nach dem erfolgreichen hinzufügen auf Fertigstellen drücken und es erscheint das Hauptmenü des Nachtlichts.
Soundmodus:
Wiederholt kurz drücken: Wechsel durch die 3 Sound-Modi: Natur → Tier → Schlaf.
Sound-Auswahl:
Wiederholt kurz drücken: Wechsel durch die Sounds in jedem Modus: 10 Natur-Sounds / 7 Tier-Sounds / 8 Schlaf-Sounds.
Lautstärke erhöhen:
Wiederholt kurz drücken: Lautstärke schrittweise zu erhöhen (16 Stufen).
Lautstärke verringern:
Wiederholt kurz drücken: Lautstärke schrittweise zu verringern (16 Stufen).
Nachtlicht-Steuerung:
Kurz drücken: Nachtlicht ein- bzw. ausschalten.
2 Sekunden gedrückt halten: Helligkeit stufenlos ändern.
Automatischer Abschalt-Timer:
Wiederholt kurz drücken: Aktivierung des Timers / Einstellung der gewünschten Zeitspanne (30 Min. → 60 Min. → 120 Min. → 240 Min. → abbrechen).
Wenn die Zeit abgelaufen ist, schalten sich Ton, Nachtlicht und Anzeigen automatisch aus.
2 Sekunden gedrückt halten: Der aktivierte Timer wird abgebrochen. Die Timer-Anzeige erlischt.
WiFi-Verbindung:
Kurz drücken: WiFi ein- bzw. ausschalten.
Gedrückt halten: Wechsel in den Koppelungsmodus:
• blau blinkend → koppelnd
• rot leuchtend → Verbindung fehlgeschlagen / offline
• blau leuchtend → verbunden
Wiedergabe / Pause:
Kurz drücken: Wiedergabe oder Pause der Musikfunktion.
M
30´
60´
120´
240´
+
z
z
z
-
M
30´
60´
120´
240´
+
z
z
z
-
M
30´
60´
120´
240´
+
z
z
z
-
M
30´
60´
120´
240´
+
z
z
z
-
M
30´
60´
120´
240´
+
z
z
z
-
WiFi Reset
DE
5

Steuerung per Smart Life App
Die Smart Life App ermöglicht es Dir, das Gerät mithilfe Deines Smart Devices zu steuern und die Steuerung anzupassen.
1
2
3
4
5
6
7
1. Übersicht Nachtlicht:
Hier wird angezeigt welche Nachtlicht-Farbe aktuell eingestellt ist und
welcher Sound gerade abgespielt wird.
2. Modus:
Hier kann aus den 7 voreingestellten Modi mit Licht und Sound aus-
gewählt werden oder 5 persönliche Modi erstellt werden. Persönliche
Modi erstellst Du, indem Du die Modus Funktion ausklappst und dann
auf das runde Plus drückst.
Falls Dir ein Modus nicht mehr gefallen sollten, kannst Du diesen
einfach über das Bearbeiten Symbol entfernen.
3. Geräusche:
Wähle aus einem der 25 vorinstallierten Sounds und Naturgeräusche
aus und steuere die Wiedergabe.
Die Lautstärke kannst Du über den Schieberegler steuern.
4. Licht:
Schalte hier das Licht an und ändere die Helligkeit und Farbe des Lichts.
6. Zeitplan:
In der Funktion Zeitplan kannst Du einstellen, wann das Gerät einge-
schaltet werden soll und welche Funktionen hinterlegt sein sollen.
Somit könntest Du zum Beispiel eine Aufwachroutine erstellen, in der
Dein kleiner Liebling mit Licht und sanften Geräuschen sanft geweckt
wird.
7. Kindersicherung:
Um sicherzustellen, dass nur Du die Funktionen des Gerätes
einstellen oder verändern kannst gibt es die Funktion der
Kindersicherung. Dadurch werden die Gerätetasten deaktiviert.
Diese Funktion kann nur in der App ein- und ausgeschaltet werden.
Achtung! Wenn das Gerät vom Strom getrennt wurde, wird die
Kindersicherung ausgeschalten.
Teilen:
Im Einstellungsmenü des Nachtlichtes kannst Du die Funktion Gerät
Teilen auswählen. Nachdem Du die Schritte befolgt hast, erhältst Du
einen Link, den Du teilen musst. Sobald die Person dann den Link
öffnet, wird diese auch wieder nach den Anmeldedaten gefragt.
Falls diese Person noch kein Konto hat, muss diese zunächst ein
neues Konto erstellen. Danach wird das Nachtlicht automatisch
eingebunden.
Alternativ ist auch eine Anmeldung mit einem Account auf bis zu
200 Geräten möglich, um eine Nutzung von verschiedenen mobilen
Endgeräten zu ermöglichen.
5. Timer:
Der Timer schaltet das Gerät nach der eingestellten Zeit ab.
DE

Problembehebung
Problem Maßnahme
Ich kann nicht in den Kopplungsmodus wechseln
(WiFi-Anzeige blinkt nicht blau).
•Anzeige rot: Halte die WiFi-Taste gedrückt, bis die Anzeige blau blinkt, um manuell in den Kopplungs-
modus zu wechseln.
•Anzeige AUS: Drücke die WiFi-Taste zum Einschalten kurz. Der Wechsel in den Kopplungsmodus
erfolgt automatisch.
Ich erhalten keinen Verifizierungscode. •Stelle sicher, dass Du deine E-Mail-Adresse bei der Anmeldung richtig eingegeben hast.
•Überprüfe, ob die E-Mail auf der Sperrliste steht.
•Erhältst Du auch nach mehreren Versuchen noch keinen Code, kontaktiere bitte den
reer Kunden Service.
Ich kann keine Verbindung zum WiFi-Netzwerk
herstellen/ WiFi-Verbindung instabil.
•Stelle sicher, dass Dein Smart Device mit einem sicheren 2.4GHz Netzwerk verbunden ist.
•Stelle sicher, dass Du das korrekte WiFi-Passwort eingegeben hast.
•Stell die Lampe im Signalbereich des Routers auf.
•Meide Hindernisse wie Metalltüren und Fenster, mehrere Wände etc.
Ich kann meine Lampe nicht mit der Smart Life APP
verbinden.
•Stelle sicher, dass Dein Telefon und Deine Lampe mit demselben sicheren 2.4GHz WiFi-Netzwerk
verbunden sind.
•Befolge die Schritte in „Verbindung mit dem Smart Device“, um es erneut zu probieren.
Kann ich die Lampe auch ohne die APP steuern? •Ja, die App beinhaltete lediglich zusätzliche Funktionen. Die Lampe funktioniert auch ohne
Verbindung mit einem Smartphone perfekt.
Die Lampe leuchtet nicht, nachdem sie
angeschlossen wurde.
•Achte darauf, dass die Lampe an einer passenden Steckdose angeschlossen ist.
•Überprüfe, ob die Lampe eingeschaltet ist.
Das Bedienfeld reagiert nicht. •Bediene die Lampe mit trockenen Händen.
•Trenne die Netzverbindung, um die Lampe neu zu starten.
Datenschutz
Die Datenschutzrichtlinie kannst Du in der Smart Life App unter Einstellungen->Verwaltung der Datenschutzrichtlinien-> Datenschutzrichtlinie einsehen.
Garantie
Bitte Kaufbeleg, Gebrauchsanleitung und Artikelnummer aufbewahren. Gewährleistungsansprüche oder Ansprüche aus Garantieversprechen sind ausschließlich mit
dem Händler abzuwickeln. Alle technischen Daten, Informationen sowie Eigenschaften des in diesem Werk beschriebenen Produktes wurden nach bestem Wissen
zusammengestellt und entsprechen dem Stand bei Veröffentlichung. Die von reer bereitgestellten Informationen sollten korrekt und zuverlässig sein. Die Firma reer
übernimmt dennoch keinerlei Haftung für mögliche Fehler in diesem Dokument und behält sich das Recht vor, ohne vorherige Ankündigung, Änderungen am Produkt-
design beziehungsweise an den Spezifikationen vorzunehmen. Vervielfältigung und Weitergabe von Informationen aus diesem urheberrechtlich geschützten Werk in
irgendeiner Form oder auf irgendeine Weise, grafisch, elektronisch oder mechanisch, durch Fotokopieren, Aufzeichnen auf Band oder Speichern in einem Datenabfrage-
system, auch auszugsweise, bedürfen einer vorherigen schriftlichen Genehmigung der Firma reer.
Hinweis zum Umweltschutz
Dieses Produkt darf am Ende seiner Lebensdauer nicht über den normalen Hausmüll entsorgt werden, sondern muss an einer Sammelstelle für das
Recycling von elektrischen Geräten abgegeben werden. Das Symbol auf dem Produkt, in der Gebrauchsanleitung oder auf der Verpackung weist
darauf hin. Die Werkstoffe sind gemäß ihrer Kennzeichnung wiederverwendbar. Mit der Wiederverwendung, der stofflichen Verwertung oder
anderen Formen der Verwertung von Altgeräten, leisten Sie einen wichtigen Beitrag zum Schutze unserer Umwelt. Bitte fragen Sie bei Ihrer
Gemeindeverwaltung nach der zuständigen Entsorgungsstelle.
Konformitätserklärung
Hiermit erklärt die reer GmbH, dass das Nachtlicht MyMagicSmartLight (Art.Nr.: 52470) der Richtlinie 2014/53/EU entspricht. Der vollständige Text der EU-Konformi-
tätserklärung ist unter der folgenden Internetadresse verfügbar: http://www.reer.de
Reinigung und Wartung
Ziehe immer das Netzteil aus der Netzsteckdose, bevor Du das Gerät reinigst. Verwende ausschließlich ein leicht feuchtes Tuch. Tauche das Gerät nicht ins Wasser.
Benutze keinerlei chemische Reinigungsmittel. Dieses Produkt erfordert keine spezielle Wartung. Reparaturen am Gerät dürfen nur von einem Fachmann durchge-
führt werden.
DE
7

Input 100-240V~50/60Hz
Output 5V/ 600mA max.
Wifi Protokoll IEEE 802.11 b/g/n 2.4GHz
Frequency 2,412~2,484GHz
Bluetooth Standard Bluetooth 4.0
Supported operating systems Android 5.0 or higher
iOS 9.0 or higher
Lumen 145lm ± 10%
Range Unlimited
Cable length 1,50 m
Operating temperature -9°C – +40°C
Technical data
Smart Night Light
Congratulations on the purchase of your new reer MyMagicSmartLight with sounds and lullabies.
Your smart night light can be controlled directly via the device, using a mobile phone app and with various voice assistants such as Alexa. In the app you can create custom
sleep and wake-up schedules and choose from a variety of different light colours. You can also see which sounds your little one is listening
to at any time.
We’re confident you’ll enjoy the quality of our product for a long time to come. Please take a few minutes to read through the safety instructions
carefully. You will only be able to use the MyMagicSmartLight with confidence if all of the points mentioned here have been checked. Please keep the instruction
manual in a safe place for future reference.
Contents
a. MyMagicSmartLight Nachtlicht
b. 5V AC mains adapter
c. USB-C cable
M
30´
60´
120´
240´
+
z
z
z
-
a b c
GB
8

Device description
General safety instructions
!Check the unit for visible damage before each use. If you detect any damage, do not use the unit.
!Only use the supplied chargers and mains adapters. Make sure that the operating voltage of the power outlet matches that of the mains adapter. Check -
especially when travelling abroad - that the local mains voltage matches the voltage specified on the units and/or mains adapters.
!Except for the battery compartment cover, never open the units or mains adapters, as there is a risk of electric shock. If a unit does not work correctly, please do
NOT try to fix the problem yourself. Please contact your dealer in the case of any problems.
!Avoid bringing the battery and/or electrical connection contacts on the units into contact with metal objects.
!This product is not a toy! Do not allow children to play with the unit.
Safety instructions for installation
!The power lead must be secured out of the reach of children to avoid any risk of strangulation. Do not use extension cables.
!DO NOT place the device in the vicinity of radio transceivers or microwaves. Radiant emissions from these devices can significantly affect radio reception.
!Do not use the units near water or in humid places. Do not submerge the units in water.
!Do not rinse the units under running water.
!Avoid extreme heat and direct sunlight
!The socket used for connecting the mains adapter must be located close to the device and kept freely accessible at all times.
!Disconnection from the mains supply is only allowed if the mains adapter is disconnected from the power socket.
!The light source of this light cannot be replaced; when the light source has reached the end of its life, the whole light has to be replaced.
!ONLY use the included USB-C cable and AC power adapter. In order to ensure adequate brightness, make sure that the power adapter has an output of DC5V and
a minimum of 1A.
!DO NOT install or operate near extreme heat sources, moisture or corrosive substances.
!Do not use the light if it has a damaged cable or other damage, or after a malfunction has occurred.
!Always place the night light out of your child’s reach (minimum distance: 1 metre).
!Never place the night light inside the crib, cot or playpen.
M
30´
60´
120´
240´
+
z
z
z
-
WiFi Reset
Night light
control
Wi-Fi ON/OFF/
pair
Sound
control
Automatic
switch-off timer
USB-C
input
GB
9

Control and functions
Connection with a smart device
All of the controls can be customised in the Smart Life app.
Make sure your mobile device is connected to a secure 2.4 GHz network and that Bluetooth is activated.
1. Download and install the Smart Life app from the App Store or Google Play Store.
2. Open the app and select “Create a new account” if you don’t have one already, or sign in with your existing account.
3. Connect the light using the power adapter supplied. It will automatically switch to pairing mode (Wi-Fi indicator flashes blue).
4. Press the blue plus symbol in the upper right corner of the app to add the device.
5. The light has been identified and can now be added. Press “Add”.
6. Enter the Wi-Fi network you would like to connect the device to and enter the Wi-Fi password.
7. After successfully adding the night light, press “Finish” and you will be taken to the night light’s main menu.
Sound mode:
Repeated short press: Switch between the 3 sound modes: Nature →Animal →Sleep.
Sound selection:
Repeated short press: Switch between the sounds in each mode: 10 nature sounds / 7 animal sounds / 8 sleep sounds.
Increase volume:
Repeated short press: Increase volume step by step (16 levels).
Decrease volume:
Repeated short press: Decrease volume step by step (16 levels).
Night light control:
Short press: Switch the night light on or off.
Press and hold for 2 seconds: Change the brightness as desired.
Automatic switch-off timer:
Repeated short press: Activate timer / Set the desired time span (30 min. →60 min. →120 min. →240 min. →cancel). When the time is up, the sound, night
light and display will turn off automatically.
Press and hold for 2 seconds: The activated timer is cancelled. The timer display will turn off.
Wi-Fi connection:
Short press: Switch the Wi-Fi on or off.
Press and hold: Change to pairing mode:
• flashing blue →pairing
• red light →connection failed / offline
• blue light →connected
Play / Pause:
Short press: Play or pause the music function.
M
30´
60´
120´
240´
+
z
z
z
-
M
30´
60´
120´
240´
+
z
z
z
-
M
30´
60´
120´
240´
+
z
z
z
-
M
30´
60´
120´
240´
+
z
z
z
-
M
30´
60´
120´
240´
+
z
z
z
-
WiFi Reset
GB
10

Control via the Smart Life app
The Smart Life app allows you to control the device using your smart device and adjust the control.
1
2
3
4
5
6
7
1. Night light overview:
Here you can see which night light colour is currently set and which
sound is currently playing.
2. Mode:
Here you can choose from the 7 pre-set modes with light and sounds
or create 5 custom modes. You can create personal modes by opening
the mode function and then pressing the round plus symbol .
If you decide that you no longer like a mode, you can easily remove it
by clicking on the edit icon .
3. Sounds:
Choose from one of the 25 pre-installed sounds and nature sound-
scapes and control the playback.
The volume can be controlled with the slider.
4. Light:
Here you can switch on the light and change its brightness and colour.
6. Schedule:
The Schedule function allows you to configure a time for the device
to switch on and which functions are to be stored in the device. For
example, you could set up a wake-up routine that gently wakes your
child with light and soft sounds.
7. Child lock:
The child lock function ensures that only you can set or change the
functions of the device. This deactivates the buttons on the device. This
function can only be switched on and off in the app.
Caution! The child lock will switch off if the device has been
disconnected from the power supply.
Share:
In the settings menu of the night light, you have the option to “Share
device”. After following the steps, you will receive a link to share.
When the other person opens the link, they will be asked for their log-
in data. If this person doesn’t have an account yet, they will first have
to create a new account. Then the night light will be automatically
connected.
Alternatively, it is also possible to log in to a single account on up to
200 devices to enable use from different mobile devices.
5. Timer:
The timer will switch the device off after the set time.
GB

Troubleshooting
Problem Action
I can’t switch to pairing mode
(Wi-Fi indicator is not flashing blue).
•The indicator is red: Press and hold the Wi-Fi button until the indicator flashes blue to manually
switch to pairing mode.
•The indicator is OFF: Press the Wi-Fi button briefly to switch on. It will switch to pairing mode
automatically.
I haven’t received a verification code. •Make sure you entered your email address correctly when you registered.
•Check if the email is in your spam folder.
•If you still haven’t received a code after several attempts, please contact reer customer service.
I can’t connect to the Wi-Fi network / the Wi-Fi
connection is unstable.
•Make sure your smart device is connected to a secure 2.4 GHz network.
•Make sure you have entered the correct Wi-Fi password.
•Set up the lamp within the signal range of the router.
•Avoid obstacles such as metal doors and windows, multiple walls, etc.
I can’t connect my light to the Smart Life app. •Make sure your phone and light are connected to the same secure 2.4 GHz Wi-Fi network.
•Follow the steps outlined in “Connecting to the smart device” to try again.
Can I control the light without the app? •Yes, the app merely offers additional functions. The light also works perfectly without a connection to
a smartphone.
The light does not come on after it has
been connected.
•Make sure that the light is plugged into an appropriate socket.
•Check that the light is switched on.
The control panel is not responding. •Operate the light with dry hands.
•Disconnect the power supply to restart the light.
Privacy
You can read the privacy policy in the Smart Life app under Settings -> Privacy policy management -> Privacy policy.
Warranty
Please retain your receipt, the user manual and item number. Warranty claims or claims from promises of guarantee must be processed by the dealer. The technical
specification, information and characteristics of the product described herein have been compiled to the best of our knowledge and belief and are correct at the time
of printing. Any information provided by reer should be correct and authoritative. Nevertheless, reer does not accept liability for potential errors in this document and
reserves the right to make changes to the product design and/or specifications without prior notice.Reproduction and disclosure of information contained in this copy-
right-protected document, in any form or by any means - graphical, electronic or mechanical by photocopying, recording on tape or storage in a data retrieval system
(even in part), require prior written consent from reer.
Environmental protection
At the end of its useful life, this product must not be disposed of with normal household waste. Owners of old devices have a duty to hand them in
to a collection point for the recycling of electronic devices. Please contact your local council to find out more about an appropriate disposal centre.
It may be possible to hand in small devices with a maximum edge length of less than 25 cm at an electrical retailer. Batteries and battery packs
must be removed from the device before handing it over, provided that this is possible without causing damage, and separately disposed of at a
collection point for batteries and battery packs. The relevant symbol on the product, in the user manual or on the packaging refers to these duties.
Declaration of Conformity
Hiermit erklärt die reer GmbH, dass das Nachtlicht MyMagicSmartLight (Art.Nr.: 52470) der Richtlinie 2014/53/EU entspricht. Der vollständige Text der EU-Konformi-
tätserklärung ist unter der folgenden Internetadresse verfügbar: http://www.reer.de
Cleaning and maintenance
Always disconnect the mains adapters from the wall power socket before cleaning the unit.Only use a slightly dampened cloth. Do not submerge the unit in water.
Do not use chemical detergents.This product does not require any special maintenance. Repairs to the unit must be carried out by skilled personnel only.
GB
12

Input 100-240V~50/60Hz
Output 5V/ 600mA max.
Protocole WiFi IEEE 802.11 b/g/n 2.4GHz
Fréquence 2,412~2,484GHz
Bluetooth Standard Bluetooth 4.0
Systèmes d‘exploitation compatibles Android 5.0 ou plus
iOS 9.0 ou plus
Lumen 145lm ± 10%
Portée Illimitée
Longueur de câble 1,50 m
Température de fonctionnement -9°C – +40°C
Données techniques
Veilleuse Smart
Félicitations pour l‘acquisition de ta nouvelle MyMagicSmartLight reer avec des sons et des berceuses. Tu peux paramétrer ta veilleuse Smart directement
sur l‘appareil, par appli sur téléphone portable et avec différents assistants vocaux comme Alexa. Dans l‘appli, tu peux définir des plannings d‘endormissement
et de réveil personnalisés et faire une sélection parmi plusieurs types de lumières. En plus, tu vois à tout moment quels sons ton enfant entend.
Nous sommes convaincus que tu pourras profiter longtemps de la qualité de notre produit. Prends quelques minutes pour lire attentivement la notice de sécurité.
MyMagicSmartLight ne peut être utilisée sans souci que lorsque les points décrits ci-après sont respectés. Conservez bien ce mode d‘emploi, afin de pouvoir le relire
ultérieurement.
Contenu
a. MyMagicSmartLight Nachtlicht
b. 5V AC bloc d‘alimentation
c. câble USB-C
M
30´
60´
120´
240´
+
z
z
z
-
a b c
FR
13

Description de l‘appareil
Consignes générales de sécurité
!Avant chaque utilisation, contrôle que l’appareil ne présente pas de défaut apparent. Si tu constates un défaut, cet appareil ne doit pas être utilisé.
!Assure-toi que la tension de la prise de courant correspond à celle de l‘adaptateur. Notamment en voyage à l‘étranger, assure-toi que la tension locale corre-
spond à celle qui est mentionnée sur l‘appareil et sur l‘adaptateur.
!L‘appareil et l‘adaptateur ne doivent pas être ouverts, car il y a risque de décharge électrique. Si l‘appareil ne fonctionne pas bien, n‘essaie PAS de régler le
problème par toi-même. Dans ce cas, adresse-toi à un revendeur.
!Évite de toucher les contacts électriques de l’appareil avec des objets métalliques.
!Cet article n’est pas un jouet! Ne laisse pas les enfants jouer avec l’appareil.
Consignes de sécurité concernant l‘installation
!Afin d’éviter que l’enfant ne s’étrangle, conserve le câble hors de sa portée. N‘utilise pas de rallonge.
!NE place PAS le récepteur à proximité d‘appareils radio ou à micro-ondes. Le rayonnement de ces appareils peut compromettre fortement la réception.
!N‘utilise pas les appareils à proximité de l‘eau ou dans des endroits humides. Ne plonge pas l‘appareil dans l‘eau.
!Ne rince pas l‘appareil à l‘eau courante.
!Évite l‘exposition à la chaleur extrême ou aux rayons du soleil.
!La prise électrique pour raccorder l‘adaptateur doit être située à proximité de l‘appareil et être accessible en permanence.
!La séparation du réseau d‘alimentation n‘est garantie que lorsque la prise est débranchée.
!On ne peut pas changer la source lumineuse de cette lampe; lorsque la source lumineuse a atteint sa fin de vie, il faut changer complètement la lampe.
!Utilise UNIQUEMENT le câble USB C et l‘adaptateur AC joints. Pour garantir une luminosité suffisante, assure-toi d‘une puissance de sortie de DC 5V et de 1A
minimum au niveau de l‘adaptateur.
!NE PAS placer ou utiliser à proximité de sources de chaleur externes, d‘humidité, ou de substances corrosives.
!N‘utilise pas la lampe si le câble est endommagé ou en cas d‘autres détériorations, ou après un dysfonctionnement.
!Place toujours la veilleuse hors de portée de l‘enfant (distance minimum 1mètre).
!Ne place jamais la veilleuse dans le lit du bébé ou de l‘enfant ou bien dans le parc pour enfants.
M
30´
60´
120´
240´
+
z
z
z
-
WiFi Reset
Fonctionnement
de la veilleuse
WiFi ON/OFF/
couplage
Gestion
du son
Minuterie
automatique
Entrée
USB-C
FR
14

Paramétrage et fonctions
Connexion avec Smart Device
Le paramétrage complet est modifiable dans l‘appli Smart Life.
Assure-toi que ton terminal mobile est connecté à un réseau 2.4GHz sécurisé et que ton Bluetooth est activé.
1. Télécharge l‘appli «Smart Life» depuis l‘App Store ou le Google Play Store et installe-la.
2. Ouvre l‘appli et tape sur «Création d‘un nouveau compte» si tu n‘as pas encore de compte, ou inscris-toi avec ton compte existant.
3. Raccorde la lampe au bloc d‘alimentation fourni. Elle passe automatiquement en mode couplage (le témoin du WiFi clignote en bleu).
4. Appuie en haut à droite dans l‘appli sur le signe « plus » bleu pour ajouter l‘appareil.
5. La lampe a été identifiée et peut être ajoutée. Appuie maintenant sur Ajouter.
6. Saisis le réseau WiFi sur lequel l‘appareil doit être connecté, ainsi que le mot de passe correspondant.
7. Après l‘ajout, appuie sur Terminer. Le menu principal de la vielleuse s‘affiche.
Mode Sound :
Appuyer brièvement plusieurs fois: passage par le mode 3Son: Nature →Animal →Sommeil.
Choix des sons :
Appuyer brièvement plusieurs fois: passage aux sons de chaque mode: 10sons Nature / 7sons Animal / 8sons Sommeil.
Augmenter le volume :
Appuyer brièvement plusieurs fois: augmenter le volume par paliers (16niveaux).
Réduire le volume :
Appuyer brièvement plusieurs fois: téduire le volume par paliers (16niveaux).
Paramétrage de la veilleuse :
Appuyer brièvement: allumer ou éteindre la veilleuse.
Maintenir appuyé 2secondes : modifier la luminosité en continu.
Minuterie d‘arrêt automatique :
Appuyer brièvement plusieurs fois: activation de la minuterie / Paramétrage de la durée souhaitée (30min. → 60min. →120min. → 240min. → annuler).
Quand le temps est écoulé, le son, la veilleuse et l‘affichache s‘éteignent automatiquement.
Maintenir appuyé 2secondes : la minuterie activée est annulée. L‘affichage de la minuterie s‘éteint.
Connexion WiFi :
Appuyer brièvement : Activer ou désactiver le WiFi.
Maintenir appuyé: Changement de mode de couplage:
• bleu clignotant →en cours de couplage
• rouge fixe →échec de la connexion / hors ligne
• bleu fixe →connecté
Lecture / Pause :
Appuyer brièvement: lecture ou pause de la fonction Musique.
M
30´
60´
120´
240´
+
z
z
z
-
M
30´
60´
120´
240´
+
z
z
z
-
M
30´
60´
120´
240´
+
z
z
z
-
M
30´
60´
120´
240´
+
z
z
z
-
M
30´
60´
120´
240´
+
z
z
z
-
WiFi Reset
FR
15

Gestion par l‘application Smart Life
L‘appli Smart Life te permet de paramétrer l‘appareil au moyen de ton Smart Device et de modifier les paramètres.
1
2
3
4
5
6
7
1. Aperçu veilleuse :
La couleur paramétrée actuellement pour la veilleuse apparaît ici, de
même que le son diffusé actuellement.
2. Mode :
Il est possible de choisir entre 7modes préparamétrés de lumière et de
son, ou entre 5modes personnalisés. Tu crées des modes personnalisés
en ouvrant le mode fonction, puis en appuyant sur le signe « plus »
rond .
Si un mode ne te plaît plus, tu peux le supprimer facilement avec
l‘icone Modifier .
3. Sons :
Sélectionne à partir de 25sons et bruits de la nature préinstallés et
paramètre la diffusion.
Tu peux gérer le volume sonore grâce au curseur.
4. Lumière :
Allume la lumière et modifie intensité et couleur de la lumière.
6. Planning :
Avec la fonction Planning, tu peux paramétrer quand activer l‘appareil
et quelles fonctions enregistrer. Par exemple, tu peux instaurer une
routine de réveil au cours de laquelle ton enfant est réveillé par de la
lumière et des sons doux.
7. Sécurité enfants :
La fonction de sécurité enfant te permet de t‘assurer que tu es seul(e)
en mesure de paramétrer les fonctions de l‘appareil ou de les modifier.
Cette fonction désactive les touches de l‘appareil. Elle ne peut être
activée et désactivée que dans l‘appli.
Attention! Si l‘appareil est débranché, la sécurité enfant est
désactivée.
Partager :
Dans le menu de paramétrage de la veilleuse, tu peux sélectionner la
fonction Partager l‘appareil. Après avoir effectué les étapes, tu reçois
un lien que tu dois partager. Une fois que la personne ouvre le lien,
elle doit indiquer ses données de connexion. Si cette personne n‘a pas
encore de compte, elle doit d‘abord créer un nouveau compte. Ensuite,
la veilleuse est connectée
automatiquement.
Il est aussi possible d‘inscrire jusqu‘à 200appareils avec un seul
compte ce qui permet l’utilisation de différents terminaux mobiles.
5. Minuterie :
La minuterie désactive l‘appareil au bout du temps paramétré.
FR

Résolution des problèmes
Problème Mesures à prendre
Je ne peux pas passer en mode couplage
(le témoin WiFi ne clignote pas en bleu).
•Lumière rouge: Maintiens le bouton WiFi enfoncé jusqu‘à ce que le témoin clignote en bleu, pour
passer manuellement en mode couplage.
•Lumière éteinte: Appuie brièvement sur le bouton WiFi pour l‘allumer. Le passage en mode
couplage est automatique.
Je n‘obtiens pas de code de vérification. •Assure-toi d‘avoir bien saisi ton adresse e-mail au moment de l‘inscription.
•Vérifie si l‘e-mail se trouve dans le dossier des courriers indésirables.
•Après plusieurs tentatives, si tu n‘obtiens pas de code, contacte le service à la clientèle de reer.
Je ne peux pas établir de connexion avec le réseau
WiFi / connexion WiFi instable.
•Assure-toi que ton Smart Device est connecté avec un réseau 2.4GHz sécurisé.
•Assure-toi que tu as saisi le mot de passe WiFi correct.
•Allume la lampe dans le champ du routeur.
•Évite les obstacles comme les portes et les fenêtres métalliques, les cloisons etc.
Je ne peux pas connecter ma lampe avec l‘appli
Smart Life.
•Assure-toi que ton téléphone et ta lampe sont connectés sur le même réseau WiFi 2.4GHz sécurisé.
•Suis les étapes de «Connexion avec le Smart Device»“ pour un nouvel essai.
Est-ce que je peux aussi gérer la lampe sans
l‘appli?
•Oui, l‘appli contient seulement des fonctions supplémentaires. La lampe fonctionne aussi parfaite-
ment sans connexion avec un smartphone.
La lampe ne s‘allume pas après la connexion. •Assure-toi que la lampe est branchée à une prise adaptée.
•Assure-toi que la lampe est allumée.
Le champ de commande ne réagit pas. •Utilise la lampe avec des mains sèches.
•Déconnecte la lampe du réseau pour la redémarrer.
Protection des données
Tu peux voir la directive relative à la protection des données dans l‘appli Smart Life sous Paramètres -> Gestion des directives relatives à la protection des données ->
Directive relative à la protection des données.
Garantie
Veuillez conserver la preuve d‘achat, le mode d‘emploi et le numéro d‘article. Les droits à la garantie ou les réclamations en vertu de la garantie sont à définir
exclusivement avec le commerçant. Les caractéristiques techniques, les informations et les spécificités du produit dans ces pages sont données de bonne foi, et
répondent au stade actuel de la technique. Les informations fournies par reer devraient être correctes et fiables. La société reer ne peut cependant assumer aucune
responsabilité pour les possibles erreurs dans ce document et elle se réserve le droit de procéder, sans préavis, à des modifications du design ou des caractéristiques
du produit. Toute reproduction ou retransmission à tout tiers des informations de ce document, protégé aux termes de la législation sur les droits d‘auteur, sous quelque
forme que ce soit, graphique, électronique ou mécanique, notamment par photocopie, enregistrement sur bande ou stockage dans un système d‘interrogation (même
en extraits) nécessite l‘autorisation préalable par écrit de la société reer.
Informations sur la protection de l‘environnement
À la fin de sa vie, ce produit ne doit pas être jeté avec les ordures ménagères. Les anciens appareils doivent être remis à un centre de collecte pour le
recyclage des appareils électriques. Veuillez vous adresser à l’administration de votre commune pour connaître les centres compétents pour le traitement
des déchets. Les petits appareils ayant une longueur d’arête de max. 25 cm peuvent éventuellement être remis à un magasin d’électronique. Les batteries
et les piles doivent être retirées avant la remise de l’appareil, dans la mesure du possible sans les détruire, et doivent être remises à un centre de
collecte pour les batteries et les piles. Ces obligations sont indiquées par le symbole sur le produit, dans le mode d’emploi ou sur l’emballage.
Déclaration de conformité
La société reer GmbH déclare par la présente que la veilleuse MyMagicSmartLight (n° art.: 52470) est conforme à la directive 2014/53/UE. Le texte intégral de la
déclaration de conformité UE est disponible à l‘adresse suivante: http://www.reer.de.
Nettoyage et entretien
Débranchez toujours l‘appareil du secteur avant de le nettoyer.Utilisez toujours un chiffon légèrement humide. Ne plongez pas l‘appareil dans l‘eau. N‘utilisez pas de
nettoyants chimiques.Ce produit ne nécessite pas de maintenance spéciale. Les réparations de l‘appareil ne doivent être faites que par un spécialiste.
FR
17

Input 100-240V~50/60Hz
Output 5V/ 600mA max.
Protocollo WiFi IEEE 802.11 b/g/n 2.4GHz
Frequenza 2,412~2,484GHz
Standard Bluetooth Bluetooth 4.0
Sistema operativo supportato Android 5.0 o successivi
iOS 9.0 o successivi
Lumen 145lm ± 10%
Copertura Senza limiti
Lunghezza cavo 1,50 m
Temperatura di esercizio -9°C – +40°C
Dati tecnici
Luce notturna intelligente
Ci congratuliamo con te per l’acquisto della tua nuova reer MyMagicSmartLight con suoni e ninne nanne. La luce notturna intelligente è controllabile direttamente
sull’apparecchio, tramite app su cellulare e tramite diversi assistenti vocali come Alexa. Nell’app, è possibile definire piani di sonno e risveglio e scegliere tra numerosi
colori di luce diversi. Inoltre, è possibile vedere in ogni momento quali sound sta ascoltando il piccolino.
Siamo certi che rimarrai soddisfatto/a della qualità del nostro prodotto. Ti preghiamo di prenderti un paio di minuti per leggere attentamente le istruzioni di sicurezza.
Solo se si rispettano tutti i punti qui indicati, la MyMagicSmartLight può essere utilizzata senza preoccupazioni. Conservare con cura le istruzioni di funzionamento per
futura consultazione.
Contenuto
a. MyMagicSmartLight Nachtlicht
b. 5V AC alimentatore
c. cavo USB-C
M
30´
60´
120´
240´
+
z
z
z
-
a b c
IT
18

Descrizione dell‘apparecchio
Avvertenze di sicurezza generali
!Prima di ogni utilizzo, verificare l’eventuale presenza di danni visibili all’apparecchio. Qualora vengano riscontrati danni, l’apparecchio non deve essere utilizzato.
!Assicurarsi che la tensione di esercizio della presa di corrente corrisponda a quella dell’alimentatore. Verificare, soprattutto quando ci si trova in viaggio all’estero,
che la tensione di rete del luogo corrisponda alla tensione indicata sugli apparecchi o sugli alimentatori.
!L’apparecchio e l’alimentatore non devono essere aperti, onde evitare il pericolo di scosse elettriche. In caso di malfunzionamento, NON tentare di risolvere il
problema autonomamente. In tale evenienza raccomandiamo di rivolgersi al proprio rivenditore.
!Evitare che le batterie o i contatti di collegamento elettrico dell’apparecchio entrino in contatto con oggetti metallici.
!Questo prodotto non è un giocattolo! I bambini non devono giocare con l’apparecchio.
Istruzioni di sicurezza per l‘installazione
!Per evitare uno strangolamento con il cavo di alimentazione, assicurarsi che i cavi si trovino al di fuori della portata dei bambini. Non utilizzare prolunghe.
!NON collocare l’apparecchio in prossimità di apparecchi radio o a microonde. L’irradiazione di tali apparecchi può compromettere fortemente la ricezione.
!Non utilizzare l’apparecchio in prossimità di acqua o in luoghi umidi. Non immergere l’apparecchio in acqua.
!Non sciacquare l’apparecchio con acqua corrente.
!Non esporre al calore estremo e ai raggi diretti del sole.
!La presa per il collegamento dell’alimentatore deve trovarsi nei pressi dell’apparecchio e deve essere accessibile in qualsiasi momento.
!Lo scollegamento della rete di alimentazione è garantito solo se l‘alimentatore è staccato dalla presa.
!La sorgente luminosa di questa lampada non può essere sostituita, pertanto, una volta raggiunto il termine della sua durata sarà necessario sostituire
completamente la lampada.
!Utilizzare SOLO il cavo USB-C e l’alimentatore AC in dotazione. Per garantire una buona luminosità, occorre una potenza di uscita di DC5V e un alimentatore di
almeno 1.5A.
!NON posizionare o mettere in funzione in prossimità di fonti di calore, umidità o sostanze corrosive.
!Non utilizzare lampade con cavi danneggiati o altri danni o dopo che si è verificato un malfunzionamento.
!Posizionare sempre la luce notturna fuori dalla portata del bambino (distanza minima di 1 m).
!Non lasciare mai luce notturna nella culla, o nel lettino, o nel box.
M
30´
60´
120´
240´
+
z
z
z
-
WiFi Reset
Comando della
luce notturna
Accoppiare
WiFi ON/OFF/
Comando
del sound
Timer di spegnimento
automatico
Ingresso
USB-C
IT
19

Comando e funzioni
Connessione con il dispositivo smart
I comandi sono personalizzabili nell’app Smart Life.
Accertarsi che il proprio dispositivo mobile sia connesso con una rete sicura a 2.4GHz e che il Bluetooth sia attivato.
1. Scaricare l’app “Smart Life” dall’App Store o da Google Play Store e installarla.
2. Aprire l’app e toccare su “Crea nuovo account” qualora non si disponga di un account o effettuare l’accesso con le proprie credenziali.
3. Collegare la lampada all’alimentatore in dotazione. L’apparecchio passerà automaticamente in modalità di accoppiamento (l’indicatore del WiFi lampeggia in blu).
4. Per aggiungere l’apparecchio, premere ora il Più blu presente nell’app in alto a destra.
5. La lampada è stata ora rilevata e può essere aggiunta. Ora premere su “Aggiungere”.
6. Indicare la rete WiFi con la quale connettere l’apparecchio e inserire la relativa password.
7. Dopo aver aggiunto con successo la luce notturna, premere “Fine” per visualizzare il menu principale dell’apparecchio.
Modalità sound:
Premere ripetutamente per breve tempo: alternanza tra le 3 modalità sound: natura →animali →sonno.
Selezione sound:
Premere ripetutamente per breve tempo: alternanza tra i suoni in ogni modalità: 10 suoni della natura/7 versi di animali/8 suoni per dormire.
Alzare il volume:
Premere ripetutamente per breve tempo: aumento graduale del volume (16 livelli).
Abbassare il volume:
Premere ripetutamente per breve tempo: riduzione graduale del volume (16 livelli).
Comando della luce notturna:
Premere per breve tempo: accensione e spegnimento della luce notturna.
Tenere premuto per 2 secondi: variazione continua della luminosità.
Timer di spegnimento automatico
Premere ripetutamente per breve tempo: attivazione del timer/impostazione del periodo di tempo desiderato (interrompere dopo 30 min. →60 min. →120 min.
→240 min.).
Allo scadere del tempo, suono, luce notturna e indicatori si spengono in automatico.
Tenere premuto per 2 secondi: interruzione del timer attivato. L’indicatore del timer si spegne.
Connessione WiFi
Premere per breve tempo: accensione e spegnimento del WiFi.
Tenere premuto: cambio della modalità di accoppiamento:
• luce lampeggiante blu →in accoppiamento
• luce fissa rossa →connessione fallita/offline
• luce fissa blu →connesso
Riproduzione/Pausa:
Premere per breve tempo: riproduzione o pausa della funzione musica.
M
30´
60´
120´
240´
+
z
z
z
-
M
30´
60´
120´
240´
+
z
z
z
-
M
30´
60´
120´
240´
+
z
z
z
-
M
30´
60´
120´
240´
+
z
z
z
-
M
30´
60´
120´
240´
+
z
z
z
-
WiFi Reset
IT
20
This manual suits for next models
1
Table of contents
Languages:
Other Reer Home Lighting manuals