Regin ALH230A User manual

ALH230A
11071B AUG 15
ALH230A
SW1 SW2
1
2
3
1
2
3
JP1
JP1
JP1
1
2
3
SW1 SW2
R28 R29
MIN MAX
92R82R
XAMNIM
0 V 5 V
1 V
2 V 3 V
4 V
5 V 10 V
6 V
7 V 8 V
9 V
1) 2)
123 4 567 8
110-240 V~
50/60 Hz
L N
OUT
GND
0..10V
V
3 mm
1.
2.
3.
4.
5.
6.
7.
8.
1

ALH230A
11071B AUG 15
INSTRUCTION ALH230A
Room humidity controller
ALH230A is a room humidity controller that controls a 0...10 V
output signal with a proportional algorithm in direct or reverse
action. The output signal is applied to an air handling unit, e.g. a
ventilator such as an EC fan or damper.
Technical data
Supply voltage 110...240 V AC, 50/60 Hz
Power consumption Max. 0.46 W
Operating temperature 0...50°C, 10...90 % RH
(non-condensing)
Outputs 1 analogue output 0...10 V (max. 1 mA)
Working range 0...100 % RH
Manual activation Min. 600 cycles
Automatic activation > 100 000 cycles
Dimensions (WxHxD) 85 x 100 x 30.5 mm
Installation *Wall mounting
Impulse voltage 2,5 kV
Pollution degree 2
Classication of unit Type 1
Protection class IP30
Insulation class Class II
*The unit must be installed exclusively in contact with a wall.
Installation with a spacer that would allow access to the back of the
unit is forbidden.
Installation
Place the device in a location that has a temperature representative
for the room. A suitable location is approx. 1.6 m above oor level in
a place with unobstructed air circulation. To remove the front cover,
use a 3 mm atblade screwdriver to depress the locking tongue in
the lower part of the casing (picture 1). Press and twist the screw-
driver, and at the same time pull the bottom part of the front outwards
(pictures 2-4). When the bottom end of the front cover is free from
the bottom part of the casing, slide the cover towards the top of the
casing to free the hooks holding the upper edge of the front cover
(picture 5). Perform the connections according to electrical wiring
diagram. Cables must be xed using the 2 cable ties supplied as indi-
cated in picture 6. Screw the bottom part of the casing to the wall.
Disconnection
ALH230A should be connected to a switch or circuit breaker in the
building installation. This switch should be in close proximity to the
controller and within easy reach of the operator, and should be
marked as the disconnecting device for the equipment.
Always use the circuit breaker to disconnect the controller from the
mains supply during maintenance of the EC fan or damper.
Settings
The direction of the output signal is set using the JP1 jumper
(picture 8):
SW1: Humidity setpoint (20...90 % RH)
SW2: Humidity proportional band (5...50 % RH)
JP1 closed 1-2: Humidication
JP1 closed 2-3: Dehumidication
R28: EC fan min. limit speed
R29: EC fan max. limit speed
The humidity setpoint is set using rotary switch SW1:
SW1 01234567
Setpoint
(% RH) 20 25 30 35 40 45 50 55
SW1 8 9 A B C D E F
Setpoint
(% RH) 60 65 70 75 80 85 90 90
The proportional band is set using rotary switch SW2:
SW2 01234567
P-band
(% RH) 5 10 15 20 25 30 35 40
SW2 8 9 A B C D E F
P-band
(% RH) 45 50 50 50 50 50 50 50
The range of the voltage applied to the ventilator is dened using
the MIN and MAX knobs. MIN is used to dene the minimum ap-
plicable voltage to the ventilator (0...5 V), while MAX denes the
maximum voltage (5...10 V). The PI controller will then operate
between the relevant MIN and MAX values.
Example 1:
If the MIN value is set to the minimum position and MAX to the
maximum position, the PI controller will work from 0...10 V.
Example 2:
If MIN is set to 2 V and MAX is set to 7 V, the PI controller works
from 2 to 7 V.
Low Voltage Directive (LVD) standards
This product conforms to the requirements of the European Low
Voltage Directive (LVD) 2006/95/EC through product standard
EN 60730-1.
EMC emissions & immunity standards
This product conforms to the requirements of the EMC Directive
2004/108/EC through product standards EN 61000-6-1,
EN 61000-6-3, EN60730-1 and EN 60730-2-13.
RoHS
This product conforms to the Directive 2011/65/EU of the European
Parliament and of the Council.
Contact
AB Regin, Box 116, 428 22 Kållered, Sweden
Tel: +46 31 720 02 00, Fax: +46 31 720 02 50
www.regincontrols.se, [email protected]
2
i
Read this instruction before installation and wiring of the
product. Subject to change without notice.
Consult documentation in all cases where this symbol is
used, in order to nd out the nature of the potentional
hazards and any actions to be taken. All installation,
setting or maintenance of this unit must be performed with the
supply voltage switched off and without any external loads on the
unit! These operations should only be carried out by skilled
workers. The manufacturer is not responsible for any damages
caused by inadequate skills during installation and/or by any safety
devices having been removed or tampered with.
EN

ALH230A
11071B AUG 15
Installation
Montera enheten på en plats med en för rummet representativ tem-
peratur. Lämplig placering är ca 1,6 m över golvet, utan omgivande
hinder för luftcirkulation. Tag av locket genom att med en 3 mm bred
skruvmejsel trycka in plasttungan i kåpans nedre gavel (bild 1).
Tryck in och vrid om skruvmejseln och dra samtidigt locket lite utåt
(bild 2-4). När lockets nedre del lossnat från botten, skjut locket i rik-
tning mot den övre delen för att lossa på hakarna i lockets övre ände
(bild 5). Koppla in enheten enligt inkopplingsdiagrammet.Kablarna
måste xeras med de 2 medföljande buntbanden (bild 6). Skruva
fast enheten i väggen.
Frånskiljning
ALH230A ska kopplas till en säkerhetsbrytare/arbetsbrytare i byg-
gnaden där den installerats. Denna brytare ska monteras i regu-
latorns närhet och lätt kunna nås av operatören. Den ska tydligt
märkas som brytare för enheten. ALH230A måste alltid göras spän-
ningslös vid underhåll på EC-äkt eller spjäll.
Inställningar
Utsignalens verkan ställs in via bygeln JP1 (bild 8):
SW1: Börvärde luftfuktighet (20...90 % RH)
SW2: P-band för luftfuktighet (5...50 % RH)
JP1 sluten 1-2: Befuktning
JP1 sluten 2-3: Avfuktning
R28: EC-äkthastighet, minbegränsning
R29: EC-äkthastighet, maxbegränsning
Börvärdet för luftfuktighet ställs in via vridomkopplaren SW1:
SW1 01234567
Börvärde
(% RH) 20 25 30 35 40 45 50 55
SW1 8 9 A B C D E F
Börvärde
(% RH)
60 65 70 75 80 85 90 90
P-bandet ställs in via vridomkopplaren SW2:
SW2 01234567
P-band
(% RH) 5 10 15 20 25 30 35 40
SW1 8 9 A B C D E F
P-band
(% RH)
45 50 50 50 50 50 50 50
INSTRUKTION ALH230A
i
SV
Rumsregulator för luftfuktighet
ALH230A är en rumsregulator för bruk inom lufthantering eller
behovsstyrd ventilation. Den styr en 0...10 V utsignal med
PI-algoritm med direkt eller omvänd verkan. Utsignalen matas till
ett luftbehandlingsaggregat, t.ex. en EC-äkt eller ett spjäll.
Tekniska data
Matningsspänning 110...240 V AC, 50/60 Hz
Strömförbrukning Max. 0,46 W
Drifttemperatur 0...50°C, 10...90 % RH
(icke-kondenserande)
Utgångar 1 analog utgång 0...10 V (max. 1 mA)
Mätområde 0...100 % RH
Manuell aktivering Min. 600 cykler
Automatisk aktivering > 100.000 cykler
Dimensioner (BxHxD) 85 x 100 x 30,5 mm
Installation *Väggmontage
Stötspänning 2,5 kV
Nedsmutsningsgrad 2
Klassicering av enhet Typ 1
Skyddsklass IP30
Isoleringssklass Klass II
*Enheten måste installeras på en vägg. Installation med distans som
ger åtkomst till enhetens baksida är förbjuden.
Läs denna instruktion innan produkten monteras och
ansluts. Kan ändras utan föregående notis.
Följ alltid de anvisade säkerhetsföreskrifterna i
dokumentationen för att förebygga risken för brand, elstöt
och personskador Installation eller underhåll av denna
enhet får endast utföras då enheten ej är spänningssatt! Arbetet
ska endast utföras av utbildad personal. Tillverkaren är inte på
något sätt ansvarig för eventuella skador som kan uppkomma
p.g.a. bristande kompetens eller färdighet under installationen,
eller på grund av att installatören tagit bort eller gjort ändringar i
enhetens inbyggda säkerhetsmekanismer.
Det spänningsintervall som ska gälla för äkten anges med MIN-
och MAX-rattarna. MIN används för att ange minsta möjliga spän-
ning till äkten (0...5 V), medan MAX anger maxspänningen
(5...10 V). PI-regulatorn kommer därefter att arbeta mellan de
inställda MIN- och MAX-värdena.
Exempel 1:
Om MIN-värdet ställs till minimum och MAX till sitt högsta möjliga
värde kommer PI-regulatorn att arbeta mellan 0...10 V.
Exempel 2:
Om MIN ställs till 2 V och MAX till 7 V kommer PI-regulatorn att
arbeta mellan 2...7 V.
LVD, lågspänningsdirektivet
Produkten uppfyller kraven i det europeiska lågspänningsdirektivet
(LVD) 2006/95/EG genom produktstandard EN 60730-1.
EMC emissions- och immunitetsstandard
Produkten uppfyller kraven i EMC-direktivet 2004/108/EG genom
produktstandard EN 60730-1, EN 61000-6-1, EN 61000-6-3 och
EN 60730-2-13.
RoHS
Produkten uppfyller Europaparlamentets och rådets direktiv
2011/65/EU.
Teknisk support
Teknisk hjälp och råd på telefon: 031 720 02 30
Kontakt
AB Regin, Box 116, 428 22 Kållered
Tel: +46 31 720 02 00, Fax: +46 31 720 02 50
www.regin.se, [email protected]
3

ALH230A
11071B AUG 15
ANLEITUNG ALH230A
Raumfeuchteregler
Der ALH230A ist ein Raumtemperaturregler, der einen Ausgang
von 0...10 V mit einem PI-Algorithmus in normaler oder invertierter
Wirkungsweise regelt. Das Ausgangssignal gilt für eine Lüftungs-
anlage, wie z. B. ein Ventilator in Form eines EC-Ventilators oder
einer Klappe.
Technische Daten
Versorgungsspannung 110...240 V AC, 50/60 Hz
Leistungsaufnahme Max. 0,46 W
Betriebstemperatur 0...50 °C, 10...90 % rel. F.
(nicht kondensierend)
Ausgänge 1 Analogausgang 0...10 V (max. 1 mA)
Arbeitsbereich 0...100 % rel. F.
Manuelle Aktivierung Min. 600 Zyklen
Automatische Aktivierung > 100 000 Zyklen
Maße (B x H x T) 85 x 100 x 30,5 mm
Montage *Wandmontage
Impulsspannung 2,5 kV
Schadstoffbelastungsgrad 2
Klassizierungen
des Reglers Typ 1
Schutzart IP30
Isolierklasse Klasse 2
*Der Regler muss unbedingt mit Wandkontakt montiert werden.
Es ist verboten, den Regler mit einem Abstandshalter zu montie-
ren, um Zugang zur Reglerrückseite zu gewähren.
Montage
Der Regler muss an einem Ort montiert werden, an dem die Tem-
peratur für den ganzen Raum repräsentativ ist. Eine geeigneter Ort
dafür wäre in ca. 1,6 m Höhe über dem Boden an einer Stelle mit
ungehinderter Luftzirkulation. Benutzen Sie zum Entfernen der Front-
abdeckung einen Schlitzschraubendreher (3 mm), um die Rastzunge
im Gehäuseunterteil herunterzudrücken (Abbildung 1). Drücken und
Drehen Sie den Schraubendreher und ziehen Sie gleichzeitig dabei
das Unterteil der Frontabdeckung nach außen (Abbildungen 2 – 4).
Wenn das Unterteil der Frontabdeckung vom Unterteil des Gehäu-
ses gelöst wurde, muss die Abdeckung Richtung Gehäuseoberteil
geschoben werden, um sie aus den oberen Befestigungshaken zu
lösen (Abbildung 5). Führen Sie die Anschlüsse dem elektrischen
Schaltplan entsprechend aus. Die Kabel müssen mit den beiden mit-
gelieferten Kabelbindern befestigt werden (Abbildung 6). Schrauben
Sie das Gehäuseunterteil an die Wand.
Netztrennung
Der ALH230A muss bei Montage an einen Schutzschalter oder eine
Sicherung angeschlossen werden. Dieser Schalter bzw. diese Siche-
rung muss sich in unmittelbarer Nähe des Reglers benden, leicht
zugänglich und als Trennschalter für die Anlage gekennzeichnet sein.
Bei Wartungsarbeiten an EC-Ventilator oder Klappe ist der Regler
grundsätzlich mit Hilfe des Schutzschalters von der Versorgungs-
spannung zu trennen.
Einstellungen
Die Richtung des Ausgangssignals wird über die Brücke JP1 einge-
stellt
(Abbildung 8):
SW1: Sollwert Feuchte (20...90 % rel. F.)
SW2: Proportionalbereich Feuchte (5...50 % rel. F.)
JP1, 1-2 geschlossen: Befeuchtung
JP1, 2-3 geschlossen: Entfeuchtung
R28: Untergrenze für EC-Ventilator
R29: Obergrenze für EC-Ventilator
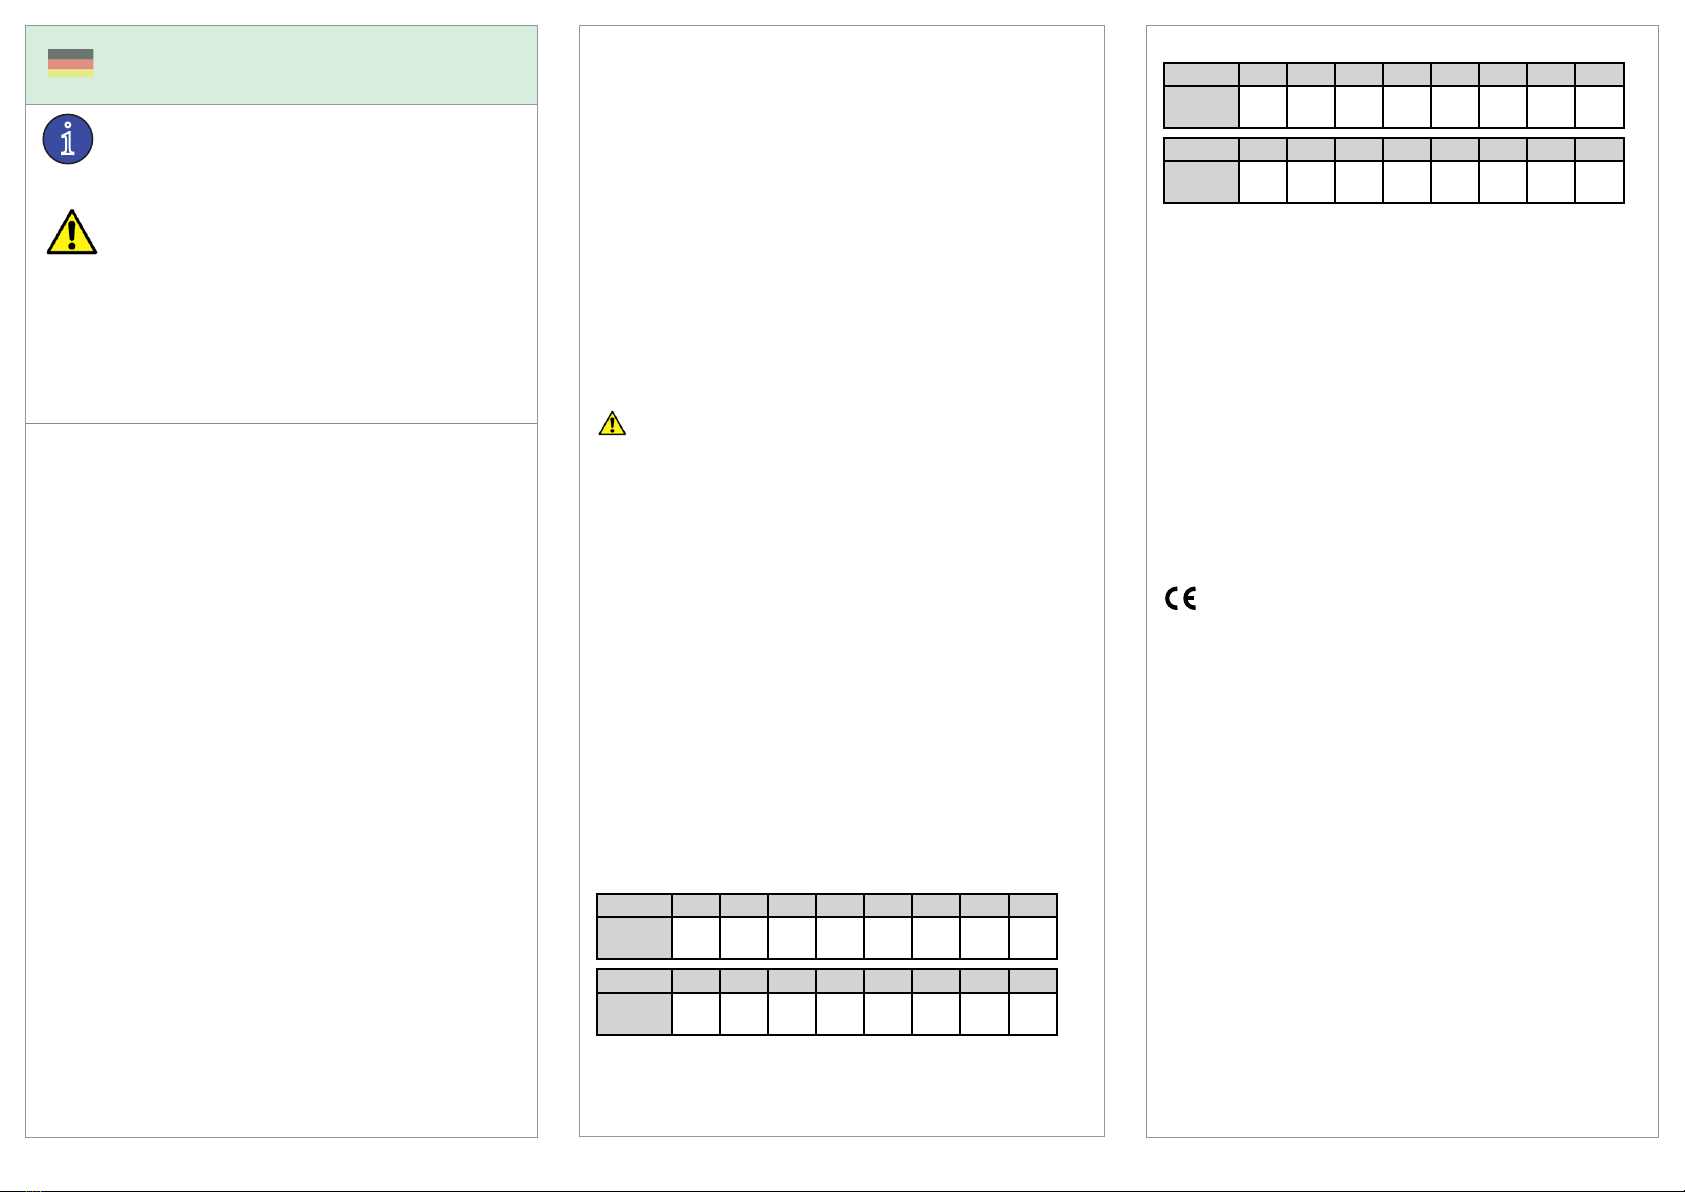
Der Feuchtesollwert wird mit dem Drehschalter SW1 eingestellt:
SW1 01234567
Sollwert
(% rel. F.) 20 25 30 35 40 45 50 55
SW1 8 9 A B C D E F
Sollwert
(% rel. F.) 60 65 70 75 80 85 90 90
Der Proportionalbereich wird mit dem Drehschalter SW2 eingestellt:
SW2 01234567
P-Band
(% rel. F.) 5 10 15 20 25 30 35 40
SW2 8 9 A B C D E F
P-Band
(% rel. F.) 45 50 50 50 50 50 50 50
Der Spannungsbereich für den Ventilator wird mit den Drehknöpfen
MIN und MAX eingestellt. MIN wird verwendet, um die Mindest-
spannung zu denieren, die an den Ventilator angelegt wird
(0...5 V) und mit MAX wird die entsprechende Höchstspannung
deniert (5...10 V). Der PI-Regler wird dann in dem Bereich des
eingestellten Werts für MIN bzw. MAX betrieben.
Beispiel 1:
Wenn der MIN-Wert auf die niedrigste Stufe und der MAX-Wert
auf die höchste Stufe eingestellt wurde, arbeitet der PI-Regler
in einem Bereich von 0...10 V.
Beispiel 2:
Wenn MIN auf 2 V und MAX auf 7 V eingestellt wurde, arbeitet
der PI-Regler in einem Bereich von 2...7 V.
Niederspannungsrichtlinie (LVD)
Dieses Produkt entspricht den Anforderungen der
Niederspannungsrichtlinie 2006/95/EG (LVD) durch
Erfüllung der Norm EN 60730-1.
Elektromagnetische Verträglichkeit (EMV)
Dieses Produkt entspricht den Anforderungen der EMV-Richtlinie
2004/108/EG durch Erfüllung der Normen EN 61000-6-1,
EN 61000-6-3, EN60730-1 und EN 60730-2-13.
RoHS
Dieses Produkt entspricht den Anforderungen
der Richtlinie 2011/65/EU des Europäischen Parlamentes
und des Europäischen Rats.
Kontakt
Regin Controls Deutschland GmbH
Telefon: +49 30 77 99 40
Internet: www.regincontrols.de
E-Mail: [email protected]
i
Lesen Sie diese Montageanleitung vor Installation und
Verdrahtung des Produktes bitte durch. Änderungen der
Informationen in diesem Dokument sind vorbehalten.
Dieses Symbol macht auf eventuelle Gefahren bei der
Handhabung des Produktes sowie auf in der Dokumenta-
tion nachzulesende Maßnahmen aufmerksam. Alle
Installationen, Einstellungen oder Wartungsarb
eiten an diesem Produkt dürfen nur bei ausgeschalteter Versor-
gungsspannung und ohne externe Lasten vorgenommen werden!
Diese Tätigkeiten dürfen nur von Fachkräften durchgeführt werden.
Der Hersteller haftet nicht für Schäden, die durch mangelnde Fach-
kenntnisse bei der Installation und/oder Sicherheitsvorkehrungen,
die entfernt oder manipuliert wurden, verursacht werden.
DE
4
Table of contents
Languages: