manuals.online logo
Brands
  1. Home
  2. •
  3. Brands
  4. •
  5. Regis
  6. •
  7. Indoor Furnishing
  8. •
  9. Regis Calibre User manual

Regis Calibre User manual

Regis Calibre
INSTRUCTIONS
INSTRUCTIONSDOOR FITTING
1. Begin by opening the drawer and removing all
items from inside. Pull back the dark grey cover clips
on the support arm to reveal the thread.
4. Place the released drawer on the ground with the
drawer clips facing up. Bend the clips 90o to release
tension and remove.
5. Fitting a New Door
Keep the fitting clips from the previous door. Your new door
may not come pre-drilled so you will have to:
•Use the previous door front to measure location of holes.
• Mark the new drawer front.
• Drill to 10mm deep.
• Insert clips and unfold to lock them in place.
Now repeat the previous steps in reverse to fit your new door.
2. Twist the support arms Anti-Clockwise to loosen
the support from the door. Locate and remove the
dark grey cover caps from the side of the drawer.
3. Using a posidrive screwdriver, insert screwdriver
into the area shown above and twist 90oaway from
the door panel. This will now release the door panel.
6. Shelf installation
This is done in the same way you
would join a kitchen unit, clamp
and screw to the main cabinet
either with correct size wood
screws or joining bolts.
INSTRUCTIONS
1. Locate and insert the Mounting Bracket (if not already in place). Make
sure the Hanger is facing the wall side as displayed in the second image.
Once in position, lever down the Unit Lock to secure the Mounting Bracket
as shown in the third image.
2. Measure the position for the wall hangers and
screw into position. Place the Mounting Bracket
hangers onto both the Wall Hangers as shown
here (right).
3. Now tighten the Hanger first and then the red
Clamp by turning both clockwise. Once both are
tight, there should be no movement.
The adjustment screw can be used to lower or
heighten the unit by 10mm.
Hanger
Clamp
Unit Inserts
Bend to Snap
As Supplied
Unit Lock
Adjustment
Mounting Bracket
Wall Hangers
UNIT MOUNTING
INSTRUCTIONS
• On receipt of any product, ensure that the product is unboxed carefully and inspected
for damages or defects, within one day. In the unlikely event that the product is
damaged please report this to retailer. Under no circumstance should the product be
installed.
• Do not carry units by their struts/rails.
• Do not compress carcasses or other items up against walls as this may aect the door or
draw opening action.
• Avoid the use of strong adhesive tapes, to prevent damage to the laminated surface.
• The manufacturer assumes that the product is being installed by a competent
professional. We may ask for the evidence of this.
• The manufacturer assumes that the product is being installed on reasonable level floors
and walls. If this is not the case, it is expected the product may not perform optimally.
• Steps must be taken to ensure the product is secured to a suitable surface, i.e. a stud
with noggins placed for fixings.
• Glass Warning: Do not strike glass components with hard or pointed items. Do not
place very hot or very cold items against or in close proximity to glass surfaces unless
an adequately thick insulation material is used to prevent such items coming in contact
with the glass. If a glass component becomes chipped or broken, replace immediately.
• Beware of hidden pipes and cables.
• Ensure appropriate PPE is warn.
• Never overload shelves or carcass.
• This furniture is designed for domestic environments only. These environments must be
suitably ventilated using an extractor fan, of the appropriate size for the room, which
has an overrun function.
• MDF or MFC based bathroom furniture must never be installed close to an un-
enclosed shower, or in a wetroom environment with any risk water will come into
contact with the product.
• Any cut panel edges must be sealed with a good quality PVA, or silicone based sealant,
especially the rear edge of any trimmed worktops or abutments to basins. Failure to do
this will invalidate the guarantee.
• All points where worktops or furniture abut walls, floors or basins should be sealed with a
bead of silicone to prevent capillary action causing water ingress into the units.
• Any and all spillages must be immediately cleaned and dried to prevent water ingress
from occurring.
• Ensure any WC installed to the laminate is fully secured to the floor to prevent the WC
from pulling up the veneer.
• Damage caused by water ingress will not be classified as a manufacturing defect as a
combination of all the preventative measures, will result in the product lasting a lifetime.
Important Information
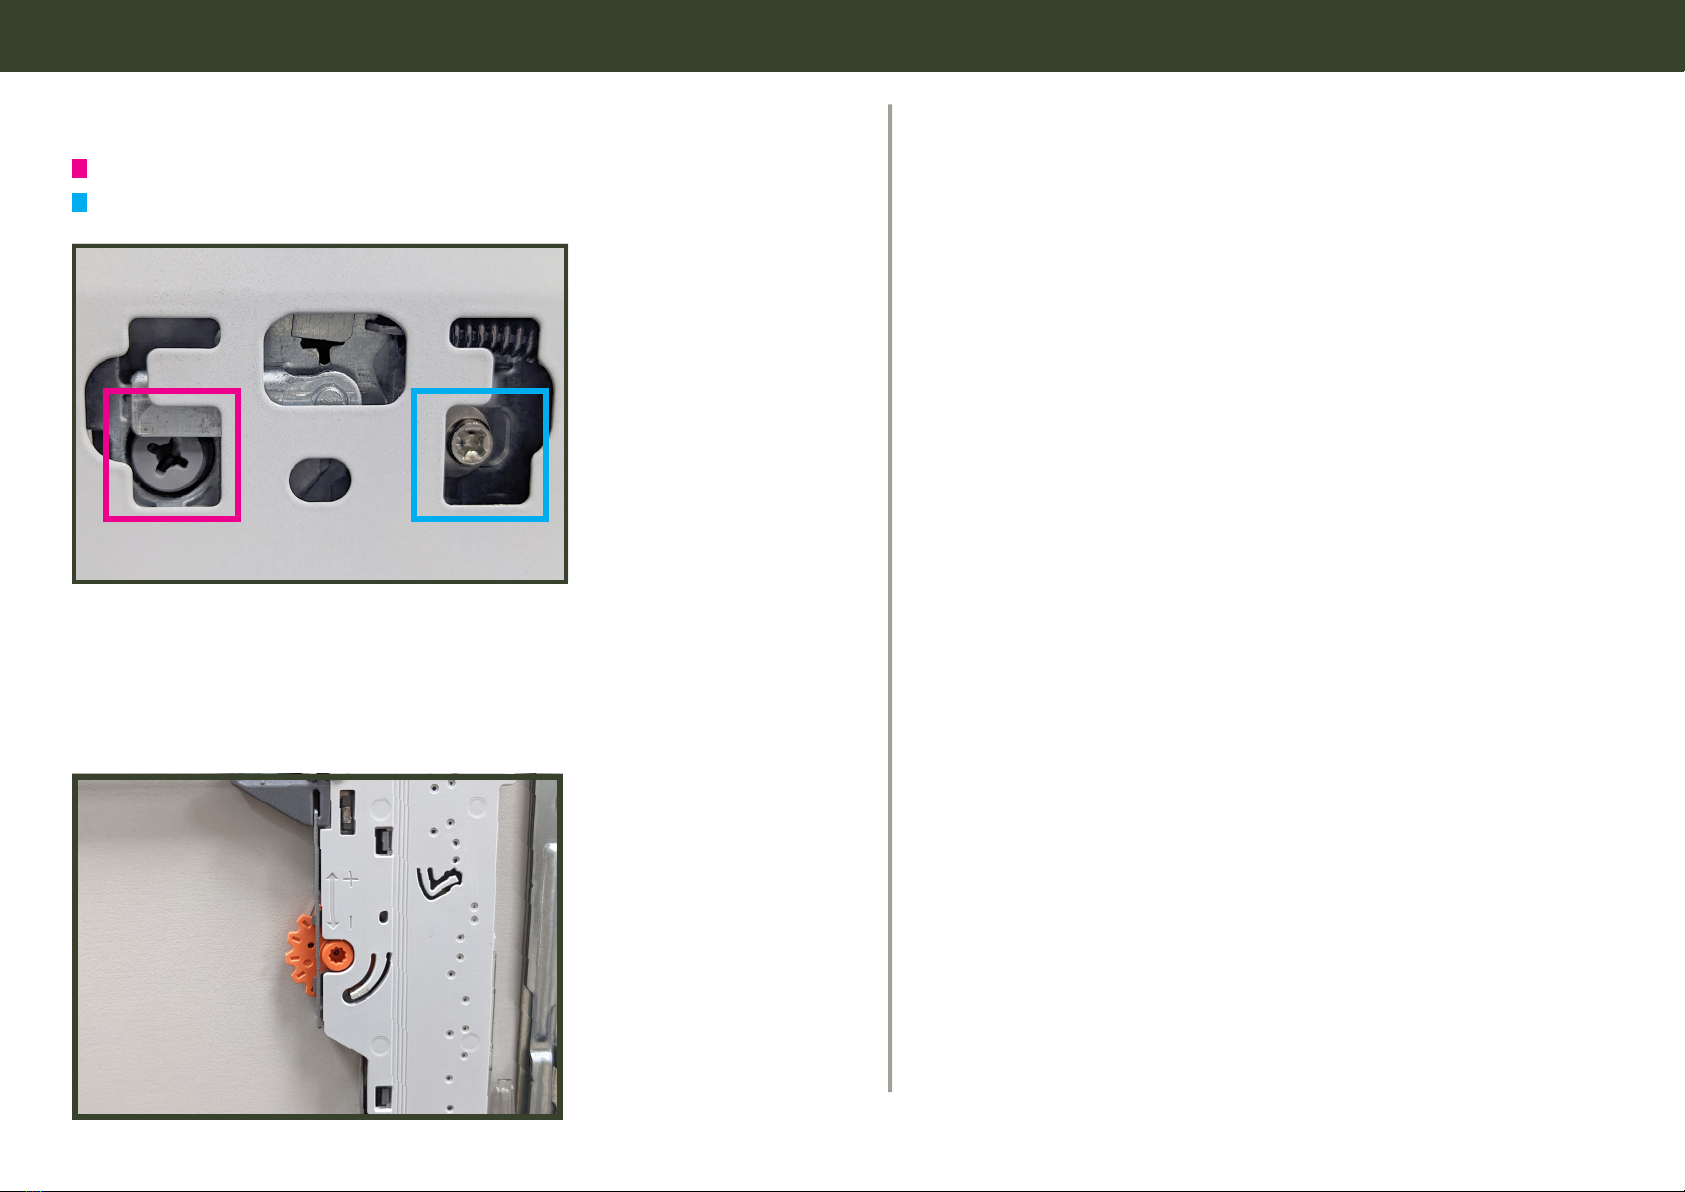
Cam adjustment to raise and lower the drawer box
Adjust drawer front left and right
Soft Close and Push Release Adjustment:
This can be adjusted by turning the orange wheel.
Notice the direction of the positive and negative
rotation next to the wheel.
DRAW ADJUSTMENT

Popular Indoor Furnishing manuals by other brands

Regency LWMS3015 Assembly instructions

Regency

Regency LWMS3015 Assembly instructions

Furniture of America CM7751C Assembly instructions

Furniture of America

Furniture of America CM7751C Assembly instructions

Safavieh Furniture Estella CNS5731 manual

Safavieh Furniture

Safavieh Furniture Estella CNS5731 manual

PLACES OF STYLE Ovalfuss Assembly instruction

PLACES OF STYLE

PLACES OF STYLE Ovalfuss Assembly instruction

Trasman 1138 Bo1 Assembly manual

Trasman

Trasman 1138 Bo1 Assembly manual

Costway JV10856 manual

Costway

Costway JV10856 manual

moss DESIGN Caisson Credenza Assembly instructions

moss DESIGN

moss DESIGN Caisson Credenza Assembly instructions

Aquaglide FULL DECK 15.0 owner's manual

Aquaglide

Aquaglide FULL DECK 15.0 owner's manual

AREBOS AR-HE-SW30 user manual

AREBOS

AREBOS AR-HE-SW30 user manual

Till-Hilft Fulda 87005.330 Assembly instructions

Till-Hilft

Till-Hilft Fulda 87005.330 Assembly instructions

Twoey Outside 2010 quick start guide

Twoey Outside

Twoey Outside 2010 quick start guide

Hettich Easys 200 operating instructions

Hettich

Hettich Easys 200 operating instructions

The bedboss RELAX 404 Series owner's manual

The bedboss

The bedboss RELAX 404 Series owner's manual

Oeseder Möbelindustrie Bern 991 720 Assembly instructions

Oeseder Möbelindustrie

Oeseder Möbelindustrie Bern 991 720 Assembly instructions

Costway HW68469 user manual

Costway

Costway HW68469 user manual

Next ALIX A27743 Assembly instructions

Next

Next ALIX A27743 Assembly instructions

BROSA Hans Assembly guide

BROSA

BROSA Hans Assembly guide

Prodigg MINIKA PBA015T-FUR installation manual

Prodigg

Prodigg MINIKA PBA015T-FUR installation manual

manuals.online logo
manuals.online logoBrands
  • About & Mission
  • Contact us
  • Privacy Policy
  • Terms and Conditions

Copyright 2025 Manuals.Online. All Rights Reserved.