Renegade Hoof Boots User manual

P a g e | 1
Renegade® Hoof Boots:
For the Barefoot Performance Horse
Riders who are using Renegade® Hoof Boots are discovering an
unparalleled world of design, function, ease of use, and performance.
Renegade® Hoof Boots are proudly made in the USA!
Easy On/Easy Off: Renegades are designed to stay secure in even the
toughest conditions, but are still easy to install and remove.
No Rubbing: The innovative pivoting Heel Captivator moves with the heel
bulbs to eliminate rubbing and accommodates the bio-mechanics of the
hoof and leg structure, allowing for natural flexion of both the hoof and the
pastern.
The boot is comprised of a high-tech polymer compound that is extremely
durable and designed to provide grip and traction on a variety of
surfaces. It is designed for a hoof trimmed in a natural barefoot style,
featuring a short toe, low heels, and mustang roll on the wall. The
Renegade® is ideal for high-performance equine sports. They’re extremely
popular with endurance riders and trail riders, and are also being used with
success in a variety of other disciplines. They are available in seven sizes
and eight different colors.
CONTACT US
Local: 928-692-2668
Toll Free: 888-817-4794
Fax: 928-263-6321
sales@renegadehoofboots.com
Lander Industries Inc.
11361 N Classical DR
Kingman, AZ 86401

P a g e | 2
Limited Warranty
To ease the stress for first time customers selecting a size, we have a 15
day exchange for another size policy, even if you’ve ridden in them a few
times. 90 days warranty against manufacturing defects. 30 days
satisfaction guarantee or your money back, provided you first contact us to
help you be successful and you provide photos of the boots installed on the
horse as ready to ride so we can evaluate the fit and installation. The Heel
Captivator is warranted for life, even if your dog chews on it.
Due to conditions beyond our control, there is no warranty for tread wear. A
properly-moving horse which lands heel first can expect from 300 to 600
miles out of the tread. This will vary depending upon the way the horse
moves, the type of terrain ridden upon and the speed traveled thereto.
If your horse lands toe first or toe heavy, you may experience significantly
less mileage in the toe region and more wear and tear on the boot
structure. A horse should not be moving in this manner and as such, there
is no warranty for tread wear and no warranty for structural damage caused
by a toe first landing.
Proper Hoof Conformation for Renegade® Boots
The Renegade®Hoof Boot was specifically designed for hooves which are
maintained with a “natural style” trim appreciating naturally low heel
heights, a naturally short toe, and a natural “mustang roll”.
Natural heel height is often deemed to be “low” when compared to what is
the norm for traditionally modern hoof-care practice. An example of a heel
within the range of “natural” is shown below.

P a g e | 5
The lower heel has taken the excess pressure off the sidewalls.
A side-by-side comparison of the two hooves;
High heels at left and naturally-trimmed low heels at right
The high-heeled hoof form often
Results in less than optimal BOOT performance.
If your horse exhibits high heels, you can expect problems with boot
retention, increased wear and tear on the cables, and increased tread wear
at the toe as a result of forward-shifted weight-bearing and a lack of a
proper heel first landing.
The high-heeled hoof form often
Results in less than optimal HORSE performance.
It should also be noted that the high-heeled hoof form and its often-
associated steep pastern angles greatly reduces the length of stride and
diminishes the leg column’s ability to properly suspend the weight of the
horse and absorb shock, which may lead to a shorter useful competitive life
of the horse.
If your horse has high heels, what should you do?
The two hooves shown in the above examples are actually the very same
hoof, with the photos taken right before and right after a natural trim with
considerable heel reduction! Through proper trimming practices, most high-
heeled horses can achieve a lower and more natural hoof form.
Sometimes the horse may have only one high heel (usually the right fore),

P a g e | 6
either an example of “high-low syndrome” or a “club foot”. These horses
will usually require the horse owner to perform interim heel maintenance in
order to keep the heel height in check between regular trims. Consult with
your hoof care professional for further advice.
How to Measure and Size for Renegade® Hoof Boots
Hoof Width is the distance measured at the widest point of the hoof.
Hoof Length is the distance measured from the toe to the rearmost point
of weight bearing (colored line above).
Boot Width >Hoof Width AND Boot Length >Hoof Length (here, >means
greater than).
Directly below are tables depicting Renegade®Hoof Boot sizes and their
corresponding boot dimensions, not to be confused with hoof dimensions.

P a g e | 7
Renegade®Hoof Boot Sizing Chart
English Metric
Boot Size
Boot Width
Boot Length
00
4 3/16"
4 3/4"
0
4 9/16"
5"
1
4 3/4"
5 1/4"
2
5"
5 1/2"
2W
5 1/4"
5 1/2"
2WW
5 1/2"
5 1/2"
4WW
6"
6"
Boot Size
Boot Width
Boot Length
00
106.5mm
120.5mm
0
116mm
127mm
1
121mm
134mm
2
127mm
140mm
2W
133mm
140mm
2WW
140mm
140mm
4WW
152mm
152mm
If you have any questions on sizing, please contact us and we’ll be happy
to assist you in making sure you get the proper size.
If there does not appear to be an exact size match but the measurements
are in the range of our sizes, contact us anyway; we might be able to
customize at no extra cost.
Step 1: Width
The best time to measure hooves for boots is when the given horse gets a
“natural” trim featuring a low heel, a short toe and a mustang roll. The
mustang roll is important because the inside corners of the Renegade® are
“filleted” or rounded to accept the shape of the rounded hoof wall edge
(mustang roll). Taking measurements at the event of a trim will allow us to
size the hoof before and after the trim. This way we can determine the full
range of growth. However, one set of measurements taken soon after a
recent would suffice.
If, after trimming, your horse has squared off and sharp hoof wall edges,
the boot will not to fit properly, which may lead to boot instability. Sharp

P a g e | 8
hoof wall edges are exactly that…SHARP…and can cut the flesh of
opposing legs, damage the hoof boots, and are more prone to
chipping. Ask your farrier to perform a proper mustang roll or at the very
least, rasp the sharp edge off with a simple bevel shape. Take note that the
mustang roll should go all the way to the heels. The hoof in the example
photos does not have a mustang roll all the way to the heels in order to
improve clarity and understanding of the rearmost point of weight bearing.
Renegade® Hoof Boots should NOT be fitted tightly! The Heel Captivator is
the main means of boot retention, not a tight-fitting boot shell. A
Renegade® which fits the hoof perfectly would of course be preferred,
however, due to hoof growth, will simply be too small tomorrow. Somewhat
loosely-fitting Renegades are just as likely to be successful in most
situations.
Without a doubt, experience has shown that a boot which fits loose is more
stable than a boot which fits too tight. If the boot shell does not fit easily
onto the hoof, or if you cannot seat the toe into the boot with a tap from the
palm or your hand, the boots are too tight.
Understand that as hooves grow longer, they also get wider. If the width of
your horse’s hoof is exactly the same as a particular boot size, you should
consider the trimming interval of your horse and how long they grow
between trims and decide whether or not you should go up one boot size to
allow for said growth.
Many boot users groom the hooves with a rasp each time before installing
boots which helps to maintain a good fit and promotes a healthy hoof.
Step 2: Length
Now compare the measured hoof length to that of the boot length in the
chart. The hoof in the example photos measures 4-1/2″ long, which is 1/2″
shorter than the size 0 boot. This means about 1/2″ of boot base will be
sticking out past the rearmost point of weight bearing.
For most types of riding, the extra 1/2″ of boot base length is not a problem,
but we do offer a free Cutback Option, which shortens the boot base about

P a g e | 9
1/4″ (6.5mm). If a horse is going to be ridden fast, or in deep mud, or upon
highly technical terrain, or otherwise perform in a very high performance
manner, the Max Cutback option, a cutback of 3/8″ (9.5mm) off the boot, if
needed is something to consider as it eliminates excess boot material that
might cause an interference during such types of riding.
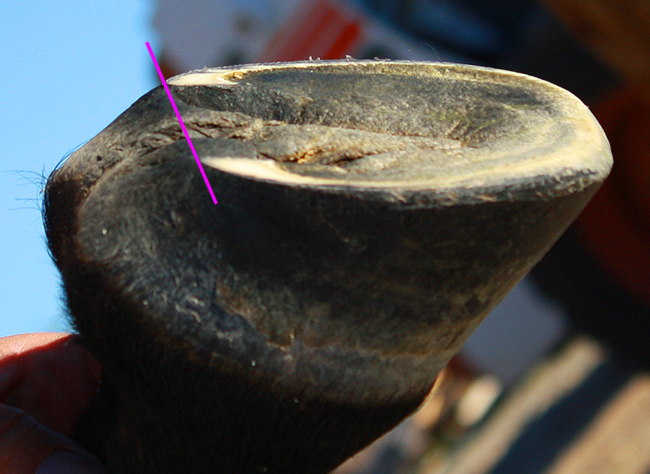
Note that toe shape can affect actual boot length requirements, as a hoof
with a large toe bevel or over-accentuated mustang roll will not seat all the
way forward in the boot, thus a hoof which measures 4-1/2″ long may not
actually have 1/2″ of boot base sticking out past the rearmost point of
weight bearing.
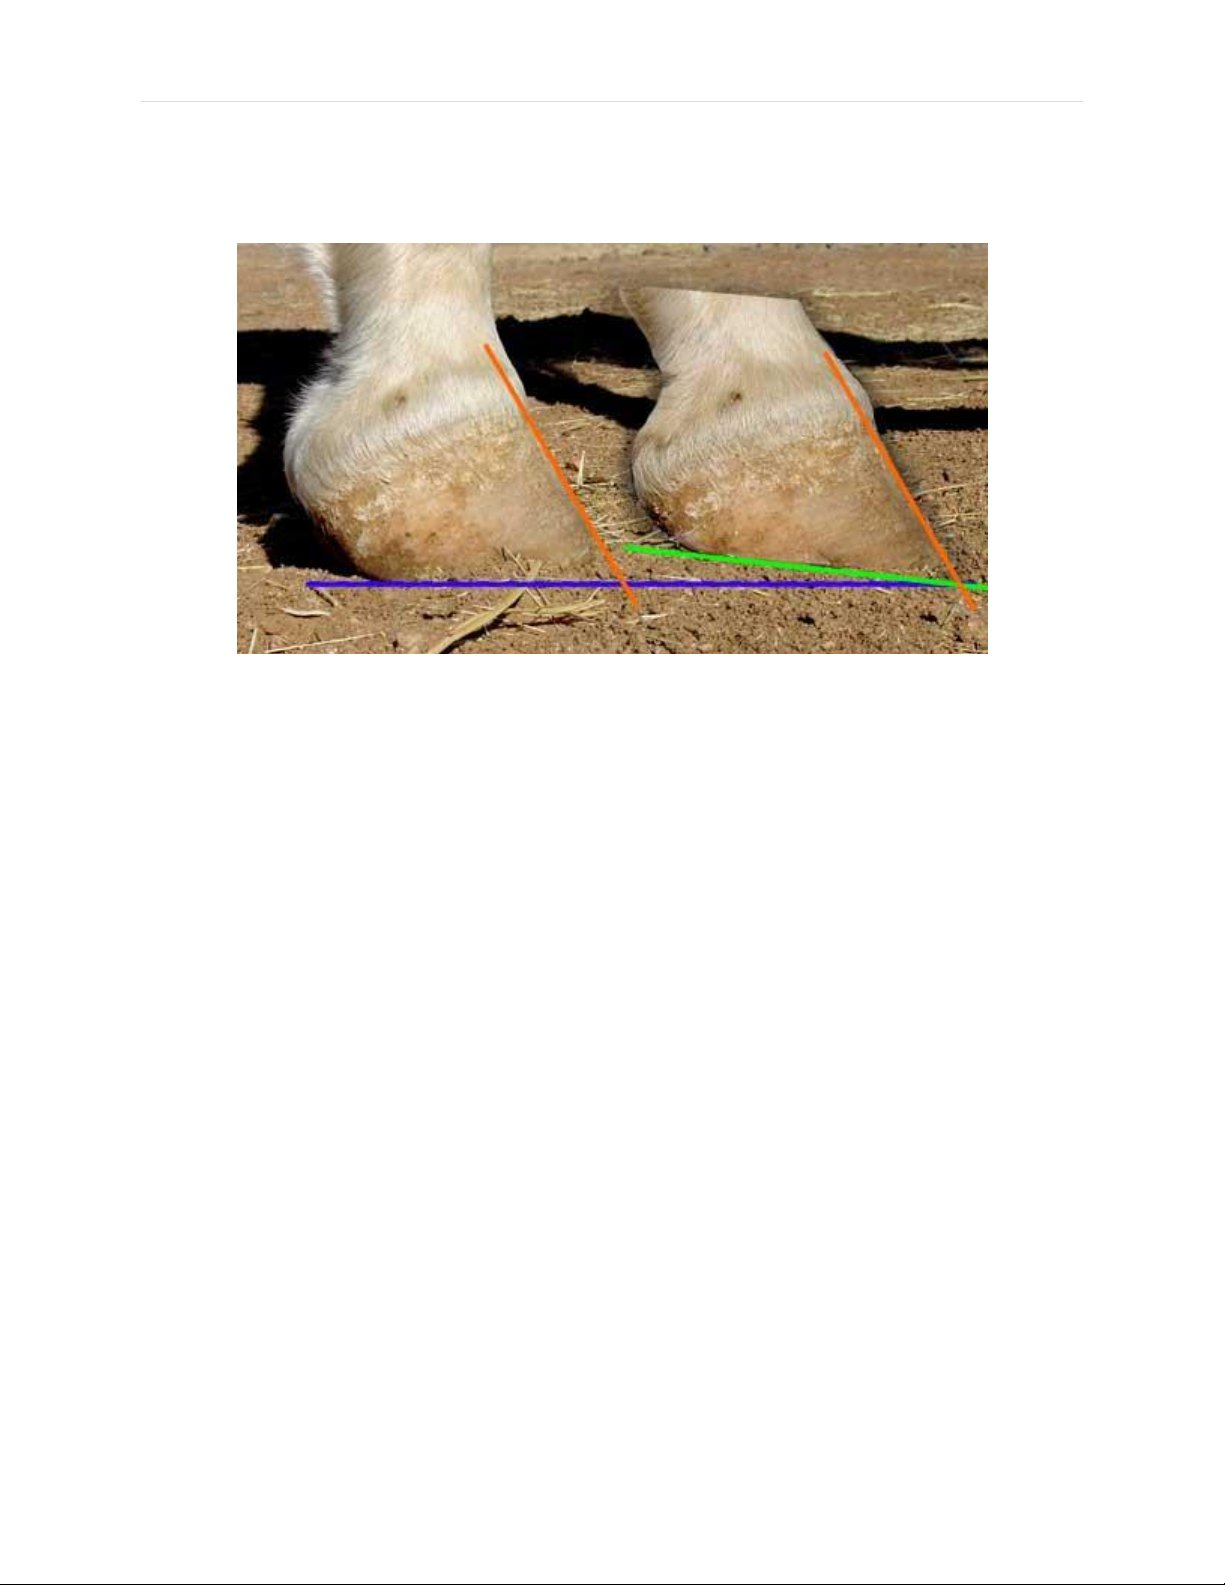
Also, high-heeled and upright hooves (not the natural hoof form) have a
steeper toe angle which is usually steeper than the toe angle of the boot.
This will cause the toe of the hoof to not seat all the way forward therefore,
also resulting in the heel sitting further back in the boot base than it would
otherwise.
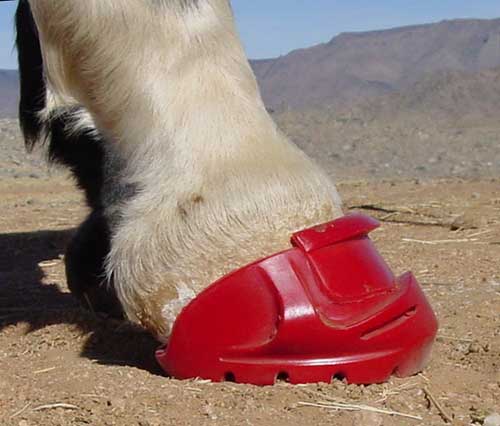
If you find the boot size selected in step 1 is too short, go up one numerical
boot size to gain additional length. This will result in some extra boot width,
but as noted previously, the Renegade® need not be fitted tightly, and for
most situations some extra width is OK.
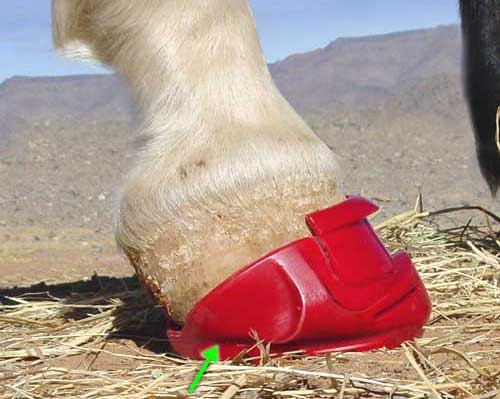
If you will be riding in deep mud, crossing streams with rocks and boulders,
or riding fast, it becomes more important to match boot length to hoof
length. Horses known to overreach, forge or interfere should also be more
closely matched for boot length. While we offer our Cutback options that
cover most situations, the boot can also be custom-trimmed in the field with
hoof nippers and finished smooth with a small rotary grinder like a Dremel
tool.
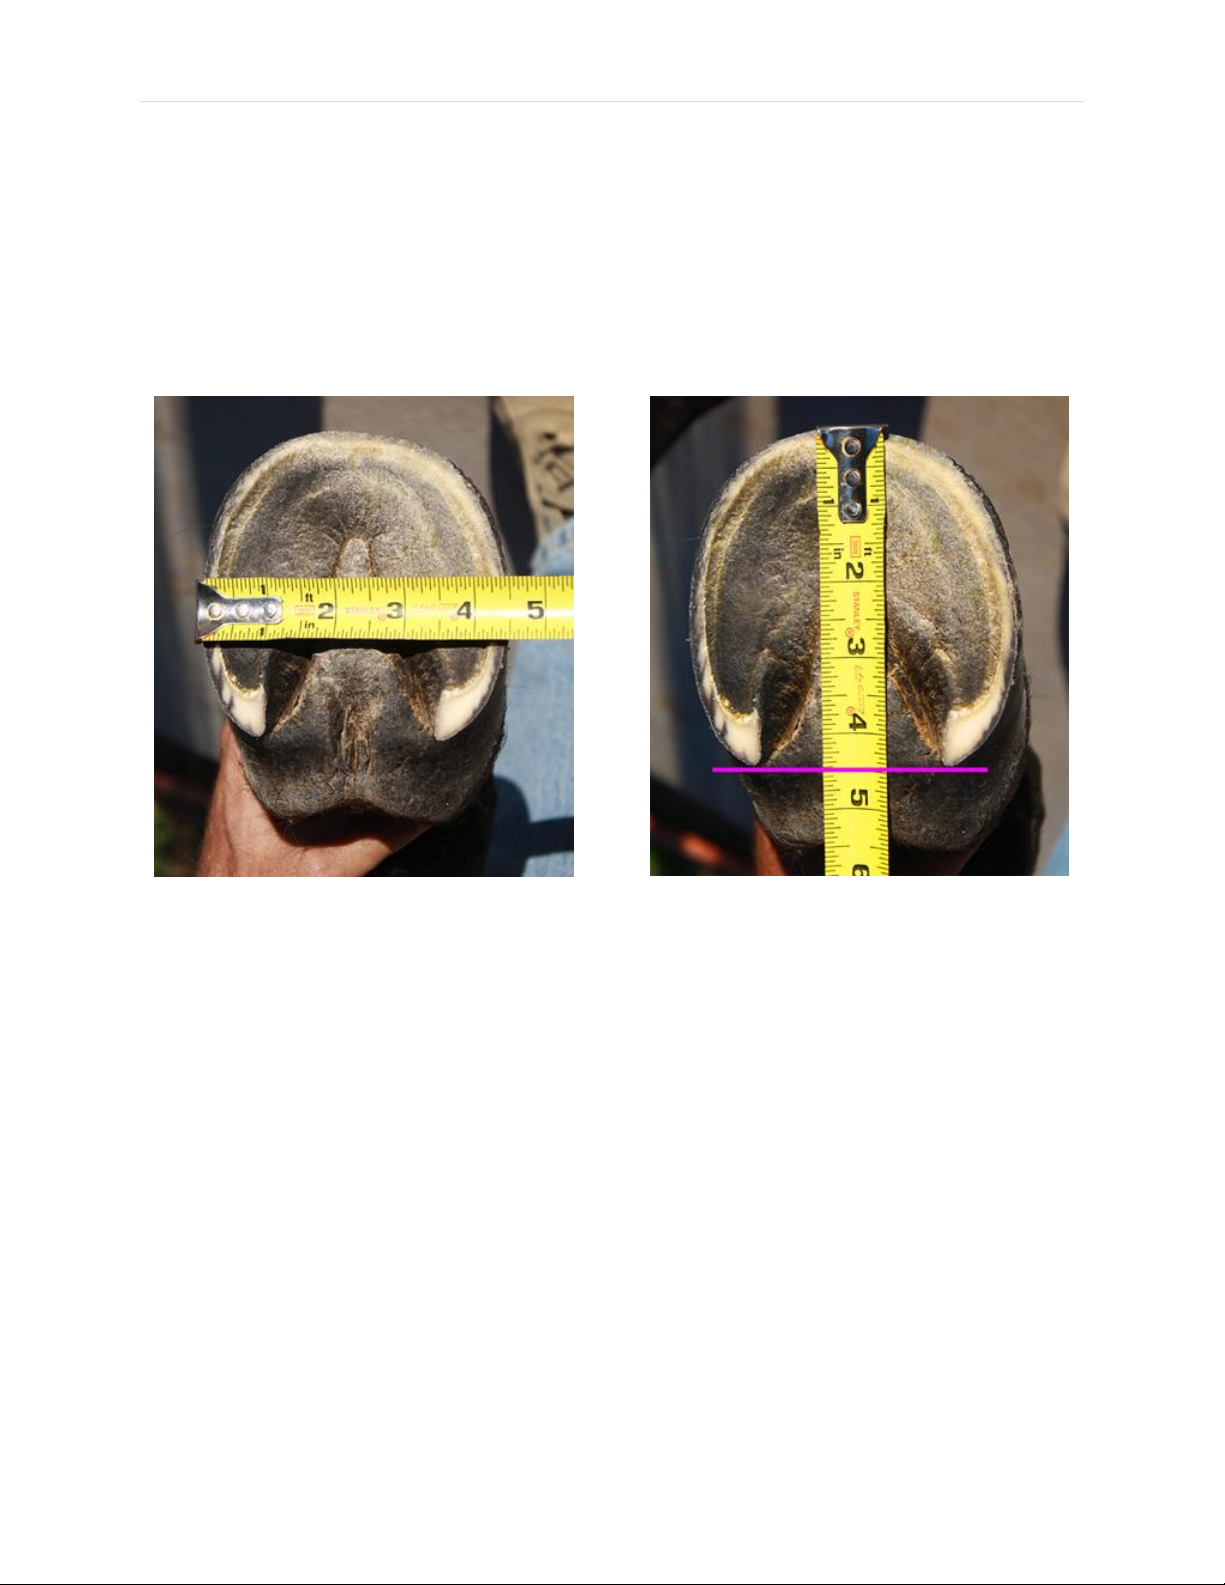
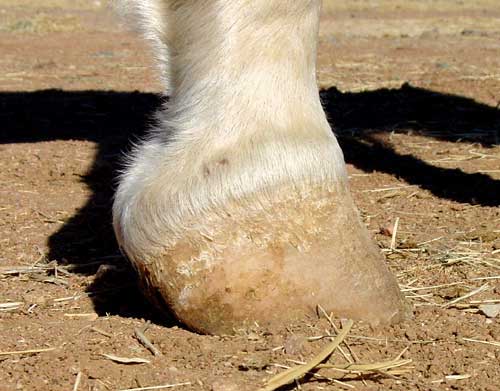
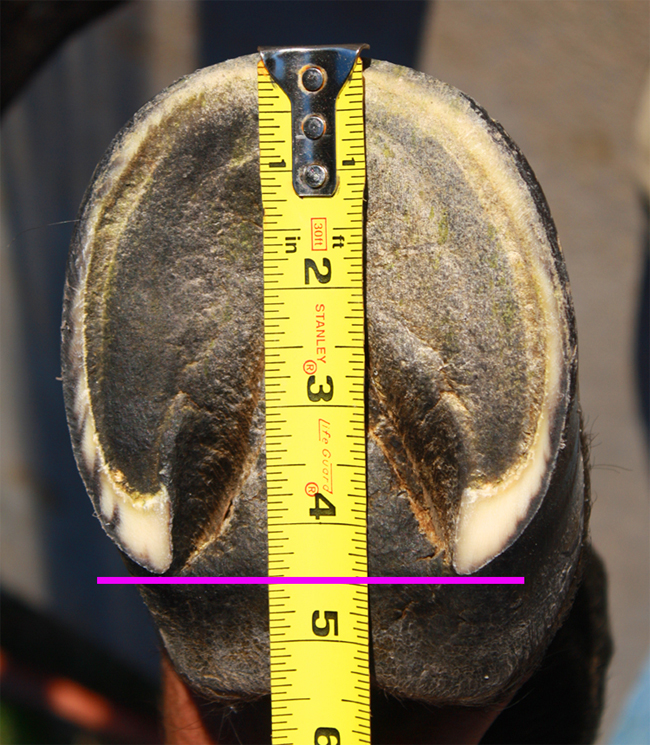
Example Problem: The Hoof in the Pictures
First, measure the hoof width after and compare to the chart above. Select
the boot size which is closest to the hoof width without being smaller. The
example hoof in the photo measures approximately 4-1/2″ wide. The size 0
boot is 4-9/16″ wide, which is 1/16″ wider than the hoof. The size 00 boot is

P a g e | 10
4-3/16″ wide, which is 5/16″ narrower than the hoof and so is too small. As
Renegades should not be fitted tightly, the size 0 boot is the right boot for
this hoof width.
Second, we check the length of the hoof against the length of the boot
selected in step 1 to see if we have any Cut Back requirements.
Observation of the photo reveals that the hoof measures 4-1/2” long. The
size 0 boot measures 5” long. This gives us ½” of excess sole plate,
assuming the hoof has proper form and is well seated into the toe of the
boot. Adding about 1/8” to the hoof length to allow for growth we have
about 3/8” that in an optimum situation would need to be removed. Thus,
we will need to select either a standard cut back or a max cut back. For
first time customers or if you are unsure as to whether or not your hoof form
will allow the hoof to seat well in the toe of the boot, the standard cut back
option would be recommended here. To achieve high levels of
performance with proper hoof form, the max cut back option may be
selected. Further Information
Understanding Hoof Length
And the Rearmost Point of Weight Bearing
It’s easy to see and understand hoof width, but hoof length can be tricky
because we must be able to determine the rearmost point of weight bearing
at the heels. In the photos above, the bottom of the hoof has been sprayed
with a light coat of black lacquer paint and then lightly rasped across the
heels to remove the paint and some hoof wall. Doing this serves to provide
a clean, flat surface at the heels with the paint improving contrast.
As you can clearly see, the rearmost point of weight bearing is at the
colored line drawn across the back of the heels. If you have trouble

P a g e | 11
projecting an imaginary line onto your tape measure, you can apply a piece
of masking tape or duct tape onto the hoof with the back edge of the tape
aligned with the heel.
Another way to look at this is to imagine for a moment you applied wet
paint to the bottom of your horse’s hoof and then walked him across a
smooth hard surface. When looking at the hoof prints left behind by the
wet paint, the rearmost point of weight bearing would correspond with the
rearmost point of the print, but not counting any print left by the
frog. (We’re not recommending you measure the hooves with wet paint,
but this may help serve as a mental example to help understanding.)
In addition, we need to discuss heel shape, as most heels won’t be nice
and flat with crisp edges as depicted in the photos above. Somewhat
rounded-off heels are more typical, especially for those horses landing heel
first, which is natural. Some trimmers will also intentionally round the heels
to help promote a heel first landing and to help mimic the rounded heels
found in the wild hoof using a trimming technique known as a “Reverse
Breakover”. Such trimming methods are recommended and will not
negatively impact the fit of the boot.
Fortunately, the measurement does not need to be an exact science. The
closest estimate to the rearmost point of weight-bearing is sufficient for the
purposes of measuring and sizing.
Installation and Removal of the Renegade® Hoof Boot
Always install hoof boots in a clear area and have somebody assist you in
holding your horse. It is not recommended that you tie your horse during
boot installation. If your horse is not already used to wearing hoof boots,
let him spend some time doing so while turned out in an arena or similar
enclosure with the boots installed until you are satisfied your horse is non-
reactive toward wearing them.
Seek the help of an equine professional if you are unsure about your safety
when using, installing or removing hoof boots.

P a g e | 17
THE PASTERN STRAP SHOULD NOT BE TIGHT!
Approximately two fingers’ width of clearance under the strap is
recommended. The pastern strap is NOT the primary means of boot
retention; this is the job of the Heel Captivator. The pastern strap is a
“check strap” to prevent the Heel Captivator from pulling downward off the
heel bulbs in the event of an overreach from a hind hoof , interference with
opposing hooves, or when riding through heavy brush, etc.
11. You should see a gap under the strap as shown above.
Setting the pastern strap tightly will not allow the Heel Captivator to find its
equilibrium with the bulbous shape of the heel bulbs and may force it up
against the backside of the pastern bones which could lead to rubbing.
Keep in mind that just as the pasterns descend during weight loading, they
also move forward just before the hoof leaves the ground. If the pastern
strap is too tight, then this forward movement of the pastern acts upon the
Heel Captivator, pulling it forward and upward in an undesirable cyclical
manner.

P a g e | 18
12. When you are satisfied with the pastern strap adjustment, press the
hook and loop surfaces of the strap together and secure the end by
pushing it under the rubber keeper loop. There are now two o-rings
included on the strap. For additional security, push the strap through both
o-rings, then double it back over the closest o-ring and back under the
second o-ring.

P a g e | 19
13. Return to the toe strap and set the strap tension by pulling the metal
cable adapter with one hand and the strap with the other. By doing this you
can pull evenly from both sides helping to keep the Heel Captivator
centered on the heel bulbs. It is not necessary to tighten the strap tightly.
Just get the strap “snug”. Think about your own shoes, do you like them
overly tight? In dry conditions, the boots have been tested on a galloping
horse with no tension on the straps. By “No Tension” we mean that all the
slack was taken out of the cables by pulling on the strap using only a few
ounces of force and no more.
Each user of the boot will need to experiment with tension settings to
discover what degree of tension works best for the way your horse moves,
the speed you ride and the environmental conditions you ride under. In all
cases, you should always start with loose settings and work your way up
from there. If you are having boot retention problems, setting the strap
“super tight” is NOT the solution.

P a g e | 20
14. When you are satisfied with the toe strap setting, secure the end of the
strap by pushing it under the rubber keeper loop.
As with the pastern straps, the toe straps now come with two o-rings and
can be secured in the same fashion: Push the strap through both o-rings,
then double it back over the closest o-ring and back under the second o-
ring.
Table of contents
Popular Pet Care Product manuals by other brands

Frisco
Frisco 109787 instruction manual

Petsafe
Petsafe PDT00-14016 Operating and training guide

Trainertec Electronic
Trainertec Electronic DT2200 Operation guide

Best Choice Products
Best Choice Products SKY3084 instructions

Aqua One
Aqua One EuroStyle Bow 85 instruction manual

Arf Pets
Arf Pets APDGWW4PL user guide