Trainertec Electronic DT2200 User manual
Remote Dog Training Collar
Operation Guide

-1-
Dog Training Collar Operation Guide
Thank you for choosing DT-2200 Remote dog training collar. Our
mission is to offer the best electronic training solutions. We want to
ensure your dog’s safety by providing you with the tools and
techniques to successfully train your pet. Please feel free to contact
us if you have any problems and we will resolve them immediately.
Please read the complete operation guide carefully before
starting to train your dog including the FAQ.
This instruction is suitable for remote dog training collar DT-2200
IMPORTANT SAFETY INFORMATION
Not for Aggressive Dogs. Do not use this product if your dog is
aggressive, or if your dog is prone to aggressive behavior.
Aggressive dogs can cause severe injury or even death to their
owners and others. If you are unsure if this product is appropriate
for your dog, please consult your veterinarian or certified trainer.
CAUTION Please read and follow the instructions in the manual.

-2-
Proper fit of the collar under the dog’s neck is important. A collar
worn for too long or made too tight on your dog’s neck may cause
skin damage or irritation. This can range from redness to pressure
ulcers; commonly known as bed sores. Training collars can cause
pressure necrosis if used incorrectly and is often misidentified as
burns.
1. Avoid leaving the collar on the dog for more than 8 hours
out of every 24 hours and try to reposition the collar on
your dog’s neck every 1 to 2 hours if possible.
2. Check the fit of the collar to prevent excessive pressure;
follow the instructions in the manual.
3. Never connect a lead to the electronic collar; it could
cause excessive pressure on the contacts.
4. When using a separate collar for a lead, don’t put pressure
on the electronic collar.
5. Wash the dog’s neck area and the contacts of the collar
weekly with a washcloth and mild soap, then rinse
thoroughly.
6. Examine the contact area daily for signs of a rash or a
sore. Brushing the coat daily may help.

-3-
7. If a rash or sore is found, discontinue use of the collar
until the skin has healed.
8. If the condition persists beyond 48 hours, see your
veterinarian.
These steps will help keep your pet safe and comfortable. Millions
of pets are comfortable while they wear stainless steel contacts.
Some pets are sensitive to contact pressure and it is important to
continue daily checks of the contact area. If redness or sores are
found, discontinue use until the skin has fully healed.
Training sessions which are shorter and more positive (10-15
minutes) are often the most effective.
Do not use the collar on a dog that is under 10lbs or 6 months of
old.
Improper or inappropriate use of a training collar system can be
harmful. Please use this product correctly and pay attention when
training your dog.

-4-
Table of Contents
Components…………………………………………...6
How the system works…………………………...........6
Main Features………………………………………….7
Transmitter…………………………………………….9
Receiver Collar……………………………………….12
Setting Up Multi-dog System………………………...15
Charging……………………………………………....19
Operate High Light LED…….………………………..21
Training Guide………………………………………..23
Battery Replacement………………………………….24

-5-
General Training Tips.………………………………....25
Intensity Selection Tips………………………………..27
Test Light Instructions…………………………………28
How Dogs Learn……………………………………….28
Frequently Asked Questions…………………………...32
Troubleshooting Guide…………………………………36

-6-
Components
How the System Works
The DT-2200 dog trainer has been proven safe, comfortable, and
effective for all pets over 10 pounds and 6 months old. This system
assists you in controlling your pet without a leash in a long distance
range. At the push of a button, the remote transmitter sends a signal,
activating the receiver collar. Using the remote trainer consistently

-7-
and correctly, many misbehaviors that your pet exhibits can be
corrected or any basic obedience commands can be taught.
Important: The remote trainer actual distance is dependent on
the way you hold the remote transmitter, the range may vary.
Hold the remote transmitter in a horizontal position away from
your body to achieve optimum range. Terrain, weather,
vegetation, vehicles, buildings, transmission from other radio
devices, and other factors will affect the range of your remote
trainer.
Main Features
- Range in open field up to 1.5miles.
-Highlight LED function allows you to find pet from 200~300
meters away at night
- Train up to 3 dogs from the same transmitter.
- 10 levels each of static shock.
- 10 levels of vibration
- “Beep” sound activated with a separate button.

-8-
- Two buttons “+” and “-” allow you to set your intensity
- Dog selection button allow you to select your dog.
- LCD digital display for 10 shock & vibration levels & dog ID
- Memorize shock level in transmitter for different dogs.
- Easy to operate with rubber button.
- Waterproof transmitter and receiver. Dogs can swim freely.
- Rechargeable 3.7V Li-ion battery for transmitter and receiver.
-Strong TPU Collar Strap.
- LED low power indication, red light will flash when battery
level is low.
- Full functional multi-dog training system.
- Around 8 seconds safe static shock protection.
- Comes with warranty.

-9-
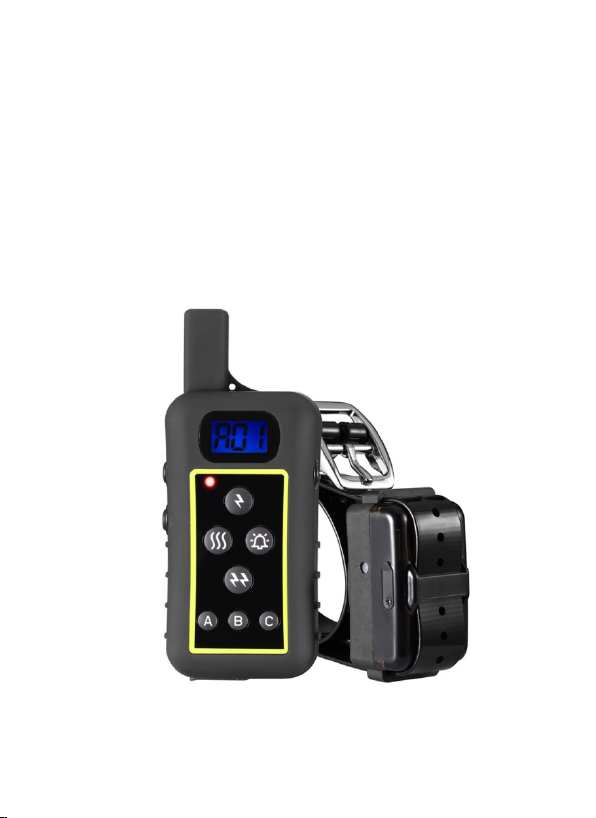
Transmitter
Antenna
Stimulation
Level
Button
On/Off
Button
Dog
Selection
Button
LED Light
LCD display
Bell Button
Momentary
Shock
Button
Continuous
Shock
Button
DC Jack Cover
Vibration
Button

-10 -
“ ” and “ “buttons: Press these buttons to adjust the shock
and vibration intensity from levels 1 to 10.
“ ”button: This is the power switch; hold this button for 2seconds
to switch on power, then LCD will display the default “A01”. You may
change Dog ID by pressing the relative buttons. If you want to switch
off the power, hold this button for 2 seconds to switch off power.
“ ”button: No-stimulation warning beep
“ ”button: Vibration stimulation. Press 1 time- vibrate 1 time. Press
and hold on- emit continuous vibration. Will stop vibrating when you let
go of the button. Will stop automatically when you go past 8 seconds of
holding the button.
“ ” button: Continuous static shock for about 8 seconds.

-11 -
“ ”button: Momentary static shock.
“A, B, C” buttons: Dog selection button, default is “A”. Your
transmitter is capable of training up to three dogs with optional receiver
collars. You select”A“dog, LCD display dog ID “A XX”. If you want to
train 2dog, press “B” button, LCD will display “BXX”. If you want to
train 3dog, press “C” button again, LCD will display “C XX”. “XX” is
for showing the shock& vibration level from 1-10.
The transmitter has the memory functions to save the suitable shock &
vibration levels for different dogs. 10 levels of shock stimulation, 10
levels of vibration stimulation. One tone.
NOTE: The red LED light will flash when the battery is low on
power. Recharge the battery at once.
-12 -
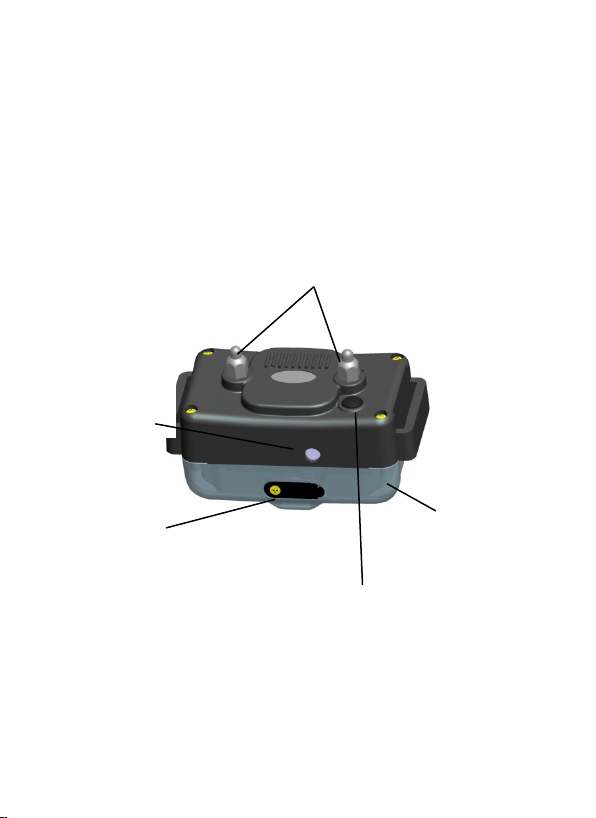
Receive Collar
NOTE: CHARGE RECEIVER BEFORE FIRST USE. IF
IT DOESN’T CHARGE CONTACT US IMMEDIATELY
On/Off Button
Press and hold on 4 seconds to turn the collar on. Two confirming tones will
sound and the collar green LED light will flash 1 time per 5 seconds if
connected. The LED will flash fast if disconnected. Press and hold on 4
seconds to turn the collar off. One long tone will sound and the green LED
light will stop flashing and turn off.
Turn the collar off when not in use to conserve battery
Contact Prong
Choose short or long prong to match
the dog’s coat type.
LED Light
Indicate the working
status, low
battery ,charging status.
DC Jack Cover
Open the Rubber Cover
and insert the adaptor
plug into DC Jack to
charge.
High Light LED
For the 1st dog , the
high light LED is
White; For the 2nd
dog ,the high light
LED is Red ;For
the 3rd dog ,the
high light LED is
Green

-13 -
You can expand your one dog trainer to a multi-dog remote trainer
by yourself. Simply purchase extra receiver collars and add them to
your system.
NOTE: IF THE COLLAR DOESN’T TURN ON
PLEASE CONTACT US FOR A NEW BATTERY OR
CHARGER.
Spanner
Change the Contact Prong depending on the
pet’s coat type.
Note: If the contact prong is tight, don’t
continue to turn the spanner clockwise or
the contact prong will be broken. Never turn
the contact prong too tightly. Turn
anticlockwise to loosen or remove.

-14 -
Key Points to note
1.Always charge before use. Ideal time to charge is 2-3
hours for the receiver as this is better for the life of the
battery.
2.The on/off buttons need to be held down for several
seconds to turn the units on and off
3.Only use the receiver for 8 in every 24 hours and adjust
the collar every 1-2 hours if possible to make sure it is
correctly placed and not causing irritation.
4.If the receiver won’t connect to a specific number on
the remote, try a different number as this does sometimes
happen.
5.If the green light goes from flickering fast, to flickering
once every 4-5 seconds, it is now connected, you just need
to take it out of connection mode.

-15 -
6.The receiver is still waterproof without the rubber
stopper in place. This does not affect performance.
7.You may remove the receiver and attach it to a collar
that you prefer to use instead that fits.
Setting Up Multi-Dog System
1. Match a Receiver Collar To add a receiver collar to your remote
dog training system, following the below steps. Only turn on 1
collar at a time to connect.
Step 1: Take out 1 unmatched receiver collar. Press and hold
“ON/OFF” button. After two “beep” sounds, release the
button, the receiver power is on. Green LED light should be
flashing frequently. This means the collar is disconnected
from the remote.
(Note: Never open 2 or more unmatched receivers at the same
time.)
Step 2: Take out the transmitter that you want to match to the
-16 -
receiver. Press and hold on the “ ” button until LCD
display occurs then release, the transmitter is now on.
Step 3: Press and hold the Dog selection button and “ ” button
at the same time . Not to release the two buttons.
If you want to match the 1st dog , press and hold on “A”
button and “ ” button at same time until the digital
numbers on the LCD display starts counting up on the
screen. Then numbers will be counting up e.g. “08, 09, 10,
11……99”, increasing automatically, this is correct.
If you want to match the 2nd dog , press and hold on “B”
button and “ ” button at same time until the digital

-17 -
numbers on the LCD display starts counting up on the
screen.
If you want to match the 3rd dog , press and hold on “C”
button and “ ” button at same time until the digital
numbers on the LCD display starts counting up on the screen.
Step 4: Hold the transmitter close to the unmatched receiver 1 to
2inches away. After hearing 5 “beeps” sound from the
receiver and you see the green LED flashing slow down to
once every 4-5 seconds, you release the button. It should
connect pretty fast.
Step 5: Test matched Receiver
press “ ” button, if you can hear the “beep” sound
from the matched receiver then congratulations, you have
matched the receiver. You can also use the test light to
place the prongs in the little gaps and press each button on
-18 -
the remote to see if the test light comes on. This shows
that the collar is working. If you choose, you can also put
it on the lowest setting and test on the back of your
hand/arm for confirmation if you’re still unsure.
If the collar didn’t connect, please repeat the step3 to step 4. Try
to close to the collar from different direction and more close.
If you just want to disconnect a collar follow ‘Cancel a matched
Receiver’ instructions.
2. Cancel a Matched Receiver Follow the below steps one by
one to cancel the matched receiver:
Step 1: Pick up the matched receiver. Press and hold the “ON/OFF”
button. After two “beep” sounds, the receiver’s power is on.
The green LED will flash 1 time per 5 seconds.
Step 2: Press and hold “ ” button on the transmitter until the
LCD display occurs then release, the transmitter power is
on.
Step 3: Press and hold the “ ” button and “ ” button at the

-19 -
same time, until the digital number on the LCD display
counts up continuously (01,02,03…98,99). increasing
automatically, this is correct. Not to release the two buttons.
Step 4: Hold the transmitter next to the receive collar 1 to 2 inches
away. You can listen for the 5 “beep” sounds from the receiver.
The green LED light of the receiver should now be flashing
frequently. Congratulations, you have cancelled the matched
receiver successfully.
If the collar didn’t cancel the match, please repeat the step
3 to step 4 . Try to close to the collar from different
direction and more close.
Charging
The transmitter and receiver charge rapidly in about 2 hours.
The transmitter and receiver collar can be charged at the same time.
Common adapter for transmitter and receiver charging.
To recharge, open the rubber cover first. Plug the adapter contact
Table of contents
Other Trainertec Electronic Pet Care Product manuals

Popular Pet Care Product manuals by other brands


Majestic Pet
Majestic Pet 52" Cat Tree Assembly instructions

THE DOGLINE
THE DOGLINE SportDOG NoBark SBC-R-E operating guide

Merry Products
Merry Products zoovilla PTH0641720110 Care Instructions

Dogtra
Dogtra Super-X Series owner's manual

Dogtra
Dogtra 2500T&B Series owner's manual

Petsafe
Petsafe Deluxe Ultralight PUL-275 product manual