Renegade E-BOXX15 User manual

E-BOXX15
BATTERY POWERED PORTABLE TROLLEY SPEAKER SYSTEM
VERS. 1.1

2
Bitte lesen Sie die Bedienungsanleitung vollständig durch, bevor Sie das Gerät in
Betrieb nehmen. Behalten Sie die Bedienungsanleitung für spätere Zwecke auf.
Änderungen vorbehalten
Technische Daten
Ausgangsleistung RMS 120 W
Ausgangsleitung Max. Musikleistung 240 W
Impedanz 4 Ω
Frequenzgang 40 Hz - 20 kHz
Signalrauschabstand >71 dB
Klirrfaktor <0.7% (1 W)
Betriebsspannung Wechelstrom 220 - 240 V ~ 50/60 Hz
Betriebsspannung Gleichstrom 12 - 15 V
Bass/Mittenlautsprecher 38 cm (15“)
Hochtonhorn 2,5 cm (1“)
Abmessungen 440 x 405 x 705 mm
Nettogewicht 21,5 kg
Ausstattung
Bluetooth® Audio Streaming Funktion
Audio Player (kompatibel mit MP3, WMA, WAV, AAC, FLAC)
USB Anschluss
TF/SD Kartenschacht
FM/UKW Radio (87,50 - 108,00 MHz)
Auadbare Batterie (Bis zu 12 / 6 / 3 / 1,5 Std. Laufzeit bei 10 / 20 / 50 / 100% Verstärkerlast je nach Intensität des Musiksignals)
Karaoke und Aufnahme-Funktion
Echo Audioeffekt
Mikrofon-Eingang (6,3 mm)
Gitarren-Eingang (6,3 mm)
Cinch Stereo Eingang
Cinch Stereo-Ausgang (Mixed)
LED-Lichtorgel am Lautsprecher
Ausziehbarer Trolley-Griff und Transportrollen
Lieferumfang
1 x Portables Soundsystem
2 x Funkmikrofon (185,15 / 202,2 MHz, 4 x AA Batterien benötigt)
1 x Fernbedienung (2 x AAA Batterien benötigt)
1 x Netzkabel
1 x Bedienungsanleitung

3
Sicherheitshinweise
1. Verwenden Sie für die Stromversorgung
und zum Laden der eingebauten Batterie
nur das mitgelieferte Stromkabel. Versorgen
Sie das Gerät nur mit der oben angegebe-
nen Spannung.
3. Legen Sie keine schweren Gegenstände
auf das Gerät. Vermeiden Sie direktes Son-
nenlicht und halten Sie das Gerät von Heiz-
quellen wie Öfen, Heizkörpern usw. fern.
Vermeiden Sie, dass das Gerät viel Staub
und Schmutz, hohen Temperaturen sowie
starken Licht- und Magnetquellen ausge-
setzt ist.
5. Zerlegen Sie keinesfalls das Gerät. Wenn
Sie interne Teile des Geräts berühren, kann
es zu einem schweren elektrischen Schlag
kommen. Lassen Sie keine Metallteile und
Flüssigkeiten in die Geräteöffnungen fallen.
2. Stecken oder ziehen Sie NIEMALS das
Stromkabel mit nassen Händen ein oder
aus. Stellen Sie das Gerät nicht an einen
feuchten Ort oder im Regen auf, um eine
Ansammlung von Flüssigkeit auf der Ober-
äche zu vermeiden. Stellen Sie keinen Be-
hälter mit Wasser oder anderen Flüssigkei-
ten auf dem Gerät ab.
4. Ziehen Sie das angeschlossene Netzka-
bel nicht am direkt am Kabel aus dem Gerät
oder der Steckdose, ziehen Sie immer direkt
an den Steckern. Halten Sie das Netzkabel
von Orten fern, an denen darauf getreten,
es eingeklemmt oder darüber gestolpert
werden könnte. Legen Sie keine schweren
Gegenstände auf das Kabel.
6. Wenn das Gerät längere Zeit nicht ver-
wendet wird, ziehen Sie immer den Netzste-
cker aus der Steckdose.
220-240V ~
50/60Hz

4
RISK OF ELECTRIC SHOCK
DO NOT OPEN
TO PREVENT ELECTRIC SHOCK, DO NOT REMOVE COVER.
NO USER SERVICEABLE PARTS INSIDE.
REFER SERVICING TO QUALIFIED SERVICE PERSONNEL.
WARNING
CAUTION
E-BOXX 15
120/240 WATTS RMS/MAX.
CHARGE
FULL
BATTERY
STATUS
MIN
ON
DC 12V
LED
ON OFF
OFF
CHARGE
ON
AC 220V
AC IN
POWER
200-240V~50/60Hz
EXTERNAL DC 12V IN
LINE INMIX OUT
MIC
PRIORITY
GUITAR
VOLUME
MIC
VOLUME
MIC
BASS
MIC
TREBLE
MIC
ECHO
MAIN
BASS
MAIN
TREBLE
ON
MIN MAX MIN MAX MIN MAX MIN MAX MIN MAX MIN MAX MIN MAX
MIN MAX
OFF
MAIN
VOLUME
USB SD MMC CARD
GUITAR
INPUT
MIC
INPUT
INPUT
MODE
VOL – AUTO VOL +
REPEAT
TRACK/FOLDER
SKIP TRACK
+10
Anschlussdiagramm

5
Funktionsübersicht
1. Stummschaltung ein oder aus
2. Der vorherige Ordner auf dem ausge-
wählten Datenträger wird abgespielt
3. Equalizereinstellungen
4. Der vorherigen Titel wird abgespielt
5. Aufnahme wird gestartet (Eine MP3-
Datei wird vom Gesamtsignal aufge-
zeichnet und auf dem ausgewählten
Datenträger gespeichert).
6. Das Gerät wird auf Stand-by geschaltet
7. Der nächste Ordner auf dem ausge-
wählten Datenträger wird abgespielt
8. Der gerade ausgewählte Ordner wird
wiederholt
9. Der gerade ausgewählte Titel wird
wiederholt
10. Die Gesamt-Lautstärke wird erhöht
11. Der nächste Titel wird abgespielt
12. Der ausgewählte Titel wird abgespielt
oder pausiert
13. Die Gesamt-Lautstärke wird verringert
14. Titelauswahl per Nummerntasten
15. Wählt die Eingangssignalquelle aus
1 6
15
7
8
9
10
11
12
13
14
2
3
4
5

6
RISK OF ELECTRIC SHOCK
DO NOT OPEN
TO PREVENT ELECTRIC SHOCK, DO NOT REMOVE COVER.
NO USER SERVICEABLE PARTS INSIDE.
REFER SERVICING TO QUALIFIED SERVICE PERSONNEL.
WARNING
CAUTION
E-BOXX 15
120/240 WATTS RMS/MAX.
CHARGE
FULL
BATTERY
STATUS
MIN
ON
DC 12V
LED
ON OFF
OFF
CHARGE
ON
AC 220V
AC IN
POWER
200-240V~50/60Hz
EXTERNAL DC 12V IN
LINE INMIX OUT
MIC
PRIORITY
GUITAR
VOLUME
MIC
VOLUME
MIC
BASS
MIC
TREBLE
MIC
ECHO
MAIN
BASS
MAIN
TREBLE
ON
MIN MAX MIN MAX MIN MAX MIN MAX MIN MAX MIN MAX MIN MAX
MIN MAX
OFF
MAIN
VOLUME
USB SD MMC CARD
GUITAR
INPUT
MIC
INPUT
INPUT
MODE
VOL – AUTO VOL +
REPEAT
TRACK/FOLDER
SKIP TRACK
+10
Funktionsübersicht
3 4 5 6 7 8 91
10 11 12 13 15 16 1714
2
24
23
18
20
19
27
26
25
21
22

7
Funktionsübersicht
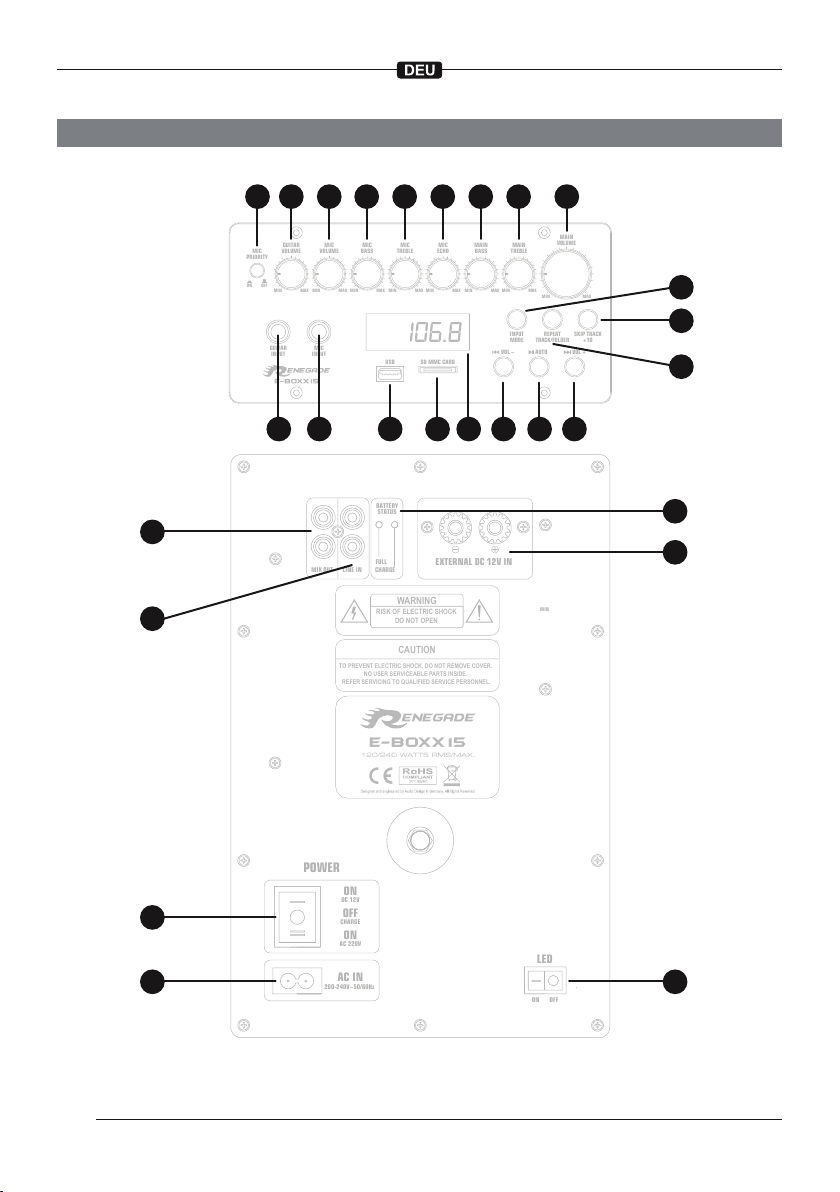
1. Der Schalter MIC PRORITY aktiviert
die Karaoke-Funktion, d.h. die Hinter-
grundmusik wird etwas leiser abgespielt,
sobald ein Mikrofon benutzt wird.
2. Der Regler GUITAR VOLUME regelt
die Lautstärke einer angeschlossenen
Gitarre.
3. Der Regler MIC VOLUME regelt die Laut-
stärker der angeschlossenen Mikrofone.
4. Der Regler MIC BASS regelt die Bässe
der angeschlossenen Mikrofone.
5. Der Regler MIC TREBLE regelt die Hö-
hen der angeschlossenen Mikrofone.
6. Der Regler MIC ECHO regelt den Grad
des Echo-Effekts der angeschlossenen
Mikrofone.
7. Der Regler MAIN BASS regelt die Bässe
des Soundsystems.
8. Der Regler MAIN TREBLE regelt die
Höhen des Soundsystems.
9. Der Regler MAIN VOLUME regelt die
Gesamtlautstärke des Soundsystems.
10. Schließen Sie an GUITAR IN eine Gitarre
per Kabel (6,3 mm) an.
11. Schließen Sie an MIC INPUT ein Mikro-
fon per Kabel (6,3 mm) an.
12. Stecken Sie am USB-Port einen USB-
Stick mit Musikdateien ein.
13. Stecken Sie am Kartenschlitz eine
passende Speicherkarte mit Musikdatei-
en ein.
14. Die LCD-Anzeige zeigt Statusinfos
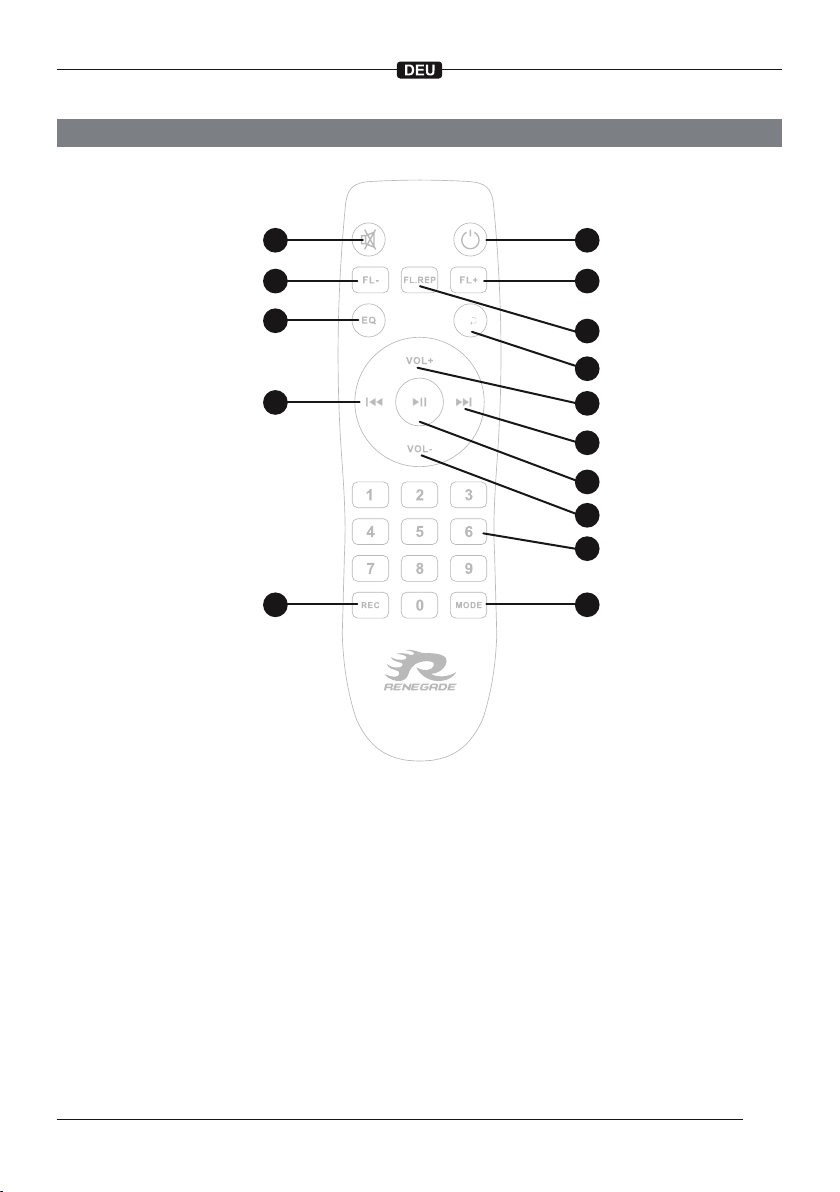
15. Mit der Taste I<< VOL – können Sie zum
vorherigen Titel oder Radiosender sprin-
gen (kurz antippen) bzw. die Lautstärke
des gerade gewählten Eingangs an die
Gesamtlautstärke nach unten anpassen
(gedrückt halten).
16. Mit der Taste >I AUTO können Sie den
ausgewählten Titel abspielen oder pau-
sieren bzw. den automatischen Sender-
suchlauf des Radios starten
17. Mit der Taste >>I VOL+ können Sie zum
nächsten Titel oder Radiosender springen
(kurz antippen) bzw. die Lautstärke
des gerade gewählten Eingangs an die
Gesamtlautstärke nach oben anpassen
(gedrückt halten).
18. Mit der Taste INPUT MODE können Sie
die Eingangsquelle auswählen.
19. Mit der Taste SKIP TRACK können inner-
halb des aktuellen Ordners 10 Titel nach
vorne springen.
20. Mit der Taste REPEAT können Sie die
Wiederholfunktion für den aktuellen Titel
oder Ordner aktivieren.
21. Am Signalausgang MIX OUT können Sie
z.B. ein Mischpult anschließen.
22. Am Signaleingang LINE IN können Sie
eine externe Signalquelle anschließen.
23. ON DC 12V: Das Gerät wird mit der inter-
nen Batterie betrieben.
OFF CHARGE: Das Gerät ist aus und die
interne Batterie wird geladen, wenn der
Netzstecker angeschlossen ist.
ON AC 220V: Das Gerät wird mit 220 Volt
über den angeschlossenen Netzstecker
betrieben.
24. Schließen Sie an AC IN den beiliegenden
Netzstecker an.
25. Die CHARGE LED zeigt an, dass die
interne Batterie gerade lädt (Ladezeit
ca. 8-10 Stunden). Laden und entladen
Sie die Batterie immer vollständig um
sie optimal zu konditionieren. Die FULL
LED zeigt an, dass die interne Batterie
vollständig geladen ist.
26. An EXTERNAL DC 12V IN kann eine
externe 12 Volt Batterie (z.B. Fahrzeug-
batterie) angeschlossen werden, um das
Gerät mit Strom zu versorgen, falls die
Ladekapazität der internen Batterie zu
niedrig ist.
27. Am Schalter LED können Sie die LED-
Lichtorgel am Lautsprecher an- oder
ausschalten.

8
Funkmikrofone
Hinweise zur Entsorgung der internen Batterie
Nach dem Batteriegesetz (BattG) sind wir verpichtet, Sie auf Folgendes hinzuwei-
sen: Batterien und Akkus dürfen nicht im Hausmüll entsorgt werden. Altbatterien können
Schadstoffe enthalten, die bei nicht sachgemäßer Lagerung oder Entsorgung die Umwelt
oder Ihre Gesundheit schädigen können. Batterien enthalten aber auch wichtige Rohstoffe
wie z. B. Eisen, Zink, Mangan oder Nickel und können wieder verwertet werden.
Bitte entsorgen Sie im Falle eines Defekts die interne Batterie nur bei entsprechenden Bat-
terieentsorgungseinrichtungen oder Recyclinghöfen in Ihrer Nähe.
Die beiden beiliegenden Funkmikrofone benötigen jeweils eine AA-Batterie, welche nicht im
Lieferumfang enthalten ist.
Nachdem Sie die Batterien eingelegt haben und den An-/Ausschalter am Mikrofon betätigt
haben, ist dieses funktionsbereit und automatisch mit dem Soundsystem verbunden. Beach-
ten Sie dazu die Hinweise 3 bis 7 auf der vorherigen Seite.
Nach Benutzung der Mikrofone sollten Sie diese wieder ausschalten, ansonsten entlädt sich
die eingelegte Batterie.
Der VHF-Übertragungsbereich der Mikrofone liegt bei 185,15 / 202,2 MHz.
Pb
Bluetooth®Audio Streaming
1. Schalten Sie das Soundsystem ein und drücken Sie die Taste INPUT MODE an der
Gerätefront oder MODE an der Fernbedienung, bis auf dem Display „blue“ als Ein-
gangsquelle angezeigt wird.
2. Suchen Sie den Namen „Bluetooth“ auf Ihrem Mobiltelefon oder einem anderen Gerät
und drücken Sie auf „Verbinden“. Das Gerät gibt einen Signalton aus, wenn die Ver-
bindung hergestellt wurde.
3. Spielen Sie Musik auf Ihrem Mobiltelefon oder einem anderen Gerät ab. Die Wieder-
gabe erfolgt über das Soundsystem.
4. Um den Bluetooth®-Verbindung zu trennen, deaktivieren Sie Bluetooth®auf Ihrem
Mobiltelefon oder einem anderen Gerät oder ändern Sie die Eingangsquelle des
Soundsystems.

9
Please read the owner’s manual completely before using the device. Keep the
owner’s manual for later use.
Subject to change
Specications
Output Power RMS 120 W
Output Power Max. 240 W
Impedance 4 Ω
Frequency Range 40 Hz - 20 kHz
Signal to Noise Ratio >71 dB
Total Harmonic Distortion <0.7% (1 W)
Operating Voltage AC 220 - 240 V ~ 50/60 Hz
Operating Voltage DC 12 - 15 V
Bass/Mid Loudspeaker 38 cm (15“)
Tweeter 2,5 cm (1“)
Dimensions 440 x 405 x 705 mm
Gross Weight 21,5 kg
Features
Bluetooth® Audio Streaming Function
Audio Player (compatible with MP3, WMA, WAV, AAC, FLAC)
USB Port
TF/SD Card Slot
FM Radio (87.50 - 108.00 MHz)
Rechargeable Battery (Up to 12 / 6 / 3 / 1.5 hours runtime at 10 / 20 / 50 / 100% amplier load depending on the intensity of the music signal)
Karaoke and Recording Function
Echo Audio Effect
Microphone Input (6,3 mm)
Guitar Input (6,3 mm)
RCA Stereo Input
RCA Stereo Mixed Output
LED Speaker Lightshow
Extendable Trolley Handle and Wheels
Scope of Delivery
1 x Portable Sound System
2 x Wireless Microphone (185,15 / 202,2 MHz, 4 x AA Battery required)
1 x Remote (2 x AA Battery required)
1 x Power Cable
1 x User’s Manual

10
Safety Instructions
1. Use only the supplied power cable to pow-
er on and charge the built-in battery. Only
supply the device with the voltage specied
above.
3. Do not place heavy objects on the device.
Avoid direct sunlight and keep the device
away from heat sources such as stoves,
radiators, etc. Avoid exposing the device to
high levels of dust and dirt, high tempera-
tures and strong light and magnetic sources.
5. Do not disassemble the device. Touching
internal parts of the device may result in a
serious electric shock. Do not drop metal
parts or liquids into the device openings.
2. NEVER plug in or unplug the power cord
with wet hands. Do not place the device in a
damp place or in the rain to avoid accumula-
tion of liquid on the surface. Do not place a
container with water or other liquids on the
unit.
4. Do not unplug the connected power
cord by the cable directly from the device
or the power outlet, always pull directly on
the plugs. Keep the power cord away from
places where it could be kicked, pinched, or
tripped over. Do not lay heavy objects on the
cable.
6. If the device will not be used for a long
time, always disconnect the power plug from
the power socket.
220-240V ~
50/60Hz

11
Connection Diagram
RISK OF ELECTRIC SHOCK
DO NOT OPEN
TO PREVENT ELECTRIC SHOCK, DO NOT REMOVE COVER.
NO USER SERVICEABLE PARTS INSIDE.
REFER SERVICING TO QUALIFIED SERVICE PERSONNEL.
WARNING
CAUTION
E-BOXX 15
120/240 WATTS RMS/MAX.
CHARGE
FULL
BATTERY
STATUS
MIN
ON
DC 12V
LED
ON OFF
OFF
CHARGE
ON
AC 220V
AC IN
POWER
200-240V~50/60Hz
EXTERNAL DC 12V IN
LINE INMIX OUT
MIC
PRIORITY
GUITAR
VOLUME
MIC
VOLUME
MIC
BASS
MIC
TREBLE
MIC
ECHO
MAIN
BASS
MAIN
TREBLE
ON
MIN MAX MIN MAX MIN MAX MIN MAX MIN MAX MIN MAX MIN MAX
MIN MAX
OFF
MAIN
VOLUME
USB SD MMC CARD
GUITAR
INPUT
MIC
INPUT
INPUT
MODE
VOL – AUTO VOL +
REPEAT
TRACK/FOLDER
SKIP TRACK
+10

12
Functional Overview
RISK OF ELECTRIC SHOCK
DO NOT OPEN
TO PREVENT ELECTRIC SHOCK, DO NOT REMOVE COVER.
NO USER SERVICEABLE PARTS INSIDE.
REFER SERVICING TO QUALIFIED SERVICE PERSONNEL.
WARNING
CAUTION
E-BOXX 15
120/240 WATTS RMS/MAX.
CHARGE
FULL
BATTERY
STATUS
MIN
ON
DC 12V
LED
ON OFF
OFF
CHARGE
ON
AC 220V
AC IN
POWER
200-240V~50/60Hz
EXTERNAL DC 12V IN
LINE INMIX OUT
MIC
PRIORITY
GUITAR
VOLUME
MIC
VOLUME
MIC
BASS
MIC
TREBLE
MIC
ECHO
MAIN
BASS
MAIN
TREBLE
ON
MIN MAX MIN MAX MIN MAX MIN MAX MIN MAX MIN MAX MIN MAX
MIN MAX
OFF
MAIN
VOLUME
USB SD MMC CARD
GUITAR
INPUT
MIC
INPUT
INPUT
MODE
VOL – AUTO VOL +
REPEAT
TRACK/FOLDER
SKIP TRACK
+10
3 4 5 6 7 8 91
10 11 12 13 15 16 1714
2
24
23
18
20
19
27
26
25
21
22

13
Functional Overview
1. The MIC PRORITY switch activates the
karaoke function, i.e. the background
music will be played a bit quieter as
soon as a microphone is used.
2. The GUITAR VOLUME control adjusts
the volume of a connected guitar.
3. The MIC VOLUME control adjusts the
volume of the connected microphones.
4. The MIC BASS control adjusts the
bass level of the connected micro-
phones.
5. The MIC TREBLE control adjusts the
treble level of the connected micro-
phones.
6. The MIC ECHO control adjusts the
degree of echo effect of the connected
microphones.
7. The MAIN BASS control adjusts the
bass level of the sound system.
8. The MAIN TREBLE control adjusts the
treble level of the sound system.
9. The MAIN VOLUME control adjusts the
overall volume of the sound system.
10. Connect to GUITAR IN to a guitar via a
suitable cable (6.3 mm).
11. Connect to MIC 1 INPUT a microphone
via a suitable cable (6.3 mm).
12. Insert a USB stick with music les into
the USB port.
13. Insert a suitable memory card with
music les into the Card Slot.
14. The LCD display shows status infor-
mation
15. Use the I<< VOL – key to skip to the
previous track or radio station (tap
it briey) or adjust the volume of the
currently selected input to the overall
volume at the bottom (press and hold).
16. Press the key >I AUTO to play or
pause the selected track or start the
automatic radio station scan.
17. Use the >>I key to skip to the next
track or radio station (tap it briey)
or adjust the volume of the currently
selected input to the overall volume
(press and hold).
18. Use the INPUT MODE key to select the
input signal source.
19. Use the SKIP TRACK key to skip 10
tracks forward within the current folder.
20. Use the REPEAT key to activate the
repeat function for the current title or
folder.
21. At the signal output MIX OUT you can,
for example, connect a mixer.
22. You can connect an external signal
source to the LINE IN signal input.
23. ON DC 12V: The device is powered by
the internal battery.
OFF CHARGE: The device is off and
the internal battery is charging when
the power plug is connected.
ON AC 220V: The device is operated
with 220 volts via the connected power
supply plug.
24. Connect to AC IN to the enclosed
power plug.
25. The CHARGE LED indicates that
the internal battery is being charged
(charging time approx. 8-10 hours).
Please always charge and discharge
the battery completely to optimally con-
dition it. The FULL LED indicates that
the internal battery is fully charged.
26. An external 12V battery (such as a
vehicle battery) can be connected to
EXTERNAL DC 12V IN to power the
device if the charge capacity of the
internal battery is too low..
27. With the LED switch you can switch
the LED lightshow on the loudspeaker
on or off.

14
Functional Overview
1. Mute on/off
2. The previous folder on the selected
media carrier will be played
3. EQ settings
4. The previous song will be played
5. Starts recording (A MP3 le is recorded
from the main output signal and stored
on the selected media carrier).
6. The device is switched to stand-by
7. The next folder on the selected media
carrier will be played
8. The currently selected folder will be
repeated
9. The currently selected track will be
repeated
10. The overall volume will be increased
11. The next track will be played
12. The selected track will be played or
paused
13. The overall volume will be reduced
14. Title selection via number keys
15. Selects the input signal source
1 6
15
7
8
9
10
11
12
13
14
2
3
4
5

15
Wireless Microphones
Bluetooth®Audio Streaming
Notes on Disposal of the Internal Battery
According to the Battery Act (BattG), we are obliged to point out the following: Bat-
teries must not be disposed in the household waste. Used batteries may contain harmful
substances which, if not properly stored or disposed, could damage the environment or your
health. But batteries also contain important raw materials such as iron, zinc, manganese or
nickel and can be recycled.
In the event of a defect, please dispose of the internal battery only at appropriate battery
disposal facilities or recycling centers in your area.
The two enclosed wireless microphones each require an AA battery, which is not included
in the delivery.
After you have inserted the batteries and pressed the on/off switch on the microphone, it is
ready for use and automatically connected to the sound system. Refer to notes 3 to 7 on
page 13.
After using the microphones, they should be switched off again, otherwise the inserted bat-
tery discharges.
The VHF transmission range of the microphones is 185,15 / 202,2 MHz.
1. Turn on the power of the sound system and press the INPUT MODE key at the front
panel or MODE on the remote until the display shows “blue” as input source.
2. Search the name “Bluetooth” on your mobile phone or an other device and press on
connect. The device gives a signal tone when connection is succeeded.
3. Play music on your mobile phone or an other device and it will be played via the sound
system.
4. To disconnect the Bluetooth®operation, turn off Bluetooth®on your mobile phone or an
other device or change the input source on the sound system.
Pb

DESIGN
Audio Design GmbH
Am Breilingsweg 3 · D-76709 Kronau/Germany
Tel. +49 7253 - 9465-0 · Fax +49 7253 - 946510
www.audiodesign.de
©2019 Audio Design GmbH, All Rights Reserved
Table of contents
Languages:
Popular Speakers System manuals by other brands

Insignia
Insignia NS-HSB318 quick start guide

Sanyo
Sanyo FWSB405FS owner's manual

Uclear
Uclear Motion Series Quick setup guide

Ultimate Sound
Ultimate Sound Platinum Format Series Installation and operation guide

MyLocoSound
MyLocoSound PLC009 US Steam instructions

HP
HP GL313AA - USB Speakers PC Multimedia datasheet