Respireo SOFT Baby User manual

MANUEL D’UTILISATION • USER GUIDE • GEBRAUCHSANLEITUNG • MANUAL DE USO • ISTRUZIONI D’USO • INSTRUÇÕES DE USO
BRUGERVEJLEDNING • BRUKSANVISNING • GEBRUIKSAANWIJZING • INSTRUKCJA OBSŁUGI • ΟΔΗΓΙΗΣ ΧΡΗΣΗΣ
ИНСТРУКЦИЯ ДЛЯ ПОЛЬЗОВАТЕЛЯ • UŽIVATELSKÝ MANUÁL • 使用说明 • 使用説明書
Respireo SOFT Baby
Masque nasal avec fuites calibrées • Nasal mask vented • Nasenmaske mit kalibrierten luftauslassöffnungen • Mascarilla nasal con
oricios de exhalación calibrados • Maschera nasale con fori di esalazione calibrati • Máscara nasal com furos de exalação calibrados
Nasal maske med kalibrerede udåndingshuller • Näsmask med kalibrerade utandningshål • Nesemaske med kalibrerte utpustingshull
• Neusmasker met gekalibreerde ventilatieopeningen • Maska nosowa z kalibrowanymi otworami wentylacyjnymi • Ρινική μάσκα με
ρυθμισμένες οπές εξαερισμού • Носовая маска с калиброванными выдыхательными отверстиями • Nosní maska s kalibrovanými
vydechovacími otvory • 带有标准通气口的 鼻面罩 • 鼻マスク 通気穴付き

2
INDEX
FRANÇAIS
............................................................ p. 7
ENGLISH
................................................................. p. 12
DEUTSCH
.............................................................. p. 16
ESPAÑOL
............................................................... p. 21
ITALIANO
................................................................ p. 26
PORTUGUÊS
................................................... p. 31
DANSK
...................................................................... p.37
SVENSKA
............................................................... p. 41
NORSK
....................................................................... p. 45
NEDERLANDS
............................................... p. 50
POLSKI
....................................................................... p. 55
ΕΛΛΗΝΙΚΑ
............................................................ p. 61
РУССКИЙ
.............................................................. p. 66
ČEŠTINA
................................................................. p. 70
中文
.................................................................................. p. 74
日本語
............................................................................ p. 79

3
Respireo SOFT Baby
A
a)
3)
1)
2)
c)
4)
6)
5)
7)
b)
B
1
2

4
1 2
3 4
Respireo SOFT Baby C
OPTIONAL

5
1 2
3
4
Respireo SOFT Baby D

6
2
Respireo SOFT Baby E
1

7
1 - USAGE PREVU
Respireo SOFT Baby est un masque nasal destiné à être utilisé
sur des enfants ayant un poids compris entre 3 et 12 kg, pour
lesquels une thérapie de pression positive continue aux voies
aériennes (CPAP) ou de ventilation (Bilevel) à deux niveau de
pression positive a été prescrite.
Respireo SOFT Baby est un masque mono-patient en utilisation
à domicile, mais multi-patient en utilisation hospitalière.
2 - AVERTISSEMENTS
2.1 Le masque doit être utilisé sous la surveillance d’un adulte
capable de comprendre les instructions d’utilisation.
2.2 Le masque dans la conguration avec orices de
ventilation (raccord transparent) ne doit être utilisé
qu’avec les équipements CPAP ou Bi-level (générateurs
de ux) conseillés par votre médecin ou votre thérapeute
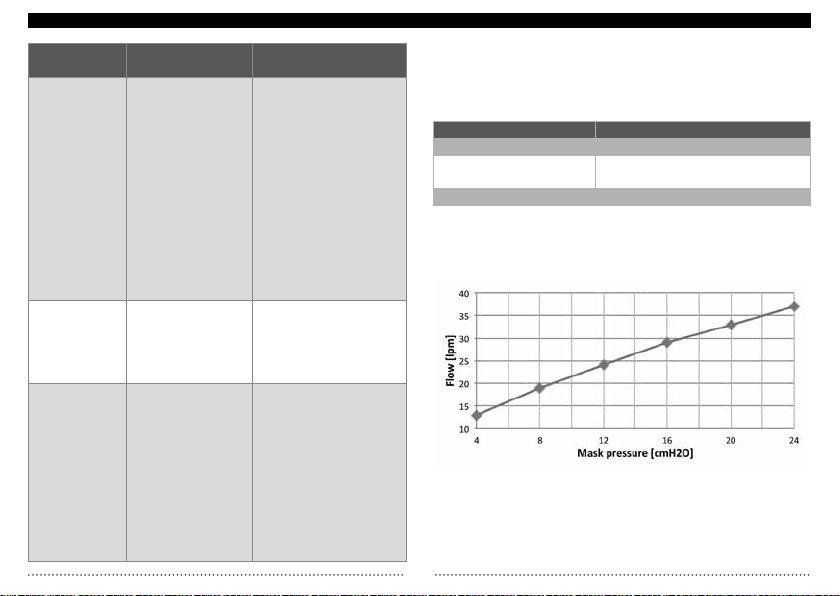
respiratoire et opérant à une pression d’au moins 4
cmH2O. A des pressions inférieures, le débit d’air délivré
par la machine pourrait être insufsant et une ré inhalation
des gaz expirés pourrait se produire.
2.3 Il ne faut jamais boucher les orices de ventilation.
2.4 La gamme de pression thérapeutique doit être comprise
entre 4 et 24cmH2O.
2.5 En cas de gêne, irritation ou de réaction allergique à un
des composants du masque, consultez votre médecin ou
votre thérapeute respiratoire.
2.6 En cas d’adjonction d’oxygène avec les appareils (CPAP
ou Bi-level), éteignez le dispenseur d’oxygène quand
ces appareils ne sont pas en marche an d’éviter que
l’oxygène ne s’accumule à l’intérieur des appareils (CPAP
ou Bi-level) pouvant entrainer un risque d’incendie.
2.7 Défense de fumer ou de se servir de ammes libres quand
vous utilisez de l’oxygène.
2.8 N’utilisez pas le masque en cas de vomissement.
2.9 Le masque doit être nettoyé et désinfecté. Pour plus
de détails, consultez le paragraphe NETTOYAGE DU
MASQUE.
2.10 Avant d’utiliser le masque, vériez son intégrité ; s’il a subi
des dommages pendant le transport, adressez-vous à
votre revendeur.
2.11 Seules sont admises les modalités d’utilisation qui sont
expressément décrites dans ce manuel.
2.12 Certains composants du masque, du fait de leur taille,
risquent d’être avalés par les enfants. Ne pas laisser ces
composants sans surveillance. La présence d’un adulte
est toujours nécessaire.
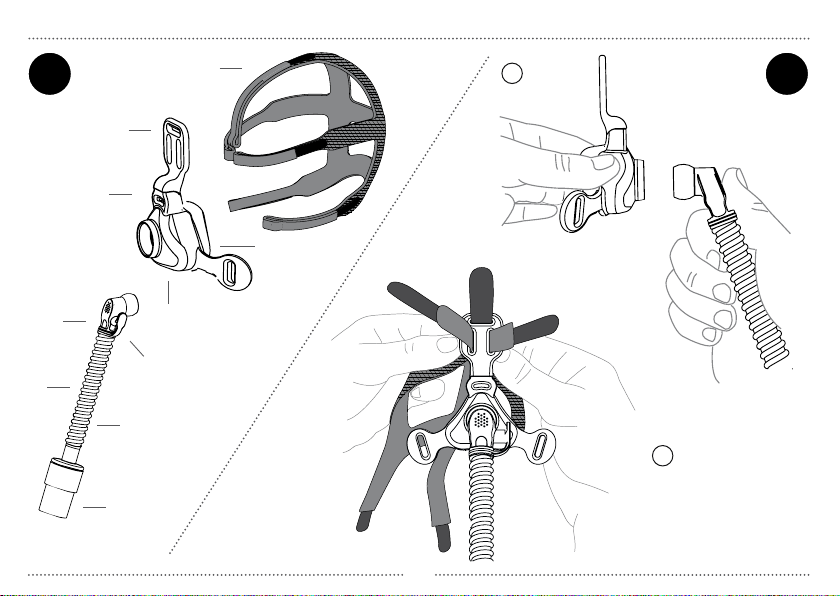
3 - COMPOSANTS DU MASQUE (Fig.A)
a) Corps principal: armature (1), bulle (2), appui frontal (3).
b) Groupe tube: raccord coudé avec fuite calibrée (4), tube (5),
connecteur tournant (6), bouchon (7).
c) Harnais.
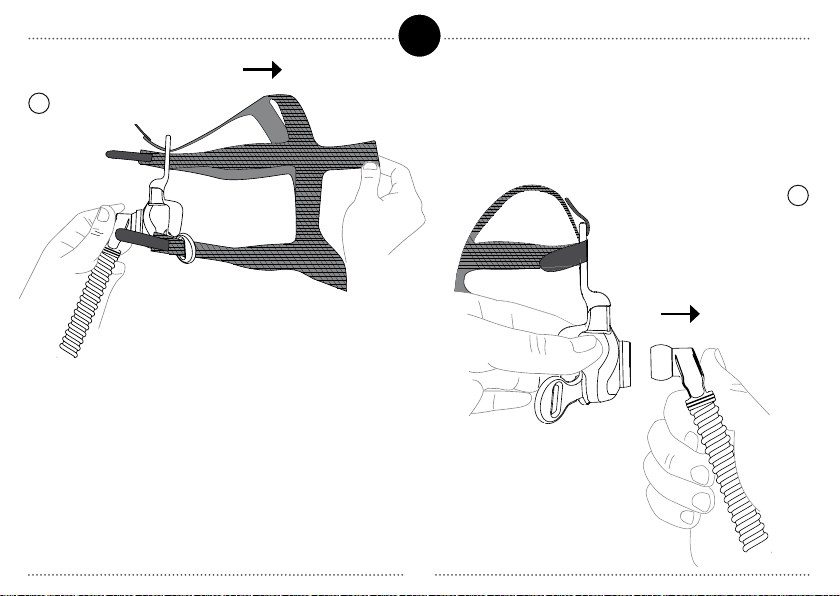
4 - PREMIÈRE INSTALLATION DU MASQUE (Fig. B-C)
Raccordez le groupe tube (b) en introduisant la partie sphérique
du raccord coudé (4) dans l’insert du corps principal (a) comme
le montre la gure B1.
L’installation du masque dépend de la conguration choisie
(AVEC ou SANS et appui frontal).
Merci de vous reporter au paragraphe correspondant à la
conguration sélectionnée:
4.1 - Masque AVEC appui frontal (3)
4.2 – Masque SANS appui frontal (3)
FRANÇAIS

8
4.1 UTILISATION DU MASQUE AVEC APPUI FRONTAL
(FIG. B2)
4.1.1 Introduisez les trois courroies supérieures du harnais (c)
dans les trois fentes supérieures de l’appui frontal (3) comme le
montre la gure B2 puis accrochez les courroies.
4.1.2 Merci de vous reporter directement au paragraphe
INSTALLATION DU MASQUE SUR LE NOURISSON.
4.2 UTILISATION DU MASQUE SANS APPUI FRONTAL
(FIG. C) (OPTION)
4.2.1 Pour enlever l’appui frontal (3), il suft de couper le corps
principal (a) à l’aide de ciseaux comme le montre la gure C1.
N.B: Attention, ne jetez pas l’appui frontal (3) qui sera utilisé
par la suite.
N.B: Attention, l’acte de coupure est irréversible. Après que
vous avez enlevé l’appui frontal (3), il ne sera plus possible de
le raccrocher au corps principal (a) du masque.
4.2.2 Introduisez la courroie centrale du harnais (c) tout d’abord
dans la fente supérieur de l’appui frontal précédemment coupé,
puis dans la fente supérieure du corps principale (a) comme le
montre la gure C2.
4.2.3 Insérez les courroies latérales du harnais dans les fentes
latérales de l’appui frontal (désolidarisé du corps principal)
comme le montre la gure C3.
4.2.4 Introduisez la courroie centrale supérieure du harnais
(c) dans la fente supérieure du corps principal (a) comme le
montre la gure C4; accrochez ensuite la courroie).
5 - INSTALLATION DU MASQUE SUR LE NOURISSON (Fig.D)
5.1 En tenant le masque délicatement bloqué sur le visage et
en s’assurant que la bulle (2) adhère bien au prol autour du
nez, enlez la coquille sur la tête de l’enfant comme le montre
la gure D1.
5.2 Introduisez les courroies inférieures non accrochée du harnais
(c) dans les fentes latérales correspondante du corps principal (a)
comme le montre la gure D2; accrochez ensuite la courroies.
5.3 An d’assurer le bon positionnement du masque, veillez
à ajuster les réglages des courroies, en débutant par les
courroies inférieures, comme indiqué dans la gure D3.
5.4 Connectez le connecteur tournant transparent (6) aucircuit
respiratoire de l’appareil de ventilation comme montré dans la
gure D4. Ensuite, allumez l’appareil de ventilation.
5.5 An d’éliminer toute fuite non intentionnelle autour de la
bulle, tirez tout d’abord sur les courroies du bas, tout en veillant
à ce que le masque adhère bien au visage de l’enfant. Faites
attention à ne pas trop serrer.
N.B. Les courroies supérieures servent à maintenir le masque
en place, non à assurer l’étanchéité au niveau de la bulle. Pour
cette raison, veillez à les serrer avec une tension minimale.
6 - RETRAIT DU MASQUE
Pour retirer le masque, décrochez une des deux courroies
inférieures du harnais. Éloignez le masque du nez de l’enfant
et soulevez le harnais au-dessus de la tête.
Il n’est pas nécessaire de desserrer ou de détacher les autres
courroies du harnais.
7 - DÉMONTAGE DU MASQUE (Fig.E)
7.1 Détachez le harnais (c) du corps principal (a) en décrochant
les courroies puis en les retirant des fentes comme le montre
la gure E1.
7.2 Détachez le groupe tube (b) en extrayant le raccord coudé
FRANÇAIS

9
9 - PRÉCAUTIONS
N’utilisez pas de solution contenant de l’alcool, des composés
aromatiques, des humidiants, des agents antibactériens ou
des huiles aromatiques pour nettoyer le masque. Ces solutions
peuvent endommager le produit et abréger sa durée de vie.
L’exposition prolongée du masque à la lumière directe du soleil
ou à la chaleur pourrait l’endommager.
En cas de détérioration visible (ssures, déchirures, etc.),
éliminez et remplacez le composant endommagé. Vériez
minutieusement l’absence de dépôts de savon ou de corps
étrangers à l’intérieur du masque.
10 - PORT D’ENTREE POUR CONTRÔLE PPC OU
ADJONCTION OXYGENE
Si un supplément d’oxygène ou des lectures de pression sont
nécessaires, vous pouvez utiliser l’ouverture prévue à cet effet
sur le raccord coudé (4).
Ouvrez le bouchon de l’ouverture (7), introduisez fermement le
tube d’oxygène ou de pression dans l’ouverture.
11 - PROBLÈMES, CAUSES POSSIBLES ET SOLUTIONS
(4) du corps principal (a) comme le montre la gure E2.
8 - NETTOYAGE DU MASQUE
8.1 - NETTOYAGE QUOTIDIEN DU MASQUE POUR LE
RÉUTILISER SUR LE MÊME PATIENT
Avant de nettoyer le masque, lavez-vous soigneusement les
mains.
Pour nettoyer le masque, démontez ses différents composants
(voir le paragraphe DÉMONTAGE DU MASQUE) et lavez-le
soigneusement à l’eau tiède (à 30°C environ) avec un savon
neutre. Rincez bien le masque à l’eau potable et laisse-le
sécher à l’air et à abri de la lumière solaire directe.
N.B. Il est conseillé de nettoyer la coquille une fois par semaine.
8.2 - RETRAITEMENT DU MASQUE POUR LE RÉUTILISER
SUR DES PATIENTS DIFFÉRENTS
N.B. Vous devez impérativement régénérer le masque avant de
l’utiliser sur un nouveau patient.
N.B. La coquille (c) doit être remplacée.
N.B. En cas de désinfection thermique, de désinfection chimique
ou de stérilisation en autoclave, veuillez remplacer le tube (b).
Pour permettre un usage multi-patient, le masque peut être
désinfecté (maximum 12 cycles) selon les protocoles suivants:
• Désinfection thermique;
• Désinfection chimique;
• Stérilisation à l’autoclave (121°C, maximum 20 minutes);
• Stérilisation eu gaz plasma Sterrad.
Veuillez consulter le détail des instructions de stérilisation et
de désinfection à disposition sur le site
www.device.airliquidehealthcare.com ou adressez-vous à
votre revendeur.
FRANÇAIS
PROBLÈMES CAUSES
POSSIBLES
SOLUTIONS
• Il ne sort
pas d’air du
masque,
ou le débit
d’air est
insufsant
• Générateur de
débit éteint.
• Générateur de
débit mal réglé.
• Tube du circuit
patient non
branché.
• Allumer le générateur
de débit.
• Régler le générateur
de débit.
• Brancher le tube de
raccordement au
générateur de débit et
au masque.

10
12 - COMPOSITION ET ÉLIMINATION
L’appareil et ses composants sont réalisés avec les matériaux
indiqués ci-dessous ; leur élimination doit être effectuée dans
le respect des réglementations en vigueur.
COMPOSANT MATÉRIAU
corps principal (a) Silicone+ Polycarbonate
groupe tube vented (b) Polycarbonate+Métallocène-
+Acétal+Silicone
harnais (c) Nylon+Polyuréthane
13 - DONNÉES TECHNIQUES
DÉBIT CONTINU MINIMUM
REMARQUE : En raison de différences de fabrication, il pourra
y avoir des différences dans le débit d’air expiré par rapport aux
valeurs indiquées dans le tableau (±10%).
FRANÇAIS
PROBLÈMES CAUSES
POSSIBLES
SOLUTIONS
• Masque
bruyant.
• Les orices
d’exhalation
sont obstrués
partiellement ou
complètement.
• Le masque a
été assemblé de
façon incorrecte.
• Nettoyer les trous à
l’aide d’une brosse à
soies douces.
• Désassembler
le masque puis
l’assembler
à nouveau
conformément aux
indications fournies
au paragraphe
MONTAGE DU
MASQUE.
• L’air expiré
ne sort pas,
difculté dans
l’expiration.
• Les orices
d’exhalation
sont obstrués
partiellement ou
complètement.
• Nettoyer les trous à
l’aide d’une brosse à
soies douces.
• Le masque ne
s’adapte pas
au visage du
enfant, fuites
d’air.
• Le masque n’a
pas été placé
correctement
sur le visage du
patient.
• Les régalges du
harnais sont trop
tendus/serrés.
• Repositionner le
masque en suivant
les indications
du paragraphe
INSTALLATION DU
MASQUE SUL LE
NOURISSON
• Détacher les
courroies et régler de
nouveau en veillant à
ne pas trop serrer.

11
FRANÇAIS
Réglementations
Marquage CE en conformité avec
la directive européenne 93/42/
EEC.classe IIa et modications
d'implémentation successives.
EN ISO 14971, ISO 5356-1, ISO
10993-1, EN ISO 17510-2, EN
ISO 17664
Résistance
1,05 cm
H2O
à 50 lpm – 3,30
cm
H2O
à 100 lpm
Espace mort à l'intérieur du
masque
63 ml
Pression sonore pondérée A
selon la norme ISO 3744 15,8 dB(A) ± 1,5 dB(A)
Puissance sonore pondérée
A selon la norme ISO 3744 19,5 dB(A) ± 1,5 dB(A)
Pression de traitement 4 cmH2O – 24 cmH2O
Température de service Température : 5°C – 40°C
Dimensions d'ensemble
maximales 86 mm x 70 mm x 352 mm
14 - CERTIFICAT DE GARANTIE
Air Liquide Medical Systems S.r.l. garantit votre produit contre
tout défaut de matériaux ou de main d’œuvre pendant une
période de 120 jours à compter de la date d’achat à condition
que les prescriptions d’utilisation indiquées dans la notice
d’instructions soient respectées.
Si le produit s’avère défectueux aux conditions normales
d’utilisation, Air Liquide Medical Systems S.r.l. réparera
ou remplacera le produit défectueux ou ses éléments à sa
discrétion.
Le fabricant se considère responsable de la sécurité, de la
fiabilité et du rendement du dispositif à condition qu’il soit utilisé
conformément au présent mode d’emploi et à la destination
d’emploi prévue. Le fabricant se considère responsable de la
sécurité, de la fiabilité et du rendement du dispositif à condition
que les réparations soient effectuées à la propre usine du
fabricant ou auprès d’un atelier agréé par ce dernier.
Conserver l’emballage original pendant toute la période de
garantie.
En cas de défaut du produit, contactez votre revendeur pour
faire valoir la garantie.
Pour plus de renseignements sur les droits prévus par la
garantie, adressez-vous à votre revendeur.
COPYRIGHT
Aucun des renseignements contenus dans ce manuel ne peut
être utilisé pour des finalités différentes de celles qui sont
prévues à l’origine. Le présent manuel est la propriété d’Air
Liquide Medical Systems S.r.l. et ne peut pas être reproduit,
que ce soit totalement ou partiellement, sans l’autorisation
écrite de la société. Tous droits réservés.
MISE À JOUR DES CARACTÉRISTIQUES TECHNIQUES
Dans l’optique d’une amélioration constante du rendement,
de la sécurité et de la fiabilité, tous les dispositifs médicaux
produits par Air Liquide Medical Systems S.r.l. font l’objet
de révisions et de modifications périodiques. Les manuels
d’instructions sont donc modifiés en conséquence pour assurer
la cohérence constante avec les caractéristiques des appareils
mis sur le marché. En cas de perte du manuel d’instructions qui
accompagne ce dispositif vous pourrez demander au fabricant
un exemplaire de la version correspondant à votre équipement
en citant les références présentes sur l’étiquette.

12
1 - APPLICATION
Respireo SOFT Baby is a non-invasive nasal mask used for
treating respiratory failure in babies weighing between 3 and
12 kg.
Respireo SOFT Baby is designed for use by babies who have
been prescribed continuous positive airway pressure (CPAP)
or Bi-level positive airway pressure treatment.
Respireo SOFT Baby is designed for use by a single patient at
home or more than one in the hospital environment.
2 - IMPORTANT NOTES
2.1 The mask must be used under the supervision of an
adult who has read and understands the instructions.
2.2 The mask must only be used with a CPAP device or
Bi-level ow generator recommended by the family
doctor or respiratory therapist, operating at a pressure
of at least 4 cmH2O. With low CPAP pressures, the ow
through the vent ports may be insufcient to eliminate all
the gas exhaled from the tube, which could lead to partial
re-inhalation.
2.3 The vents in the mask must never be obstructed.
2.4 The operating pressure range is 4-24 cmH2O.
2.5 If you experience discomfort or irritation, or suffer an
allergic reaction to any of the components of the mask,
please report this to your doctor or respiratory therapist.
2.6 If oxygen is used with the device (CPAP or Bi-level), the
oxygen supply must be turned off when it is not in use to
prevent oxygen accumulating inside, which is a re risk.
2.7 Never smoke or light naked ames when using oxygen.
2.8 Do not use the mask in the presence of nausea or
vomiting.
2.9 The mask must be cleaned and disinfected. For further
details refer to section CLEANING THE MASK.
2.10 Check the mask each time before use. If there is any
visible damage, report it to the dealer.
2.11 The mask must only be used in accordance with these
instructions only. No other instructions are applicable.
2.12 Some of the components of the mask are small enough
to be swallowed by children and must never be left
unattended. An adult must always be present.
3 - COMPONENTS OF THE MASK (Fig.A)
(a) Main body: frame (1), cushion (2), forehead rest (3);
(b) Tube assembly: elbow tting with calibrated vent ports
(4), tube (5), swivel tting (6), cap (7);
(c) Headgear.
4 - HOW TO ASSEMBLE THE MASK (Fig. B-C)
Connect the tube assembly (b) by inserting the sphere on the
elbow tting (4) in the slot in the main body (a), as shown in
Fig. B1.
The instructions on how to use the mask depend on the
chosen conguration (WITH or WITHOUT the forehead rest).
Refer to the relevant subsection:
4.1 – Using the mask WITH the forehead rest (3)
4.2 – Using the mask WITHOUT the forehead rest (3)
4.1 USING THE MASK WITH THE FOREHEAD REST
(FIG. B2)
4.1.1 Insert the three straps at the top of the headgear (c) in
the three slots in the forehead rest (3), as shown in Fig. B2.
Then fasten the straps.
ENGLISH

13
4.1.2 Move on to Section HOW TO PUT THE MASK ON THE
CHILD.
4.2 USING THE MASK WITHOUT THE FOREHEAD REST
(FIG. C) (OPTION)
4.2.1 To remove the forehead rest (3), merely cut it off the main
body (a) using a pair of scissors, as shown in Fig. C1.
N.B. Do not throw away the forehead rest (3). It will be required
later.
N.B. Once the forehead rest (3) has been cut off from the main
body (a), it cannot be reattached.
4.2.2 Take the cut-off forehead rest (3) and insert the central
strap at the top of the headgear (c) in the top slot, as shown in
Fig. C2.
4.2.3 Insert the side straps at the top of the headgear (c) in the
side slots, as shown in Fig. C3.
4.2.4 Insert the central strap at the top of the headgear (c) in the
slot at the top of the main body (a), as shown in Fig. C4. Then
fasten the strap.
5 - HOW TO PUT THE MASK ON THE CHILD (Fig.D)
5.1 Place the mask gently on the child’s face, making sure the
cushion (2) ts snugly round the nose. Pull the headgear over
the child’s head, as shown in Fig. D1.
5.2 Insert the loose lower straps of the headgear (c) in the side
slots in the main body (a), as shown in Fig. D2. Then tighten
the straps.
5.3 Position the headgear (c) comfortably on the child’s head
and adjust all the straps, starting from the lower ones, as shown
in Fig. D3.
5.4 Connect the swivel tting (6) to the tube of the CPAP/Bi-level
device, as shown in Fig. D4. Then turn on the ow generator.
5.5 Readjust the lower straps if necessary to eliminate any
leaks, but make sure the mask is not too tight.
N.B. The lower straps only serve to hold the mask in position, so
they must be kept fairly loose.
6 - HOW TO REMOVE THE MASK
Unfasten one of the lower straps on the headgear (c). Take off
the mask off the face and lift the headgear off. It is not necessary
to unfasten the other straps.
7 - HOW TO DISSAMBLE THE MASK (Fig. E)
7.1 Unfasten and pull out the straps, as shown in Fig. E1, then
detach the headgear (c) from the main body (a).
7.2 Detach the tube assembly (b) by pulling the elbow tting (4)
out of the main body (a), as shown in Fig. E2.
8 - HOW TO CLEAN THE MASK
8.1 – DAILY CLEANING FOR REUSE BY THE SAME PATIENT
First wash your hands thoroughly.
Disassemble all the components (see HOW TO DISASSEMBLE
THE MASK) and wash carefully in warm water at about 30°C,
using mild soap. Rinse thoroughly under the tap and leave in the
air to dry, but not in direct sunlight.
N.B. The headgear (c) should be cleaned once a week.
8.2 – REPROCESSING THE MASK FOR RE-USE WITH
OTHER PATIENTS
N.B. The mask must always be regenerated before being
used by another patient.
ENGLISH

14
N.B. The headgear (c) must be replaced each time.
N.B. In case of thermal disinfection, chemical disinfection and
autoclave sterilization, the tube assembly (b) must be replaced.
The mask can be regenerated up to 12 times, using one of the
following methods:
• high-level thermal disinfection;
• high-level chemical disinfection;
• sterilisation in an autoclave at 121°C for no more than 20
minutes;
• Sterrad gas-plasma sterilisation.
Full details of the mask regeneration process can be obtained
by logging on to www.device.airliquidehealthcare.com or by
contacting your dealer.
9 - PRECAUTIONS
Do not clean the mask with solutions containing alcohol,
aromatic compounds, humidiers, antibacterial agents or
aromatic oils as they would damage the product and reduce
its life.
Prolonged exposure to direct sunlight or heat may damage
the mask.
If any damage is noticed (cracks, tears, etc.), the damaged
part must be replaced.
Check carefully to make sure there are no soap deposits or
foreign bodies inside the mask.
10 - PRESSURE/OXYGEN PORT
If additional oxygen or a pressure reading is required, use the
port in the elbow tting (4).
Remove the cap (7) and insert the oxygen/pressure tube in
the port.
ENGLISH
11 - TROUBLE-SHOOTING CHART
PROBLEMS POSSIBLE CAUSES SOLUTIONS
• No air or
insufcient
air comes
out of the
mask
• Flow generator off
• Flow generator
regulated wrongly
• Patient tube not
connected
• Switch on the ow
generator.
• Regulate the ow
generator.
• Connect the patient
tube to the ow
generator and mask.
• The mask is
noisy
• Vent ports
partially or entirely
obstructed
• Mask assembled
incorrectly
• Clean the vents using
a SOFT brush.
• Take the mask apart
and reassemble it, as
explained in section
HOW TO ASSEMBLE
THE MASK.
• Exhaled air
does not
ow out and
difculty
exhaling
• Vent ports partially
or entirely
obstructed
• Clean the vents using
a SOFT brush.
• The mask
does not
t the face
snugly
• Mask not positioned
correctly on the
patient’s face
• Headgear straps
too tight
• Reposition the mask,
as explained in
section HOW TO PUT
THE MASK ON THE
CHILD.
• Unfasten the lower
straps and refasten
more loosely.

15
ENGLISH
12 - DISPOSAL INSTRUCTIONS
The components of the mask are made of the following
materials and must be disposed of in accordance with the
applicable laws.
COMPONENT MATERIAL
Main body (a) Silicone + Polycarbonate
Tube assembly (b) Polycarbonate + Metallocene + Acetalic
+ Silicone
Headgear (c) Nylon + polyurethane
13 - TECHNICAL DATA
MINIMUM CONTINUOUS FLOW
N.B. Due to manufacturing differences, the exhalation ow rate
may differ from the values shown in the table (±10%).
Normative references
CE marking in accordance with
European Directive 93/42/EEC,
class IIa, as amended, EN ISO
14971, ISO 5356-1, ISO 10993-1
and EN ISO 17510-2, EN ISO 17664
Resistance
1,05 cm
H2O
at 50 lpm – 3,30 cm
H2O
at 100 lpm
Dead space volume
inside the mask 63 ml
Weighted sound
pressure A
according to ISO 3744
15,8 dB(A) ± 1,5 dB(A)
Weighted acoustic
pressure A
according to ISO 3744
19,5 dB(A) ± 1,5 dB(A)
Operating pressure 4-24 cmH2O
Temperature range 5-40°C
Max. overall dimensions 86 mm x 70 mm x 352 mm
14 - WARRANTY
Air Liquide Medical Systems S.r.l. warrants the product free
from material and manufacturing defects for a period of 120
days from the date of purchase, provided the operating
conditions and instructions are complied with.
If the product is found to be faulty during normal use, it will be
repaired or replaced at the manufacturer’s discretion.
The manufacturer accepts liability for the safety, reliability and
performance of the device only if it is used for the intended
application and in accordance with the operating instructions.
The manufacturer accepts liability for the safety, reliability and
performance of the device only if repairs are carried out by the
manufacturer or an authorised workshop.
The original packaging must be retained for the entire warranty
period.
Claims under the warranty should be submitted to your local
dealer, who can also provide further details of your warranty
rights.

16
ENGLISH DEUTSCH
2 - WARNHINWEISE
2.1 Die Maske muss unter der Aufsicht eines Erwachsenen
verwendet werden, der in der Lage ist, die
Gebrauchsanweisung zu verstehen.
2.2 Die Maske darf nur mit CPAP- oder BiLevel-Geräten
(Flussgeneratoren) verwendet werden, die vom
behandelnden Arzt oder Atemtherapeuten empfohlen
wurden und mit einem Druck von mindestens 4 cmH2O
arbeiten. Bei niedrigen Druckwerten auf CPAP-Niveau
kann der Luftuss durch die Luftauslassöffnungen nicht
ausreichend sein, um das ausgeatmete Gas vollständig
aus dem Schlauch zu führen. In diesem Fall kann es zu
einer partiellen Rückatmung kommen.
2.3 Die Luftauslassöffnungen der Maske dürfen niemals
verstopft sein.
2.4 Der Betriebsdruckbereich liegt zwischen 4 und 24 cmH2O.
2.5 Bei Unannehmlichkeiten oder Reizungen oder bei
allergischen Reaktionen auf irgendeinen Bestandteil
der Maske wenden Sie sich bitte an Ihren Arzt oder
Atemtherapeuten.
2.6 Wenn Sauerstoff mit den Geräten (CPAP oder BiLevel)
verwendet wird, muss die Sauerstoffzufuhr ausgeschaltet
werden, wenn diese nicht in Betrieb sind, um zu vermeiden,
dass sich Sauerstoff im Inneren der Geräte (CPAP oder
BiLevel) ansammelt und dadurch Brandgefahr entsteht.
2.7 Während der Verwendung von Sauerstoff ist es verboten,
zu rauchen oder freie Flammen einzusetzen.
2.8 Verwenden Sie die Maske nicht bei Erbrechen.
2.9 Die Maske muss gereinigt und desinziert werden. Für
weitere Einzelheiten siehe Abschnitt REINIGUNG DER
MASKE.
COPYRIGHT
The information contained in this booklet must not be used for
any purpose other than the reason for which it is provided. This
booklet is the property of Air Liquide Medical Systems S.r.l. and
no part of it may be reproduced without the manufacturer’s
written permission. All rights reserved.
TECHNICAL UPDATES
Air Liquide Medical Systems S.r.l. periodically reviews and
modies all its medical devices in order to improve their
performance, safety and reliability. The instruction booklets are
updated to make sure they remain consistent with the features of
the devices placed on the market. If the booklet accompanying
the device gets damaged or mislaid, a replacement copy can
be obtained from the manufacturer by quoting the data shown
on the rating plate.
DEUTSCH
1 - VERWENDUNGSZWECK
Respireo SOFT Baby ist eine Maske für die nichtinvasive
Beatmung, die für die Behandlung von Ateminsufzienz
bei Kindern mit einem Körpergewicht zwischen 3 und 12 kg
verwendet wird.
Respireo SOFT Baby kann bei Kindern eingesetzt werden, die
eine Therapie der Atemwege mit kontinuierlichem positivem
Überdruck (CPAP) oder eine BiLevel-Behandlung (Zweiphasen-
Überdruckbeatmung) verschrieben bekommen haben;
Respireo SOFT Baby ist eine Maske für den Gebrauch durch
nur einen Patienten im häuslichen Umfeld sowie für den
Gebrauch durch mehrere Patienten im Krankenhaus.

17
4.2 - GEBRAUCH DER MASKE OHNE STIRNSTÜTZE
(ABB.C) (OPTION)
4.2.1 Um die Stirnstütze (3) zu entfernen, muss lediglich mit
einer Schere der Hauptkörper (a), wie in Abbildung C1 gezeigt,
abgeschnitten werden.
NB. Achtung, werfen Sie nicht die Stirnstütze (3) weg; sie wird
später verwendet.
NB. Achtung, nachdem sie einmal entfernt wurde, kann die
Stirnstütze (3) nicht wieder an den Hauptkörper (a) der Maske
angebracht werden.
4.2.2 Nehmen Sie die zuvor abgeschnittene Stirnstütze (3)
und führen Sie in ihren oberen Schlitz den oberen, mittleren
Riemen der Kopfkappe (c) ein, wie in Abbildung C2 gezeigt.
4.2.3 Führen Sie dann die oberen, seitlichen Riemen der
Kopfkappe (c) in die seitlichen Schlitze der Stirnstütze ein, wie
in Abbildung C3 gezeigt.
4.2.4 Führen Sie den oberen, mittleren Riemen der Kopfkappe
(c) in den oberen Schlitz des Hauptkörpers (a) ein, wie in
Abbildung C4 gezeigt; sichern Sie dann den Riemen.
5 - ANLEGEN DER MASKE AN DAS KIND (Abb.D)
5.1 Drücken Sie die Maske sanft auf das Gesicht, vergewissern
Sie sich, dass dasPolster (2) am Prol um die Nase herum
anliegt, und ziehen Sie die Kopfkappe über den Kopf des
Kindes, wie in Abbildung D1.
5.2 Führen Sie die unteren, nicht gesicherten Riemen der
Kopfkappe (c) in die betreffenden seitlichen Schlitze des
Hauptkörpers (a) ein, wie in Abbildung D2 gezeigt; sichern Sie
dann die Riemen.
5.3 Passen Sie die Kopfkappe (c) an den Kopf des Kindes an,
indem Sie ausgehend von den unteren Riemen alle Riemen
2.10 Überprüfen Sei vor dem Gebrauch die Unversehrtheit
der Maske. Falls sie während des Transports beschädigt
wurde, melden Sie dies ihrem Händler.
2.11 Es sind nur die Anwendungsverfahren zulässig, die in
dieser Bedienungsanleitung angegeben sind.
2.12 Einige Bestandteile der Maske können aufgrund ihrer
Größe von Kindern verschluckt werden. Lassen Sie
diese Bestandteile nicht unbeaufsichtigt. Es ist immer die
Anwesenheit eines Erwachsenen erforderlich.
3 - BESTANDTEILE DER MASKE (Abb.A)
a) Hauptkörper: Gestell (1), Polster (2), Stirnstütze (3).
b)Schlaucheinheit: Kniestück mit kalibrierten Luftauslassöffnungen
(4), Schlauch (5), Drehanschluss (6), Verschlusskappe (7).
c) Kopfkappe.
4 - MONTAGE DER MASKE (Abb. B-C)
Schließen Sie die Schlaucheinheit (b) an, indem Sie das
kugelförmige Ende des Kniestücks (4) in den steifen Sitz des
Hauptkörpers (a) einstecken, wie in Abbildung B1 gezeigt.
Das Anlagen der Maske hängt von der gewählten Konguration
ab (MIT oder OHNE Stirnstütze). Gehen Sie zu dem Abschnitt
der gewählten Konguration:
4.1- Maske MIT Stirnstütze (3)
4.2 - Maske OHNE Stirnstütze (3)
4.1 - GEBRAUCH DER MASKE MIT STIRNSTÜTZE (ABB.B2)
4.1.1 Führen Sie die drei oberen Riemen der Kopfkappe (c) in
die drei oberen Schlitze der Stirnstütze ein (3), wie in Abbildung
B2 gezeigt, und sichern Sie sie anschließend.
4.1.2 Gehen Sie direkt zum Abschnitt ANLEGEN DER MASKE
AN DAS KIND.
DEUTSCH

18
justieren, wie in Abbildung D3 gezeigt.
5.4 Schließen Sie den transparenten Drehanschluss (6) an
den Schlauch des CPAP/Bilevel-Geräts an, wie in Abbildung
D4 gezeigt. Schalten Sie nun den Flussgenerator ein.
5.5 Justieren Sie bei Bedarf erneut die Spannung der unteren
Riemen, um mögliche Verluste zu vermeiden. Geben Sie acht,
die Riemen nicht zu fest anzuziehen.
NB.: Die oberen Riemen dienen allein dazu, die Maske
in Stellung zu halten, und sind daher lediglich mit einer
Mindestspannung anzuziehen.
6 - ABNEHMEN DER MASKE
Um die Maske abzunehmen, lösen Sie einen der beiden
unteren Riemen der Kopfkappe. Entfernen Sie die Maske von
der Nase und heben Sie die Kopfkappe über den Kopf.
Es ist nicht nötig, die anderen Riemen der Kopfkappe zu
lockern oder zu entfernen.
7 - ZERLEGEN DER MASEK (Abb.E)
7.1 Lösen Sie die Kopfkappe (c) vom Hauptkörper (a), indem
Sie die Riemen öffnen und aus dem Hauptkörper herausziehen,
wie in Abbildung E1 gezeigt.
7.2 Entfernen Sie die Schlaucheinheit (b), in dem Sie den
Drehanschluss (4) aus dem Hauptkörper (a) herausziehen, wie
in Abbildung E2 gezeigt.
8 - REINIGUNG DER MASKE
8.1 – TÄGLICHE REINIGUNG DER MASKE FÜR EINE
WIEDERVERWENDUNG BEI DENSELBEN PATIENTEN:
Waschen Sie sich gründlich die Hände, bevor Sie die Maske
reinigen.
Für die Reinigung muss die Maske in ihre Bestandteile zerlegt
(siehe Abschnitt ZERLEGEN DER MASKE) und anschließend
sorgfältig in lauwarmem Wasser (circa 30°C) mit neutraler
Seife gewaschen werden. Spülen Sie die Maske gründlich mit
Trinkwasser ab und lassen Sie sie vor direktem Sonnenlicht
geschützt an der Luft trocknen.
NB.: Es wird empfohlen, die Kopfkappe (c) einmal wöchentlich
zu reinigen
8.2 – AUFBEREITUNG DER MASKE FÜR DIE
WIEDERVERWENDUNG BEI ANDEREN PATIENTEN
NB.: Die Maske muss immer aufbereitet werden, bevor sie für
einen neuen Patienten verwendet wird.
NB.: Die Kopfkappe (c) muss ersetzt werden.
NB.: Bei Sterilisation im Autoklav, chemische Desinfektion oder
thermischer Desinfektion muss die Schlauchgruppe (b) ersetzt
werden.
Die Maske kann maximal 12 Mal anhand eines der
nachstehenden Verfahren aufbereitet werden:
• hochgradige thermische Desinfektion;
• hochgradige chemische Desinfektion;
• Sterilisation im Autoklav bei 121°C für einen Zeitraum von
maximal 20 Minuten;
• Sterrad Gasplasma-Sterilisation.
Für alle Details über das Verfahren zum Aufbereiten der Maske
lesen Sie die Anweisungen, die im Netz unter der Adresse
www.device.airliquidehealthcare.com zur Verfügung stehen
oder bei Ihrem Händler angefordert werden können.
9 - VORSICHTSMAßREGELN
Verwenden Sie keine Lösungen, die Alkohol, aromatische
Verbindungen, Befeuchtungsmittel, antibakterielle Mittel oder
DEUTSCH

19
Duftöle erhalten, um die Maske zu reinigen. Diese Lösungen
können Schäden hervorrufen und die Lebensdauer des
Produkts verkürzen.
Direkte Sonnen- oder Hitzeeinstrahlung auf die Maske über
einen längeren Zeitraum können diese beschädigen.
Bei sichtbaren Verschleißerscheinungen (Brüche, Risse usw.)
muss das beschädigte Bestandteil der Maske entfernt und
ersetzt werden.
Kontrollieren Sie sorgfältig, dass sich im Inneren der Maske
keine Seifenreste oder Fremdkörper benden.
10 - SCHNITTSTELLE ZUM MESSEN DES DRUCKS UND
ZUR VERABREICHUNG VON SAUERSTOFF
Wenn zusätzlicher Sauerstoff und/oder Druckmesswerte
erforderlich sind, kann die dafür vorgesehene Schnittstelle am
Kniestück (4) benützt werden.
Öffnen Sie die Verschlusskappe der Schnittstelle (7) und
setzen Sie den Sauerstoff- oder Druckschlauch fest in der
Schnittstelle ein.
11 - PROBLEME, MÖGLICHE URSACHEN, BEHELF
DEUTSCH
PROBLEME MÖGLICHE
URSACHEN
BEHELF
• Aus der Maske
tritt keine oder
nur unzureichend
Luft aus
• Flussgenerator
ausgeschaltet
• Flussgenerator
schlecht eingestellt
• Patientenkreis nicht
angeschlossen
• Flussgenerator
einschalten
• Flussgenerator
einstellen
• Patientenkreis am
Flussgenerator
und an der Maske
anschließen
PROBLEME MÖGLICHE
URSACHEN BEHELF
• Maske nicht
geräuscharm
• Die
Luftauslassöffnungen
der Maske sind
teilweise oder
vollständig verstopft
• Die Maske
wurde falsch
zusammengebaut
• Die Öffnungen mit
einer Bürste mit
weichen Borsten
reinigen
• Zerlegen Sie die
Maske und bauen
Sie sie erneut
wie im Abschnitt
MONTAcGE
DER MASKE
beschrieben
zusammen.
• Die
Ausströmungsluft
tritt nicht aus,
Schwierigkeiten
beim Ausatmen
• Die
Luftauslassöffnungen
der Maske sind
teilweise oder
vollständig verstopft
• Die Öffnungen mit
einer Bürste mit
weichen Borsten
reinigen
• Die Maske passt
sich nicht an
das Gesicht des
Patienten an,
Luftverlust
• Die Maske liegt nicht
ordnungsgemäß
am Gesicht des
Patienten an
• Die Riemen der
Kopfkappe sind zu
eng eingestellt
• Legen Sie die
Maske erneut
entsprechend der
Beschreibung
im Abschnitt
ANLEGEN DER
MASKE AN DAS
KIND an
• Lösen und sichern
Sie die unteren
Riemen, indem
Sie sie sanft
anziehen

20
12 - ENTSORGUNG
Die Bestandteile der Maske sind aus den unten angegebenen
Materialien hergestellt. Sie müssen in Übereinstimmung mit
den geltenden Gesetzesbestimmungen entsorgt werden.
BESTANDTEIL MATERIAL
Hauptkörper (a) Silikon+Polyurethan
Schlaucheinheit
Vented (b)
Polycarbonat+Metallocen+Acetal+
Silikon
Kopfkappe (c) Nylon+Polyurethan
13 - TECHNISCHE DATEN
KONTINUIERLICHER MINDESTFLUSS
HINWEIS: Wegen Bearbeitungsunterschiede kann es zu
Differenzen zwischen dem Ausströmungsuss und den in der
Tabelle angegebenen Werten kommen (±10%).
DEUTSCH
Vorschriften
CE-Kennzeichnung in Übereinstimmung
mit der Europäischen Richtlinie 93/42/
EWG, Implementierungsklasse IIa in
der aktuellen Fassung EN ISO 14971,
ISO 5356-1, ISO 10993-1, EN ISO
17510-2, EN ISO 17664
Widerstand
1,05 cm
H2O
a 50 lpm – 3,30 cm
H2O
a 100 lpm
Totraum in der Maske
63 ml
Dauerschallpegel A
nach Norm ISO 3744 15,8 dB(A) ± 1,5 dB(A)
Schallleistungspegel
A nach Norm ISO 3744 19,5 dB(A) ± 1,5 dB(A)
Therapiedruck 4 cmH2O – 24 cmH2O
Betriebstemperatur Temperatur: 5°C – 40°C
Maximale
Gesamtabmessungen 86 mm x 70 mm x 352 mm
Nutzungsdauer Die zu erwartende Nutzungsdauer
des Produktes beträgt 120 Tage, bei
täglicher Nutzung und Reinigung,
wenn die Nutzung und Reinigung des
Produktes in Übereinstimmung mit den
Angaben in der Gebrauchsanweisung
erfolgt. Das Produkt kann über diesen
Zeitraum hinaus verwendet werden,
wenn es keine Beschädigungen
aufweist und sich in einem sicheren
Zustand bendet.
14 - GARANTIESCHEIN
Air Liquide Medical Systems S.r.l. gewährt für sein Produkt
eine Garantie auf Materialfehler oder Herstellungsmängel für
Table of contents
Languages:
Other Respireo Oxygen Equipment manuals