Reval Transcare Series User manual

EN Instruction manual
ELECTRIC Hi-Lo Bathtub
Transcare
7203.00
7202.00

SUMMARY
CONTENTS
PAGES
DIMEN ION 2
- - - - - - - - - - - - - - - - - - - - - - - - - - - - - - - - - - - - - - - - - - - - - - - - - - - - - - - - - - - - - - - - - - - - -
DE CRIPTION & CONTROL PANEL 3-4
- - - - - - - - - - - - - - - - - - - - - - - - - - - - - - - - - - - - - - - - - - - - - - - - - - - - - - - - - - - - - - - - - - - - -
TECHNICAL PECIFICATION 5
- - - - - - - - - - - - - - - - - - - - - - - - - - - - - - - - - - - - - - - - - - - - - - - - - - - - - - - - - - - - - - - - - - - - -
OPERATION 6
- - - - - - - - - - - - - - - - - - - - - - - - - - - - - - - - - - - - - - - - - - - - - - - - - - - - - - - - - - - - - - - - - - - - -
AFETY IN TRUCTION AND WARNING 7
- - - - - - - - - - - - - - - - - - - - - - - - - - - - - - - - - - - - - - - - - - - - - - - - - - - - - - - - - - - - - - - - - - - - -
DIRECTION FOR U E
HIGH/LOW FUNCTION 8
TILT ADJU TMENT 8
DOOR OPERATION 9
OUVERTURE/FERMETURE DE LA VIDANGE 9
PLUG OPERATION 9
WATER TEMPERATURE ADJU TMENT 10
BATH FILL 10
WATER ADDITION 10
CLEANING HOWER (VER ION 7202) 10
CONCEALED DIGITAL MIXING VALVE RADA EN E 11
CLEANING HOWER (VER ION 7203) 11
DI INFECTION HOWER (VER ION 7202) 12
AIR WHIRLPOOL (OPTION) 13
CHROMOTHERAPY (OPTION) 14
AROMATHERAPY (OPTION) 15
AUDIO PA (OPTION) 16
- - - - - - - - - - - - - - - - - - - - - - - - - - - - - - - - - - - - - - - - - - - - - - - - - - - - - - - - - - - - - - - - - - - - -
MAINTENANCE
CHIMIC DI INFECTION : COMPO ITION & ADDITION OF DI INFECTANT 17
CLEANING THE TUB & DOOR EAL 17
CLEANING THE FILTERING CARTRIDGE OF THE MIXER 18
CLEANING THE AIR WHIRLPOOL Y TEM 18
ADJU TING THE EALING OF THE DOOR 19
- - - - - - - - - - - - - - - - - - - - - - - - - - - - - - - - - - - - - - - - - - - - - - - - - - - - - - - - - - - - - - - - - - - - -
PERIODIC IN PECTION 20
- - - - - - - - - - - - - - - - - - - - - - - - - - - - - - - - - - - - - - - - - - - - - - - - - - - - - - - - - - - - - - - - - - - - -
MAINTENANCE FORM (LOGBOOK) 21
- - - - - - - - - - - - - - - - - - - - - - - - - - - - - - - - - - - - - - - - - - - - - - - - - - - - - - - - - - - - - - - - - - - -
1/21

DIMENSIONS
128cm
96cm
111cm
183cm
205cm
47cm
111cm
126cm
TUB IN LOW POSITION WITHOUT BASE TUB IN HIGH POSITION WITHOUT BASE
122cm
137cm
22.5°
40cm
55cm
85°
207cm
192cm
120°
30cm
3° tilt of footbath
12° tilt of seat
128cm
109cm
124cm
183cm
205cm
47cm
124cm
139cm
TUB IN LOW POSITION WITH BASE TUB IN HIGHPOSITION WITH BASE
135cm
150cm
83cm
65cm
TOP VIEW
22.5°
53cm
68cm
85°
220cm
205cm
40cm
120°
30cm
3° tilt of footbath
44cm 25cm 40cm 27cm
4cm adjustable height 12° tilt of seat
2/21

DESCRIPTION
CONTROL PANEL WITH THERMOSTATIC MIXER (VERSION 7202)
3/21
Control panel
Cleaning shower
Tilting door
Hy/Low actuator
Base
ervice panel
(whirlpool system)
Plug control / Overflow
Water temperature display
Filling tap
Thermostatic mixer
Cleaning shower tap
Location of the whirlpool control
Cleaning shower
Overflow / max water
level
4 functions hand control
Aromatherapy
option
afety door to access to the
plumbing and the disinfection
shower (“disinfection” option)
Temperature display
Whirlpool control
Chromotherapy
control

CONTROL PANEL WITH DIGITAL MIXING VALVE RADA SENSE (7203) + OPTIONS
HAND CONTROL
4/21
Up
Down
Recline
Upright
Filling spout
Cleaning shower
Plug control / Overflow
Digital mixing valve
RADA EN E
Cleaning shower temperature
display
Bath fill temerature display
Overflow / max water
level
Chromotherapy lamp
Leg support

TECHNICAL SPECIFICATIONS
VERSIONS:
REF. 7202.00 Bathtub "TRAN CARE" with thermostatic mixer.
REF. 7203.00 Bathtub "TRAN CARE" with Digital Mixing Valve Rada ense.
OPTIONS :
7200.10 Chimic disinfection(version 7202.00)
7201.10 Chimic disinfection(version 7203.00)
7200.20 Air whirlpool.
7200.30 Base.
7200.50 Leg support.
7200.51 Added handgrip.
7200.52 Dispenser of washing product.
7200.60 Chromotherapy.
7200.70 Aromatherapy.
7200.80 Musicotherapy.
7110.99 Removable pillow.
GENERAL:
•Reinforced fiberglass tub, white colour.
•Handgrip.
•Door lock in stainless steel.
•4 function hand control. (up/down & recline/upright)
•Back-up battery power.
•Electric supply : 240 VAc 50Hz
PLUMBING (VERSION 7202) :
•Thermostatic mixing valve with built-in check valves, scald protection and integrated drain stopper.
•Temperature display.
•Cleaning shower.
•Manual draining & overflow line.
•Ø 50mm draining plug.
PLUMBING (VERSION 7203) :
•Rada sense bath & shower concealed digital mixing valve offering programmable max, min & default temperatures,
automatic temperature on outlet selection, duty flush and thermal disinfection with datalogging capabilities.
•Temperature display.
•Cleaning shower.
•Manual draining & overflow line.
•
Ø 50mm draining plug
PERFORMS:
•Vertical travel: 150mm
•Water reserve : 90 litres
•Maximal water volume : 190 litres
•Maximal recline angle: 22.5°
•afe working load: 200kg
•Weight of the bathtub : 120kg
CONFORMITY:
•73/23/CEE (low voltege directive)
•89/336/CEE (EMC directive)
•NF EN 60335-1 (electric standard for bathtub..)
•NF EN 60335-2-60 (electric standard for bathtub...)
•NF EN 1717 (Anti-pollution)
•NF C 15100 (Electric installations…)
5/21

OPERATION
The central lifting column, located under the tub, allows variable tub adjustment.
Tub angle adjustment via hand control and electric action. Tub Hi/Low adjustment also via hand control.
The hand control allows to control the variable height and tilting of tub.
VER ION 7201 : To activate bath fill place hand over the bath fill sensor within 30mm. Bath will fill automatically to the fill
level and stop automatically when water level indicator is reached. The water level can be stopped and restarted at any
time.
Water temperature is adjusted simply by placing your hand over the hot or cold adjustment sensor.
VER ION 7200 : Filling of tub is made by the spout. A tap allows to control the water flow.
The adjustment of the water temperature is made by the thermostatic mixer.
A digital display allows to check the water temperature.
A cleaning shower is located on the side of the bathtub. The tap of the cleaning shower allows to adjust the flow and the
thermostatic mixer the temperature.
The disinfection system includes one 5 litres tank receiving the disinfectant product, one plunger with calibrated nozzle and
one shower head with pawl.
The complete set is located behind the front door of the bathtub.
This door is equipped with a lock key system for a best security.
A compressor ensures air whirlpool (in option).
That is injection of air under pressure with adjustable flow through 12 nozzles equipped with anti-return valve and set at
the bottom of the tub.
The control is located on the control panel
6/21

SAFETY INSTRUCTIONS AND WARNINGS
Do not attempt to use this bathing system without first understanding this manual.
To ensure safe operation, carefully read this entire manual, especially the section on " afety Instructions and Warnings",
before installing, operating, or servicing this equipment.
If anything is not completely understood, please contact Reval for more details.
Failure to comply with warnings in this manual may result in injury.
Keep this manual with the tub and refer to it as required. Contents of this manual are subjected to change without prior
notice to users.
•The Transcare bathing system must be installed by a contractor or a certified installation technician.
•DO NOT open the door when the tub is reclined.
•DO NOT open the door if the bath water is above the door seam.
•DO NOT immerse the hand control in water.
•DO NOT try to lift the tub.
•DO NOT stay underneath the tub during lowering.
•DO NOT fill over the maximum water level line.
•DO NOT operate the air whirlpool pump without water.
•DO NOT pull on the shower head too forcibly.
•DO NOT place any object underneath the tub.
•DO NOT use any electrical appliances near the tub.
•DO NOT use any electrical appliances hair dryer or electric razor, etc) while in the tub.
•DO NOT force controls or taps.
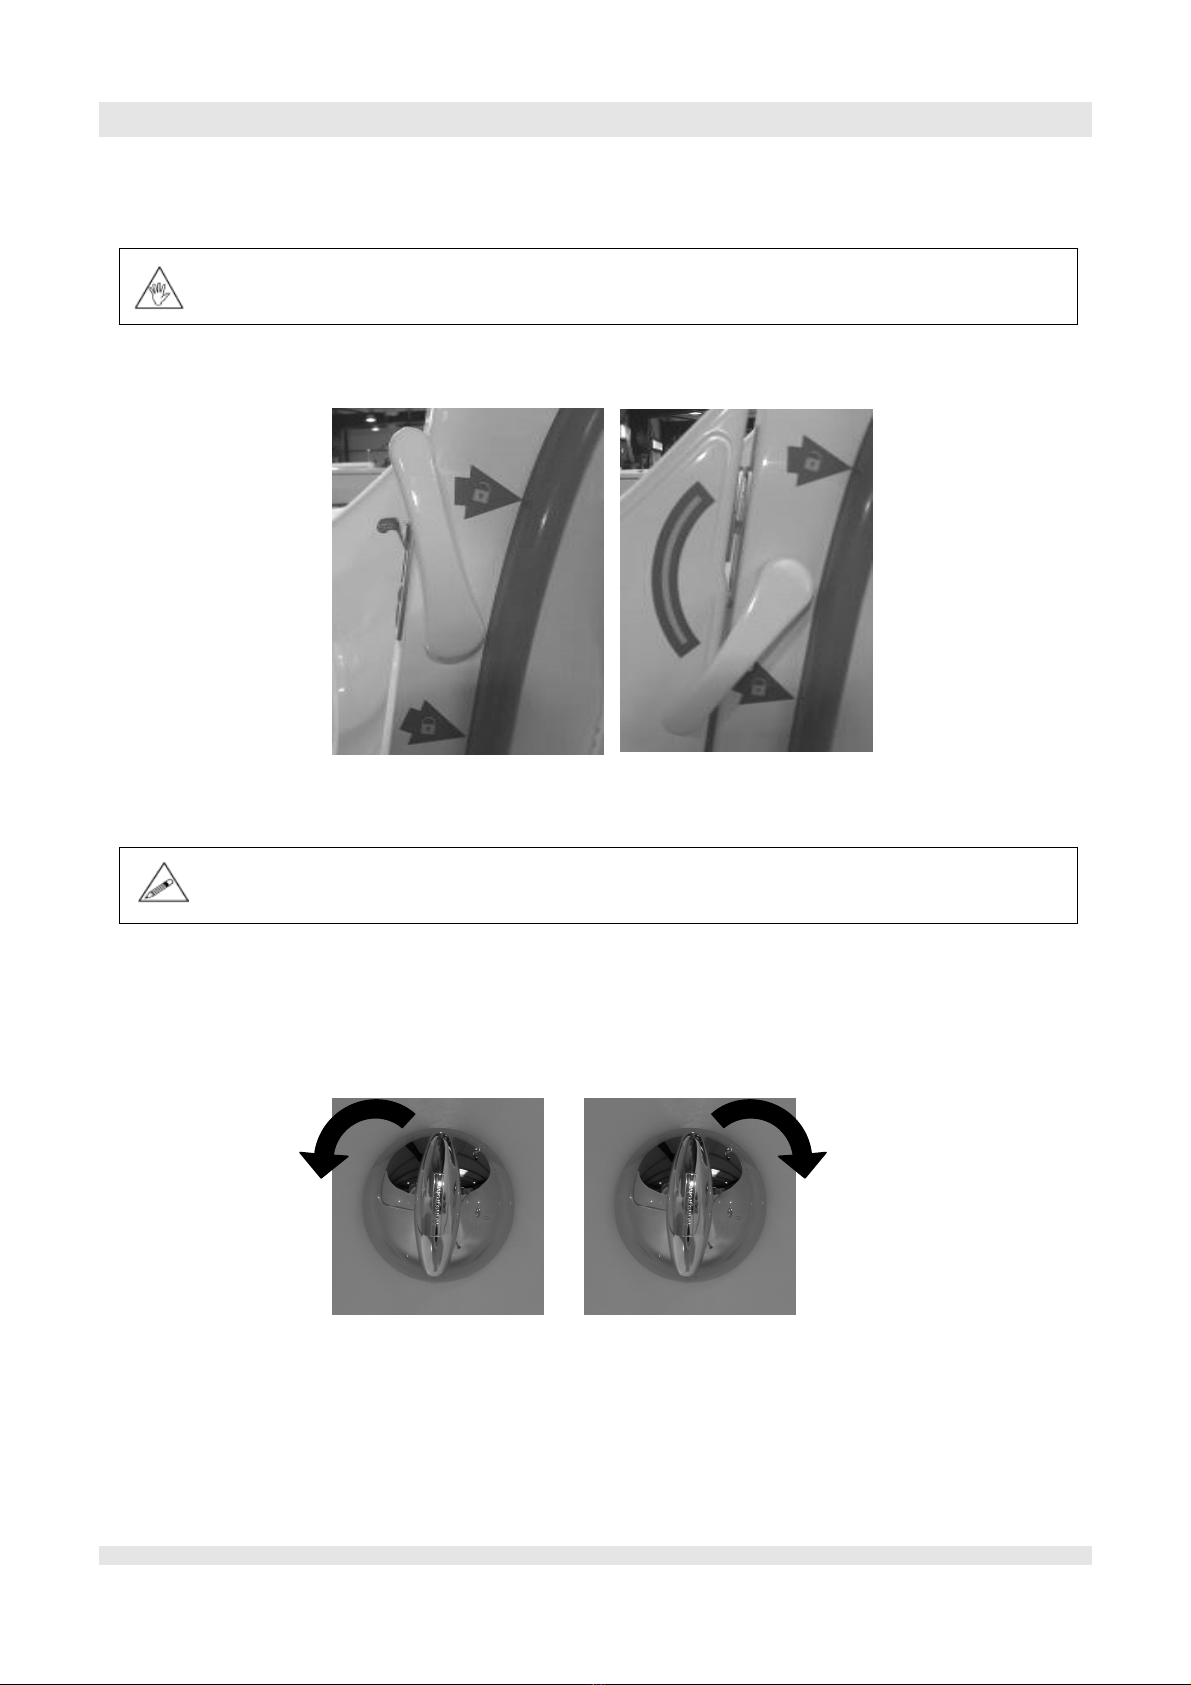
•DO NOT force the door lock handle.
•DO NOT use or turn the disinfection shower on the patient.
•ALWAY perform a daily check before using the bathing system.
•Each client should be assessed for his or her ambulatory capability to ensure the clients safety when
entering and exiting the bathing system. (Ability to utilize handgrips, correct entry height, etc.)
•ALWAY be prepared before transferring a patient into the tub.
•ALWAY rotate the door handle completely to open or close the door.
•ALWAYS check the water temperature before the patient enters the tub or to use the cleaning
shower.
•Clean bathtub after each use.
•Disinfect bathtub between each use.
•All valves should be closed after bathing is completed.
•When using disinfectant, wear rubber gloves and eye protection. In case of eye or skin contact, follow the
procedures on the disinfectant container.
•A weekly safety check should be performed to ensure all hoses, pipes, connections and securing devices
are in safe working order.
•Keep all tub components clean and dry.
7/21

DIRECTIONS FOR USE
_________________________________________________________________________
WARNING : This symbol is intended to alert the user to hazards or unsafe practices which
could result in serious bodily harm.
CAUTION: This symbol is intended to alert the user of the presence of important operating
and maintenance instructions which could prevent product damage or possible personal injury.
NOTE : This symbol offers helpful information concerning certain operating procedures.
_________________________________________________________________________
HIGH/LOW FUNCTIONS
Raising or lowering the Transcare provides care givers with a safe working environment.
Check that no obstacle obstruct the rise or the descent of the bathtub.
Press to raise tub
Press to lower tub
TILT AD USTMENT
The slope of the tub makes it possible to make pass the user of a sitting position to a reclining position without any effort.
Check there is no obstruction and adequate room before reclining the tub.
Press to recline.
Press to return to upright.
8/21

DIRECTIONS FOR USE
DOOR OPERATION
Check there is adequate room to open the door.
To close the door, pull the door down into position, and fully rotate the handle counter clockwise until you feel
the locking mechanism engage. The handle should be positioned as shown in the photo when properly closed.
To open the door, fully rotate the handle in a clockwise direction, until it stops, and lift the door up. Care should be taken
not to let the door fly up on its own. Raise the door slowly until it reaches its maximum opening point.
Fully rotate the handle to lock the door but without to force.
PLUG OPERATION
Turn the button in a clockwise direction to close the drain plug and counter clockwise to open it
OPENING CLO ING
9/21

DIRECTIONS FOR USE
WATER TEMPERATURE AD USTMENT (VERSION 7202)
To adjust the water temperature, turn the button of the mixer.
During use, If you need a water temperature upper to 40°C, push the red index and turn the
button counter clockwise.
A digital display allows to check tha water temperature.
FILLING
The filling cavity of the Transcare tub requires less then 90 litres of water to be filled to its maximum level.
When the tub is placed in recline position, this amount of water is sufficient to fully immerse the client.
Fill only to the maximum water level indicator. The overflow drains are designed to prevent an accidental overflow.
Check the water temperature. If necessary , adjust it thanks to the mixer.
Close the drain plug by turning the button in a clockwise direction.
Turn on the filling tap
WATER ADDITION
It is possible to add water into the bath when it is tilted.
However, before levelling the bath to its upright position, the water level must be decreased
by opening the drain plug to avoid water overflow and splashing.
CLEANING SHOWER
The shower head can be operated at any time. Remove the shower hand from its holder.
Turn the shower control tap counter clockwise to start and adjust the flow intensity.
elect the desired temperature by adjusting the temperature valve as described above.
The shower head spray can be adjusted from a wide to narrow flow.
10/21

DIRECTIONS FOR USE
CONCEALED DIGITAL MIXING VALVE RADA SENSE (VERSION 7203) :
To adjust the water temperature,, pass your finger in front of the cold water sensitive captor (blue triangle) or in front of the
hot water (red triangle) according to the temperature desired.
Max outlet temperature for bath: 40°C
Max outlet temperature for shower: 38°C
Automatic stop of bath filll after 5 minutes.
Automatic stop of shower after 30 secondes.
Check water temperature before each submersion.
If the bathtub is not equipped with the option "automatic stop of filling", stop water to
10cm approximately below the edge of the tub.
If the bathtub is equipped with the option "automatic stop of filling", it is advised to
carry out a test of the sensor before the filling. see procedure in this instruction
manual)
CLEANING SHOWER (VERSION 7203)
The shower head can be operated at any time.
Pass the finger in front of the pictogram of the shower head and adjust the flow intensity
with the tap in front of the bath.
elect the desired temperature by adjusting the temperature valve as described above.
The shower head spray can be adjusted from a wide to narrow flow.
After each use, turn off the valve.
11/21
Cold
adjustment
sensor
Warm
adjsutment
sensor
Bath control
hower control
ervice activation
Temperature display
Full cold

DIRECTIONS FOR USE
DISINFECTION SHOWER (VERSION 7202)
The disinfectant system includes 1x 5 litres tank receiving the disinfectant product, 1x plunger with
calibrated tube located in the tank, and connected by a flexible going through the top of the venturi (white plastic part)
and 1x disinfection shower head with pawl. This set is located behind the front door of the bathtub.
This door is equipped with a safety lock.
To access to the disinfection shower, open the front door.
Lift up the disinfectant lever to activate the flow of chemical to the shower head.
12/21
Keyhole
Push on the button
of the locker.
Lever

DIRECTIONS FOR USE
AIR WHIRLPOOL (OPTION)
FUNCTIONALITY
Fresh clean air is ingested into the system. The air is then compressed passed through a heat-exchanger to heat the air to a
specific temperature. The air is then expelled from the compressor at high pressure and passes into a multiplex-manifold
connected via airlines to 12 de-fuser nozzles positioned specifically along the bottom of the bath. These nozzles aim the
massage jets at a patient’s major muscle groups along their anatomy. The air bubbles explode on impact with the patients
muscles delivering a precise and well direct massage therapy. This stimulates the muscles and builds muscle tone and
strength. The massage therapy also relaxes the patient which is also essential to a patients experience and wellbeing
! NB. The system cannot be operated unless sufficient water is in the bath tub.
To start hydro-massage system: press the On/Off button once
To stop the hydro-massage system: press the On/Off button once again.
+ Increase intensity button: Press the + button to increase the massage intensity.
- Degrease intensity button: Press the – button to decrease the massage intensity.
Alternating Massage function: Press both +&- buttons simultaneously for three seconds to activate the alternating
massage function.
Massage cycle: The massage cycle is 0-30 minutes. After 30 minutes the system automatically switches off. If the
baths water is emptied during the massage cycle. The system will switch off when the water level reaches the water
sensor when emptying.
Auto-Clean function: Once the hydro-massage function has been switched off. The system hibernates for a period
of approximately 30 minutes to allow bath to empty and the room temperature to drop reducing the collation of
humidity. This is indicated by the Green On/Off LED light flashing intermittently. After the 30 minute period the
system will automatically turn on and run for a period of 2 minutes. This enables hot air to be blown though the
system of airlines drying any humidity or water ingress making them clean and safe for future use.
Manual Cleaning Cycle: The system can be cleaned manually whilst water is off and no water is in the bath. To
perform the manual procedure simply press the On/Off button every 2 seconds for two seconds.
Green LED light indication:
Intermittent green flashing light (1s/1s) indicates the presence of water.
Permanent green light- indication system is in “On” mode.
Intermittent green light every (0.5s/0.5s) indicating system is in “Auto-Clean” mode.
Intermittent green flashing light every (1s/7s) -
ystem running without water.
13/21
ystem On/Off
-
Lower Intensity
+ Higher Intensity
Led indicator

DIRECTIONS FOR USE
CHROMOTHERAPY (OPTION)
The chromotherapy option consists of 6 LED lamps and 1 control button.
The control button has 3 following functions : On/Off / Automatically alternate of 7 colours / Colour fixed.
Push one time on the button to turn on the lamps.
The colours of the lamps automatically alternate during 1 minute for each colour.
Push another time on the button in order to fix the actual colour.
Push another time on the button to turn off the lamps.
14/21

DIRECTIONS FOR USE
AROMATHERAPY (OPTION)
Reval give all areas of patient well being and safety careful consideration. Its unique “Aromatherapy” system combines the
benefits of hydro-massage with the relaxing aromatic effects, of infused aroma essence, providing the ultimate bathing and
rehabilitation experience. The “Aromatherapy” system is compressed heated fresh air technology, which infuses aroma
therapy oils at temperature into the hydrotherapy air jet which explodes into the bath water delivering controlled therapy
with sensual and relaxing aromas assuring a totally unique and wonderful experience. Reval's new “Aromatherapy” system
has an ultra safe auto-clean function which self dries and cleans the internal air ducting pipe work after use automatically.
The auto-clean function significantly reduces the risk and development of micro -biological organisms that can develop in
humid and wet environments. Reval's unique air ducting system can be dismantled without the need for tools and can be
termically cleaned during routine servicing in a matter of minutes.
.
TO OPERATE:
1. imply remove the chrome cap, take the wooden spatula, soak in aromatherapy oil and replace it in to the essence
well. Replace the chrome cap) finger tight). Do not over tighten!
2. witch the Aromatherapy system on via the circular control panel. Once up to temperature the heated air infuses with
the aroma oil and releases its fragrance into the water via the diffuser jets positioned in the bottom of the bath tub.
The aroma is carried inside the bubbles and explodes on contact with the water releasing the sensual aromatic
fragrances in to the air.
3. For extended use switch off and re-soak the spatula as described in points 1&2.
4. The hydro Aromatherapy has an alternating intensity function. To activate this potion press the button on the control
panel. The intensity will increase and decrease automatically providing needed therapy without sensitivity and
discomfort for those with sensitive joints and skin conditions.
5. The intensity can also be set at a fixed pressure for those who enjoy the continuous sensation and work-out. To fix the
intensity level simply press the + or – button on the control panel until the desired intensity has been found.
6. To switch off press the middle button on the control panel marked 1/0.
7. The Aromatherapy system has a self cleaning function called “Auto Clean” Once the system has been switched off the
status LED on the On/Off button changes from ON to Intermittent flashing. This indicates that the system has gone
into stand-by mode and will
Automatically switch on again and run for 5 minutes self drying any build up of humidity in the internal hydro
plumbing system. After five minutes the system will shut down.
15/21

DIRECTIONS FOR USE
AUDIO SPA (OPTION)
The “Audio spa” option consists of two loudspeakers, a waterproof amplifier, a 12V waterproof power supply, and
waterproof control panel.
Operation :
1°) Turn on the amplifier, Press MODE button to select Bluetooth function of your amplifier.
(Bluetooth light indicator should be blinking blue)
2°) Turn on Bluetooth function of your mobile or music device.
3°) On your music device, click search for Bluetooth device. Make sure you are close enough to the amplifier.
4°) elect “PPGME60” from the pairing list.
5°) Enter “6000” as the password (if required). If “6000” does not work, please try “60BT”.
6°) Click “Connect”.
7°) Once connected, you can now start playing your favorite music from your music device.
8°) Operating Range is up to 9m. (will vary, dependent on installation)
To guarantee the longevity of the amplifier, think to switch off it by pressing on the button "On / off".
Respect the legislation.
Control panel operation :
16/21

MAINTENANCE
CHIMIC DISINFECTION
COMPOSITION :
The bath is equipped with an automatic system to determine the quantity of disinfectant.
The disinfection system includes :
- 1x 5 liters tank receiving the disinfectant product.
- 1X plunger with calibrated tube, located in the tank, and connected by a flexible going through the top of the
venturi (white plastic part).
- 1 disinfection shower.
ADDITION OF DISINFECTANT :
Dilution :
The mixing of water and disinfectant inside the disinfection shower is made in 2 stages :
First :
Manual dilution inside the tank.
Second :
The suction device (venturi) ensures a dosage of 10% of the aspirated product from the tank.
Exemple :
The disinfectant BFR 4.0 must be used with a final dilution of 0,4%.
1) Manual dilution inside the tank at 4%, that is 200ml of BFR 4.0 for 4800ml of water.
2) Complementary dilution of 10% ensured with cold water by the suction device (venturi).
Once the diluted product is added to the tank, any unused solution will need to be discarded and refreshed after one week.
CLEANING THE CONTROL PANEL
To clean the “rada sense” control panel, take the magnetic key located behind
the security door in front of the bath and pass it in front of the infra red of the control
panel to desactivate it. This will disable the sensors for 30 minutes or until the magnetic
key is reapplied. To reactivate the control panel, do the inverse operation.
CLEANING THE TUB & DOOR SEAL
Only use liquid products (liquid soap).
Don't use abrasive products like "scouring cream" to avoid scratches on the tub surface "Gelcoat".
Furthermore, to eliminate calcareous marks settled by water moving, we recommend to use the scaler (Gel ervex ).
Do not swill down the outside of the tub.
Do not use liquid soap and the scaler Gel Servex) on the control panel elements;
Rada sense mixer and whirlpool control.
Open the door, clean and dry the door seal removing dirt. Wipe with a soft cloth
DISINFECTING THE TUB
•pray a suitable cleaner or disinfectant onto the interior tub surface.
•Let the disinfectant activate for 2 minutes on the bath surface then rince off using the patient.
•Thoroughly rinse the interior tub surfaces.
•Dry the interior tub surfaces with a soft cloth.
17/21

MAINTENANCE
CLEANING THE FILTERING CARTRIDGE OF THE MIXER (VERSION 7202)
A right maintenance of the filter cartridge acts on flow and water temperature control.
When "TH" degree of water is superior to 8 or when pipes conduct drive many impurities, clean the cartridge filter each
month.
N° REF.
DESIGNATIONS
N° REF.
DESIGNATIONS
1
Corps
14
Tube fileté
2
Cartouche
15
Tube carré
4
Manette consulat
16
Ensemble friction
7
Ensemble rosace
17
Cadran ABS
13
Ecrou de liaison
18
Ensemble chapeau
CLEANING OF THE AIR WHIRLPOOL SYSTEM
For the efficient functioning of the whirlpool system, the nozzles have to be cleaned on a regular basis (at least once a year).
Functioning of a whirlpool’s nozzle. Air is low through the nozzle and is discharged under the chromed air jet cap.
There is a risk of heating the air jet cap is the nozzles are not regularly cleaned. Layers of soap or deposit can hinder the
circulation of the air.
To clean the nozzles, please follow the next stages :
1) witch off the whirlpool option and empty the bath..
2) Unscrew the air jet cap.
3) Clean the chromed air jet cap, the nozzle and the ball. Then the air jet cap on the nozzle.
4) witch on the bath and the whirlpool system to check they are working properly.
18/21

MAINTENANCE
AD USTING THE SEALING OF THE DOOR
The seal between the tub and the door is provided by a silicone seal. When you close the door, the seal compresses and
therefore ensures sealing.
Over time and following the many manipulations of the lock and / or deformation of the composite material of the door,
the seal between the tub and the door can be reduced. In this case, an adjustment of the lock is necessary in order to
increase the compression of the seal.
PROCEDURE FOR INCREASING COMPRESSION OF THE SEAL:
1 °) Have a 5mm Allen key.
2 °) Insert the Allen key into the adjusting screw located inside the door lock.
3 °) Turn the Allen key a quarter of a turn in a clockwise direction.
4 °) Remove the Allen key.
5 °) Close the door and operate the lock.
6 °) Visually check the compression of the seal over its entire length.
7 °) Fill the tank with water to test the tightness.
Repeat if necessary.
19/21
T
ightening
the set screw will make the door handle harder to operate.
In case the seal could not be adjusted AND / OR the door handle would be too much hard to
operate, it is necessary to adjust the door at the level of the bearings.
For this, contact our After-Sales Service.
Table of contents
Other Reval Bathtub manuals
Popular Bathtub manuals by other brands

Kohler
Kohler K-1822 Homeowner's guide

KOS
KOS GEO 170X70 installation manual

American Standard
American Standard Savona 2901.028WC Specifications

Clou
Clou InBe IB/05.40302 installation instructions

American Standard
American Standard ACRYLUX 6030Y.BW installation instructions

Therabath
Therabath TB6 Operator's manual

glass 1989
glass 1989 petra 180/75 manual

Fleurco
Fleurco SONORO BLSN6732 Installation and user guide

EAGO
EAGO TS Series Installation instruction

Kohler
Kohler K-1375 Roughing-In Guide

American Standard
American Standard Hampton 2425.XXXW SERIES installation instructions

American Standard
American Standard Cadet Elite Corner Whirlpool 2775EC Specification sheet