Rheinland Elektro Maschinen GSEm 4500 SB User manual

GSEm 2200 SB GSEm 4500 SB
GSEm 3500 SB GSEm 7250 TBE
GSEm 3700 SB
Read and
understand the
Owner’s Manual
before operating the
generator.
Preberite navodila
za uporabo, pred
zagonom
generatorja
EN
SI
GENERATORS
AGREGATI
GENERATORI
HR
Pročitajte upute za
upotrebu , prije
uporabe
generatora
Ташев-Галвинг ООД
www.tashev-galving.com

The right is reserved to technical and color alterations,
errors and misprints
Technische Änderungen, Irrtümer, Druckfehler und
farbliche Abweichungen bleiben vorbehalten
Tehnične spremembe, zmote, napake v tisku in
barvna odstopanja so pridržani
Pridržavamo pravo tehničkih izmjena, zabuna, tiskarskih
pogrešaka i odstupanja u boji.
Technické změny, omyly, tiskové chyby a
barevné odchylky vyhrazeny
SK
CZ
BG
MK
$30
SI
D
SRB
EN
Zadržavamo pravo na tehničke izmene, zabune,
štamparske greške i odstupanja u boji
Запазва се правото на технически и цветови
промени, грешки и печатни грешки
Технички промени, грешки, печатен грешка и
боја отстапувања се задржани
Technické zmeny, chyby, tlačové chyby
a farebné odchýlky sú vyhradené
Los cambios técnicos, errores, errata y
el color desviaciones son reservados
TR
ES
DK Tekniske ændringer, fejl, bliver trykfejl og
farveafvigelser forbeholdes
Teknik değişiklik, hatalar, baskı hatası
ve renk sapmaları saklıdır
RU Технические изменения, ошибки, опечатки
и отклонения цвета зарезервированы
Tekniske endringer, feil, trykkfeil og
fargeavvik er reservert
LVA
NOR
SWE Tekniska ändringar, fel, tryckfel och
färgavvikelser är reserverade
Tehniskas izmaiņas, kļūdas, drukas
kļūda un krāsu novirzes ir aizsargātas
IT Modifiche tecniche, errori, errori di stampa e
colori le deviazioni sono riservati
Ташев-Галвинг ООД
www.tashev-galving.com

Thank you for purchasing a Rheinland Elektro
Maschinen generator. This manual covers operation
and maintenance of generator. All information in this
publication is based on the latest product information
available at the time of approval for printing. Rheinland
Elektro Maschinen reserves the right to make changes
at any time without notice and without incurring any
obligation. No part of this publication may be
reproduced without written permission. This manual
should be considered a permanent part of the generator
and should remain with it if it is resold. Pay special
attention to statements preceded by the following words:
WARNING:
Indicates a strong possibility of severe personal
injury or death if instructions are not followed.
CAUTION:
Indicates a possibility of personal injury or equipment
damage if instructions are not followed.
NOTE:
Gives helpful information.
If a problem should arise, or if you have any questions
about the generator, consult an authorized Rheinland
Elektro Maschinen dealer.
WARNING:
Rheinland Elektro Maschinen generator is
designed to give safe and dependable service if
operated according to instructions.
SAFETY INSTRUCTIONS
IMPORTANT SAFETY INFORMATION
Rheinland Elektro Maschinen generators are
designed for use with electrical equipment that has
suitable power requirements. Other uses can result
in injury to the operator or damage to the generator
and other property.
Most injuries or property damage can be prevented if
you follow all instructions in this manual and on the
generator. The most common hazards are discussed
below, along with the best way to protect yourself
and others.
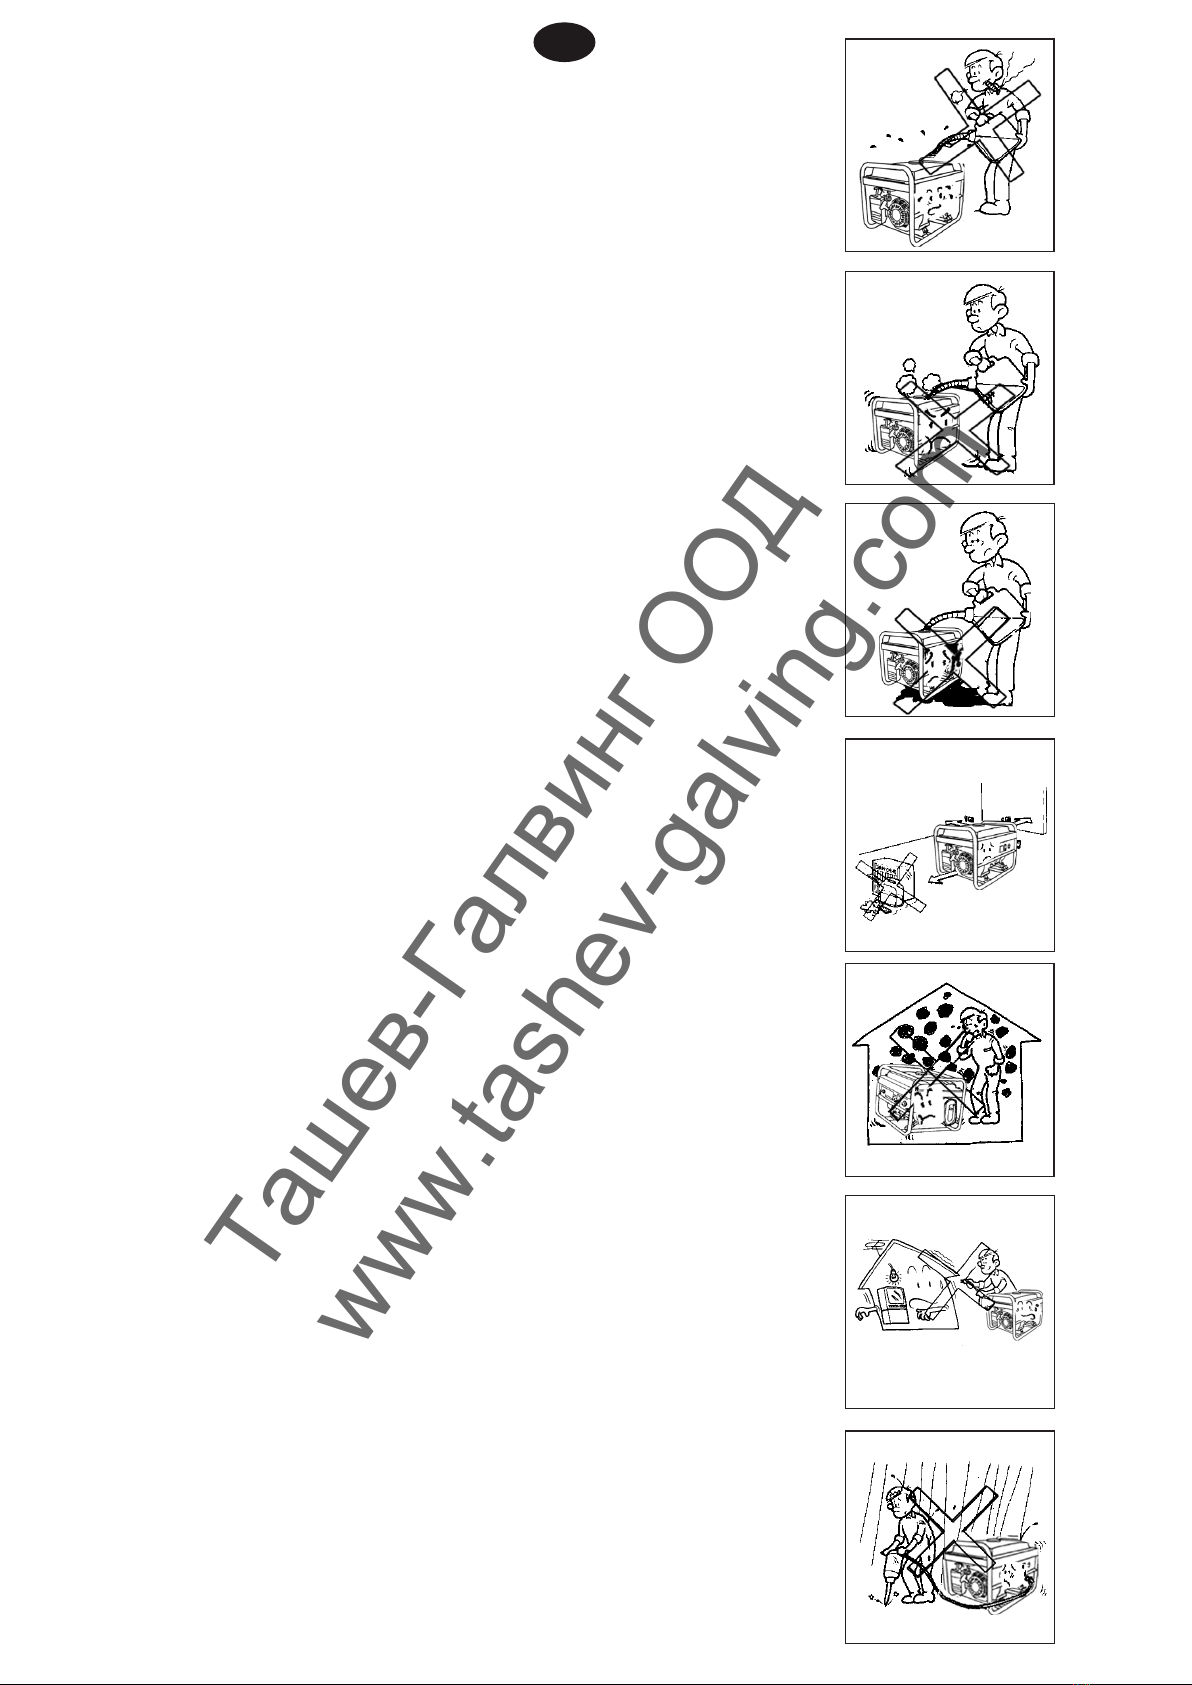
Never attempt to modify the generator. It can cause
an accident as well as damage to the generator and
appliances.
•Do not connect an extension to the muffler.
•Do not modify the intake system.
•Do not adjust the governor.
•Do not remove the control panel or do not change
the wiring of the control panel.
Operator Responsibility
Know how to stop the generator quickly in case of
emergency. Understand the use of all generator controls,
output receptacles, and connections.
Be sure that anyone who operates the generator receives
proper instruction. Do not let children operate the generator
without parental supervision. Be sure to observe the
instructions in this manual for how to use the generator and
maintenance information. Ignoring or improperly following
the instructions can cause an accident such as an electric
shock, and the condition of the exhaust gas may
deteriorate. Obey all applicable laws and regulations where
the generator is used. Gasoline and Oil is toxic. Follow the
instructions provided by each manufacturer before use.
Place the generator on a firm level place before operation.
Do not operate the generator with any cover removed. You
may get your hand or foot caught in the generator and it
may cause accident.
Consult your authorized Rheinland Elektro Maschinen
dealer for disassembly and service of the generator that are
not covered in this manual.
Carbon Monoxide Hazards
Exhaust contains poisonous carbon monoxide, a colorless,
odorless gas. Breathing exhaust can cause loss of
consciousness and may lead to death.
If you run the generator in an area that is confined, or even
partially enclosed area, the air you breathe could contain a
dangerous amount of exhaust gas.
Never run your generator inside a garage, house, or near
open windows or doors.
Read and understand the Owner’s Manual before
operating the generator. Failure to do so could result
in personal injury or equipment damage.
EN
Ташев-Галвинг ООД
www.tashev-galving.com

Do not pour the water directly on the generator to put out
the fire when it occurs. Use an appropriate fire
extinguisher specially designed for electric fire or oil fire.
If you inhale fumes produced by an accidental fire with
the generator, consult a doctor and have medical
treatment immediately.
Refuel With Care
•Gasoline is extremely flammable, and gasoline vapor
can explode. Allow the engine to cool if the generator
has been in operation.
•Refuel only outdoors in a well ventilated area with the
engine off.
•Do not refuel during operation.
•Do not overfill the fuel tank.
•Never smoke near gasoline, and keep other flames
and sparks away.
•Always store gasoline in an approved container.
•Make sure that any spilled fuel has been wiped up
before starting the engine.
Explosion proof
This generator is not complaint with explosion proof.
Disposal
To protect the environment, do not dispose of the used
generator, battery, engine oil, etc. carelessly by leaving
them in the waste. Observe the local laws or regulations
or consult your authorized REM generator dealer to
dispose of these parts.
Electric Shock Hazards
The generator produces enough electric power to cause a
serious shock or electrocution if misused.
Using a generator or electrical appliance in wet conditions,
such as rain or snow, or near a pool or sprinkler system, or
when your hands are wet, could result in electrocution.
Keep the generator dry.
If the generator is stored outdoors, unprotected from the
weather, check all of the electrical components on the
control panel before each use. Moisture or ice can cause a
malfunction or short circuit in electrical components that
could result in electrocution.
If you get an electric shock, consult a doctor and have
medical treatment immediately.
Fire and Burn Hazards
Do not use the generator in areas with a high risk of fire.
The exhaust system gets hot enough to ignite some
materials.
•Keep the generator at least 1 meter (3 feet) away from
buildings and other equipment during operation.
•Do not enclose the generator in any structure.
•Keep flammable materials away from the generator.
Some parts of the internal combustion engine are hot and
may cause burns. Pay attention to the warnings on the
generator.
The muffler becomes very hot during operation and remains
hot for a while after stopping the engine. Be careful not to
touch the muffler while it is hot. Let the engine cool before
storing the generator indoors.
EN
Ташев-Галвинг ООД
www.tashev-galving.com

SAFETY LABELS
These labels warn you of potential hazards that can cause serious injury. Read the labels and
safety notes and precautions described in this manual carefully.
If a label comes off or becomes hard to read, contact your servicing dealer for a replacement.
LOCATION OF IMPORTANT LABELS
Please read the following labels carefully before operating this machine.
hot muffler warning
caution and spart plug label
mounting label
safety simbols and maschine data label
quick start instruction label
oil label
oil level label
air filter label
engine label
safety warnings label
handle caution label (only models with handle ad wheels)
1.
2.
3.
4.
5.
6.
7.
8.
9.
10.
11.
1.
2.
3.
4.
5.
6.
7.
8. 9.
10.
EN
Ташев-Галвинг ООД
www.tashev-galving.com

•Gasoline is highly flammable and
explosive. Turn the engine off and let it
cool before refueling.
•Improper connections to a building’s electrical
system can allow current from the generator to
backfeed into the utility lines.
Such backfeed may electrocute utility
company workers or others who contact the
lines during a power outage, and the generator
may explode, burn, or cause fires when utility
power is restored.
Consult the utility company or a qualified
electrician prior to making any power
connections.
•Rheinland Elektro Maschinen generator is
designed to give safe and dependable service
if operated according to instructions.
Read and understand the Owner’s Manual
before operating the generator. Failure to do
so could result in personal injury or
equipment damage.
•Exhaust contains poisonous carbon monoxide,
a colorless, odorless gas. Breathing carbon
monoxide can cause loss of consciousness
and may lead to death.
•If you run the generator in an area that is
confined, or even partially enclosed area, the
air you breathe could contain a dangerous
amount of exhaust gas.
•Never run your generator inside a garage,
house or near open windows or doors.
•Before the generator can be connected to a
building's electric system, a licensed
electrician must install an isolation (transfer)
switch in the building's main fuse box.
•Ground (earth) terminal
Be sure to ground (earth) the generator.
•Never smoke near gasoline, and keep
other flames and sparks away.
EN
Ташев-Галвинг ООД
www.tashev-galving.com

888888
•Always stop the engine before any
setup or maintenance operation, on
Electric starting generators also
disconect the starting battery.
•A hot exhaust system can cause serious
burns. Avoid contact if the engine has been
running.
4.
2.
5.
4.
19.
7.
11.
9.
8.
1. Starter Handle
2.Fuel switch
3.Choke Lever
4.Frame
5.Engine
6.Alternator
7.Display
8.. Main switch
9.. Oil dipstick
10.. Fuel Cap
11.. Fuel Tank
12.. Air Filter
13.. Muffler
14.Spark Plug
3.
12.
13.
14.
17.Handles (only some models)
18.Voltage display
19.DC output
20.Circuit breaker Control
21.AC output
6.16.
17.
15.
21.
20.
8.
Main switch Voltage/Frequency/Time
display - only
GSEm 3700SB,
GSEm 4500SB
DC output
12V
Circuit breaker
Control
AC output
220V
22.
Ground terminal
18.
22.Ground terminal
CONTROL PANEL GSEm 2200SB, GSEm 3500SB, GSEm 3700SB, GSEm 4500SB,
16.Wheels (only some models)
15.Battery (only E-start model)
1.
10.
EN
Ташев-Галвинг ООД
www.tashev-galving.com

888888
19.21.20.
8.
Main switch Voltage/Frequency/Time
display DC output
12V
Circuit breaker
Control
AC output
220V
22.
Ground terminal
18.
CONTROL PANEL GSEm 7250 TBE
21.
AC output
380V
Wheel Kit Hardware for GSEm 3700 SB
GSEm 4500 SB
Tools required – box cutter or similar device.
1. Carefully cut the packing tape on top of the carton.
2.
3.
Remove the Wheel Kit Accessories cardboard box.
Carefully cut two sides of the carton to remove the
generator.
WHEEL KIT ACCESSORIES BOX
Open the Wheel Kit Accessories box and verify
the contents against the list below. If any parts are
missing, please call Elektro maschinen dealer.
Components:
Wheels (2 pcs)
Handles with Grips (2 pcs)
Socket Wrench (1 pcs)
Mounting Foot (1 pcs)
Rubber Pads (2 pcs)
UNPACKING THE GENERATOR
(Only for GSEm 3700 SB, GSEm 4500 SB, GSEm 7250 TBE)
1
2
3
4
5
1 - Clevis Pin
50 x 10 mm
(2 used)
2 - Flange Bolt
M6 x 18 mm
(4 used)
3 - Wheel Axle Pin
16 mm x 105 mm
(2 used)
4 - Locking Flange
Nut M6 (4 used)
5 - Hairpin Cotter
(4 used)
EN
Ташев-Галвинг ООД
www.tashev-galving.com

ASSEMBLY
Before assembling the generator, read user
manuals and the following safety messages.
Never lift the generator without
assistance. The generator is heavy and
lifting without assistance could result
in personal injury.
!Never use the handles as a lifting
point to support the entire weight of
the generator. Only use the handles
to move the generator by lifting the
handles and using the wheels to move
the generator.
Use caution when collapsing the
handles. Hands and fingers could get
caught and pinched.
Assembling the generator will require lifting the unit
on one side. Make sure all engine oil and fuel are
drained from the unit prior to assembling.
Tools required – tool bag (included).
1. Place generator on a flat surface.
2. Tip the generator onto its side (engine should be
on the bottom).
CAUTION:
NOTICE:
1
2
3
Installing the Rubber Pads
1 - Mounting Foot
2 - Rubber Pad Flange Bolt
3 - M6 x 18 mm
4. Install the mounting feet to the frame using four
M6 x 18 mm bolts and M6 locking fl ange nuts.
1
1
3
2
2
Assemble Mounting Feet to Frame
1 - Mounting Feet
2 - M6 x 18 mm
Bolts
3 - M6 Locking
Flange Nuts
5. Install the M12 x 105 mm wheel axle fl ange bolt
through the wheel .
6. Thread the M12 serrated flange nut onto the bolt
with serrated edges facing away from the wheel.
Tighten the nut.
Installing Outside Serrated Flange Nut
1 - Wheel Axle 2 - Serrated Flange
Flange Bolt Nut
7. Install the wheel with bolt through the axle bracket
on the frame.
8. Install the serrated fl ange nut and tighten.
EN
Ташев-Галвинг ООД
www.tashev-galving.com

1
2
Assemble Wheels to Frame
1 - Axle Bracket 2 - Serrated Flange Nut
2
4
1
3
Attaching the handles
1 - Clevis Pin
2 - Handle
3 - Nylon Washers
4 - Hairpin Cotter
INSTALLING THE BATTERY
(ELECTRIC START
GENERATORS ONLY)
To avoid electric shock:
•ALWAYS connect the positive (+)
battery wire (red boot) first when
connecting battery wires.
•ALWAYS disconnect the negative (-)
battery wire (black boot) first
when disconnecting battery wires.
•NEVER connect the negative (-)
battery wire (black boot) to the
positive (+) post on the battery.
•NEVER connect the positive (+)
battery wire (red boot) to the negative
(-) post on the battery.
•NEVER touch both battery posts
simultaneously.
•NEVER place a metal tool across
both battery posts.
•ALWAYS use insulated or non-
conducting tools when installing the
battery.
WARNING:
The generator comes equipped with the
positive battery wire (red boot) already attached.
1. Verify the positive (+) battery wire (red boot) is
securely tightened to the positive (+) battery post.
Make sure boot is over battery post.
2. Carefully remove the protective wrapping around
the lug of the negative (-) battery wire (black boot).
3. Locate negative (-) cable attached to alternator
cable, remove tie and route to the negative (-)
battery post.
4. Pull back the black boot and securely attach the
negative (-) battery wire (black boot) to the negative
(-) battery post. Replace the black boot so it
protects the wire lug and battery post.
1
2
Attaching the Negative (-) Battery Wire (Black)
1 - Positive (+)
Battery Cable
(Red)
2 - Negative (-)
Battery Cable
(Black)
NOTICE:
EN
Ташев-Галвинг ООД
www.tashev-galving.com

PRE-OPERATION CHECK
CAUTION:
Be sure to check the generator on a level surface with the engine
stopped.
Before each use, look around and underneath the engine for signs of
oil or gasoline leaks.
ADDING / CHECKING ENGINE OIL
The generator leaves factory without engine oil. Generator will
be protected for non-start without sufficient engine oil filled.
Do not tilt the generator when filling engine oil, which may
result in overfilling and damage to the generator.
•
•
NOTE:
CAUTION:
Using non detergent oil or 2-stroke engine oil could shorten
the engine’s service life.
Recommended oil
Use 4-stroke motor oil that meets or exceeds the requirements
for API service category SE or later (or equivalent). Always check
the API service label on the oil container to be sure it includes the
letters SE or later (or equivalent).
Read the instruction on the oil container before use.
SAE 10W-30 is recommended for general use. Other viscosities
shown in the chart may be used when the average temperature
in your area is within the indicated range.
Recommended engine oil:
A: SAE15W-40, B:SAE10W-30, C:SAE5W-30
Oil Fill Plug/Dipstick
Adding Engine Oil
1. Always operate or maintain the generator on a flat
surface.
2. Stop engine if running.
3. Let engine sit and cool for several minutes (allow
crankcase pressure to equalize).
4. Thoroughly clean around the oil fill plug/dipstick.
5. Remove oil fill plug/dipstick and wipe clean.
6. Select the proper engine oil as specifi ed
7. Using the supplied funnel and tube, slowly add
engine oil to the engine. Stop frequently to check
the level to avoid overfi lling.
Adding Engine Oil
H
L
Checking Oil Level
CAUTION:
Running the engine with insufficient oil can cause serious
engine damage.
NOTE:
The Oil Alert system will automatically stop the engine before the oil
level falls below the safe limit. However, to avoid the inconvenience
of an unexpected shutdown, it is still advisable to visually inspect
the oil level regularly.
EN
Ташев-Галвинг ООД
www.tashev-galving.com

If the fuel level is low, refuel the fuel tank until the level as
specified. After refueling, tighten the fuel filler cap securely.
Use automotive unleaded gasoline with a Research Octane
Number of 93 or higher.Never use stale or contaminated
gasoline or an oil/gasoline mixture. Avoid getting dirt or
water in the fuel tank.
ADDING / CHECKING ENGINE FUEL
! DANGER
Filling the fuel tank with gasoline while
the generator is running can cause
gasoline to leak and come in contact
with hot surfaces that can ignite the
gasoline.
Before starting the generator, always check the level of:
Engine oil
Gasoline in the fuel tank
Once the generator is started and the engine gets
warm, it is not safe to add gasoline to the fuel tank or
engine oil to the engine while the engine is running or
the engine and muff er are hot.
Filling the Fuel Tank – Follow the steps below to f ll the
fuel tank:
1. Shut off the generator.
2. Allow the generator to cool down so all surface
areas of the muff er and engine are cool to the
touch.
3. Move the generator to a flat surface.
4. Clean area around the fuel cap.
5. Remove the fuel cap by rotating counterclockwise.
6. Slowly add gasoline into the fuel tank. Be very
careful not to overf fill the tank. The gasoline level
should NOT be higher than the bottom of the fi ller
neck .
7. Install the fuel cap by rotating clockwise until
you hear a click, indicating the cap is completely
installed.
Maximum Gasoline Fill Level
WARNING:
•Gasoline is extremely flammable and is explosive under certain
conditions.
•Refuel in a well ventilated area with the engine stopped. Do not
smoke or allow flames or sparks in the area where the engine is
refueled or where gasoline is stored.
•Do not overfill the fuel tank (there should be no fuel above the
upper limit mark). After refueling, make sure the fuel filler cap is
closed properly and securely.
•Be careful not to spill fuel when refueling. Spilled fuel or fuel
vapor may ignite. If any fuel is spilled, make sure the area is dry
before starting the engine.
•Avoid repeated or prolonged contact with skin or breathing of
vapor. KEEP OUT OF REACH OF CHILDREN.
Check the air cleaner element to be sure it is clean and in
good condition.
CHECK THE AIR CLEANER
1. Move the generator to a flat, level surface.
2.Turn the release knob at the bottom of the air
cleaner assembly counterclockwise until the air
cleaner cover can freely move outward.
3.Slowly lift up and disengage the top tabs of the air
cleaner cover . Clean the air cleaner cover with a
clean rag and place on a clean surface.
Removing Air Cleaner Cover
5. Clean or replace the element if necessary.
Removing Air Filter Element
4.Visualy check the foam filter element.
EN
Ташев-Галвинг ООД
www.tashev-galving.com

6. Install the air cleaner cover by re-engaging the tabs
on the top of the air cleaner assembly and then
installing the release knob by turning clockwise.
Installation of Air Cleaner Cover
CAUTION:
Never run the engine without the air cleaner element. Rapid
engine wear will result from contaminants, such as dust and dirt,
being drawn through the carburetor, into the engine.
2. Move the fuel shutoff valve to the ON position.
Fuel Shutoff Valve in the ON Position
STARTING THE GENERATOR
Before starting the generator, read manuals.
Before attempting to start the generator, verify the
following:
The engine is filled with engine oil (see Checking
Engine Oil .
The generator is situated in a proper location (see
Location Selection.
The generator is on a dry surface (see Weather and
Dry Surface.
All loads are disconnected from the generator (see
No Connected Loads.
The generator is properly grounded (see Grounding
the Generator .
Manually Starting a Generator
NOTE: This procedure can also be used on an
electric start generator.
1. Make sure the circuit breakers are properly set.
1 2 3 4
Breakers
1 - 240/120V Main
Circuit Breaker
Operating
Position
2 - 240/120V Main
Circuit Breaker
Tripped Position
3 - 120V Circuit
Breaker
Operating
Position
4 - 120V Circuit
Breaker Tripped
Position
EN
Ташев-Галвинг ООД
www.tashev-galving.com

4. Push the engine control switch into the RUN
position.
Engine Control Switch
5. Firmly grasp and pull the recoil handle slowly until
you feel increased resistance. At this point, apply a
rapid pull while pulling up and slightly away from the
generator .
6. As the engine starts and stabilizes, gradually move
the choke lever back to the OFF position.
3. Move the choke lever to the ON position.
Choke Lever
Starting an Electric Start Generator
1. Verify the battery is properly installed and both
battery cables are attached (see Installing the
Battery (Electric start Generators only).
2. Make sure the circuit breakers are properly set.
1 2 3 4
Circuit Breakers
1 - 240/120V Main
Circuit Breaker
Operating
Position
2 - 240/120V Main
Circuit Breaker
Tripped Position
3 - 120V Circuit
Breaker
Operating
Position
4 - 120V Circuit
Breaker Tripped
Position
3. Move the fuel shutoff valve to the ON position.
Fuel Shutoff Valve in the ON Position
4. Move the choke lever to the ON position.
Choke Lever
EN
Ташев-Галвинг ООД
www.tashev-galving.com

5. Push and hold the engine control switch in the
START position until the engine starts. Once the
engine starts, release the engine control switch; the
switch will automatically move into the RUN position.
Engine Control Switch
6. As the engine starts and stabilizes, gradually move
the choke lever back to the OFF position.
STOPPING THE GENERATOR
Normal Operation
During normal operation, use the following steps to stop
your generator:
1. Remove any connected loads from the control
panel receptacles.
2. Allow the generator to run at “no load” to reduce
and stabilize engine and alternator temperatures.
3. Push the engine control switch to the OFF position.
4. Turn the fuel shutoff valve to the OFF position.
During an Emergency
If there is an emergency and the generator must be
stopped quickly, push the engine control switch to the
OFF position immediately.
Engine Control Switch
MAINTENANCE CHART
WARNING Stop the engine before starting maintenance work.
NOTICE:
Use only specified genuine parts for replacement. Ask an authorized dealer for further information.
Table 1: Maintenance Schedule - Owner Performed
Maintenance
Item Before Every
Use
After First 20
Hours or First
Month of Use
After 50 Hours
of Use or Every
3 Months
After 100 Hours
of Use or Every
6 Months
After 300 Hours
of Use or Every
Year
Engine Oil Check Level Change Change – –
Cooling
Features Check/Clean ––––
Air Filter Check – Clean1– Replace
Spark Plug – – – Check/Clean Replace
Spark Arrestor – – – Check/Clean –
1 Service more frequently if operating in dry and dusty conditions.
Fuel Check level – –– –
Table 2: Maintenance Schedule - Authorized Rheinland Elektro Maschinen Service Dealer Performed
Maintenance
Item Before Every
Use
After First 20
Hours or First
Month of Use
After 50 Hours
of Use or Every
3 Months
After 100 Hours
of Use or Every
6 Months
After 300 Hours
of Use or Every
Year
Valve Clearance –––– Check/Adjust
Fuel Filter – – – Check/Clean –
Idle Speed –––– Check/Adjust
–
–
––
EN
Ташев-Галвинг ООД
www.tashev-galving.com

Changing Engine Oil
1. Stop the engine.
2. Let engine sit and cool for several minutes (allow
crankcase pressure to equalize).
3. Place oil pan (or suitable container) under the oil
drain plug.
4. With a damp rag, thoroughly clean around the oil
drain plug.
5. Remove the oil drain plug. Once removed, place
the oil drain plug on a clean surface.
Oil Drain Plug
6. Remove the oil fill plug so the oil can drain more
easily from the oil drain port.
7. Allow oil to completely drain.
8. Replace oil drain plug.
9. Fill crankcase with oil following the steps outlined in
Adding Engine Oil.
Never dispose of used engine oil by dumping the
oil into a sewer, on the ground, or into groundwater
or waterways. Always be environmentally
responsible. Follow the guidelines for proper
disposal of hazardous materials. Consult local
authorities or reclamation facility.
10. Dispose of used engine oil properly.
NOTE:
AIR FILTER MAINTENANCE
! WARNING
Never use gasoline or other flammable
solvents to clean the air filter. Use only
household detergent soap to clean the
air filter.
Cleaning the Air Filter
The air filter m must be cleaned after every 50 hours
of use or 3 months (frequency should be increased if
generator is operated in a dusty environment).
1. Turn off the generator and let it cool for several
minutes if running.
2. Move the generator to a flat, level surface.
3. Turn the release knob at the bottom of the air
cleaner assembly counterclockwise until the air
cleaner cover can freely move outward.
4. Slowly lift up and disengage the top tabs of the air
cleaner cover . Clean the air cleaner cover with a
clean rag and place on a clean surface.
Removing Air Cleaner Cover
5. Remove the foam air fi lter element.
Removing Air Filter Element
EN
Ташев-Галвинг ООД
www.tashev-galving.com

6. Pay special attention to the metal backf re plate in
the upper left corner of the air cleaner assembly.
This metal plate must be in its proper position when
installing the foam air fi lter element .
Position of Metal Backfire Plate
7. Wash the foam air filter element by submerging
the element in a solution of household detergent
soap and warm water. Slowly squeeze the foam to
thoroughly clean.
NEVER twist or tear the foam air filter element
during cleaning or drying. Only apply slow but firm
squeezing action.
8. Rinse in clean water by submerging the air filter
element in fresh water and applying a slow
squeezing action.
9. Dispose of used soap cleaning solution properly.
10. Dry the air filter element by again applying a slow
firm squeezing action.
11. Return the air fi lter element to its position in the air
cleaner assembly box. Make sure the metal back fire
plate is in its proper position.
12. Install the air cleaner cover by re-engaging the tabs
on the top of the air cleaner assembly and then
installing the release knob by turning clockwise.
Installation of Air Cleaner Cover
SPARK PLUG MAINTENANCE
The spark plug must be checked and cleaned after
every 100 hours of use or 6 months and must be
replaced after 300 hours of use or every year.
1. Stop the generator and let it cool for several
minutes if running.
2. Move the generator to a flat, level surface.
3. Remove the spark plug boot by fimly pulling the
plastic spark plug boot handle directly away from
the engine.
Never apply any side load or move the spark plug
laterally when removing the spark plug. Applying a
side load or moving the spark plug laterally may crack
and damage the spark plug boot.
Removal of Spark Plug Boot
4. Clean area around the spark plug.
5. Using the spark plug socket wrench provided,
remove the spark plug from the cylinder head.
NOTE:
NOTE:
Squeeze and Dry
Squeeze
Do not twist.
Do not twist.
Clean
Dip in Oil
EN
Ташев-Галвинг ООД
www.tashev-galving.com

Removing Spark Plug
6. Place a clean rag over the opening created by the
removal of the spark plug to make sure no dirt can
get into the combustion chamber.
7. Inspect the spark plug for:
Cracked or chipped insulator
Excessive wear
Spark plug gap (the acceptable limit of
0.60 – 0.80 mm).
If the spark plug fails any one of the conditions listed
above, replace the plug with a equivalent.
Only use the recommended spark plug . Using a
non-recommended spark plug could result in
damage to the engine.
Spark Plug Gap Requirements
8. Install the spark plug by carefully following the steps
outlined below:
a - Carefully insert the spark plug back into the
cylinder head. Hand-thread the spark plug until
it bottoms out.
b - Using the spark plug socket wrench provided, turn
the spark plug to ensure it is fully seated.
c - Replace the spark plug boot, making sure the
boot fully engages the spark plug’s tip.
Recommended Spark Plug Replacement:
AutoLite 63
Champion RN9YC
Bosch WR7DS
Torch F6RTC
CLEANING THE GENERATOR
It is important to inspect and clean the generator before
every use.
Clean All Engine Air Inlet and Outlet Ports – Make
sure all engine air inlet and outlet ports are clean of any
dirt and debris to ensure the engine does not run hot.
Engine Air Inlet and Outlet Ports
Clean All Engine Cooling Fins – Use a damp rag and
a brush to loosen and remove all dirt on or around the
engine’s cooling fi ns.
Engine Cooling Fins
NOTE:
EN
Ташев-Галвинг ООД
www.tashev-galving.com

Clean All Alternator Cooling Air Inlets and Exhaust
Ports – Make sure the cooling air inlets and exhaust
ports of the alternator are free of any debris and
obstructions. Use a vacuum cleaner to remove dirt and
debris stuck in the cooling air inlets and exhaust ports.
Alternator Cooling Air Inlet and Outlet Port
Alternator Cooling Air Inlet and Outlet Port General
Cleaning of the Generator – Use a damp rag to clean
all remaining surfaces.
LONG-TERM STORAGE
Never store a generator with fuel in the
tank indoors or in a poorly ventilated
area where the fumes can come in
contact with an ignition source.
Gasoline stored for as little as 60 days can go bad,
causing gum, varnish and corrosive buildup in fuel
lines, fuel passages and the engine. This corrosive
buildup restricts the f ow of fuel, preventing an engine
from starting after a prolonged storage period.
Proper care should be taken to prepare the generator for
any long-term storage.
Storage Procedure
1. Clean the generator as outlined in Cleaning the
Generator .
2. Drain all gasoline from the fuel tank as best as
possible.
3. With the fuel shutoff valve open, start the engine
and allow the generator to run until all the remaining
gasoline in the fuel lines and carburetor is
consumed and the engine shuts off.
4. Close the fuel shutoff valve.
5. Change the oil (see Changing Engine Oil)
6. Remove the spark plug and place about 1 tablespoon
of oil in the spark plug opening. While placing a clean
rag over the spark plug opening, slowly pull the recoil
handle to allow the engine to turn over several times.
This will distribute the oil and protect the cylinder wall
from corroding during storage.
7. Replace the spark plug
8. Move the generator to a clean, dry place for storage.
NOTE:
WARNING
EN
Ташев-Галвинг ООД
www.tashev-galving.com

TROUBLESHOOTING
!WARNING
Before attempting to service or
troubleshoot the generator, the owner
or service technician must first read
the owner’s manual and understand
and follow all safety instructions.
Failure to follow all instructions may
result in conditions that can lead to
voiding of product warranty, serious
personal injury, property damage or
even death.
PROBLEM POTENTIAL CAUSE SOLUTION
Engine is running, but no
electrical output.
1. Circuit breakers are tripped. 1. Reset the circuit breakers and check for overload
condition.
2.Faulty or defective power cord 2.Replace power cord.
3.Faulty or defective electrical
appliance 3.Try connecting a known good appliance to verify the
generator is producing electrical power.
4.If trying 1-3above does not
solve the problem, the cause
might be the generator has a
fault.
4.Take the generator to your nearest authorized
service dealer.
Engine will not start or
remain running while trying
to start.
1. Fuel shutoff valve is in the OFF
position. 1. Move the fuel shutoff valve to the ON position
2. Generator is out of gasoline. 2. Add gasoline to the generator
3. Fuel flow is obstructed. 3. Inspect and clean fuel delivery passages.
4. Unit is overchoked. 4. Move the choke lever halfway between the ON and
OFF positions
5. Starting battery may have
insufficient charge 5. On electric start models only. Check battery output
and charge battery as necessary.
6. Dirty air filter 6. Check and clean the air filter.
7. Low oil level shutdown switch
is preventing the unit from
starting.
7. Check oil level and add oil if necessary
8.Spark plug is faulty. 8.Remove and check the spark plug. Replace if faulty
9.Dirty/plugged spark arrestor 9.Check and clean the spark arrestor
10.Stale fuel 10.Drain fuel and replace with fresh fuel
11.If trying 1-10above does not
solve the problem, the cause
might be the generator has a
fault.
11.Take the generator to your nearest authorized
service dealer.
EN
Ташев-Галвинг ООД
www.tashev-galving.com
This manual suits for next models
4
Table of contents
Languages:
Popular Portable Generator manuals by other brands

Honeywell
Honeywell HW7500EL - Portable Generator owner's manual

Winco
Winco WT3000H Installation and operator's manual

Toyama
Toyama TWGD220EXP owner's manual

PICOLAS
PICOLAS LDP-CWL 06-20 user manual

Generac Power Systems
Generac Power Systems 02010-2, 04164-2 Installation and owner's manual

Briggs & Stratton
Briggs & Stratton 30348 Operator's manual