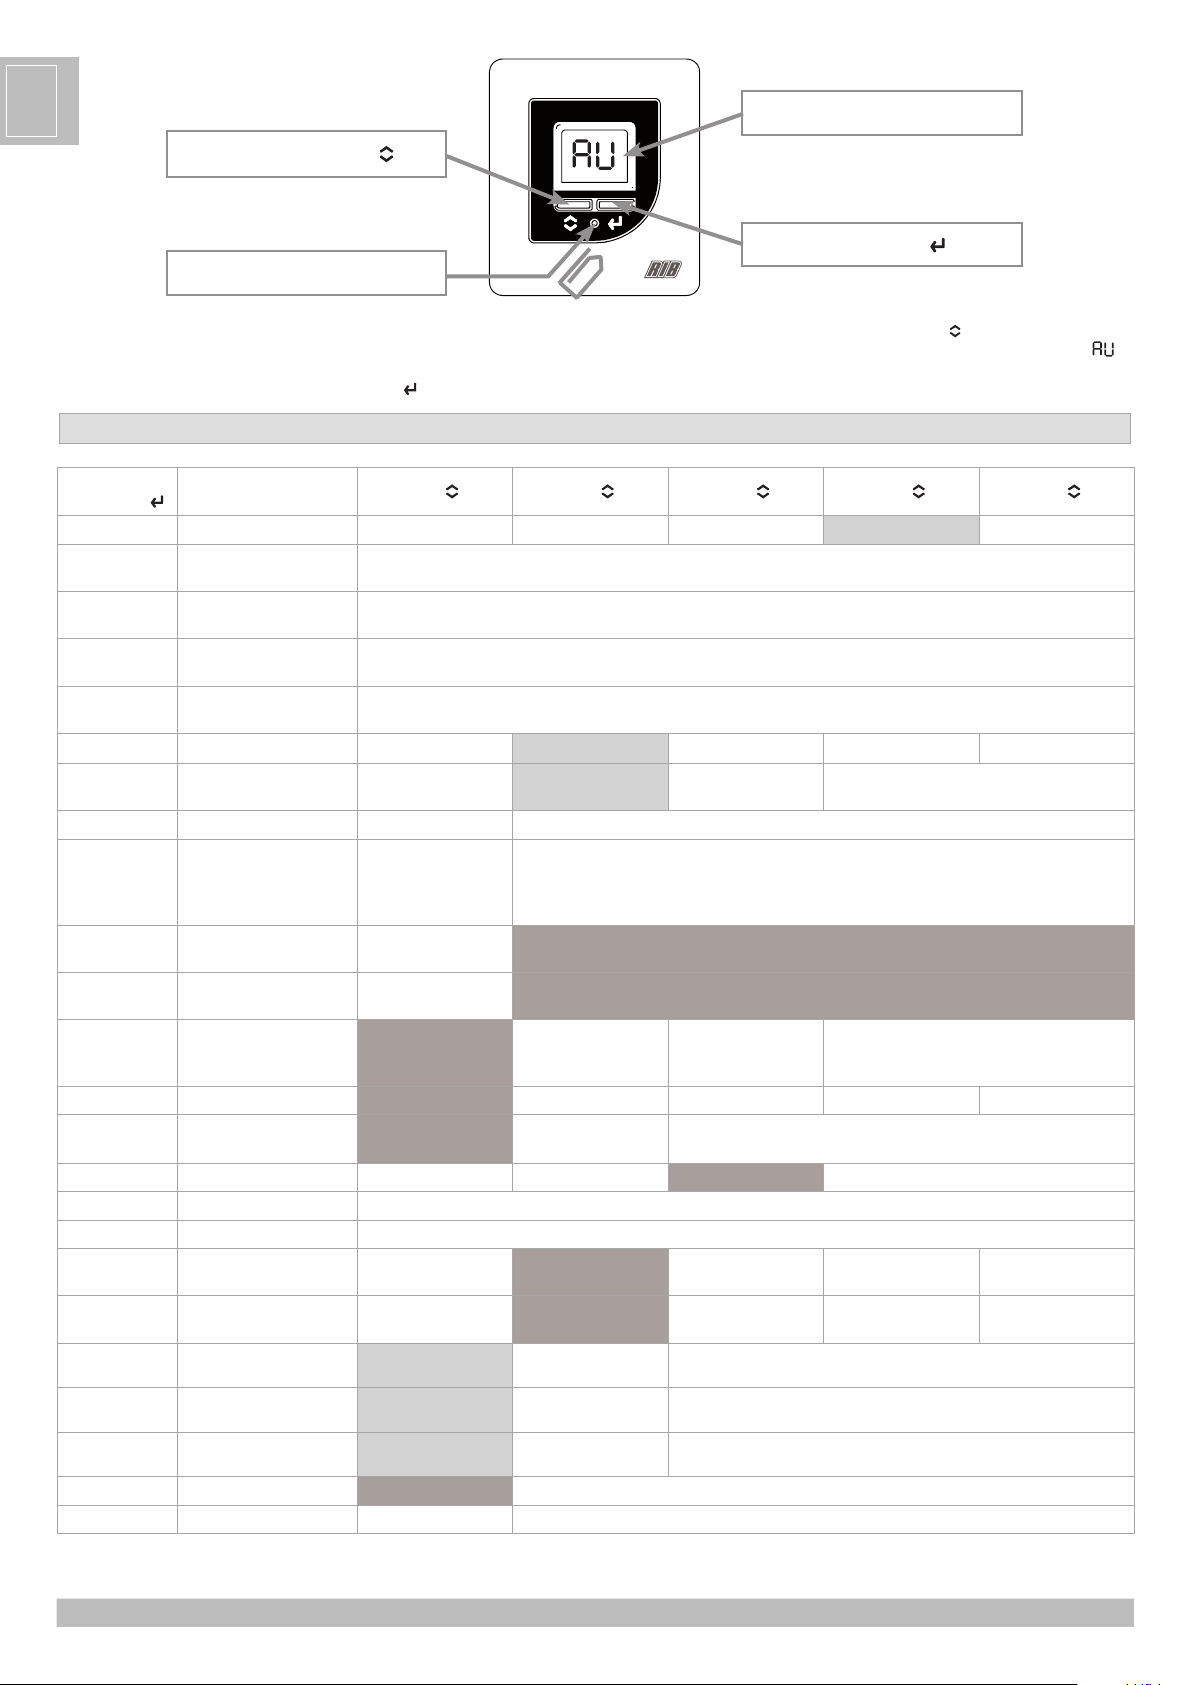
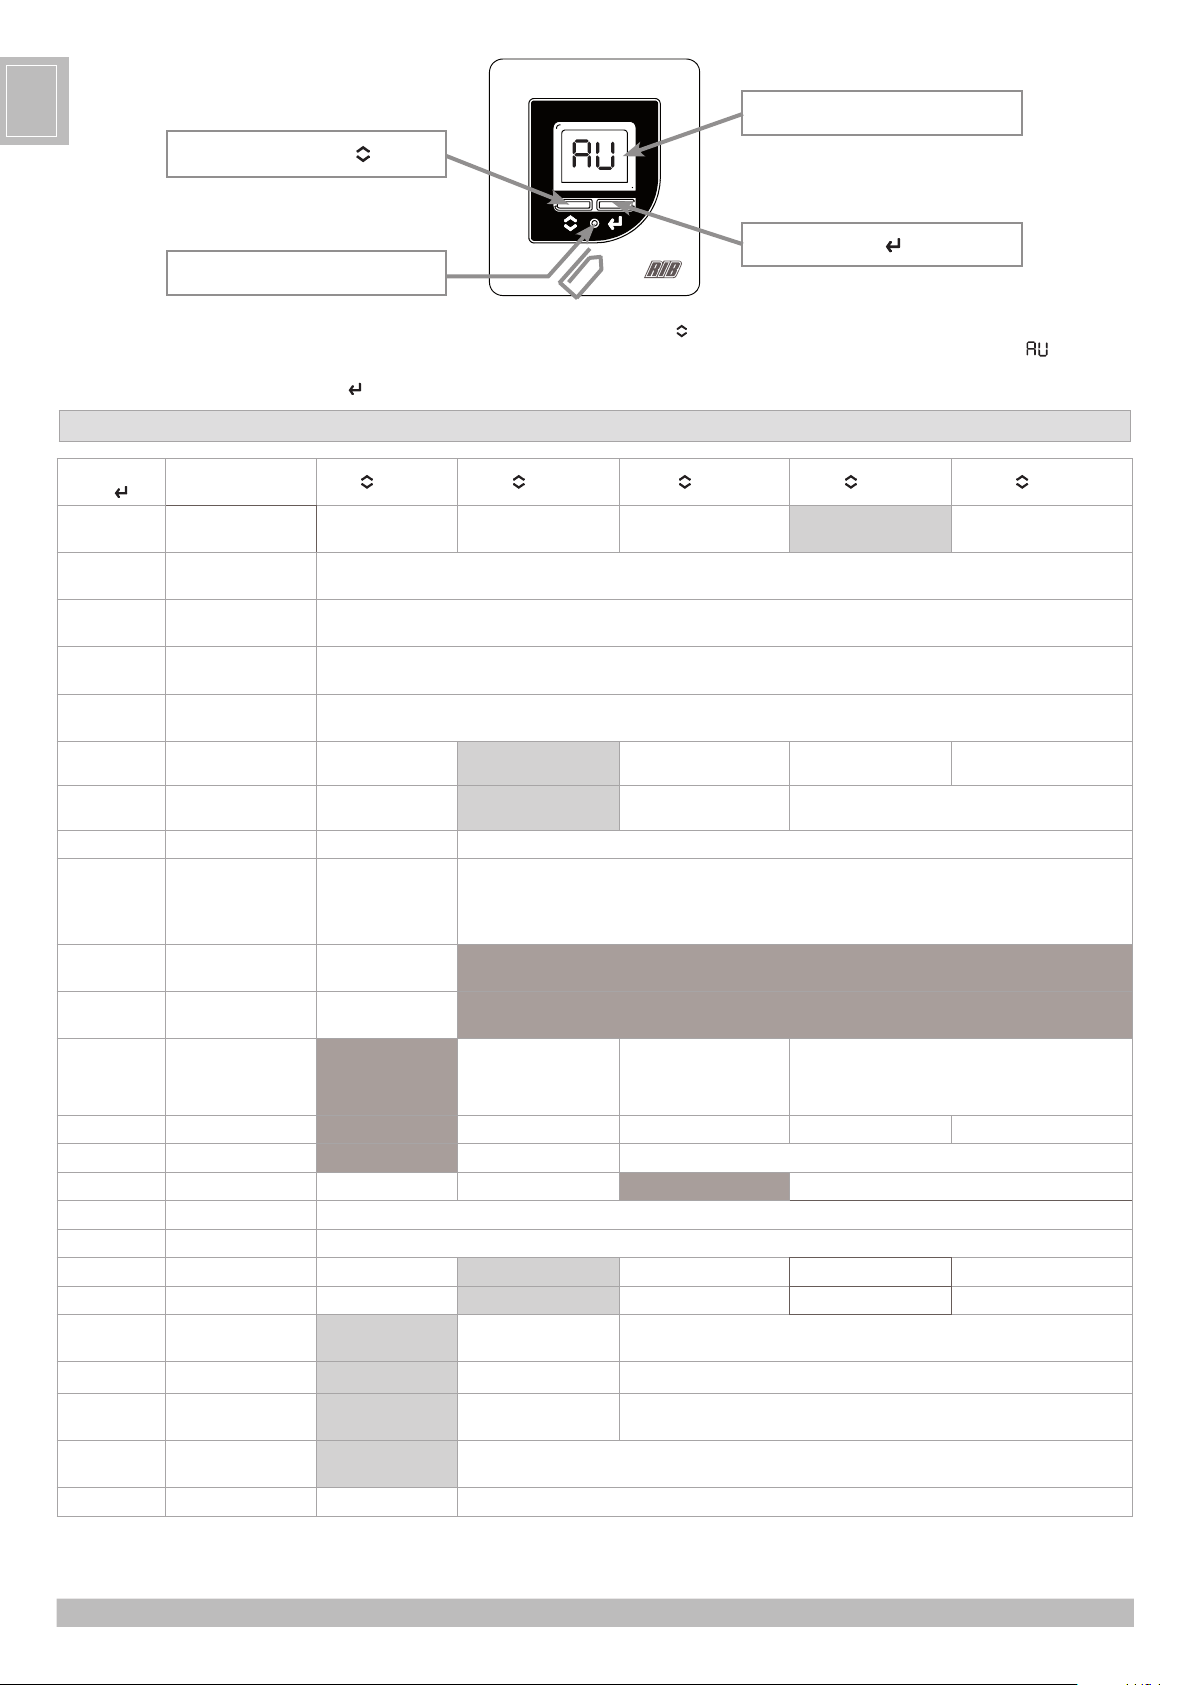
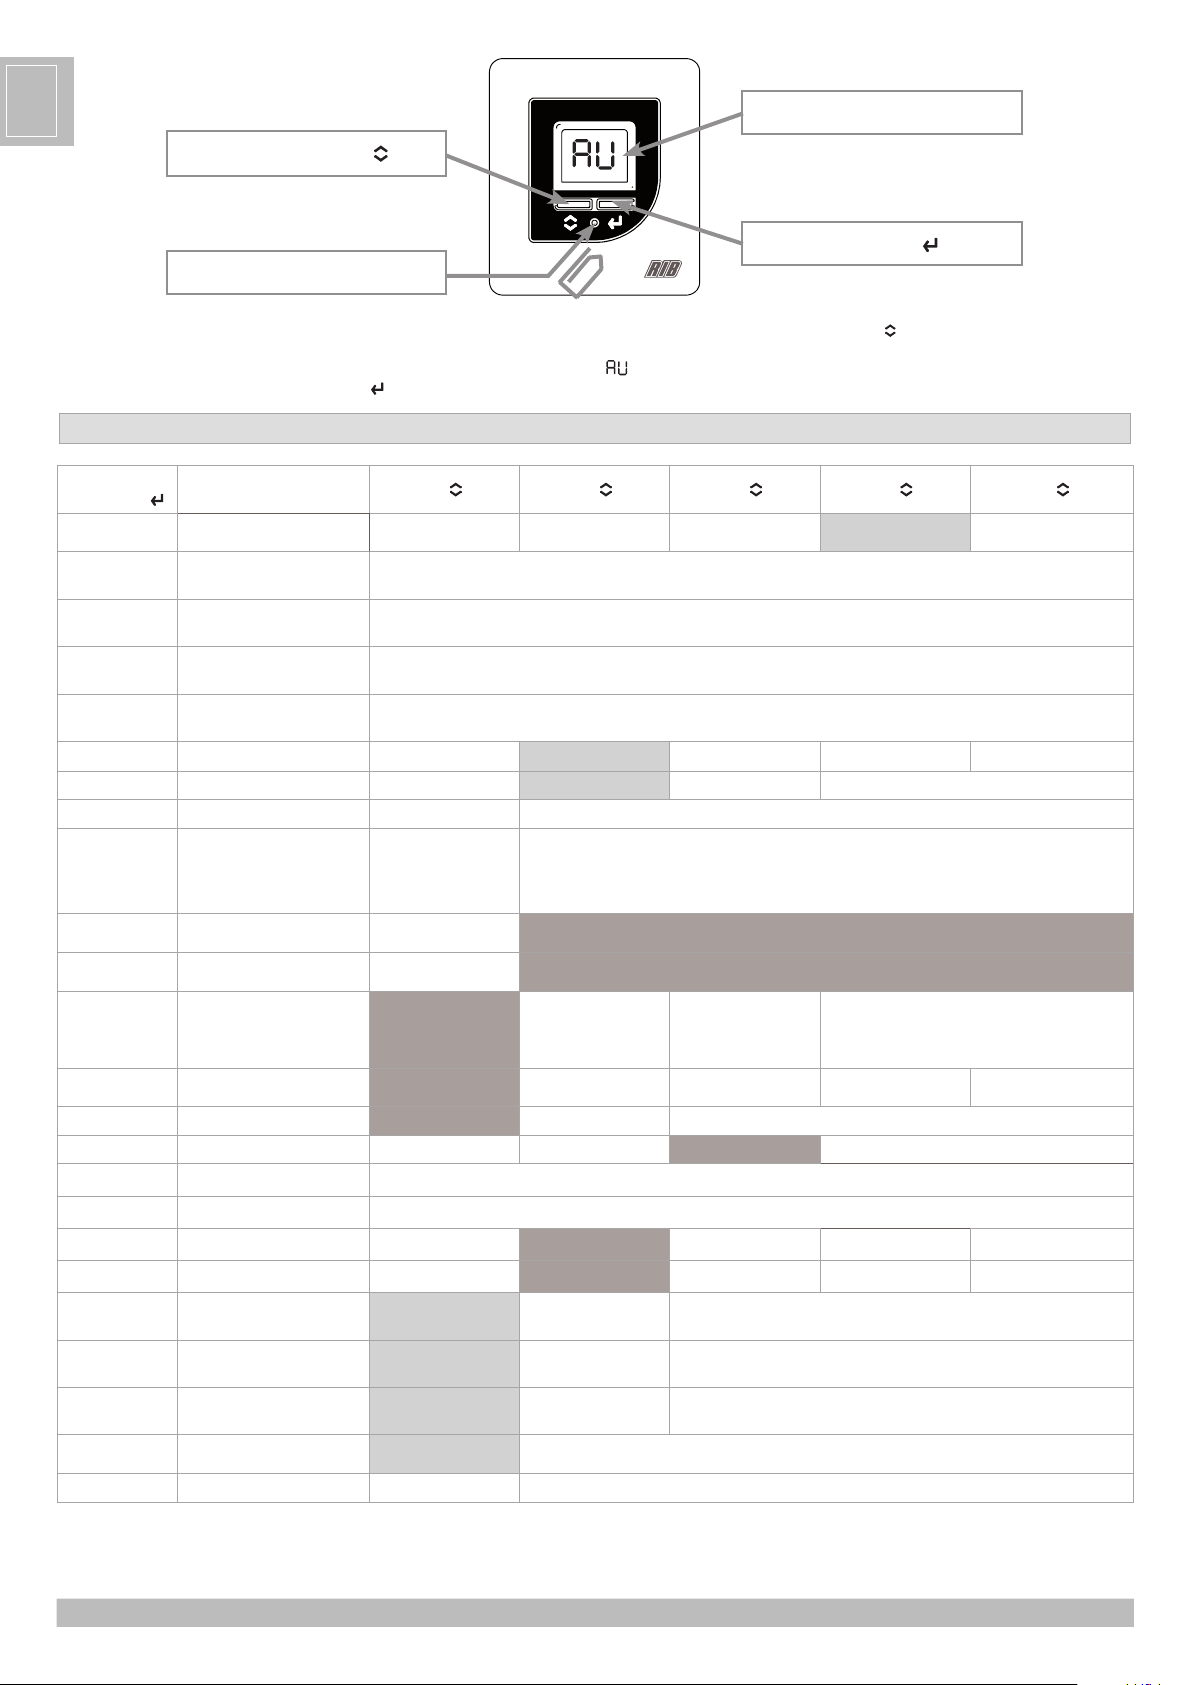
RIB SLIDER User manual

ITALIANO pag. 02 / FRANÇAIS pag. 04 / ENGLISH page 06 / ESPAÑOL pag. 08
PROGRAMMATORE LCD per SLIDER
PROGRAMMEUR LCD pour SLIDER
LCD PROGRAMMER für SLIDER
PROGRAMADOR LCD para SLIDER fw.1
Code ACG9419
IP30

2
PARAMETRO
(tasto ENTER )FUNZIONE Tasto A = 0 Tasto A = 1 Tasto A = 2 Tasto A = 3 Tasto A = 4
.a Rilevamento ostacoli Molto alto Alto Basso Molto basso
.b Velocità max apre 1 2 3 4 5 67 8
molto lenta +++ +++ ++++ +++++ ++++++ molto veloce
.c Velocità max chiude 1 2 3 45 6 7 8
molto lenta +++ +++ ++++ +++++ ++++++ molto veloce
.d Velocità rallentamento apre 1 2 3 45 6 7 8
molto lenta +++ +++ ++++ +++++ ++++++ molto veloce
.E Velocità rallentamento chiude 1 2 34 5 6 7 8
molto lenta +++ +++ ++++ +++++ ++++++ molto veloce
.F Stop progressivo Stop immediato Rampa 0,1 sec. Rampa 0,2 sec. Rampa 0,3 sec. Rampa 0,4 sec.
.G Funzione
elettroblocco Sempre spento Sempre
attivo Attivo ogni apertura
.x Apertura parziale 1=5% 2=10% 3=20% 4=40% 5=50% 6=60% 7=70% 8=80%
.i Tempo chiusura automatica
da comando OPEN
Un comando apre,
uno chiude. Chiusura
automatica esclusa
1=10sec 2=20sec 3=30sec 4=40sec 5=50sec 6=60sec 7=70sec 8= 80sec 9=90sec
.L Chiusura autom.dinamica Non abilitata 3 chiusure consecutive non ultimate = aumento 5 sec. chiusura automatica impostata
.M Apertura parziale dinamica Non abilitata 3 chiusure consecutive non ultimate = apertura totale
.n Batterie emergenza
SLIDER senza batterie o
funzionamento fino a
esaurimento carica
batterie
Apre in mancanza
di tensione di rete
Chiude in mancanza
di tensione di rete
.o Funzione antivento Non abilitata Bassa Media Alta
.P Fototest Non abilitato Abilitato ogni chiusura
.r Interblocco Abilitato Non abilitato
.t Frenata apre 1=10% 2=20% 3=30% 4=40% 5=50% 6=60% 7=70% 8=80%
. u Frenata chiude 1=10% 2=20% 3=30% 4=40% 5=50% 6=60% 7=70% 8=80%
.y Accostamento in chiusura Molto lento Lento Medio Veloce
.v Accostamento in apertura Molto lento Lento Medio Veloce
.5 Stop su fermo battuta apre Stop non a contatto su
fermo battuta
Stop a contatto su
fermo battuta
.0 Profilo LED (optional) Attivo modalità
notte
Attivo modalità
porta aperta
-
-
-Accostamento in apertura Veloce
(ante senza inerzia)
Lento
(ante con inerzia)
.Indirizzo BUS seriale RS485 Funzione
disabilitata Possibilità di collegare un PC per la gestione centralizzata delle automazioni (max 31)
.J Rampa di accellerazione 1=0,2sec 2=0,4sec 3=0,6sec 4=0,8sec 5=1sec 6=1,2sec 7=1,4sec 8=1,6sec 9=1,8sec
I
ATTENZIONE: l’automazione ha un impostazione di default ed i parametri sono evidenziati in grassetto.
Per accedere ai parametri premere il tasto di programmazione Bper 2 secondi (aiutandosi per
esempio con una spilla fermafogli).
Verrà visualizzato il parametro A3.
Per scorrere i parametri premere il tasto ENTER .
Per modificare il valore premere il tasto selezione A.
Per uscire dalla programmazione attendere 10 secondi. Il display visualizzerà la scritta .
Display LCD
Tasto ENTER
Tasto programmazione B
Tasto selezione A

3
I
Tasto ENTER
ACCESSO ALLE FUNZIONI DELL’AUTOMAZIONE TRAMITE SELETTORE DIGITALE:
- Premere per 2 secondi il tasto ENTER .
La funzione attiva in quel momento inizia a lampeggiare.
- Premere il tasto Aper scorrere le funzioni.
- Quando viene visualizzata la funzione desiderata, attendere 10 secondi.
- Dopo 10 secondi il simbolo della funzione desiderata da lampeggiante diventa fisso.
NOTA: Solo se selezionate le funzioni MANUALE o SEMPRE APERTO i simboli della
funzione invece di essere fissi lampeggiano lentamente.
COLLEGAMENTI ELETTRICI
Funzione NOTTE
lampeggiante = non abilitata
fisso = disabilitati comandi radar int/ext - apertura solo con comando open
Funzione MANUALE
lampeggiante = abilitata
Per riportarla in (automatica) premere il tasto A.
Funzione SEMPRE APERTO
la porta si apre, il display visualizza il simbolo lampeggiante e non accetta nessun comando di chiusura.
Per riportarla in (automatica) premere il tasto A.
Funzione AUTOMATICA
la porta accetta comandi di apertura dai radar e chiude trascorso il tempo di “chiusura automatica”.
Funzione APERTURA PARZIALE
apertura parziale nella percentuale impostata.
Funzione RADAR INTERNO
Attivo radar interno, radar esterno disattivato.
ALLARMI
- Simboli alternati indicano batteria scarica.
- Simboli alternati indicano guasto fotocellule (con fototest abilitato).
- Simbolo indica una manovra di apprendimento.
- Simbolo indica radar esterno attivo.
- Simbolo indica radar esterno / interno attivo.
BLOCCO TASTIERA
- Mantenere premuto contemporaneamente il tasto Aed il tasto ENTER .
- Il simbolo nel display lampeggia.
- Mantenere premuto fino allo stop lampeggio.
SBLOCCO TASTIERA
- Mantenere premuto contemporaneamente il tasto Aed il tasto ENTER .
- Rilasciare il tasto A ed il tasto ENTER quando il simbolo sul display lampeggia.
SIG
Tasto selezione A
PROGRAMMAZIONE AUTOMAZIONE
1 - Premere il tasto programmazione “B” per 3 secondi.
2 - Premere tasto
A
e
ENTER
contemporaneamente fino a visualizzare PR nel display. L’automazione va in chiusura e dopo 3 secondi in apertura
(manovre a bassa velocità).
3 - Visualizzazione timer in secondi per chiusura automatica (da radar).
4 - Premere tasto
A
e
ENTER
contemporaneamente trascorso il tempo desiderato. L’automazione effettua la manovra di chiusura terminando la
programmazione.

4
F
PARAMÈTRE
(Touche ENTE ) FONCTION Touche A = 0 Touche A = 1 Touche A = 2 Touche A = 3 Touche A = 4
.a Détection d’obstacles Très haute Élevée Basse Très Basse
.b Vitesse max. d’ouverture 1 2 3 4 5 67 8
Très lente +++ +++ ++++ +++++ ++++++ Très rapide
.c Vitesse max. de fermeture 1 2 3 45 6 7 8
Très lente +++ +++ ++++ +++++ ++++++ Très rapide
.d Vitesse ral. d’ouverture 1 2 3 45 6 7 8
Très lente +++ +++ ++++ +++++ ++++++ Très rapide
.E Vitesse ral. de fermeture 1 2 34 5 6 7 8
Très lente +++ +++ ++++ +++++ ++++++ Très rapide
.F Arrêt progressif Arrêt immédiat Rampe 0,1 s Rampe 0,2 s. Rampe 0,3 s Rampe 0,4 sec.
.G Fonction blocage
électrique Toujours éteint Toujours activé Activé à chaque
ouverture
.x Ouverture partielle 1=5% 2=10% 3=20% 4=40% 5=50% 6=60% 7=70% 8=80%
.i
Temps de fermeture
automatique par
commande OPEN
Une commande
ouvre, une autre ferme.
Fermeture automatique
non activée
1=10 s 2=20 s 3=30 s 4=40 s 5=50 s 6=60 s 7=70 s 8= 80 s 9=90 s
.L Fermeture automatique
dynamique Désactivée 3 fermetures consécutives non terminées = augmentation 5 s fermeture automatique réglée
.M Ouverture partielle
dynamique Désactivée 3 fermetures consécutives non terminées = ouverture totale
.n Batteries d’urgence
SLIDER sans batterie ou
fonctionnement afin de la
charge de le batterie
Ouverture en cas
d’absence de tension
secteur
Fermeture en cas
d’absence de tension
secteur
.o Fonction anti-vent Désactivée Basse Moyenne Haute
.P Phototest Désactivée Activé à chaque
fermeture
.r Interverrouillage Fonction activée Fonction désactivée
.t Freinage d’ouverture 1=10% 2=20% 3=30% 4=40% 5=50% 6=60% 7=70% 8=80%
. u Freinage de fermeture 1=10% 2=20% 3=30% 4=40% 5=50% 6=60% 7=70% 8=80%
.y Approche pendant la
fermeture Très lente Lente Moyenne Rapide
.v Approche pendant la
ouverture Très lente Lente Moyenne Rapide
.5 Stop à contact de butée
mécanique de ouverture
Stop pas à contact de
butée mécanique
Stop à contact de butée
mécanique
.0 Profil LED (optionnel) Actif en mode nuit Actif en mode porte
ouverte
-
-
-Accrochement en
ouverture
Rapide
(vantails sans inertie)
Lent
(vantails avec inertie)
.Adresse BUS série RS485 Fonction désactivée Possibilité de brancher un PC pour la gestion centralisée des systèmes automatisés (max. 31).
.J Rampa di accellerazione 1=0,2sec 2=0,4sec 3=0.6sec 4=0,8sec 5=1sec 6=1,2sec 7=1,4sec 8=1,6sec 9=1,8sec
ATTENTION: Le système automatisé est réglé par défaut et les paramètres son mis en évidence en gras.
Pour accéder aux paramètres, appuyer sur le bouton de programmation Bpendant au moins
2 secondes (par exemple à l’aide d’un trombone pour papier).
Le paramètre A3 doit s’afficher.
Pour parcourir les paramètres, appuyer sur le bouton ENTER .
Pour modifier la valeur, appuyer sur le bouton de sélection A.
Pour sortir de la programmation, attendre 10 secondes. L’écran affichera l’inscription .
Display LCD
Touche ENTER
Touche de programmation B
Touche de sélection A

5
F
Touche ENTER
ACCÈS AUX FONCTIONS DU SYSTÈME AUTOMATISÉ AU MOYEN DU SÉLECTEUR NUMÉRIQUE:
- Appuyer pendant 2 secondes sur le bouton ENTER . La fonction active commence alors à
clignoter.
- Appuyer sur le bouton A pour parcourir les fonctions.
- Lorsque la fonction désirée s’affiche, attendre 10 secondes.
- Après 10 secondes, le symbole de la fonction désirée ne clignote plus et reste fixe.
REMARQUE: Ce n’est qu’en sélectionnant les fonctions MANUEL ou TOUJOURS OUVERT
que les symboles se mettent à clignoter lentement.
BRANCHEMENTS ÉLECTRIQUES
Fonction NUIT
clignotante = non activée
commandes radar int./ext. désactivées - ouverture uniquement par commande OPEN.
Fonction MANUEL
clignotante = activée
Pour la rapporter à (automatique), appuyer sur la touche A .
Fonction TOUJOURS OUVERT
la porte s’ouvre, l’afficheur montre le symbole clignotant et aucune commande de fermeture n’est acceptée.
Pour la rapporter à (automatique), appuyer sur la touche A .
Fonction AUTOMATIQUE
la porte accepte des commandes d’ouverture des radars et elle se ferme une fois que le temps de “fermeture automatique” s’est écoulé.
Fonction OUVERTURE PARTIELLE
ouverture partielle du pourcentage défini.
Fonction RADAR INTERNE
Radar interne activé, radar externe désactivé.
ALARMES
- Les symboles alternés indiquent que la batterie est déchargée.
- Les symboles alternés indiquent une panne des photocellules (avec phototest
activé).
- Le symbole indique une opération d’apprentissage.
- Le symbole indique que le radar externe est activé.
- Le symbole indique que le radar externe/interne est activé.
BLOCAGE DU CLAVIER
- Maintenir la touche Aet la touche ENTER pressés simultanément.
- Le symbole sur l’afficheur clignote.
- Maintenir pressé jusqu’à l’arrêt du clignotement.
DEBLOCAGE DU CLAVIER
- Maintenir la touche Aet la touche ENTER pressés simultanément.
- Relâcher le bouton A et le bouton ENTER lorsque le symbole qui figure à l’écran
clignote.
SIG
Touche de sélection A
PROGRAMMATION DE L’AUTOMATION
1 - pousser la touche programmation “B” pour 3 secondes.
2 - Pousser la touche
A
et
ENTER
ensemble afin de voir PR dans le display. L’automation va en fermeture et après 3 secondes elle va en ouverture
(manoeuvres à baisse vitesse).
3 - Visualisation timer en secondes pour fermeture automatique (de radar).
4 - Pousser la touche
A
et
ENTER
ensemble une fois passé le temps désiré. L’automation effectue la manoeuvre de fermeture et termine la programmation.

6
G
B
PARAMETER
(ENTER key) FUNCTION A Key = 0 A Key = 1 A Key = 2 A Key = 3 A Key = 4
.a Obstacle
detection Very high High High Very low
.b Maximum
opening speed
1 2 3 4 5 67 8
very slow +++ +++ ++++ +++++ ++++++ very fast
.c Maximum
closure speed
1 2 3 45 6 7 8
very slow +++ +++ ++++ +++++ ++++++ very fast
.d Opening deceleration
speed
1 2 3 45 6 7 8
very slow +++ +++ ++++ +++++ ++++++ very fast
.E Closure deceleration
speed
1 2 34 5 6 7 8
very slow +++ +++ ++++ +++++ ++++++ very fast
.F Progressive stop Immediate stop Ramp 0.1 sec. Ramp 0.2 sec. Ramp 0.2 sec. Ramp 0.4 sec.
.G Electric lock function Always off Always active Enabled at each opening
.x Partial opening 1=5% 2=10% 3=20% 4=40% 5=50% 6=60% 7=70% 8=80%
.i Automatic closure
time from OPEN order
One command opens,
another one closes.
Automatic closure
disabled
1=10sec 2=20sec 3=30sec 4=40sec 5=50sec 6=60sec 7=70sec 8=80sec 9=90sec
.L Dynamic automatic
closure Not enabled 3 consecutive closures not completed = 10 sec. increase automatic closure set
.M Dynamic partial
opening Not enabled 3 consecutive closures not completed = total opening
.n Emergency batteries
Door without batteries
or door active until
batteries become
weak
Door opens when there is
no power supply
Door closes when there is
no power supply
.o Anti-wind function Not enabled Low Medium High
.P Photo test Not enabled Enabled at each closure
.r Interlock Enabled function Disabled function
.t Opening braking 1=10% 2=20% 3=30% 4=40% 5=50% 6=60% 7=70% 8=80%
. u Closure braking 1=10% 2=20% 3=30% 4=40% 5=50% 6=60% 7=70% 8=80%
.y Approach in closure Very slow Slow Medium Quick
.v Approach in opening Very slow Slow Medium Quick
.5 Stop touching
opening stopper
Not touching opening
stopper Touching opening stopper
.0 LED profile (optional) Active in night mode Active when door is open
-
-
-Approach in opening Fast
(door without inertia)
Slow
(door with inertia)
.RS485 serial BUS
address Disabled function Possibility of connecting a PC for the centralised management of automations (max 31)
.J Acceleration ramp 1=0,2sec 2=0,4sec 3=0,6sec 4=0,8sec 5=1sec 6=1,2sec 7=1,4sec 8=1,6sec 9=1,8sec
CAUTION: the automation has a default setting and the parameters are indicated in bold type.
To access the parameters, press programming key Bfor at least 2 seconds (with the help of
a paper clip, for example).
You will see parameter A3.
To scroll through the parameters, press the ENTER key.
Press key Ato change the value.
To exit programming, wait for 10 seconds. The screen will display the text .
LCD Display
ENTER key
Programming key B
Selection key A

7
G
B
ENTER key
ACCESS TO THE AUTOMATION FUNCTIONS THROUGH THE FUNCTION DIGITAL SELECTOR:
- Press the ENTER key for 2 seconds. The function is active when it starts to flash.
- Press key Ato scroll through the functions.
- When the desired function is visible, wait 10 seconds.
- After 10 seconds the symbol of the desired function will go from flashing to a steady light.
NOTE: If you select the MANUAL functions or ALWAYS OPEN the function symbols
will flash slowly instead of being a steady light.
ELECTRICAL CONNECTIONS
NIGHT function
flashing = not enabled
steady = int/ext radar control disabled - opening only with open order
MANUAL function
flashing = enabled
In order to take it back to (automatic), press key A .
ALWAYS OPEN function
the door opens, the display shows the symbol flashing and does not accept any closure order.
In order to take it back to (automatic), press key A .
AUTOMATIC function
the door accepts opening orders from the radars and is closed once the “automatic closure” time has passed by.
PARTIAL OPENING function
partial opening in the percentage set.
INTERNAL RADAR function
Internal radar active, external radar disabled.
ALARMS
- alternate symbols indicate discharged battery.
- alternate symbols indicate photocell breakdown (with photo test enabled).
- symbol indicates a learning maneuver.
- symbol indicates active external radar.
- symbol indicates active external / internal radar.
KEYBOARD LOCKING
- Press and hold down keys Aand ENTER at the same time.
- The symbol on the display flashes.
- Keep them pressed until flashing stops.
KEYBOARD UNLOCKING
- Press and hold down keys Aand ENTER at the same time.
- Release key A and the ENTER key when the symbol on the display flashes
SIG
Selection key A
PROGRAMMING THE AUTOMATIC DOOR
1 - Press and hold for 3 seconds the “B” key.
2 - Press and hold the A and ENTER
keys simultaneously until PR appears on the display. The door closes and after 3 seconds opens. (movement
at low speed).
3 - Check the timer, in seconds, for automatic closing (by the radar).
4 - Press simultaneously the A and ENTER keys after the desired time. The door closes completing the programming operation.

8
E
S
PARÁMETRO
(Tecla ENTER )FUNCIÓN Tecla A = 0 Tecla A = 1 Tecla A = 2 Tecla A = 3 Tecla A = 4
.a Detección de obstáculos Muy alta Alta Baja Muy baja
.b Velocidad máx. abre 1 2 3 4 5 67 8
muy lenta +++ +++ ++++ +++++ ++++++ muy rápida
.c Velocidad máx. cierra 1 2 3 45 6 7 8
muy lenta +++ +++ ++++ +++++ ++++++ muy rápida
.d Velocidad desac. abre 1 2 3 45 6 7 8
muy lenta +++ +++ ++++ +++++ ++++++ muy rápida
.E Velocidad desac. cierra 1 2 34 5 6 7 8
muy lenta +++ +++ ++++ +++++ ++++++ muy rápida
.F Stop progresivo Stop inmediato Rampa 0,1 seg. Rampa 0,2 seg.Rampa 0,3 seg. Rampa 0,4 seg.
.G Función bloqueo electrónico Siempre apagado Siempre activo Activo cada abertura
.x Abertura parcial 1=5% 2=10% 3=20% 4=40% 5=50% 6=60% 7=70% 8=80%
.i Tiempo de cierre autómatico
desde mando OPEN
Un mando abre,
uno otro cierra.
Cierre autómatico no
habilitado
1=10sec 2=20sec 3=30sec 4=40sec 5=50sec 6=60sec 7=70sec 8= 80sec 9=90sec
.L Cierre autom. dinámico No habilitado 3 cierres consecutivos no concluidos = aumento 10 seg. cierre automático programado
.M Abertura parcial dinámica No habilitada 3 cierres consecutivos no concluidos = apertura total
.n Baterías emergencia
Puerta sin pilas o
operación hasta el
acabamiento de la carga
de las pilas.
Abre en ausencia
de tensión de red
Cierra en ausencia
de tensión de red
.o Función antiviento No habilitada Baja Media Alta
.P Fototest No habilitado Habilitado cada cierre
.r Interbloqueo Función activada Función desactivada
.t Frenazo abre 1=10% 2=20% 3=30% 4=40% 5=50% 6=60% 7=70% 8=80%
.v Frenazo cierra 1=10% 2=20% 3=30% 4=40% 5=50% 6=60% 7=70% 8=80%
.y Aproximación en cierre Muy lenta Lenta Media Rápida
.u Aproximación en abre Muy lenta Lenta Media Rápida
.5 Se detiene contra el bloqueo
de abertura
Se detiene sin llegar
contra el bloqueo
Se detiene contra el
bloqueo
.0 Perfil luces LED (opcional) Función Noche activa Función puerta abierta
activa
-
-
-Aproximación en abre Rápido
(hojas sin inercia)
Lento
(hojas con inercia)
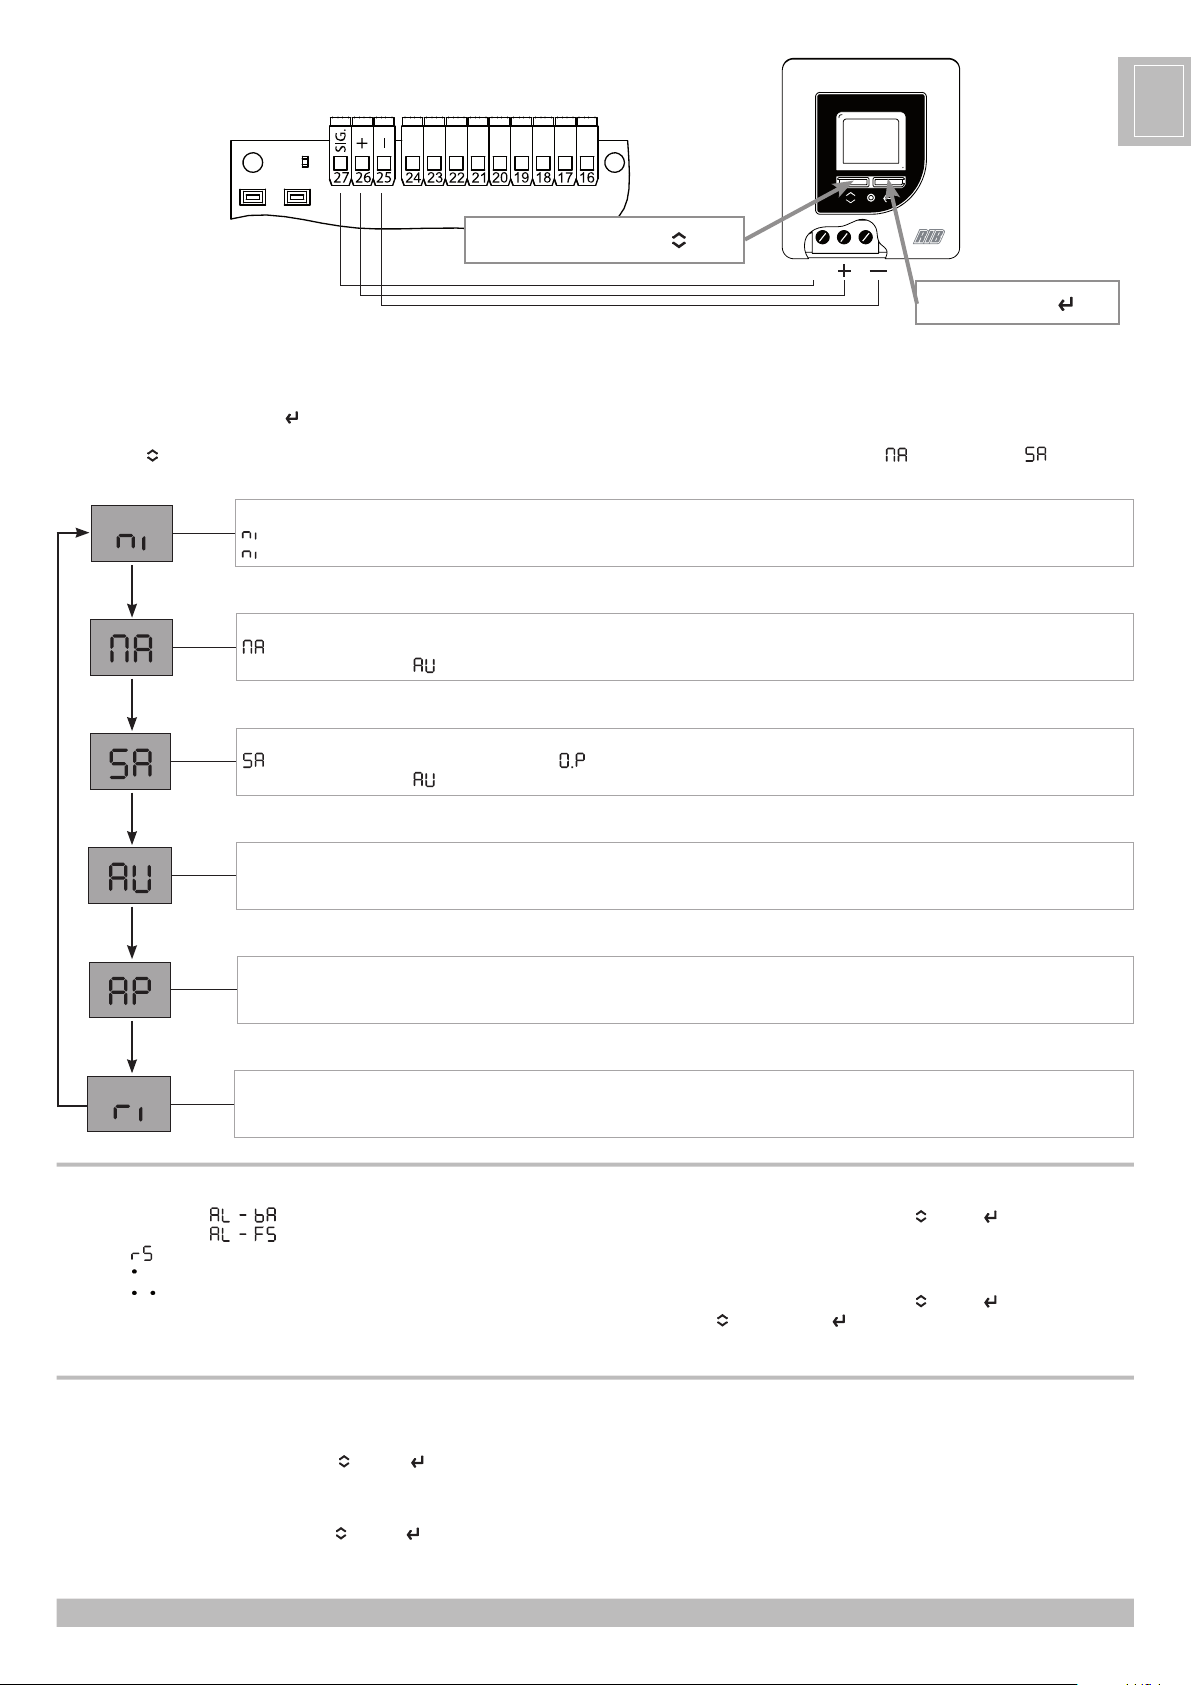
.Dirección BUS serial RS485 Función desactivada Posibilidad de conectar un PC para la gestión centralizada de los equipos (máx. 31)
.J Rampa de aceleración 1=0,2sec 2=0,4sec 3=0,6sec 4=0,8sec 5=1sec 6=1,2sec 7=1,4sec 8=1,6sec 9=1,8sec
ATENCIÓN: el equipo tiene una configuración por defecto y los parámetros se muestran en negrita.
Para acceder a los parámetros, pulse la tecla de programación Bdurante, al menos, 2
segundos (con la ayuda de, por ejemplo, un clip).
Se visualizará el parámetro A3.
Para hacer pasar los parámetros, pulse la tecla ENTER .
Para modificar el valor, pulse la tecla selección A .
Para salir de la programación, espere 10 segundos. En la pantalla, se visualizarán las letras
.
Pantalla LCD
Tecla ENTER
Tecla de programación B
Tecla de selección A

9
E
S
Tecla ENTER
ACCESO A LAS FUNCIONES DEL EQUIPO MEDIANTE EL SELECTOR DIGITAL DE FUNCIONES:
-
Pulse, durante 2 segundos, la tecla ENTER . La función se activa en el momento en el que comienza
a parpadear.
- Pulse la tecla Apara hacer pasar las funciones.
- Cuando se visualiza la función deseada, espere 10 segundos.
-
Transcurridos 10 segundos, el símbolo de la función deseada deja de funcionar y se queda encendido
de forma permanente.
NOTA: Sólo si se seleccionan las funciones MANUAL o SIEMPRE ABIERTA , los símbolos de
la función parpadean lentamente en vez de permanecer fijos.
CONEXIONES ELÉCTRICAS
Función NOCHE
parpadeante = no activada
fija = desactivados los mandos radar int./ext. - apertura sólo con mando open
Función MANUAL
parpadeante = activada
Para volver a llevarla a (automática) presionar la tecla “A”.
Función SIEMPRE ABIERTO
la puerta se abre, la pantalla muestra el símbolo parpadeante y no recibe ninguna orden de cierre.
Para volver a llevarla a (automática) presionar la tecla “A”.
Función AUTOMÁTICA
Función APERTURA PARCIAL
Función RADAR INTERNO
ALARMAS
- Los símbolos alternados indican batería descargada.
- Los símbolos alternados indican avería en fotocélulas (con fototest activado).
- El símbolo indica una maniobra de aprendizaje.
- El símbolo indica radar externo activo.
- El símbolo indica radar externo / interno activo.
BLOQUEO TECLADO
- Mantener presionadas simultáneamente las teclas Ay ENTER .
- El símbolo en la pantalla parpadea.
- Mantener presionada hasta que se detenga el parpadeo.
DESBLOQUEO TECLADO
- Mantener presionadas simultáneamente las teclas Ay ENTER .
- Suelte la tecla A y la tecla ENTER cuando el símbolo de la pantalla parpadee.
Tecla de selección A
PROGRAMACIÓN DE AUTOMATIZACIÓN
1 - Pulse la tecla de programación “B” manteniendola por 3 segundos.
2 - Pulsar al mismo tiempo las teclas
A
y
ENTER
hasta que se vea PR en la pantalla. La puerta cierra y después de 3 segundos abre (maniobras a
baja velocidad).
3 – Averiguar el temporizador, en segundos, por el cierre automatico (por radar).
4 - Pulsar al mismo tiempo las teclas
A
y
ENTER
despues del tiempo elegido. La puerta cierra terminando la operación de programación.

10
ASSISTENZA TECNICA
SERVICE D’ASSISTANCE TECHNIQUE
TECHNICAL ASSISTANCE
ASISTENCIA TÉCNICA
CLIENTE
CLIENT
CUSTOMER
CLIENTE
Il presente registro di manutenzione contiene i riferimenti tecnici e le registrazioni delle attività di installazione, manutenzione,
riparazione e modifica svolte, e dovrà essere reso disponibile per eventuali ispezioni da parte di organismi autorizzati.
Ce dossier d’entretien contient les références techniques et les enregistrements des opérations d’installation, d’entretien,
de réparation et de modification effectuées, et devra être rendu disponible pour les inspections éventuelles de part
d’orgenismes autorisée.
This maintenance log contains the technical references and records of installation works, maintenance, repairs and
modifications, and must be made available for inspection purposes to authorised bodies.
El presente registro de mantenimiento contiene las referencias técnicas y la indicación de las actividades de instalación,
mantenimiento, reparación y modificación realizadas, y deberá conservarse para posibles inspecciones por parte de
organismos autorizados.
MATERIALE INSTALLATO
MATERIEL INSTALLEE
INSTALLATION MATERIAL
MATERIAL INSTALADO
Data
Date
Date
Fecha
Descrizione dell’intervento (installazione, avviamento, verifica delle sicurezze, riparazioni, modifiche)
Description de l’intervention (installation, mise en marche, réglage, contrôle des sécurités, réparations, modifications)
Description of the operation (installation, start-up, adjustement, safety device check, repair, modifications)
Descripción de la intervención (instalción, puesta en marcha, reglaje, comprobación de los dispositivos de seguridad, reparaciones o modificciones)
Firma del tecnico
Signature du techicien
Technician’s signature
Firma del técnico
Firma del cliente
Signature du client
Customer’s signature
Firma del cliente
NOME, INDIRIZZO, TELEFONO - NOM, ADRESSE, TÉLÉPHONE - NAME, ADDRESS, TELEPHONE NUMBER - NOMBRE, DIRECCIÓN Y TELÉFONO
REGISTRO DI MANUTENZIONE - DOSSIER D’ENTRETIEN
MAINTENANCE LOG - REGISTRO DE MANTENIMIENTO

11
D
NOTES

PROGRAMMATORE LCD
Cod. CVA2077 - 01062018 - Rev. 03
80 mm 37 mm
30 mmØ 65 mm
90 mm
Foro per PROGRAMMATORE LCD DA INCASSO
Trou pour PROGRAMMEUR LCD ENCASTRABLE
BUILT-IN LCD PROGRAMMER hole
Agujero para PROGRAMADOR LCD
25014 CASTENEDOLO (BS) - ITALY
Via Matteotti, 162
Tel. +39.030.2135811
Fax +39.030.21358279
automatismi per cancelli
automatic entry system
s
®
This manual suits for next models
1
Table of contents
Languages:
Other RIB Motherboard manuals
Popular Motherboard manuals by other brands

Peak
Peak PCAN-MicroMod Mix 2 user manual

AOpen
AOpen AX4GEFM manual

Gigabyte
Gigabyte GA-P67A-UD3R-B3 user manual

International Rectifier
International Rectifier IRDC3847-P1V2 user guide

NXP Semiconductors
NXP Semiconductors PCAL6416AEV-ARD user manual

Texas Instruments
Texas Instruments Modular MSOP8 EVM user guide

Intel
Intel DP55SB - Desktop Board Extreme Series... Specification update

Quectel
Quectel TE-A HANDS-ON TRAINING

Avalue Technology
Avalue Technology RSC-IMX61 user manual

Asus
Asus M3A78 - Motherboard - ATX quick start guide

Texas Instruments
Texas Instruments BQ79631EVM user guide

MSI
MSI B150M GAMING PRO manual