Richy RWH001-635I User manual

SPA HOT TUB
Hot tub assembly instruction

Place all parts in a cleared area and remove the packing materials from the box,
do not dispose of the packing material until assembly is completed.
Assembly requireds 1 to 2 people, for 2 to 4 hours.
Prepare necessary tools that are requied for assembling, see below.
For the samll parts used in assembly, see the part list below.
During assembly, make sure that all parts are oriented as shown in the drawings.
Before beginning assembly , carefully read the following information and
instructions:
●
●
●
●
●
Instructions
1. Tools we provided
Plastic Hammer 1×Silicon Silicon Gun
2. Tools you need to prepare
Power Drill 1×Adjustable Wrench 2×Inner Hexagon Spanner 1×Pencil 1×
3. All parts screw list
(Please see next page)
2

NO. Component Screw size Unit Model Screw Numbers/
Base Connector
Bands
Bench top
Step
Step bracket
Step bracket screw
5x3 5x3 5.5x4 6x3 7x3
6x3 5.7x3 5.7x4
6x4
1
2
3
4
5
6
7
8
M8x100
M12x180
M12x250
M6x75
M5x60
M5x30
60x60x50
Pcs
Pcs
Pcs
Pcs
Pcs
Pcs
Pcs
14 14 14 19 19 19 19 19 19
223
446446
18 18 24 18 18 24 18 18 24
Bench feet
M5x60 Pcs
222222222
10 10 10 10 10 10 10 10 10
36 32 36 36 36
36 36 32 32
36 32 36 36 36
36 36 32 32
All Parts S L
for the hot tub without fence
crew ist
()
NO. Component Screw size Unit Model / Screw numbers
Base Connector
Bands
Bench top
fire box
Fence hinge
Lower fence connector
Upper fence fitting
Fire box cover
Step
Step bracket
Step bracket screw
5x3 5x3 5.5x4 6x3 7x3
6x3 5.7x3 5.7x4
6x4
1
2
3
4
5
6
7
8
9
10
11
12
13
M8x100
M12x180
M12x250
M6x75
ST6X35
M3x16
M5x30
M5x50
M5x50
M5x60
M5x30
60x60x50
Pcs
Pcs
Pcs
Pcs
Pcs
Pcs
Pcs
Pcs
Pcs
Pcs
Pcs
Pcs
14 14 14 19 19 19 19 19 19
223
446446
20 20 20 20 20 20 24 24 24
888888888
888888888
24 24 24 24 24 24 24 24 24
555555555
444444444
18 18 24 18 18 24 18 18 24
Bench feet M5x60 Pcs 24 24 24 24 24 24 28 28 28
222222222
10 10 10 10 10 10 10 10 10
All parts S L
for the hot tub with fence
crew ist
()
3

There are 6 basic steps to fully assemble your hot tub
Assemble the base
Assemble the tub wall and fit the bands
Install the fire box and lower fence
Assemble the bench seating
Assemble the stair
Assemble the fire box cover and upper fence
Step One:
Step Two:
Step Three:
Step Four:
Step Five:
Step Six:
4
1
2
3
4
5
6
7
8
9
The model of the hot tub showed in the diagrams of this instruction for reference:
6x3.5 (with fence)
1 Upper fence 2 fire box cover 3fire box 4 lower fence 5 Insulation cover
6 Bench; 7 Stave 8 Base 9 Stair
- ;- ; ;- ;- ;
-;-;-;-

Step one- Assemble the base
1. Place the two base halves upside down and interlock together.
Hint: If having trouble interlocking the 2 base halves together, make sure that one end is
interlocked together and bolt this end together through the bottom fastening piece
as shown. Once the bolt has been tightened, ‘wiggle’ the 2 base halves gently up and
down slightly and the 2 base halves should gradually join together.
2. Place the base connector pieces of wood in line with the holes on the base struts.
3. Insert the M8x100LM into the base connector pieces of wood and tighten.
4. Insert the M8x100LM into the bottom fastening pieces and tighten.
5. Connect the supplied flexible drain hose to the drain, making sure the rubber seal is
correctly fitted.
6. Carefully flip the base over and lay onto your desired position.
7. We recommend your wooden hot tub to sit either on a wooden deck designed to carry
the heavy weight or to sit on a solid concrete pad, paving slabs or crushed rocks with a
sand base.
TOOLS:
M8x100LM
Connector
Base Fastening Piece
PARTS:
5
NO. Component Screw size PIC
1 Base Connector M 8x100

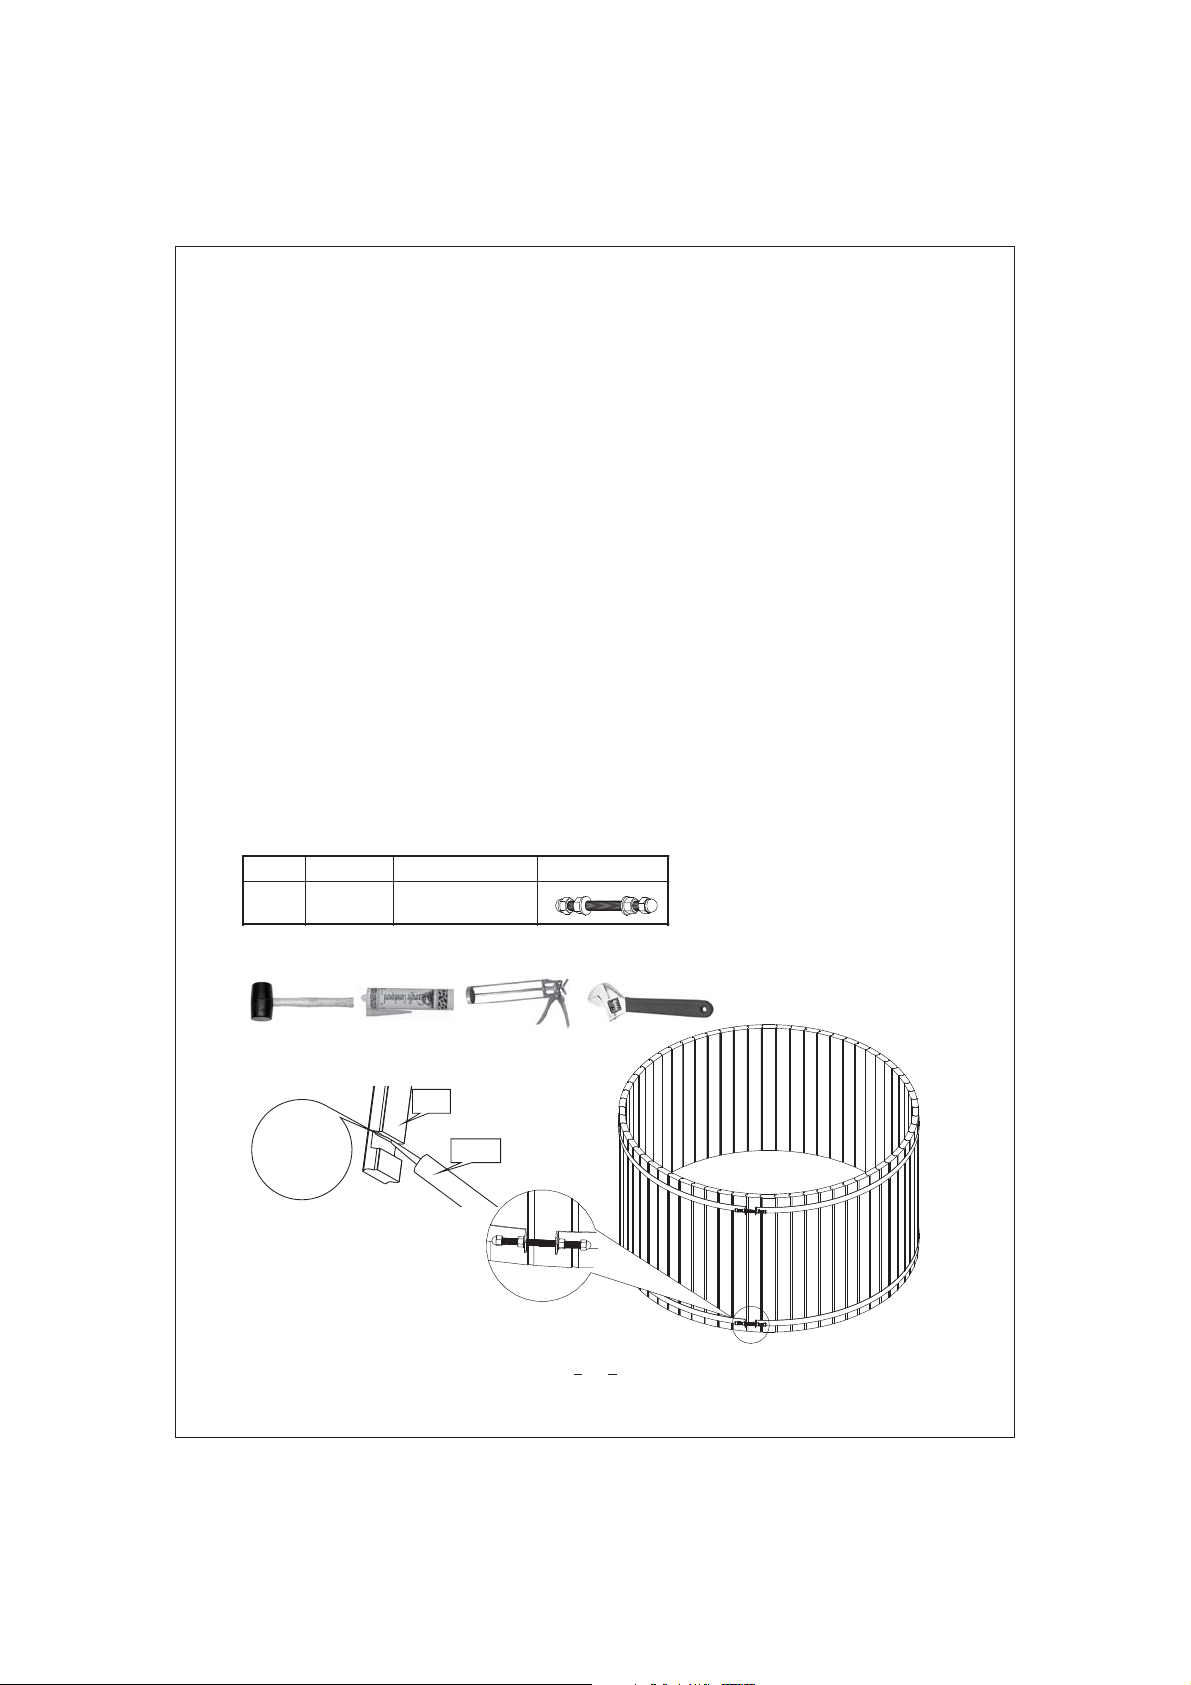
Step 2. Assemble the tub wall & fit the bands
Hint:
Hint:
Hint:
Unwrap and place the firebox onto the centre of the base before building the hot tub
wall. This saves having to lift the heavy firebox over the hot tub wall later on.
Place something gently up against the hot tub wall to help keep the staves in place if
they seem a bit loose.
Place something suitable on the ground under the tub wall to stop the band from
falling down and going under the hot tub.
1. • Apply some silicon sealant in the position shown in the diagram on the next page,
to each stave before placing into position.
2. • Start with placing the stave with the semi-circle hole over the top of where the flexible
drain hose comes out from underneath the tub.
3. • Angle the next stave into the previously fitted stave
• Gently tap with the rubber mallet, firstly tapping the side of the stave so that it fits
up tightly against the previous stave, then tapping on the outside of the stave placing
in tightly up against the hot tub base. Alternate between tapping on the side and the
outside of the stave until it fits snugly together and there are no gaps. Make sure that
the whole length of the stave is in line with the previous stave in the upright position
otherwise the bottom piece of the stave could break off if tapped too hard on the wrong
angle.
4. • After gradually working your way around with placing all the staves onto the base,
the hot tub wall has now been formed.
5. • Carefully unwrap the stainless steel bands.
• Join the 2 band pieces together to form one
length, making sure that you have the correct pieces joined together-1 short length
and 1 longer length for the medium hot tubs for example.
• Ideally with the help of 2 people with each person holding one end of the band, walk
around the hot tub and place the band around at the bottom of the hot tub.
• Slowly tighten the band just enough to hold it in position at the base of the hot tub
6

.
If your hot tub is being set up close to the sea, a simple way to protect the bands
from the harsh sea air and to stop the speckled appearance of surface rust
appearing is to apply a coat of varnish to retain the shiny look.
• Slowly tighten the band making sure that it is level all the way around and in line or
just above the point where the tub base fits into each stave.
6. • Place the remaining bands around the hot tub making sure that the top band is
approximately 20-30cm from the top of the wall and the centre band is equal distance
between the top and bottom bands.
• Alternate between tightening the different bands and stopping occasionally to walk
around the hot tub ‘wiggling’ the staves to make sure they are closing up tightly
together. A creaking sound of the wood shows that the hot tub is tightening together.
• Don’t over tighten the bands as once the hot tub if filled with water, this will cause the
wood to swell up and expand forming a tight seal.
The bolts may appear to rust after a relatively short while but this is only surface rust
which doesn’t make the bolts any weaker.
Hint:
TOOLS:
PARTS:
7
NO. Component Screw size PIC
1 Bands M12x180 or M12x250
Apply the
silicon here
The diameter of
the silicon should
reach 1 cm
.
Stave
Silicon

Step 3. Assemble the firebox and lower fence
1. Carefully unpack the firebox and all the accessories from it's box and lift into the hot
tub if you already have not done this.
Before screwing down the firebox, make sure you have it in the correct position.
Position the fence and the firebox cover so that they all fit correctly and evenly together
making sure that the drain plug is located just on the outside of the fence for easy access.
Make sure that the drain is not going to be underneath where the bench feet for the seat
will be located.
Also, double check to make sure there is an even gap around the 2 cut out holes for the
flue and firebox lid on the firebox covers.
Screw down the firebox and fence.
2. Screw the rain cap to the top of the chimney, then fit together the flue pipes then
connect to the firebox. Be very careful of fingers while doing this!!
Place the heat shield into the correct position by undoing the small screw on the heat
shield then re-tightening when in your desired position.
It is recommended to take down the flue pipes when your hot tub is not in use and to
cover the opening in the firebox. This helps to keep any rain water out of the firebox
and also stops the flue from blowing over in situations of high winds.
A exhaust sealant can be applied to the flue joins. This helps to keep a water-tight seal
and helps to keep any rain water out.
•
•
•
•
•
•
•
•
•
Hint: Use the firebox wooden cover to determine the correct position of the fire box.
8

PARTS: TOOLS:
9
3
4
5
6
7
1 ST6x35 2 fire box 3 M5x30 4 lower fence left
5 lower fence connector
8
-;- ;-;- ();
-;
-
-();-();
;
lower fence middle 6 lower fence right 7
M3x16
NO. Component Screw size PIC
1Lower fence
connector M5x30
2Lower fence
hinge M3x16
3 Fire box ST6x35
8
1
2

Step 4. Assemble the bench seating
1. • Assemble the seats to the bench feet pieces making sure the 2 screw holes on the
bench feet are at the front and that the seat is correctly positioned as shown in the
diagram below.
2. • Place all the assembled bench seats in the correct position inside the hot tub making
sure that the 2 screws on the bench feet are facing towards the centre of the hot tub.
3. • When all the bench seats are in the correct position, screw them down.
Hint: When bolting the seats to the bench feet, use an Allen/hex key to turn the M6 x 75
bolt piece on the top while using a socket piece to hold the nut in place underneath.
If you do not have a socket set, simply insert a screwdriver up underneath to hold the
nut in place as you turn the bolt piece.
PARTS:
Hint: To adjust the seat height so that the most enjoyable water level for young and old is
achieved, simply place blocks of wood under the bench feet and screw down. Try
using the hot tub first to determine the best height then empty and re-screw the
into the desired height for optimum enjoyment.
seats
10
Pencil
Bench
1
2
3
4
1 Bench top 2 M6x75 3 Bench feet 4 M5x60-;-;- ;-
NO. Component Screw size PIC
1 Bench top M6x75
2 Bench feet M65x60
TOOLS:

PARTS:
Step 5. Assemble the stair
1. • Assemble the stair as shown in the diagram below.
• In the photos shown below, to get the correct position and to keep the steps square,
lay flat on level ground then screw in the screws.
TOOLS:
Congratulations-your hot tub is now assembled!!!
You can use a fine sandpaper (120 grade for example) to sand away any marks that you may
find on your hot tub.
11
NO. Component Screw size PIC
1 Step M5x60
2 Step bracket screw M5x30
3 Step bracket 60x60x50
12
1-Connect pipe to the thermostat 2 contect pipe to the filter system;- ;

PARTS:
Step 6. Assemble the fire box cover and upper fence
•
Put the upper fence on top of the cover, then insert the M5 X 50 screws.
Assemble the fire box cover as shown in the diagram below.
•
TOOLS:
12
NO. Component Screw size PIC
1 upper fence fitting M5x50
2 Fire box cover M5x50
1
2
3
4
5
1 insulation cover
2 M5x50
3 upper fence
4 M5x50
5 fire box cover
-
-
-
-
-
100 mm

How to use the Firebox?
• Using the supplied ash scoop, empty any excessive amounts of ash by simply lifting up
the hinge-mounted fire grate at the bottom of the fire box. Also make sure that there
are no blockages in the air intake.
• Prepare paper and dry kindling wood on the grate then light the fire, slowly building it
up with small split pieces of firewood. Keep the fire box lid on top with the air intake
open and check fire very 20 minutes or so.
• Always make sure that the firebox is completely surrounded by water before lighting
the fire otherwise it may buckle.
• Regularly check the water temperature and close the air vent when you reach your
desired temperature. After a few attempts at heating up the water, you will get to know
the best method and time for your hot tub to be at your desired temperature.
• If the fire is managed correctly and built up steadily, then a minimal amount of smoke
will be produced. Smoke occurs when there is insufficient heat to burn off all the gases.
• The firebox burns best with dry wood.
• DO NOT USE COAL. As the stove is underwater, it’s surface temperature isn’t high
enough to burn off excess tar in the burner.
Flue inlet
Air intake
Sliding cover to control the air intake
13

■Wiring Diagram
Ground Wire
Air Switch Air Switch
Leakage
Protector
220V-240V/50HZ
LN
E
LNE
LN
LNLN
LN
--14

Cleaning and Maintenance
--15

Frequently asked questions
1. How long does it take to get the water up to temperature?
2. How do you keep the water clean?
3. Is there any colour leakage from the wood?
4. Are wooden tubs hard to clean and maintain?
5. How difficult is it to assemble?
6. Can the outside of the wood tub be treated with anything?
7. How do you control the temperature of the water?
Heating the water up to around 40C takes on average 1.5 – 2 hours (gas or wood-fired).
When covered with the supplied lockable heat retention cover, the water remains hot
overnight with no additional heating required to enjoy your hot tub the next morning.
Only a quick heat up is required later on in the day to boost it back up to the required
temperature.
Many of our tub owners opt for hot tubbing which involves draining the tub more regularly
after use, then giving it a quick clean and refilling when needed.
There are many other water treatment options available now days including chlorine-free
treatments such as blue crystal and bromine tablets placed in a dispenser.
You can purchase a pump with filter (for gas or wood-fired hot tubs) if desired.
Initially yes. For the first few fills and especially the first one, the tannin in the wood
(which gives whiskey its colour in whiskey barrels) leaches out into the water.
The water will appear brown but is in no way harmful and in fact is very aromatic but with
progressive water changes this leaching will gradually disappear.
Absolutely not. To clean a hot tub all you have to do is drain the water, scrub the inside
with a soft brush while it’s still wet and rinse it out.
If desired they can be gently scrubbed with a mild bleach/water solution.
Our installation instructions are written with do-it-yourself installers in mind and takes
you step-by-step through the basic hot tub assembly process.
Total installation time is about 3-4 hours and generally requires the help of 2 people.
Our hot tubs are not really too difficult to assemble. It’s a nice sense of achievement
and actually quite satisfying and fun to assemble one.
We recommend to use a wood oil which is water-repellent, non-filming and a good timber
protector that protects and reduces the effect of mould and decay. A birch colour oil or
natural colour looks best and makes the hot tub a lovely colour.
However, the outside of a wooden hot tub doesn't actually require any type of treatment
and nothing is required to extend its life. As with any type of wood, over time it will
bleach out to a lovely silver colour if you let it.
Nothing should be applied to the inside of the hot tub.
To increase the water temperature, open the air vent on top of the fire box which lets more
air through to the fire.
Close the air vent when the desired temperature is reached.
16

8. Can I use other fuels other than wood?
9. Will the wood shrink in a dry summer if the tub isn’t used?
10. Will the hot tub leak?
No. Only dry wood can be used.
Yes, if left empty and without a cover on.
We recommend (after draining and cleaning) that you refill the tub with about 20cm
of water.
Expect your hot tub to leak a little for up to 2 weeks initially. Red Cedar being a softwood
will eventually swell up and any leaks will eventually disappear over time.
You may get quite a lot of leakage around the heavier, darker coloured staves because this
harder piece of cedar takes a little longer to swell up.
17
This manual suits for next models
1
Table of contents
Popular Hot Tub manuals by other brands

Aquatic
Aquatic AI2522SKAS Specification sheet

Weslo
Weslo Daybreak 510blue manual

Sunrise spas
Sunrise spas Paragon Collection Series owner's manual

PDC spas
PDC spas Luxury Series owner's manual

Schmidlin
Schmidlin HYDRO SILK Instructions for use

American Standard
American Standard Cadet Elite Corner Whirlpool 2775E parts list