RIPSpeed DVD-722B User manual

DVD/CD/MP3 PLAYER WITH AM/FM TUNER
C
M
Y
CM
MY
CY
CMY
K

1
Safety Information
WARNING
To reduce the disk of fire or electric shock, do not expose this product to rain or moisture.
CAUTION
This product is a CLASS 1 LASER PRODUCT. Use of controls or adjustments or performance of procedures other than those specified herein may
result in hazardous radiation exposure. Do not open covers and do not repair yourself. Refer servicing to qualified personnel.
TWO LASER PRODUCTS
Wave length: CD:780nm DVD:650nm
Laser power: no hazardous radiation is emitted with safety protection.
To reduce the risk of fire electric shock, and annoying interference,use only the included components.
DISC NOTES
• PlayingadefectiveordustyDISCcancausedropoutsinsound.
• HoldDISCasillustrated.
• Donottouchtheunlabeledside.
• Donotattachanyseal,labelordataprotectionsheettoeithersideofadisc.
• DonotexposeaDISCtodirectsunlightorexcessiveheat.
• WipeadirtyDISCfromthecenteroutwardwithacleaningcloth.
• Neverusesolventssuchasbenzineoralcohol.
• Thisunitcannotplay3-inch(8cm)DISC.
• Neverinserta3-inchDISCcontainedintheadapteroranirregularlyshapedDISC.Theunitmaynotbeabletoeject
it, resulting in a malfunction.

2
Contents
Safety Information ............................................................................................................................................................................................................... 1
Contents............................................................................................................................................................................................................................... 2
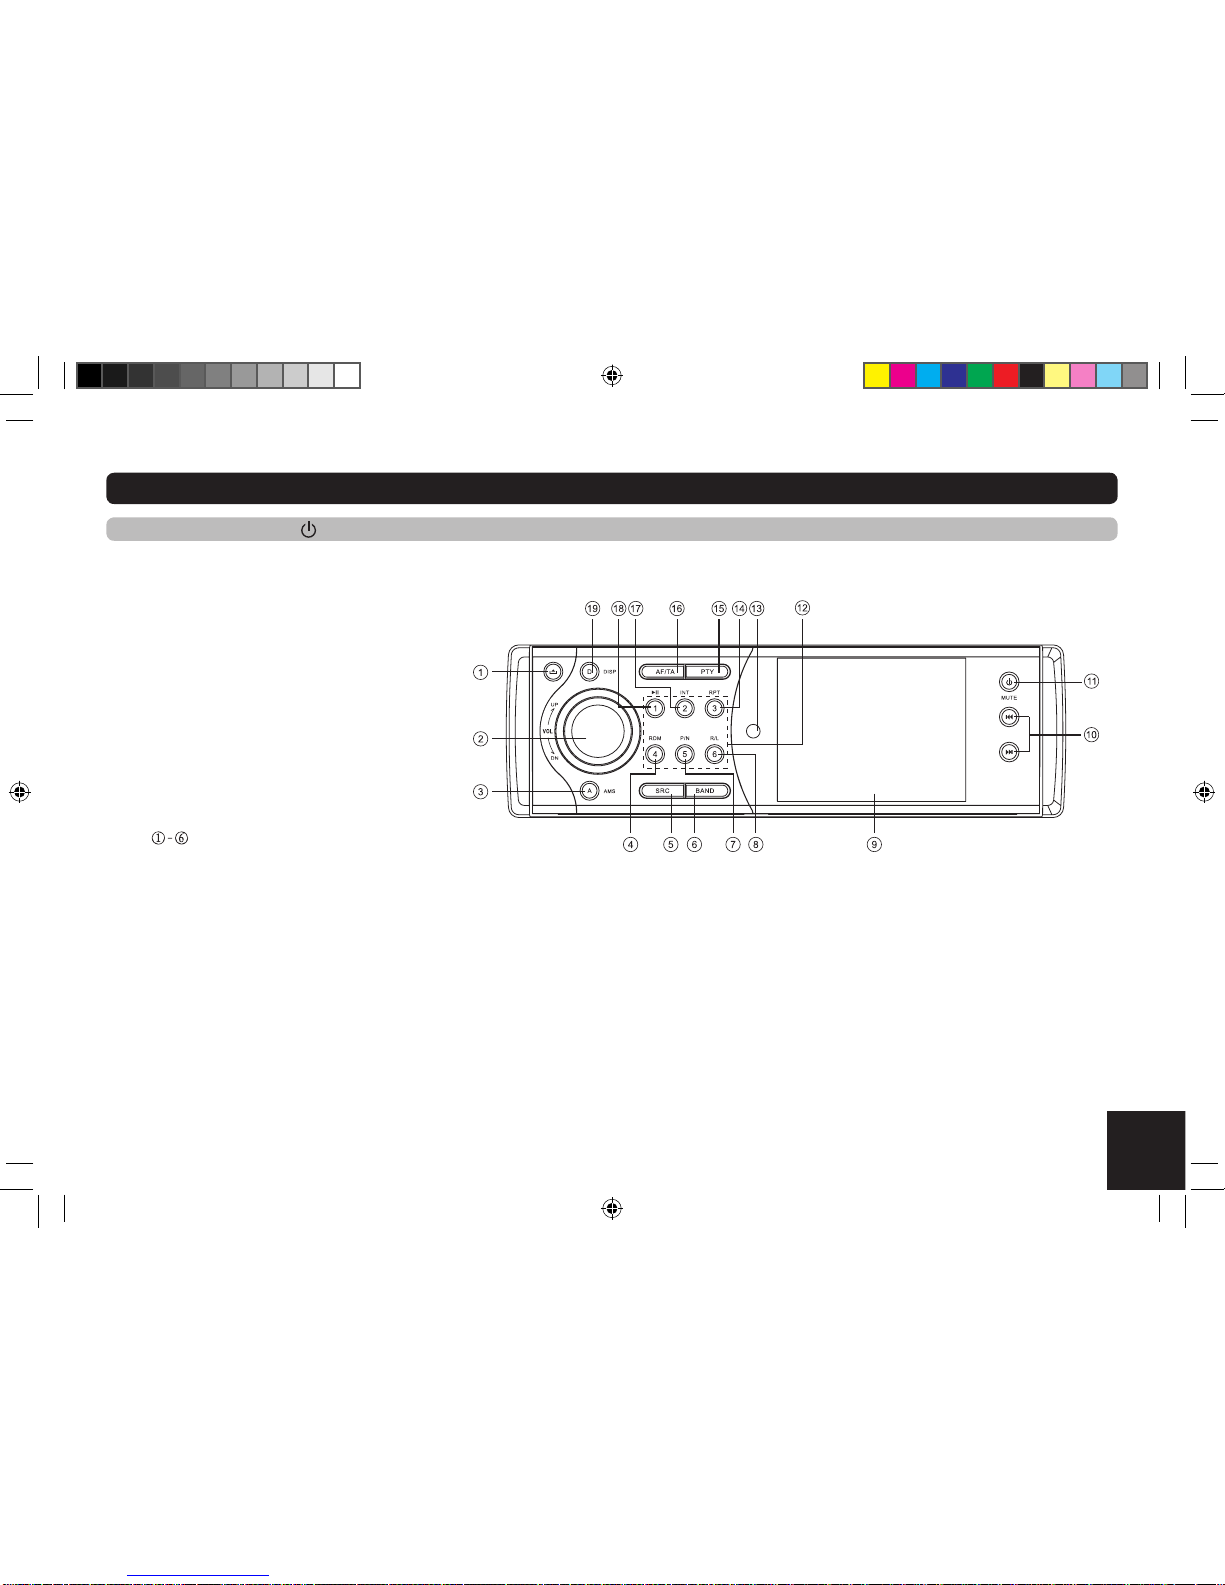
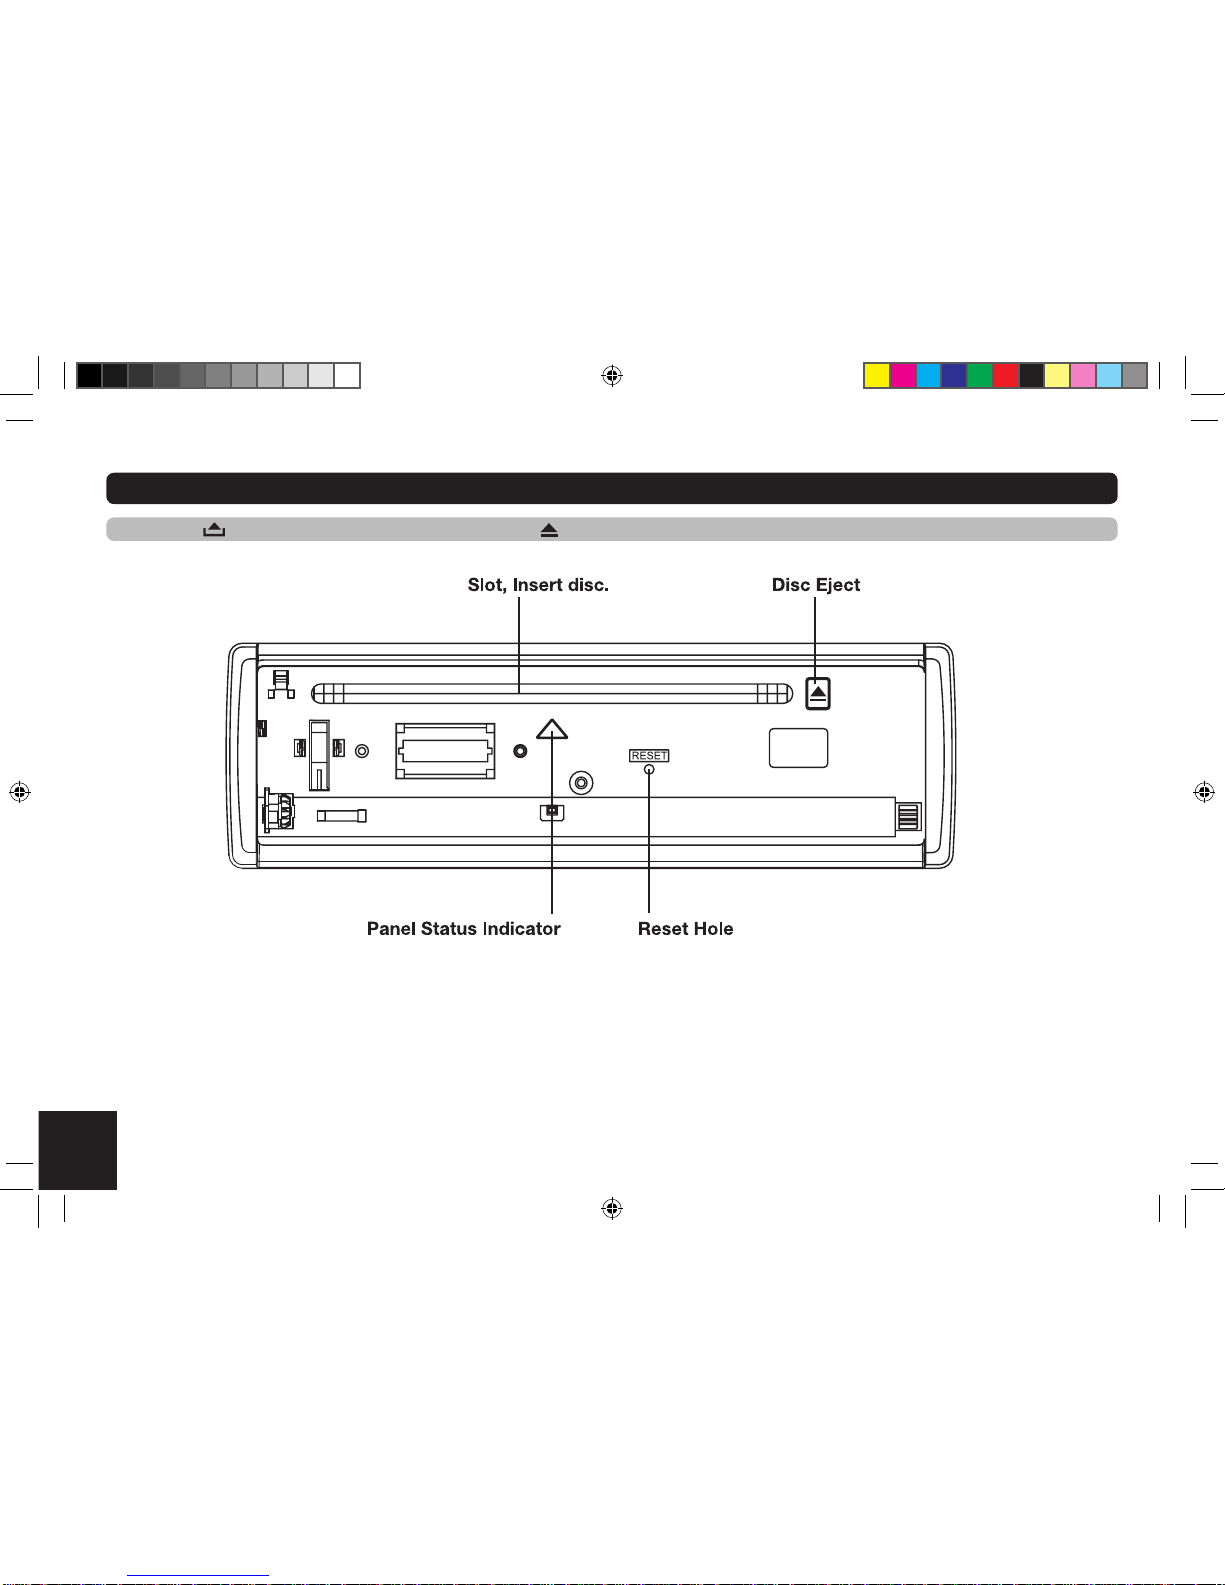
Panel Controls ..................................................................................................................................................................................................................... 3
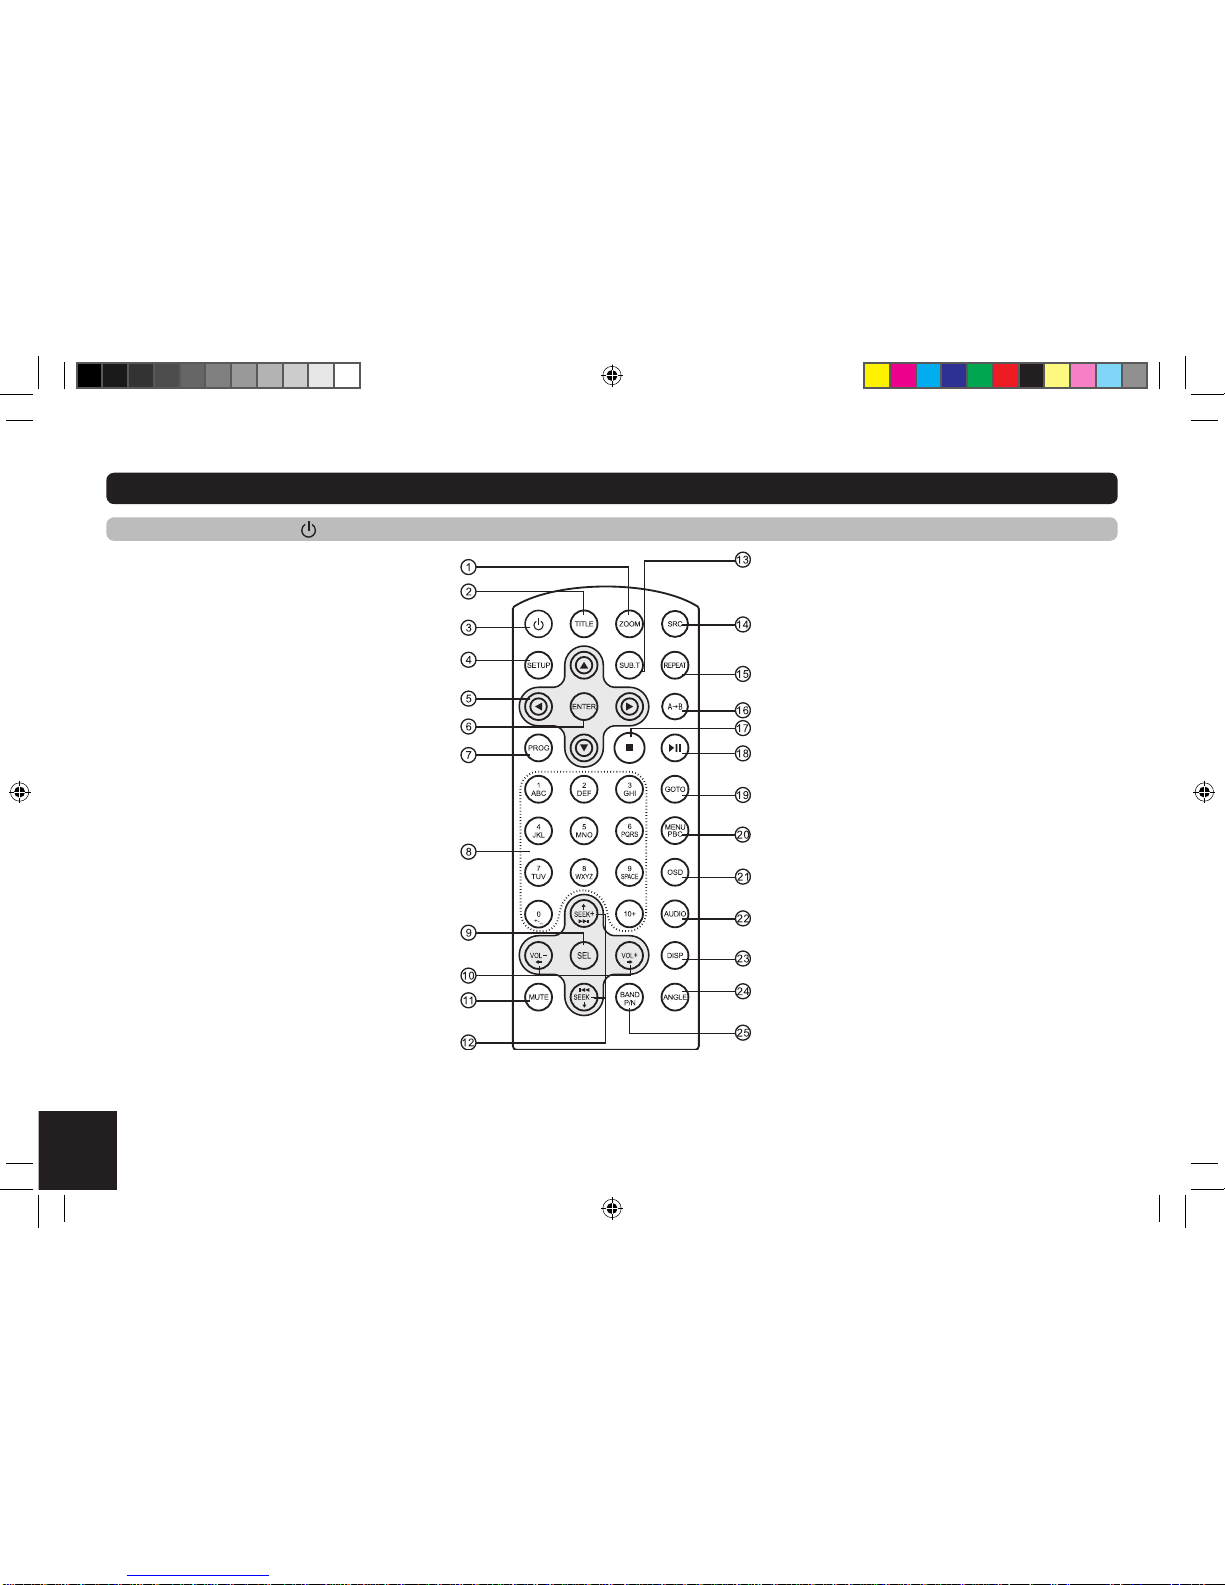
Remote Controls .............................................................................................................................................................................................................. 4-5
Getting Started .................................................................................................................................................................................................................... 6
General Operation ............................................................................................................................................................................................................... 7
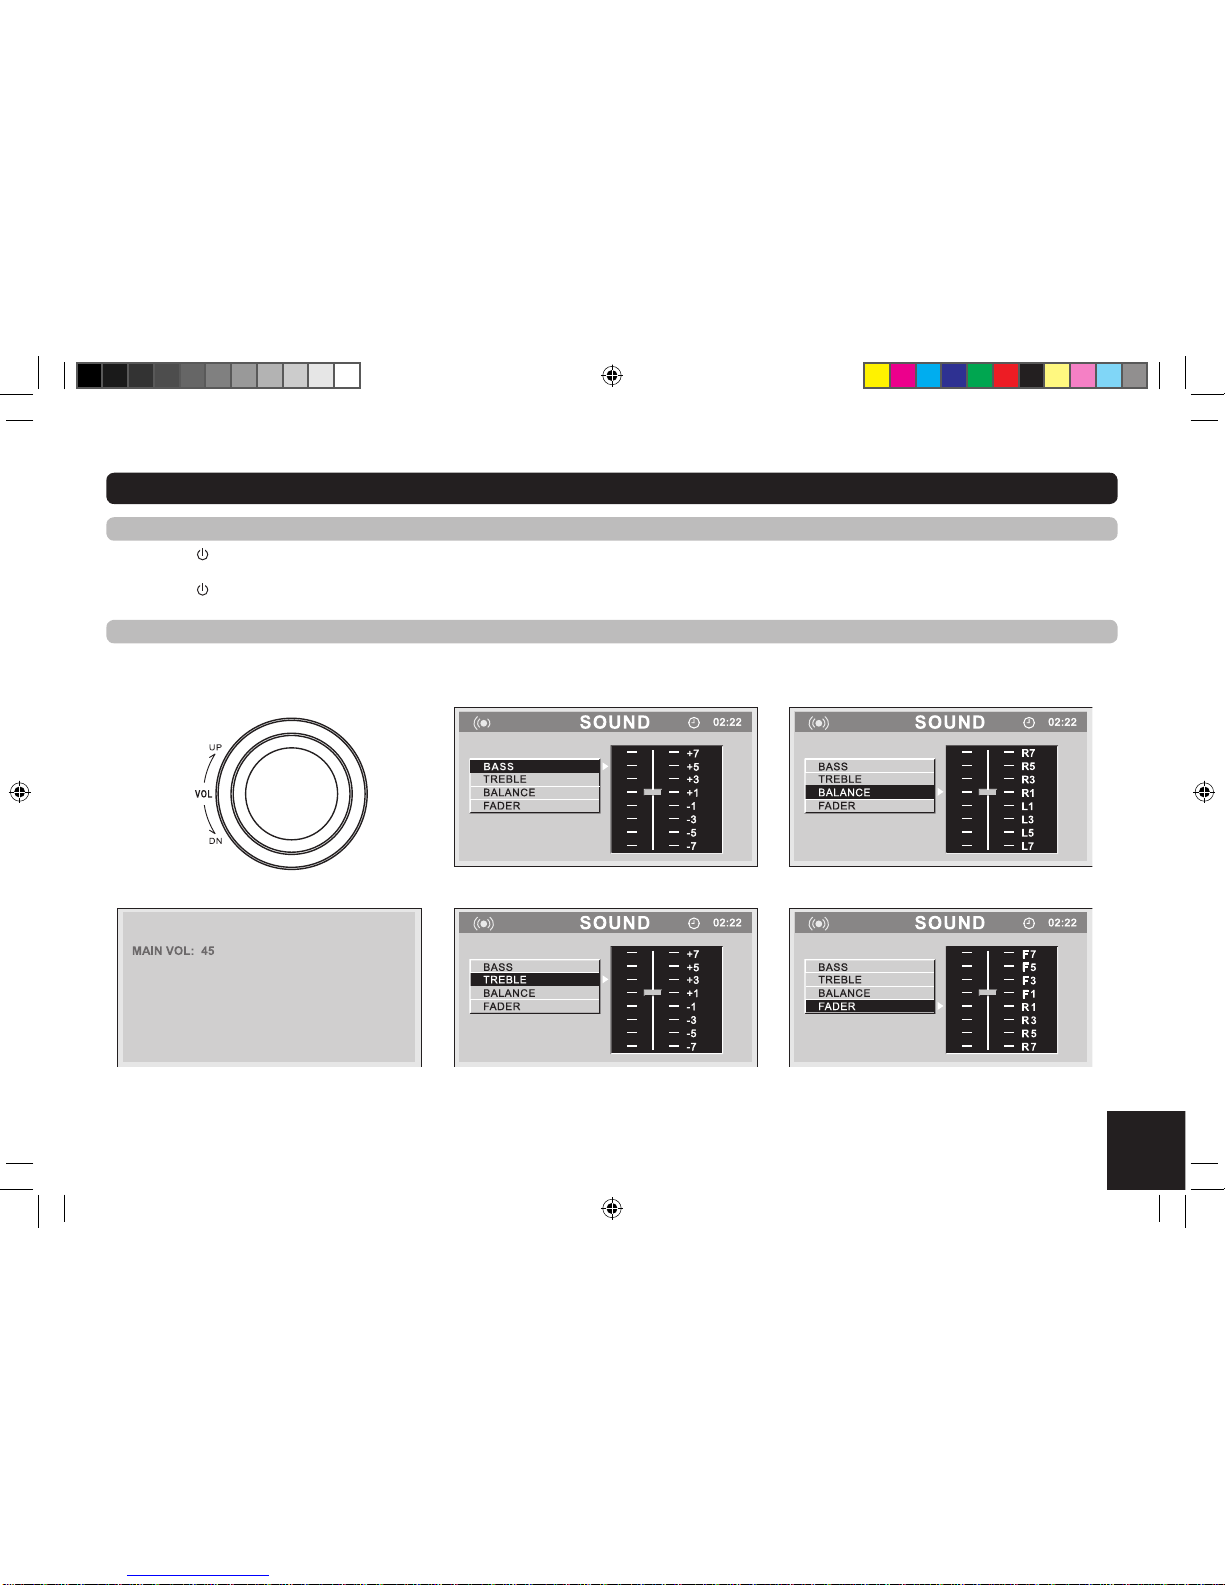
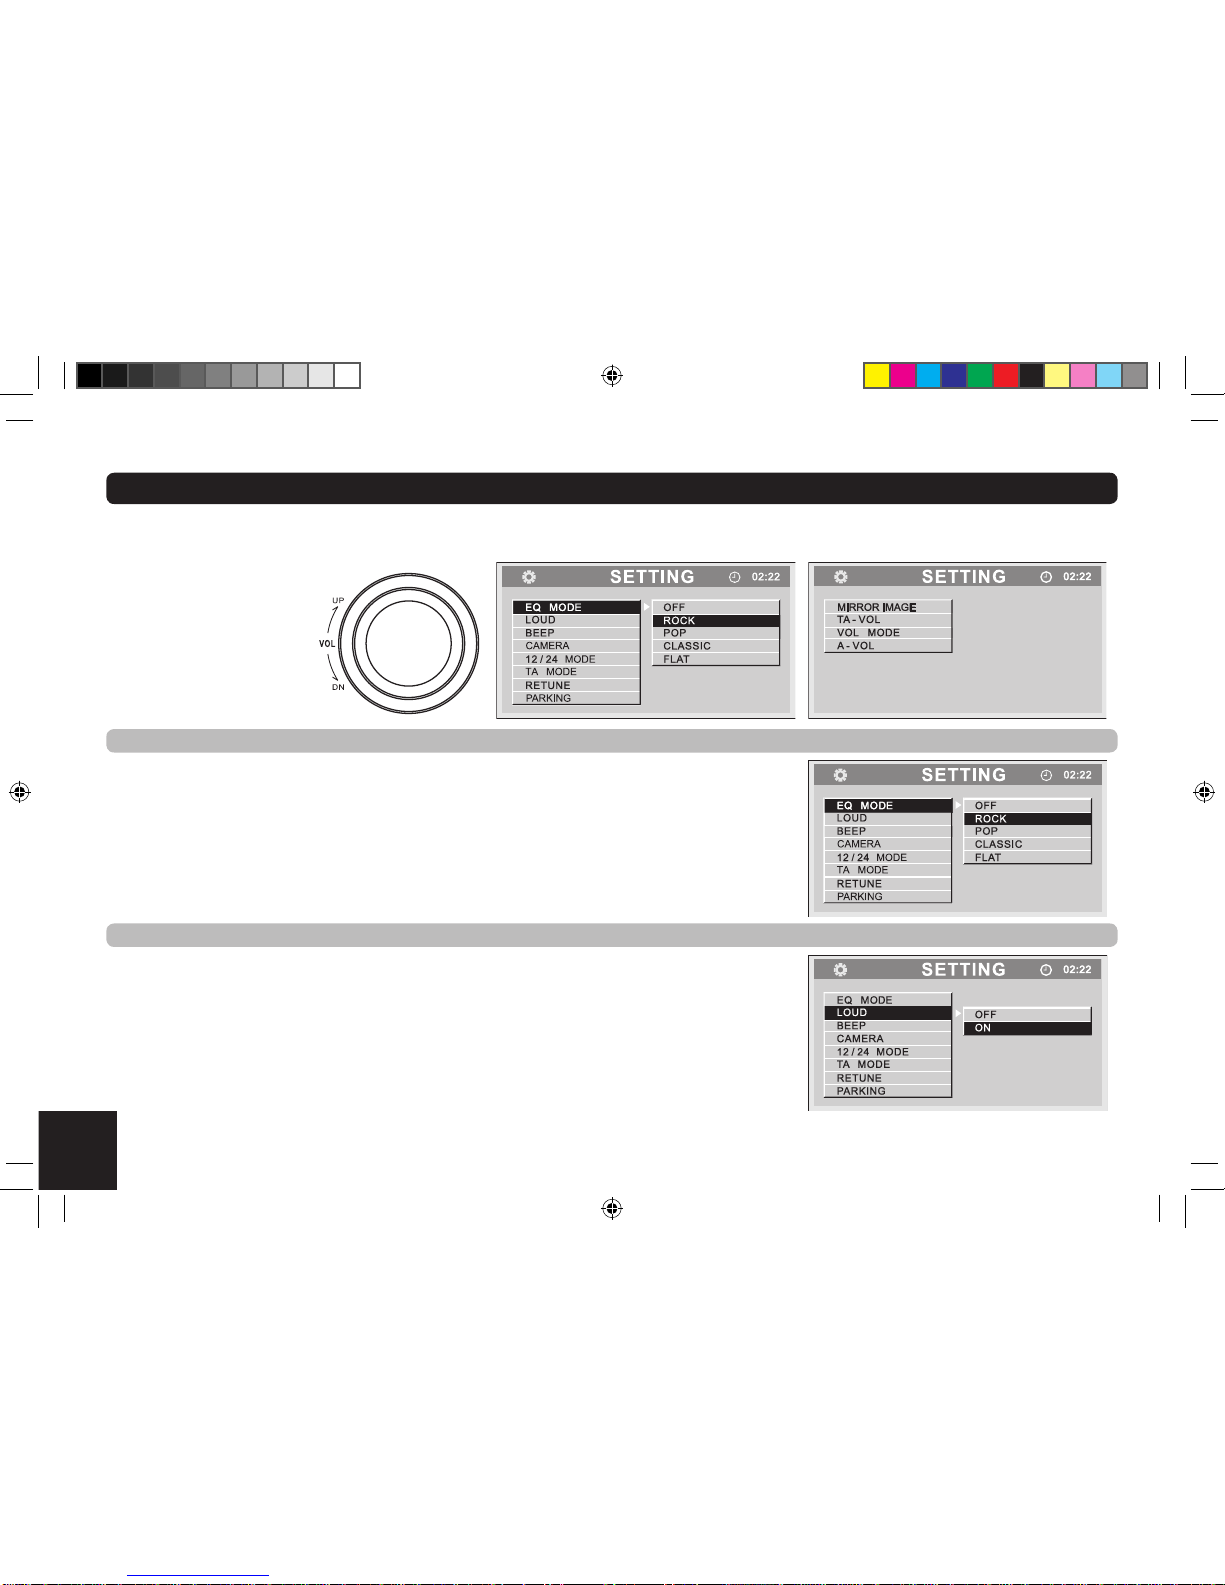
Rotary Knob Menu .........................................................................................................................................................................................................8-12
Radio................................................................................................................................................................................................................................... 13
DVD mode .......................................................................................................................................................................................................................... 14
Radio and Clock ................................................................................................................................................................................................................ 15
RDS ( Radio Data System ) .......................................................................................................................................................................................... 16-17
Disc Playback .................................................................................................................................................................................................................... 18
Disc Playable ..................................................................................................................................................................................................................... 19
Audio/Video/Picture File Playback .................................................................................................................................................................................. 20
Track Playback ............................................................................................................................................................................................................. 21-23
DVD Playback .................................................................................................................................................................................................................... 24
DVD Setup .......................................................................................................................................................................................................................... 25
DVD System Setup ....................................................................................................................................................................................................... 25-26
DVD Language Setup ........................................................................................................................................................................................................ 27
DVD Audio Setup ............................................................................................................................................................................................................... 28
DVD Video Setup ............................................................................................................................................................................................................... 29
DVD Digital Setup .............................................................................................................................................................................................................. 30
Electrical Connections................................................................................................................................................................................................. 31-32
Installation Guide............................................................................................................................................................................................................... 33
Anti-Theft System.............................................................................................................................................................................................................. 34
Trouble shooting........................................................................................................................................................................................................... 35-36
Specifications .................................................................................................................................................................................................................... 37

3
Panel Controls
Power On/Off: Press to turn on/off the unit.
1 -Panelopen
2 -Rotatetheknobtoadjustvolumelevel.
-PushtoselectBAS/TRE/BAL/FAD,rotatetheknobtoadjustlevel.
3 -AMS:RadioAutopreset/RadioPresetscan
4 -Trackrandomplay
5 -Radio
-DiscPlay(whendiscinserted)
6 -Bandswitch:FM1-FM2-FM3-MW1-MW2
7 -VideoSystemPAL/NTSC/AUTO
8 -DVDAudioChannel
-VCDAudioChannelL/R/ST
9 -3inchTFTdisplay
10 -RadioTune
-TrackSkip/Seek
11 -PowerON/OFF(pressmorethan2sec.)
-Mute
12- Radio Preset: Press to listen to a preset
station hold for more than 2 seconds to store
station.
13 -RemoteSensor
14 -Trackrepeatplay
15 -ProgramType
16 -TrafficAnnouncements(pressmorethan2secondstoturnon/off.)
-AlternativeFrequencyON/OFF
17 -Introplay
18 -Play/Pause
19 -Displayswitch/Timeadjust

4
Remote Controls
Power On/Off: Press to turn on/off the unit.
1 -Zoom(DVD/VCDonly)
2 -Title(DVDonly)
3 -Poweron/off
4 -Setup
5 -Menucursor
6 -Enter
7 -Program
8 -DigitArea
9 -AudioModeSelectBas/Tre/Bal/Fad
-Pushmorethan2secondstoMenumode
10 -Volume
11 -Mute
12 -RadioTune
-TrackSkip/Seek
13 -Subtitle(DVDonly)
14 -Radio
-DiscPlay(whendiscinserted)
15 -REPEAT
16 -A-Brepeat
17 -Stop/Return
18 -Play/Pause
19 -GotoSearch
20 -DVDMENU
-PBC(forVCD2.0orup)
21 -OnScreendisplay
22 -DVDAudio
-VCDAudioL/R/ST
23 -OnPaneldisplay
24 -Angle(DVDonly)
25 -VideosystemPAL/NTSC/AUTO
-Radioband

5
Remote Controls
Replacing the lithium battery of remote control unit.
When the range of the operation of the card remote control becomes short or no functions while operating, replace the battery with a new
lithium battery. Make sure the battery Polarity replacement is correct.
1. Pulloutthebatteryholderwhilepressingthestopper.
2. Insertthebutton-typebatterywiththestamped(+)markfacingupward.Insertthebatteryholderintotheremotecontrol.
Remote control operating range
Theremotecontrolcanoperatewithinadistanceof3~5m.
WARNING :
• Storethebatterywherechildrencannotreach.Ifachildaccidentallyswallowsthebattery,consultadoctorimmediately.
• Donotrecharge,short,disassembleorheatthebatteryordisposeitinafire.
• Donotexposeorbringintocontactthebatterywithothermetallicmaterials.
• Doingthismaycausethebatterytogiveoffheat,crackorstartafire.
• Whenthrowingawayorsavingthebattery,wrapitintapeandinsulate;otherwise,thebatterymaygiveoffheat,crackorstartafire.
(CR 2025)

6
Getting Started
Press the button to open the panel and press to eject the disc.
Lightupwhenyouslidethepaneldown;twinkleswhenyou
remove the panel.
Note:PressingtheRESET hole will erase the clock
setting and stored stations.

7
General Operation
SWITCHING ON AND OFF
1.Press to turn on the unit.
2.Press SRConceormoretoselectyourdesiredfunction:DISC,Tuner(Radio).
3.Press more than 2 seconds to power off.
4.Whenyouswitchoffthesystemorcarignition,thesettings,tunerpresetsandthevolumelevelwillberetainedintheunit'smemory.
VOL Knob Function
PresstheknoboncetoselectBASS/TREBLE/BALANCE/FADER,rotatetheknobtoadjust.

8
Rotary Knob Menu
Presstheknobmorethan2secondstoentermenumode,theneachpresschangesthemodeasfollows:
EQ MODE, LOUD, BEEP, CAMERA, 12 /24 MODE, TA MODE, RETUNE, PARKING, MIRROR IMAGE, TA-VOL, VOL-MODE, A-VOL.
EQ mode
RotatetheknobtoselectEQsoundeffect:ROCK - POP - CLASSIC - FLAT - EQ OFF
LOUD mode
Rotatetheknobtochooseloudonoroff.

9
Rotary Knob Menu
BEEP ON/OFF mode
Rotatetheknobtochoosebuttonbeepsoundonoroff.
CAMERA
Rotatetheknobtoturnrearcameraonoroff.whileunitentercameraONmode,Presstheknob
morethan2secondsreturntocameraOFFmode.Undercameraonmode,PresstheSRC is
invalid.
12/24 mode
Select 12 hours mode or 24 hours mode.
HOURS
HOURS

10
Rotary Knob Menu
TA mode
RotatetheknobtochooseTAALARMorTASEEKmode.IftheTA(TrafficAnnouncements)is
turnedonandthereisnotrafficprogramidentificationcodereceivedinthespecifiedtime,noTA/
TPwilldisplayandeitherTAALARMorTASEEKwillbeactivated.
TAALARMmode:Alarmisturnedon.
TASEEKmode:TASEEKisautomaticallyactivated.
RETUNE mode
RotatethecontroltochooseRETUNE-SorRETUNE-L.
RETUNE-SorRETUNE-ListimelengthselectionofTASEEKretuneinterval.
RETUNE-S:Short,TASEEKRetuneintervalis45seconds.
RETUNE-L:Long,TASEEKRetuneintervalis180seconds.
REMARK:RETUNEmodefunctionsforTAduringTASEEKmodeonly.
PARKING mode
Rotatetheknobtoturnrearparkingattentiononoroff.WhileunitenterparkingONmode,Playthe
videodisc,Thescreenappera“DONOTWATCHVIDEOWHILEDRIVING”,andblankscreen.

11
Rotary Knob Menu
MIRROR IMAGE mode
RotatetheknobtochooseMIRRORIMAGEmodeonoroff.WhileenterMIRRORIMAGEONmode,
The video of camera is mirror image.
TA-VOL
RotatetheknobtochooseTA-VOLlevel.
VOL - mode
RotateknobtochooseVOLLAST,theturn-onvolumelevelisthevolumeleveloflatestpoweroff.
RotateknobtochooseVOLADJUST,thenpresstheknobtochooseA-VOL,andsettheA-VOL
volumelevel,IntheVOL ADJUSTmode,Thevolumelevelofpoweronisthevolumelevelof
A-VOL.

12
Rotary Knob Menu
A - VOL
RotatetheknobtochooseA-VOLlevel.

13
Radio
Band
1. Press to power on, then press SRC once or more to select tuner.
2. Press BAND once or more to select FM1, FM2, FM3, MW1, MW2.Displayshowswaveband,frequency,andpresetstationnumberifalready
stored.
Tune
Radiotunebystepmanually:Press or less than 2 second.
Radio seek automatically: Press or more than 2 second.
Press either buttontostoretheselectedstation.

14
DVD mode
Press SRC button to select DVD mode (when disc is insert, and unit is reading disc), then press the DISP button. The LCD wll display:

15
Radio and Clock
AMS : Auto Memory Store
Press AMSbrieflytoscanthepresetstation1-6for5secondseach.Holdmorethan2seconds,the6strongestavailable
stationswillbeautomaticallysavedinthememoryofpresetbutton1-6.
Clock Setting
1. Press DISPmorethan2seconds,minutedisplayblinks,rotatetheknobtosetminute.
2.Presstheknobonce,hourdisplayblinks,rotatetheknobtosethour.
3.PressDISP to confirm.

16
RDS ( Radio Data System )
RDSserviceavailabilityvarieswithareas.PleaseunderstandifRDSserviceisnotavailableinyouarea,thefollowingserviceisnotavailable.
RDS Basics
AF(AlternativeFrequency)Whentheradiosignalstrengthispoor,enablingtheAFfunctionwillallowtheunittoautomaticallysearchanotherstation
withthesamePI(programidentification)asthecurrentstationbutwithstrongersignalstrength.
PS(ProgramServicename)Thenameofstationwillbedisplayinsteadoffrequency.
AFMode:PressAF/TAbuttonlessthan2secondstoswitchAFmodeonandoff.
AFon:AFfunctionisactivated.
AFoff:AFfunctionisdisabled.
Remark:AFindicatoronLCDwillflashuntilRDSinformationisreceived.IfRDSserviceisnotavailableinyourarea,turnofftheAFmode.
Traffic Announcements
SomeRDSFMstationsperiodicallyprovidetrafficinformation.
TP(TrafficProgramIdentification)Broadcastingoftrafficinformation
TA(TrafficAnnouncementsIdentification)Radioannouncementsontrafficconditions
TAMode:PressAF/TAformorethan2secondstoturnon/offtheTAfunction.WhenTAmodeisturnedon,theTAindicatorwillblink.
Whentrafficannouncementisreceived,theTAindicatorwilldisplay.Theunitwilltemporarilyswitchtothetunermode(regardlessofthecurrent
mode)andbeginbroadcastingtheannouncementatTAvolumelevel.Afterthetrafficannouncementisover,itwillreturntothepreviousmode
andvolumelevel.WhenTAisturnedon,SEEK,SCAN,AMSfunctioncanonlybereceivedorsavedwhentrafficprogramidentification(TP)
code is received.
EON ( Enhanced Other Networks )
WhenEONdataisreceived,theEONindicatorlightsandtheTAandAFfunctionsareenhanced.
TA:Trafficinformationcanbereceivedfromthecurrentstationorstationsinothernetwork.
AF:ThefrequencylistofpresetRDSstationsisupdatedbyEONdata.EONenablestheradiotomakefulleruseofRDSinformation.It
constantlyupdatestheAFlistofpresetstations,includingtheonethatcurrentlytunedinto.Ifyoupresetastationaroundtheareaatyourhome,
youwilllaterbeabletoreceivethesamestationatanalternativefrequency,oranyotherstationservingthesameprogram,EONalsokeeps
trackoflocallyavailableTPstationsforquickreception.

17
RDS ( Radio Data System )
PTY Reception ( Program Type )
RDSFMstationsprovideaprogramtypeidentificationsignal.
Example: news, rock, info, sport, etc.
PTYMode:PressPTY to turn on the Program Type reception, the previous PTY type is shown. Press PTYonceagaintoentertheMUSICtype
orpresstwicetoentertheSPEECHtype,thenusebuttons1-6toselectthedesiredprogramtype.TheselectedPTYtypeisshownand
searchingstartsifnootherfunctionisselectedfor2seconds.Ifthereisnocorrespondingprogramtype,NOPTYisshownandtheunitwill
return to normal mode.
PTY Type Preset: Press PTYoncetoentertheMUSICtypeorpressPTYtwicetoentertheSPEECHtype.Thenusefunction to select the
desired program type.
REGMode:PressPTYformorethan2secondstoswitchREGmodeonandoff.
REGon:AFfunctionwillimplementtheregionalcode(ofthePI)andonlystationsinthecurrentregioncanbetunedautomatically.
REGoff:AFfunctionwillignoretheregionalcode(ofthePI)andstationsintheotherregionscanalsobetunedautomatically.

18
Disc Playback
Disc Load / Eject
Load: Press buttontoslidedownthepanel.Insertthediscintotheslot.
Eject: Press buttontoslidedownthepanel.Press to eject the disc .
Disc playback
1.Whendiscinserted,displayshowsREAD.ForMP3ordiscwithmixedfiles,readingtimemayexceed1minute.
2.ERRORwillbedisplayediferrorfoundindiscoperation.
3.ForVCD/CD,VCDorCDiconwillappearonthedisplay.
4.WhileMP3/WMAfilesplayback,MP3/WMAiconwillappearonthedisplay.
5.ForDVD,DVDiconwillappearonthedisplayandTITLEappears.
Press ENTER or to play.

19
Disc Playable
File type supported
Audiofile:MP3(*.mp3),WMA(*.wma)
Videofile:MPEG2(*.vob),MPEG1(*.dat)
Picturefile:JPEG(*.jpg)
MP3file:ISO9660orISO9660+Jolietformat-Max.30characters.
Max.nesteddirectoryis8levels.
Themax.albumnumberis99.
The max. length of each track is 99 minutes 59 seconds.
SupportedsamplingfrequencyforMP3disc:8KHzto48KHz(44.1KHzpreferably).
Supportedbit-ratesofMP3discare:32-320kbps(128kbpspreferably).
Disc and file NOT supported
*.ACC,*.DLF,*.M3U,*.PLS,MP3PROfilesandfileswithDRM.
Open session discs.
Table of contents