Riptide SL User manual

800-735-3029
Sales@riptidevac.com
Riptide
Pool Vacuum System
SL Model

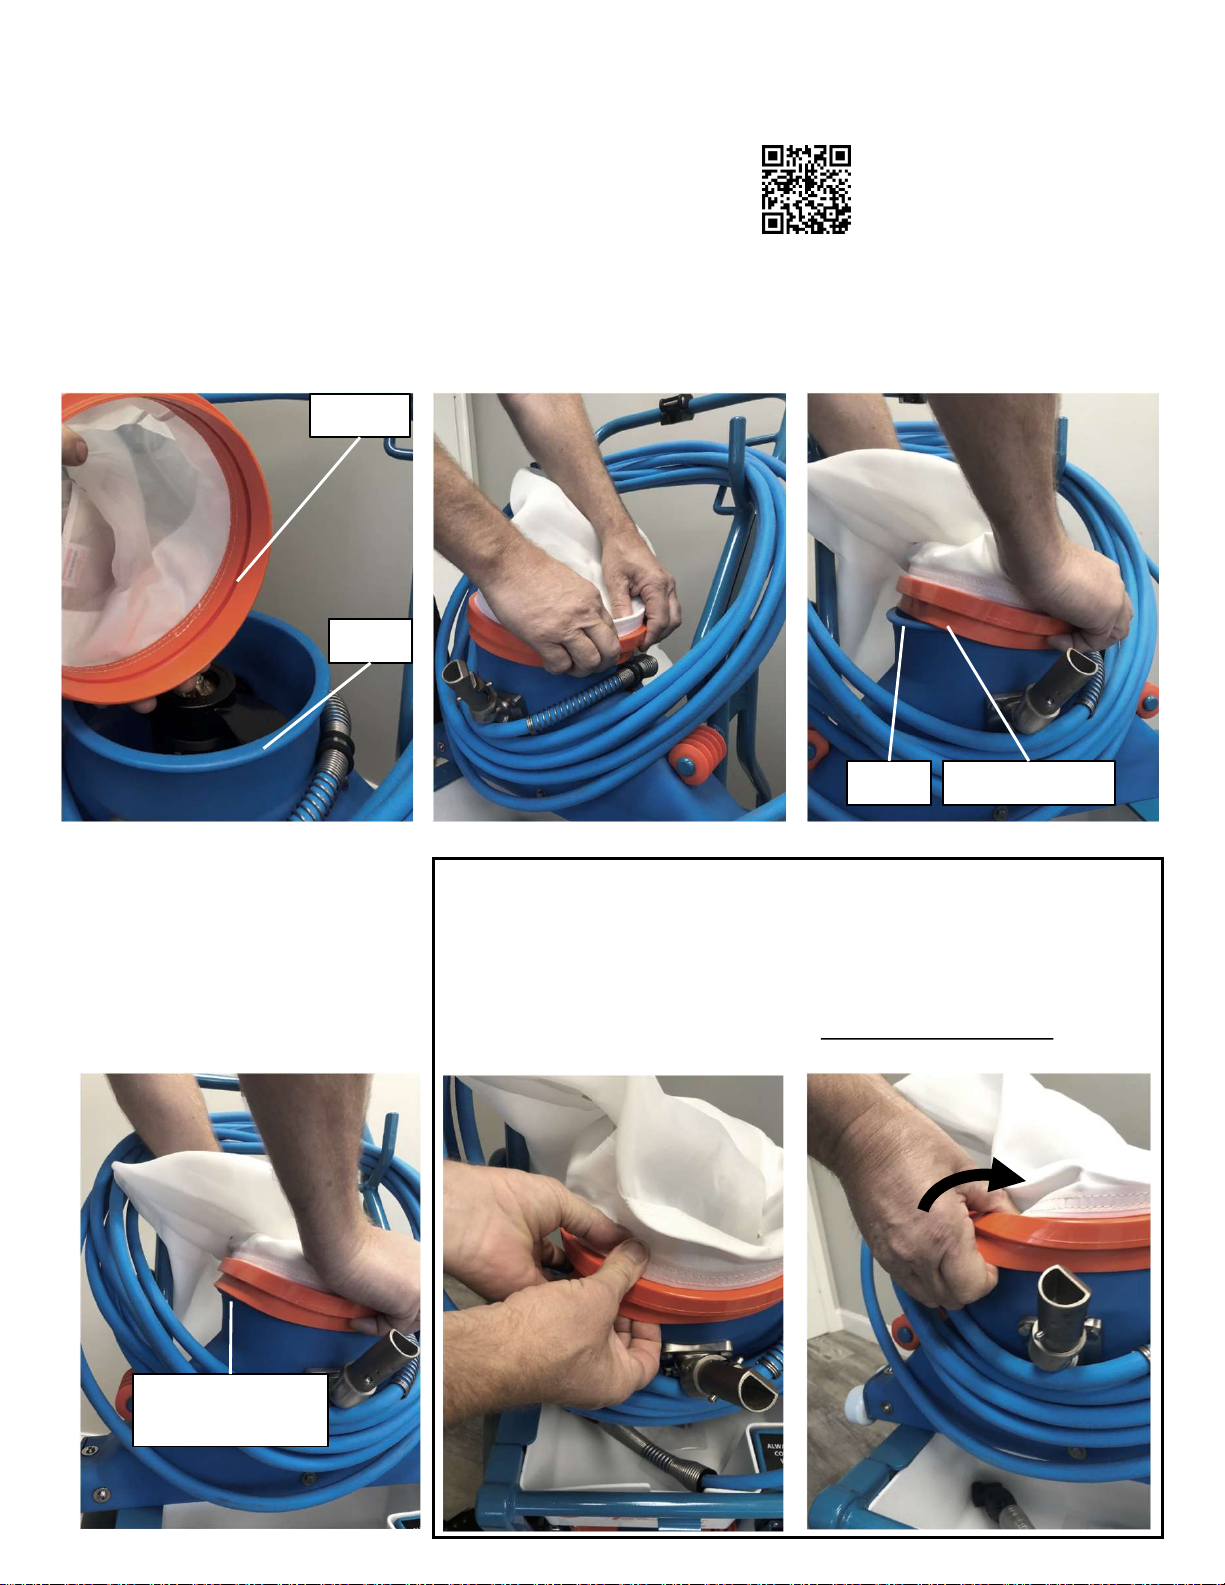
Understanding Filter Bag Options
There are several different bags available, the hole size in the cloth is measured in microns, the higher the
number the larger the hole that is in the filtering cloth. Bags are available in 25,60,75,100,200 and 400
micron. There is also a heavy net bag available, the heavy net bag is the only one that will work for a pool
with algae. It will be necessary to experiment with different bags to find the best one for your situation.
•A finer bag will vacuum slower and plug easier.
•A plugged bag can’t vacuum at all and will push debris away from the vacuum.
•Algae will plug all bags except the heavy duty net bag.
•Algae will need to be vacuumed to waste (with a pump) after removing the
large debris with the heavy duty net bag.
Available Bags:
GRAY RING Heavy Duty Net Bag (no filter cloth) (3/16 inch holes) This is the only bag that will work with
algae, it removes the large debris and allows the algae and fine debris to pass through so it can easily be
vacuumed to waste without clogging your vacuum hose with the leaves and large debris.
BLACK RING Coarse (400 Micron) Leaves and large debris.
YELLOW RING Medium (200 Micron) Leaves and general debris
ORANGE RING Standard (100 Micron) General debris and sand.
RED RING Fountain bag (100 Micron) This bag uses the same filter cloth as the standard bag but it is short
enough that it won’t drag on the floor of the pool when vacuuming in shallow water or when vacuuming
large amounts of debris like sand.
GREEN RING Ultra Fine (75 Micron) Fine sand and granular particles.
BLUE RING Extreme Fine (60 Micron) Very fine particles, some pollen.
PURPLE RING (25 Micron) This is a true dust bag it will remove most pollen, black dirt, cement and other
small particles. It may plug and need to be emptied even though it looks like there is very little debris in
the bag.
Plugged Bag/Reduced Suction
Reduced suction occurs when a bag becomes clogged, in this scenario the bag will have a lot of pressure
and appear hard. When the bag is clogged water can’t pass through it so water moving into the vacuum
head is reduced, when a bag becomes totally clogged water will be forced backward out through the
intake so debris will be pushed away from the vacuum, when this occurs you either need to empty the
bag and/or switch to a coarser bag.

Keep pushing down until the
bottom flange stretches over
the ridge and snaps on.
Removing the bag
Put your two thumbs together and push on the top flange, place your
fingers under the bottom flange and TWIST THE FLANGE, do not pull
up, keep twisting the flange until the bag releases from the ridge on
the vacuum head. TWIST, DON’T PULL UP AND
THE BAG WILL RELEASE.
Twist the
flange
Flange stretching
over ridge
PUSH DOWN ON CENTER OF
RING.
Starting on the opposite side
from where you are standing,
snap the ridge into the groove.
The groove in the bag ring snaps
onto the ridge on the vacuum.
Note: Do not put the orange
ring below the ridge.
Attaching/Removing a filter Bag
The bags are very easy to attach when done properly, if you don’t find yourself attaching the bags
effortlessly with the following instructions, please visit our website to view an instructional video.
Groove
Ridge
Ridge Bottom Flange
Slide your hands back to the
center of the ring and push
down, this will bend the ring in
the middle and the bottom
flange will stretch over the ridge.
Scan here to watch video

Cart Assembly Instructions
Step 1 Install Battery Pads
1. Lay the cart frame on its side.
2. Assemble the three orange
battery pads onto the cart as
shown.
3. Before tightening select a
battery. (See the section on
battery selection.)
4. If you are using a battery
larger than a group 27 don’t
use the bottom pads
Step 2 Install The Axle
1. Slide both axle hangars
onto the axle.
2. Bolt the axle hangars
onto the cart (bolt heads
must be toward the
inside of the cart and the
nuts on the outside.)
3. Tighten the set screw to
keep the axle from
spinning in the hangar.
Step 3 Install The Wheels
1. Install one washer onto each end of the axle and slide it up to
the axle hangar.
2. Apply anti-seize (included) to the ends of the axle.
3. Install the wheels onto the axle.
4. Install another washer onto each end of the axle.
5. Install the collar.
6. Tighten the set screw on the collar very tightly to ensure the
wheel doesn’t fall off.
Washer Wheel Washer
Collar
Axle
Set Screw
Cart
Frame

Cart Assembly Instructions (continued)
Step 4 Install The Handlebar
1. Insert the bolts with the heads and washers on the outside as
shown. The nuts go on the inside with no washers.
2. Before Tightening see the section on battery selection, the
handlebar height is adjustable which allows you to achieve a
well balanced cart with any battery.
3. When tightening, hold the nut and turn the bolt, (turning the
nut will damage the powder coating.)
Installing the Cord Clip
The cord clip will be installed centered on the
handlebar, this is the only place the clip will
function properly because it relies on downward
pressure.
There is an T20 Torx bit screwdriver included in the
Diagnostic/Tool kit, use it to tighten the six screws
on the Cord Clip.
Before completely tightening the six screws rotate
the cord clip so there is some space between the
spring and the coil of cord as shown.
To attach/release the plug from the cord clip, lift
the cord to 90 degrees as shown.

Transport Rack Assembly Instructions
Step 1 Attach Release Handle
1. Install the orange rod through the black bracket and orange dog as shown. The end of the rod must
stick all the way through the black bracket ¼ to ½ inch.
2. The Black Bumper must be fully seated into the orange dog when the release handle is installed.
3. Tighten the bolt. (It must be very tight.)
Note: The rod can be installed from either side it can also be rotated to the top so you will push it to
release.
This bolt must be very tight
Black rubber bumper must
be fully seated into the
orange dog

Step 2 Attach Bottom Hook Bracket
1. Latch the Transport Rack onto the cart.
2. Adjust the bottom hook bracket tight to the bottom rod on the cart, hold in place as you tighten the
bolts.
3. Tighten nut #1 first and nut #2 second.
4. Make sure the carriage bolts are very tight.
Bottom rod
on cart
Bottom hook
bracket tight to
bottom rod of cart
#1
#2 Tighten #1
first
Hang the transport rack
onto the cart as shown.
Adjust the bottom hook
bracket tight to the bottom
rod on the cart.
Tighten Nut #1 first.
Tighten Nut#2 second.
Tighten#2
second

Transport Rack Assembly Instructions (Continued)
Step 3 Assemble The Rest of The Transport Rack
Anti Wobble Plate
U-bolts for adjusting
how high the cart
wheels will ride off the
ground
Hole for
Padlock
(Padlock not
included)
Safety Pin
Use these holes if
you need to lift
the cart up to an
additional 3”
Rod must stick
through at least 1/4”
Rubber
Bumper
Fluid film is a great product to lubricate and prevent rust
on your transport rack. If you spray the rack when it is
new and every couple of months from then on it will
stay rust free. It can be purchased online or at some
auto parts stores.
Keep the pivot points lubricated.
Lubricate pivot points
(both sides) also
spray the dog springs
(eliminates movement between your
hitch receiver and transport rack.)

Battery Selection
Battery Charger Selection
You will need a 12 volt automatic battery charger that will deliver at least 10 amps to the battery.
DO NOT USE A TRICKLE CHARGER. A trickle charger will not fully charge the battery over night.
Choosing the right type and size battery for your needs is essential, you must use a DEEP CYCLE battery
not a starting battery. We recommend a group 27 (this is the size of the battery) you can expect 5 to 6
hours of run time with this battery. Note: If you select a battery larger than a group 27 you must remove
the bottom orange pads to ensure the terminals don’t hit the frame.
Deep cycle batteries should be used all day and charged every night with a good automatic battery
charger capable of delivering at least a 10 amp charge to provide the longest possible life.
It’s important to select a battery that doesn’t leak acid when it is laid on it’s side.
It is important to use a wrench when installing a battery, the terminals must be very tight.
Load Testing the Battery
Included in your diagnostic/tool kit
This simple tool will determine if your battery is good or bad
within 10 seconds, it is the only test we know of that will
give absolute and conclusive test results.
Check your battery anytime you feel your Riptide isn’t
functioning at full power.
This is the only tester that will be needed to determine if your
battery is in good condition.
Fig 1

Adjusting the Battery Compartment
1. Before purchasing a battery, lay it on its side to
ensure it doesn’t leak acid.
2. After selecting an appropriate battery for your
needs slide it into the battery compartment.
(See battery selection previous page)
3. Adjust the orange battery pads tight to the sides
of the battery and tighten the bolts.
4. Adjust the top orange battery pad to hold the
battery down and tighten the bolts
5. With the battery in place, install the split rings
and the spring rod, adjust the split rings to hold
the rod tight to the battery.
6. Attach the battery terminal to the battery. The
red wire must attach to the (+ Positive) and the
black wire attaches to the (– negative) terminal.
Spring Rod
Split Ring
Battery Pads

Heavier Battery
Lighter Battery
1. Install the battery.
2. load the cart with everything you will normally carry.
3. Adjust the handlebar to achieve a comfortable height/balance.
Adjusting the Handlebar height
To balance the cart

Clean under the impeller
Remove the impeller weekly to
clean debris that may wrap around
the debris guard or motor shaft.
Debris Guard
Your Riptide is equipped with our proprietary Debris Guard. The function of the Debris Guard is to protect
the shaft seals of the motor which can be damaged from debris wrapping on the motor shaft.
The impeller pin must be centered in the shaft and it must align with the slot in the impeller when the
impeller is installed.
Pin must be
centered in
shaft and align
with slot in
impeller
Pin must align
with slot
Impeller nut
Maintenance
•Clean and tighten battery terminals as needed
•Clean plug contacts on the cart and the cord.
•Clean under the impeller. (see below)
Cleaning the Plug Contacts
The plug is designed to provide problem free long term use but it will be necessary to clean the contacts
periodically.
The plug on the end of the cord is open and can easily be cleaned with a typical stainless steel wire brush.
(Fig1)
The contacts on the control panel are also open for easy cleaning, a common round wire brush designed for
cleaning pipes is perfect for this job. (Fig 2) Make sure the switch is in the off position.
Fig1 Fig 2
Keep Contacts clean on both sides Clean contacts with a round wire brush.
Insert the brush from the bottom
Switch in off
position

Steering Knuckle
Use a tool (allen key,
screwdriver, etc.) to
push in the button
below the slide
retainer.
Remove
the slide
retainer
Remove
the pole
pins
Removing the pole pins for replacement
Retainer
Button
pushed in
below the
retainer
Accessories
(Sold Separately)
Quart Bottle
Holder
(Up to 4 can be mounted
on the cart)
Holds:
•Quart Bottles
•Water Bottles
•Chlorine tabs
Organizer
Holds:
•Test kit
•Water test strips
•Brush
•Leaf Rake
•Miscellaneous Tools
•Many other things
Tile Brush
Bracket
Test kit goes here

Accessories
(Sold Separately)
Transport rack (included
with the SL model riptide)
The Swing hitch is a device that allow the Riptide to be left in the transport rack and swung out of
the way to allow access the bed of your truck or van. It also allows the transport rack to be offset
which is very helpful when mounting on a van because it allows unimpeded use of the active door
and it can be swung out of the way to gain access through both doors.
Swing Hitch
Inserts into your
vehicles 2 inch receiver
License Plate Bracket
Our license plate bracket attaches to the transport
rack and moves the license plate off to the side, it
includes a light but no wiring.
Battery Box
License Plate
Bracket
Transport rack
(included with the SL
model riptide)
Our battery box will hold a 35 amp hour battery. It’s a perfect
solution for yards that don’t have access for the cart.
Other manuals for SL
1
Table of contents