RISTRETTO 303FS User guide

Owner’s Handbook |Assembly & Maintenance

Certificate of Identity and Warranty
303FS Founders Edition
Model
Ristretto Electric, Denver, CO
Design
Detroit Bikes, Detroit, MI
Manufacturer Details
July 1st, 2022
Start Date of Warranty
Serial No.
Located on the seat tube of your 303FS.
Color

Owner’s Handbook
Assembly & Maintenance

1
Ristretto Founders Edition
For additional help view the Ristretto assembly video available in the Ristretto Help Center at www.ristrettoelectric.com/helpcenter
Welcome to Ristretto.
Thank you for choosing Ristretto and your purchase of the 303FS Founders limited-edition bike.
Your electric bike was manufactured in Detroit, Michigan by one of the best artisan bike engineers in North America,
Detroit Bikes. It is important for us to follow this same tradition of excellence for all Ristretto products. Your 303FS
bike has been quality crafted and is feature-rich, optimized to provide you with an elevated riding experience.
Our number one priority is to ensure your safety and the best riding performance possible.
Important: please read and understand this manual first before assembling and operating your Ristretto bike.
We recommend having your bike professionally assembled by a certified electric vehicle mechanic.
The 303FS is a high performance electric bike, designed for experienced riders. Please ride responsibly.
If you have questions after reading this manual, please reference the Ristretto Electric Help Center, or contact
We would love to hear from you.

2
Owner’s Handbook
General Information
This manual contains warnings and cautions that are marked by the triangular caution symbol and should be given
special attention to the information marked in this owner’s manual.
If you have questions after reading this manual, please reference the Ristretto Help Center.
Keep this manual, along with any other documents that were included with your bike, for future reference. All
content in this manual is subject to change so please be sure to visit ristrettoelectric.com/ownershandbook to view
and download the latest version. Ristretto makes every effort to ensure the accuracy of its documentation is correct
and assumes no responsibility of liability if any errors or inaccuracies appear within.
Assembly and the first adjustment of your 303FS requires special tools and skills, therefore it is recommended
that you have your bike assembled by a certified, electric bike mechanic or a mobile assembly service provider like
velofix.com. Riding an incorrectly assembled bike can put your and others’ safety at risk.
There are risks associated with the use of any bike which cannot be predicted or avoided and are the sole
responsibility of the rider. Please ride responsibly.
PLEASE NOTE: THIS MANUAL IS NOT INTENDED AS A DETAILED USER, SERVICE, REPAIR OR MAINTENANCE
MANUAL. PLEASE SEEK ASSISTANCE FROM A QUALIFIED TECHNICIAN FOR SERVICE, REPAIRS OR MAINTENANCE.
YOUR INSURANCE POLICIES MAY NOT PROVIDE COVERAGE FOR ACCIDENTS INVOLVING THE USE OF THIS BICYCLE.

3
Ristretto Founders Edition
For additional help view the Ristretto assembly video available in the Ristretto Help Center at www.ristrettoelectric.com/helpcenter
General Information –––––––––––––––––––––––––– 2
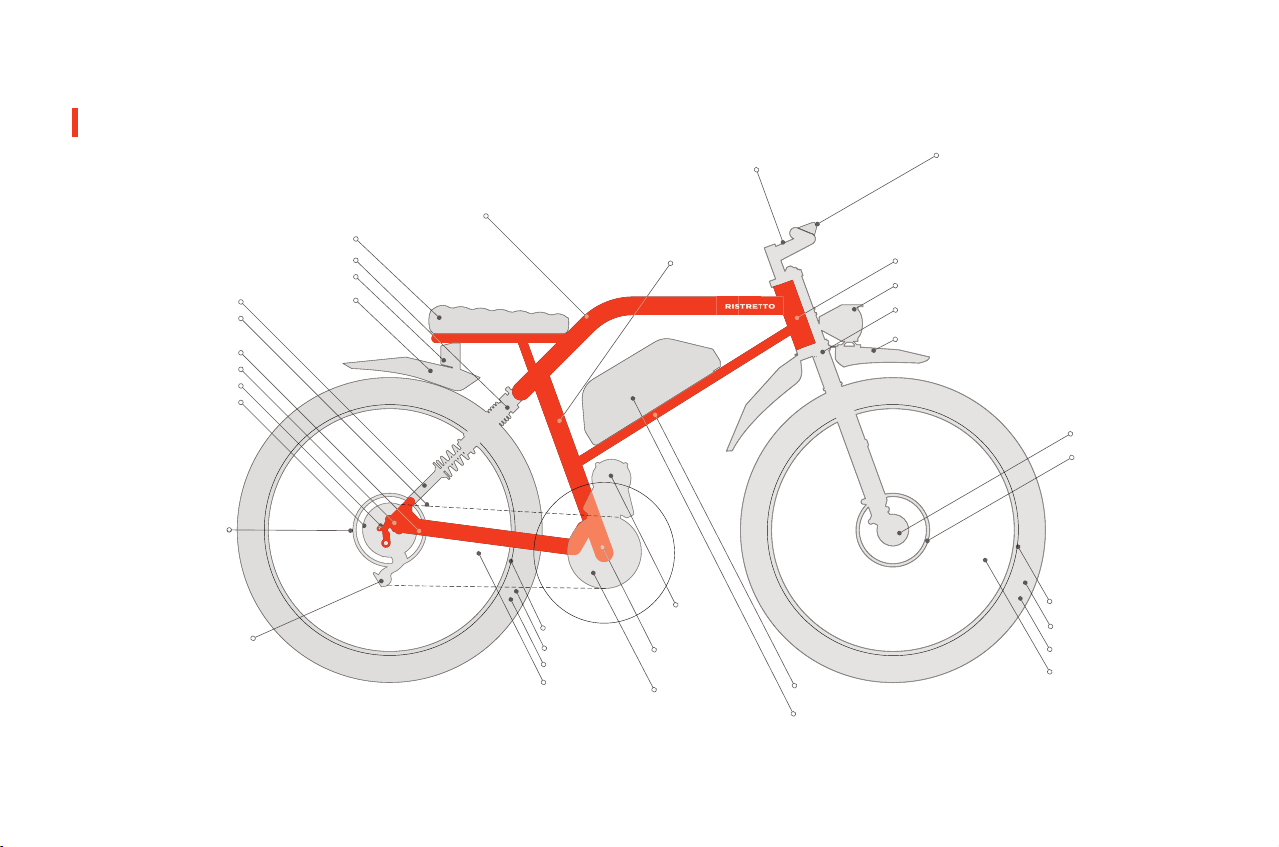
303FS Diagram ––––––––––––––––––––––––––––––––– 4
Assembly Instructions –––––––––––––––––––––––––5
Step 1: Unbox and Install Front Wheel ––––––– 5
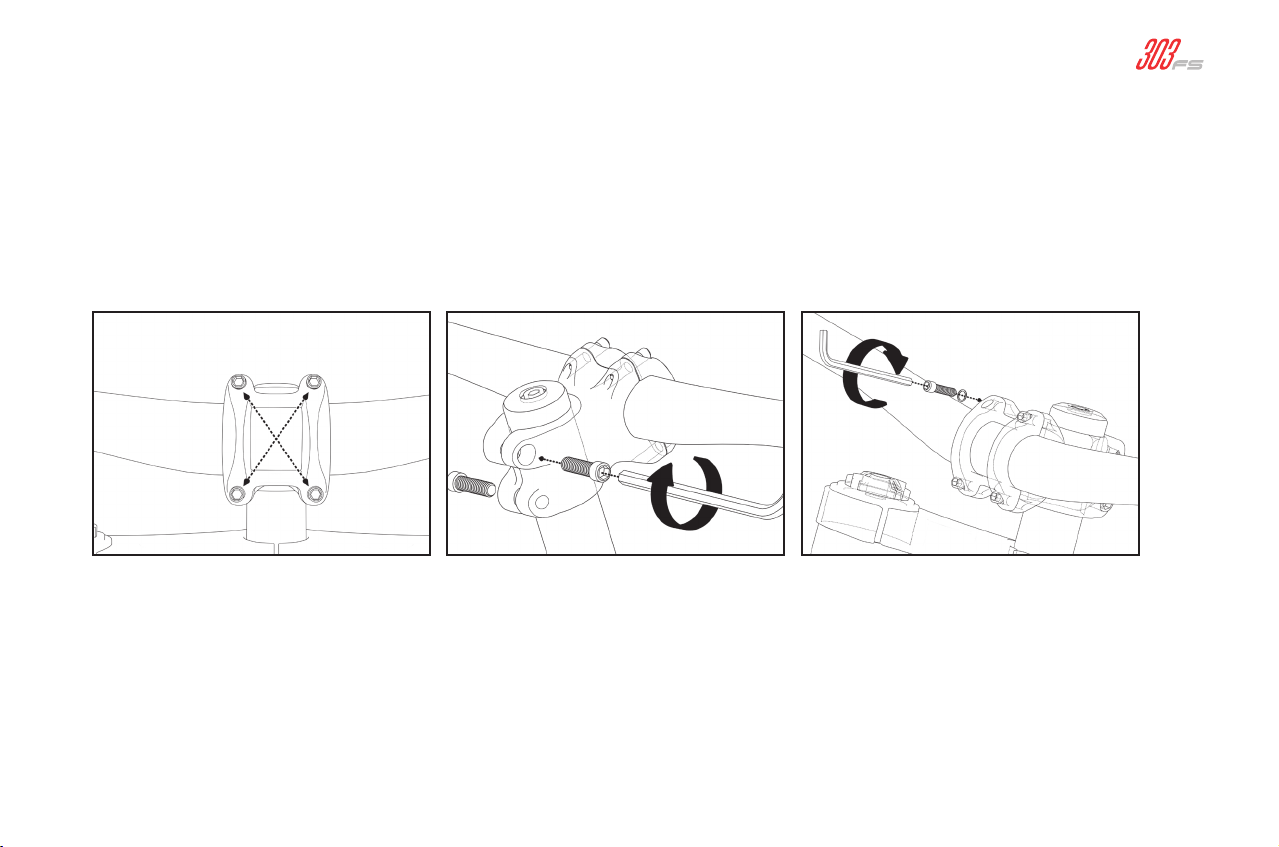
Step 2: Install Handlebar ––––––––––––––––––––– 7
Step 3: Install Pedals ––––––––––––––––––––––––– 7
Step 4: Inflate Tires –––––––––––––––––––––––––– 9
Step 5: Charge Battery Pack ––––––––––––––––– 9
Battery ––––––––––––––––––––––––––––––––––––––– 10
How To Remove Battery Pack –––––––––––––– 10
Battery Charging Information –––––––––––––– 10
Operating Instructions –––––––––––––––––––––– 12
Powering On –––––––––––––––––––––––––––––––– 12
Display Set Up ––––––––––––––––––––––––––––––––– 13
Braking Procedure –––––––––––––––––––––––––––– 14
Pedal Assist Level Settings –––––––––––––––––––– 15
Basic Controller Display Settings ––––––––––––– 16
Mode and Class Selection ––––––––––––––––––––– 17
Advanced Controller Display Settings ––––––––– 18
Operating Integrated Lights –––––––––––––––––– 19
Powering Off the Motor –––––––––––––––––––––– 19
Ristretto App ––––––––––––––––––––––––––––––––– 20
How to Connect the Mobile App ––––––––––––– 20
Change Riding Modes ––––––––––––––––––––––––– 21
Troubleshooting
Error Codes ––––––––––––––––––––––––––––––––––– 22
Troubleshooting –––––––––––––––––––––––––––––– 23
Checklist
Pre-Ride Checklist ––––––––––––––––––––––––––––– 26
Post-Ride Checklist ––––––––––––––––––––––––––– 27
Maintenance Checklists ––––––––––––––––––––––– 28
Warranty
Limited Warranty & Other Terms ––––––––––––– 29
Table of Contents

4
303FS Diagram
Battery Pack
Headset
Head Tube
Grips
Handlebars
Suspension Fork
Dropouts
Cogset
Saddle
Rear Shocks
Front Hub
Brake Rotor
Brake Caliper
Brake Pads
Top Tube
Rear Hub
Seat Tube
Down Tube
Rear Shocks Mount Tube
Chain Stay
Chain
Rim
Tire
Tube
Spokes
Fenders
Fenders
Rear Derailleur
Derailleur Cable
Stem Brake Levers
Rear Light Head Light
Display
Brake Rotor
Brake Caliper
Brake Pads
Motor
Chainring
Botton
Bracket
Rim
Tire
Tube
Spokes
Owner’s Handbook | Assembly Instructions

5
Ristretto Founders Edition
For additional help view the Ristretto assembly video available in the Ristretto Help Center at www.ristrettoelectric.com/helpcenter
Assembly Instructions
STEP 1: UNBOX AND INSTALL FRONT WHEEL
Carefully open the bike box fasteners then remove the owner’s tool box.
Owner’s Tool Box Contents:
•Owner’s Manual
•Battery Lock Keys (2x)
•Battery Charger
•Pedal Set
•Pedal Wrench
•Multi Tool (can be used instead of a torque wrench if needed)
UNBOXING AND BIKE ASSEMBLY IS HIGHLY RECOMMENDED TO BE COMPLETED
BY TWO PEOPLE THAT ARE CAPABLE OF LIFTING A HEAVY OBJECT SAFELY.
1. Lay down a soft floor covering to protect the bike forks and your floor.
2. Remove the front wheel from the box to prepare for installation.
3. Remove packaging material then carefully lift the bike out from both sides.
4. Place the bike on the soft floor covering with one person holding the bike upright.

6
5. With one person holding the bike upright, remove one fastener from the front axle using an M6 hex key,
then slide the front axle out from the front forks.
6. With one person holding the bike upright, prepare to slide the front wheel between the front forks:
a. Remove the front brake caliper spacer.
b. Carefully align the wheel brake rotor to slide between the brake caliper pads.
c. Align the front wheel hub with the fork axle holes.
d. Gently slide the axle through the fork axle holes and through the front wheel hub.
e. Hand thread the second axle fastener on the front axle.
f. Torque the axle fasteners (2x) using an M6 hex key (15 Nm)
g. Torque fork axle pinch fasteners (4x) using an M5 hex key (10 Nm)
PLEASE USE A TORQUE WRENCH IF POSSIBLE. BE CAREFUL NOT TO
CROSS-THREAD OR DAMAGE THE FASTENER THREADS.
7. With one person holding the bike upright, spin the front wheel to ensure proper alignment.
Make sure the front brake rotor is properly aligned between the brake caliper pads.
A PROPERLY INSTALLED FRONT WHEEL SHOULD SPIN FREELY. IF YOU HAVE ANY
HESITATION, PLEASE CONTACT A CERTIFIED EV MECHANIC FOR ASSISTANCE.
Please be kind to the environment and be sure to recycle all packaging materials according to your local guidelines.
Assembly Instructions

7
Ristretto Founders Edition
For additional help view the Ristretto assembly video available in the Ristretto Help Center at www.ristrettoelectric.com/helpcenter
STEP 2: INSTALL HANDLEBAR
1. Remove the bolts of the handlebar clamp using an M5 hex key.
2. Place the lower crossbar of the handlebar in the groove of the top crown once the clamp is open.
3. Finger tighten the handlebar clamp, then adjust the angle of the handlebar to the rider’s preference.
4. Torque the stem clamp fasteners using an M5 hex key (10 Nm) in a cross pattern making sure the
clamp is tight and the handlebars do not move.
STEP 3: INSTALL PEDALS
1. Locate the Right side pedal (stamped with an “R” at the end of the pedal axle).
The Right side pedal goes on the crank on the Right side of the bike (the side
with the drivetrain gears). Torque each pedal to (35 Nm). Use the included
pedal wrench to avoid damage caused by wider wrenches.

8
a. The Right side pedal is tightened by threading it clockwise.
Carefully thread the Right pedal onto the crank on the Right side of the bike slowly and by hand.
b. The Left side pedal is reverse-threaded and tightens counter-clockwise (stamped with an “L” at
the end of the pedal axle). Carefully thread the pedal onto the Left crank by hand slowly.
WARNING
CROSS-THREADING OR IMPROPER PEDAL INSTALLATION CAN CAUSE IRREVERSIBLE
DAMAGE TO THE CRANK ARM THREADS. INSTALL WITH CARE.
BE CAREFUL NOT TO CROSS-THREAD OR DAMAGE THE THREADS.
Assembly Instructions
Right side pedal Left side pedal

9
Ristretto Founders Edition
For additional help view the Ristretto assembly video available in the Ristretto Help Center at www.ristrettoelectric.com/helpcenter
STEP 5: CHARGE BATTERY PACK
1. Ensure the battery is switched off.
2. Plug the charger into the battery charging port. With the battery on or off the bike, place the charger in a
flat, secure place, and connect the DC output plug from the charger (round 3-pin connector) to the
charging port on the side of the battery.
3. Plug the charger into a power outlet. Connect the charger input plug to the power outlet. Charging
should initiate and will be indicated by the LED charge status light on the charger turning red.
4. Once fully charged the LED charge status light will turn green. Unplug the charger from the wall outlet first
and proceed to remove the charger output plug from the battery charging port.
STEP 4: INFLATE TIRES
1. Check that the tires and tire beads are evenly seated around the rims.
2. Use a bike pump with a Schrader valve and pressure gauge to inflate each tire to the recommended
air pressure indicated on the tire sidewall.
DO NOT OVER INFLATE OR UNDER INFLATE THE TIRES.

10
BATTERY CHARGING INFORMATION
•Check the charger, cables, and battery for damage
before beginning each charge.
•Always charge in a safe area that is indoors, cool, dry,
away from direct sunlight, dirt and debris, in a low
traffic area away from the potential to trip on the
charging cords, or to cause damage to the bike,
battery, or charging equipment while parked and/or
charging. *Always charge your battery in temperatures
between 10 °C – 25 °C (50 °F – 77 °F).
•The battery can be charged on or off the bike. To
remove the battery, turn the key to the off and
unlocked position, remove the key from the key port
by pulling directly backwards without twisting, and
then carefully pull the battery forward and up until
the battery detaches from the receptacle. The battery
should be recharged after each use, so that it is ready
to go the full range for your next ride. There is no
memory effect, so charging the battery after short
rides will not cause damage.
WARNING
ALWAYS CHARGE YOUR BATTERY IN TEMPERATURES BETWEEN 10 °C - 25 °C (50 °F – 77 °F) AND ENSURE
THE BATTERY AND CHARGER ARE NOT DAMAGED BEFORE INITIATING CHARGE.
NEVER LEAVE A CHARGING BATTERY UNATTENDED. CHARGE ONLY IN A SAFE LOCATION.
HOW TO REMOVE BATTERY PACK
•Insert battery key into battery lock.
•Rotate key counter-clockwise to unlock.
•With both hands, carefully slide battery pack forward and lift it off of the battery cradle.
Battery
Battery

11
Ristretto Founders Edition
For additional help view the Ristretto assembly video available in the Ristretto Help Center at www.ristrettoelectric.com/helpcenter
WARNING
FAILURE TO FOLLOW THE BEST PRACTICES OUTLINED IN THE BATTERY CHARGING INFORMATION SECTION
COULD RESULT IN UNNECESSARY WEAR TO THE CHARGING COMPONENTS, BATTERY, AND OR CHARGER,
AND COULD LEAD TO AN UNDERPERFORMING OR NON-FUNCTIONAL BATTERY, REQUIRING REPLACEMENT
THAT WILL NOT BE COVERED UNDER WARRANTY. FAILURE TO FOLLOW BATTERY SAFETY PROCEDURES MAY
RESULT IN THE RISK OF FIRE OR EXPLOSION.
CHANGE THE BATTERY ONCE EVERY MONTH IF YOUR BIKE HAS NOT BEEN IN USE.
•Charging the battery normally takes 4-7 hours. In rare
cases, it may take longer to allow the battery management
system to balance the battery, particularly when the
bike is new or after long periods of storage. Balance
the battery during the first three charges by leaving it
connected to the charger for at least two hours after
it is fully charged.
•The charge indicator lights will show two red lights while
the battery charges. When charging is complete, one
indicator light will turn green, so one green, and one
red will be illuminated. Ensure the lights face upward
when charging.
•Remove the charger from the battery after the green
light indicates a complete charge. The charger is
designed to automatically stop charging when the
battery is full, but unnecessary wear of the charging
components could occur if the charger is left attached
to the battery and a power source for longer than 12
hours. Detach the charger as soon as possible once
the green light indicates a complete charge to avoid
unnecessary wear of charging components.
•Never charge a battery for more than 12 hours at a time.
•Do not leave a charging battery unattended.

Operating Instructions
12
Operating Instructions
POWERING ON
•Flip up the kickstand, squeeze the brake lever to engage the brakes and kick your leg over the saddle.
•When firmly seated on the bike, press the handlebar control power button to turn the bike on.
NOTE: The control power button needs to be pressed (2-3 seconds) to start-up/ power down.
WARNING
ONCE THE DISPLAY SCREEN IS ILLUMINATED, THE THROTTLE AND PEDAL
ASSIST IS LIVE. DO NOT TOUCH THE CHAINS, CHAINRINGS, MOTOR, COG,
WHEELS, OR ANY MOVING PARTS WHILE THE MOTOR IS ACTIVATED.
WARNING
DO NOT RIDE A BIKE THAT HAS NOT PASSED THE 100% SAFETY VERIFICATION. BEFORE EACH RIDE,
CHECK THE BIKE AS DESCRIBED IN THE SECTION “PRE-RIDE SAFETY CHECK”. FOR HELP PLEASE VIEW
THE RISTRETTO HELP CENTER AT WWW.RISTRETTOELECTRIC.COM/HELPCENTER
NEVER SIT ON THE BIKE WITH THE KICKSTAND ENGAGED.

13
For additional help view the Ristretto assembly video available in the Ristretto Help Center at www.ristrettoelectric.com/helpcenter
Ristretto Founders Edition
Display Set Up
Before your first ride, double check the basic display settings.
1. Turn on display & double press the Menu button to activate the settings menu
•Press the Power button to enter basic settings menu
2. Select ‘Wheel’, then press the Menu button to select the wheel size
•Make sure the 303FS wheel size is set to ‘29 inch’ (for 26” fat tire diameter)
- This will ensure accurate speedometer readings
3. Select ‘Battery’, then press the Menu button to select voltage setting
•Make sure the 303FS battery voltage is set to ‘52 V’
- This will ensure accurate battery capacity level readings
4. Press Menu again to set the changes and exit the settings navigation.

Operating Instructions
14
Braking Procedure
The 303FS uses a four piston Tektro hydraulic brake system with large rotors. When used properly this system
will give the rider a strong, safe and reliable stopping power. The Left lever will activate the front brakes when
compressed and the Right lever will activate the rear brakes when compressed.
Front brake = Left Lever
Rear brake = Right Lever
In most cases when braking we recommend primarily squeezing the front brake lever while leaning your weight
back in order to prevent the rear tire from losing traction.
WARNING
BRAKE HOSES AND CALIPERS MAY BE HOT AFTER A SHORT RIDE. DO NOT
TOUCH THE BRAKE HOSES, CALIPERS, PADS OR ROTORS UNTIL THEY HAVE
FULLY COOLED DOWN.

15
For additional help view the Ristretto assembly video available in the Ristretto Help Center at www.ristrettoelectric.com/helpcenter
Ristretto Founders Edition
Pedal Assist Level Settings
When the rider begins to pedal or turn the cranks, pedal assist sensors will activate the motor according
to the pedal assist level settings.
1. Press the up ( + ) button to increase the pedal assist level.
2. Press the down ( - ) button to decrease the pedal assist level.
3. The 303FS comes set with 5 pedal assist levels:
a. Level 0 = 0%, pedal assist is turned off.
b. Level 1 = 30%
c. Level 2 = 45%
d. Level 3 = 60%
e. Level 4 = 80%
f. Level 5 = 100%

Operating Instructions
16
Basic Controller Display Settings
Double press the Menu button to activate the settings menu.
Press the Power button
to change Display Setting /
Basic Setting.
Mileage Mode Switch
Short Press Power button:
Trip - ODO - Time
Speed Mode Switch
Short Press Menu button:
Speed - Avg Speed -
Max Speed
Screen Backlight On / Off
Press and hold the UP
button for 1 second

17
For additional help view the Ristretto assembly video available in the Ristretto Help Center at www.ristrettoelectric.com/helpcenter
Ristretto Founders Edition
NOTE THAT R MODE (RACE MODE) IS FOR OFF-ROAD
USE ONLY AND IS NOT LEGAL ON PUBLIC ROADS.
USE AT OWN RISK AND DISCRETION. RISTRETTO WILL
NOT BE HELD LIABLE FOR ANY DAMAGES INCURRED.
NOTE: Switch between S and R mode by double pressing power button
(need to restart to take affect). Please ignore all other settings.
Mode and Class Selection
•Double press POWER on your display to switch
between S (Street Mode) and R (Race Mode)
•Restart your bike to activate mode.
WARNING
R (RACE MODE) MODE IS FOR OFF-ROAD USE ONLY!
Table of contents