Merkava TrailX750 User manual

TrailX750
User Manual
POWER CHARGED lRANSPOR'TERS

Trailx750 Quick Start Guide:
1. Carefully remove contents of box out ofthe packaging.
You will find:
. 1x Trailx7so eBike
. 1 x Front WheeuTire
. 1x 110V Charger
. 1x set of Pedals
. 2 x keys to unlock battery
. 2 x reflective lights
2. Make sure the quick release latch/stem is passed though the front wheel. The quick release
latch should be on the side of the wheel opposite to the disc brake. lnstall front wheel and
tighten quick release latch-
3. Place handle bar in place and tighten allen screws
4. Place seat to desired height and tighten quick release latch.
5. Place white .eflective light on front fork and red relledive light on seat post once you've
determined appropriate seat height.
6. lnflate tires to about 15-20PSi
7. Place your Trailx750 in a clean and dry environment and proceed to vjsually check the
corflponents and ensure that all screws and bolts are tightened and that tires are correctly
inflated. Check and adjust break levers to your preference and check that the multi speed
derailleur functions properly. This is usually already done once at the factory and once
before shipping b{lt as a precautionary measure we recommend you do this as well before
riding as components may be subject to move during transport.
8. Charge your Trailx7so in a clean and dry environment at ambient temperature until light on
the charger turns from red to green. See below for instructions on maintaining your battery
tife.
L You may chargethe batterywhile inside the eBike usingthe charging portfound on the
frame. You may also remove the battery and charge it outside the eBike using the charging
port found directly at the bottom ofthe battery.
10. To remove the battery insert the key on the side ofthe frame, turn the key counter
clockwise then turn the black safety knob right above the battery to release the battery
pack.
11. Once you've famillarized yourselfwith the digitaldisplay you willbe ready to ride. Please
ride carefullyl {see attached instruction for 8005 lntelligent display)
Maintaining your rrailxTso battery pack:
Before shipping, we conduct spot checks on our transporters to validate overall quality and condition of
electrical components including hotor and battery pack. These checked units have their battery tested
and fully charged before shipping.
The lithium ion technoloBy is intended to last for several years while being charged and discharged many
times. However, the battery's life span will depend on your care of the battery.
8attery life will depend on your maintenance and care ofthe battery. TrailX750 uses advanced lithium-
lon batteries made with high capacity SAMSUNG cells and they should be charged at least once a month
(when not in use)to ensurethe lon8evitvofyour battery. Make sureto only use our suppiied 48V
charger on your 48V battery.
Allow your battery to rest for 10 minutes after char8ing before riding and for 10 min after riding before
charging. Unplug your battery char8er after the lightturns green indicatingyour battery is fully charged.
Always unplug the charger from the walloutlet before pluggingor unplugging the other end into your
TrailX750-
Typical charging time after the battery has reached the 10% critical low level is between 4 to 5 hours
using the provided 2Ah charger.
Coutiorj Do not expose your battery to extremely low or high temperatures to avoid potentialdamage
to your battery.>>
IMPORTANT NOTE: To AVorD DAMAGTNG youR BATTERY pAcK wE srRoNcry REcoMMEND
USER SHUTS DOWN AND RECHARGE THE ITaiIXT5O ONCE BATTERY I-EVEL REACHES 10%. YOU wlLL
€NTER THIS CRITICAI LEVEL SHORTLY AFTTR YOUR DISPLAY SHOWS 1 BAR OR REACHES 4OV IN THE
VOI.TAGE METER.

Warranty information:
\terka\r sf.ndr hehind ils products..All ()ur transportrrc beoetlt from tl2 \cir limitcd
wrrrantl.
The COMPANY warralrts that the frame will be free Aom defects ifl the materials ard
workmanship for a period of2 years.
The COMPANY wanants that the motor and battery psck will be free from defects in the
materials and workmanship for a period of 1 year*.
The COMPANY warrants that the electricrl components including the controller and
charger will be free ftom defects in the materials and workmanship for a pedod of 6 months.
Before shipping, we conduct spot checks on our transporterc to validate overall quality and
condition ofelecrical components including motor and battery pack. These checked units have
their battery tesred and fully charged before shipping.
The lithium ion technology we use is intended to last for several years while being charged and
discharged many times. However, the battery's life span will depend on your care ofthe battery.
Ifthe PRODUCT proves defective AND a claim is filled during the wa{anty period, the
COMPAIIY at its optior! will:
Repair the PRODUCT by means oftelephone support, email support, or by providing the
necessary parts at no charge.
*Wananty on battery will be limited to 6 months if it is determined that our guidelines for proper
battery care have not been followed-
The following are not covered by the warranty:
o Wear and tear on frame, g p tape, leverc, tubes, tires, brake discs, brake pads, cables.
derailleur, seats, plastic fairings and any other component which wears out naturally
during usage.
. Minor scratches and stress marks that may occur during shipping and handling.
. Water damage caused by exposing sensitive electrical pats to water such as washing
transporler with hose or prcssure washer.
. Accidents. misuse, abuse. overloading, human enors or lack ofmaintenance.
. Acts-of-god such as fire, flood, earthquake, freezing, etc

Warranty information continued:
The following will void the warranty:
. The modification ofyour trarsporter or use outside those specified on this site.
. The serial number ofthe product has been altered or removed.
. The product has been dismantled and repaired/reassembled improperly or with
aftermarket parts.
. Overloading your transporter.
. Storing your tansporler outdools.
IMPORTANT NOTE: To AVorD oAMAGtNG youR BATTERY PACK wE STRoNGLY RECoMMEND
USER SHUTS DOWN AND RECHARGE THE TTaiIXT5O ONCE BATTERY TEVEL REACHES 10%, YOU WILL
ENTER THIS CRITICAL LEVEI. SHORTI.Y AFTER YOUR OISPTAY 5HOW5 1 SAR OR REACHES 4OV IN THE
VOLTAGE METER,
Safe Operation:
Always wear a Helmet
. Always Start in the slow PedalAssist mode (1)
. Grip both hand grips
. Check brake levelfor positive braking action
. once you are comfortable riding the eBike with the pedal assist mode you can start
LrsinB the throttle instead of pedaling. Please note, throttle only riding will lower the
max range on a charge considerably.
. Pedal assist mode and throttle mode are two different riding modes. Refrain from using
both simultaneously. Either pedal only or throttle only.
. ALWAYS follow your local laws regarding eBikes and be respectful of other riders on the
trails.
Helmet
Always wear an ASTM and cPsc certified helmet when riding. Make sure that chin strap is
attached before your ride and follow the helmet manufactures instructions for proper user and
fit,
Footwear
Make sure to always wear shoes that have good traction on the pedals and will stay on your
feet.
Brakes
Squeeze the hand brake levers to ensure there is positive braking action before starting your
ride.
IMPORTANT NOTE: To AvoID DAMAGING YoUR BATTERY PACI( wE STRoNGLY RECOMMENO
USER SHUTS DOWN AND RECHARGE THE TTaIIXT5O ONCE BATTERY LEVEL REACHES 1O%. YOU WILL
ENTER THIS CRITICAL IEVEL SHORTLY AFTER YOUR DISPI.AY SHOWS l BAR OR REACHES4OV IN THE
VOI-TAGE METER.

1 Product Name
1.1 Th6 Middl€ instell int€lligeot LCO Ollplay
1.2 Model:APT12LCO80OS
3 ElectricalParametera
+ 24VB6V battery supply
+ Rated operating cunenl: 'lonA
+ llrax operating currenl :30mA
+ Off leakage curenl < 1uA
+ Max oulgut cunent to controller : 50mA
+ Operating temParatu.e : _30-70 C
+ Storage lempehture : 40-70C
4 Dimensions & Material
1.1 Prcducl shell B ABS, transparent window as made with hrgh strength Acrylb, the
stifn636 equals the tempered glass.
Dimenlions : hosyL90mm'W54mm'H13.3mm
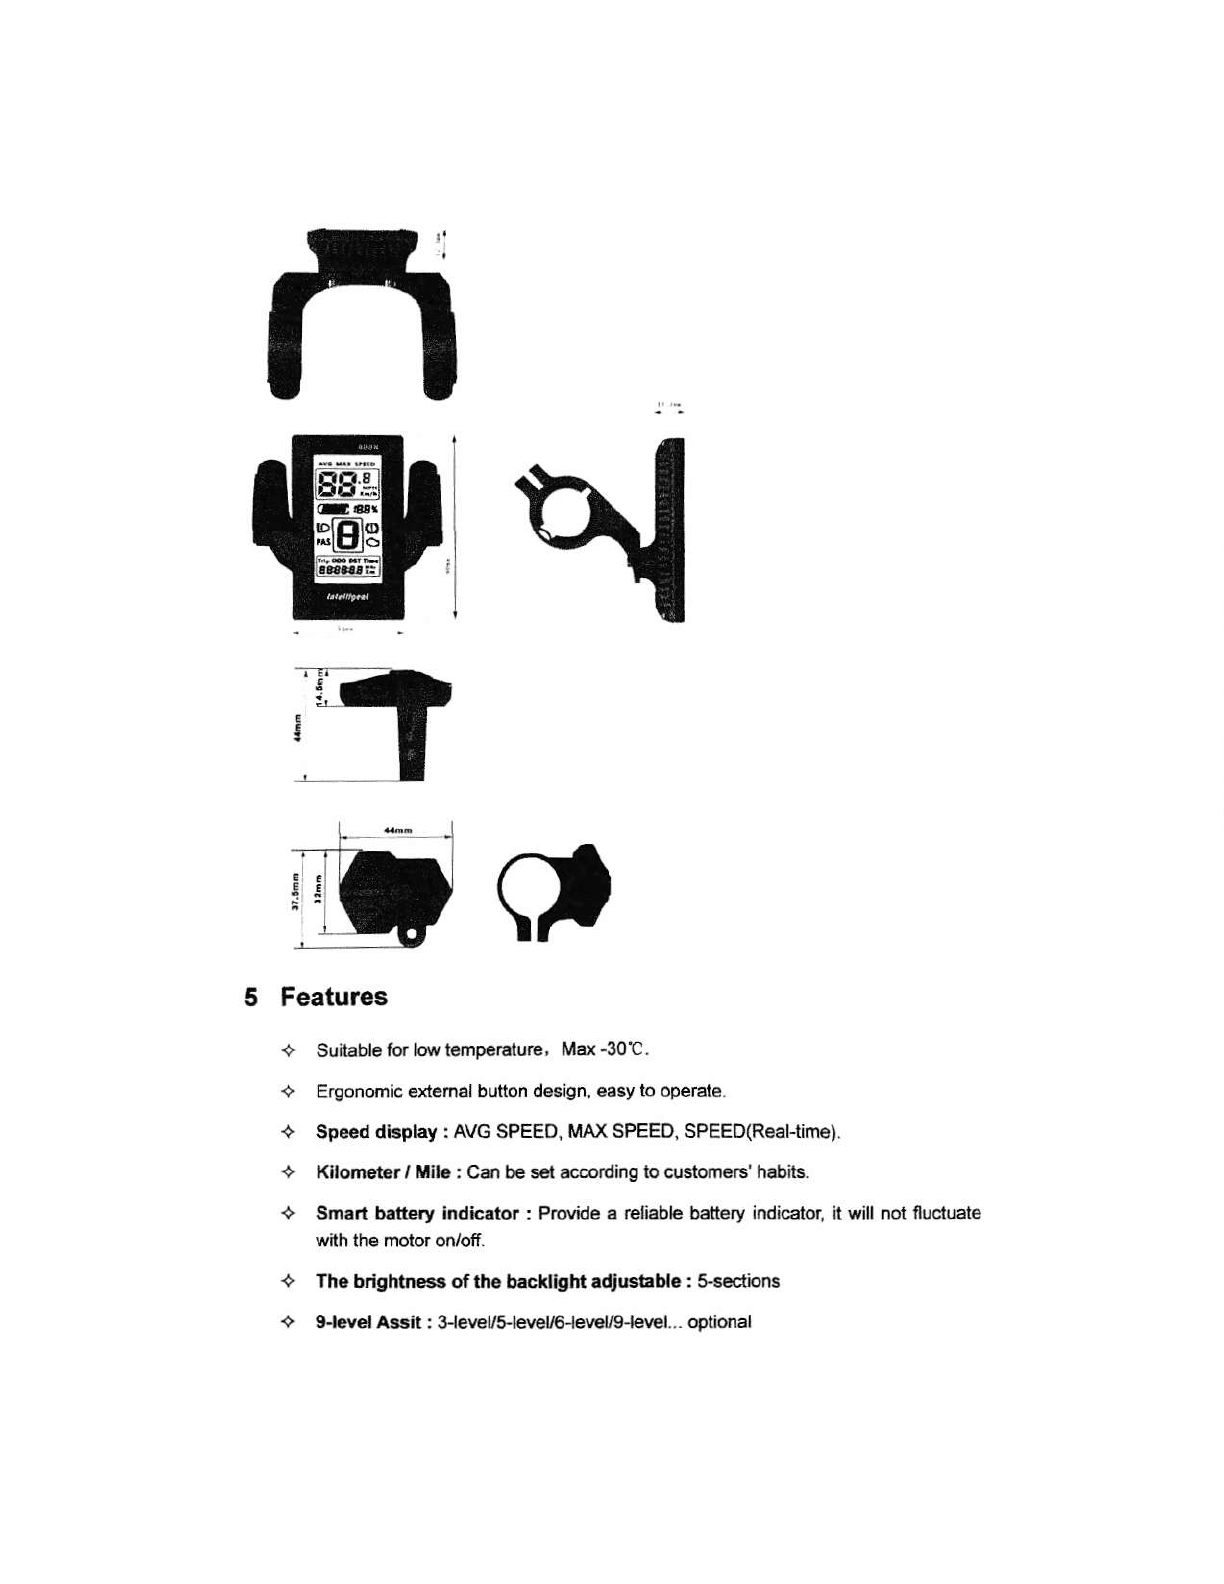
Features
+ Suilable for lo\,lemperelure, Mar-30C.
+ Ergonomic extemal button design, €sy to operate
+ Speed dbplay : AVG SPEED, MAX SPEED, SPEED(Real-time).
+ Kilometer I ililc : Can be set according to customers' habits.
+ Smart batery indicator : Provide a reliable b€ttery indicator, it will not fluctuate
wilh lhe motor on/off
+ The brlghtne63 ofths bacHlght adJGt bl.:s€ection3
+ gJevel Assat : 3-leveu eveu6-le\rel,/9-level-.. optional
ffi
ffi
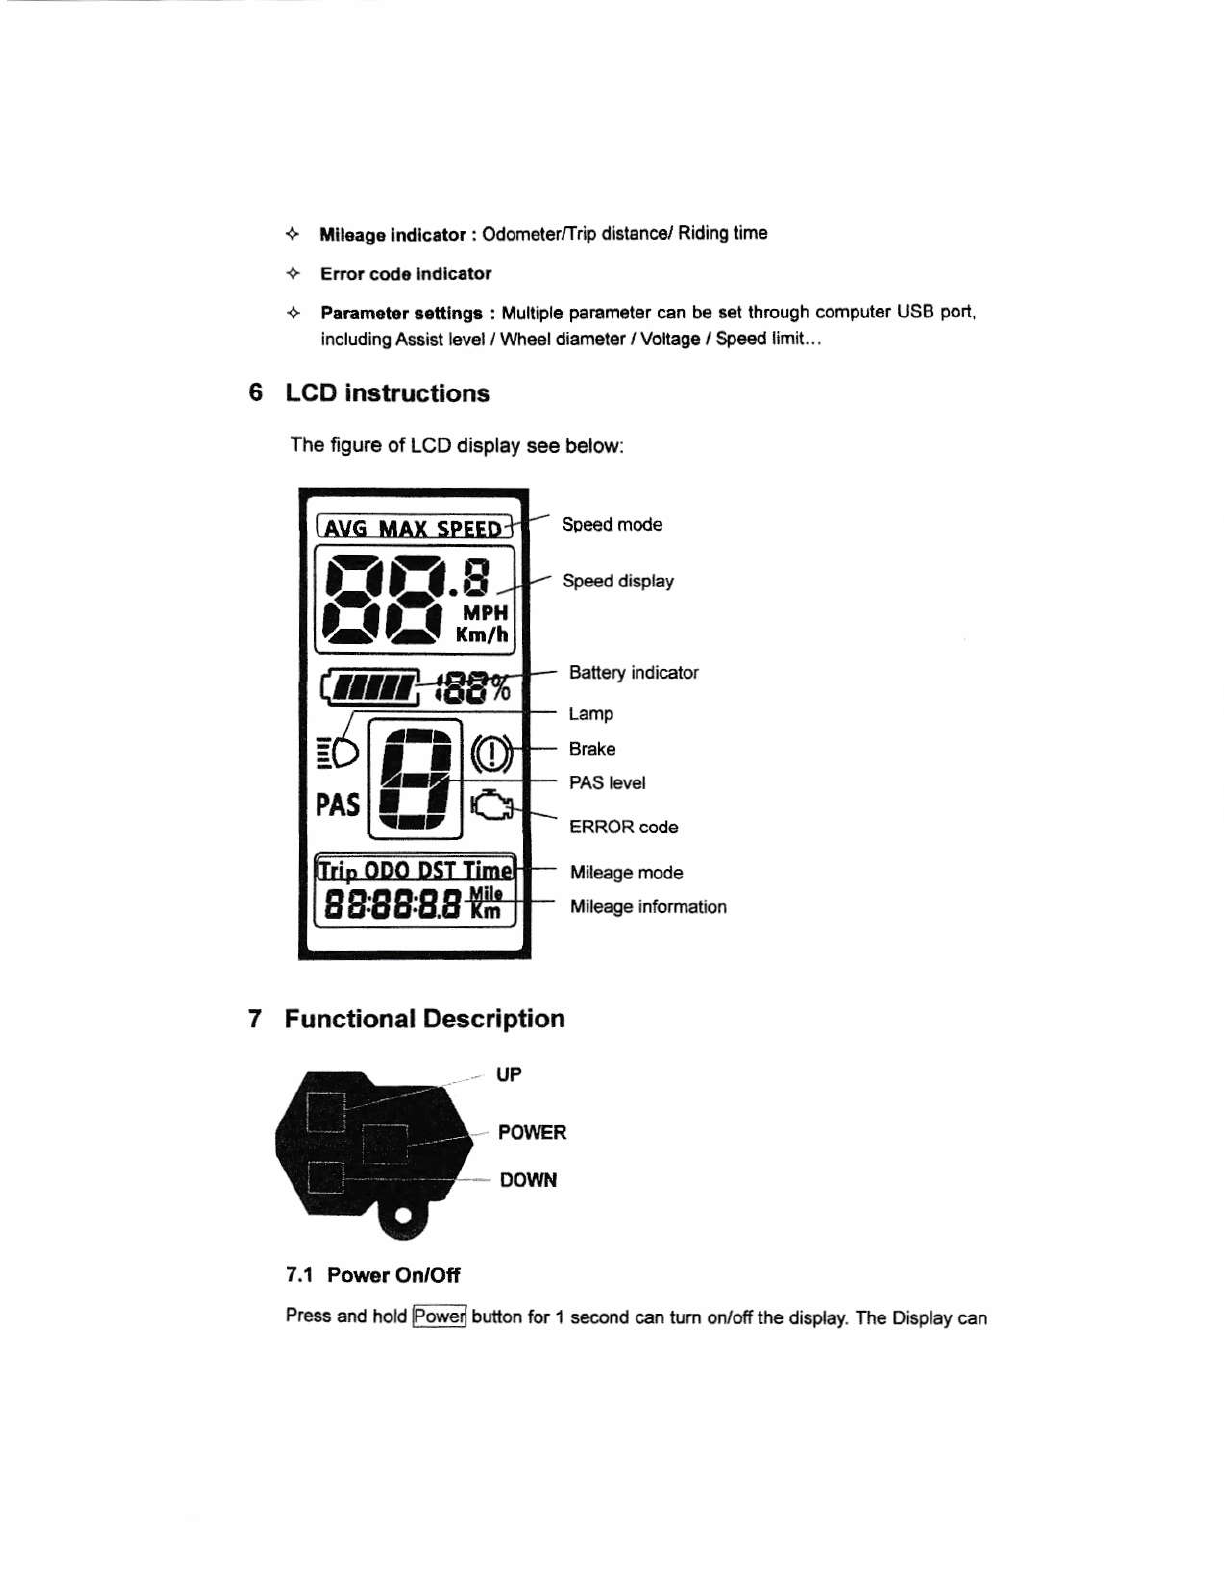
+ lilloaos Indlc.tor: Odomotor/Trip di6lenc€/ Ridino lime
+ Eno? cod. lndlclloi
+ Par.mot.r lettlngs : Mullipl6 paramoter csn b€ 6€l lhrough computor USB port,
includ:ng Assist lev€l / Wheel daamolor / Vollage / Speed limit. . .
6 LCD instructions
The fgu.e of LCD display see below:
Speed mode
Speed display
Batt€ry indicaior
Lamp
Brek€
PAS level
ERROR code
Milege mode
Mileao€ infornetion
7 FunctionalDescrlption
UP
POI,IER
DOWN
7.t Pov{Er OnrOff
Press and hoH @l button for 'l second can tum on/off the dispiay- The Dbplay can
EEfl,*
r_l
I i,
ir-
aulomalically shul down wh€n lhere i3 no opelale & rbe 'or X minules ( X '!uld be
0-9 )
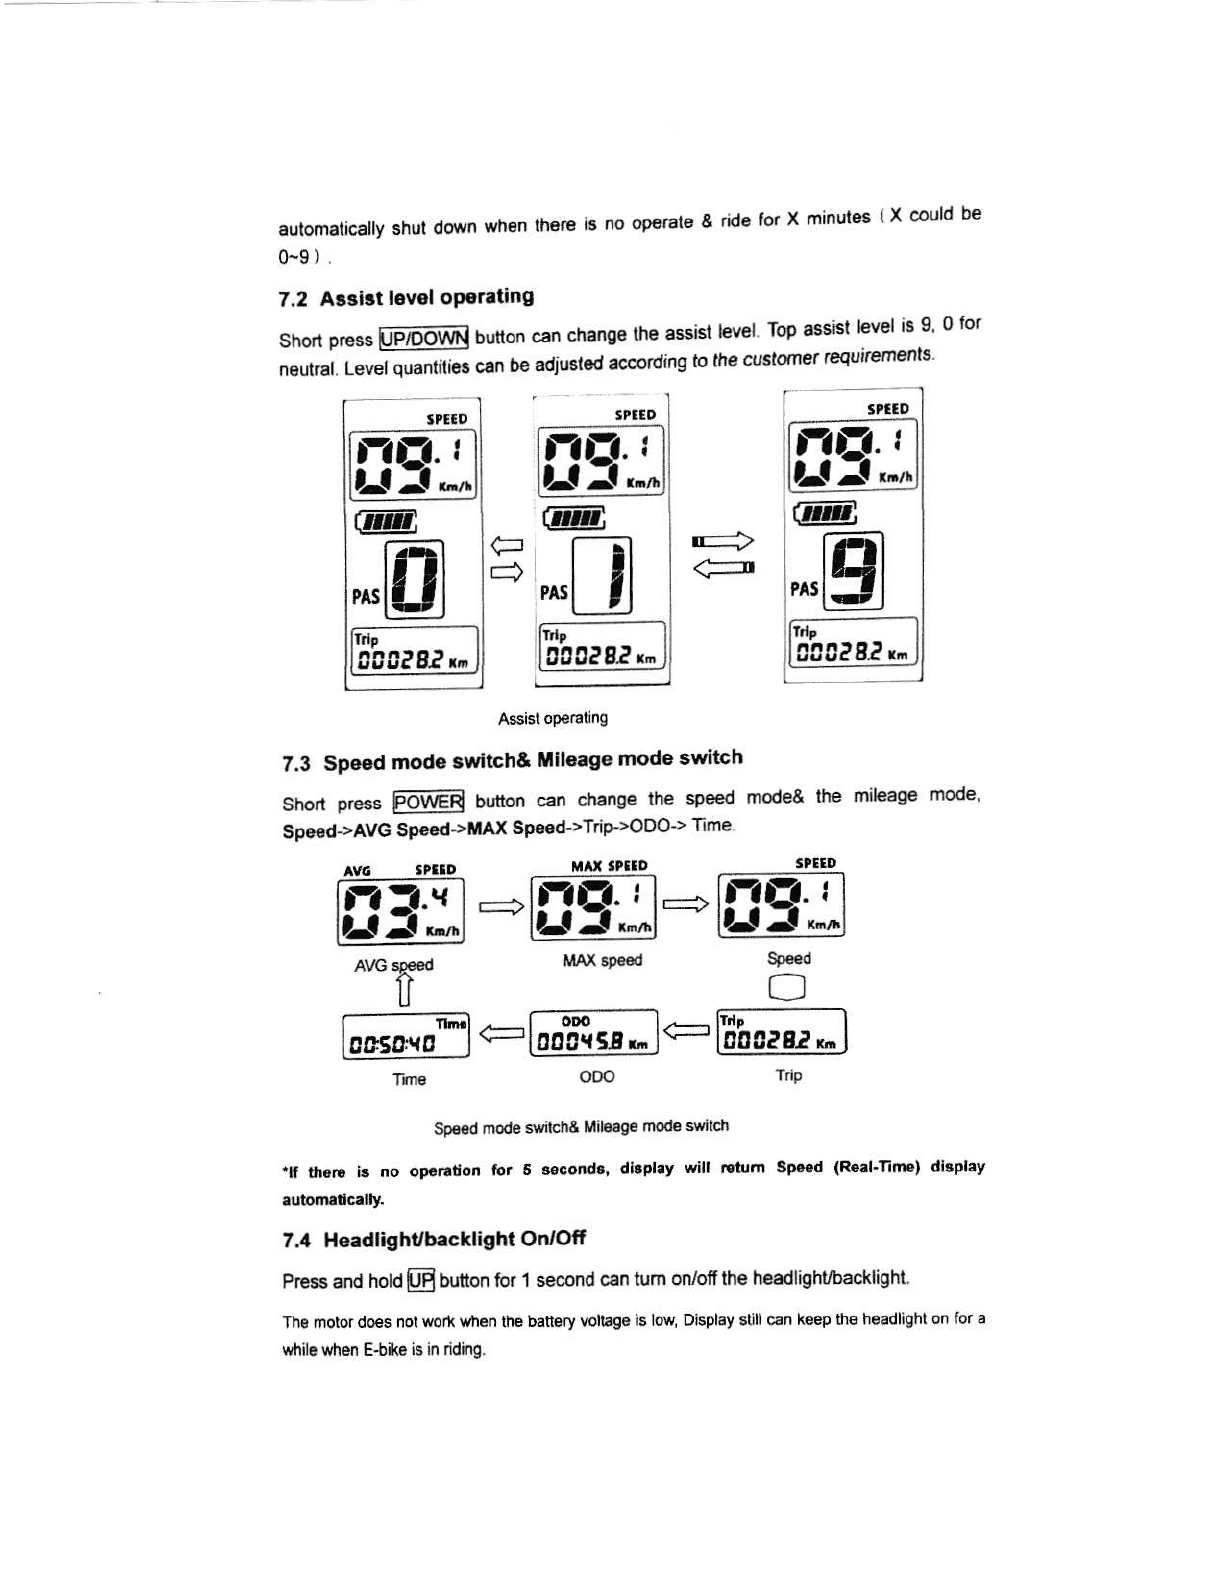
7.2 A.ailt l6vol oporaiing
srrort press @ uutlon can chtnge lhe assid bvel Top 696ist level is 9' 0 for
n"rtlal L"r"i *iti"! *n be adiusled according to the cugtorner requiremo'l9'
lI+
<_
Assist oPetallng
7.3 Speod mode switch& Itliloage modo switch
Snon press @l button can change the speed mode& the mileage mode'
Speed->AVG SpeedlirAx Speed->Tip>ODO>]'ime
- fjj-------l-
<-looa{srr. l''_-
oDo
Sp€sd mode swiich& Mil6rge modo *itch
'[ $6l! ilr no op.!id.n ior 5 .ecotld., dl.pllv will ,Etrtn sP..d (R6.1'llm€) .ll3plav
7.4 Headlighubacklight On Ofi
Pess and hold@ button for 1 second can tum on/off the headlighl./backlight
Tho motor do€s nol wbft eien the batlsry volLge is low DisPlay still c5n keep in€ headlighi on tor a
whil! wnen E$iks is in dding.
ffi*ffi*ri-E''l
L,-l.!*l
o
rr,l,-------l
100 0? 82 x. I
fr
lccsaro I
@
,*D
lt,----l
lccc?8rr.l
@B
,*m
ffi;;
+
stalo
m
@
ilg
ccc?8? r-
tk
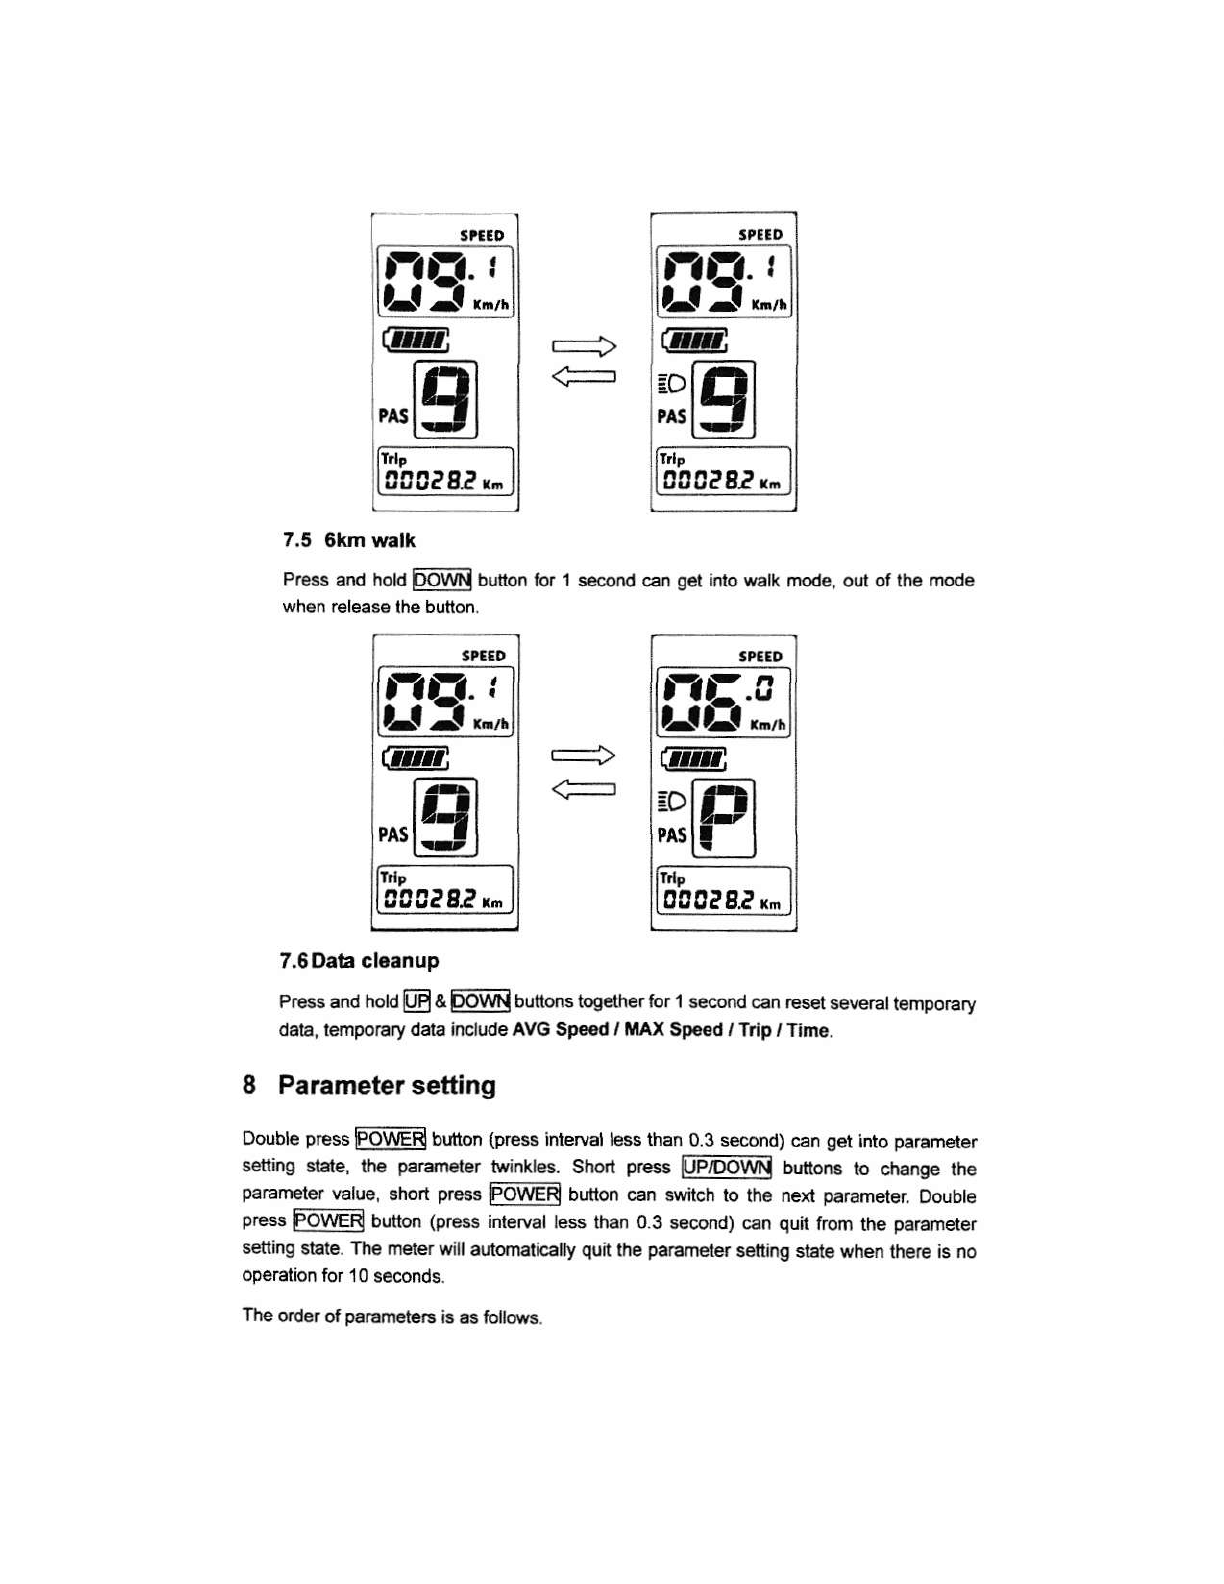
7.5 6km lra
Press and hoE E6ffilbutton lor 1
when releasalhebutton. second can get into walk mode, oul of lhe mode
lPaao
ffi
fimn
=DEil
PAsll I
OzBP I-
7.6Oata cl6.nup
eress ana mU @ a @lbuttons together for 1 second can r€set severat temporary
data, temporary data include AVG Speod , MAX Spood , Trlp , Timo.
8 Parameter setting
OouUte press @ Outton (press inteNal less than 0.3 second) c€n get into parameter
setting she, th€ parameler twinkles. Sho press EFOOW butons to change the
pa€meter value, short press @ buttoh can switch to the next parameter Doubte
press Fowpsl Outton lpress inlerval less ihan 0 3 second) can quit from the parameter
setting state. The meter will autornaticatly quit the paEmeter seiing staie when there is no
operation for 10 seconds.
Tle order of parameters is as follows.
3ta€D
m
ffin,
c--t
Psltl]
E t-;
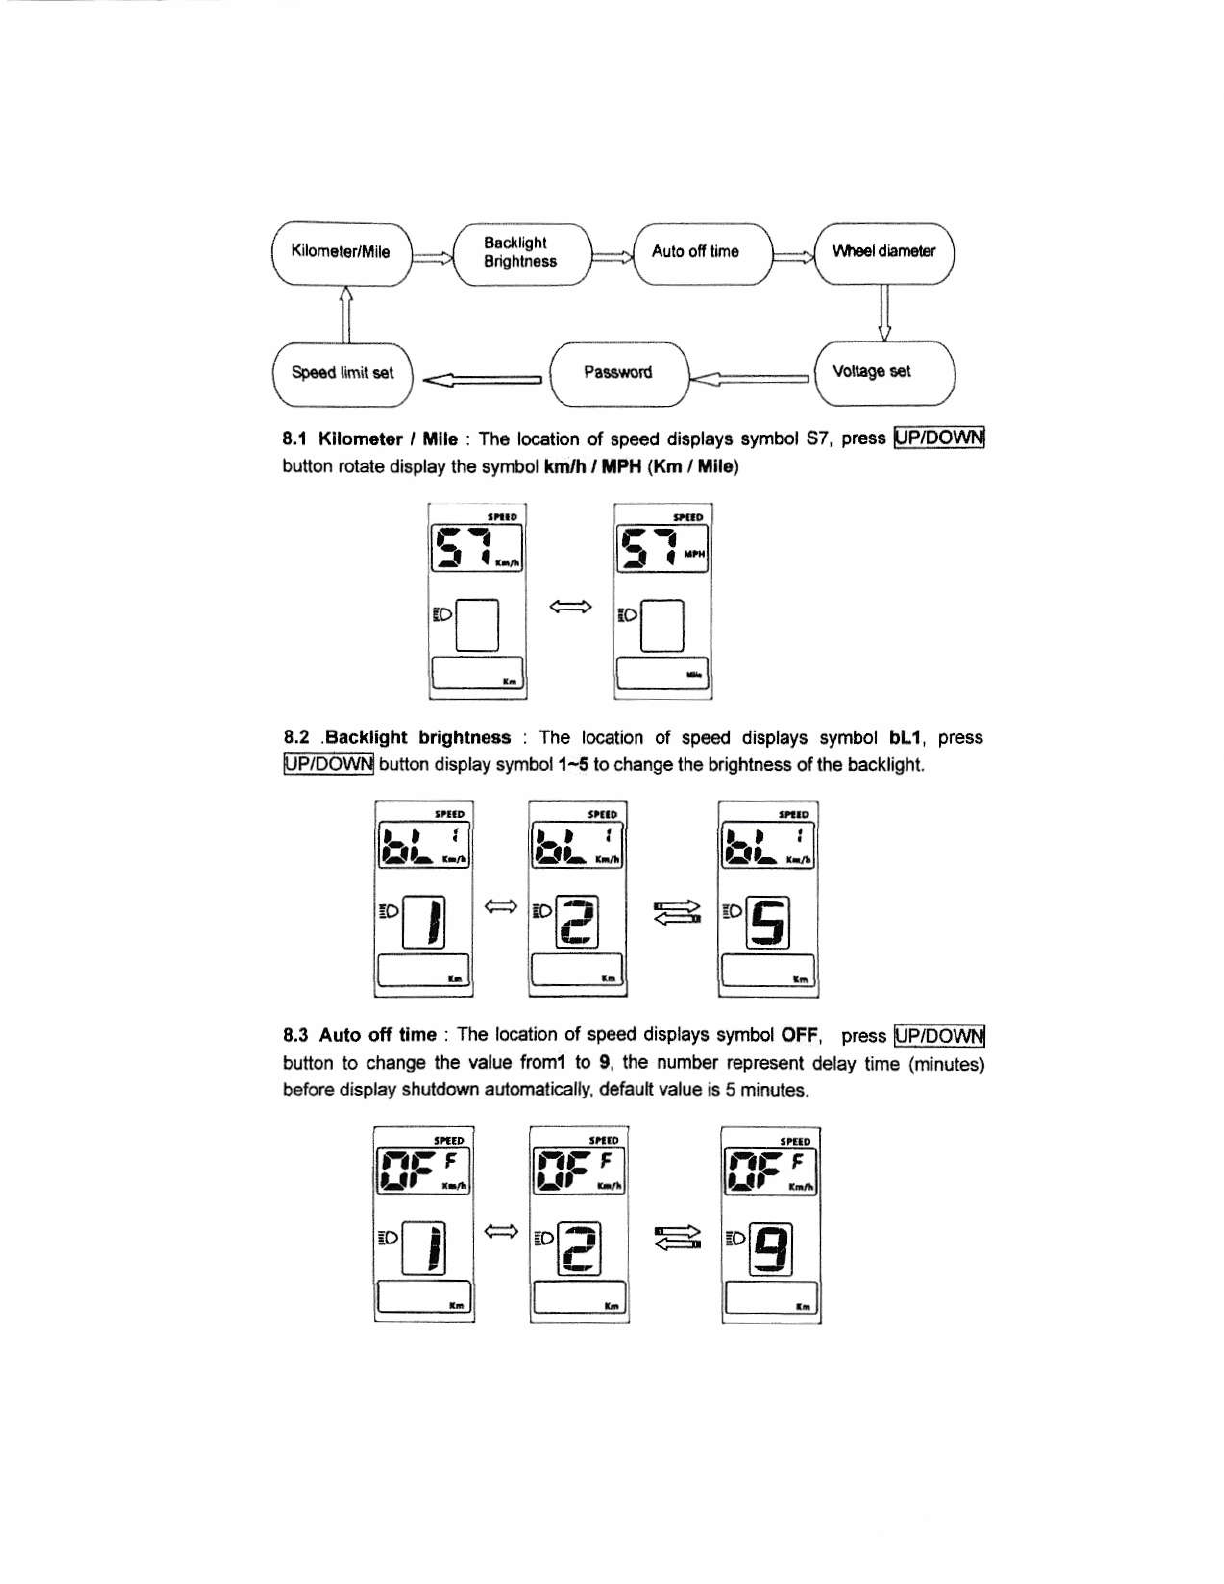
8.1 Kllornoter , llllle : Th6 location of speed display3 sy.nbol SZ press @i
button rolaie di8play lhe symbol kn h / PH (Xm / Mll.)
E]-
''T
8.2 .Backlight brightness : The location of sp€ed displays symbol bL1 press
UFlb6frid outton dlsptay symboll-5 to changelhe brightness oflhe backlight.
8.3 Auto off llme : The locstjon of speed displays syfibol OFF, press EEDoffi
button to change lhe valu6 from'l to 9, the numb$ represent delay time (minutes)
before display shuldown aulomalically. dafault value is 5 minut6s.
ht;
,D
frF',*
_- r---n
-Lll
hti
t.-r
rot tt
1l_ I
riF:
olFl
L:-,
[F:
*E

f.ii Whool dhmet6. : Th€ location ol spoed displayr rymbol Wd. preg3 lJ!@
button totato display the lyfif,;,l ltllgtz0n2nlflal mcr:lt ilo, val!. roprelont! lh€
diameter ol th6 whsel (inch). I^,rrong value lor wh6ol dismot€r will cau3€ lpe€d&milesge
6bnomal.
,n
0
-;J r----=-
16 .,1 F-Ztt
lluJ-l lllrJ-l
l-l-L
c+l-rrLc=l-rI
It II ItJ
ffi---:r ll;;--:r
r --=l
h--illl
trrrJ -ll
.= l,'-, lo
Ilt
E=
r-_--=lr--;lr-----=.tr-----;;
E---in 6 .rl b . lta .al
llrJ*l hJJ*ll luJ-ll l,JJyl
I.-, lol..- Io 1..-', l='l
r,r r rr r r "l'"l ]l
lt;__:tr ifi---:rl ffi] E
8,5 voltags s6t : The location of sp€ed displays symbol huo, press [FEoffilbutton
rctate display the symbol 24Vl36V/UbE, UbE means useriellned voltage setting, this
paBmeler can be set through computer.
8.8 Passwodlspe€d limilsot : The loc€tion of sp€€ds displaF symbol PSd, require
to input passwods, press [Edo-iN buttons to change the password value (o-9),
short press f@ button to switch the password iem, password is 4 digits, lhe
deiault password is "{919". Press FOIEF bubn when password adjuslment is
completed. Display will retum to the Voltege sel ilem if lh€ passwod is inconecl.
Correct password willenter lhe Sp€od llmltsel item.
P5*
-E
Eu:
,T
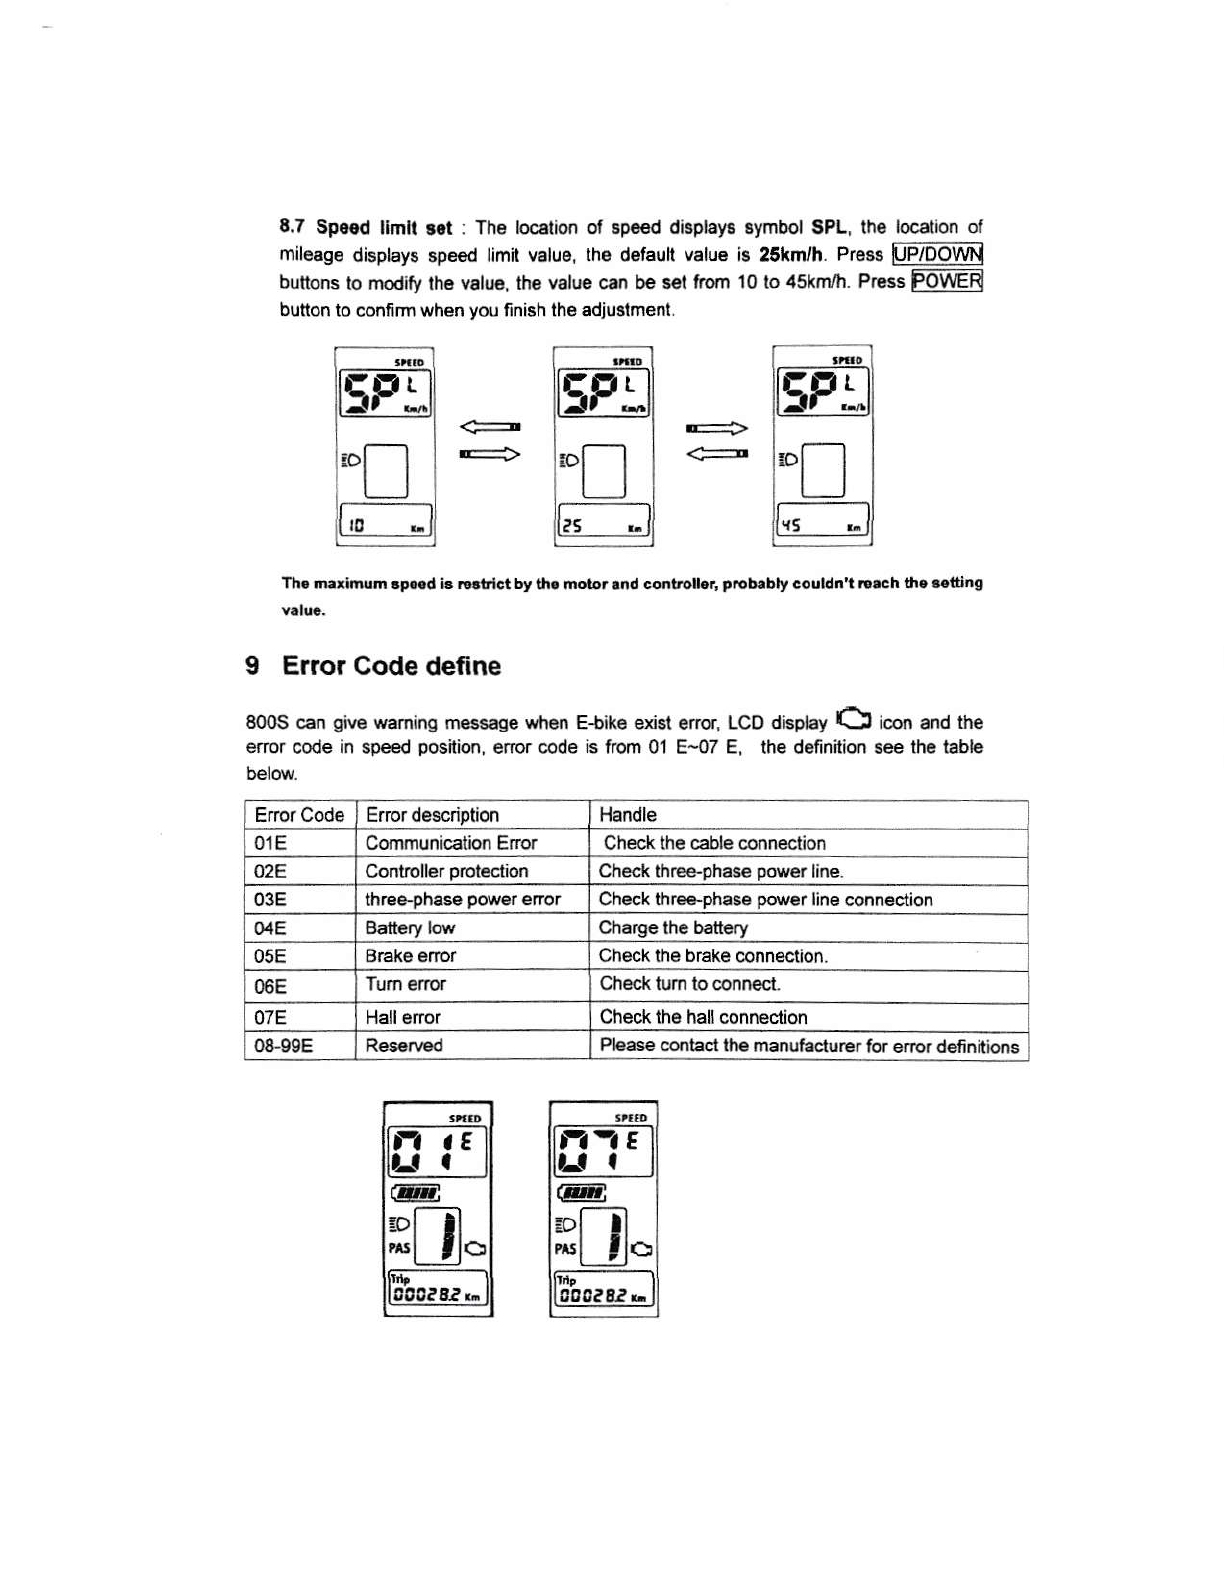
8.7 Sp6rd llmli tct : The locstion of sp6€d dbplays symbol sPL, the location of
mileags displays spe€d limit value, lhe defeult value is 25lm/h. Presa @
butlons lo modify lhe velu6, the value can be 351 trom lO to 45kn/h. Press FO_Ed
bunon to conlirm when you nnish lhe adjustmenl r -;I
ilEr:ll
-l---l
:l'l lI
ll,.-ll
L:: _
Tn. lnerlmuD !p..al b Mtri.t by ih. motor .nd coftoll.r, prob.Uy couldn't lllch th. .€tung
9 Error Code define
Boos can gav€ waming messsge when E+ike exist enor, LCO dispby O icon and the
error code in speed posilion, enor code is from 01 E-07 E, lhe defin ion see th. iable
ErrorCode Error description l_landle
01E Communication Er.or Check lhe cable connection
02E Controller proiection Check three-phase pow€r line.
03E three-phase power enor Check lhrce-pha6e power line conneclion
04E Battery low Charge the battery
05E Brake eror Check the bake connection.
06E Check tum to connect.
07E Hallerror Check lhe hall conneclion
08-99E Please contacl the manufacluaer for enor definitions
l-l !E
,Jt .
@
*D.
lfcsaB?,. ]
EF.I
'T EF.!"
'f
Other manuals for TrailX750
1
Table of contents
Other Merkava Bicycle manuals


