RKS CD15 User manual

CD15
USER MANUAL
E-BIKE
www.rksmotor.eu


01
Thank you for sharing the space of your beautiful life with our electric bike. Owning,
riding and sharing this bike is a pleasurable experience.
This E-bike is equipped with an electric pedal speed sensing system to enhance your
cycling experience when you pedal. It means, while you are pedaling, you will find the
movement effortless as the motors will rotate as per your pedaling speed. A more
comfortable way of riding this bike would be by using the throttle. This means complete
electric transmission and you can enjoy the ride as effortless as it can be and also enjoy
the nature you pass by. You can ride to work, shop or just participate in leisure activities,
go to a picnic or carry this behind your vehicle to trail the ranges of the peak next door.
Perhaps you might not be very familiar with an E-bike, let's get to know it in a better
fashion.
Safety is our prime concern so the bike comes with auto braking power cutoff system
and is functional with key and a power button.
We wish you a pleasant ride and most importantly, do not forget to have fun!

02
CONTENTS
Components ..........................................................................................03
Specifications.........................................................................................04
Control panel..........................................................................................05
LCD Functions description……………………………………….06
Content introduction……………………………………………...06
Battery....................................................................................................09
Assembly Illustration. .............................................................................12
Maintenance...........................................................................................14
Periodic Maintenance.............................................................................15
Warning………………………………………......................................…..15
03
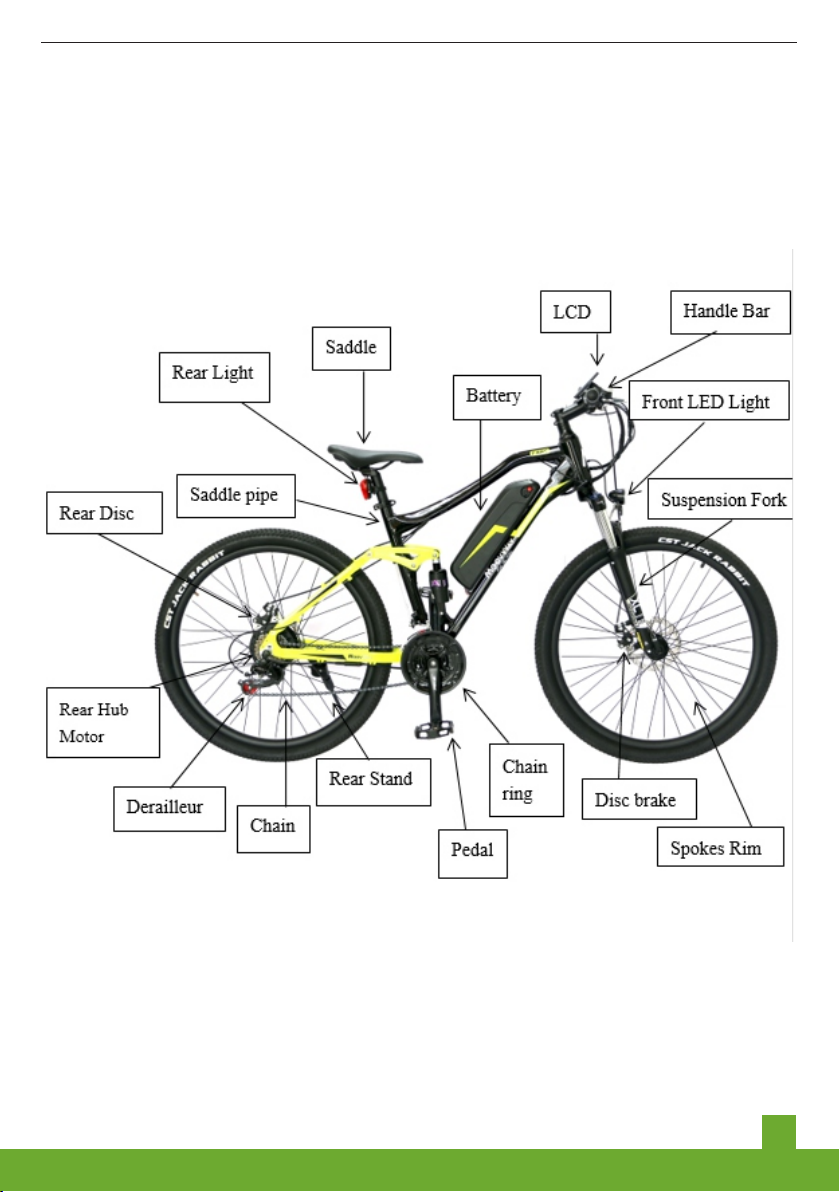
COMPONENTS

04
SPECIFICATIONS
•Frame:
•Alumnum 6061 – lfetme Rust free wth Alumnum seat post and hyper cushon
seat
•20 nches support structure wth foldng opton for easy carrage.
•
•Brakes:
•Front Dsk - Mechancal
•Rear Dsk - Mechancal
•
•Modes:
•3 speed access (Throttle)
•Sngle mode Pedal Assstance (PAS)
•
•Tres:
•20 nches dameter wth 4 nches fat tyre wth Magnesum spokes rm
•CST BFT Jack Rabbt Mountan tral heavy duty tyre for all surface road.
•Alloy Rms steel spokes wth heavy duty grd lnes avodng punctures
•
•Dsplay:
•LCD modes wth odometer and trp functon
•LED Flashlght n the front
•
•Battery:
•36V 10.4Ah wth 12 months warranty
•5.5 hours chargng tme
•Consumpton per charge - 1 Unt electrcty (Rs.5-8/Charge)
•
•Range:
•45-50km usng complete throttle for 3 modes
•Upto 70km usng Pedal Assstance (PAS)
•
•Motor:
•36V 250Watt
•Rear hub motor
05
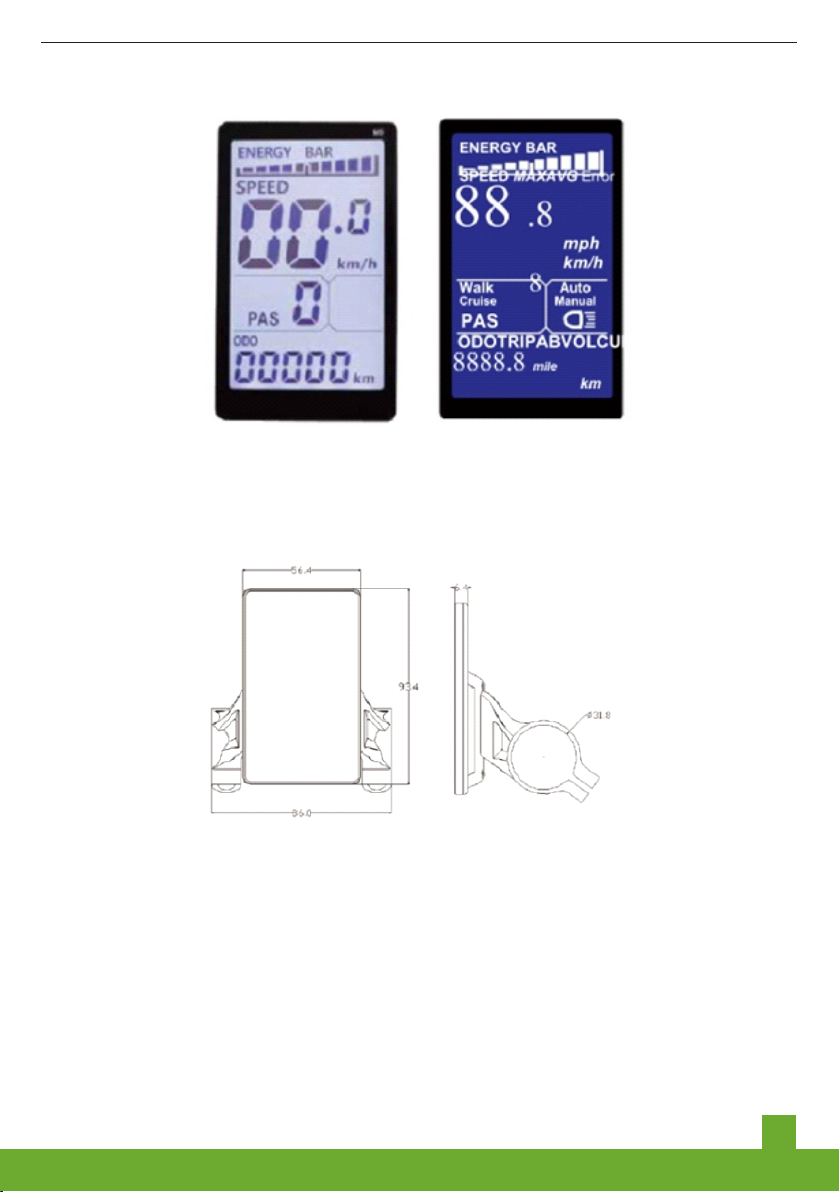
Control Panel (LCD)
The outer shell of the display material is ABS, Liquid crystal transparent window material
with synthetic acrylic is used to build the display.
Front View Side View
06
LCD Functions description
1. Display function - Speed display, power level display, power indicator, failure
warning, total mileage, single mileage, headlight display, single driving time display.
2.Control, setting up functions - Power switch control, headlight switch control, 6Km/h
point control, wheel diameter setting, maximum speed setting, idle automatic
hibernation time setting, backlight brightness setting, voltage level setting
3. :UARTCommunication protocol
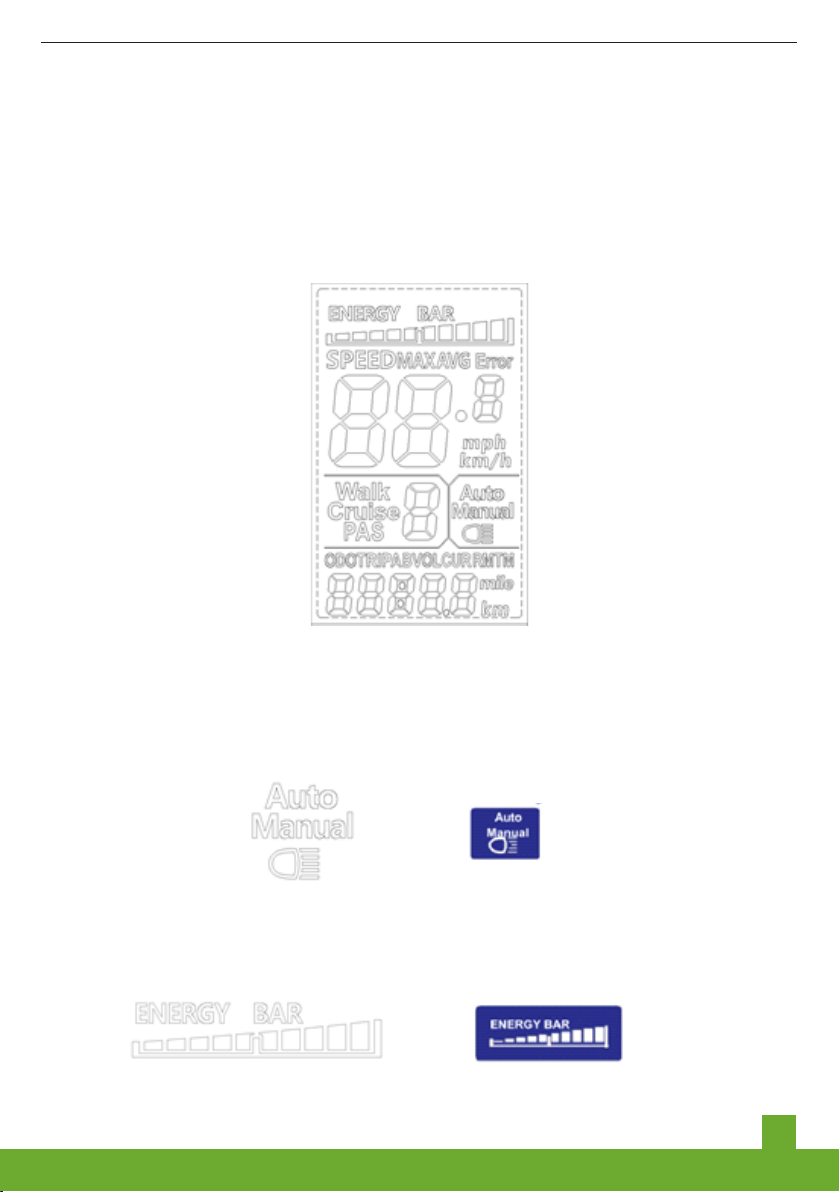
All the contents of the display screen (full display in boot 1S)
Content Introduction
3.1 Headlight - The instrument can be manually turned on and the brightness of the
sensing environment is automatically turned on (light sensitivity support required for
this function).
3.2 BATTERY Power Display

07
3.3 Multifunctional Display -
Total mileage - ODO
single mileage - TRIP A, single mileage - TRIP B
Battery current voltage - VOL
current operating current - CUR
remaining mileage - RM
Instrument boot time - TM
3.4 Vehicle Mode
Walk boost mode – Bicycle riding with 21 gears.
Cruise: constant speed cruise mode applied with throttle and pedal assistance
PAS: Power file position: 0 ~ 9 adjustable Pedal Assistance
3.5 Speed display
Maximum speed – MAX, Average Speed – AVG
Speed Measuring Unit – mph, km/h
The meter calculates the speed of the e-bike based on wheel rotation and data
transmission from the speed sensor.

0108
3.6 Vehicle Status Display
Vehicle status Code Descriptions
5S Protocol State (Code with description)
Status
Code(Decmal)
Actual State
Remarks
0
Normal
1
Reservaton
2
Brakes
3
Power Sensor Fault (Rdng Mark)
Not Realzed Here
4
6KM/H cruse
5
Real-tme crusng
6
Battery Under voltage, PCB overload
7
Motor falure
8
Turn malfunctonng
9
Controller falure
10
Communcaton recepton falure
11
Communcaton dspatch falure
12
BMS communcaton falure
13
Headlght falure
Status
Code(Decmal)
State Meanng
Remarks
33
Current anomaly
34
Turn the anomaly
35
Motor phase defcency
36
Motor Hall anomaly
37
Brake anomaly.
30
Communcaton anomaly

09
3.7 Factory Settings
BATTERY
Samsung INR18650 Type A 10S4P Arrangement wth under current and over voltage
protecton board.
Attenton!
Be careful to the electrical shock, do not disassemble the charger by yourself.
Contact your dealer in case of any emergency.
Battery precautons!
Batteres must not be burned but recycled.
Batteries should not be placed in environments with temperatures over 50
degrees Celsius.

10
Batteries and dry batteries should not be thrown in non-dedicated
garbage bins.
Batteries should not be exposed to water or placed in water.
Avoid battery complete discharging (excessive or deep discharge),
otherwise it will damage the battery life cycle (this is not within the
scope of quality assurance).
Charge after each use and if the e-bike is not in use, charge the
battery for at least four hours every month
Chargng of battery
The e-Bike is equipped with lithium battery to power the motor of 36v match. Compared
to other batteries, lithium battery has no "memory effect" and can be recharged even if
the charge is not completely exhausted.
After several times of charging and discharging, the battery can achieve the best
performance. It is better to charge fully for the first time. The charger will turn off
automatically when the light of charger turns red to green as an indication of full charge.
Instructions
• Firstly, connected the charger with the battery. The charging port of lithium
battery is located behind and below the battery cases' base, which is assembled
with IP 67 water-proof cover and dust proof sealant.
• Insert the charger pin into power socket.
• During charging, the charging indicator of the charger is red, indicating that
charging is in progress; when the charging indicator of the charger changes from
red to green, the battery is fully charged.
• After charging, please unplug the charger from power socket first and then unplug
the charger from the battery.
If the LED light does not turn on red, it is due to overheating of the
battery, and the
battery need to be cooled for a period of time before charging.

11
There is a state-of-charge indicator on the battery power display. Press the power
button to check the battery state, and the LED lamp displays the battery state:
3 LED = battery 100% charging.
2 LED = battery 40~70% charging.
1 LED =battery 0~40% charging.
Calculations: The conventional lithium battery chargers are
2A chargers. If the battery capacity is 10AH, it will take at least 5.5 hours to be fully
charged.
If the LED light is not on, it is indicated that battery should be charged
for without electricity
Battery nstructon
In order to avoid short circuit, do not let the positive and negative terminals of the
battery come in contact.
The battery is waterproof to prevent rain from penetrating. The water- proof
rating is IP64 (no harm caused by water splashing in any direction), so you can use
your bicycle on rainy days. Because the waterproof level of the battery case is
waterproof splashing, when the battery is exposed to water in rainy day, there is a
danger of disconnection. It is necessary to avoid rain in time and strengthen the
external water-tight measures of the battery case.
The battery causes no harm to environment since it use clean energy.
However, it should be recycled after the complete life span.
Under ideal conditions, the battery can be charged about 550 times. With
time and frequent usage, the current capacity of the battery will gradually decrease.
This is called depreciation of cells. Finally the entire battery needs to be replaced.
Do not place the battery in a high temperature environment (> 50 °C), such
as heating, direct sunlight and sources of ignition. Do not remove the battery. Please
consult your dealer if you have any questions. Please store the battery in a cool and
dry place in case you are not using it for a longer time and only use the charger
provided by the manufacturer to charge the battery.
0 0
All specifications noted are valid for 25 C – 35 C usage temperatures.
Note - Normally, the battery power supply capacity will be reduced by 1% for
every
1 C temperature reduction.

12
ASSEMBLY ILLUSTRATION
1. After opening the box, put the front wheel and saddle beside the frame
2. Installaton of front wheel: Take out the dsk brake, whch s shown n the pcture.
Stuck the hub nto the center of the end of front fork, along wth the forward drecton
of the tre thread. Stuck the hub nto the center of the end of front fork, along wth the
forward drecton of the tre thread.Infix the quck-release lever from your rght-hand
sde, adjust the front wheel to the center of the front fork, and tghten the nut, lock the
quck-release handle from 90 degrees upwards.
3. Installaton of handle bar wth stem : Use the nner hexagon wth no.4 wrench to
remove the small four-pont screw and alumnum cover of the stand ppe, adjust the
angle of the handlebar, fix the small four-pont screw and alumnum cover wth 4MM
hexagon socket wrench.
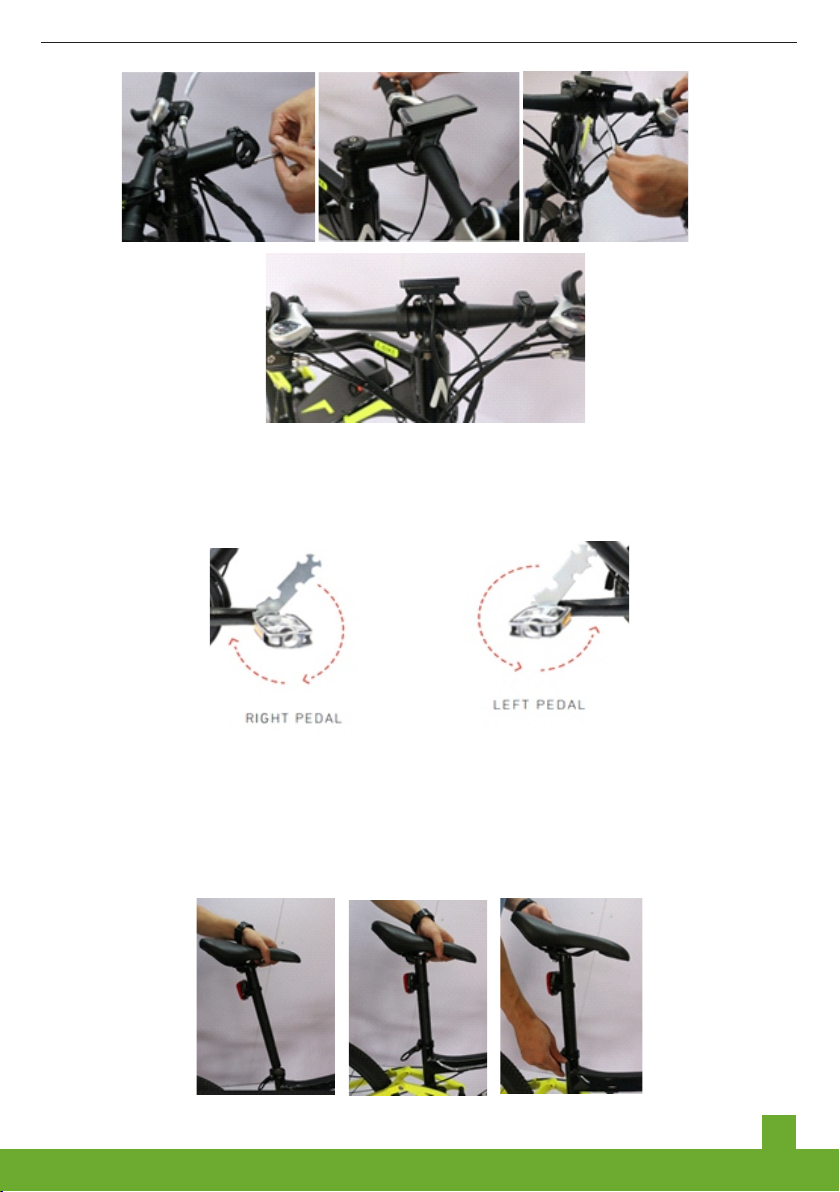
13
4. Installaton of Pedal: After dsassemblng the pedal, you wll see there are left and rght
sgns on the pedal. The left sde s marked L, the rght sde s marked R. Rotate and lock
the left pedal n counterclockwse drecton, and the rght pedal n clockwse drecton
tghten as per standard. Do not over tghten, t may lead to wreckng of the nternal
threads.
5. Installaton of Saddle/Seat: The saddle and seat ppe s combned as the finshed
product, you only need to open the mddle tube quck release lever. Insert the saddle
tube nto the mddle tube, adjust the heght, do not lower the seat than the secure lne,
adjust as per requred heght. Lock the quck release to fix the saddle untl you cannot
twst the saddle wth both of your hands.

14
6. Installaton of battery: After openng the battery package, the drecton of the keyhole
s upward.The battery case s fixed on the lower tube. There s a card poston movng up
and down between the battery case and the base.Once you find the card poston, stck
the battery onto the base and squeeze n the downward drecton.Lock the key n the
drecton of the "LOCK" and fix the battery case.
Unplug the key and keep t.
Indcaton on the battery pack: "O" s the OFF state, and "-" s the ON state.
7. Remove the battery: Use the key to nsert the keyhole and rotate t to OPEN to unlock
t. Use the battery case to pull the battery up and forward to remove the battery. Then
hold the battery case wth both hands and pull the battery upwards to remove the battery.
MAINTENANCE
We recommend you to vst the dealer after one month of purchase. It s advsed to
perform the first perodc mantenance after 1 month of ntal use and a second
mantenance after 2 months of usage and once n 2 months followng. Regular
nspectons can avod unnecessary damage and repar costs afterwards. Keep your e-
bke n neat condton and avod settlng of dust, greasng the necessary parts are very
mportant and do make sure, you never mss a perodc mantenance wth your dealer.
Ths wll enhance the usablty. Here are a few tps for your reference.
•Check f the hanger fixng screws are loose or they fell off. Check f the fixng screws of
the battery cases’ base are loose.
•Check f the battery s charged accordng to the correct procedure n the manual and
stored n a place wthn the permssble temperature.
•Do not let the drt enter the gap between sensor and bottom bracket (Mddle of the Pedal
arms). Clean t regularly.

15
PERIODIC MAINTENANCE
•Check the wres for looseness and wear. Use dshcloth and warm water to clean stans
on meter, pedal sensors, battery boxes and wres.•Do not use hgh-pressure water guns
to clean parts where connectons are exposed. Please clean them wth a normal brush
and then dry the bcycle wth a soft cloth.•Please clean the batter surface wth wet
dshcloth or use degreaser n case there s a deep cleanng requred.•If any drt s found
around the sensor, t should be cleaned up n tme to avod sand and dust nfiltraton and
abrason of the sensor bearng. Ths leads to malfuncton of coordnaton n the motor
controller unt and other components.
WARNING
•Please read ths manual carefully and follow the nstructons.
•After usng the electrc bcycle, please turn off the meter power supply and turn off the
man power swtch on the battery to prevent the chld from turnng on the meter/mssng
the crank and rotatng the electronc throttle. At ths tme, the e-bke wll move forward
suddenly and cause an accdent.
•If you want to charge the battery, please use the charger provded wth your e-bke
durng purchase.
•Do not use a hgh-pressure water gun to clean the bcycle. Hgh pressure water guns
can damage the electronc components of the bcycle. Such damage s not covered by
the warranty.
•Improper use can be dangerous for you and others. In addton, damage caused by
mproper use s not covered by the warranty.
•When usng another battery, you can only use the orgnal battery suppled by Electro
Motorad.
•Do not make the charger, battery and electronc components to come nto contact wth
water or other lquds.

E-BIKE
MANUFACTURER COMPANY
RKS Otomotiv Insaat Sanayi Ve Ticaret A.S.
4. Organize Sanayi Bolgesi 83422 Nolu Cad. Sehitkamil / Gaziantep / Turkey
www.mj.com.tr
www.rksmotor.eu
Table of contents
Other RKS Scooter manuals


