RKS RS I-X User manual

RS I-X / PRO
RS III / PRO
RS IV
USER MANUAL
www.rksmotor.com.tr

01
TABLE OF CONTENT
About Ths Manual
Why You Should Read Ths Manual?
Warnng, Important Safety Informaton
Model Types-Dagram
Operatng Instructon
Important Notces / Helmets
Rdng
Battery and Power Indcator
PAS (Pedal Assst System)
Pedal Installaton
F E-B O F E-BHow to old the ike ( nly for olding ike)
Shfter (If has)
Deralleur System
Front Wheel-Quck Release
Brake Adjustment
Rear Carrer-Lght
Saddle Poston
Mantenance
FAQ
Servce & Mantenance Schedule
Problems and Remedy
About Dealer and Informaton Card
.......................................................................................................2
.................................................................................................3-5
...........................................................................................................................6-8
.....................................................................................................................9
......................................................................................................................................................11
...................................................................................................................13-16
....................................................................................................................16
.....................................................................................................................................18
..................................................................................19
...........................................................................................................................................20
...................................................................................................................................21
...................................................................................................................22
...................................................................................................................................23
...................................................................................................................................24
......................................................................................................................................25
..........................................................................................................................................26-27
........................................................................................................................................................28
..................................................................................................29-34
....................................................................................................................35-39
....................................................................................................40

02
TABLE OF CONTENT
Ths manual s wrtten to help you to get the best performance, comfort, enjoyment and safety when rdng
your new E-Bke. The manual descrbes specfic care and mantenance procedures that help protect your
warranty and ensure years of trouble free use. Please pay partcular attenton to the secton on battery
chargng and mantenance.
It s mportant for you to understand the features and operaton of your new E-Bke so that you can get
maxmum enjoyment wth maxmum safety. By readng ths manual before you go on your first rde, you’ll
know how to get the most from your new E-Bke.
It s also mportant that your first rde on a new E-Bke be taken under a controlled envronment, away from
cars, obstacles and other cyclsts.
WARNING
WHY YOU SHOULD READ THIS MANUAL
Cyclng can be a hazardous actvty even under the best crcumstances, Gvng Proper mantenance to
your E-Bke s your responsblty as t helps to reduce the rsk of njury. Ths manual contans many
“Warnngs” and “Cautons” concernng the consequences of falure to mantan or nspect your E-Bke.
Many of the Warnngs and Cautons say “you may lose control and fall” Because any fall can result n
serous njury or even death, we do not repeat the warnng of possble njury or death whenever the rsk of
fallng s mentoned. Please note that those rsks are present.

03
IMPORTANT SAFETY INFORMATION
Your new E-Bke ncorporates many features and functons that have never been bult nto a bcycle before.
Read ths manual thoroughly to understand how those features enhance your rdng pleasure and safety.
Always Wear a Helmet!
Helmets sgnficantly reduce the possblty and severty of head njures. Always wear a helmet that
comples wth your state laws when rdng the E-Bke.
Check wth your local polce department for requrements n your communty.
Do not wear loose clothng that can become tangled n the movng parts of the E-Bke. Wear sturdy shoes
and eye protecton. Also check your state laws concernng other protectve wear that may be requred when
rdng the E-Bke.
Know Your E-Bke!
Rde Defensvely!
One of the most common cyclng accdents s that when the drver of a parked car opens hs door nto a
rder’s path.
Understand the features of your E-Bke and become aware of the challenges that you wll meet on the road.
There are many thngs you can do to protect yourself whle rdng. We wll offer many recommendatons and
safety tps throughout ths manual. The followng are those that we beleve are the most mportant.
Your E-Bke can provde many years of servce, fun and fitness-f you take good care of t.

04
IMPORTANT SAFETY INFORMATION
Keep Your E-Bkes n Safe Condton
Cyclsts are requred to follow traffic rules. Addtonally, some communtes regulate the use of motorzed
bcycles regardng mnmum age requrements and necessary equpment. Check wth your local polce
department for specfic detals.
Make Yourself Easy To See!
Make yourself more vsble by wearng brght reflectve clothng. Keep your reflectors clean and properly
algned. Sgnal your ntentons so other drvers and other cyclsts can notce your actons.
Another common occurrence s when a car or another cyclst moves suddenly nto your path. Always be
aware of other vehcles around you. Do not assume that drvers or other cyclsts see you. Get prepared to
take evasve acton or stop suddenly.
Rde wthn Your Lmts!
Take t slow untl you are famlar wth condtons that you encounter. Be especally careful n wet
condtons as tracton can be greatly reduced and brakes less effectve. Never rde faster than condtons
warrant or beyond your rdng abltes. Remember that alcohol, drugs, fatgue and nattenton can
sgnficantly reduce your ablty to make good judgments and rde safely.
Follow the nspecton and mantenance gudelnes begnnng on page_9_. Check crtcal safety
equpment before each and every rde.
Know the Law

05
IMPORTANT SAFETY INFORMATION
Correct Frame Sze
For safe and comfortable rdng there should be a clearance of no less than 1-2 nches between the gron
area of the ntended rder and the top tube of the bcycle frame, whle the rder straddles the bcycle wth both
feet flat on the ground.
The deal clearance wll vary between types of bcycles and rder preference. Ths makes straddlng the
frame when off the seat easer and safer n stuatons such as sudden traffic stops. Women can use a men’s
style bcycle to determne the correct sze.
When selectng a new E-BIKE, the proper frame sze s a very mportant safety consderaton. Most full
szed bcycles come n a range of frame szes. These szes usually refer to the dstance between the center
of the bottom bracket and the top of the frame seat tube.

06
MODEL TYPES
RS I-X RS I-X PRO
RS III RS III PRO RS IV
DIAGRAM
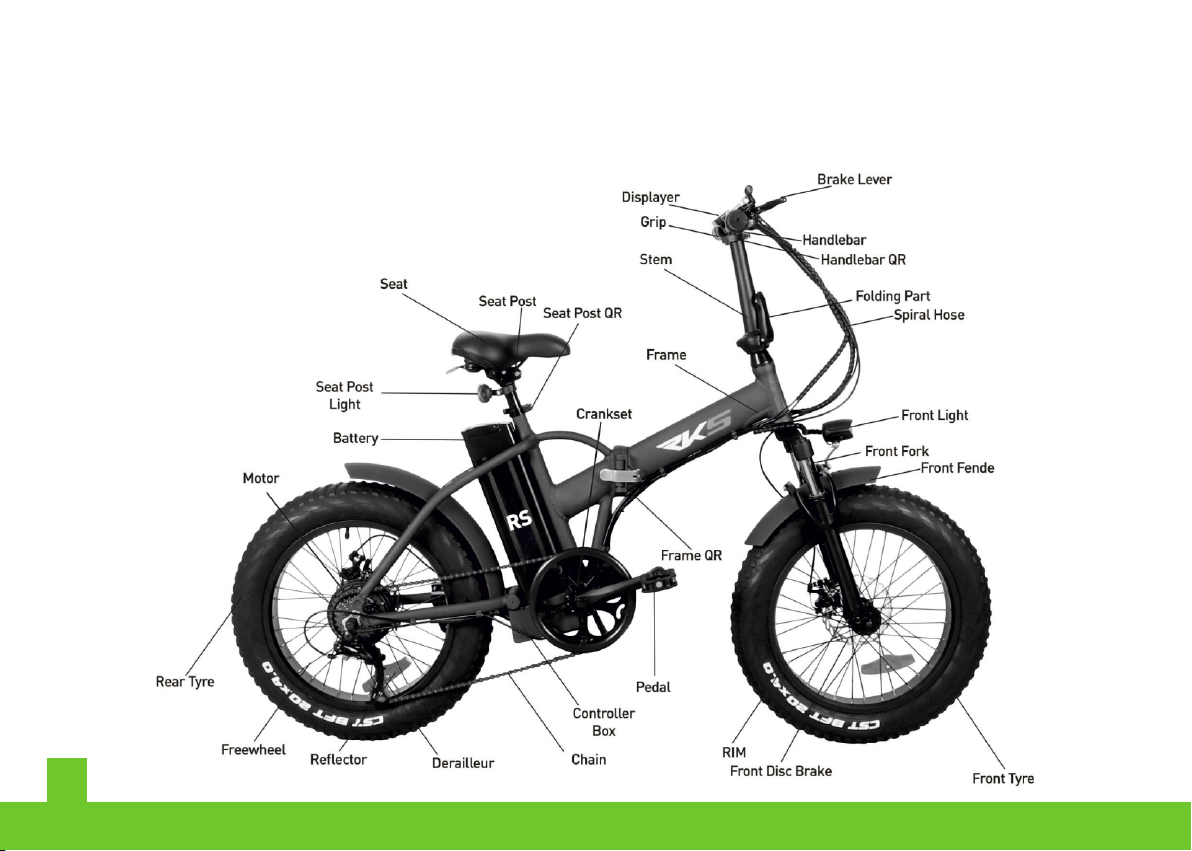
PARTS DIAGRAM OF FOLDING E-BICYCLE
07
08
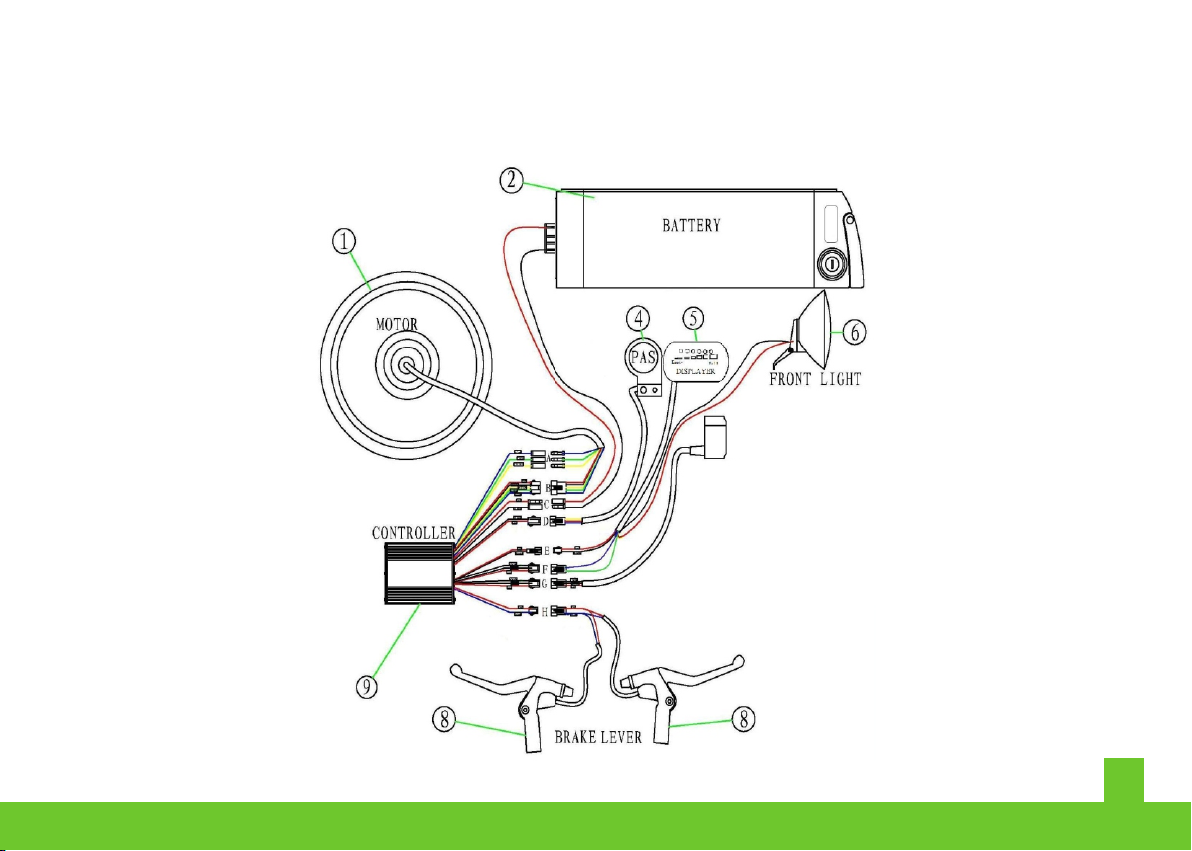
DIAGRAM
WIRING DIAGRAM

09
OPERATION INSTRUCTION
Please read and understand these nstructons completely before operatng your E-bke to prevent
serous njury to yourself and others, and to prevent damage to your E-Bke.
IMPORTANT NOTICES
• Always recharge the battery mmedately after each use. Falure to do so may damage the battery.
HELMETS
• The charger can reman plugged-n for trckle-charge purposes durng long perods of storage.
Always wear a properly fitted helmet whch covers the forehead when rdng an E-BIKE.
Many states requre specfic safety devces. It’s your responsblty to famlarze yourself wth the laws of
the state where you rde and to comply wth all applcable laws, ncludng properly equppng yourself and
your bke as the law requres.
• For storage perods over 1 month, the battery should be checked and fully recharged before rdng.
It’s strongly advsed that a properly fitted E-Bcycle safety helmet be
worn at all tmes when rdng your E-Bcycle. The correct helmet should:
- Be comfortable
- Be lghtweght
- Have good ventlaton
- Ft correctly
- Cover forehead

10
OPERATION INSTRUCTION
Reflectors are mportant safety devces whch are desgned as an ntegral part of your E-bke. Federal
regulatons requre every bcycle to be equpped wth front, rear wheel and pedal reflectors. These reflectors
are desgned to pck up and reflect street lghts and car lghts n a way that helps you be seen and recognzed
as a movng bcyclst. Checkng reflectors and ther mountng brackets regularly to make sure they are
clean, straght, unbroken and securely mounted. Replace damaged reflectors and straghten or tghten any
that are bent or loose.
Reflectors
Your E-bke s suppled wth one front, one rear wheel reflector,and four pedals reflectors. These are
mportant safety and legal requrements, and should reman securely fitted and n good, clean condton at
all tmes. Perodcally nspect all reflectors, brackets and mountng hardware for sgns of wear or damage.
Replace mmedately f damange s found. Some bcycles wll requre you to nstall your reflectors onto your
bcycle. Please refer to the followng secton for nstructons on all types of bcycle reflectors.

11
OPERATION INSTRUCTION
Be famlar wth all the spare parts of the E-bke and test all the electrc functons
before rdng. Make sure all the spare parts for the bcycle are n good condton,
such as battery power, and tre pressure. The detaled operaton s as follows:
Start-up
Rdng Method
turn to “ON” poston, f the power dsplay lghts on, then power supply s normal.
Insert the key nto power swtch at the rght sde of battery box, ¤OR
Start-up by pedal assstance: After turnng on the power, you can use your pedals
to start-up the E-bke, then you can control your speed wth pedal, as well as by
pedalng the bcycle faster. but please do not pedal too hard, n case t may
damage the components of e-bke snce t s manly motor drven.

12
OPERATION INSTRUCTION
1.Speed should be ncreased slowly after start-up, n order not to waste energy and damage electrcal
components, t s much better start-up wth pedal assstance.
ŸDo not use the pedals and brake together whle rdng, you can release the pedal first, and then brake. In
order to
Rdng Attenton on the Road
1.Shut off the power swtch after you get off. In order to prevent accdents caused by startng up the bcycle
abruptly.
ŸWhle stayng safe, try to reduce frequent brakng and start-up whle rdng, n order to save energy.
Ÿnot overload motor or damage other E-bke’s components.
2.Do not start-up bcycle frequently whle statonary, to ensure the servce lfe of battery, motor and electrc
swtch.
Parkng Attenton
2.The pedal assstance facltate the clmbng hlls or steep terran, n order to prolong the servce lfe of
battery and the motor.
ŸMoreover a rear brake system has been nstalled to the e-bke, t wll automatcally cut off power supply to
the motor and
ŸTo stop the E-bke, you can release the pedal by turnng clockwse, the speed wll slow down and stop.
ŸOptmum weght s 75kg (ncludng the rder weght), please do not overload.
Ÿslow down when you pull the brake, then the rear brake n the back wheel wll stop the E-Bke.
3.Shut off the power after parkng, and remove the key.

OPERATION INSTRUCTION
One s to take out the battery then charge, the other s to charge the battery on e- bkes.
Battery Chargng
When the rde s over or the battery s runnng out, charge battery mmedately.
There s an LED ndcator on the battery charger unt.
The LED s red when the power s connected and the battery s chargng.
*Do not charge contnuously for more than 18 hours.*
SLA (sealed lead acd) recommended chargng tme:6-8hours
L-LON recommended chargng tme:5-6 hours
Connect to a 100-220V/50-60Hz power source (dependng on your regon).
When the LED turns green, the battery s fully charged.
Connect the charger plug to the battery chargng port and the AC.
Chargng methods can be dvded nto two knds:
After chargng, unplug the nput plug first (from the outlet), then unplug the output connector (from the bke).
The battery charger must have constant voltage. Fluctuatng voltage or fluctuatng power supply of any knd
may damage the battery storage cells.
13

14
OPERATION INSTRUCTION
Checkng the Battery Pack Before Usng for the Frst Tme
ŸThe battery pack s provded partally charged. To ensure full battery pack capacty, completely charge the
battery pack before usng for the first tme.
Battery Care
L-LON recommended chargng tme: 5-6 hours
ŸFor a complete,100% chargng, leave the battery on the charger for one full hour after the charger ndcator
lght turns green.
ŸDstrbutors should charge the batteres as soon as recevng the E-bke from suppler.
Ÿ*Never charge batteres for longer than 24 hours*.
ŸThe rated output capacty of a battery s measured at 77”F(25”C).Any varaton n ths temperature wll
WARNING
SLA(sealed lead acd)recommended chargng tme: 6-8 hours
ŸL-on batteres do not have a ‘’memory.’’ Partal dscharge/charge cycles wll not harm the batteres’
capacty or performance.
ŸEven wth proper care, rechargeable batteres do not last forever. Every tme the battery s dscharged and
subsequently recharged, Its relatve capacty decreases by a small percentage. You can maxmze the lfe
of your battery by followng the nstructons n ths gude. Battery should be fully charged mmedately when
they are receved for the full recommended charge tmes.

15
OPERATION INSTRUCTION
Insertng, Unlockng and Removng the Battery
ŸInsert the key nto the keyhole
ŸAlways be sure to turn the bke power swtch to “OFF” after each use. If you leave the power swtch the
“ON” poston or your E-bke has not been charged for a long perod of tme, the battery may reach a stage
at whch t wll no longer hold a charge.
ŸTurn the key swtch to (A. Pcture 1),then the battery s unlocked and removable
ŸTurn the key swtch to OFF when stoppng use of the E- Bke (B. Pcture)
ŸTurn the key swtch to ON when usng the E- Bke (C. Pcture 1)
Ÿalter the performance of the battery, and shorten ts expected lfe. Hgh temperatures especally reduce
overall battery lfe &runnng tme.
Picture 1

16
OPERATION INSTRUCTION
Power Indcator
When the sensor s engaged (Powerng the motor) and the e-bke s n
moton, the LED on the battery gauge ndcate nstantaneous lne voltage as
measured at the battery termnals - not the avalable energy n the battery
pack. The lne voltage wll wng out from a dead stop, or gong up a steep hll,
the motor wll be under a hgh load and may show a reduced number of LED
or show the “Yellow” or even ”RED” LED. When t s dsengaged LED on the t
wll ndcate the voltage of the battery pack. The voltage of the battery pack
wll rse when no load s on the motor. The best ndcaton of how much battery
lfe s remanng s to check the t LED, after reachng crusng speed, on a flat
straght road as ths wll allow the battery voltage to stablze and gve a much
more accurate readng.

17
The drvng asssted system conssts of a drvng unt, a battery, a controller, and varous electronc
components (harness wres, sensors and swtches). It s mportant to know that when the assstant
system s turned on, the drvng unt engages to provde power only whle you are pedalng. The amount of
power provded by unt depends on your pedalng force and the assstance model/level you set wth
handlebar control unt at any tme, f you stop pedalng, the drve assstant wll dsengage. In all
models/levels, the drvng asssted system power reduces progressvely and cuts off as the bke reaches a
speed of 25km/h, (15.5mph), or sooner f you stop pedalng. The drve assst re-engages when speed
drops below 25km/h, (15.5mph) as long as the pedals are turnng.
Ths E-bkes have an electrc pedal asssted drvng system. In EU countres, t s known legally as “PAS”
cylce or Pedal Asssted System.
If the e-bke s equpped wth muft-functon dsplay (see photo at left.), Whch
has 3 levels of PAS speed, power ndcator on and lght on/off.. Keep pressng '-
' button to turn off PAS, you can pedal the bke normally. The drvng assstance
system s not actvated. Hold the '+' button on meter can get hgher PAS speed
level. Each level of assst corresponds to a maxmum motor speed; at level 3,
the motor runs at full power. Overall range decrease at hgher power levels.
OPERATION INSTRUCTION

OPERATION INSTRUCTION
18
Pedal Installaton
Pedals are a par wth “R” & “L” (pcture 1), “R” for rght, “L” for left. Tght the pedals wth the drectve turnngs
(pcture 2).
Pcture 1
Remark: R-Rght; L-left
Pcture 2

How to Fold the E-Bke (Only for Foldng Bke)
1. Turn the key swtch to the OFF poston.
2. Unlock the handlebar quck release lever (A, Pcture 1) and
push down the handlebar to the lowest poston, then lock the
handlebar quck release lever.
3. Unlock the handlebar quck release lever (A, Pcture 2) and
rollover The handle bar.
4. Rotate the pedal upward so t s perpendcular to the ground
(A, Pcture 3).
5. Release the lock lever from ts clasp on the rght sde of the E-
Bke (A, Pcture 4).
7. Grasp the seat and the handlebar. Pvot the front half of the
frame rearward around the hnge untl the front wheel s besde
the rear wheel (Pcture 5).
6. Rotate the lock lever (A, Pcture 4) clockwse untl t ponts
backward Pull the locknut and rotate the locknut (A, Pcture 4)
out away from the E-bke untl the nut clears the lock plate (B,
Pcture 4).
Pcture 1 Pcture 2
Pcture 3 Pcture 4
Pcture 5
19
OPERATION INSTRUCTION
This manual suits for next models
4
Table of contents
Other RKS Scooter manuals


