RMvisto 3500 User manual

RMvisto3500
User Manual
Version 1.0

INDEX
RMVISTO.................................................... 2
INTRODUCTION.........................................2
FEATURES...............................................2
FEATURES DESCRIPTION ..........................3
VIDEO FEATURES.......................................... 3
AUDIO FEATURES .......................................... 3
PHOTO FEATURES......................................... 3
PACKAGE CONTENTS...............................3
OPTIONAL ACCESSORIES .........................3
DETAILED VIEW .......................................4
HARD DRIVE ASSEMBLY...........................5
COMPUTER CONNECTION....................... 7
SYSTEM SETUP ........................................7
FORMATTING THE HDD ............................8
FORMATTING ON A PC (WIN2000/XP/VISTA).. 8
FORMATTING ON A MAC (OS X)..................... 8
TV CONNECTION....................................... 9
THE REMOTE CONTROL..........................10
MENU FUNCTIONALITY............................10
MENU FUNCTIONALITY............................11
MAIN MENU................................................. 11
MOVIE ........................................................ 11
MUSIC ........................................................ 12
PHOTO........................................................ 12
FILE............................................................ 13
PLAY LIST................................................... 13
9PIC.......................................................... 13
SETUP MENU........................................... 14
SYSTEM SETUP ......................................14
VIDEO SETUP.........................................14
RECORDING SETUP.................................15
NETWORK .............................................16
RECORDING ............................................ 17
STANDARD RECORD...............................17
SCHEDULE RECORDING..........................18
APPENDIX................................................ 19
FIRMWARE UPDATE ................................19
SPECIFICATIONS ....................................20
FAQS...................................................21
ABOUT THIS MANUAL..............................22
■
RMVisto
Introduction
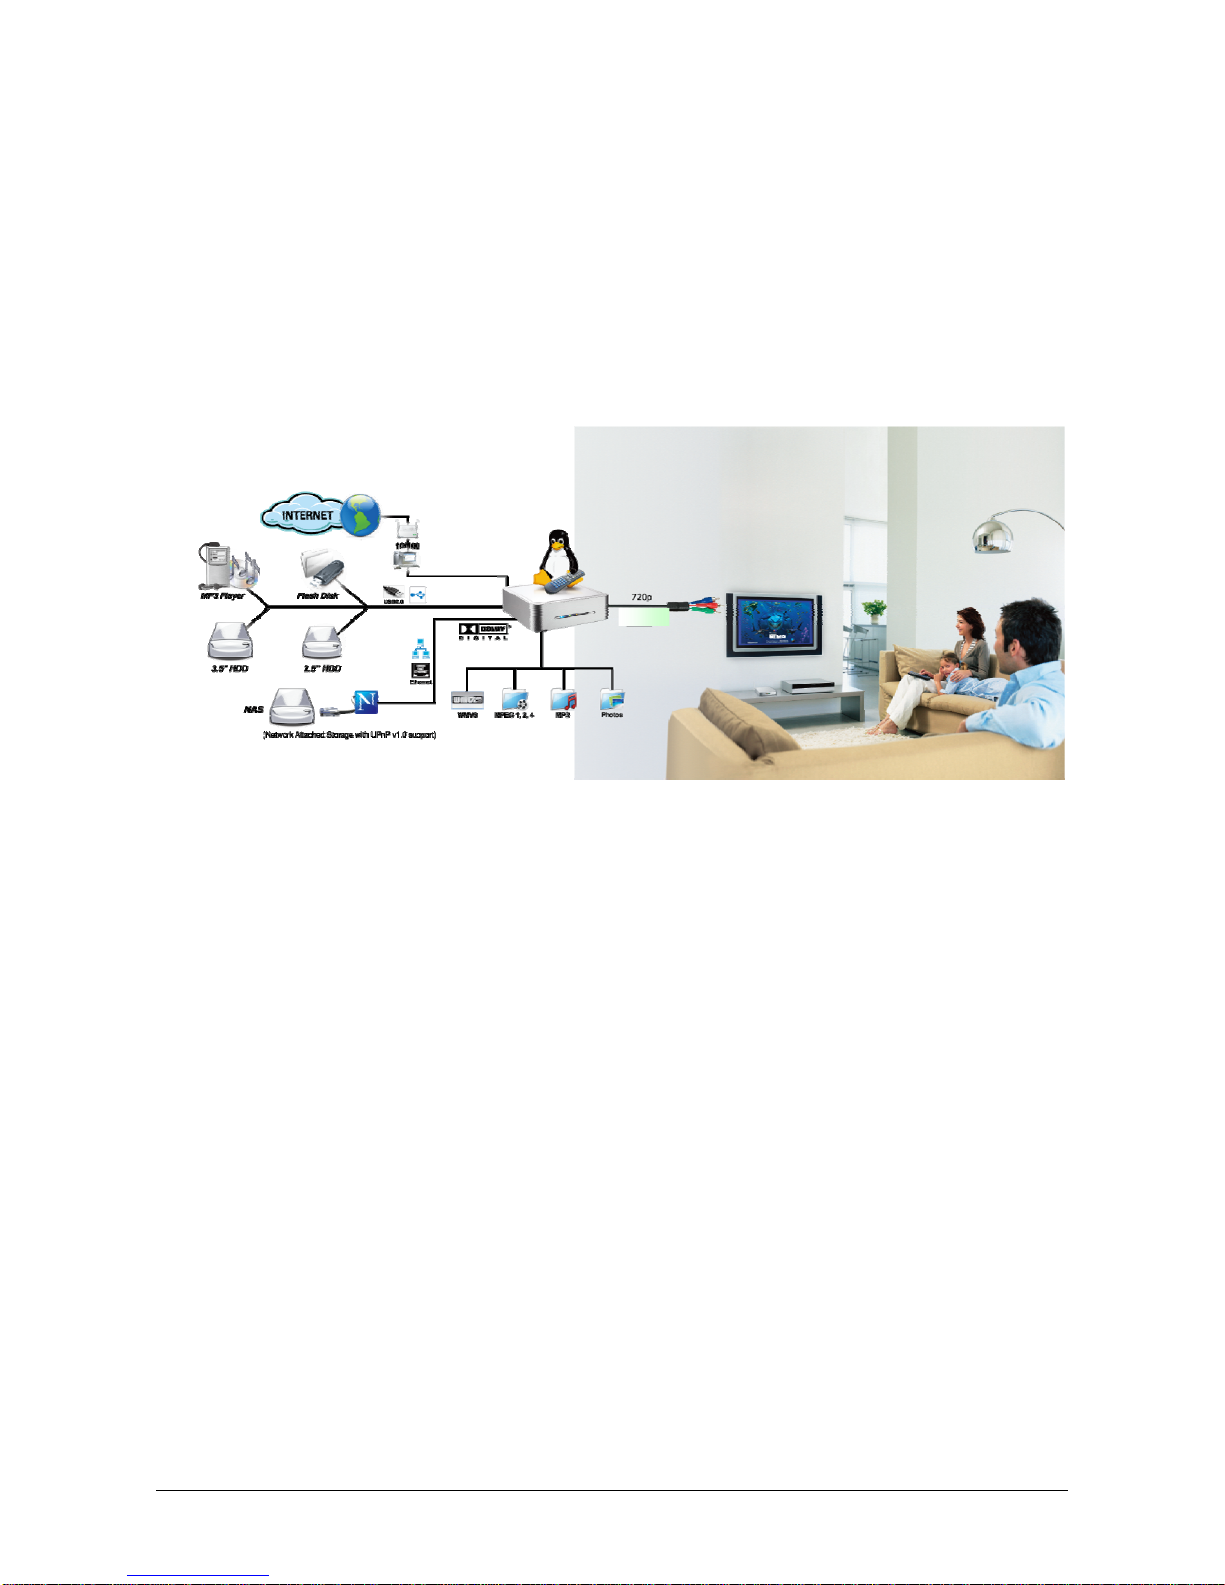
The RMvisto is a digital media player that can be connected to the TV and playback media files
from USB drives, its internal hard drive, media cards and network folders, as well as record videos
directly to its internal SATA hard drive. It supports high definition video playback (up to 720P),
offers digital HDMI output and features both scheduled recording and time shifting.
HDMI
Features
•Support RM/RMVB,Divx, XviD standard video and support HD video up to 720p
•Support HDMI、YPbPr, VGA and composite A/V output.
•Support USB host function to connect USB device. Support record and schedule record ant
time shifting.
•Support network playing
•Support firmware upgrading
Chapter 2 - System Setup / Page 2
Features Description
Video Features
Video formats supported RM,RMVB
MPEG-1 (AVI, MPG, DAT),
MPEG-2 (AVI, VOB),
MPEG-4(AVI, DivX, XviD).
H.264(720*576),MKV,ASF,FLV(Vp6)
HD Video formats supported ( up to 720P)
XviD&DivX,WMV9,MPEG2-TS,
Video output port: : NTSC/PAL
HDMI
AVI
YPbPr
VGA
Audio features
Audio formats supported: MP3, AC3
Audio Output Formats: Dual Stereo analog Digital
Photo features
Photo formats supported:JPG. BMP, PNG, GIF
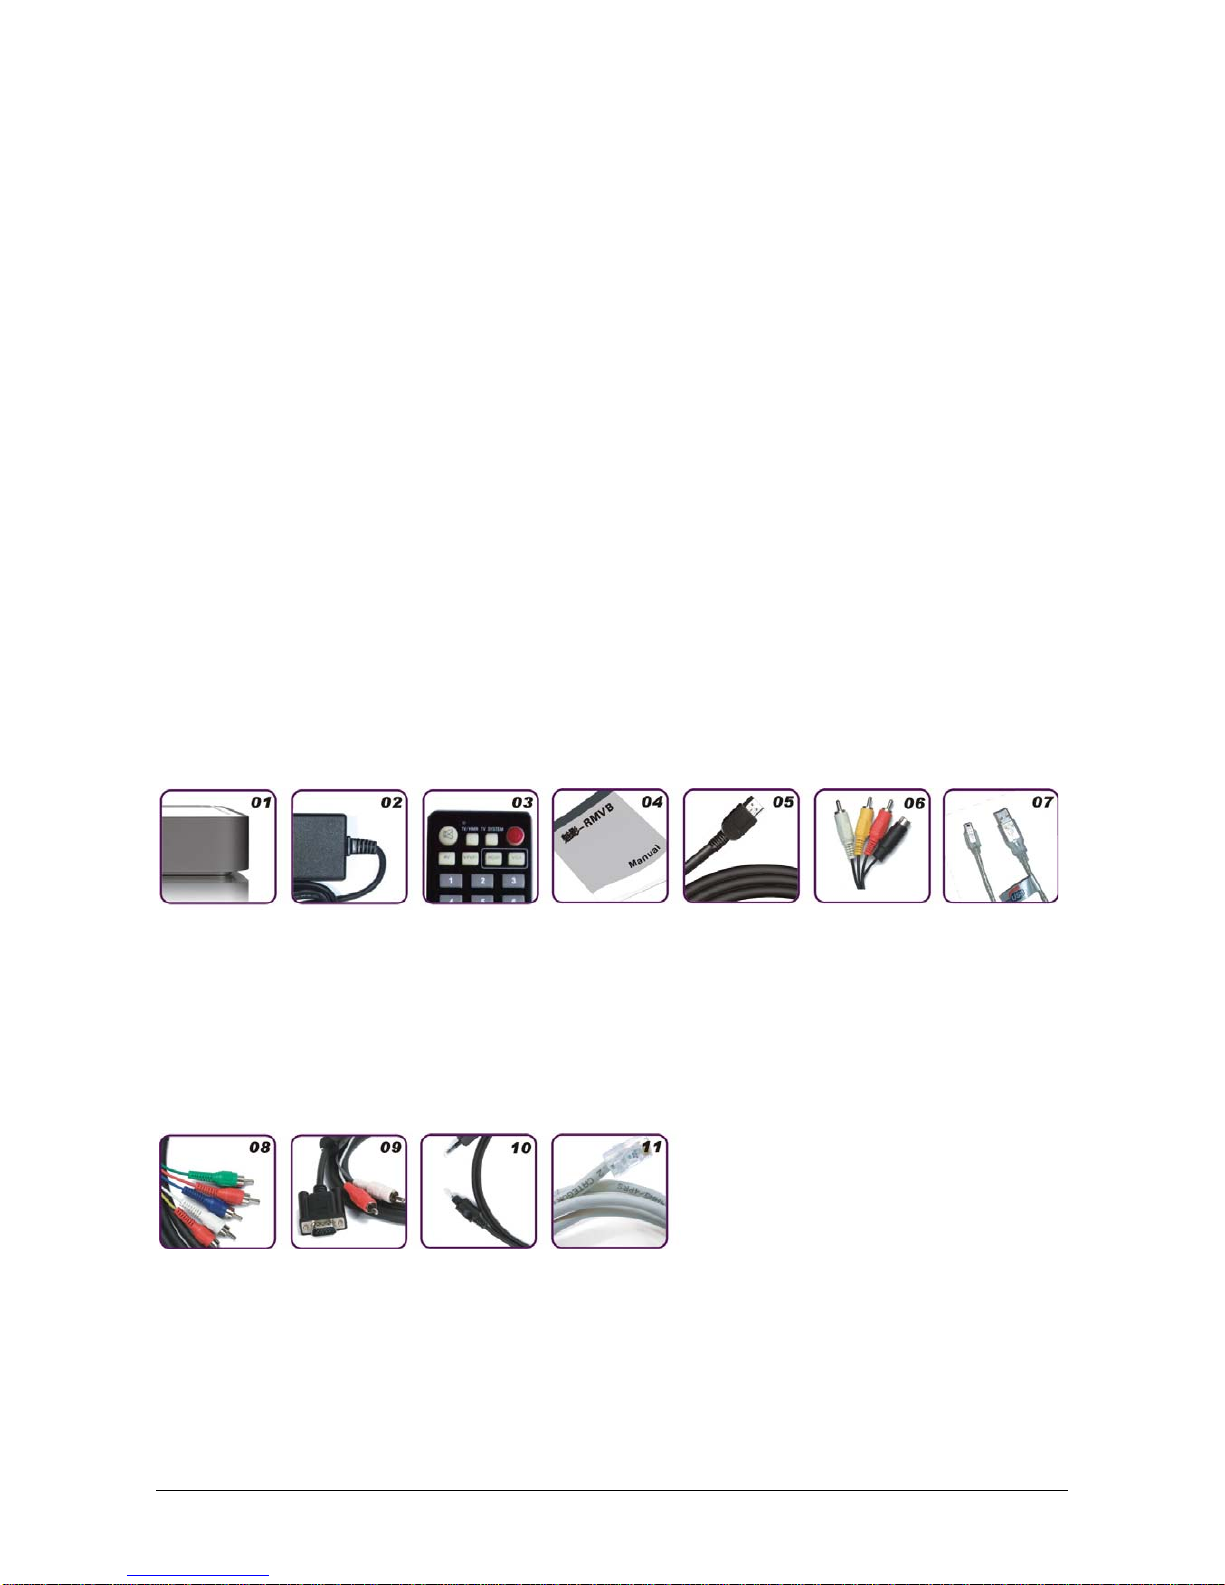
Package Contents
01. RMVisto
02. Power adapter
03. Remote control
04. User manual
05. HDMI cable
06. AV composite cable
07. USB2.0 cable
Optional Accessories
08. YPbPr cable
09. VGA cable
10. Optical cable
11. Network cable
Chapter 2 - System Setup / Page 3

Detailed View
Front
LED Indication:
•Power LED:“RED”
•Network LED:“Orange”,and lights up during data access through network.。
•HDD LED:“Blue” lights up during data access
•Record LED:“Green”
7
1 2 3 4 5 6 8
Rear:
1. Power On/Off switch
2. Power receptacle
3. A/Voutput
YPbPr, VGA, A/V composite and analog audio output.
4. Optical audio output
5. Ethernet port
6. USB HOST port
7. USB 2.0 port
8. HDMI A/V output
HDMI HD audio/video Output (please contrast with 3 A/V output)
Chapter 2 - System Setup / Page 4

Hard Drive Assembly
1. Lift the top cover off the body. If it’s
already locked in place, push it
upwards with a thin and small item
through the opening at the bottom.
2. Remove the screws which are holding
the aluminium frame in place.
3. Lift the frame out of the plastic casing.
4. Align the screw threads of the hard
drive with the holes in the framing and
place it upside down in the frame.
Chapter 2 - System Setup / Page 5

5. Place the metal sheet cover over the
drive and align it with the holes of the
framing.
6. Fasten the screws from the side.
7. Place the assembled drive back in the
plastic framing, connect the cables and
mount it on the heat sink by fastening
the screws.
8. Align the top cover with the body and
push lightly into place.
Note: Be careful not to damage any cables or components during the installation!
Page 6 / Chapter 2 - Hardware Installation
Computer Connection
System setup
RMVistor automatically operates as an external USB 2.0 hard disk when connected to a PC
or Macintosh. Use the included USB 2.0 cable to connect your device to the computer
system. Your system will automatically recognize RMVistor as an external hard disk in which
you can copy any file(s) you want (music, movie, picture, and/or data).
RMVistor is an external USB 2.0 hard disk device that can be connected to a variety of
Operating Systems supporting the USB interface:
•Win98/SE (Install driver from CD first)
•Windows Me/2000/XP/Vista
•Mac OS9, OSX
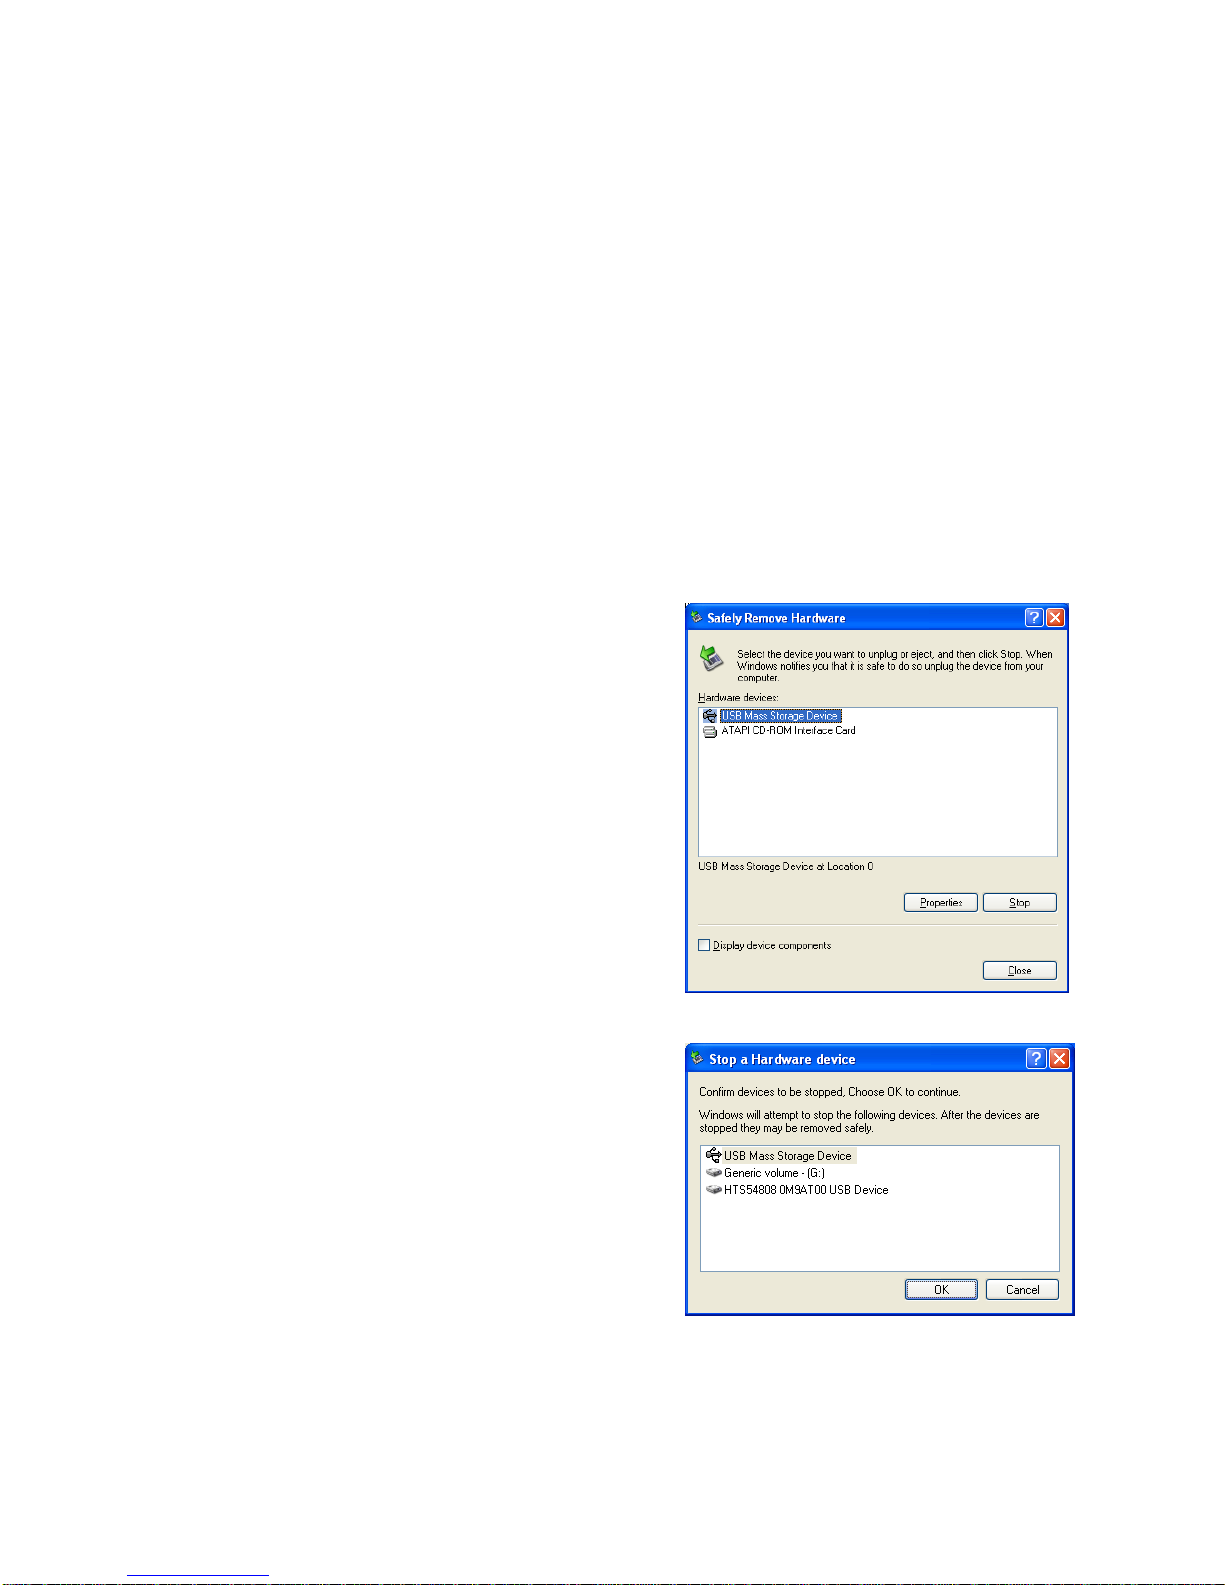
In order to safely remove your RMVistor from your
system, please follow the same procedures as for
any Plug & Play external USB device. Specifically:
Double click on the taskbar icon to “Unplug or Eject
hardware”. The adjacent dialogue box will appear,
displaying the Plug & Play external devices. In the
current example, you can see RMVistor as a USB
Mass Storage Device.
In order to remove it, click the device in the list and
then click Stop.
Click OK on the next dialogue box. The operating
system will automatically stop the device and inform
you for its safe removal. If you are using RMVistor
(e.g. you are working on a Word document or a
picture located in its disk), the operating system will
notify you that it is unable to remove the device. In
this case, close all the applications affecting or
accessing RMVistor and try again.
7

Formatting the HDD
Formatting on a PC (Win2000/XP/Vista)
Use the Disk Management Utility
•Right click on “My Computer”
and choose “Manage”
•Select “Disk Management”
•Choose the drive you want to
format and right click on the
Disk or drive field for further
commands
•Create a primary partition and
format it
•Follow the Wizard instructions
You can also format RMVistor using FAT32 but this will have the limitation of max disk being
32GB and max file size being 4GB.
Note: To be able to use the RMVistor on all Operating Systems, you will need to use
FAT32. To create one single disk over 32GB use the DOS command prompt and the
“fdisk” command on Win98/SE or WinME.
RMVistor supports three partition.
Formatting on a Mac (OS X)
Mac OS9.2 and earlier, do not
support creation of partitions on
an external drive. To do that,
you will need to purchase
additional 3rd party software,
connect the drive to the internal
IDE bus, or upgrade to OS X.
Initializing the drive can be done
on all Operating Systems.
For Mac OS X, use the Disk
Utility to format and create
partitions on your external disk.
•Select “Disk Utility” in the
utilities folder
•Choose your external drive
and format it according to
your requirement. For Mac
only, choose “Mac OS Extended”
NOTE: To be able to use the RMVistor on all Operating Systems, you will need to use
FAT32 (max file size limited to 4GB!). To create one single disk over 32GB, use the
DOS command prompt and the “fdisk” command on Win98/SE or WinME.
8- 8 -
TV Connection
RMVisto provides high quality video and audio output when connected to your TV set and audio
system.
The TV connection is straightforward. Just connect RMVisto to your TV set (NTSC or PAL)
using the included AV cable, plug the Power Supply adaptor to the DC jack on the RMVisto,
and then into the electrical outlet.
Under TV mode, RMVisto support USB HUB function, you can connect USB device to play
media files.
9- 9 -

The Remote Control
The RMVisto remote has all the functional capabilities to fully control your device and enjoy
your multimedia files. The next figure describes each button’s function.
Change Video output
Select HDMI video output
ON/OFF switch
Mute
Numeric key pad
VOL +, Increase volume
VOL -, Decrease volume
Pervious track
Reverse play Fast forward
Select YPbPr video output Select VGA video output
Setup menu Zoom function
Next track
Navigation Buttons
Stop Pause/STEP
Photo
Music
Movie
Advanced setup TV record
Time record function
Reseach Display playlist
Play mode
Display file information 9pic display photo
TV
Slower play
Displays subtitle
10 - 10 -
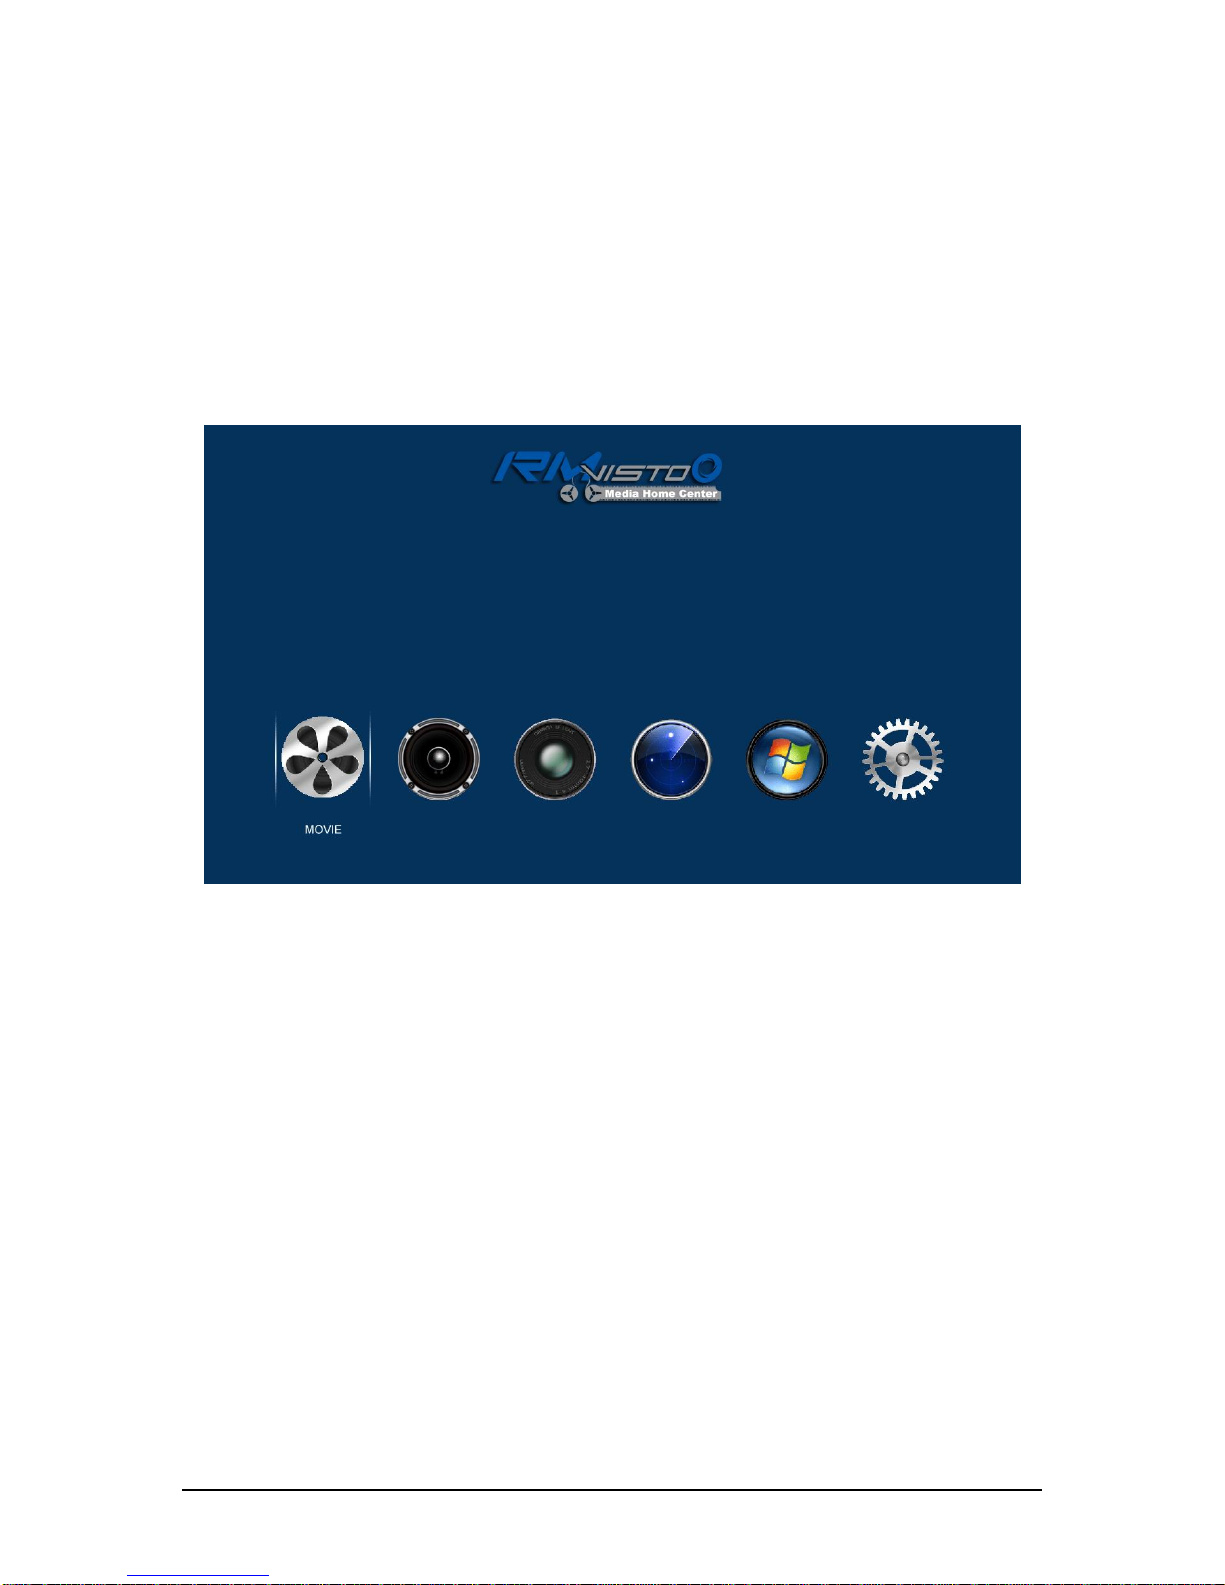
Menu Functionality
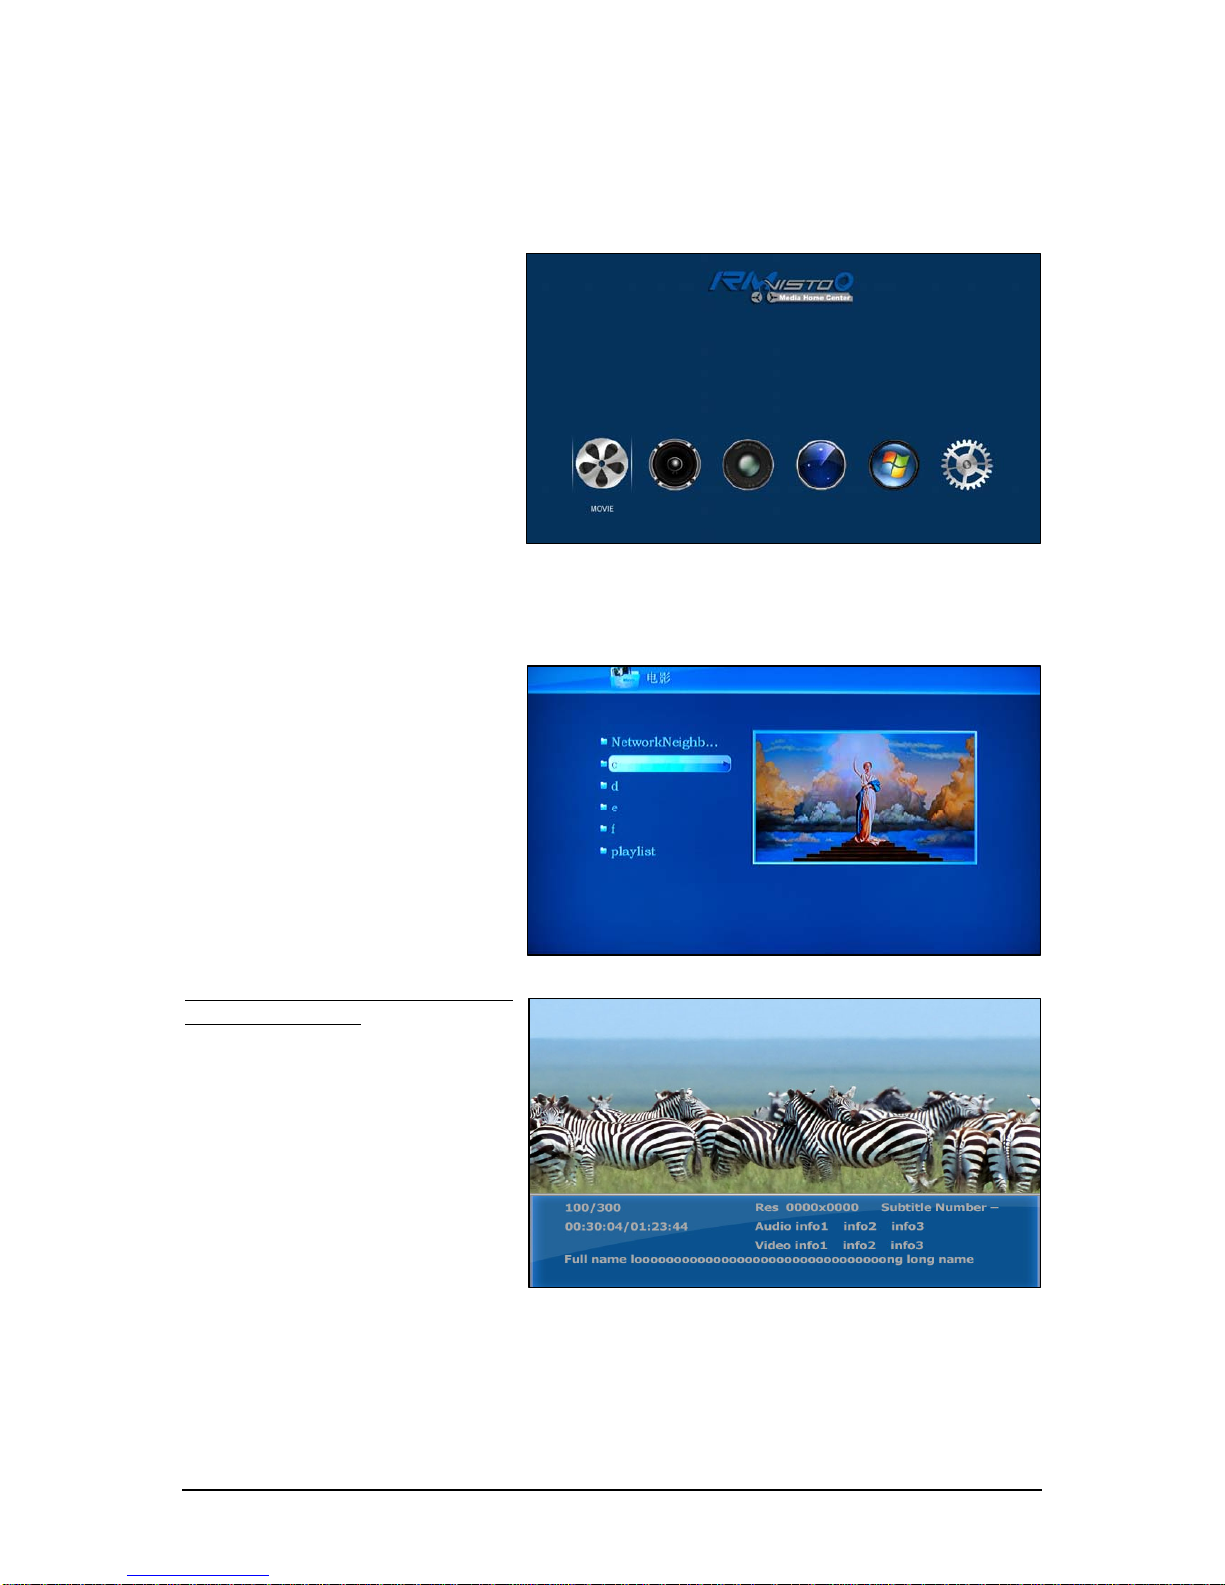
Main Menu
This is the menu (as shown in the
adjacent figure) that appears when
you power on your RMVisto device.
You have four (6) main selections
that you can access with the
navigation buttons and by pressing
PLAY/ENTER:
•Movie
•Music
•Phote
•TV
•File
•Setup
Please have a look in the next paragraphs for a more detailed approach of these menus.
Movie
By selecting the Movies menu, you
will see the adjacent image on your
TV screen. System automatically
display network Neighborhood,
internal HDD and USB device icon.
By using the navigation buttons
and the PLAY/ENTER of your
remote you can select the specific
movie and play it.
By using the Left/Right buttons to
up/down the folder.
When movie plays, You can press
the INFO button to display movies’
detail information: resolution, file
size, video format, audio format
etc…
And when movie、music or photo
play, press “Play Mode” button in
the remote control, to change
different play mode.
11 - 11 -

Music
By selecting the Music menu, you
will see the adjacent image on your
TV screen
By using the navigation buttons
and the PLAY/ENTER of your
remote you can select the specific
music and play it.。
By using the Left/Right buttons to
up/down the folder.
And when movie 、music or
photo play, press “Play Mode”
button in the remote control, to
change different play mode.
If you want to display song’s lyric
(must be .lrc format), Please pay
attention that in order for RMvisto
to display the lyric, both “movie.avi”
and “movie.lrc” should be placed in
the same directory.
Photo
By selecting the Photo menu will
bring the adjacent image onto your
TV screen.
By using the navigation buttons
and the PLAY/ENTER on your
remote, you can select the digital
picture you want to display.
By using the Left/Right buttons to
remote the photo.
Background music
RMVisto support background music playing function. Please select “FILE” mode and select
one song as background music, then select to view photo.
And when photo play, press “Play Mode” button in the remote control, to change different
play mode.
12 - 12 -
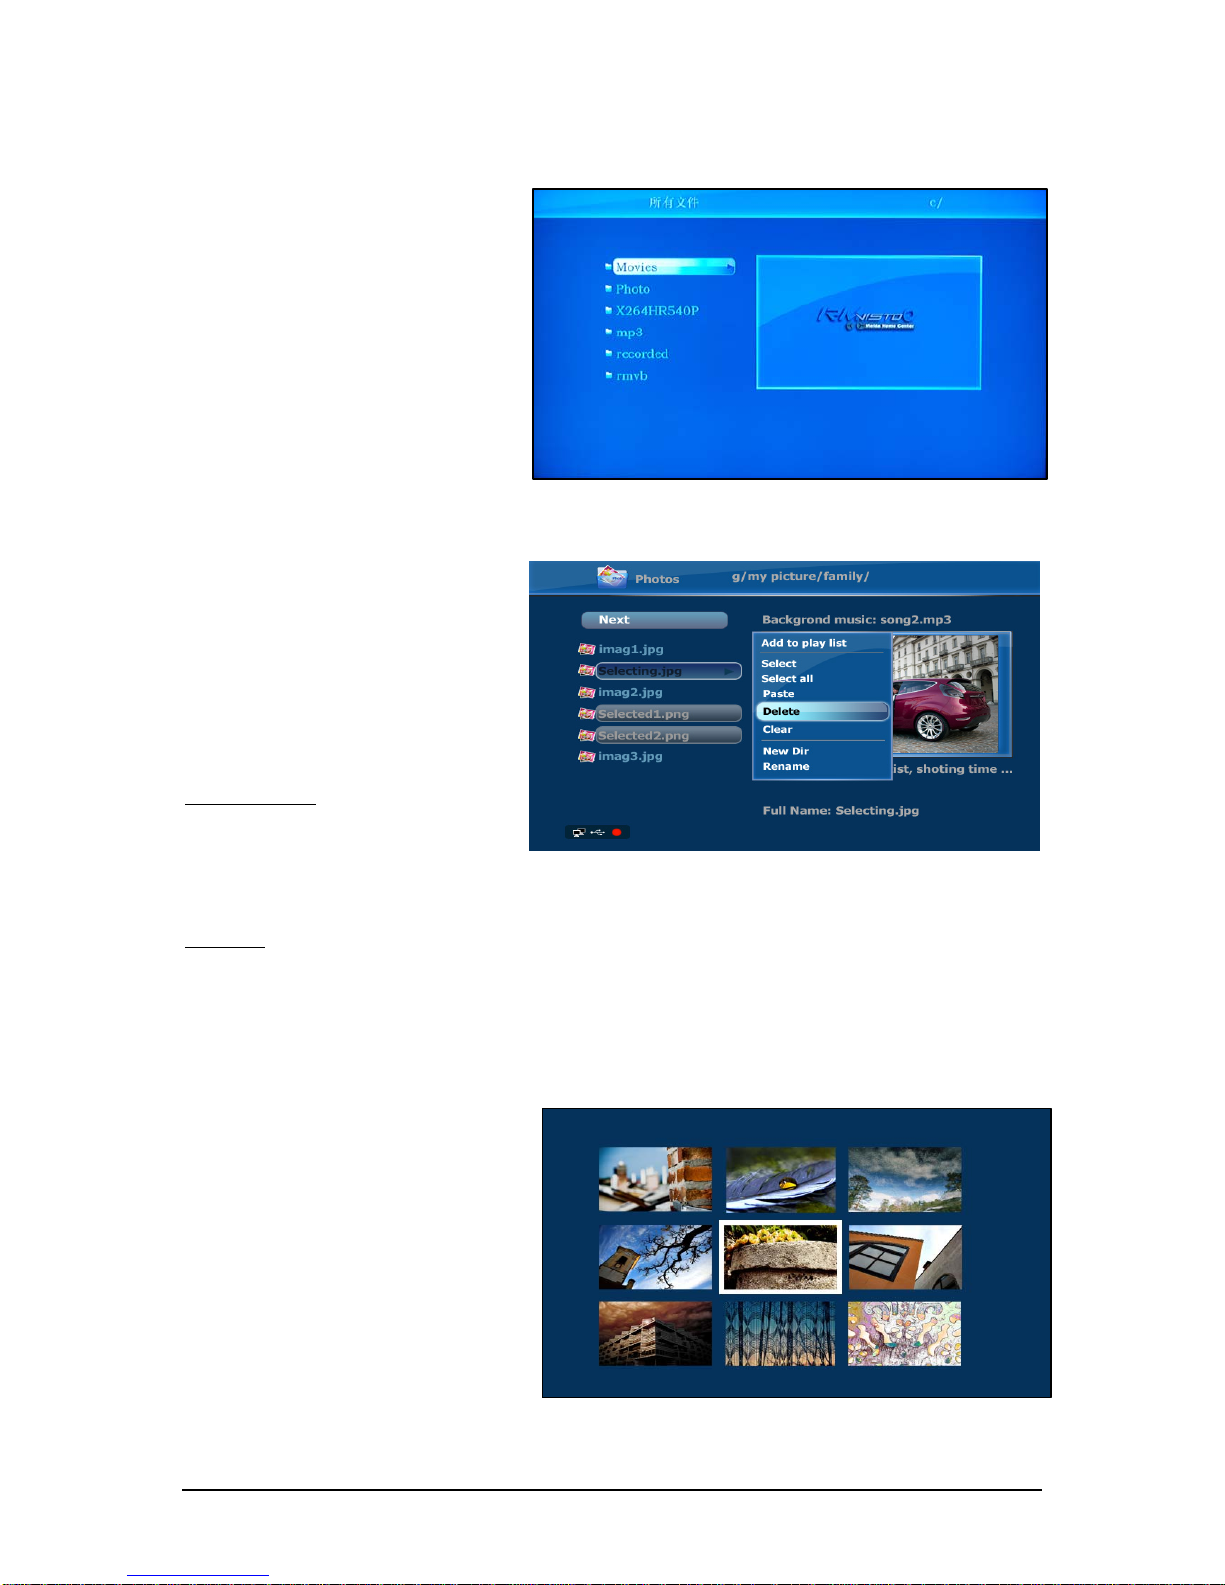
File
选By selecting the File menu will
bring the adjacent image onto your
TV screen. On the left side you will
see the directory list of the files
organized in your device’s hard
disk..
By using the navigation buttons and
the PLAY/ENTER on your remote,
you can select the File you want to
display.
Play List
You can add your favourite movie,
music or photo in playlist folder.
When browser move, music or photo,
press right button in the remote
control to open the file editing menu.
In this menu, you may select below
more function:
Add to Playlist
Add current file to default play list.
If there are more than one play list
exist, need select one to add. This selection is only available when you select more than one
file. Don’t support directory yet.
Copy file
Firstly select some file in any directory, and go to destination directory, press “function” key
and select paste. This selection is only available after you have selected any files in some
directory. If you select two group files in different directory, only the latest group files will be
copied.
9 PIC
Press “9-Pic” key in picture viewing
will open 9-picture preview menu.
13 - 13 -

Setup Menu
The RMVisto Setup Menu is
extremely important in order to
correctly configure your device and
benefit from its advanced features.
In the following paragraphs, there
are detailed descriptions of the
various settings and parameters.
System setup
1. Language
RMVisto support English,
Simplified Chinese, Traditional
Chinese.
2. Slideshow time
Select picture slide show time
3. Current time
Setup current system data/ time.
4. Firmware Update
Search firmware update package
and popup firmware update menu, please refer to Firmware update chapter.
Video setup
1. TV System
Select video output system type:
NTSC, PAL
2. Video Output
Set video output mode: CVBS, S-
Video, Component, HDMI
Select the corresponding video
output mode depending on your
current connection. Instead of the
setup menu and when the current
screen is not visible, press the AV
button on your remote control until
you see the correct output.
3. Video Resolution
Set the Video reslution, depending on your display and video output mode.
RMVisto support resolution up to 720P.
14 - 14 -

4. Aspect Ratio
Set the TV aspect ratio, depending on your display and preferences.
• Zoom:: For standard 4:3 displays (full screen but cuts off the sides for widescreen films).
• Letter Box: For standard 4:3 displays (adds black bars on top and bottom for widescreen
films).
• 16:9: For 16:9 widescreen displays (full screen).
5. SPDIF output
Set SPDIF output: None, PCM, RAW
Recording setup
1. Video input
Select video input: CVBS, S-
VIDEO
2. Recording Quality
RMVisto support recording quality:
720 x 480
352 x 480
352 x 240
The higher the recording quality,
the larger the resulting video file
will be and the sooner the storage
space will be used up. HQ
produces the best quality, whereas
SLP creates the smallest file.
3. REC Device
Define the target device where the recorded videos are to be stored.
4. Recording Format
set default recording file type: AVI, MP4
5. Recording Video
set default video encoding format: MPEG4, VC1, MJPEG
6. Recording Audio
set default audio encoding format: AAC, MP3
15 - 15 -
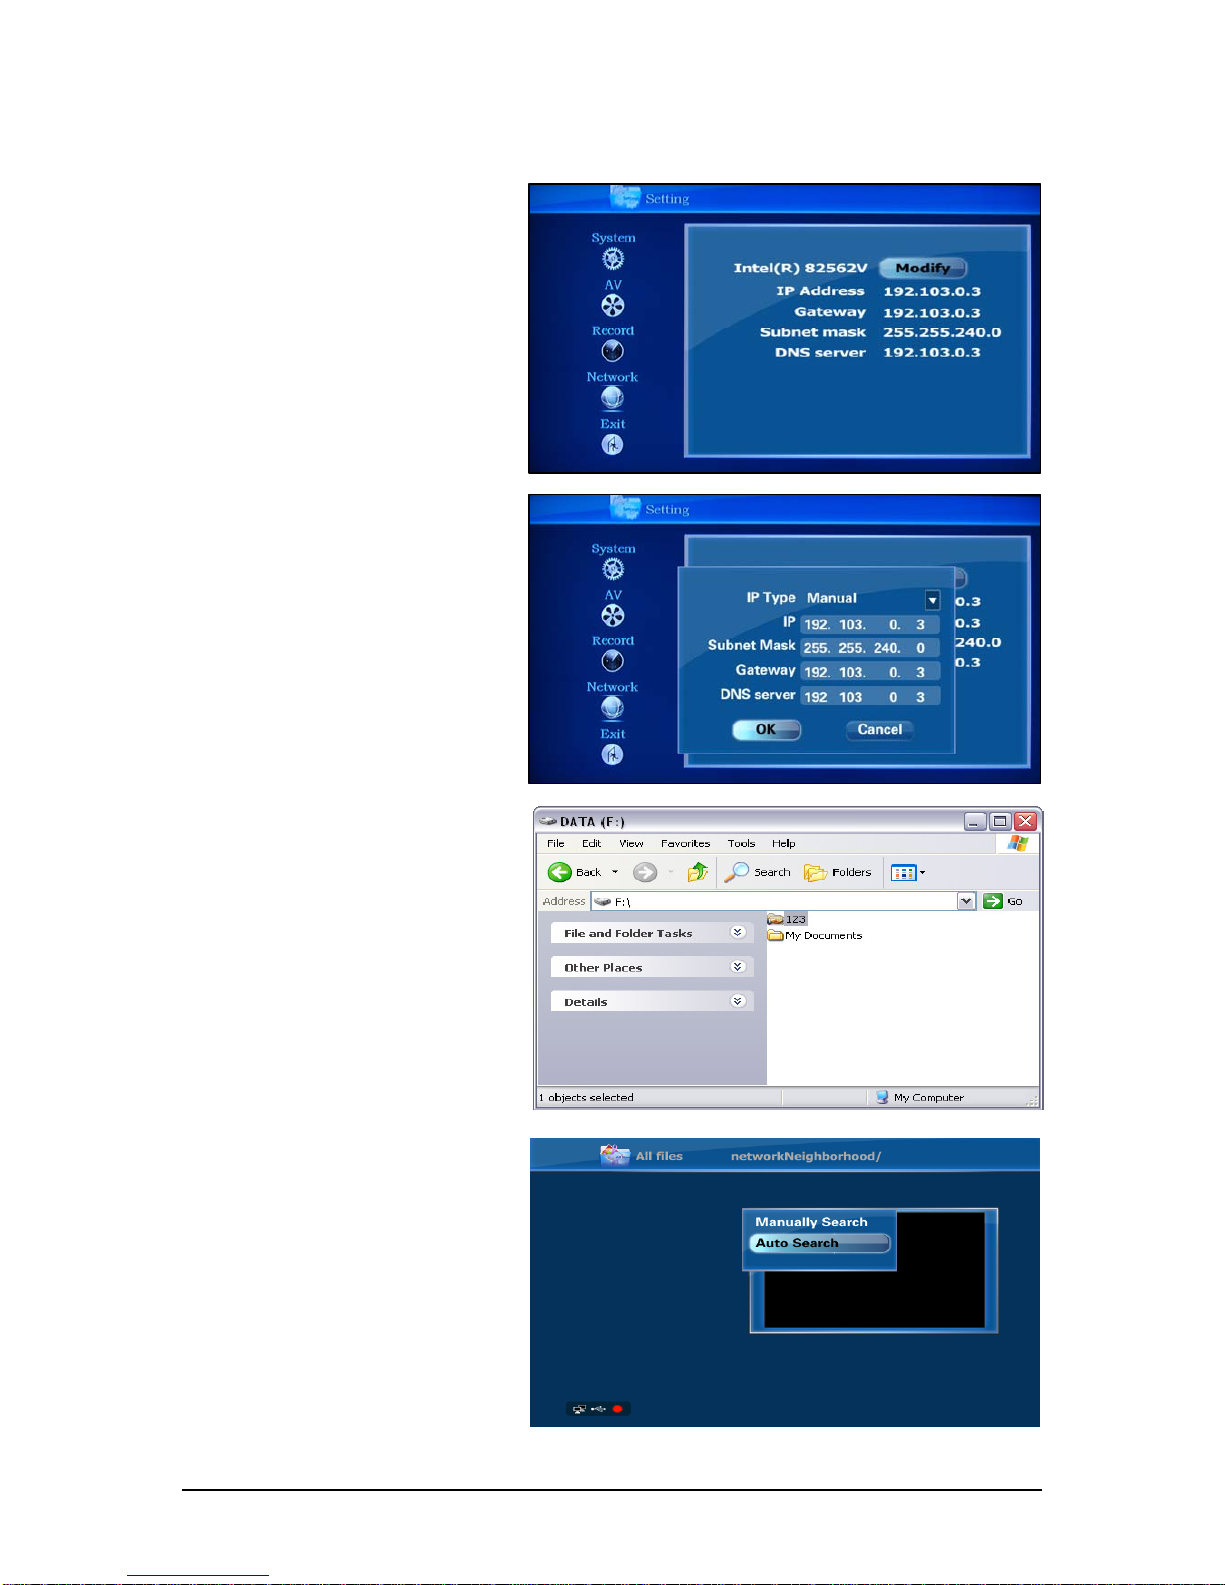
Network
Setup network connection for
network playback.
Choose DHCP to get the IP
address automatically from the
DHCP server or set the IP address
Manually
User can look through, copy or play
streams on network neighborhoods
through RMVisto platform, and also
can visit RMVisto platform from
Windows.
Pressing the right key can popup
the network operation menu in
folder networkNeighborhood, and
then user can choose to search the
network neighborhood manually or
automatically. If manual search is
chosen, both IP address and
computer name are available.
16 - 16 -

Recording
Standard Record
RMVisto support video recording
function.
First, Select the TV from the main
screen
When TV program displays, Press
the REC button on the remote
control. The RMvisto start to
recordIn the TV program
You can press the Function button
to setup more recording function.
Such as: record target, hdd
capacity and recording quality etc.
17 - 17 -

Schedule Recording
RMVisto support video schedule
recording function.
First, Select the TV from the main
screen
Press the TIME REC button on the
remote control. In the Edit category,
select Add a new schedule and
press the Enter button.
Select Modify or New will show the
schedule recording edition menu
And you can use remote control to
input the starting time and finishing
time
The device is the destination where
the recorded files will be stored and
Quality will determine the video
quality and bit rate. Refer to the
Rec category in the Setup menu for
more details.
Press Enter once all settings have been adjusted. Select Confirm to add the new settings to
the schedule. The new schedule is now listed and the status set to Ready.
18 - 18 -

19 - 19 -
Appendix
Firmware update
You will be able to upgrade your device with new features and capabilities by following the
firmware1upgrade procedure:
•Get the latest update from web site.
•Connect RMVisto to your computer and copy the firmware file to the RMVisto HDD..
•Connect RMVisto to the TV
•Choose “SETUP” and select “Firmware Upgrade”
•Wait a few minutes for the new firmware to be updated.
•Never disconnect or turn off your unit before the firmware has been completely
updated!!
•Turn off RMVisto by disconnecting the power supply, wait a few seconds, and then
connect the power supply again. Wait a few seconds and your RMVisto will appear.
•Done!
___________________________________
1Firmware is the software stored in RMVisto Flash memory that contains the programs running in your
device. These programs remain stored even when the system is switched off.
Table of contents


