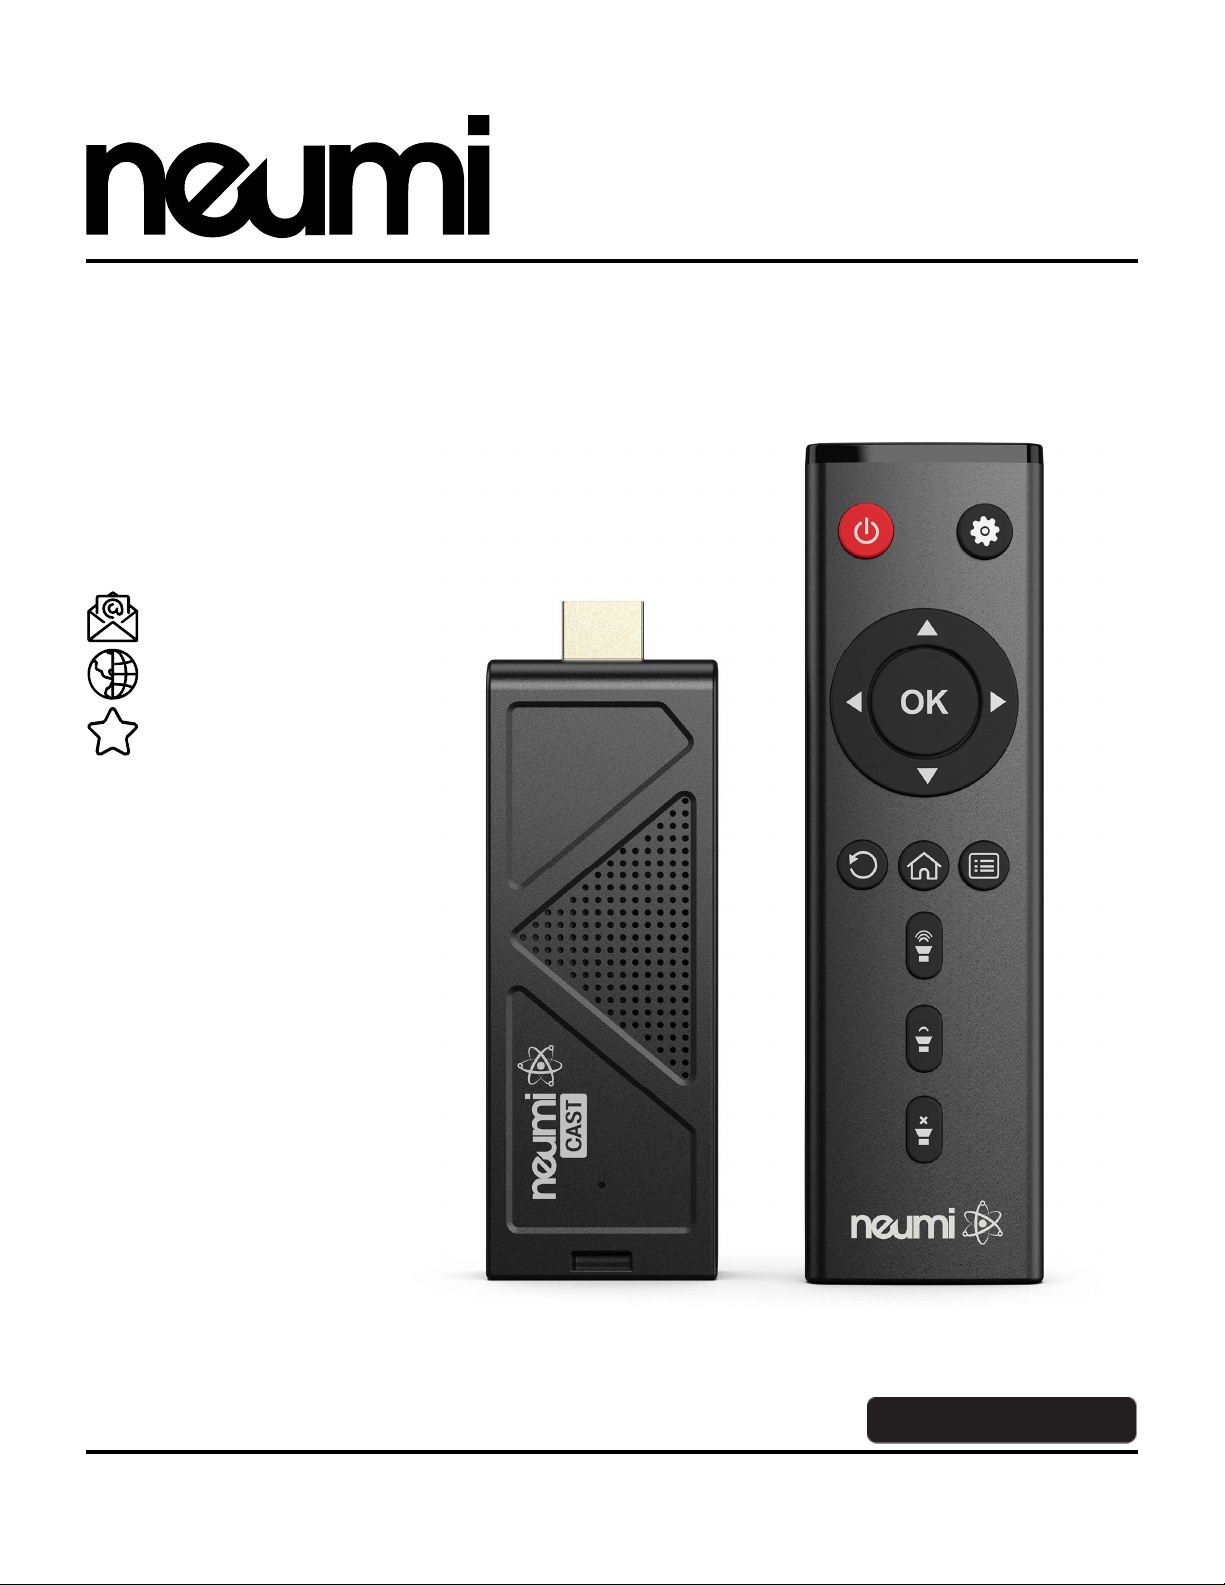
Neumi ATOM CAST User manual
AUG2021
ATOM CAST HD Digital Media Player
ATOM CAST
User Manual
LET US HELP!
Our friendly customer service team
is standing by to answer questions,
help with setup, or fix issues.
support@neumitech.com
www.neumitech.com
One Year Warranty


Got Questions? Let Us Help! Email SUP[email protected]
Congratulations on your purchase of the NEUMI ATOM CAST digital media player.
We now your time is valuable, so we have configured this media player with
optimized default settings that is suitable for most users. This manual contains
information on how to adjust the settings to customize your user experience. If you
encounter any difficulties or have questions, please email
[email protected] and our friendly support team will help you
promptly.
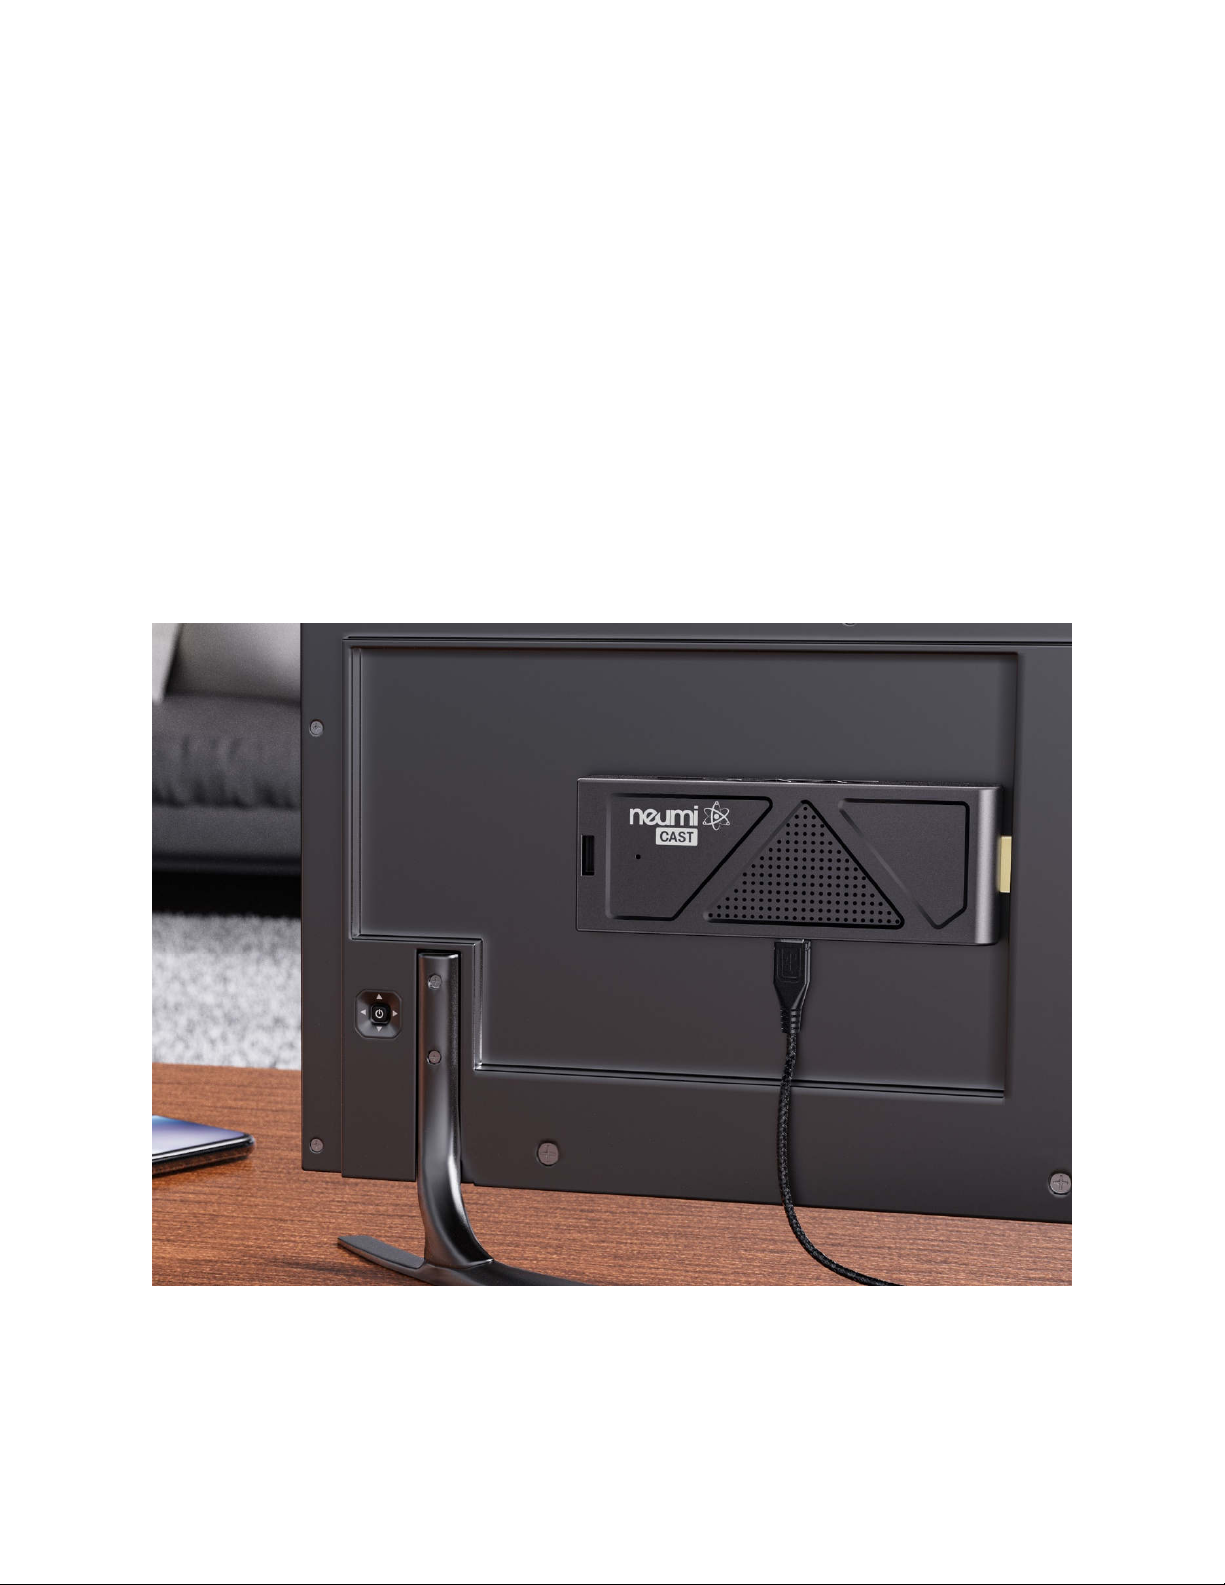
First Things First - Connect It All U !
In the pac age are your new media player, an AC power adapter, remote control, AV cable, and
this user’s manual. Ta e a minute to examine the player to become familiar with the available
connectors, this step will save you time later:
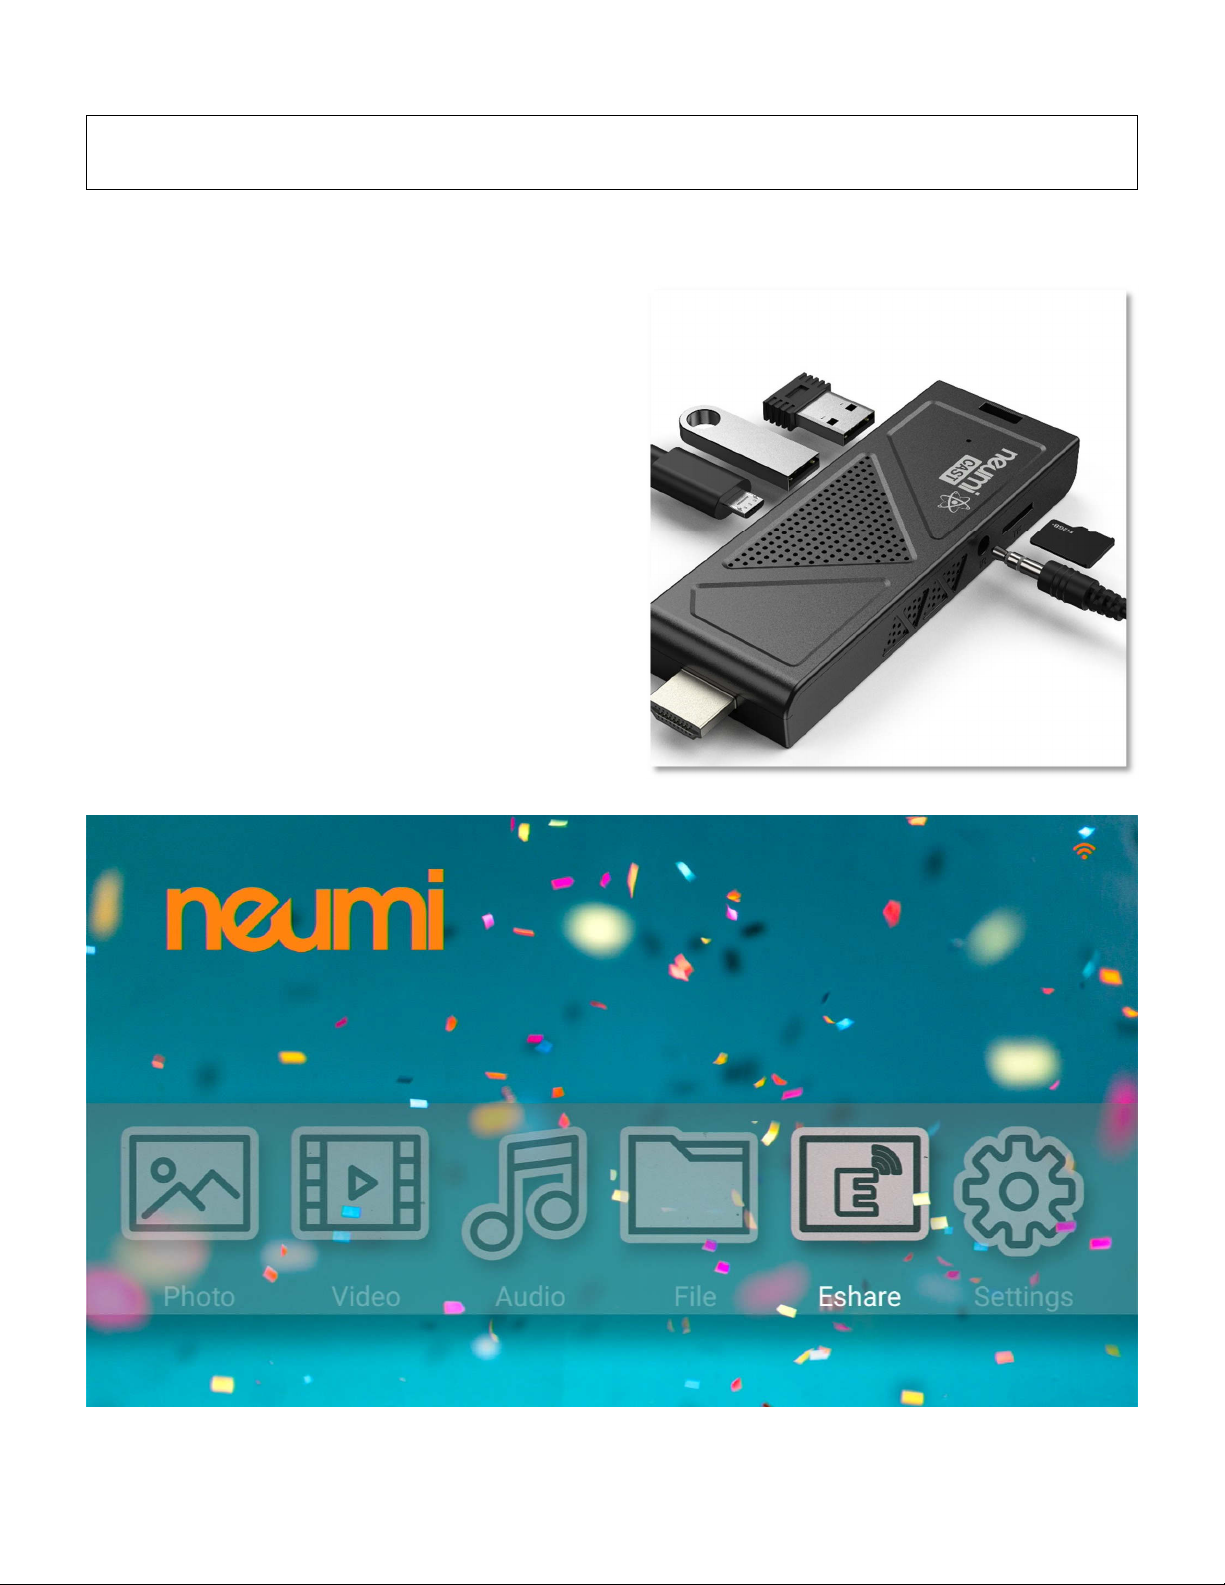
1 USB 2.0 connector #1 for USB drives, eyboards, and mouse
2 USB 2.0 connector #2 for USB drives, eyboards, and mouse
3 Micro USB connector for power only
4 IR input jac for wired infrared remote sensor
5 Memory card reader for microSD cards
6 HDMI to connect to a TV or home theater with HDMI input
User Advice: Place the wired remote sensor where it can “see” the IR signal from the remote
control. For additional convenience, you may purchase a wireless radio remote control and install
the receiver in one of the two USB ports. A wireless radio remote does not require line-of-sight,
allowing the remote to be held in any position.
Got Questions? Let Us Help! Email SUP[email protected]
To get your media player ready for use
:
•Connect the media player to your TV by plugging it into an available HDMI input port.
The included HDMI extension cable can be used if needed. If a longer extension cable is
needed, be sure to purchase one that is HDMI 2.0 compliant.
•Connect the IR receiver cable and mount the receiver where it can “see” the IR signal
from the remote control.
•Turn on your TV and set it to the appropriate input source where the media player is
connected.
•Connect the AC adapter for the media player – it will turn on automatically. Ta-da!
•Install two AAA batteries (not included) into the remote control.
That’s it! Now all you need to do is load some videos onto a Micro SD card or USB drive (not
included) and begin enjoying your new media player.
Got Questions? Let Us Help! Email SUP[email protected]
How Do I Play Videos? How Do I...
How do I load videos, photos, or music onto the media player?
Use a computer to copy videos, photos, or music
onto a Micro SD card or USB drive (not included).
Organize the files in folders to ma e them easier to
manage. The player supports up to 1000 files per
folder. If there are more than 1000 files in a folder,
the additional files may not be read by the player.
After copying your media files, insert the Micro SD
card or USB drive into the media player to play the
videos, photos, or music.
User Advice: The media layer does not have
any internal memory. It must be used with a
Micro SD card u to 512GB or a USB drive u to
4TB. If your Micro SD card or USB drive is not
recognized, make sure is using FAT32, exFAT,
or NTFS file system format. For hel lease
email SUPPORT@NEUMITECH.COM

Got Questions? Let Us Help! Email SUP[email protected]
How do I play a video?
After powering on, the media player will display the main menu. Select the Video icon from the
main menu, then select the USB drive or Micro SD Card to browse for video files to play. Find the
video you would li e to play, press the OK button on the remote and it will begin playing. The
media player can also be configured to automatically start playing videos whenever it is turned on –
please refer to the settings section for how to configure and use this automatic playbac feature.
During video playbac , you can...
•Pause or resume playbac using the OK button. Press the Return button to stop.
•Press the Left/Right buttons to quic ly s ip bac ward or forward. Press and hold the
Left/Right buttons to use the timeline slider to quic ly get to a point in the video.
•Use the U /Down buttons on the remote to go to the previous or next video.
Additional photo display options are available by pressing the Menu button:
•Display Ratio – Choose between stretched full screen or original aspect ratio.
•Play Mode – Set the video playbac repeat mode for one or all videos.
•Subtitle – Select the subtitle trac to display or turn off the subtitle.
•Audio Trac – Select which audio trac to play.
How do I display subtitles for a video?
The NEUMI ATOM CAST supports internal and external subtitles, including SRT, SUB+IDX, and
PGS formats. If both internal and external subtitles are detected, they are listed together, with a
maximum of 10 subtitle trac s. To use an external subtitle file, name it the same as the video, but
with a language and “SRT” file extension, and place it in the same folder as the video. For example:
Got Questions? Let Us Help! Email SUP[email protected]
To display a subtitle trac , press the Menu button on the remote control to bring up the playbac
menu, select the subtitle trac you want to display and press the OK button to confirm. To stop
displaying subtitles, select “Close Subtitle” in the playbac menu.
Ex ert Note: Subtitle text encoding uses the UTF-8 code page by default. Due to the many ways in
which text can be encoded, the only officially supported subtitle languages are English, Spanish,
and Chinese.
How do I play photos?
From the main menu, select the Photo icon, then select the USB drive or Micro SD Card to browse
for photos to play. Find the photo you would li e to play, press the OK button on the remote and it
will be displayed. The media player recognizes up to 1000 photos in a folder and can play a
slideshow of photos within the same folder. The media player can also be configured to
automatically start playing photos in a slideshow whenever it is turned on – please refer to the
settings section for how to configure and use this automatic playbac feature.
During photo playbac , you can...
•Pause or resume photo slideshow using the OK button. Press the Return button to stop.
•Use the Left/Right buttons on the remote to go to the previous or next photo.
•Use the U /Down buttons on the remote to rotate the display of the photo. Note that this
effect is only for display and is not saved.
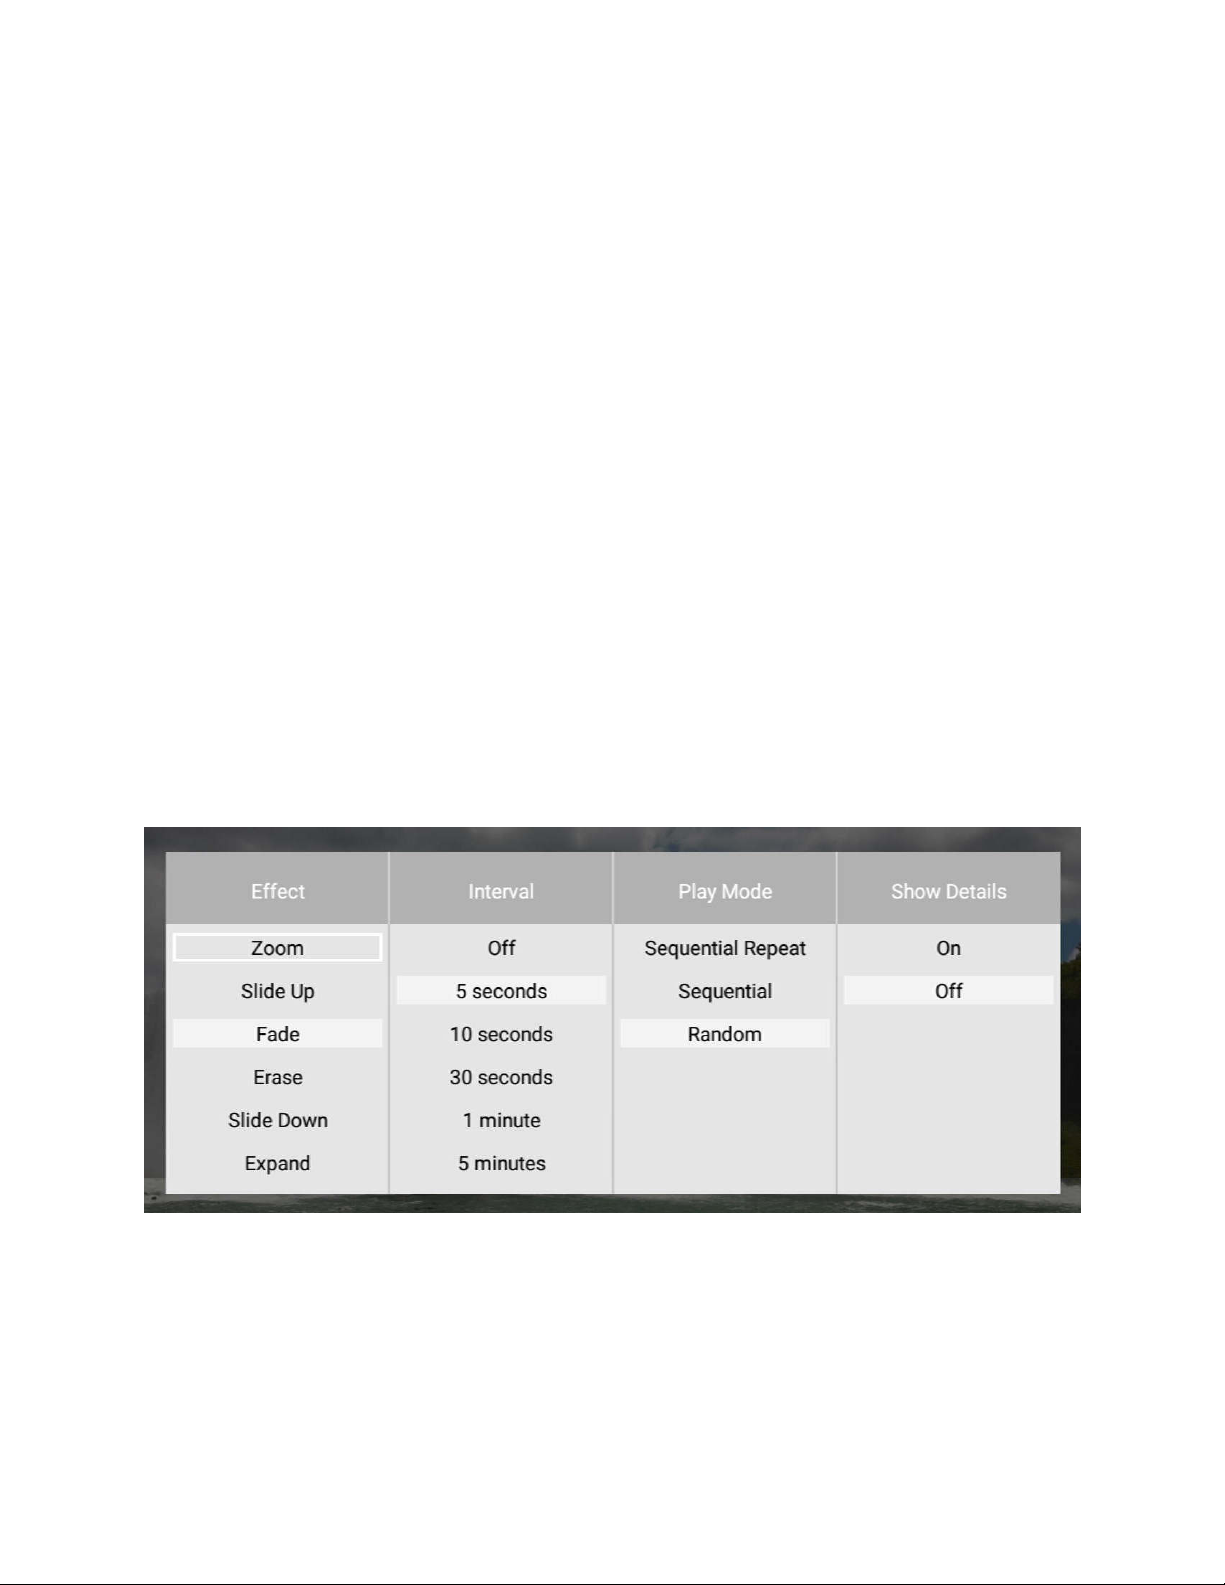
Additional photo display options are available by pressing the Menu button:
•Effect – Sets the slideshow transition effect.
•Interval – Set the delay time between photos in a slideshow.
•Play Mode – Selects sequential or random order for slideshow.
•Show Details – Toggle display of photo name and date ta en.
Got Questions? Let Us Help! Email SUP[email protected]
How do I play music?
From the main menu, select the Audio icon, then select the USB drive or Micro SD Card to browse
for music files to play. Find the file you would li e to play, press the OK button on the remote and it
will begin playing. The media player can also be configured to automatically start playing music
whenever it is turned on – please refer to the settings section for how to configure and use this
automatic playbac feature.
During music playbac , you can...
•Pause or resume the song using the OK button. Press the Return button to stop.
•Press the Left/Right buttons to quic ly s ip bac ward or forward. Press and hold the
Left/Right buttons to use the timeline slider to quic ly get to a point in the video.
•Use the U /Down buttons on the remote to go to the previous or next video.
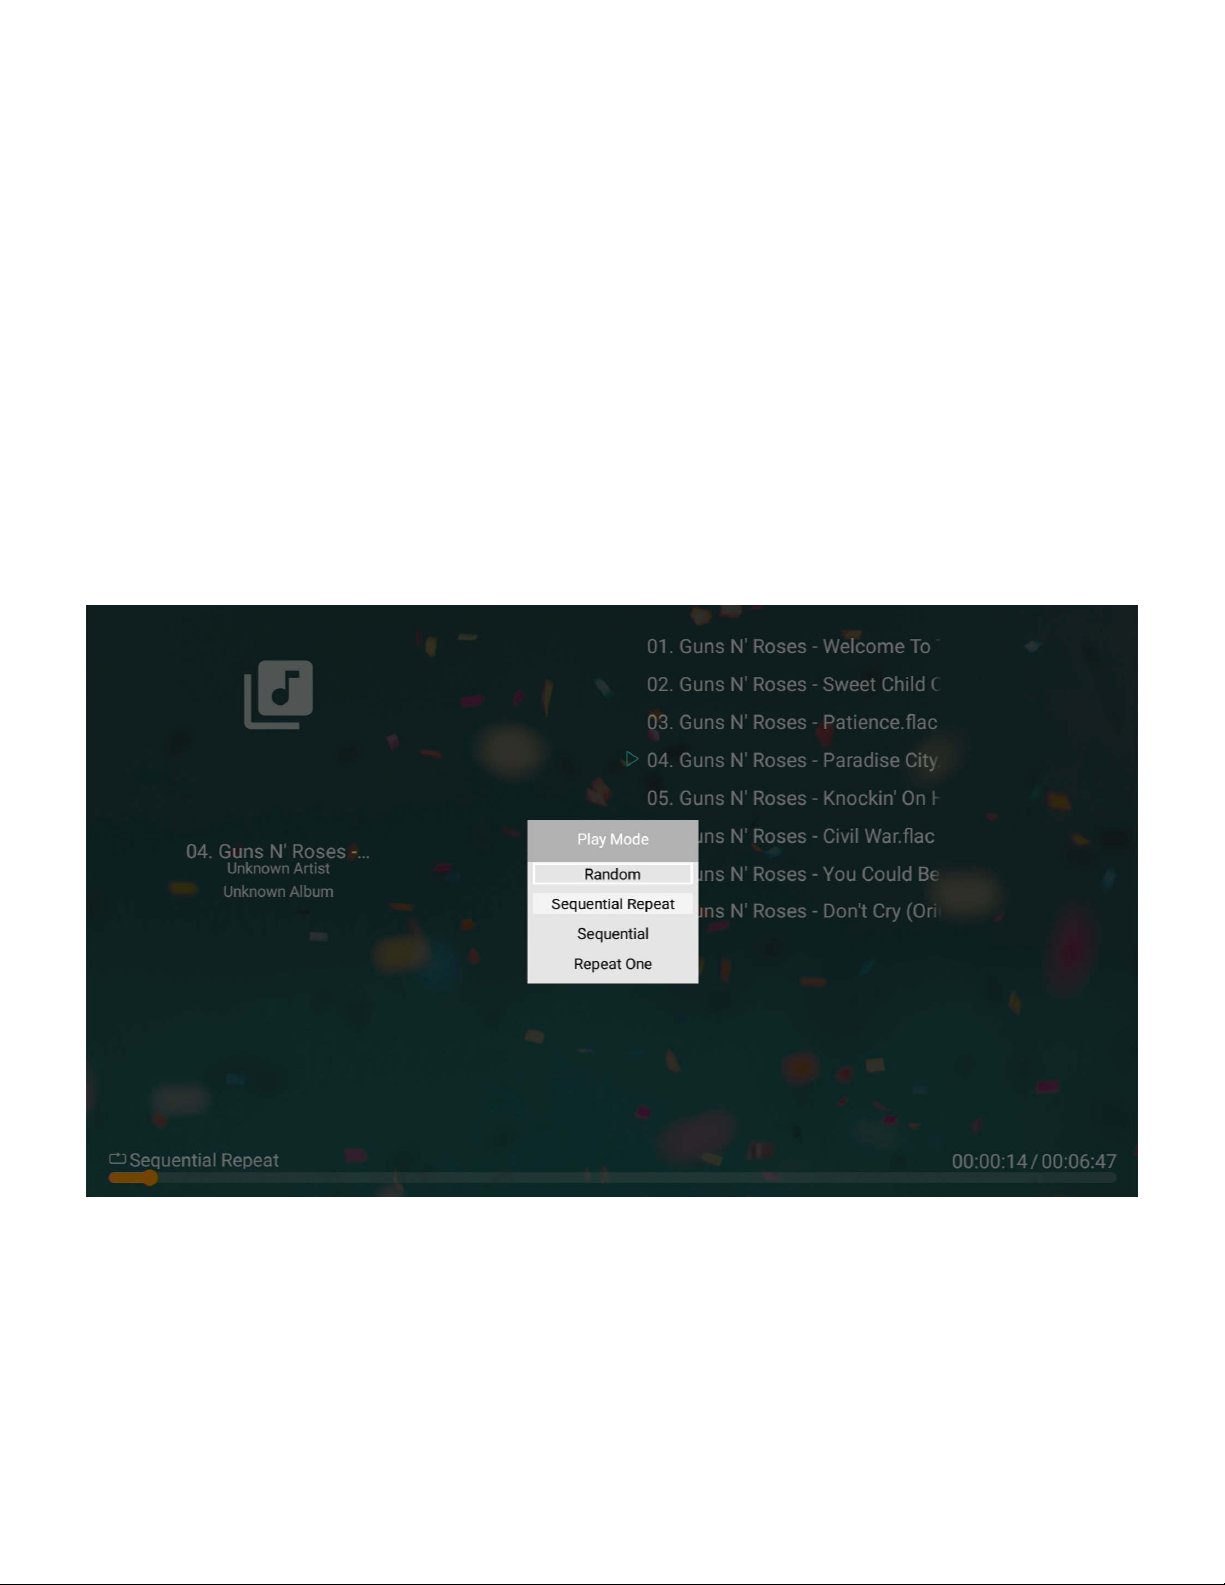
•Use the Menu button to change the playbac order of the songs in the current folder:
Random, Sequential Repeat, Sequential, Repeat One.
Got Questions? Let Us Help! Email SUP[email protected]
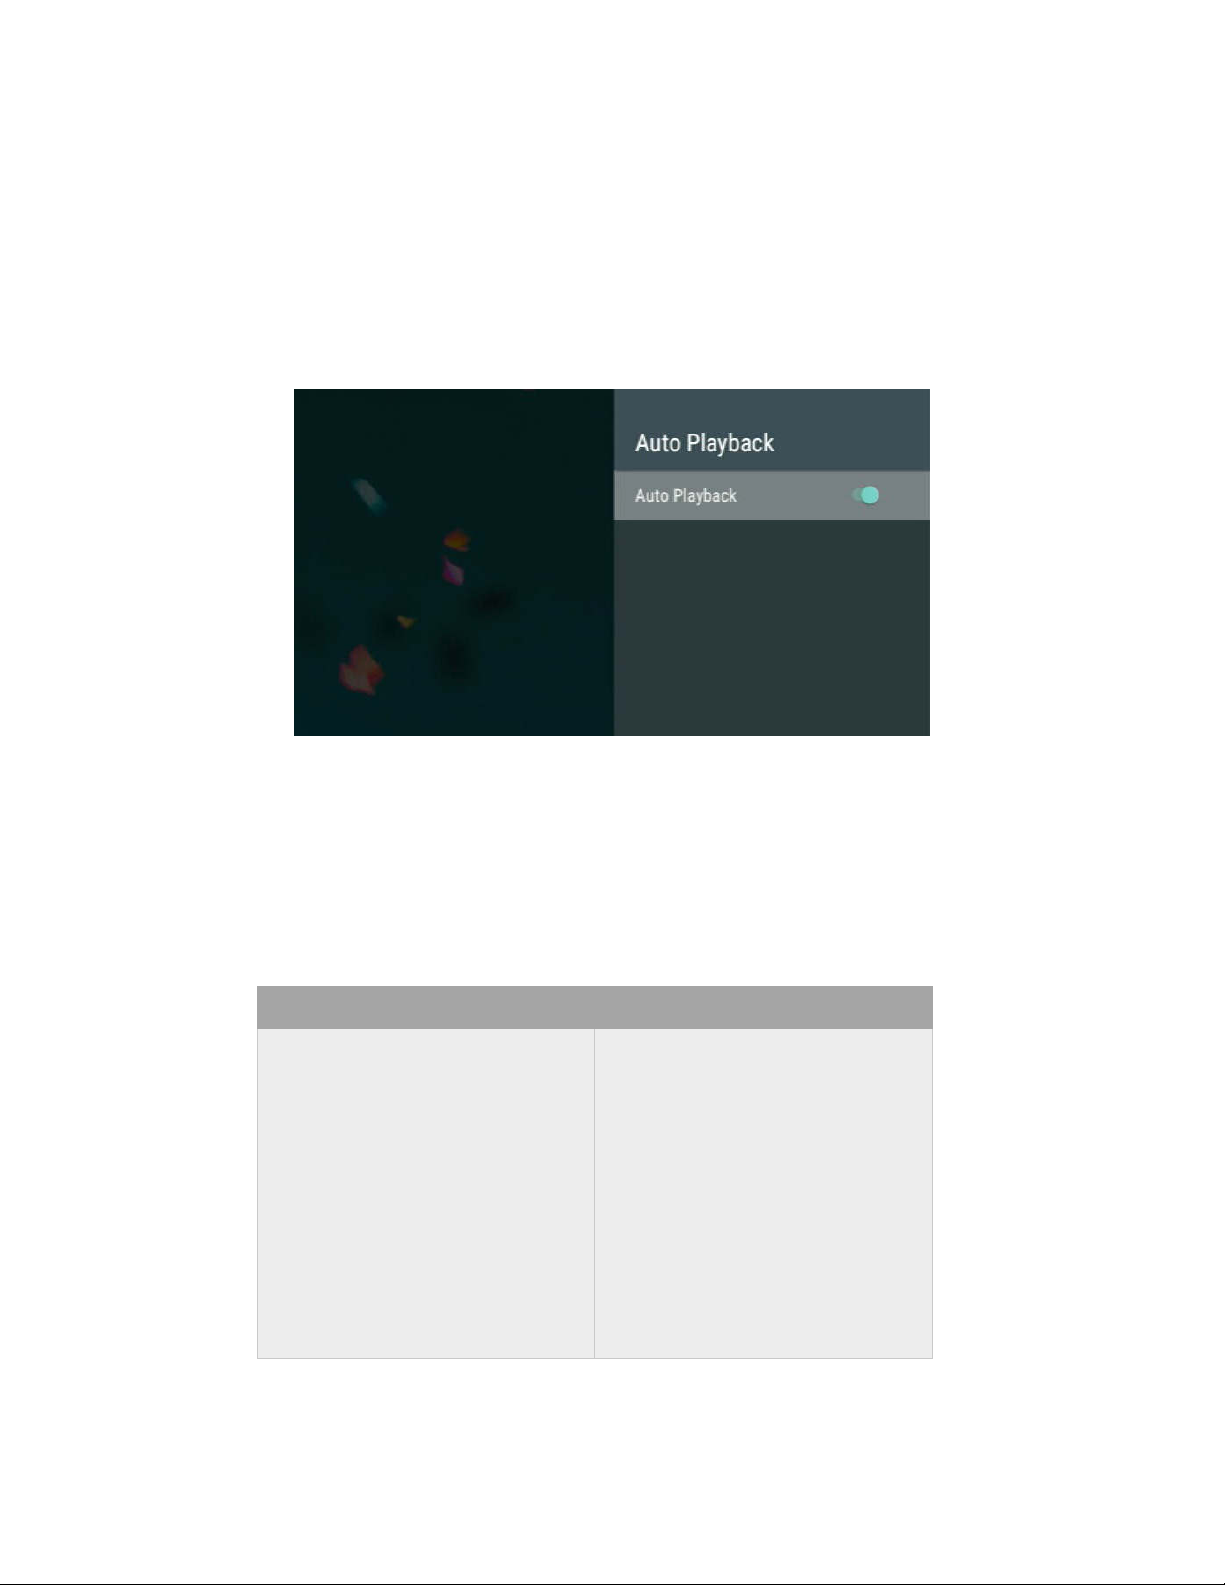
How do I play video, photos, or music automatically?
The NEUMI ATOM CAST can be configured to automatically play videos, photos, or music when:
•Power is plugged in, including when power is restored after an outage
•Turned on using the remote control
•A Micro SD card or USB drive is inserted
To enable this feature, go to the Settings menu and enable the Auto Playback setting.
Ma e sure the videos, photos, and music files that you want to automatically play are in the root
folder and not in any subfolders. The Auto Playbac feature will only play one type of media file and
will not mix files. It will first loo for videos to play; if no video files are found it will loo for music
files to play; if no music files are found it will loo for photos to play. To automatically play one file
type, ma e sure that there are no other file types in the root folder of the Micro SD card or USB
drive. To control the sequence of playbac , name the files using a common format and in
alphabetical order:
RIGHT! WRONG!
VIDEO0001.MKV
VIDEO0002.MP4
VIDEO0003.MKV
…
VIDEO0010.MKV
VIDEO0011.MKV
…
VIDEO0100.MP4
1.MKV
02.MP4
3.MKV
…
10-Video.MKV
11(1).MKV
…
100.MP4
Got Questions? Let Us Help! Email SUP[email protected]
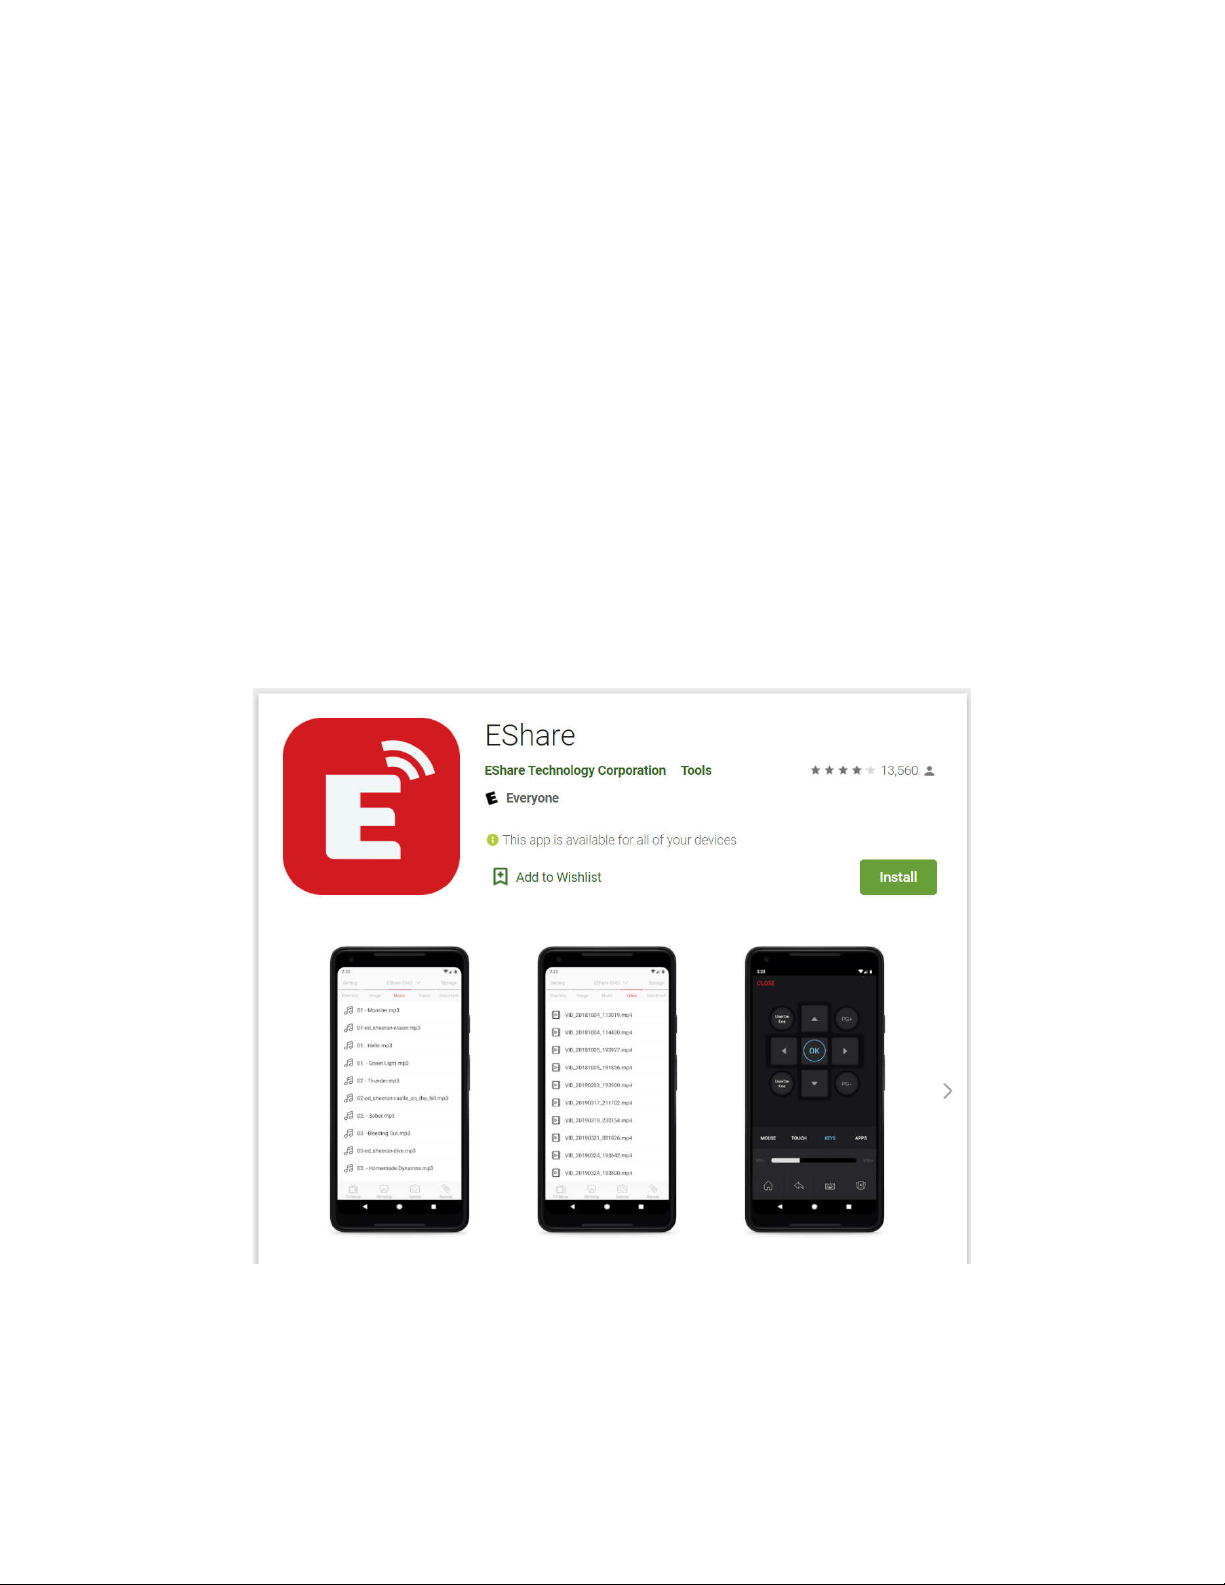
How do I use the EShare feature?
User Advice: EShare feature erformance is de endent on the s eed and signal quality of
the Wi-Fi network. High bitrate 1080 or 4K videos may not stream/cast smoothly. Please
ensure that the ATOM CAST has a strong Wi-Fi signal for the best ex erience.
The ATOM CAST comes pre-configured for use with EShare – a powerful application that provides
wireless media casting, screen mirroring, and remote control capabilities:
•Cast videos, photos, and music from your phone/tablet/computer to the ATOM CAST
•Mirror the display of the ATOM CAST to your phone/tablet/computer screen
•Mirror the display of your phone/tablet/computer to the ATOM CAST, without audio
•Stream the camera feed from your phone/tablet/computer to the ATOM CAST
•Use your phone/tablet/computer as a remote control or eyboard for the ATOM CAST
To use EShare download and install the EShare app on your smartphone, tablet, or computer. The
EShare app is available for installation from Google Play, Apple App Store, Microsoft Store, and
Chrome Web Store.
After installing EShare on your smartphone, tablet, or computer, ma e sure the ATOM CAST is
connected to the same Wi-Fi networ . Start the EShare app and it will automatically find and
connect to the ATOM CAST. For specific instructions on how to use the casting and streaming
features in EShare, please refer to the instructions provided within the EShare app.
Got Questions? Let Us Help! Email SUP[email protected]
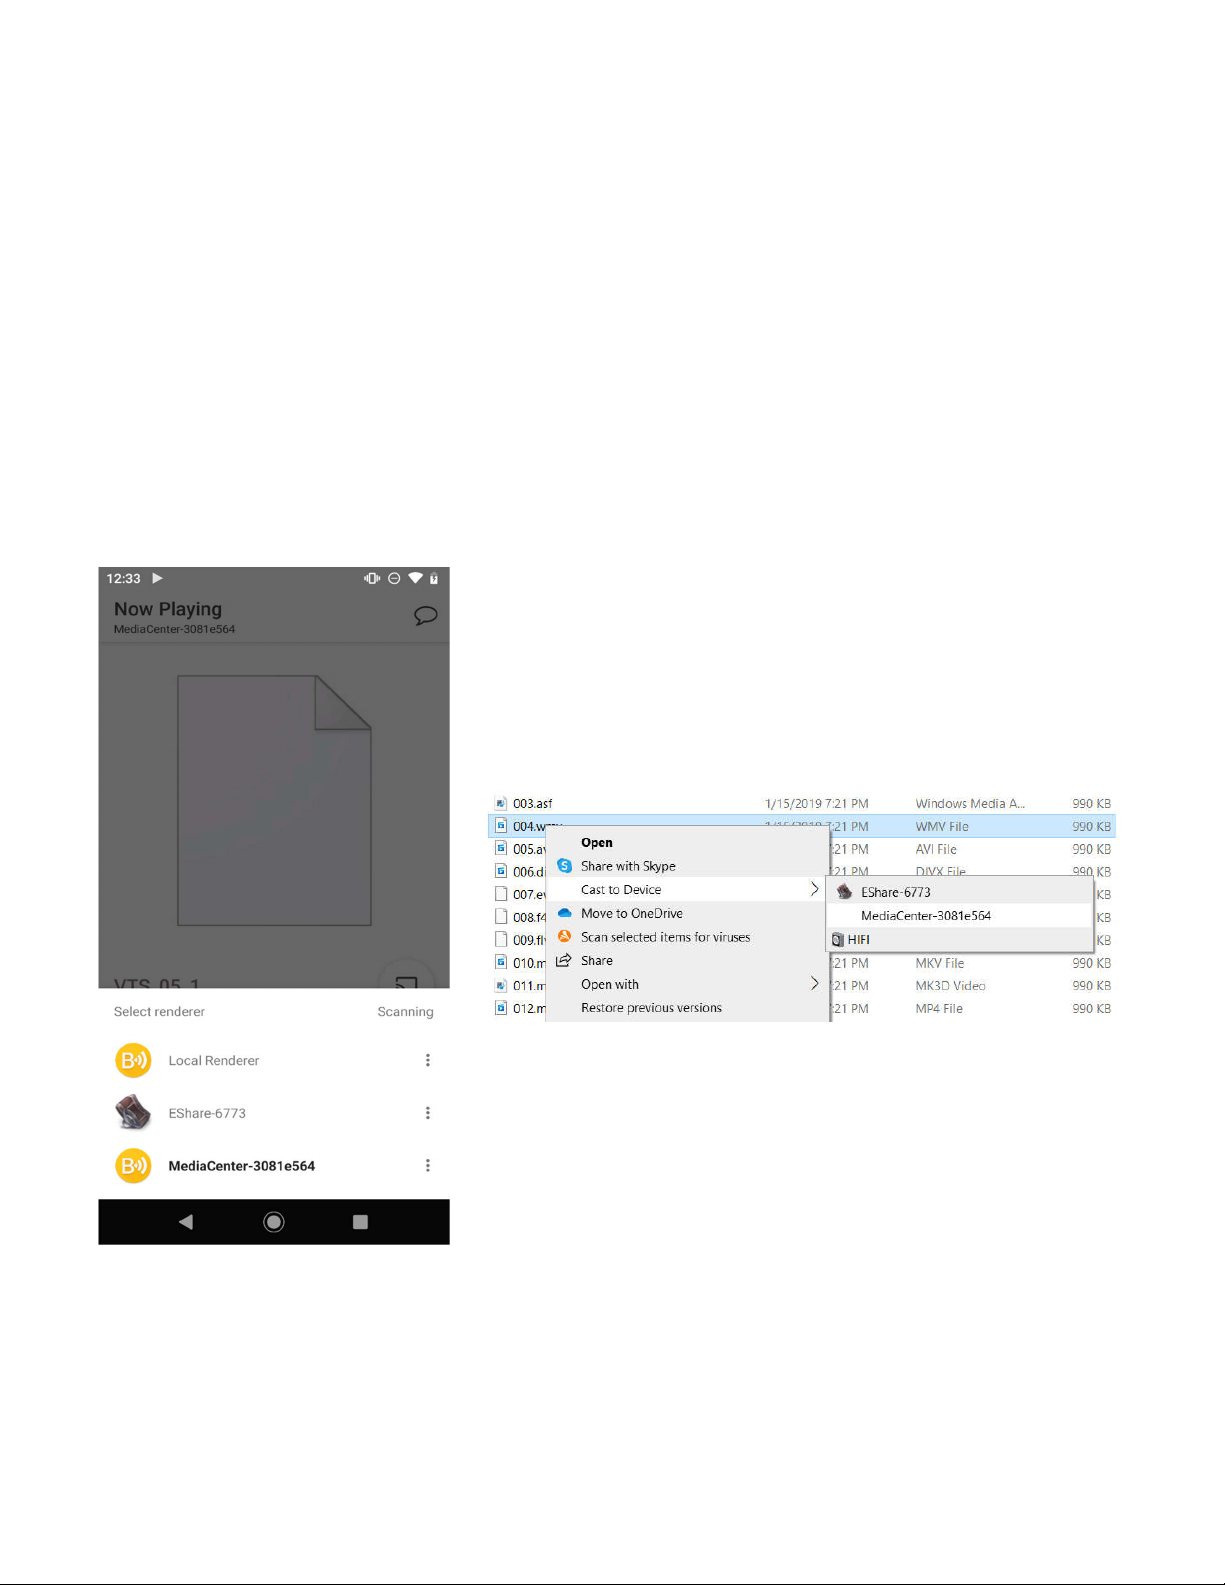
How do I use the UPnP/DLNA feature?
User Advice: UPnP/DLNA feature erformance is de endent on the s eed and signal quality
of the Wi-Fi network. High bitrate 1080 or 4K videos may not stream/cast smoothly. Please
ensure that the ATOM CAST has a strong Wi-Fi signal for the best ex erience.
The ATOM CAST has a built-in UPnP Renderer that can be used to play videos, photos, and music
from a UPnP server that is on the same local networ . This is useful for users who have a
centralized library of media files that they would li e to play on TVs in different parts of the house.
Setting up and configuration of a UPnP server is beyond the scope of this user manual, although
there are numerous tutorials on the Internet on how to do this with free software tools.
The UPnP Renderer name for the ATOM CAST is “MediaCenter” followed by a string of unique
numbers. It will be automatically listed on the UPnP casting device as an available renderer, such
as shown in the screenshots below from an example Android phone and Windows 10 computer:
When the UPnP cast video is playing, a limited number of video playbac controls are available
using the ATOM CAST remote control. Playbac can also be controlled using the UPnP casting
device.

Got Questions? Let Us Help! Email SUP[email protected]
I Now Have Additional Questions...
Here are some common questions and answers. If you have additional questions, please email
SUPPORT@NEUMITECH.COM for additional help!
Video does not play or plays with problems
The media player supports video, music, and photo files that meet the following requirements:
Video File Support
•Container files: MKV, MP4, MOV, VOB, AVI, TS, M2TS, WMV
•MPEG1, MPEG2, MPEG4/ASP, VP8 – maximum 1920x1080@60fps, 50mbps
•H.264/AVC, H.265/HEVC – maximum 4096x2304@30fps, 2048x1080@60fps, 200mbps
Music File Support
•Formats: MP3, FLAC, OGG, APE, AAC
•Bitrate: 32 bps to 320 bps
Photo File Support
•Formats: JPG, PNG, GIF (non-animated), BMP
The most common cause for videos not playing is an unsupported video codec or a resolution that
is higher than the maximum supported. You can use the free MediaInfo tool at
htt s://mediaarea.net/MediaInfoOnline to chec if your video satisfies these requirements.
Videos that do not play can be recoded using free software to be compatible. Please email our
support team at SUPPO[email protected] if you need help doing the conversion.
The USB drive or Micro SD card cannot be read
For USB drives and Micro SD cards, chec that the drive is using FAT32, exFAT, or NTFS file
system. Some drives come with hidden files from the factory that may cause error messages.
Please try copying all files off of the drive, reformatting the drive, and then copying the files bac
onto the drive.
The media player does not support Micro SD cards or USB drives that other file systems such as
HFS+, or EXT3/4. Please email SUPPORT@NEUMITECH.COM if you need help troubleshooting
storage-related issues.

Got Questions? Let Us Help! Email SUP[email protected]
Photos are displayed sideways or upside down
The media player is designed to display photos as-is without ma ing any changes to them. This
ensures that your photos are never accidentally damaged or overwritten. The rotation function
provided by the media player only changes how the current photo is shown on screen – the
rotation change is not saved to the photo file. Therefore, the next time the photo is shown, it is
again displayed without any rotation applied.
Please visit WWW.NEUMITECH.COM for tutorials on how to fix image rotation issues using free
software. Please email SUPPORT@NEUMITECH.COM if you need further help in this regard.
Photos have blac bars on the sides or above/below
The media player shows all photos without cropping any portion of the photo. For photos that do
not exactly match the display ratio of the TV screen, there will be blac bars added to the sides or
above/below the photo. This is normal behavior and your computer/phone wor the same way. To
eliminate blac bars, ma e sure your photos are a perfect match for the resolution of the TV
screen, such as 1920x1080.
The player does not respond to remote control
To see if the remote is wor ing, please use the cell phone tric where you loo at the remote's
signal emitter through your cell phone's camera. If you have an iPhone, use it in selfie mode with
the front camera since the main camera has an IR filter. If the remote is wor ing, you'll see the
emitter light up through your phone's camera. This helps determine if the remote is bad. Please
email SUPPORT@NEUMITECH.COM if you need additional assistance.

Got Questions? Let Us Help! Email SUP[email protected]
Settings Menu
Network – Connect to a Wi-Fi networ . Note that the networ
features of the ATOM CAST are dependent on the speed and signal
quality of the Wi-Fi networ . High bitrate 1080p or 4K videos may
not stream/cast smoothly. Please ensure that the ATOM CAST has a
strong Wi-Fi signal for the best experience.
Language - Sets the media player’s operating language
Dis lay Resolution - Sets the video output resolution. By selecting
Auto, the player will attempt to determine the optimal resolution
setting. Select a different resolution if desired.
Dis lay Zoom - Adjust the edge of the output image so that it
properly fits the TV screen.
Audio Out ut Mode - Sets the audio output mode. In Normal
mode, audio will be output through HDMI or analog AV output
depending on which method is used to connect the media player to
a TV. If this setting is set to Analog mode, audio will be output only
through the AV output jac . It is, therefore, possible to have the video output to a TV using HDMI,
and the audio output to a stereo system using the analog AV connection.
System Sounds - Enable or disable the system sound when the user presses a remote control
button.
Volume Setting - Set the audio output volume. The remote control volume buttons can also be
used to set the audio output volume.
Audio Out ut Format - Set the audio output format. The Default setting is stereo PCM output.
Select Passthrough to send surround sound audio to a home theater receiver.
Close Subtitle - Set the default subtitle display behavior when playing a video. When enabled,
subtitles will be closed and not shown by default.
Auto Playback - Automatically play videos, music, or photos found on the root directory of a USB
drive or Memory Card. The Auto Playbac feature will only play one type of media file and will not
mix files. It will first loo for videos to play; if no video files are found it will loo for music files to
play; if no music files are found it will loo for photos to play.
Factory Reset - When selected, resets all settings bac to factory default
Su ort Info - Display technical support contact information.
About - Display the current firmware version and access the online firmware update menu.
**Firmware Updates – When available, firmware updates will be available for download from our
product information website WWW.NEUMITECH.COM and will include installation instructions.

Got Questions? Let Us Help! Email SUP[email protected]
S ecification
Video File Support
•Container files: MKV, MP4, MOV, VOB, AVI, TS, M2TS, WMV
•MPEG1, MPEG2, MPEG4/ASP, VP8 – maximum 1920x1080@60fps, 50mbps
•H.264/AVC, H.265/HEVC – maximum 4096x2304@30fps, 2048x1080@60fps, 200mbps
Music File Support
•Formats: MP3, FLAC, OGG, APE, AAC
•Bitrate: 32 bps to 320 bps
Photo File Support
•Formats: JPG, PNG, GIF (non-animated), BMP
Storage Drive Support
•USB drives with FAT32, exFAT, or NTFS file systems
•Micro SD cards with FAT32, exFAT, or NTFS file systems
Video Output
•HDMI: 720p, 1080i, 1080p, 2160p, all @50Hz/60Hz
•AV: 720x576 (PAL), 720x480 (NTSC)
Audio Output
•HDMI: PCM, Passthrough
•AV: Stereo
Dimensions:
•4.57” x 1.54” x 0.55” (116mm x 39mm x 14mm), player alone
•Weight: 1.4 Ounce (39 Grams), player alone

Got Questions? Let Us Help! Email SUP[email protected]
FCC Statement
1. This device complies with Part 15 of the FCC Rules. Operation is subject to the following two
conditions:
(1) This device may not cause harmful interference.
(2) This device must accept any interference received, including interference that may
cause undesired operation.
2. Changes or modifications not expressly approved by the party responsible for compliance could
void the user's authority to operate the equipment.
NOTE: This equipment has been tested and found to comply with the limits for a Class B digital
device, pursuant to Part 15 of the FCC Rules. These limits are designed to provide reasonable
protection against harmful interference in a residential installation.
This equipment generates uses and can radiate radio frequency energy and, if not installed and
used in accordance with the instructions, may cause harmful interference to radio communications.
However, there is no guarantee that interference will not occur in a particular installation. If this
equipment does cause harmful interference to radio or television reception, which can be
determined by turning the equipment off and on, the user is encouraged to try to correct the
interference by one or more of the following measures:
•Reorient or relocate the receiving antenna.
•Increase the separation between the equipment and receiver.
•Connect the equipment into an outlet on a circuit different from that to which the receiver
is connected.
•Consult the dealer or an experienced radio/TV technician for help.
FCC Radiation Exposure Statement
This equipment complies with FCC radiation exposure limits set forth for an uncontrolled
environment. This equipment should be installed and operated with minimum distance 20cm
between the radiator & your body.

Got Questions? Let Us Help! Email SUP[email protected]
STANDARD LIMITED WARRANTY
The manufacturer warrants this product to be free from defects in wor manship and materials
under normal use for one (1) year from the original purchase date. The manufacturer agrees, at its
option during the warranty period, to repair any defect in material or wor manship or to furnish a
repaired or refurbished product of equal value in exchange without charge (except for a fee for
shipping, handling, pac ing, return postage, and insurance which will be incurred by the customer).
Such repair or replacement is subject to verification of the defect or malfunction and proof of
purchase as confirmed by showing the model number on the original dated sales invoice.
WARRANTY LIMITATIONS
This warranty does not include:
•Normal wear and tear
•Any condition resulting from other than ordinary use or any use for which the product was
not intended
•Any condition resulting from incorrect or inadequate maintenance or care, modifications,
misuse, abuse, negligence, accidents, or shipping damage
•Dissatisfaction due to buyer’s remorse
The limit of liability under this warranty is the original purchase price of the product. The
manufacturer ma es no express warranty or condition whether written or oral and the
manufacturer expressly disclaims all warranties and conditions not stated in this limited warranty.
To the extent allowed by law, the manufacturer disclaims all implied warranties or conditions,
including any implied warranties of merchantability and fitness for a particular purpose. For all
transactions occurring in the United States, any implied warranty of condition of merchantability,
satisfactory quality, or fitness for a particular purpose is limited to the duration of the express
warranty set forth above. Some states or countries do not allow a limitation on how long an implied
warranty lasts or the exclusion of limitation of incidental or consequential damages for consumer
products. In such states or countries, some exclusions or limitations of this limited warranty may
not apply to the customer. For consumer transactions, the limited warranty terms contained in this
statement, except to the extent lawfully permitted, do not exclude, restrict, or modify but are in
addition to the mandatory statutory rights applicable to the sale of this product to the customer.
WARRANTY CLAIMS
Claims for defective products must be made within one (1) year from the invoice date. Claims for
missing parts must be made within 30 calendar days after the product is received. Any claim for
defective merchandise returns must be pac aged for adequate protection during shipping. All
claims must provide a copy of the original invoice. If the claim is justified, the item(s) or part(s) will
be repaired or replaced or a credit will be issued.

FCC:
This device complies with part 15 of the FCC Rules. Operation is subject to the condition that
this device does not cause harmful interference (1) this device may not cause harmful
interference, and (2) this device must accept any interference received, including interference
that may cause undesired operation.
Changes or modifications not expressly approved by the party responsible for compliance
could void the user's authority to operate the equipment.
NOTE: This equipment has been tested and found to comply with the limits for a Class B
digital device, pursuant to Part 15 of the FCC Rules. These limits are designed to provide
reasonable protection against harmful interference in a residential installation. This equipment
generates, uses and can radiate radio frequency energy and, if not installed and used in
accordance with the instructions, may cause harmful interference to radio communications.
However, there is no guarantee that interference will not occur in a particular installation.
If this equipment does cause harmful interference to radio or television reception,
which can be determined by turning the equipment off and on, the user is encouraged to try to
correct the interference by one or more of the following measures:
-- Reorient or relocate the receiving antenna.
-- Increase the separation between the equipment and receiver.
-- Connect the equipment into an outlet on a circuit different
from that to which the receiver is connected.
-- Consult the dealer or an experienced radio/TV technician for help.
To maintain compliance with FCC’s RF Exposure guidelines, This equipment should be
installed and operated with minimum distance between 20cm the radiator your body: Use
only the supplied antenna.
This manual suits for next models
1
Table of contents


