Roadmaster RM-DVD9001 User manual
Car Audio Hifi System
RMRM
RM-DVD9001

1
Receiption collection
Speaker collection
Warning and Precautions........................................2
Wire Connection................................................4
Loading and Replacing the battery
Basic operation
Install the unit
Remove the unit
Installation.............................................................5
General Features....................................................6
Remote Control......................................................8
Setup Operation....................................................10
Basic Operation....................................................10
Basic
Audio
V ideo
Band
Band tuner
AS/PS
Radio Operation....................................................11
Accessories.........................................................21
Specifications.....................................................27
Troubleshooting...................................................22
Familiar characters and their meanings
General problems
TFT Monitor
Radio Tuner
Mp3 playback
DVD player
TV ........................................................19Operation
Play Operation.....................................................12
Bluetooth ............................................................16
Contents
A2DP operation....................................................18
GPS .....................................................20Operation
POWER
VOL
BAND
SEL
MENU
MUTE
BT
EJECT
DVD
MP4
E
MP3
USB
SD
JP G
VCD

2
Warnings and Precautions
1
Only connect the unit to a DC 12V power supply with negative grounding.
Never install the unit where the operation for safety driving is restrained.
Never use the video display function in the front when driving to prevent the violation of laws
regulations and also to reduce the risk of traffic accident except using for rear view video camera.
Never expose the unit, amplifier, speakers to moisture or water to prevent electronic sparks or fires.
Please don't change the fuse in the power cord without professional guidance, improper fuse may
cause damage to this using unit or even cause fire.
Please power off the unit at once and send it back to the after-sales service center or the dealer/
distributor yo purchased from if one of the following symptoms is found:
(a)NO audio output; (b)NO image output;(c)Water or other obstacle enters the unit; (d)Smoking;
(e)Peculiar smell.
To ensure safe driving, please adjust the volume to a safe and comfort level in case of emergency
situations.
2
3
4
5
6
7
Warnings

3
1 Never disassemble or adjust the unit without any professional guide. For details, please consult any professional car shop/
dealer for inquiry.
2 If the front panel or the TFT monitor is dirty, please use a clean silicone cloth and neutral detergent to wipe off the spot.
Using a rough cloth and non-neutral detergent such as alcohol for cleaning may result in scratching or decolouration to the
applicant.
3 If any abnormal behaviour of the unit is found, please refer to trouble shooting guide of this manual. If no relevant information is
found , please press [ ] button to remove the front panel , use spiky object to press RESET key to resume factory
default, please refer to page 6-7 for the position of RESET key
4 If you have parked the car in hot or cold weather for a long time, please wait until the temperature in the car becomes normal
before operating the unit.
5 Using in-car heater in low temperature environment may result in beads coagulate inside the unit, DO NOT use the unit in this
situation, eject the disc and wipe off the bead on the disc. If the unit still doesn
6 No fierce impact to the LCD monitor when it is in open position for preventing the damage to any mechanisms inside.
7 To prevent the damage to the screen, avoid touching it with sharp objects.
8 The monitor employs auto motorizing mechanism, please do
9 To provide a clear demonstration and an alternative for easy understanding to the operation of this unit, graphic illustrations
are used. However, these illustrations are some different from the actual images displayed in the unit.
10 During operation the unit," "is displayed if the particular operation is not available or illegal.
11 Operate the unit correctly according to this manual to prevent. Unnecessary problem. The guarantee won
't work after a few hours, please contact with
after-sales service centre.
n't push, pull, or swivel the monitor manually to prevent damage
to any mechanisms inside.
't be valid if the
problem is caused by inappropriate operation.
Precautions
Warnings and Precautions
4
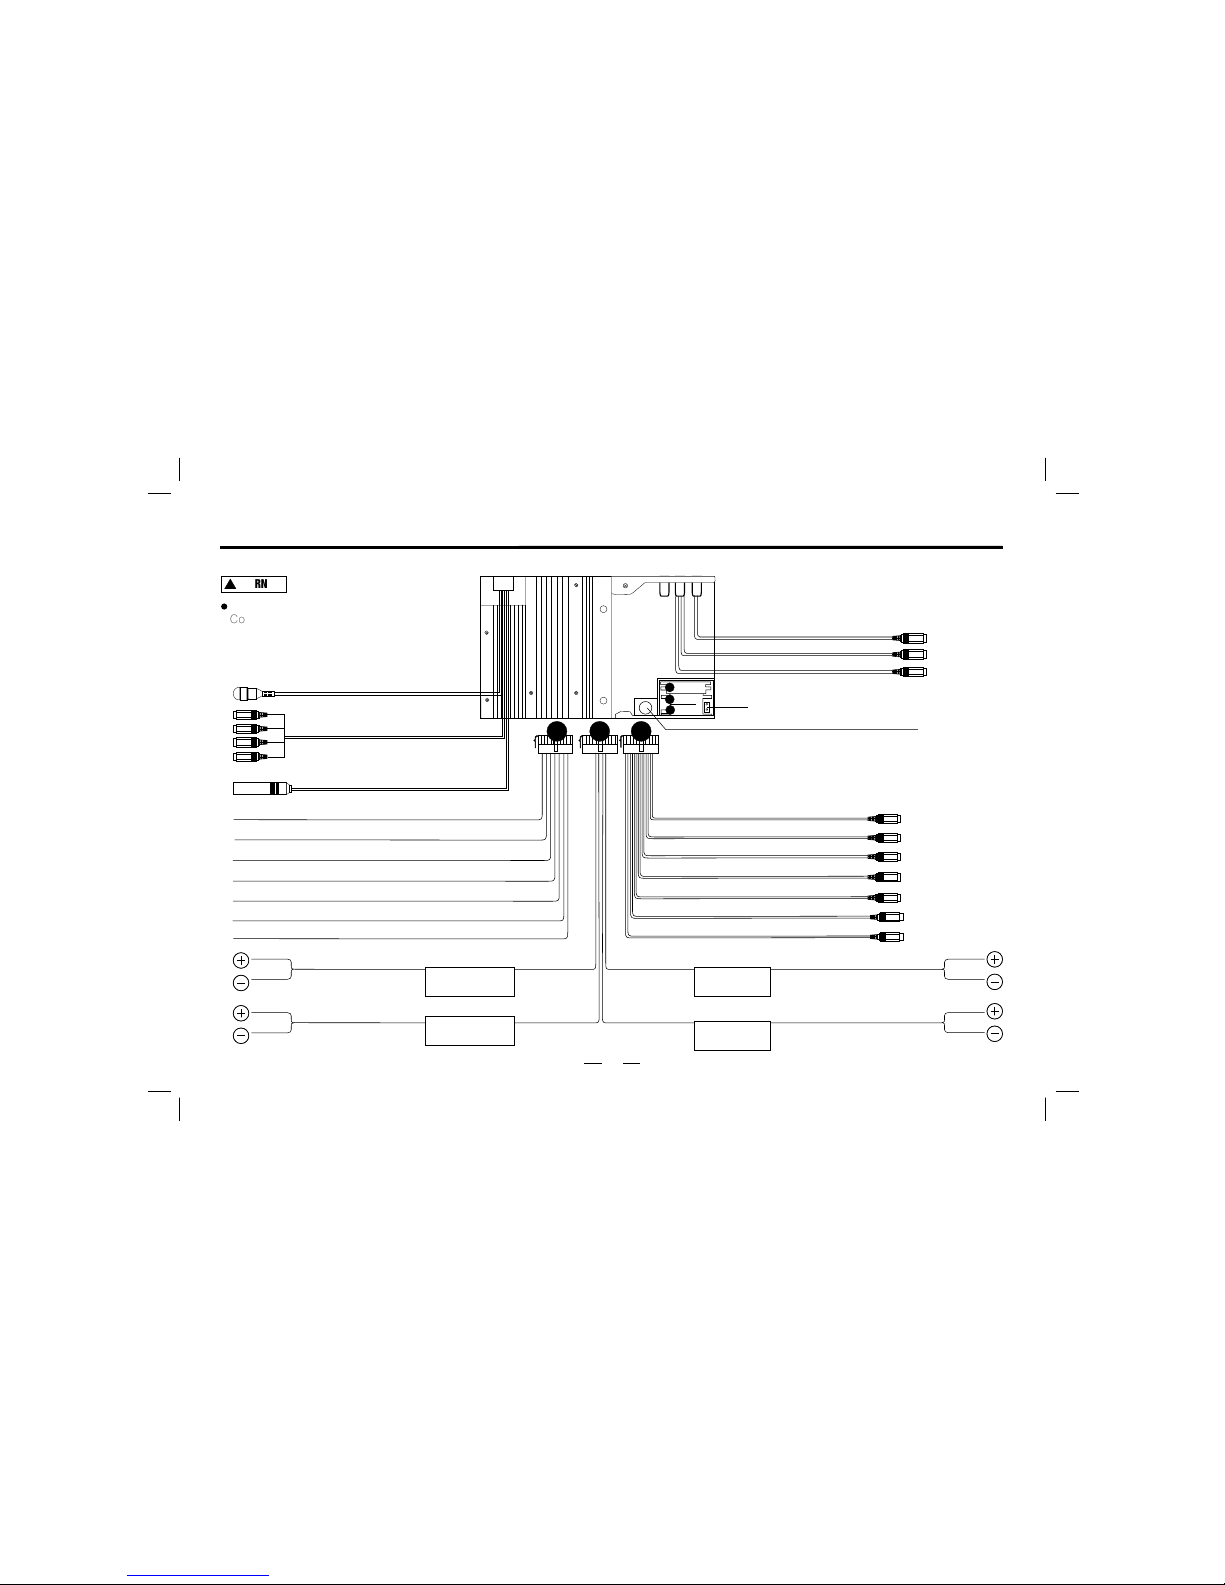
Wire Connection
Braking wire
Connect the braking wire to the
ground, or there will be only voice but no
image display on the monitor
WARNING
1
2
3
Aux video input
321
Grey Wire with Brown Treble / Bass output
Rear right RCA out
Grey Wire with Purple
Video output
Grey Wire with Yellow
Back car video in
Black Wire with Yellow
Grey Wire with blue
Rear left RCA out
Grey Wire with Red Front right RCA out
Grey Wire with White Front left RCA out
Right track input
Left track input
Black wire with red
Black wire with white
External GPS socket
10A Fuse
TV Antenna plug
GPS signal input
Radio Antenna
Gray Braking wire
Yellow Main power wire +12V
Orange Connect to dash light
Blue Antenna power output wire
Black Main ground wire
Red ACC control wire
Purple Detecting wire for back a car.
FRONT.L
White
White/Black
FRONT.R
Gray
Gray/Black
Green
Green/Black
Purple
Purple/Black
REAR.L
REAR.R
(If no TV tuner, this wire not included)
(If no GPS function, this External GPS socket not included)
(If no GPS function, these wires not included)
Black wire with Yellow

5
Install
Before install the unit, fit it in the suitable place in
your car. Then connect the corresponding speakers and
electrical connections. After checked your system is
properly, follow the installation instructionsoperated
INSTALL THE UNIT
REMOVE THE UNIT
1. Install the metal slices at the
sides of the unit.
2. Lock up the unit in the car by fixing
the metal slices with screws
1. Unfastening the screws from the metal slices.
2. Remove the metal slices . Take the unit away
from the car, then pull the connecting plug out.
2. screw
3. screwdriver
1. Metal slices

6
General Features
MUTE] Button: Mute.
MENU] Button:
SEL] Button: Audio settings.
Button:
Reset Button.
USB Slot.
SD
Button: To eject the DISC.
System setting(The main menu mode).
Decrease volume/increase volume.
Port.
1
2
3
4
5
7
6
8
9
10
11
12
13
14
15
16
BT Button:
BAND Button: Band switch.
ignal receive window.
TFT-LCD screen.
LCD OFF Button: LCD off/Pwoer.
Remote control s
MIC.
Disk slot
EJECT
MUTE
MENU
SEL
LCD OFF
BAND
+
-
Reset
BT
M
S
B
8
10
11
12
9
13
14
16
1
2
3
4
5
6
7
15
7
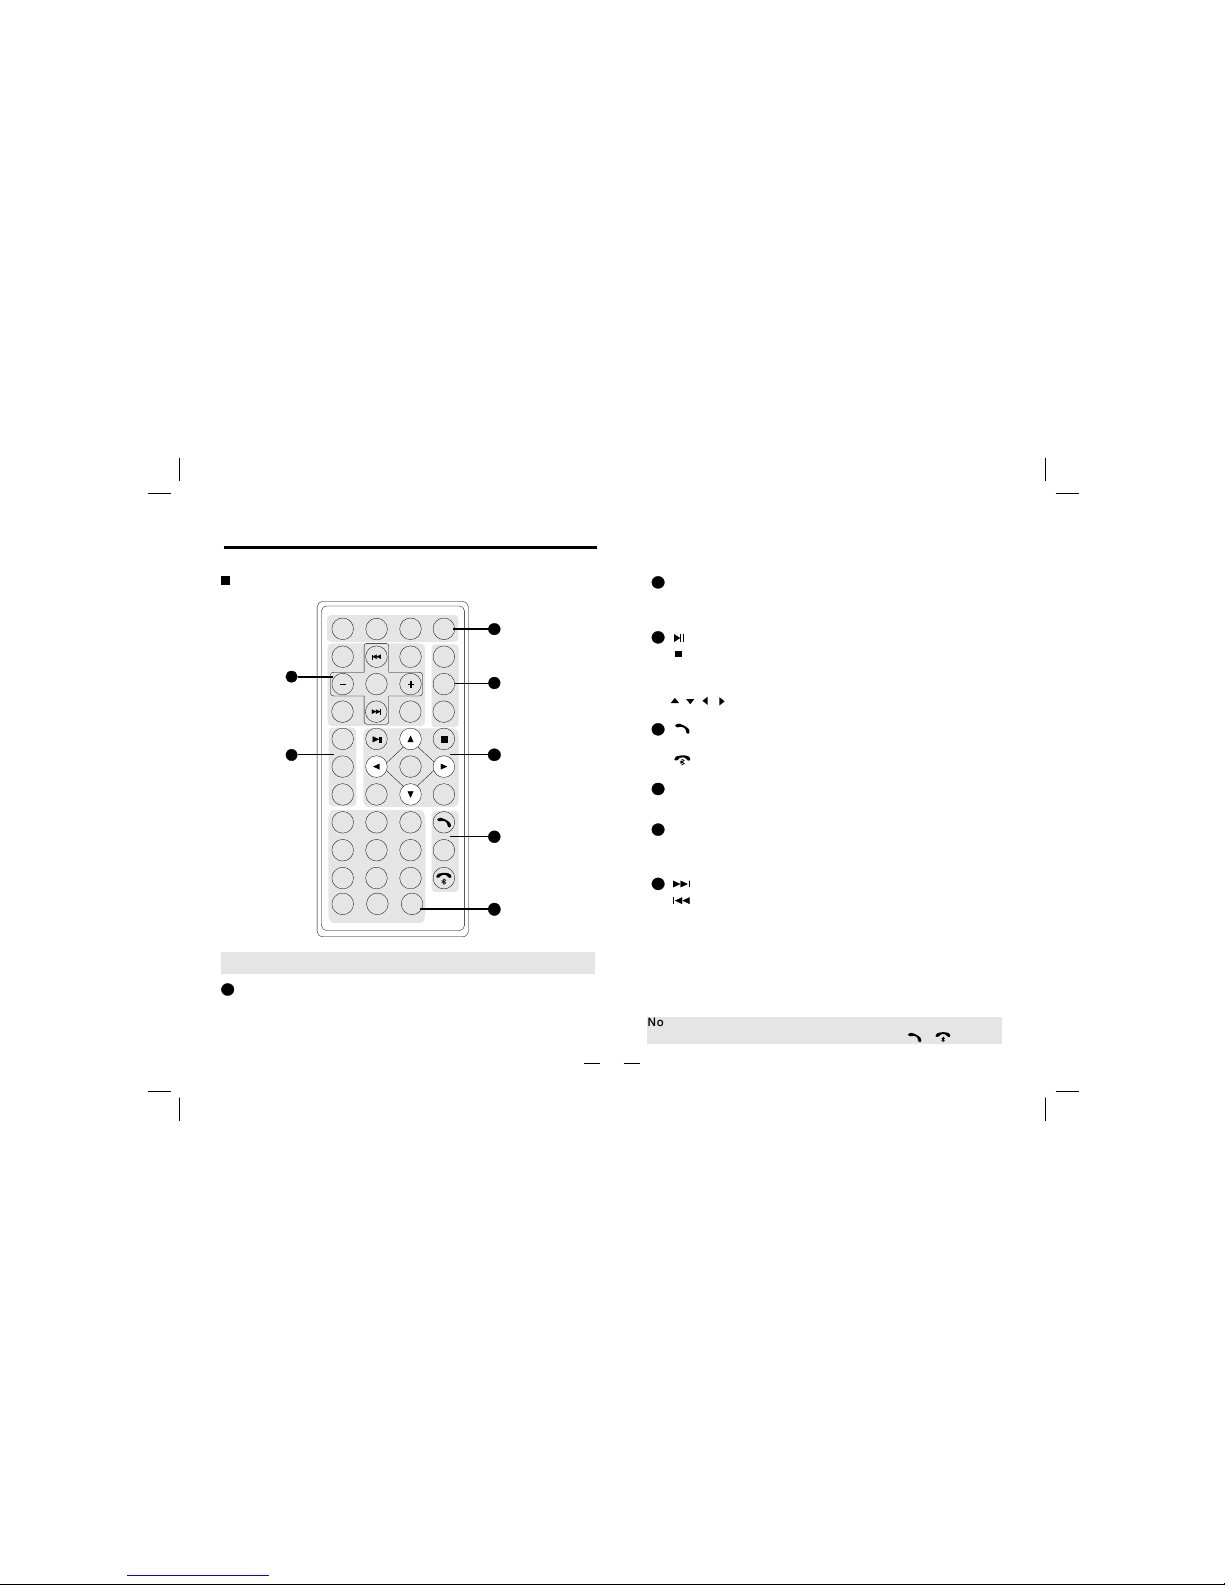
[BAND] Button: Band switch
[APS] Button: Scan
[ST/RPT] Button: Stereo switch/Repeat
[ ]Button: Play/Pause
[ ]Button: Stop
[Title] Button: Title Menu
[ENTER] Button: Play/Confirm
[ ][ ][ ][ ]Button: Up/down/left/right button
[0~9]Button:0~9
[RO/SN] Button: Radio scan
[AF] Button: Search stations automatically
[TA] Button: Traffic broadcast
[PTY] Button: Program style
[ ]Button: Forward/Next chapter
[ ]Button: Backward/Previous chapter
[+/-]Button: Increase/recluce volume
[SEL] Button: System setting
[CLK] Button: Clock display
[EQ] Button: Sound effect
[R.L/LANGUAGE] Button: Left/right sound track switch
dialogue language.
[PWR] Button: Power button
[REC/Sub-T]Button: Transfer recording/Language switch
[MUTE] Button: Mute
[SRC] Button: Play source switch
Note: Remote control picture just for reference.
Note: If the unit doesn't have RDS function, AF/TA/PTY invalid.
If the unit doesn't have Bluetooth function, [ ]/[ ] invalid.
1
2
3
4
5
6
7
[ ] Button: Ring on
[OSD/ Id3] Button: Screen Display/ Id3 information
[ ] Button: Ring off
Button and Function
5
1
3
4
2
MuteMute
Sub-TSub-T
BandBand
APSAPSAPSAPSAPSAPS
EQEQEQEQ S TS T
R/LR/L
SRCSRC
PWRPWR
1123
45 6
78 9
0
EnterEnter
SELSEL
CLKCLK
TitleTitleTitleTitle
AFAF
TATA
PTYPTY
RPTRPT
PBCPBC
OSDOSD
I D3ID3
##
ABCABC DEFDEF
GHIGHI JKLJKL MNOMNO
PQRSPQRS TUVTUV WXYZWXYZ
RO/SNRO/SN
10+10+
**
LanguageLanguage
7
6
RECREC
Remote Control

Pull out
Loading and replacing the battery
Remote Control
Notes of remote control using:
Aim the remote control at the remote sensor on the unit.
Remove the battery from the remote control or insert a
battery insulator if the battery has not been used for a
month or longer.
DO NOT store the remote control under direct sunlight
or in high temperature environment, or it may not function
properly.
The battery can work for 6 months under normal condition.
If the remote control does not work, please change the battery.
Use(button shaped) lithium battery(CR-2025)only.
DO NOT recharge, disassemble, heat or expose the battery
in fire.
Insert the battery in proper direction according to the
1)
2)
3)
4)
5)
6)
7) (+)
and ( - ) poles.
Store the battery in a place where children cannot reach to
avoid risk of accident.
8)
8

9
POWER/LCD OFF
BAND
Volume
+/+/
SEL
System setup: press this button to enter into system setup
MENU
Bluetooth: press this button to enter into Bluetooth mode
EJECT
MUTE
MENU
SEL
LCD OFF
BAND
+
-
Reset
BT
M
S
B
Press [+]to increase the volume, press [-] to decrease it.
Basic Operation
After connecting the power supply, press [PWR] to power on
the unit, When the unit is on , hold [PWR] to power off the
unit, press [PWR] to power off the TFT screen.
Press this button to switch among FM1/FM2/FM3/AM1/AM2
In any mode, press this button to back to the main
menu.
MUTE
Press [MUTE] button to turn off volume and again to resume.
EJECT
Press [EJECT] to eject the disc.
Insert the disc into the disc slot
slightly; the disc will be absorbed in automatically.
About 10 seconds after the disc ejected,
if not take it out, the disc will be absorbed in again.
If the disc can not ejected normally, hold this button
to eject the disc.
10
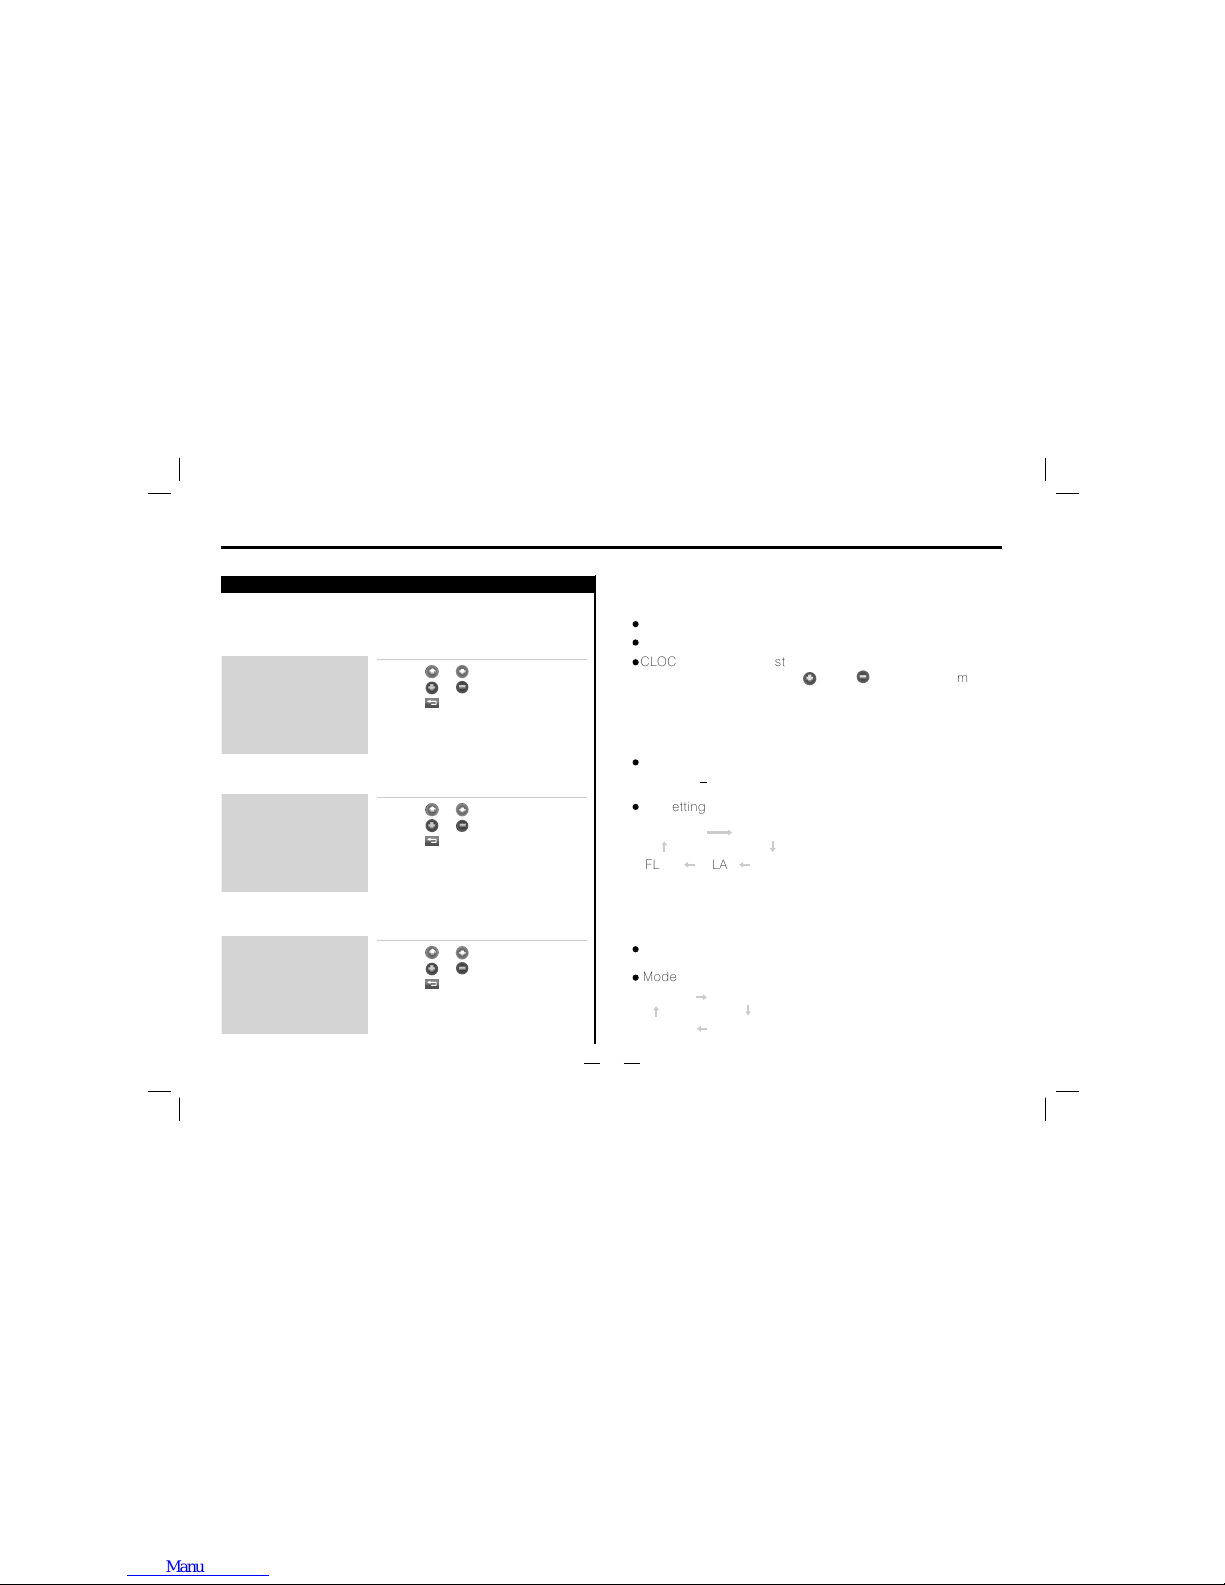
Enter the main menu, touch the setup icon on the screen, it
will display:
SETUP
BASS 0
TREBLE
-07
BALANCE R 06
AUDIO
FADER R 06
EQ FLAT
BRIGHT 14
COLOR
14
CONTRAST 13
VIDEO
MODE USER
LOUD OFF
BEEP ON
CLOCK 00:00
BASIC
Setup Operation
V d o mode:i e
Audio mode:
Basic mode: Menu operation
Touch [ ]/[ ] to choose menu.
Touch [ ]/[ ]to adjust parameter.
Touch [ ] to exit main menu.
Menu operation
Touch [ ]/[ ] to choose menu.
Touch [ ]/[ ]to adjust parameter.
Touch [ ] to exit main menu.
Menu operation
Touch [ ]/[ ] to choose menu.
Touch [ ]/[ ]to adjust parameter.
Touch [ ] to exit main menu.
V d o setupi e
Bright Color Contrast.
Mode
STAD USER
BRIG SOFT
Audio setup
Audio setup Bass Treble Balance Fader setup
between 7.
EQ setting
FLAT ROCK
POP
CLAS
NORM
+
Basic setup
RADIO setup to switch the radio among EUR/USA/S.A
Beep ON and OFF
CLOCK setup to adjust the time. Touch that line firstly
it will twinkling, then press [ ] and [ ] to setup the time
11
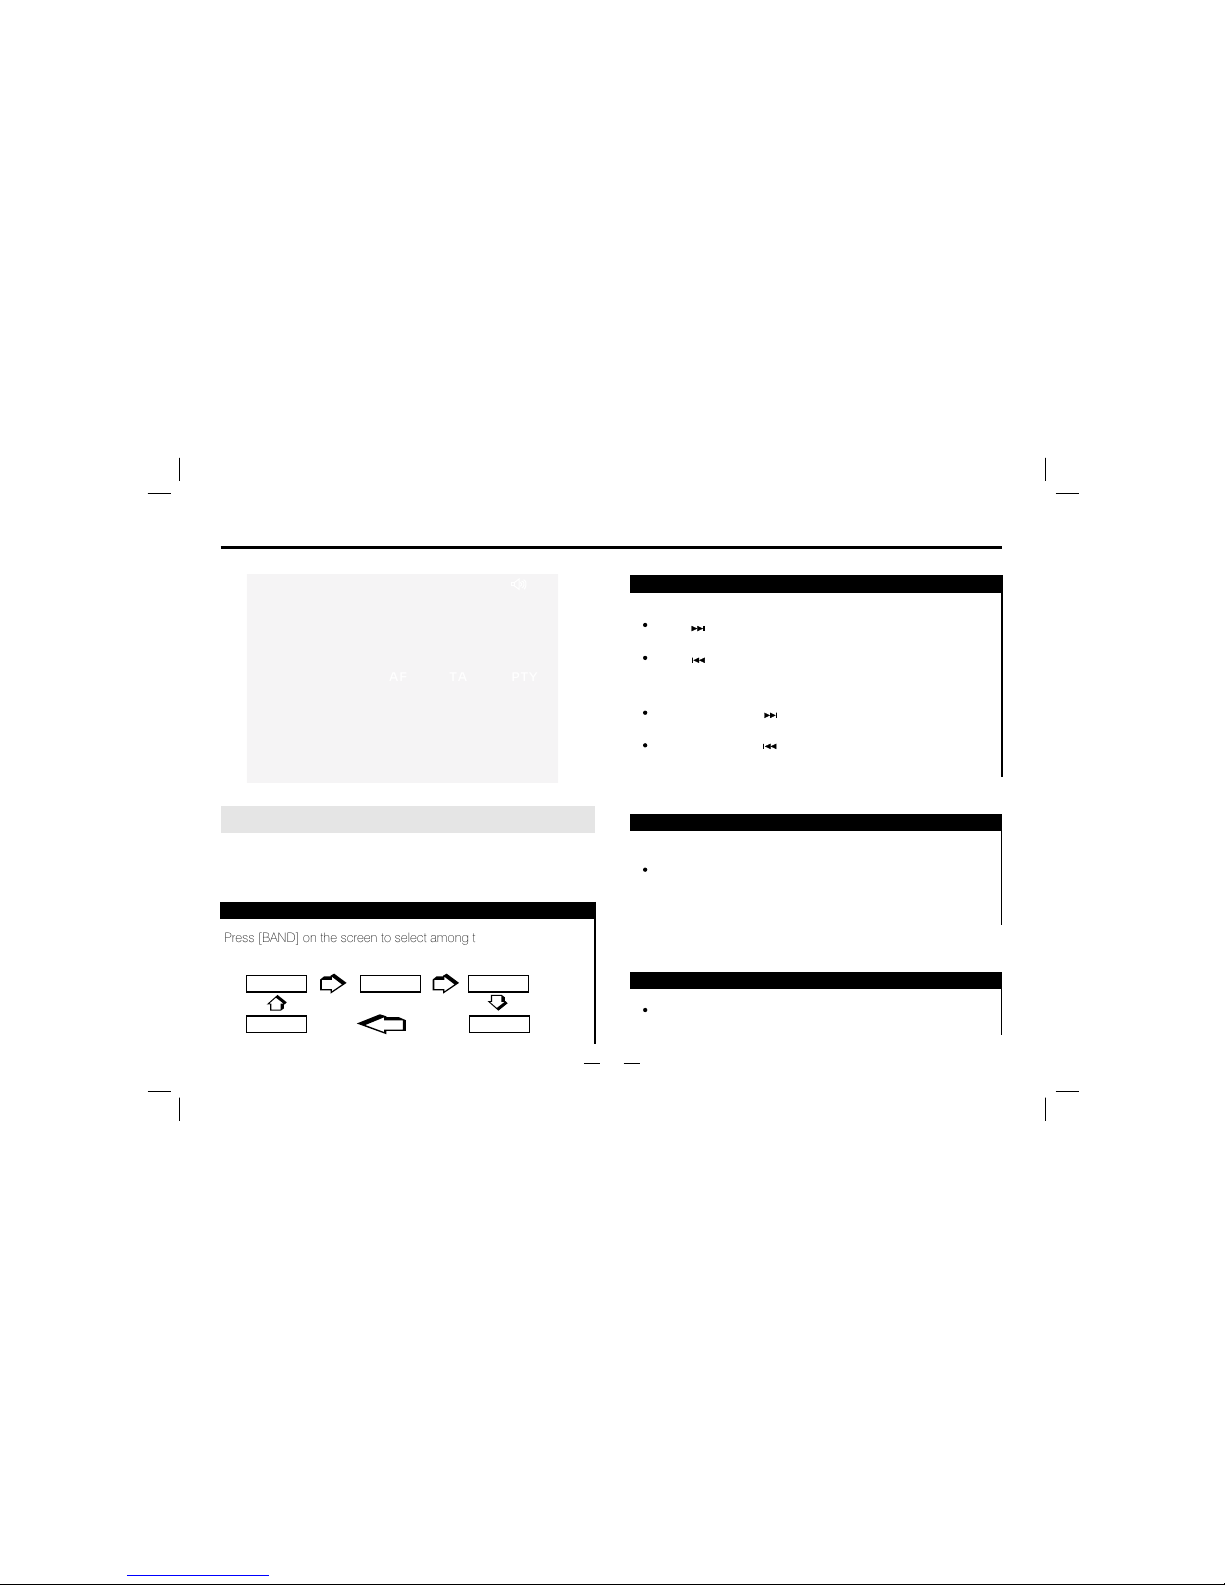
BAND
FM1 FM2
AM1AM2
FM3
AF TA PTY
Press [BAND] on the screen to select among three FM or two AM
bands. (FM1-FM2-FM3-AM1-AM2)
Band Tune
Manually Tune
Automatically Tune
Press[ ] button: adjust to higher frequency.(such as
87.5,87.6...)
Press[ ] button: adjust to lower frequency(such as
105.5,105.0...)
Holding down the [ ] button: search higher frequency
station, and will stop when meeting one.
Holding down the [ ] button: search lower frequency
station, and will stop when meeting one.
Press [APS] icon
Station searching:
Under radio playing mode, long touch [APS] icon can search
and store strong frequency stations automatically.
Select station
Note: If the unit doesn't have RDS function, the touch-screan won't
show "AF, TA and PTY".
Press [SCAN] on the screen to search wave bands.
Store wave bands by hand
Radio Operation
12
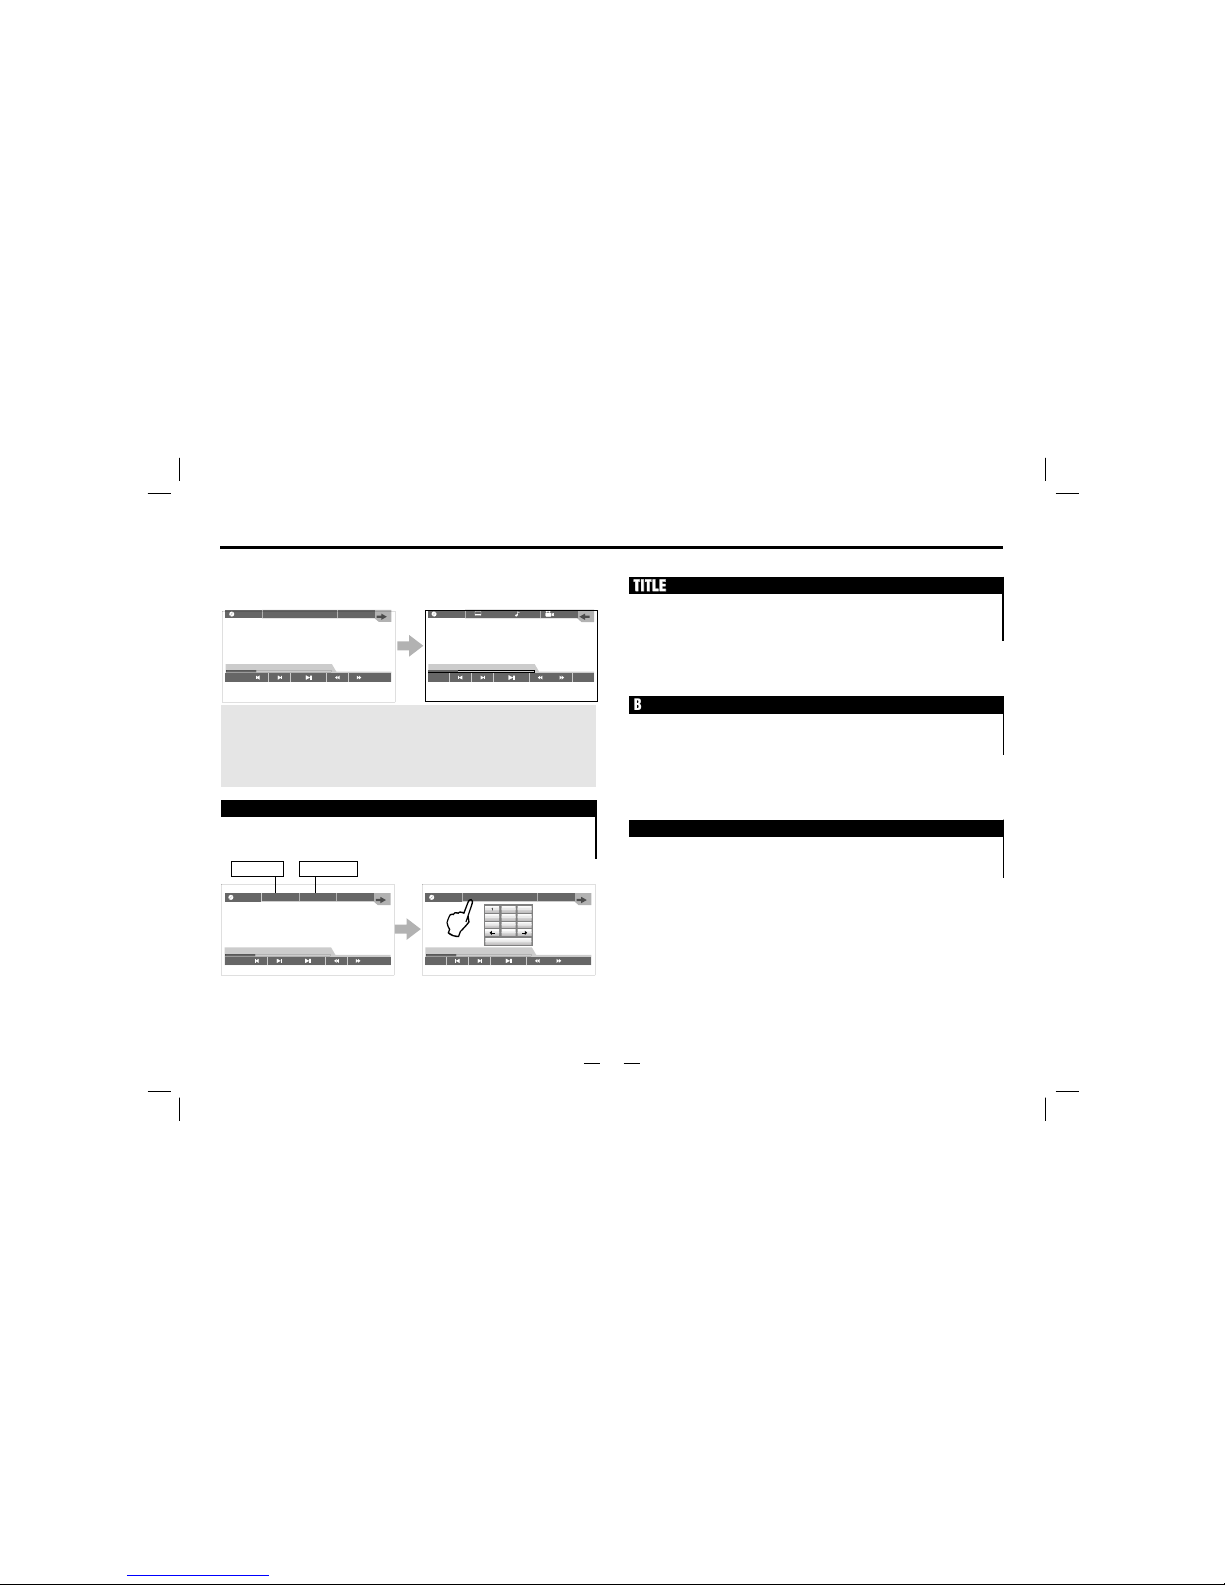
Insert DVD disc, touch the screen will show the menu
as follows:
Play Operation
T 001/003
TITLE
C 002/025
BACK
REP
00:33:11/01:45:44
DVD-V OFF
1/2
BACK
REP
00:33:11/01:45:44
DVD-V OFF
T 001/003
TITLE
C 002/025
BACK
REP
00:33:11/01:45:44
DVD-V
Click the Title Column or the Chapter Column, will appear the following
numeric keyboard, as in the Figure:
Numeric keyboard
T 001/003
TITLE
C 002/025
BACK
REP
00:33:11/01:45:44
DVD-V
TITLETITLE
BACKBACK
MPEG4MPEG4
TITLE: In the play mode, press [TITLE] on the screen or remote
control to back to the title menu, and re-select the items
needed.
Note: Because of the different state of recording, some CD-R, CD-RW,
DVD-R, DVD-RW, DVD+R, DVD+RW can not play by the unit. Besides,
the disc can not be read if it's not treated terminatively. For more inform
ation about terminative treatment, please refer to the user help of the
recording equipment or the manual of recording software.
Title Column Chapter Column
Touch the number on the numeric keyboard directly, can switch over
the title or the chapter.
Click OK to exit from the numeric keyboard.
Back to Media Player menu: When playing DVD disc, click [BACK] on the
TFT screen to back to the Media Player menu.
The operation of playing MPEG4 disc is the same as DVD disc.

OFF
Note: If the disc only has one language, this function is invalid.
OFF
OFF
1/3
1/3
Caption choose
Caption choose: If the disc contains several languages you can
switch the caption.
Angle choose
Angle choose : If DVD support multi angle feature, touch [ ]or
press [ANGLE] button on the remote control,
you can switch different angle.
Note: If the disc only has one angle, this function is invalid.
Volume Control
Volume control: Touch [ ] to switch over STEREO ,LEFT
RIGHT.
Note: general DVD only has two mode.
13
Play operation
F 011/014
4915X2644
T 008/008
001.JPG
BACK
REP
001 001 .JPG
001
PHOTO
002 002 .JPG
003 003 .JPG
004 004 .JPG
005 005 .JPG
BACK
MEDIA
Picture rotation
ZOOM OUT
Click [ ] icon on the screen to rotate the picture
JPEG
You can choose the icons on
the interface as the left picture
show, also can set up the disc.
Insert JPEG disc , the screen will show the following menu:
Click the Title Column/Chapter Column, the numeric keyboard
will show on the screen.
Title Column Chapter Column
Note: Please refer to DVD disc play for the operation of other functions
Click [ ] icon on the screen to ZOOM IN or ZOOM OUT picture

In the above menu, you can choose the song and click on it directly
to play.
Click[ ][ ] to choose more songs
001
MUSIC
001 001 .MP3
002 002 .MP3
003 003 .MP3
004 004 .MP3
005 005 .MP3
BACK
MUSIC
NONE
FILE NAME: 004 004.MP3
ALBUM: NONE
00:00:30/00:04:12
REPEAT BACK
PLAYING
001 TRACK01
001 CD
MUSIC
002 TRACK02
003 TRACK03
004 TRACK04
005 TRACK05
BACK
MUSIC
CDDA
TRACK01
00:00:30/00:04:12
REPEAT BACK
PLAYING
MEDIA
PBC
14
Insert MP3 disc, the screen will show menu as follows:
Insert CD disc, the screen will show menu as follows:
Play/pause: Click[ ] button to play or pause.
Play operation
Chapter election: When playing CD/MP3 disc, touch [ ] on the screen
or press [ ] on the panel to choose previous chapter, and touch [ ]
on the screen or press [ ] on the panel to choose next chapter.
MEDIA file format switch
If the disc has more than one file format, press [MEDIA] to switch the
file format.
When playing VCD disc, touch the words on the top right corner to
switch among STEREO, LEFT, RIGHT.
Audio track switch:
When playing VCD disc, click [PBC] on the screen to switch
the mode among ON/OFF/CANCEL

USB/SD operation
15
REPEAT
T 001/003
STEREO
PBC
BACK
REP
00:33:11/01:45:44
VCD
Play operation
USB/SD mode
When playing CD/MP3 disc, click [REP] on the screen to select
the mode among TRACK, OFF, FOLDER, ALL.
In VCD reading mode, touch the TFT screen will appear the following menu:
Insert U-disk, the system will enter into USB mode automatically.
For detailed operation information, please refer to MP3 play/DVD
play/JPEG play/VCD play.
Insert SD card, the system will enter into SD mode automatically
For detailed operation information, please refer to MP3 play/DVD
play/JPEG play/VCD play.
USB SD
EJECT
MUTE
MENU
SEL
LCD OFF
BAND
+
-
Reset
DVD
M
S
B
D
16
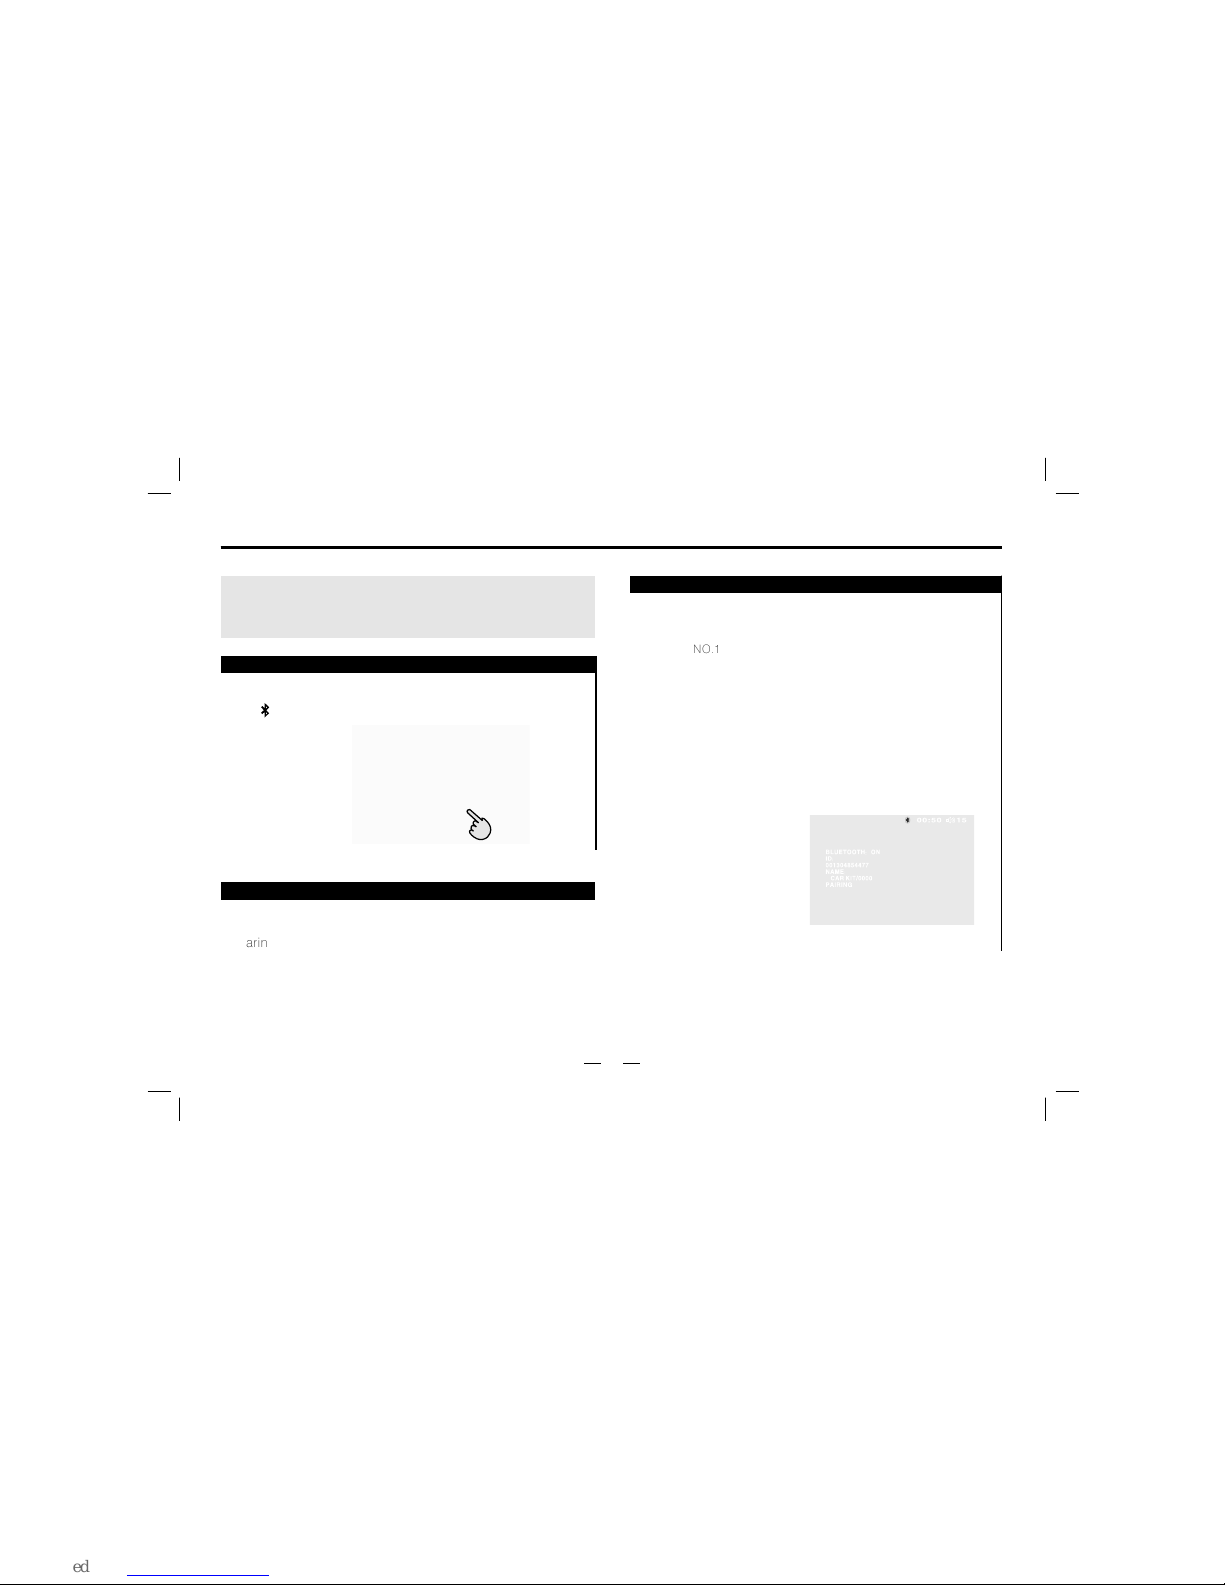
Press [ ] button or touch Bluetooth icom to enter into
Bluetoth mode
Bluetooth Selection
Bluetooth
The Bluetooth is wireless mode of transmission in short
distance.Through Bluetooth function, the DVD unit establishes
connection with Bluetooth handset. And then, these units can
realize mutually contrdling and file transfering.
Working mode of Bluetooth
Bluetooth has the following features:
Paring
Phone set pairing step as follows:
NO.1
(NO.1)
Bluetooth:
A: Turn on Bluetooth, then touch On/Off icon to turn on this
function.
B: Turn on Bluetooth function .
C: When the mobile phone set finds the signal, input pairing
number. Initial Pairing Code No. 0000 .
D: After pairing, TFT screen shows pairing succeed and quit
the pairing.
handsets
'
A: Paring
Make DVD Bluetooth function as handsets facility through
pairing.
'
B: Connecting
After connecting with the handset, you can operate the mobile
phone through DVD unit(such as H, F, call, call record etc.)

17
1380013800013800138000
1380013800013800138000
1380013800013800138000
Bluetooth
Mobile phone
After connected, you can make a phone call through touch
screen or your cellphone record.
A: Make a phone call via cellphone
After making a phone call, the [ ]will shining.
B: Make a phone call by touch screenl
Input the numbers on the screen, press [ ] icon can correct
the numbers;
Press [ ] icon to answer phone call;
Press[ ] icon to cancel or hang up.
Answering
Answering functions as follows:
A: After connected, the unit can use the telephone function.
B: When there is a phone call, the Bluetooth will switch to
phone function and show the calling number automatically.
C: Touch Transfer icon can switch to phone answer mode.
Touch it again can return to Bluetooth function of the unit.
Hang up
You can press the [ ]button to hang up.
Note: If the unit does not have this function, pls skip it.
Some models of mobile phones are not supported by the
Bluetooth module of this unit.

A2DP operation
A2DP is a subsidiary function to Bluetooth. After the phone
paired with the unit successfully, click A2DP icon on the main
menu to enter into A2DP interface, then you can operate your
cell phone via the unit, such as pause, play, previous, next.
As in figure:
18
Note: Before pairing with the unit, A2DP is invalid. In addition,
because different mobile phone use different Bluetooth module
and software, so A2DP feature may not work well or compatible
with it in use.
A2DP operation

19
Note: If the unit does not have this feature, please skip this page.
Press [AMS] to search and store the TV program
automatically
You need to install a TV antenna to use TV function
TV :
Press [TV ] icon to choose TV feature on main menu,
it will show picture as follows:
Press [ESC], you can exit to main menu.
These icons only appear when have touch screen function
TV tuner
TV operation
Choose stored Channels:
TV search automatically:
Exit TV function:
Press the number on the remote control, you car choose the stored
channel directly.
For example: press [0] and [8], it will play 8 channel.
Press[ ][ ]on the remote control or touch [CH-][CH+]
to choose previous or next channel.
AMS CH- CH+ ESC
TV
TV
BND
Press the [BND] button on the screen to switch the TV
system among PAL/NTSC/SECAM.
Table of contents
Other Roadmaster Car Stereo System manuals


Popular Car Stereo System manuals by other brands

Sony
Sony CDX-GT630UI - Cd Receiver Mp3/wma/aac Player operating instructions

Clarion
Clarion PN-2548N instruction manual

Sony
Sony CDX-454RF - Compact Disc Changer System operating instructions

Philips
Philips CED320/55 user manual

Panasonic
Panasonic CQ-RD333N Service manual

Kenwood
Kenwood NX-5800 Service manual


