Roberts R979 User manual

ROBERTS
SoundforGenerations
R979
3 Band Digital PLL RDS Radio
with Clock & Alarm
Please read this manual before use
R979 Instruction Book (Ver.2).pm6 24/10/99, 14:111

Controls
4. Wavebandswitch
5. Sensitivity switch
1. Headphonesocket
2. Telescopicaerial
3. Tonecontrol
12 3 54
1
R979 Instruction Book (Ver.2).pm6 24/10/99, 14:112

If you need any further advice, please call our Technical Helpline on
0181 758 0338 (Mon-Fri)
Controls (cont.)
6. Mainsindicator
7. Liquid crystal display
8. Forwardbutton
9. Volumecontrol
10. Reversebutton
11. Snoozebutton
12. Memorybutton
13. Displaybutton
14. Powerbutton
15. Timebutton
16. Trafficbutton
17. Weekendcancelbutton
18.Alternatefrequency button
19. Alarm 2 button
20. Sleepbutton
21. Alarm 1 button
6 7
8
9
10
11
12
13
14
15
16
17
18
19
20
21
22
2
R979 Instruction Book (Ver.2).pm6 24/10/99, 14:113

Controls (cont.)
22. Lock switch
23. Battery compartment
22 23
(onrear)
24. Mains input socket
24
3
R979 Instruction Book (Ver.2).pm6 24/10/99, 14:114

If you need any further advice, please call our Technical Helpline on
0181 758 0338 (Mon-Fri)
Fuse
Whenreplacingthefuseonlya3AASTAapprovedtoBS1362typeshould
be used and be sure to re-fit the fuse cover.
IFINDOUBT-CONSULTACOMPETENTELECTRICIAN.
ReplacementfuseholdersareavailablefromRobertsRadioTechnical
ServicesDepartment at the address shown on the rear of this manual.
Batteries
Removethebatterycover[23]ontherearoftheradiobypushingthecatch
in the direction of the arrow. Remove the small cover inside the battery
compartmentby pushing the cover towards the bottom of the radio. Lift up
thebottomedgeofthecoverandinserttwoIECsizeLR6(AAsize)cellsinto
thespacesinthecompartment.Takecaretoensureallcellsareinsertedwith
thecorrect polarityas showninside thebattery compartment.Replace the
cover.
Note : the two LR6 cells provide power for the clock / memory backup and
must be fitted at all times.
InsertfourIECsizeLR14(Csize)cellsintothespacesinthecompartment.
Takecaretoensureallcellsareinsertedwiththecorrectpolarityasshown
insidethe battery compartment.Replace the battery cover.
Reduced power, distortion, and a ‘stuttering’ sound are all signs that the
batteriesmayneedreplacing.
We would recommend for economy, that the R979 is used on the
mains whenever possible with battery operation for occasional or
stand-byuseonly.
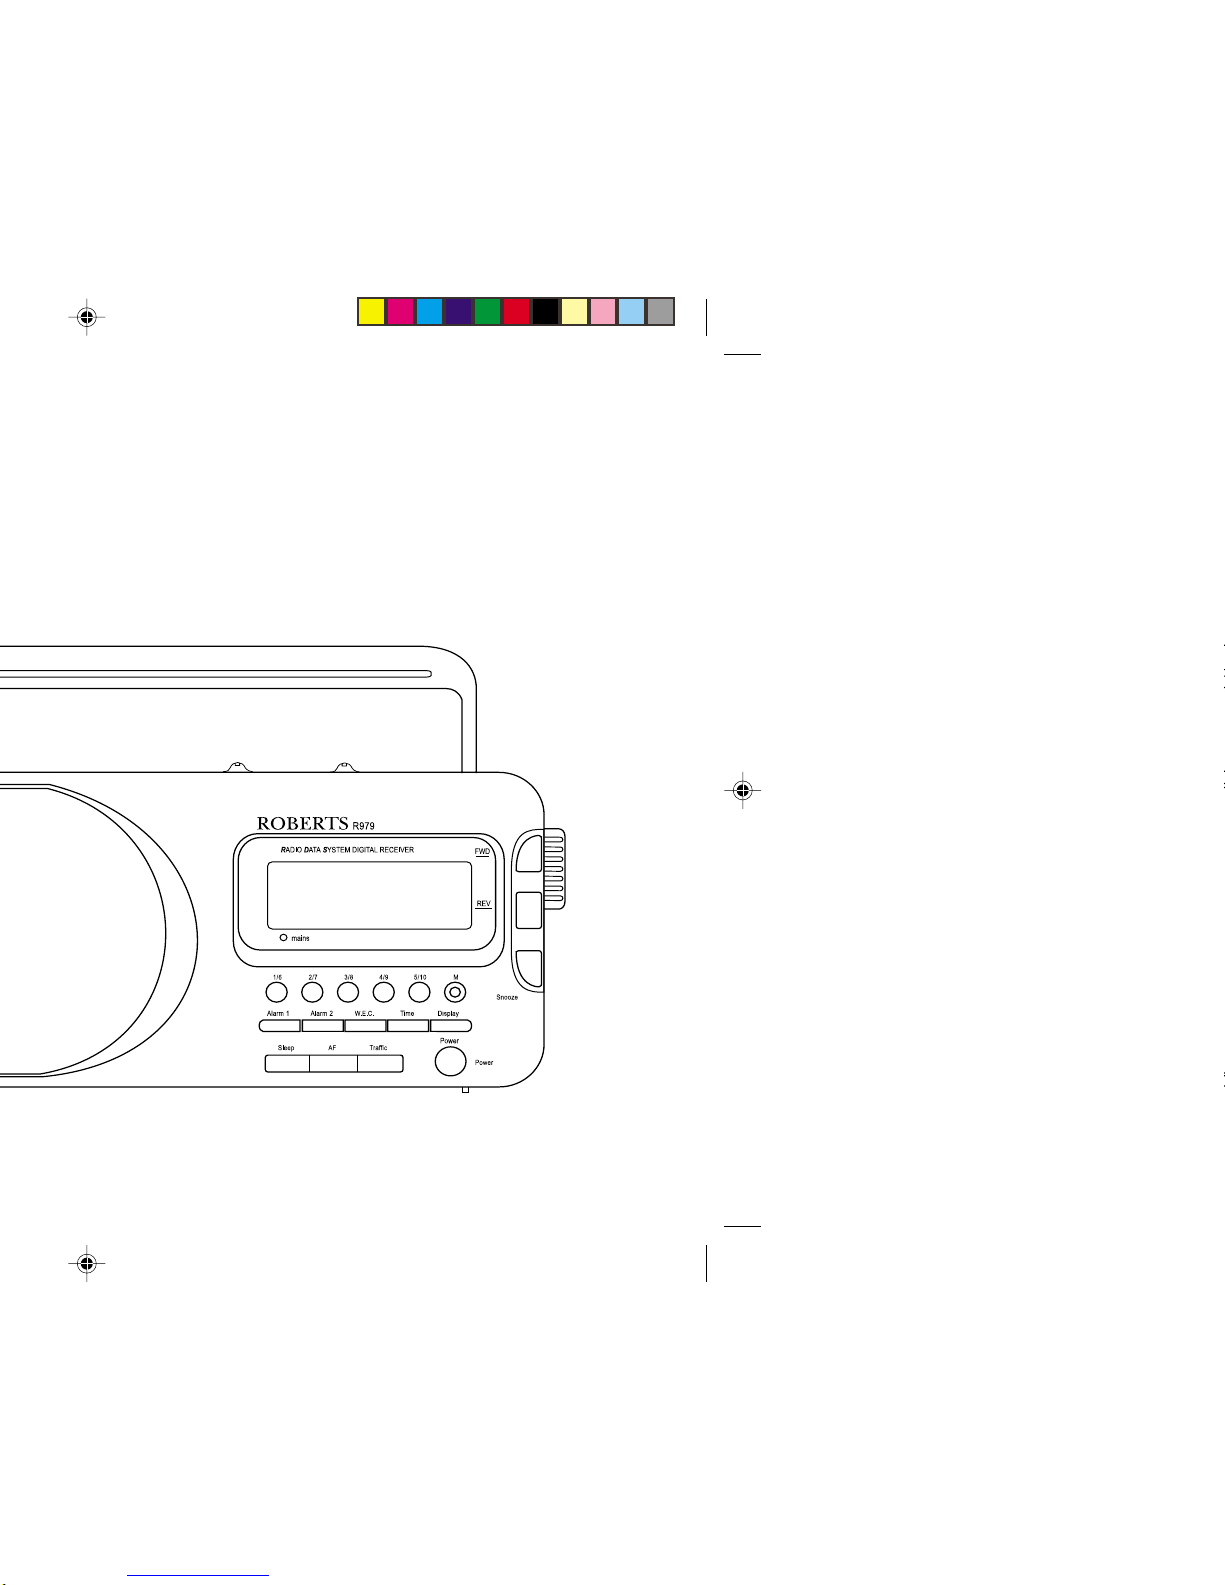
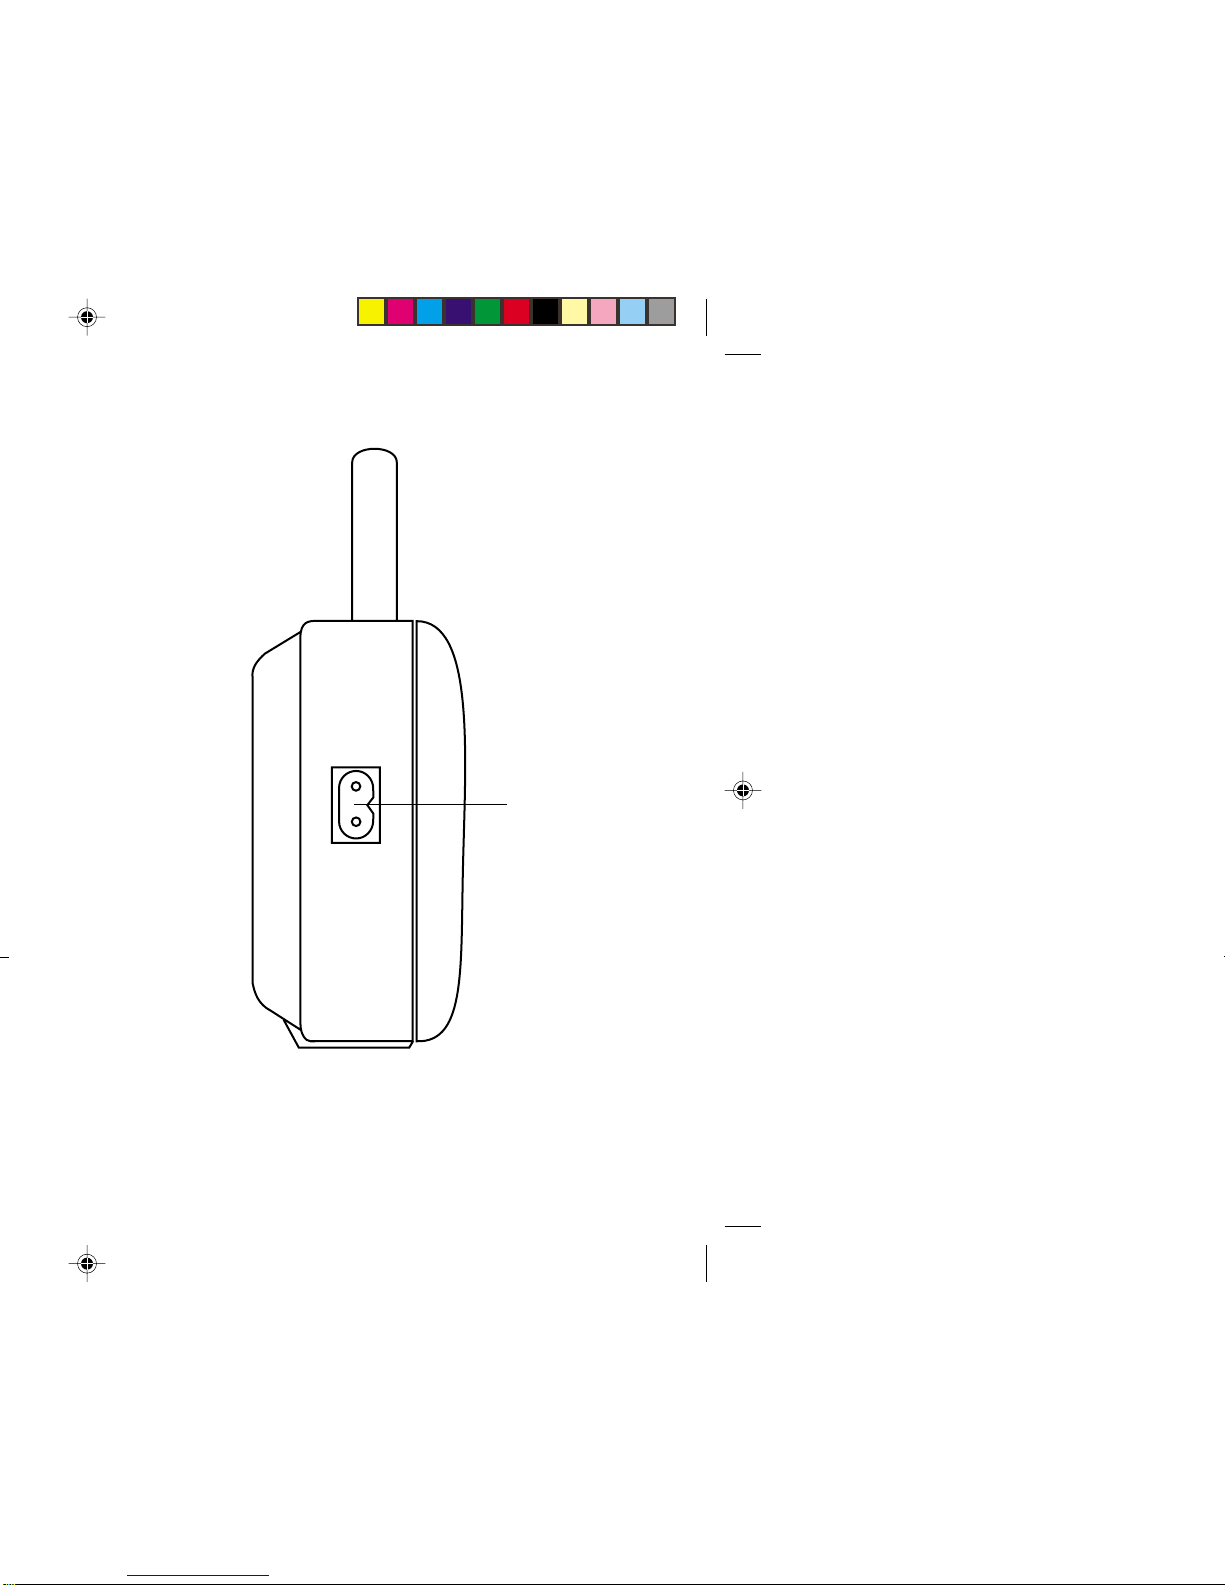
Automatic Mains/Battery switching
Tochangefrombatterytomainsoperation,simplyplugthemainsleadinto
themainsinputsocket[24]onthelefthandendoftheradio.Mainsoperation
is shown by the mains indicator [6]. The batteries will be automatically
disconnected. It does not matter which way round the plug is inserted but
makesure it is fully pushedhome. The other end shouldbe plugged into a
domestic supply socket.
General
Donotallowthisradiotobeexposedtowater,steamorsand.Donotleave
theradiowhereexcessiveheatcouldcausedamagesuchasinaparkedcar
wheretheheatfromthesuncanbuildupeventhoughtheoutsidetemperature
maynotseemtoohigh.ItisrecommendedthattheFMbandbeusedwhere
ever possible as better results in terms of quality and freedom from
interference will usually be obtained than on the MW or LW bands.
Mainssupply
TheR979 will operatefrom a supplyof 230 volts, 50Hz only.
DO NOT cut off the mains plug from this equipment.Ifthe plug fitted is
notsuitableforthepowerpointsinyourhomeorthecableistooshorttoreach
apowerpoint,thenobtainanappropriatesafetyapprovedextensionleador
adaptor.If in doubt consult yourdealer.
Ifnonethelessthemainsplugiscutoff,removethefuseanddisposeofthe
plugimmediately,toavoidapossibleshockhazardbyinadvertentconnection
to the mains supply.
Ifthisproductisnotsuppliedwithamainsplug,oronehastobefitted,then
followtheinstructionsgivenbelow:
IMPORTANT.DONOTmakeanyconnectiontothelargerterminalwhichis
markedwiththeletterEorbythesafetyearthsymbol orcolouredGreen
orGreen-and-yellow.
The wires in the mains lead are coloured in accordance with the following
codes :- BLUE - NEUTRAL BROWN - LIVE
Asthesecoloursmaynotcorrespondwiththecolouredmarkingsidentifying
the terminals in your plug, proceed as follows:
The wire coloured BLUE must be connected to the terminal marked N or
colouredBLACK.
ThewirecolouredBROWNmustbeconnectedtotheterminalmarkedLor
colouredRED.
4
R979 Instruction Book (Ver.2).pm6 24/10/99, 14:115

Lockswitch
The R979 is fitted with a lock switch [22] to prevent accidental operation.
Before operating the radio slide the lock switch up to unlock the radio. To
prevent operation when travelling or during storage, slide the lock switch
down to lock the radio. Pressing any of the control buttons with the safety
lock switched on will cause the display to show LOCKED.
Automatic clock set (operates on FM only)
Theclocktimeanddayofweekcanbesetautomaticallywhenreceivingan
RDSstationthattransmitsclocktime(CT).TheCTinformationistransmitted
onceeveryminute.Ifthestationhassufficientsignalstrengththeclockwill
set within one or two minutes.
1. Press the power button [14] to switch on the radio.
2. SelecttheFMwaveband usingthe wavebandswitch [4].
3. Fully extend the telescopic aerial [2].
4. Set the sensitivity switch [5] to the "dx" position.
5. Repeatedlypress thetime button [15]until theauto timeset symbol
appears in the liquid crystal display [7].
6. Pressandholddowntheforward[8]orreverse tuningbuttons[10]until
thefrequencyintheliquidcrystaldisplay[7]beginstochange,release
the button.
TheradiowillnowstarttosearchtheFMwavebandandwillstopwhenitfinds
a station of sufficient strength. If the station is of sufficient strength the
symbol will light up in the liquid crystal display.
Theautotimesetindicator willflashintheliquidcrystaldisplayindicating
that the radio is waiting for the RDS time signal. The indicator will stop
flashing when the time is set. If the clock does not set within three to four
minutes,theradiostationmaynotbetransmittingclocktime(CT)information
- try tuning to another radio station.
Theclocktimeanddayofweekareupdatedeachtimetheradioisswitched
on and whilst listening to an RDS station transmitting clock time (CT)
information.
Manualclockset
The clock time and day of the week can be set manually.
1. Press the power button [14] to switch on the radio.
2. Repeatedly press the time button [15] until the auto time set symbol
disappears from the liquid crystal display [7].
3. Press the power button [14] to switch off the radio.
4. Press and hold down the time button [15].
5. Set the clock time using the forward [8] or reverse [10] buttons. A
singlepressontheforwardorreversebuttonwilladvanceorretardthe
time in one minute steps. If the forward or reverse buttons are held
downthetime willadvance or retardrapidly.
Manual day of week set
1. Ensure that the radio is switched off.
2. Press and hold down the snooze button [11].
3. Set the day of week using the forward [8] or reverse [10] buttons. A
singlepressontheforwardorreversebuttonwilladvanceorretardthe
dayinonedaysteps.If theforwardorreversebuttonsarehelddown
the day of week will advance or retard rapidly.
Setting the alarm time
Your radio allows you to set two different alarm times. Each alarm can be
independently set so as to allow you to wake to either the radio or buzzer.
1. Pressandrelease thealarm1[21]oralarm2[19]button.Thedisplay
will show the last pre-set alarm time.
2. Pressandholddownthealarm1oralarm2buttonsandsetthealarm
time usingthe forwardor reversebuttons.
Displayingthealarmtimes
1. Ensure that the radio is switched off.
2. Press the display button [13] once for alarm 1 and twice for alarm 2.
Thedisplaywillautomaticallyreturntoshowingclocktimeafterthree
seconds.
5
R979 Instruction Book (Ver.2).pm6 24/10/99, 14:116

If you need any further advice, please call our Technical Helpline on
0181 758 0338 (Mon-Fri)
Wake up to radio
1. Press the power button [14] to switch on the radio.
2. Selectastationthatwillbebroadcastingatthedesiredalarmtimeand
adjustthe volumeto therequired levelusing thevolume control[9].
3. Press the power button [14] to switch off the radio.
4. Set the alarm 1 or alarm 2 time as previously described.
5. Repeatedly press the alarm 1 or alarm 2 button until the radio alarm
indicator ( or ) appears in the display.
At the pre-selected alarm times the radio will switch on and switch off
automatically after 90 minutes.
Whilst the alarm is sounding the alarm indicator will flash in the display.
Wake up to buzzer
1. Switch off the radio with the power button [14].
2. Set the alarm 1 or alarm 2 time as previously described.
3. Repeatedlypressthealarm1oralarm2buttonuntilthebuzzeralarm
indicator ( or ) appears in the display.
At the pre-selected alarm times the buzzer will switch on and switch off
automatically after 90 minutes.
Whilst the alarm is sounding the alarm indicator will flash in the display.
Snoozefunction
1. TheRadioorBuzzeralarmscanbesilencedfor5minutesbypressing
the“Snooze”button.Thissequencecanberepeated severaltimes
withinthe 90 minute alarm period.
2. The alarm indicator will flash in the display.
3. To turn off the radio or buzzer alarm until the next day, press and
release the “Power” button.
Switching off the alarm
1. Whilstthealarm issounding it canbe turned offuntil the next day by
pressingthe power button [14]
2. If you wish to turn off the alarms permanently, repeatedly press the
alarm1oralarm2buttonsuntilthealarmindicatorsdisappearfromthe
display.
Week end cancel (W.E.C.)
If you do not wish to be woken up by the alarm on weekends, press the
W.E.C. button [17] once.
The indicator will appear in the display and the alarm will sound on
weekdaysonly.
Press the W.E.C. button to switch off this function. The indicator will
beremovedfromthedisplay.
Note: the week end cancel function applies to both alarm 1 and alarm 2.
Going to sleep whilst listening to the radio
1. Press and release the sleep button [20] the radio will switch on and
display the sleep time remaining.
2. Whilstthesleeptimeisshowingpressandholddownthesleepbutton
to adjust the sleep time, release the sleep button when the required
sleep time is reached.
The sleep time can be adjusted from a maximum of 90 minutes down to a
minimumon10minutesandcanbecancelledbypressingthepowerbutton.
6
R979 Instruction Book (Ver.2).pm6 24/10/99, 14:117

Radiooperation
Sensitivityswitch.
Fornormaloperationsetthesensitivityswitch[5]tothe'dx'position.When
listening to a strong stations the signal may become slightly distorted, set
the sensitivity switch [5] to the 'local position' to improve reception.
Note : the sensitivity switch is operational on the FM band only.
SearchTuning
1. Switchonthe radioandselecttherequired waveband.
2. Press and hold the forward tuning button [8] or the reverse tuning
button [10] until the frequency in the display starts to change
continuously.Release thebutton.
3. Theradiowillcontinuesearchinguntilastationofreasonablestrength
isfound.
4. To search for additional stations it is only necessary to repeat the
aboveoperation.
5. Automatic search tuning may be stopped by a single press of either
the tuning up [8] or tuning down [10] buttons.
6. Adjust the volume [9] and tone [3] controls to the required settings
Manualtuning
1. Switchonthe radioandselecttherequired waveband.
2. Intermittently press the forward tuning button [8] or reverse tuning
button[10] untilthedesiredfrequencyisreached.Eachstepisequal
to 50kHz on FM - 9kHz on MW - and 1kHz on LW.
Memorypresets
You may store up to 10 different frequencies on each of the 3 wavebands
providinga total of 30 preset stations.
1. Selectthedesiredwavebandusingthewavebandswitch[4]locatedon
the top panel.
2. Tune in to the desired frequency using search or manual tuning as
describedabove.
3. Whenthedesiredstationistunedin, pressandreleasethe'M'button
[12]thedisplaywillflashMEMORYfor8secondsduringwhichtime
you can store a station in one of the memory pre-sets.
4. Presstherequiredpre-setnumberbutton(onceforpresetmemories
1 to 5 and twice for preset memory 6 to 10) press and release the M
button to store the station.
5. Repeattheabovefortheremainingpre-setmemories.
Note: if a station is not stored during the 8 seconds in which 'MEMORY'
is flashing in the display, the memory store mode is cancelled. No
changes to the memory pre-sets will be made.
Recallingastationfrommemory
1. Torecalltoapresetstation,firstselectthewavebandandthenpress
therequiredpresetbutton.
2. Press a pre-set number button once for preset memories 1 to 5 and
twice for preset memories 6 to 10.
RDS Functions (FM stations only)
TheRDS(RadioDataSystem)isasystemwhereinaudibledigitalinformation
istransmittedinadditiontothenormalFMradioprogramme.Thefollowing
featuresareimplementedontheR979:-
Programme Service (PS) Name
Provides a station name display in not more than eight alphanumeric
characters.
ClockTime (CT)
Provides automatic setting and synchronisation of the inbuilt clock.
AlternateFrequencies(AF)
Providesalist ofandallowseasyre-tuningtoalternativefrequenciesforthe
station you are listening to.
7
R979 Instruction Book (Ver.2).pm6 24/10/99, 14:118

If you need any further advice, please call our Technical Helpline on
0181 758 0338 (Mon-Fri)
TrafficInformation(TP)
Shows whichprogrammesprovidetrafficannouncementsandisindicated
bythe symbol inthedisplay. TrafficAnnouncements are indicatedby
a flashing symbol in the display.
Enhanced Other Networks (EON)
Provides information about other stations on the network. When used in
conjunctionwiththe(TP/TA)functionitallowstheradiotore-tunetostations
broadcastingtrafficannouncements.
Operating the radio with RDS functions (FM only)
1. Switch on the radio and select the FM waveband.
2. Tuneintoastation,thedisplaywillindicatefrequencyfortwoseconds
andthen changeto show thestation name. The symbol
will appear in the display
3. IfthestationdoesnotcarryRDSinformationonlythestationfrequency
willbeshown.Note:the indicatorwillflashifthesignalis
tooweakforRDSoperation.
DisplayModes
WhilsttunedtoanRDSstationyoucanchangebetweenstationnameand
normal time display by repeated pressing of the display button [13].
Alternate Frequency (AF)
The RDS system provides you with a list of alternative frequencies for the
station you are tuned to.
1. Switch on the radio and select the FM waveband.
2. Tuneinto a stationcarryingRDS information.
3. RepeatedlypressthealternatefrequencyAFbutton[18]untiltheradio
findsafrequencygivingthebestreceptionforthestationyouwishto
listen to.
If AFinformationhasnotyetbeenreceivedorisnotprovidedbythestation
you are listening to, the radio will remain at the current frequency and the
display will indicate 'NO AF'
Note:SomeBBCstationshaveseveraldifferentfrequenciesfor eachstation.
TrafficAnnouncements
SwitchontheradioselecttheFMwavebandandtunetoanRDSstation.The
symbol will appear in the display.
Repeatedly press the traffic button [16]. If the station provides traffic
informationthe symbolwillappearinthedisplay.Ifthestationdoesnot
providetrafficinformationthe symbolwillnotappearandtheradiowill
beep indicating that no traffic information is available. During traffic
announcementsthe symbolwillflashinthedisplay.Thevolumesetting
during traffic announcements is pre-set and is unaffected by the volume
control.Thismeansthatwhentunedtoastationgivingtrafficannouncements
the volume can be set to minimum so as to block out normal programs.
During traffic announcements the volume will increase to a pre-set level
allowing the user to listen to traffic announcements only.
IfthestationcarriesEnhancedOtherNetworkinformationtheEONsymbol
willappearinthedisplay.The radiowillautomaticallytunetootherstations
transmittingtrafficinformation.Whenthetrafficannouncementhasfinished
the radio will re-tune to the previously selected station.
e.g. If the radio is tuned to a national station such as BBC Radio 2, it will
automatically re-tune to any BBC local station broadcasting traffic
announcements. When the traffic announcement on the local station is
finishedthe radio will re-tune to thepreviously selected station.
Note: There may be occasions when the station to which you are listening
tellsthe radio to re-tune to a trafficannouncement on a local station that is
not receivable at your location. Under these circumstances there will be
somehissbeforetheradiore-tunesbacktothepreviouslyselectedstation.
Toturnofftrafficinformationpressthetrafficbutton,the symbolwillbe
removed from the display.
8
R979 Instruction Book (Ver.2).pm6 24/10/99, 14:119

Display backlight
Pressing any of the control buttons will cause the display backlight to be
switched on for 8 seconds.
Headphones(not included)
A3.5mmdiaheadphonesocket[1]isprovidedforusewitheitherheadphones
or an earpiece. Inserting a plug into the headphone socket automatically
mutes the internal loudspeaker.
Trobleshooting
Clock will not auto set
1. EnsurethattheradioistunedtoanFMstationtransmittingRDSdata
and clock time (CT) e.g BBC Radios 1, 2, 3, or 4.
2. Repeatedly press the time button [11] until the auto set indicator
appears in the display.
3. Whilst the clock is settingthe auto time set indicator will flash in
thedisplayindicatingthattheradioiswaitingfortheRDStimesignal.
The indicator will stop flashing when the time is set. If the clock
doesnotsetwithinthreetofour minutestheradiostationmaynotbe
transmitting clock time (CT) information - try tuning to another radio
station.
RDS station name not displayed
1. Rotatethetelescopicaerialuntil the symbolappearsin
thedisplayafterafewsecondsthestationnameshouldappearinthe
display.
2. If this fails to cure the problem try moving the radio to a different
location or re-tuning to another radio station.
Display shows LOCKED when any button pressed
1. Pressing any of the control buttons with the safety lock switched on
willcausethedisplaytoshowLOCKED.Slidethelockswitch[22]up
to unlock the radio.
Display shows station name for a few seconds before returning to
clock time.
1. You can change between station name and normal time display by
repeated pressing of the display button [13].
Radio will only receive strong stations on FM
1. Fornormal operationsetthe sensitivityswitch [5] tothe 'dx'position.
Note : the sensitivity switch is operational on the FM band only.
Ifaproblempersistsourtechnicalstaffwouldbepleasedtooffer assistance
on operating the radio. Our technical helpline number is, 0181 758 0338.
9
R979 Instruction Book (Ver.2).pm6 24/10/99, 14:1110

If you need any further advice, please call our Technical Helpline on
0181 758 0338 (Mon-Fri)
Specifications
Power Requirements
Mains : 230 volts, 50Hz only
Batteries : Radio 6.0V 4 x IEC LR14 (C size) cells
Clock 3.0V 2 x IEC LR6 (AA size) cells
Battery Life Approx. 40hrs of listening for 4 hours a day at
normalvolume,using Alkalinecells.
Frequency Coverage
FM 87.5-108MHz
MW 531-1620kHz
LW 144-281kHz
Circuit Features
Loudspeaker 100mm4ohms
OutputPower 1watt into 4ohms
Headphonesocket 3.5mmdia
Aerial System FM Telescopicaerial
MW Built-inFerriteaerial
LW Built-inFerriteaerial
TheCompany reserves the right to amend the specification withoutnotice.
Importedby:-
ROBERTSRADIOLIMITED
POBOX130
MEXBOROUGH
SOUTHYORKSHIRE
S648YT
10
R979 Instruction Book (Ver.2).pm6 24/10/99, 14:1111

ROBERTSRADIOTECHNICALSERVICESDEPARTMENT
97-99WORTONROAD
ISLEWORTHMIDDLESEX
TW76EG
Issue1
Guarantee
This instrument is guaranteed for twelve months from the date of delivery to the original owner against failure due to faulty workmanship or component
breakdown,subjecttotheprocedurestatedbelow.Shouldanycomponentorpartfailduringthisguaranteeperioditwillberepairedorreplacedfreeofcharge.
Theguaranteedoesnotcover: 1.Damage resultingfrom incorrectuse.
2.Consequentialdamage.
3.Radioswithremovedordefacedserialnumbers.
N.B.Damagedor brokentelescopicaerials willnotbe replacedunder guarantee.
Procedure:
AnyclaimunderthisguaranteeshouldbemadethroughthedealerfromwhomtheinstrumentwaspurchasedItislikelythatyourRobertsdealerwillbeable
toattendtoanydefectquicklyandefficiently,butshoulditbenecessarythedealerwillreturntheinstrumenttothecompany’sservicedepartmentforattention.
IntheeventthatitisnotpossibletoreturntheinstrumenttotheRobertsdealerfromwhomitwaspurchased,pleasecontactRobertsRadioservicedepartment
at the address shown on the back page of this manual before taking further action.
These statements do not affect the statutory rights of a consumer.
R979 Instruction Book (Ver.2).pm6 24/10/99, 14:1112
Other manuals for R979
1
Table of contents
Other Roberts Receiver manuals