Roberts Blutune65 User manual

Please read this manual before use
ROBERTS
DAB / DAB+ / FM RDS Bluetooth sound system
with dock for iPod®, iPhone®and iPad®

Controls ............................................................................................. 2-4
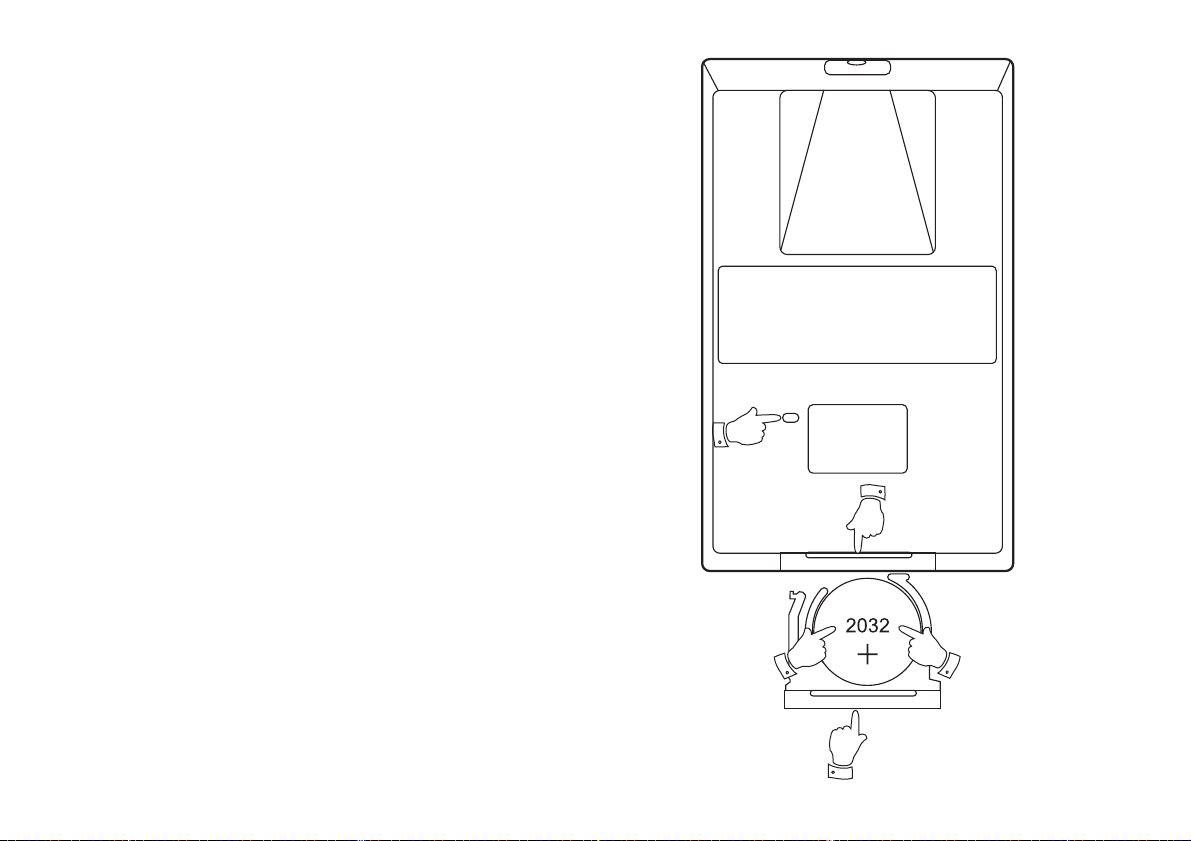
Remote handset battery replacement .................................................. 5
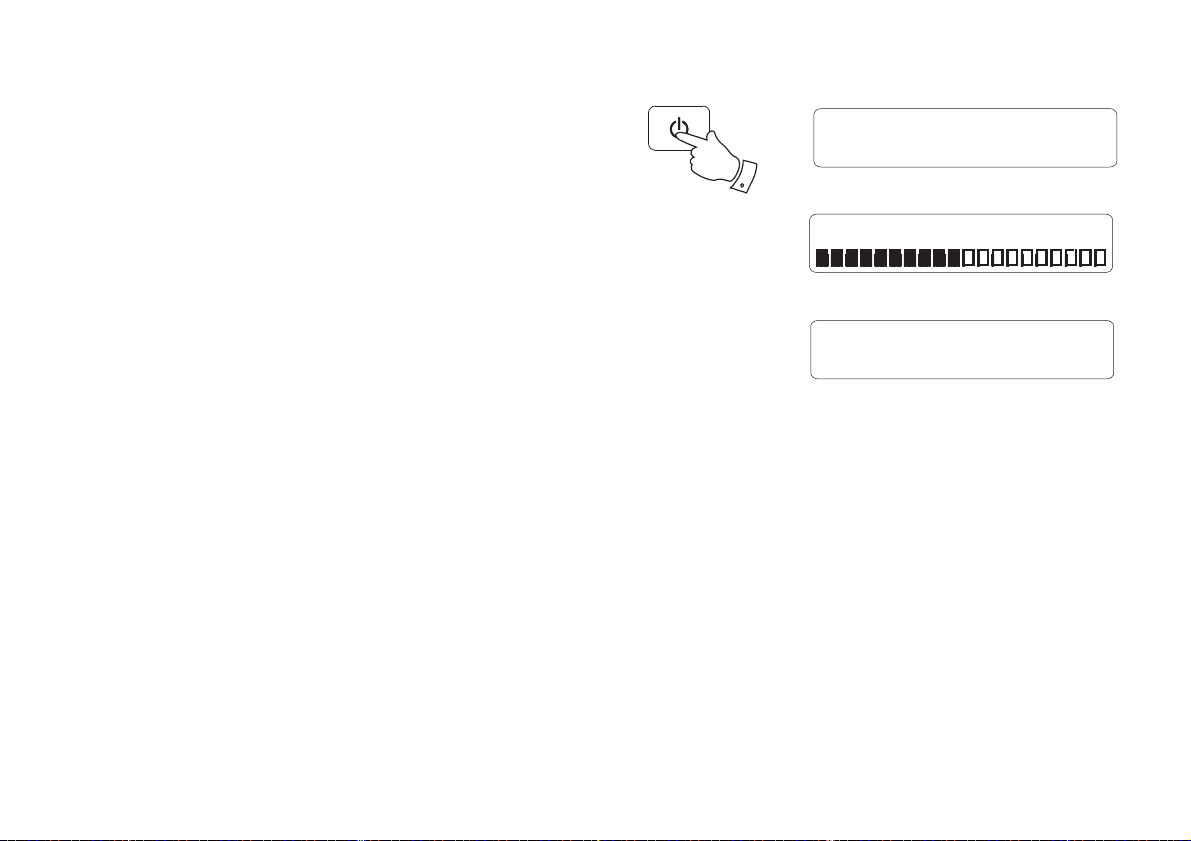
Using the radio for the first time............................................................ 6
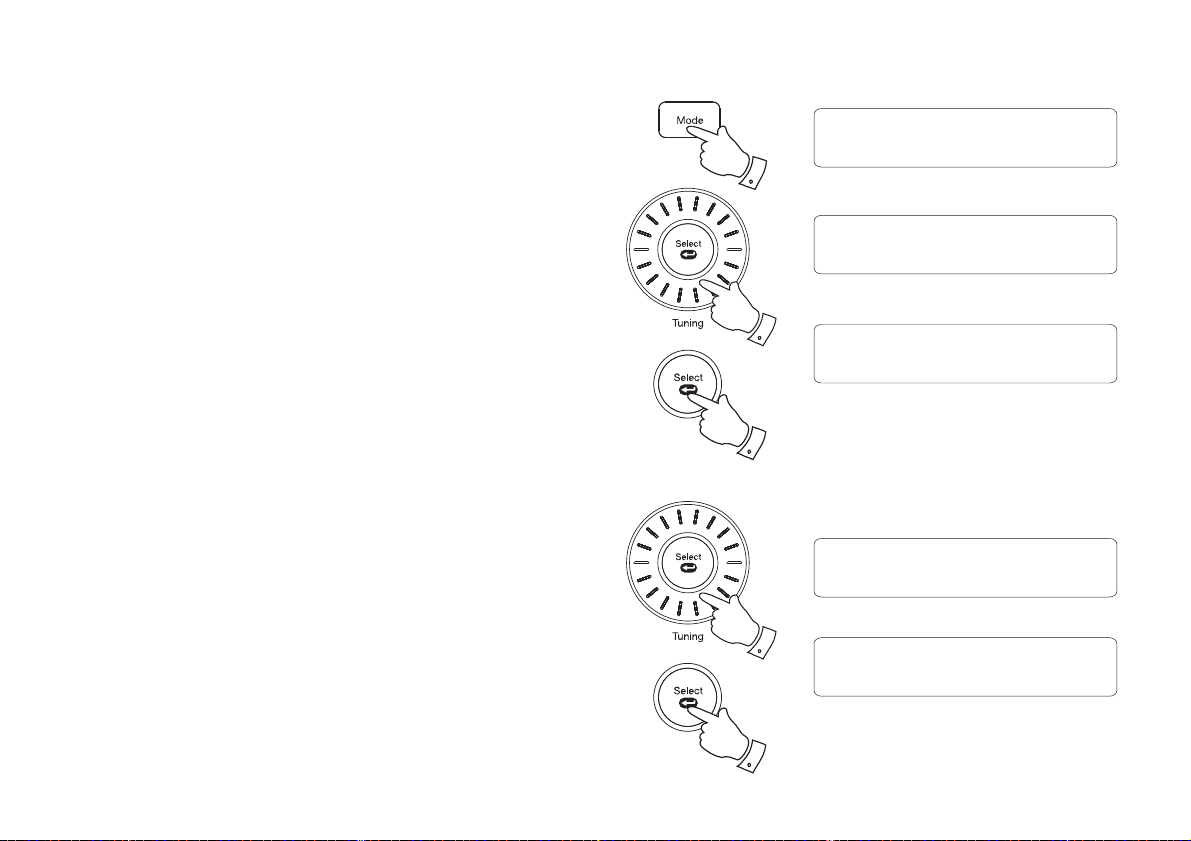
Operating your radio............................................................................. 7
Selecting a station - DAB...................................................................... 8
Secondary services - DAB.................................................................... 8
Display options - DAB...................................................................... 9-10
Finding new stations - DAB ................................................................ 10
Manual tuning - DAB ...........................................................................11
Dynamic Range Control (DRC) - DAB................................................ 12
Station order - DAB ............................................................................ 13
Prune stations - DAB.......................................................................... 14
Operating your radio - FM auto-tune .................................................. 15
Manual tuning - FM............................................................................. 16
Display options - FM........................................................................... 17
Scan sensitivity setting - FM............................................................... 18
Stereo / Mono setting - FM................................................................. 19
Presetting stations......................................................................... 20-21
iPod, iPhone and iPad docking........................................................... 22
Playing a file on your iPod, iPhone or iPad ........................................ 23
Display options - iPod mode............................................................... 24
Bluetooth mode ............................................................................. 25-28
Connecting Bluetooth devices............................................................ 26
Contents
Playing audio files in Bluetooth mode................................................. 27
Connecting and disconnecting a Bluetooth device............................. 28
Setting the alarm times.................................................................. 29-31
When the alarm sounds...................................................................... 32
Controlling alarm status...................................................................... 33
Snooze and sleep functions .......................................................... 34-35
Setting the clock manually............................................................. 36-38
To return to auto clock set mode ........................................................ 39
Equaliser function.......................................................................... 40-43
Mute function...................................................................................... 43
Language function.............................................................................. 44
Display backlight dimmer.................................................................... 44
Software version................................................................................. 45
System reset....................................................................................... 46
Headphone socket.............................................................................. 47
Auxiliary input (Line in) socket............................................................ 47
Line output socket .............................................................................. 48
USB socket for smart-phone charging................................................ 48
Cautions ............................................................................................. 49
Specifications ..................................................................................... 49
Circuit features ................................................................................... 49
Guarantee.............................................................................. Back page
1

2
Controls (Top)
1. Menu button
2. Tuning control
3. Select button
4. Alarm 2 / Fast-Forward button
5. On / Standby button
6. Mode button
7. Bluetooth Pair button
8. Snooze button
9. Alarm 1 / Play / Pause button
10. Preset button
11. Dimmer button
12. Auto Tune / Rewind button
13. Equaliser (EQ) button
14. Volume control
15. Sleep button
5
12
811 7 610
14
13
9
15
2
1
3
4
17
18
16. Info button
17. Apple Lightning®connector
18. Dock access button
16

Service
3
19. Bluetooth indicator
20. LCD display
21. Infra-red sensor
22. Speakers x 2
23. Bass radiator
Controls (front)
Controls (rear)
24. Telescopic aerial
25. DC in socket
26. Charge socket
27. Line output socket
28. Headphone socket
29. Auxiliary input socket
30. USB socket
(for service use only)
22
20
24
25
21
27282930 26
19
23

4
1. On / Standby button
2. iPod button
3. FM button
4. DAB button
5. Mute button
6. Auxiliary in button
7. Bluetooth button
8. Play / Pause button
9. Tuning Down / Rewind button
10. Menu button
11. Sleep button
12. Dimmer button
13. Snooze button
14. Alarm button
15. Equaliser (EQ) button
16. Select button
17. Info button
18. Tuning Up / Fast-forward button
19. Preset button
20. Volume Up / Down buttons
1
Controls (remote control)
Note: For the sake of clarity, the instructions for the use of the controls throughout this instruction manual show the buttons on the radio. The buttons
on the remote can be used if you prefer. However the mute is only available when using the remote control.
Please note: The mode button on the radio will access the DAB, FM, iPod, Bluetooth and Auxiliary input modes.
234
5
6
7
8
9
10
14
1312
11
15
17
18
19
20
16

5
Remote handset battery replacement
1. With the aid of the end of a paper clip slide the catch to the right hand
side.
2. Remove the battery holder by pushing the holder in the direction
shown.
3. Remove the battery from holder.
4. Replace the battery (CR2032 or equivalent) ensuring that the positive
side of the battery faces you with the holder positioned as shown.
5. Replace the battery holder.
If the remote is not to be used for an extended period of time it is
recommended that the battery is removed.
IMPORTANT: The battery should not be exposed to excessive heat
such as sunshine, fire or the like. After use, disposable batteries should
if possible be taken to a suitable recycling centre. On no account should
batteries be disposed of by incineration.
3
1
2
5
4

6
Using the radio for the first time
1. Place your radio on a flat surface.
2. Fully extend the telescopic aerial. The aerial should be fully extended
and positioned vertically for optimum reception.
3. Insert the adaptor plug into the DC socket located on the rear of your
radio. Plug the adaptor into a standard mains socket outlet. The display
will show 'Welcome to Digital Radio' for a few seconds and then the
display will then show '0:00'. After a short time the current time will
appear on the display.
4. If no stations are found, it may be necessary to relocate your radio to
a position giving better reception. You should then carry out a scan
to find stations as described on page 10.
IMPORTANT: The mains adaptor is used as the means of connecting the
radio to the mains supply. The mains socket used for the radio must remain
accessible during normal use. In order to disconnect the radio from the
mains completely, the mains adaptor should be removed from the mains
socket outlet completely.
Characters appearing on the LCD display indicate that the radio is connected
to and powered from the mains supply.
Service
Welcome to
Digital Radio

7
Operating your radio
1. Press and release the On / Standby button to switch on your radio.
When first switched on, the radio will be in DAB mode. After each use
the radio will remember the mode used and then switch on in that
mode the next time that it is used.
2. If the radio has been used before, the last used station will be selected.
3. If this is the first time that the radio has been used a scan of the Band
III DAB channels will be carried out. The first station in the list of
stations found during scanning will be played. The display will show
the station name.
4. During the scanning process the display will show progress of the
station search. The number on the right of the display is the number
of stations that have been found. When the scan is completed the first
station (in numeric-alpha order 0....9, A....Z) will be selected.
5. If no signals are found then it may be necessary to relocate your radio
to a position giving better reception. You should then carry out a scan
to find stations as described on page 10.
Note: When first switched on, the radio will set the volume to a moderately
high level, in case the broadcast is very quiet.After you have set the volume
using the Volume control, the radio will remember the setting that you
have applied for the next time that it is used.
1
Absolute Rad 60s
Now playing on the r
DAB Mode
Scanning... 24

8
Selecting a station - DAB
1. Press and release the On / Standby button to switch on your radio.
The display will show 'Connecting' for a few seconds.
2. Press and release the Mode button (DAB button on remote) until the
DAB mode is selected. The display will show the name of the radio
station currently selected.
3. Rotate the Tuning control (Tuning buttons on remote) to step through
the list of available stations.
4. When the desired station name appears on the display, press and
release the Select button to select the station. The display will show
'Connecting' while your radio finds the new station.
5. Adjust the Volume control to the required setting.
Note: If after selecting a station the display shows 'Service not available' it
may be necessary to relocate your radio to a position giving better reception.
DAB Mode
Station List
BBC Radio 2
<
<
BBC Radio 2
Connecting...
Secondary services - DAB
1. Certain radio stations have one or more secondary services associated
with them. If a station has a secondary service associated with it then
the secondary service will then appear immediately after the primary
service as you rotate the Tuning control (Tuning buttons on remote).
2. To tune to the secondary service, press and release the Select button.
Most secondary services do not broadcast continually and if the selected
service is not available, the radio will re-tune to the associated primary
service.
Station List
BBC Radio 5 Live
<
<
<
<
Station List
BBC R5LiveSportX
<
<
<<
2
3
4
1
2

9
Display options - DAB
Your radio has a range of display options when in DAB mode:-
1. Press and release the Info button to cycle through the various options.
All displays will revert to the time and date display after about 30
seconds.
a. Scrolling text Displays scrolling text messages such
as artist/track name, phone in number,
etc.
b. Programme type Displays type of station being listened to
e.g. Pop, Classic, News, etc.
c. Multiplex Name Displays the name of the DAB multiplex
to which the current station belongs.
d. Time and date Displays the current time and date.
e. Frequency & channel Displays frequency and channel number
for the currently tuned DAB station.
f. Bit rate & audio type Displays the digital audio bit rate and audio
type for the currently tuned DAB station.
e
a
c
b
d
f
BBC Radio 2
Now playing on the r
BBC Radio 2
Pop Music
BBC Radio 2
BBC National DAB
BBC Radio 2
10:28 18-07-2014
BBC Radio 2
12B 225.648MHz
BBC Radio 2
128kbps / DAB
1

10
Display options - DAB cont.
g. Signal strength Displays the signal strength for the currently
tuned DAB station. The open block in the
signal strength graph shows the minimum
signal strength needed for good DAB
reception. The signal blocks will go up or
down showing the changing signal strength
as you adjust the telescopic aerial or the
radio position.
gBBC Radio 2
Finding new stations - DAB
From time to time, new DAB radio stations may become available. Or you
may have moved to a different part of the country. In this case you may
need to cause your radio to scan for new stations.
1. Press and release the Auto Tune button.
2. Your radio will perform a scan of the Band III DAB channels. As new
stations are found, the station counter on the right-hand side of the
display will increase and stations will be added to the list.
Scanning... 24
1

11
Manual tuning - DAB
Manual tuning allows you to tune your radio to a particular DAB frequency
in Band III. Any new stations found will be added to the station list. This
function can also be used to assist the positioning of the aerial or the radio
to optimise reception for a specific channel or frequency. Note that UK
DAB stations are located in the range of channels 11B to 12D.
1. Press and release the Menu button to enter the DAB menu.
2. Rotate the Tuning control (Tuning buttons on remote) until the display
shows 'Manual Tune'. Press and release the Select button to enter
the manual tuning mode.
3. Rotate the Tuning control to select the desired DAB channel. Press
and release the Select button to tune to the chosen frequency.
4. The open block in the signal strength graph shows the minimum signal
strength needed for good DAB reception. The signal blocks will go
up and down showing the changing signal strength as you adjust the
telescopic aerial or the radio position. Any new radio stations found on
the tuned DAB multiplex will be added to the list stored in the radio.
Press and release the Select button again to return to the normal DAB
tuning mode.
Signal strength display - DAB
1. Press and release the Info button until the display shows signal strength.
The open block in the signal strength graph shows the minimum signal
strength needed for good DAB reception. The signal blocks will go
up and down showing the changing signal strength as you adjust the
telescopic aerial or the radio position.
DAB
Manual Tune
<
<
Manual Tune
12B 225.648MHz
<
<
12B 225.648MHz BBC
1
2,3
2-4
BBC Radio 2
1

12
Dynamic Range Control (DRC) - DAB
The DRC facility can make quieter sounds easier to hear when your radio
is used in a noisy environment.
There are three levels of compression:
DRC Off No compression applied. (default)
DRC High Maximum compression applied.
DRC Low Medium compression applied.
1. Press and release the On / Standby button to switch on your radio.
2. Press and release the Mode button (DAB button on remote) until the
DAB band is selected.
3. Press and release the Menu button to enter the DAB menu.
4. Rotate the Tuning control until 'DRC Value' appears on the display.
Press and release the Select button. The display will show the current
DRC value which will be marked with an asterisk.
5. Rotate the Tuning control to select the required DRC setting
(default is off).
6. Press and release the Select button to confirm the setting.After several
seconds the display will return to the normal radio display.
Note: Not all DAB broadcasts are able to use the DRC function. If the
broadcast does not support DRC, then the DRC setting in the radio will
have no effect.
DAB
DRC Value
<
<
DRC Value
DRC off
<
<
*
DRC Value
DRC high
<
<
DRC Value
DRC low
<
<
3
4,5
4-6
2

13
Station order - DAB
Your radio has 3 station order settings from which you can choose. The
station order settings are, alphanumeric, ensemble and valid.
Note: The default station order setting is alphanumeric.
1. Press and release the On / Standby button to switch on your radio.
2. Press and release the Mode button (DAB button on remote) until the
DAB mode is selected.
3. Press and release the Menu button to enter the DAB menu.
4. Rotate the Tuning control (Tuning buttons on remote) until 'Station
Order' appears on the display. Press and release the Select button.
5. Rotate the Tuning control to choose between alphanumeric, ensemble
or valid. The chosen setting will be marked with an asterisk.
'Alphanumeric' - sorts the station list alpha-numerically 0...9 A...Z).
'Ensemble' - organises the station list by DAB multiplex.
'Valid' - Shows only those stations for which a signal can be found.
6. Press and release the Select button to select the required station
order.
DAB
Station Order
<
<
Station Order
Alphanumeric
<
<
*
Station Order
Ensemble
<
<
Station Order
Valid
<
<
3
4,5
4-6
2

14
Prune stations - DAB
Over time, some DAB services may stop broadcasting, or may change
location and then not be able to receive a station. In order to remove such
stations from the DAB station list, the Prune stations function will delete
the DAB stations from your station list that can no longer be received.
Stations which cannot be found or which have not been received for a very
long time are shown in the station list with a question mark.
1. Press and release the On / Standby button to switch on your radio.
2. Press and release the Mode button (DAB button on remote) until the
DAB mode is selected.
3. Press and release the Menu button to enter the DAB menu.
4. Rotate the Tuning control (Tuning buttons on remote) until 'Prune'
appears on the display. Press and release the Select button.
5. Rotate the Tuning control to highlight 'Yes'. Press and release the
Select button to cause the stations list to be pruned, eliminating
unavailable stations.
6. If you do not wish to prune stations highlight 'No' in step 5 and then
press and release the Select button. The display will revert back to
the previous display.
Note: If you have moved to a different part of the country you should
also carry out a search for new stations (please see the section 'Finding
new stations' on page 10).
DAB
Prune
<
<
Prune?
No <
<
Yes
Prune?
No
<
<
Yes
3
4,5
4-6
2

Operating your radio - FM auto-tune
1. Fully extend the telescopic aerial. The aerial should be fully extended
and positioned vertically for optimum reception.
2. Press and release the On / Standby button to switch on your radio.
3. Press and release the Mode button (FM button on remote) to select
the FM mode.
4. Rotate the Tuning control clockwise and then press and release the
Auto Tune button to cause your radio to search from low frequency
to high frequency and to stop automatically when it finds a station of
sufficient strength.
5. After a few seconds the display will update. The display will show the
frequency of the signal found. If the signal is strong enough and there
is RDS data present then the radio may display the station name.
6. To find other stations press and release the Auto Tune button as
before.
7. Rotate the Tuning control anti-clockwise and then press and release
the Auto Tune button to cause your radio to search from high frequency
to low frequency and to stop automatically when it finds a station of
sufficient strength.
8. When the end of the waveband is reached your radio will recommence
tuning from the opposite end of the waveband.
9. Adjust the Volume to the required setting. To switch off your radio
press and release the On / Standby button.
Note:
If you find that FM reception is poor, try repositioning the Telescopic aerial.
Fully extend and position vertically for optimum reception. If you find that
an FM broadcast has a lot of background hiss, this may often be reduced
by setting the radio into Mono reception mode for the current FM station.
Please refer to the section "Stereo / Mono setting - FM" on page 19 for
further details.
Note:
Press and hold the Tuning Up button on the remote control to cause your
radio to search from low frequency to high frequency.
Press and hold the Tuning Down button on the remote control to cause
your radio to search from high frequency to low frequency .
4-7
3
4-7
FM Mode
87.50MHz
Scanning...
15

16
Manual tuning - FM
1. Fully extend the telescopic aerial. The aerial should be fully extended
and positioned vertically for optimum reception.
2. Press and release the On / Standby button to switch on your radio.
3. Press and release the Mode button (FM button on remote) to select
the FM mode.
4. Rotate the Tuning control (Tuning Up or Down buttons on remote) to
tune to a station. The frequency will change in steps of 50kHz.
If the radio is tuned to a station of sufficient signal strength with RDS
information present, then the display may change to show the station
name.
5. When the waveband end is reached the radio will recommence tuning
from the opposite waveband end.
6. Adjust the Volume to the required setting.
7. To switch off your radio press and release the On / Standby button.
Note:
If you find that FM reception is poor, try repositioning the Telescopic aerial.
Fully extend and position vertically for optimum reception.
If you find that an FM broadcast has a lot of background hiss, this may
often be reduced by setting the radio into Mono reception mode for the
current FM station. Please refer to the section "Stereo / Mono setting - FM"
on page 19 for further details.
4
3
FM Mode
87.50MHz

17
Display options - FM
Your radio has a range of display options for FM mode:-
The Radio Data System (RDS) is a system in which inaudible digital
information is transmitted in addition to the normal FM radio programme.
RDS offers several useful features.The following are available on your radio.
1. Press and release the Info button to cycle through the various options.
All displays will revert to the time and date display after about 30
seconds.
a. Scrolling text Displays scrolling text messages such
as artist/track name, phone in number,
etc.
b. Programme type Displays type of station being listened to
e.g. Pop, Classic, News, etc.
c. Name Displays the radio station name for the
currently tuned FM station.
d. Audio type Displays the audio type for the currently
tuned FM station.
e. Time & date Displays the current time and date.
Note: If no RDS information is available, the radio will be unable to display
the station name, scrolling text and programme type information.
e
c
b
a
d
BBC R4
The best variety of
BBC R4
Pop Music
BBC R4
89.30MHz
BBC R4
Mono
BBC R4
10:08 21-07-2014
1

18
Scan sensitivity setting - FM
Your radio includes a local/distant option for the auto-scan function. By
setting the radio to the 'local' scan option, weaker signals from more
distant transmitters can be ignored by the radio, making stronger signals
easier to find.
1. Press and release the On / Standby button to switch on your radio.
2. If needed, press and release the Mode button (FM button on remote)
until the FM band is selected.
3. Press and release the Menu button to enter the FM menu.
4. Rotate the Tuning control (Tuning buttons on remote) until 'FM Scan
Zone' shows on the display. Press and release the Select button to
enter the scan sensitivity adjustment mode. The current setting will
be marked with an asterisk.
5. Rotate the Tuning control to switch between 'Local' (Strong stations
only) and 'Distant' (All stations) options on the lower line of the display.
The Distant option will allow the radio to find weaker signals when
scanning.
6. Press and release the Select button to confirm your selection. The
Local or Distant setting is stored in the radio and remains in force until
changed or until a System Reset.
FM
FM Scan Zone
<
<
FM Scan Zone
Distant
<
<
*
FM Scan Zone
Local
<
<
3
4,5
4-6
2

19
Stereo / Mono setting - FM
Your radio will play stereo FM broadcasts in stereo provided that the
received signal is of adequate strength. However, as a stereo signal
becomes weaker the audio signal will become poorer. It may be preferable
to force the radio to play the station in mono in order to reduce the level
of background hiss.
1. Press and release the On / Standby button to switch on your radio.
2. Tune to the required FM radio station as previously described.
3. Press and release the Menu button to enter the FM menu.
4. Rotate the Tuning control (Tuning buttons on remote) until 'FM Audio'
appears on the display. Press and release the Select button.
5. To switch to mono to reduce the hiss from a weak FM signal rotate the
Tuning control (Tuning buttons on remote) until 'Mono' appears on the
display. Press and release the Select button to confirm the setting.
The current audio setting will be marked with an asterisk.
6. Alternatively to return to stereo, rotate the Tuning control (Tuning
buttons on remote) until 'Auto' appears on the display. Press and
release the Select button to confirm the setting. The radio will play
the current station in stereo if the signal is sufficiently strong.
FM
FM Audio
<
<
FM Audio
Mono
<
<
*
FM Audio
Auto
<
<
3
4-6
4-6
Table of contents
Other Roberts Stereo System manuals

Roberts
Roberts Swallow CD9959 User manual

Roberts
Roberts Blutune 100 User manual

Roberts
Roberts STREAM 83I User manual

Roberts
Roberts CD9925 User manual

Roberts
Roberts MP-23 User manual

Roberts
Roberts Stream 67 User manual

Roberts
Roberts Stream 67L User manual

Roberts
Roberts CD9912 User manual

Roberts
Roberts Sound 80 User manual

Roberts
Roberts MP-16CD User manual