Rockville HTS8 User manual

OWNER’S MANUAL
8 INCH COMPLETE POWERED ALL IN
ONE ENTERTAINMENT SYSTEM
HTS8HTS8

2
Thank you for purchasing this Rockville HTS8 complete powered all in one entertainment
system.
The Rockville HTS8 is a complete all in one home theater system! You will not need to
purchase anything else. This has everything built in! Each speaker has a powerful 8˝
woofer for incredible bass and a 1.5˝ neodymium silk dome tweeter for incredible highs.
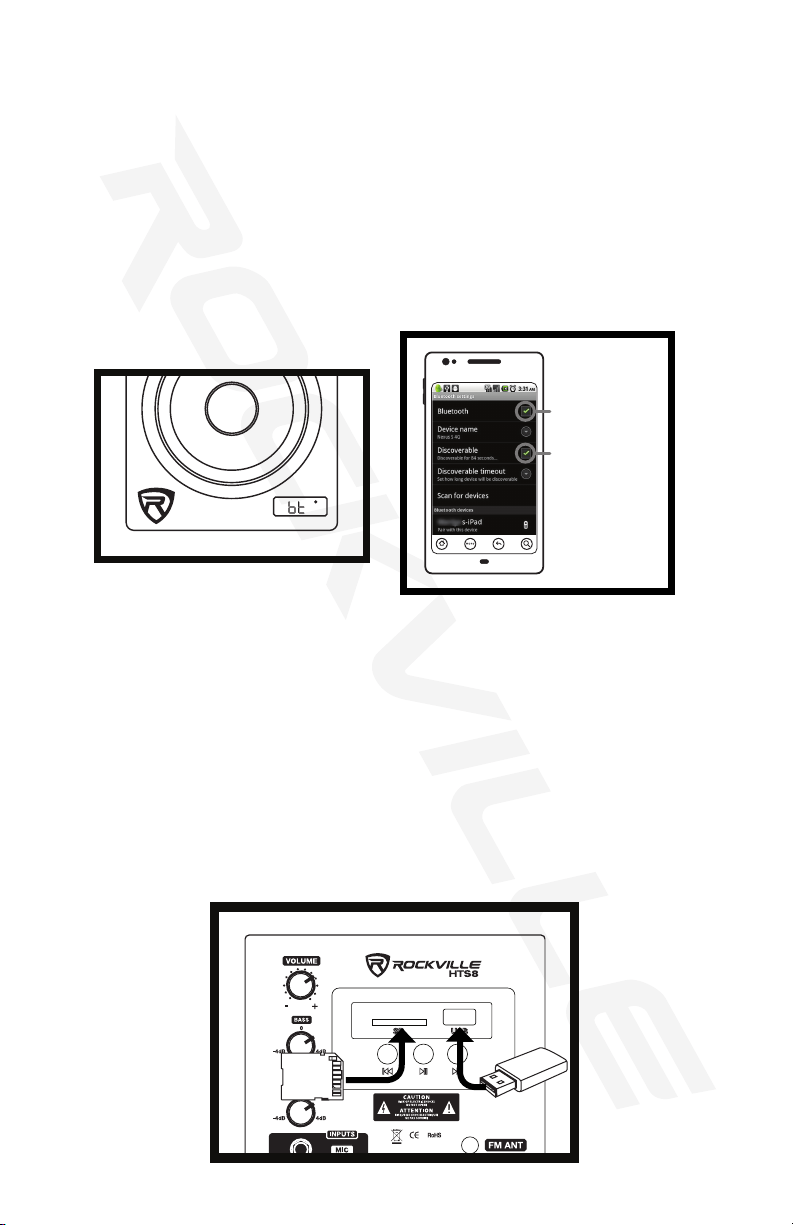
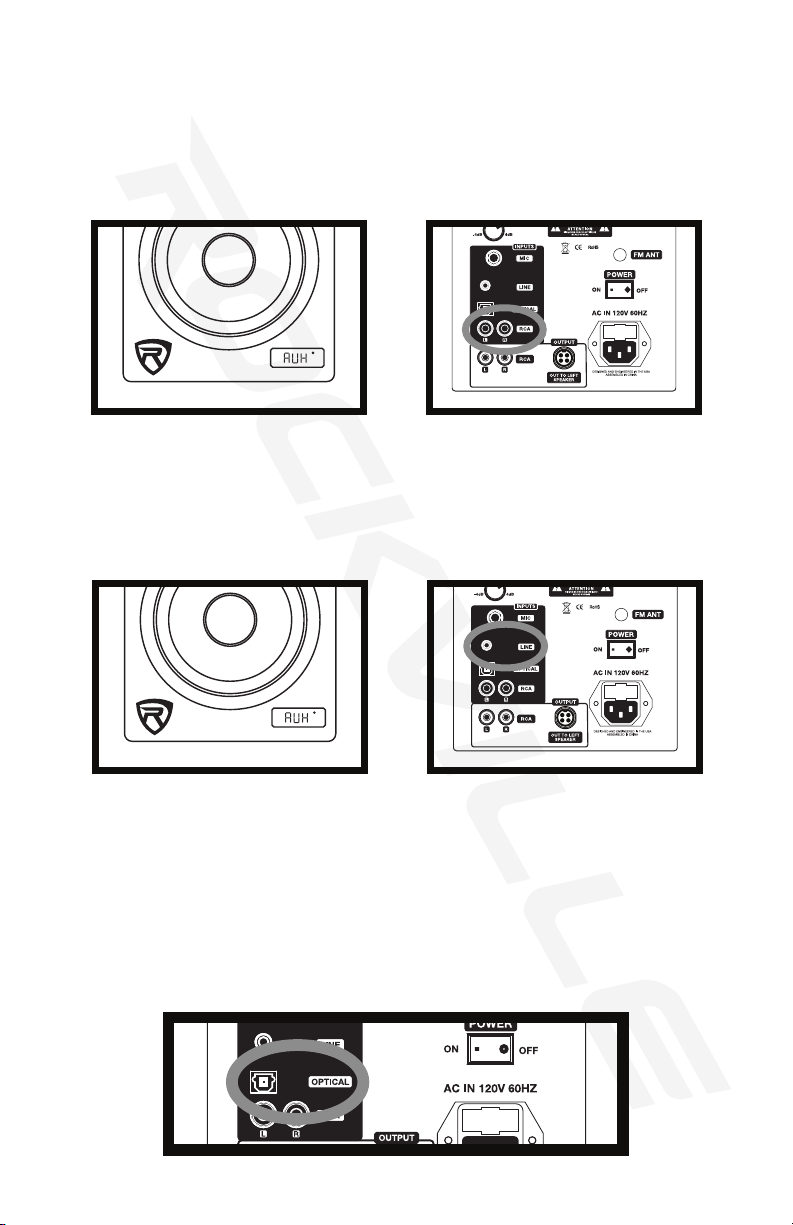
These speakers have Bluetooth, USB, SD, FM radio, and all of the inputs and outputs
you will ever need. We also added a ¼˝ mic input so this system can be used for karaoke.
Unlike a lot of home theater systems, the Rockville HTS8 features a Bi-Amplier design.
The woofer, as well as the tweeter, has an individual Frequency Optimized Amplier
(FOA). These amps guarantee that there is no wasted energy in the amplcation stage
and an absolute minimum of harmonic dsitortion. The effciency of our class D design is in
excess of 90% with zero discernible hiss or white noise. We are one of the leading speak-
er manufacturers in the USA, and we have a state of the art manufacturing process.
Please read this installation guide carefully for proper use of your Rockville HTS8 home
theater speaker system. Should you need technical assistance, please call our technical
help line at 1-646-758-0144, Monday through Friday, 9am to 5pm EST.
IMPORTANT SAFETY INSTRUCTIONS
TO REDUCE THE RISK OF ELECTRICAL SHOCK, DO NOT REMOVE AMPLFIER
PLATE. NO USER SERVICEABLE PARTS INSIDE. WE RECOMMEND TAKING THE
UNIT TO A QUALIFIED SERVICE TECHNICIAN FOR ANY REPAIRS.
• Do not place these speakers on an unstable surface. The speaker may fall over, causing serious
injury to a child or adult and serious damage to the unit.
• Do not use these speakers near water; for example, near a bathtub, sink, in a wet basement, or near
a swimming pool.
• The speakers should be situated away from heat sources such as radiators, heat registers, stoves,
or other devices that produce heat.
• These speakers should be connected to a power supply outlet of the same voltage as that which
is specied on the amp plate of the unit. Protect the power cord from being walked on or pinched,
particularly at plugs, convenience receptacles, and the point where it exits from the unit.
• Clean only with a soft damp cloth. Unplug this product from the wall outlet before cleaning.
• Upon completion of any servicing or repairs, request that service center/shop uses factory autho-
rized replacement parts. Replacement with unauthorized parts may result in re, electrical shock, or
other hazards.
Included
• (8) Isolation pads
• (8) Brass spikes
• (8) Rubber spikes
• (4) Cable clips
• (4) Cable ties
• (16) Screws

3
1. Master volume
2. SD input
3. USB input
4. Bass level adjustment
5. MP3/FM radioj controls
6. Treble level adjustment
7. FM antenna
8. Balanced ¼˝ input
9. 3.5mm line input
10. Power switch
11. Optical input
12. Unbalanced RCA input
13. Fuse compartment
14. IEC AC power socket
15. Unbalanced RCA output
16. Output to left speaker
17. LCD display
REAR PANEL (MASTER UNIT)
: power/standby
USB: select USB input
SD: select SD input
FM: enter FM radio mode
AUX: select AUX input
BT: enter Bluetooth mode
OPT: select optical input
: previous track/next track,
CH+ CH- Use to navigate FM stations
: play/pause in USB/SD/BT modes
VOL +/-: master volume control
MIC PRIORITY: microphone priority mode
REPEAT: repeat one song/repeat all songs/shufe
MIC +/-: adjust microphone volume
ECHO +/-: adjust reverb volume
TUNE +/-: manually tune FM stations
0 — 9: number pad used to direct select tracks
when in USB/SD mode
RESET: Restore factory settings
MUTE: cancel unit sound
FUNCTIONS
REMOTE CONTROL

4
2
3
5
7
10
13
14
17
1
4
8
6
9
11
12
15
16

5
Place speakers in desired position. Using the included proprietary noise rejecting cable,
connect the master speaker to slave unit. Now plug the master unit to the nearest AC
outlet.
To change input mode when the remote control is unavailable, follow these steps.
1. With the unit powered on, press the (next track) button. The display on the front of
the master unit will show the volume increasing.
2. Press and hold the (play/pause) button to change input modes. The display on the
front will change to indicate the input source: AUX - 3.5mm or RCA LINE input, FM -
FM Radio Tuner, USB - USB/SD input, BT - Bluetooth, OPT - Optical Input.
SET UP
CHANGING INPUT MODE

6
USB/SD
For USB/SD playback follow the steps listed below. Please note, the USB does not supp-
port charging. The following formats are supported: WAV/FLAC/MP3/WMA.
1. Make sure the unit is plugged in and the power switch is in the ON position.
2. Press the USB or SD button on the remote control to enter USB or SD mode.
3. Plug in your SD card or USB ash drive. The unit will automatically read the les and
begin playing music.
4. Use the buttons on the unit or on the remote to control music playback.
5. Press and hold Next/Previous track buttons on the unit's playback panel to raise or
lower the volume. You can also adjust the volume using the unit's Master volume knob
or the volume buttons on the remote control (please note: remote control volume
buttons control the Master volume). Both can be maxed out for maximum performance
without any distortion.
To connect your iPod, iPhone, MP3 player, Android phone or any other Bluetooth capable
device follow the steps listed below.
1. Make sure the unit is plugged in and the power switch is in the ON position.
2. Press the BT button on the remote control until the digital read out shows “BT”.
3. Turn on the Bluetooth feature on your device and ensure that it is in “discoverable”
mode. Search for “Rockville” on your list of available devices and select it.
4. Listen for for the beep which indicates the devices are succesfully paired.
5. Press and hold Next/Previous track buttons on the unit's playback panel to raise or
lower the volume. You can also adjust the volume using the unit's Master volume knob
or the volume controls on your Bluetooth device. All three can be maxed out for
maximum performance without any distortion.
BLUETOOTH
BLUETOOTH ON
DEVICE
DISCOVERABLE

7
The RCA inputs can be used to connect stereo signal sources such as TVs, Digital set-
top boxes, game consoles, DVD players, CD, players, etc. For playback via RCA inputs
follow the steps listed below.
1. Make sure the unit is plugged in and the power switch is in the ON position.
2. Press the AUX button on the remote control. The digital read out should read “AUX”.
3. If multiple sources are connected, use the remote button to switch between the sources.
RCA
Use the 3.5mm Line jack to connect computers, cellphones, or any other external sound
source with a 3.5mm output.
1. Make sure the unit is plugged in and the power switch is in the ON position.
2. Press the AUX button on the remote control. The digital read out should read “AUX”.
Many TVs, Digital set-top boxes, game consoles, and DVD players have optical (ber
optic) outputs. To connect via Optical input, follow the steps listed below.
1. Make sure the unit is plugged in and the power switch is in the ON position.
2. Use a digital optical audio cable to connect the speakers to the source.
3. Set your TV’s sound output to external speakers.
Please note: If you are having issues with sound output, go into your TV’s audio settings
and make sure to deactivate Dolby Pro-Logic, Dolby ATMOS, etc. and select PCM format.
LINE IN
OPTICAL

8
To use the system for karaoke connect any microphone via the ¼˝input.
MIC INPUT
FM RADIO
For FM radio follow the steps listed below.
1. Make sure the unit is plugged in and the power switch is in the ON position. Be sure to
connect the included FM antenna.
2. Press the FM button on the remote control. The digital read out should show numbers.
3. While in FM mode, press the AUTO button to activate automatic station search. Use
the CH+/- buttons to manually search through stations.
Use these RCA ouputs to connect a subwoofer or a second set of speakers.
RCA OUTPUT

9
• Dual 8˝ complete multi application speaker system
• 1000 watt powered bi-amped speakers (pair)
• RMS Power: 250 watt
• Two-way speaker design
• Full range class “D” amplier circuitry with auto-switching power supply
• Quad Amp Design: Each driver features frequency specic Independent Ampliers
• Built-in Bluetooth with 150 foot range and perfect interference-free sound quality
• Built-in USB playback
• Built-in SD card playback
• Supports WAV, FLAC, MP3, WMA le types
• Built-in FM radio with crystal clear reception
• Full function remote included
• Ferro uid enhanced 1˝ neodymium silk dome tweeter with metal grill protection
• Tweeter has 1˝ voice coil diameter
• Curved front bezel design eliminates standing wave distortion
• Injection molded polypropylene cone woofer
• Rubber woofer surrounds increases sound quality and eliminates unwanted distortions
• Computer optimized electronic crossover network supplies amazing sounding highs,
lows, and mids
• Specially wound voice coils produce accurate response along entire frequency spectrum
• 110 volt compatible
• One complete pair with master/slave output connection
• Includes a noise rejection cable to connect the 2 speakers together
Amplifier: Class D Mono Block
Quad Amp Design: Each Driver Features Frequency Specic Independent Amplier.
Low-Mid Frequency: 8˝ Polypropylene Cone with Rubber Sourround
High-Frequency: 1˝ Neodymium Silk Dome Tweeter
Frequency Response: 30Hz – 20kHz
SPL Peak: 106dB @1w/1m
Speaker Power Output (per pair): 250 Watts RMS/1000 Watts Peak
Power Output (per speaker): 125 Watts RMS/500 watts Peak
Tweeter Power Output: 30 Watts RMS
Speaker Impedance: 4 Ohm
Tweeter Impedance: 6 Ohm
Low Frequency Equalization Adjustment: -4dB - +4dB
High Frequency Equalization Adjustment: -4dB - +4dB
Input Connectors: Unbalanced RCA, Balanced ¼˝, Optical, 3.5mm, USB 2.0, SD
Ouput Connectors: unbalanced RCA
Fuse Rating: 250V/5A
AC Power Input: 120V (60Hz)
Dimensions (H x W x D): 15.35˝ (390mm) x 9.92˝ (252mm) x 12.2˝ (310mm)
Weight: Active unit: 26 lbs (11.8kg) Slave unit: 9 lbs (4kg)
FEATURES
SPECIFICATIONS

10
TROUBLESHOOTING
PROBLEM
No sound
No power 1. Make sure the unit is plugged in and
the power switch is in the ON position.
2. Check that the power cable is plugged
in tightly to the unit.
3. Check and replace the fuse if neces-
sary. See fuse replacement diagram on
the next page.
Bluetooth pairing fails
Files on SD or USB memory device will
not play back
1. Make sure you've selected the proper
source.
2. For USB/SD audio make sure that
both volume controls are set properly (see
USB/SD section for volume settings).
3. For Bluetooth audio make sure that
all 3 volume controls are set proper-
ly (see Bluetooth section for volume
settings).
5. Make sure you’ve selected external
speakers in your
TV’s sound ouput settings.
6. Deactivate Dolby Pro-Logic, Dolby
ATMOS, etc. andselect PCM in your
TV’s sound format settings.
1. Check to see that both devices are
turned on and that your Bluetooth
device is discoverable.
2. Turn both devices off and then on
again.
3. Make sure you've selected the proper
source.
4. Make sure that the Bluetooth device
is within 5 feet of the unit.
5. Move both devices away from other
Bluetooth devices, microwaves, wireless
routers, and other electronics.
6. Make sure that all 3 volume controls
are set properly (see Bluetooth section
for volume settings).
7. Make sure that the unit is not paired
to a previously paired device.
1. Make sure you've selected the proper
source.
2. Make sure that the audio les are
in the specied format (see Features
section).
SOLUTION

11
PROBLEM
No sound when receiving TV input 1. Select proper audio option from TV.
2. If using RCA cables, make sure that
they are plugged into the output jacks
of the TV and the input jacks of the
speaker.
SOLUTION
FUSE REPLACEMENT
Responsible party name: Rockville
Address: 600 Bayview Ave,
Entrance A,
Inwood, NY 11096
Hereby declares that the product Rockville HTS8 complete powered all in one entertainment system
complies with FCC rules as mentioned in the following paragraph:
This device complies with Part 15 of the FCC rules. Operation is subject to the following two
conditions: (1) this device may not cause harmful interference, and (2) this device must accept any
interference received, including interference that may cause undesired operation.
Note: This equipment has been tested and found to comply with the limits for a Class B digital device, pur-
suant to Part 15 of the FCC rules. These limits are designed to provide reasonable protection against harmful
interference in a residential installation. This equipment generates, uses and can radiate radio frequency ener-
gy and, if not installed and used in accordance with the instructions, may cause harmful interference to radio
communications. However, there is no guarantee that interference will not occur in a particular installation. If
this equipment does cause harmful interference to radio or television reception, which can be determined by
turning the equipment off and on, the user is encouraged to try to correct the interference by one or more of
the following measures:
•Reorient or relocate the receiving antenna.
•Increase the separation between the equipment and receiver.
•Connect the equipment to an outlet on a circuit different from that to which the
receiver is connected.
•Consult the dealer or an experienced radio/TV technician for help.
FEDERAL COMMUNICATIONS COMMISSION COMPLIANCE INFORMATION

© 2020 ROCKVILLE // Features and specifications are subject to change and or improvement without notice.
RockvilleAudio.com
Table of contents
Other Rockville Home Theater System manuals