Rockville HTS56 User manual

OWNER’S MANUAL
5.1 CHANNEL HOME THEATER SYSTEM
WITH LED LIGHT EFFECTS
HTS56HTS56


HTS56
HOME THEATER SYSTEM
Thank you for purchasing this Rockville HTS56 5.1 Channel Home Theater System. This
powered home theater speaker system creates a new performance level in home theater
speakers.
Please read this installation guide carefully for proper use of your Rockville HTS56 5.1
Channel Home Theater System. Should you need technical assistance during or after
your installation please call our technical help line at 1-646-758-0144, Monday through
Friday, 9am to 5pm EST.
IMPORTANT SAFETY INSTRUCTIONS
TO REDUCE THE RISK OF ELECTRICAL SHOCK, DO NOT REMOVE AMPLFIER
PLATE. NO USER SERVICEABLE PARTS INSIDE. WE RECOMMEND TAKING THE
UNIT TO A QUALIFIED SERVICE TECHNICIAN FOR ANY REPAIRS.
• Do not place these speakers on an unstable surface. The speaker may fall over, causing
serious injury to a child or adult and serious damage to the unit.
• Do not use these speakers near water; for example, near a bathtub, sink, in a wet base-
ment, or near a swimming pool.
• The speakers should be situated away from heat sources such as radiators, heat regis-
ters, stoves, or other devices that produce heat.
• Clean only with a soft damp cloth. Unplug the main unit from the wall outlet before
cleaning.
INCLUDES
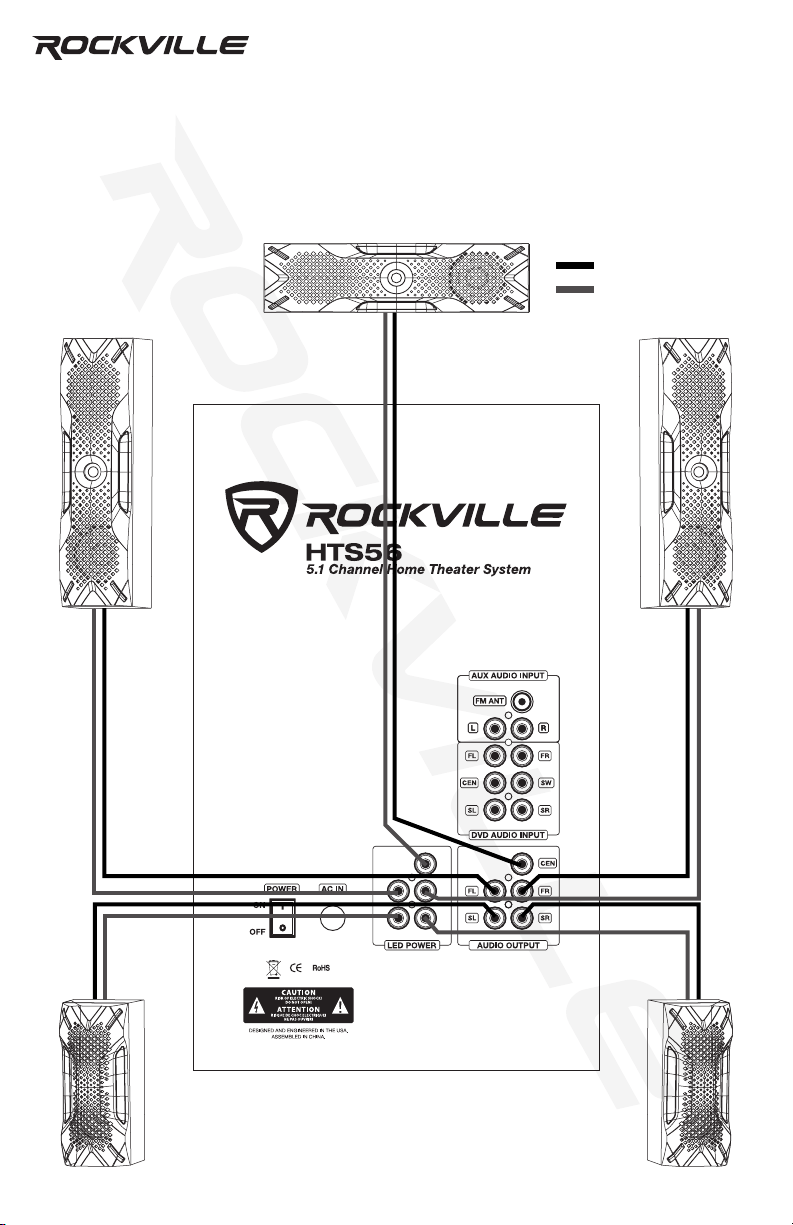
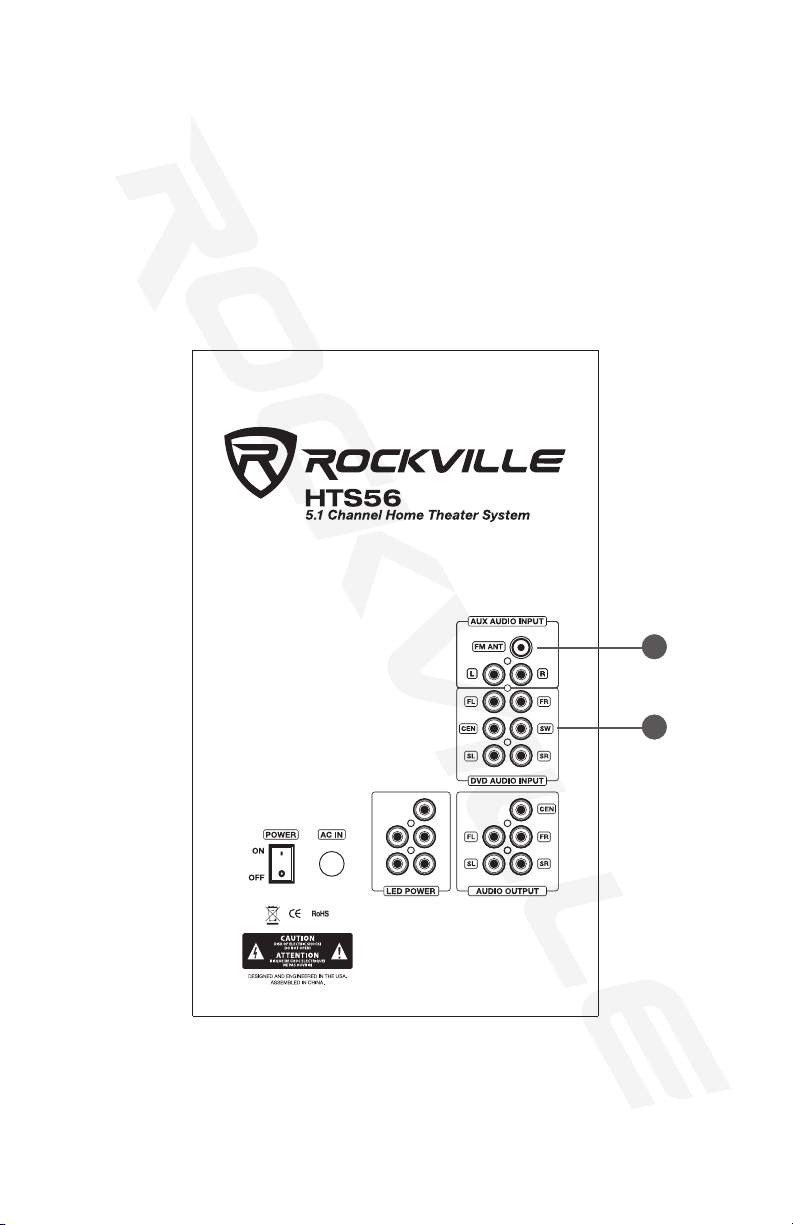
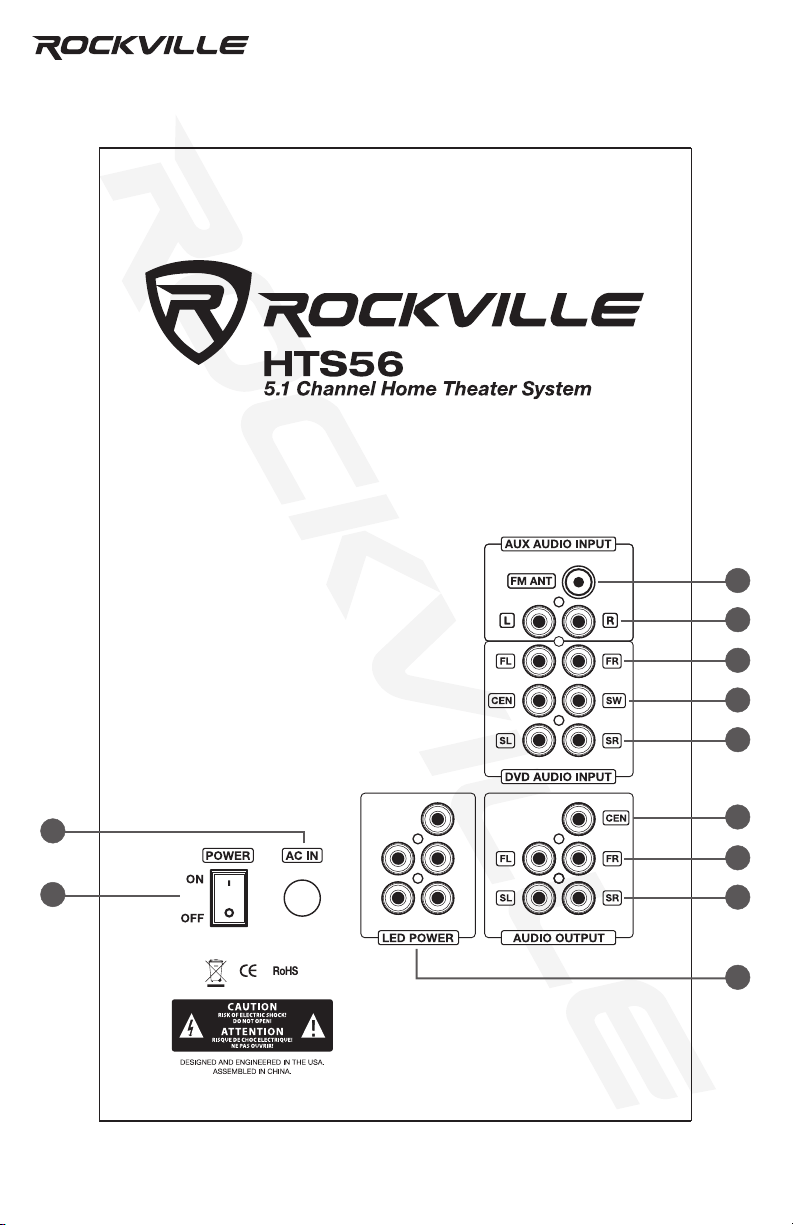
• Subwoofer with built in receiver
•(2) Front Speakers
•(2) Rear speakers
•(1) Center channel speaker
• Remote Control
• Signal Cable
• Antenna Cable
• Satellite Speaker Mounting Kits
• All wiring to connect speakers to the receiver – 24 foot cables for the rear speakers,
12 foot cables for the front speakers, 10 foot cable for the center channel speaker (extra
long cables are included to support any application)
• Manual
• Warranty Card

Place speakers in the desired position (see speaker positioning diagram on the next
page). Using the included color coded speaker cables, connect the center, front, and sat-
ellite speakers to the corresponding Audio Output RCA plugs on the subwoofer unit. Next
plug the LED power cables to the corresponding LED power RCA plugs.
SET UP
: AUDIO
: LED POWER

HTS56
HOME THEATER SYSTEM
1. RCA AUX AUDIO INPUT: Use the RCA Auxillary jacks to connect computers, cell-
phones, or any other external sound source with a 3.5mm output. You will need an RCA
to 3.5mm Y cable.
2. DVD AUDIO INPUT: Use these RCA jacks to input the sound signal from any 5.1 channel
output enabled source such as a TV, Digital set-top boxes, game consoles, DVD players,
Blu-ray players, CD players, etc.
COMPONENT CONNECTIONS
1
2

1. Most people place the subwoofer in the front of the room, near the sound input source,
for ease of connection. But since bass frequencies are omnidirectional the subwoofer can
be placed anywhere. Try placing it near a wall or a corner for increased bass.
2. The center channel speaker should be place directly in front of the listening position,
above or below the sound input source. If possible, tilt it as necessary to direct the sound
to ear level.
3. Mount the front speakers on the wall, directly to the left and right of the center channel
speaker. Angle them towards the listening postion. Preferably, the tweeters should be at
ear level.
4. Mount the satellite speakers on the wall, slightly behind the listening position, about
1 to 2 feet above ear level. If side placement isn’t possible place them to the rear of the
listening position and angle them forward.
POSITIONING THE SPEAKERS
TV
0° 20°20°
30°30°
90°90°
110 °110 °

HTS56
HOME THEATER SYSTEM
Make sure you have all the necessary screws and brackets. There
should be ve brackets and one bag of screws. If any of these items
are missing, please contact Rockville.
Before you begin please make sure you have the proper tools and necessary accesso-
ries. For this installation you will need the following items:
• mounting brackets and screws (included)
• wall hooks (optional, not included)
• speaker cable (included)
• drill
• Phillips screw driver
Using two screws, secure one bracket to the back of each speaker
you wish to mount.
Now mark on the wall the place where you will be mounting your
speakers. Use the diagram from the POSITIONING THE SPEAKERS
section to determine the best location. Both front speakers should be
at the same height; the same goes for the satellite units. Remember to
keep speakers at least two feet away from corners, and make sure you
have enough wire to reach the mounting location.
You can use a screw or a mounting hook to hang the speaker. Use a
screw with a drywall insert or drive it into a wall stud to ensure that it
is securely fastened to the wall. Use a stud nder to locate the stud
and to make sure that there are no wires or cable lines located in that
area. Once the mounting hooks or screws are in place, you are ready
to begin mounting. Be sure to wire each speaker before mounting it to
the wall.
OPTIONAL WALL MOUNTING INSTRUCTIONS

REAR PANEL
3
4
5
7
9
10
11
8
6
2
1

HTS56
HOME THEATER SYSTEM
REAR PANEL
1. Power input
2. Power switch
3. FM antenna
4. RCA AUX in
5. Front L / R RCA DVD audio input
6. Center /subwoofer RCA DVD audio input
7. Rear L / R RCA DVD audio input
8. Center RCA audio output
9. Front L / R RCA audio output
10. Rear L / R RCA audio output
11. LED power output

1
3
5
6
2
4 8
9
10
7

HTS56
HOME THEATER SYSTEM
1. Input: Use this key to switch between AUX, SD, USB, and FM modes.
2. Standby: While in AUX/SD/USB/FM modes, press and hold for 3 seconds to enter
standby.
3. Master volume: turn the knob left or right to increase or decrease the system’s volume.
4. CH–/ : Previous FM station/previous track in USB/SD mode.
5. SD card reader
6. USB port
7. Pro-Logic: Pro-logic function key
8. CH+/ : Next FM station/ next track in USB/SD mode.
9. AUTO/ : Press and hold for 5 seconds for automatic station search/ Play-pause
function in USB/SD mode.
10. ¼˝ MIC inputs: Use these jacks to connect up to 2 microphones for Karaoke.
FRONT PANEL (MASTER UNIT)

: Power/Standby
SD: SD input
5.1/2.1: Channel mode select
USB: USB input
FM: enter FM radio mode
AUX: Auxillary input
DVD: DVD input
BT: enter Bluetooth mode
SAVE: Save stations to unit memory
TUNE +/– : Manually tune FM stations
: Play/Pause in USB/SD/BT modes
AUTO: Automatic station search
CH– / : Previous FM station/previous track (USB/SD)
CH+ / : Next FM station/ next track (USB/SD)
LED LIGHT: Set subwoofer LED light mode/turn
off speaker LEDs
SLEEP: set unit to sleep mode
FL +/– : Front left speaker volume control
FR +/– : Front right speaker volume control
SW +/–: Subwoofer volume level
CEN +/– : Center speaker volume control
VOL +/–: Master volume control
SL +/– : Front left speaker volume control
SR +/– : Front right speaker volume control
0 – 9: Number pad used to direct select tracks
when in USB/SD mode
REPEAT: Repeat one song/repeat all songs/shufe
RESET: Reset volume level
EQ +/– : Adjust EQ settings (USB/SD)
ECHO +/– : Adjust echo volume
DISP +/– : Adjust display brightness
REMOTE CONTROL FUNCTIONS

HTS56
HOME THEATER SYSTEM
BLUETOOTH
To connect your iPod, iPhone, MP3 player, Android phone or any other Bluetooth capable
device follow the steps listed below.
1. Make sure the unit is plugged in and the power switch is in the ON position.
2. Press the BT button on the remote control or push the INPUT button on the unit until
the digital read out shows “BT”.
3. Turn on the Bluetooth feature on your device and ensure that it is in “discoverable”
mode. Search for “Rockville HTS56” on your list of available devices and select it.
4. If your device requires a password, please use “0000”.
FM RADIO
For FM radio follow the steps listed below.
1. Make sure the unit is plugged in and the power switch is in the ON position. Be sure to
connect the included FM antenna.
2. Press the FM button on the remote control or push the INPUT button on the unit until
the digital read out shows numbers.
3. To automatically save stations:
• Press and hold the AUTO button for 3 seconds. The unit will begin to automatically
search and save any available stations.
4. To manually save stations:
• Use the TUNE +/TUNE - buttons to nd a station you like and that is coming in clearly.
• Press the SAVE button. CHAN will start ashing on the screen. Use the CH-/CH+
buttons to select the channel number you’d like to program for that station.
• Press the SAVE button again. This will set the channel & the message “good” will be
displayed.
5. Use the CH-/CH+ buttons to navigate through saved stations or use the TUNE +/TUNE -
buttons to manually nd a station.
USB/SD
For USB/SD playback follow the steps listed below.
1. Make sure the unit is plugged in and the power switch is in the ON position.
2. Press the USB/SD buttons on the remote control or push the INPUT button on the unit
until the digital read out shows “USB” or “SD”.
3. Plug in your SD card or USB ash drive. The unit will automatically read the les and
begin playing music.
MIC INPUT
To use the system for karaoke connect any microphone via either one of the 1/4˝inputs
located on the front of the unit. While the MICs are connected, you can control the echo
settings by pressing the ECHO- or ECHO+ buttons on the remote.

• HTS56 5.1 Channel Home Theater System with LED Light Effects
• Plug and play system with everything you need right out of the box
• 1000 Watts Peak Power
• 500 Watts Program Power
• 250 Watts Continuous RMS Power
• 8˝ Subwoofer with built-in receiver
• 1 x 3˝ Center Channel Speaker
• 2 x 3˝ Full Range Front Channel Speakers
• 2 x 3˝ Full Range Rear Channel Speakers
• Top-quality MDF wood cabinets with plastic front panels
• Built-in FM receiver with amazing reception
• Digital display
• 5 Band equalizer
• You can independently control the volume of each speaker and the subwoofer
• Bluetooth v2.1
• USB input (max le size: 16Gb)
• SD input (Minimum card capacity is 512Mb, max le size: 16Gb)
• 2 ¼˝ MIC inputs with echo function for karaoke
• 5 RCA Audio outputs
• 6 RCA DVD Audio inputs
• 2 RCA AUX inputs
• FM antenna input
• Full function remote
• The subwoofer unit has 4 LED lighting modes: (blink to the beat, solid on, spectrum EQ
analyzer, off) and selectable with 7 colors or multi-color mode.
• Cable Length: Front L/F: 12Ft, Rear L/R: 23Ft, Center: 10Ft
• Frequency Response: 20Hz – 20KHz
• Certification: CE and RoHS Compliant
• Amplifier: Class AB, very efcient amplier with top components!
• Signal to noise ratio: ≥70dB (Maximum output with THD+1<1%)
• System Impedance: 8˝ driver: 8 Ohm /3˝ driver: 4 Ohm
• Max SPL: 106 dB @ 1w/1m
• THD: 1%
• Input voltage: 120V/60Hz
• Subwoofer Dimensions in Inches: (W*D*H) 9.25˝ x 13.19˝ x 14.57˝
• Center Speaker Dimensions in Inches: (W*D*H) 3.94˝ x 4.13˝ x 14.57˝
• Front L/R Satellite Speaker Dimensions in Inches: (W*D*H) 3.94˝ x 4.13˝ x 14.57˝
• Rear L/R Satellite Speaker Dimensions in Inches: (W*D*H) 3.94˝ x 4.13˝ x 9.25˝
• Shipping Dimensions in Inches: (W*D*H) 18.58˝ x 12.99˝ x 21.34˝
• Net Weight: 26.47 LBS
• Shipping Weight: 28.68 LBS
FEATURES
SPECIFICATIONS

HTS56
HOME THEATER SYSTEM
Responsible party name: Rockville
Address: 600 Bayview Ave,
Entrance A,
Inwood, NY 11096
Hereby declares that the product Rockville HTS56 complete powered home theater sys-
tem complies with FCC rules as mentioned in the following paragraph:
This device complies with Part 15 of the FCC rules. Operation is subject to the following
two conditions: (1) this device may not cause harmful interference, and (2) this device
must accept any interference received, including interference that may cause undesired operation.
Note: This equipment has been tested and found to comply with the limits for a Class B digital
device, pursuant to Part 15 of the FCC rules. These limits are designed to provide reasonable
protection against harmful interference in a residential installation. This equipment generates,
uses and can radiate radio frequency energy and, if not installed and used in accordance with
the instructions, may cause harmful interference to radio communications. However, there is no
guarantee that interference will not occur in a particular installation. If this equipment does cause
harmful interference to radio or television reception, which can be determined by turning the
equipment off and on, the user is encouraged to try to correct the interference by one or more of
the following measures:
•Reorient or relocate the receiving antenna.
•Increase the separation between the equipment and receiver.
•Connect the equipment into an outlet on a circuit different from that to which the
receiver is connected.
•Consult the dealer or an experienced radio/TV technician for help.
FEDERAL COMMUNICATIONS COMMISSION COMPLIANCE INFORMATION

© 2019 ROCKVILLE // Features and specifications are subject to change and or improvement without notice.
RockvilleAudio.com
Other manuals for HTS56
1
Table of contents
Other Rockville Home Theater System manuals