Roksan Audio K3 CD Di User manual

K3 CD Di
Set Up Guide and Product Manual
roksan.com

Roksan is a member of

CONTENTS
INTRODUCTION
Congratulations on your purchase of the Roksan K3 CD Di, CD player. This CD player is
designed and manufactured to the highest specication and rigorously tested to reward
you with many years of listening pleasure.
Your K3 CD Di is an integral part of your Hi-Fi system. Its correct installation, set-up
and operation will have a signicant inuence on the performance of the entire Hi-Fi
installation. Please read the contents of this manual thoroughly. It will help you to
understand your Hi-Fi equipment better and further enhance your listening pleasure.
UNPACKING
Included in the packing of your K3 CD Di you will nd:
• One mains lead tted with the correct mains power plug for your country.
• One Roksan R7 Remote Control and CR2032 battery
• One information pack
After removing these items please retain all packing material. Correct packing is
necessary for future transportation of your K3 CD Di.
MAINTENANCE
After disconnecting the CD player from the mains supply, the casing and front
panel may be cleaned with a lightly dampened lint-free cloth. Avoid using abrasive
substances or solvents.
1K3 CD Di
INTRODUCTION 1
UNPACKING 1
MAINTENANCE 1
EU DIRECTIVES 2
AC MAINS SUPPLY 2
LOCATION 3
FRONT PANEL VIEW 3
REAR PANEL VIEW 3
R7 REMOTE CONTROL 4
CONNECTING MAINS POWER 5
SIGNAL CONNECTIONS 5
Analogue Output 5
Digital Output 5
Digital Input 5
SWITCHING ON 5
USING THE FRONT PANEL CONTROLS 6
Loading a Disc: 6
Playing a Disc: 6
Display 7
OPERATING THE DIGITAL INPUT 7
WARRANTY 8
TROUBLESHOOTING 9
SPECIFICATIONS 10
ENGLISH

EU DIRECTIVES
Roksan declares that the apparatus “K3 CD Di” complies with the essential
requirements and other relevant provisions of Directive 1999/5/EC”.
AC MAINS SUPPLY
Your K3 CD Di is set to operate from a xed supply voltage which is marked on a label
next to the mains input plug. Before connecting the mains lead please check that your
mains supply corresponds to this label as below:
230 V Products Voltage Range : 220 - 240 V
115 V Products Voltage Range: 100 - 120 V
100 V Products Voltage Range: 90 - 110 V
The mains lead supplied with this product has an IEC C13 mains plug which is inserted
into the Mains Input Socket on the unit’s rear panel. The other end is a moulded plug
appropriate to that for your country. In the UK this is the standard UK13A plug.
NOTE: Other international markets will require a different value plug and
protection fuses. Please contact us for more details.
This plug should ordinarily not be removed from the lead. If you do remove it,
please dispose of it safely so that it cannot be plugged into a mains socket whilst in
a potentially dangerous condition. If your lead has been damaged please obtain a
complete replacement lead from your dealer.
Should you move to another area where either the mains voltage or the mains plugs
are different from those as supplied with your CD player, please contact the appointed
Roksan distributor for assistance.
Please observe correct mains polarity at all times.
The mains fuses are located on the rear panel below the IEC Mains Input Socket. These
must only be replaced by the fuse type and rating as described on the fuse rating label
on the rear panel of the unit.
If the equipment is likely to be unused for some time, unplug it from the mains supply.
This product requires connection to earth (ground). The earth wire (in the UK this is
colour coded green/yellow) of the mains cable supplied with your CD Player must be
connected to a suitable earthing point established for this purpose by your electricity
supply company. If you are in any doubt, consult a qualied electrician. If the equipment
is likely to be unattended for a longer period of time, please unplug it from the mains
supply.
2 roksan.com

LOCATION
Your K3 CD Di should be located in a well ventilated area and kept away from sources
of heat, dust, humidity and direct sunlight.
The CD player may be positioned either as a free standing unit or alongside other
audio/video product(s). Never place the CD player on other electronic equipment,
carpet or any surface likely to hinder normal ventilation. Never allow liquids or other
objects to fall into the unit.
NOTE: This unit contains no user serviceable parts. Do not remove any panels or
attempt to service it yourself. Unauthorised servicing will void the warranty.
FRONT PANEL VIEW
1. AC Mains Power Switch
2. CD Drawer
3. Digital Input Indicator LED (under
unit)
4. IR Receiver
5. Open/ Close Button
6. Stop Button
7. Play/ Pause Button
8. Digital Input Selection Switch
9. Previous Track Button
10. Next Track Button
11. Display Button
12. Display
1 2 4 5 1210 116 7 8 93
REAR PANEL VIEW
1. Chassis Ground Terminal
2. Serial Number
3. Right & Left Analogue RCA Outputs
4. Digital Coaxial Input
5. Digital Optical Input
6. Digital Optical Output
7. Digital Balanced XLR Output
8. Digital Coaxial Output
9. AC Mains Fuse Holder
10. Voltage & Fuse Rating Label
11. AC Mains Input Socket
1 2 3 4 5 6 7 8 9 10 11
3K3 CD Di
ENGLISH

R7 REMOTE CONTROL
AMP DAC
STREAMER
INPUT
VOLUME
OK
TRACK
CD
BT
SHUFFLE REPEAT
MUTE
FAST
Integrated Amplier Functions.
AMP: Puts the R7 Remote Control into Amplier mode to
control the K3 Integrated Amplier
DAC: Puts the R7 into DAC operating mode
BT: Select the Bluetooth input
INPUT : Scroll through inputs to the left
INPUT : Scroll through inputs to the right
OK: No function for K3 products
MUTE: Reduces the volume by -20dB
VOLUME : Adjusts the volume down
VOLUME : Adjusts the volume up
CD Player Functions.
CD : Stop
CD : Play/Pause
TRACK : Skip to previous track
TRACK : Skip to next track
FAST : Rewind
FAST : Forward
SHUFFLE: When in Stop mode, press Shufe to play the tracks
in a random order. To cancel press Stop
REPEAT: Press once to repeat all tracks
Press again to repeat current track
Press again to cancel repeat mode
4 roksan.com
CAUTION: Danger of explosion if remote control
battery is incorrectly replaced. Replace only with the
same or equivalent type.
WARNING: Do not ingest the battery, Chemical Burn Hazard.
This remote control contains a coin/button cell battery. If the coin/button cell battery
is swallowed, it can cause severe internal burns in just 2 hours and can lead to death.
Keep new and used batteries away from children.
If the battery compartment does not close securely, stop using the product and keep it
away from children.
If you think batteries might have been swallowed or placed inside any part of the body,
seek immediate medical attention.

CONNECTING MAINS POWER
The moulded IEC plug of the supplied mains lead should be plugged into the AC Mains
Input Socket on the rear of the unit rst and then plugged into the mains supply. The
Mains Power Switch is on the left front underside of the CD player.
SIGNAL CONNECTIONS
Analogue Outputs
The Analogue Outputs use gold plated RCA phono sockets or gold plated balanced
XLR sockets and should be connected to the CD or Line input of your amplier.
Digital Outputs
The Digital Outputs use gold plated RCA phono socket for coaxial SPDIF, Tos-Link for
optical and XLR for balanced AES/EBU output. Any of these could be connected to a
corresponding input of an amplier with a digital input, or to an outboard Digital to
Analogue Converter (DAC).
Digital Inputs
The K3 CD Di features two digital inputs:
• 1 x Coaxial RCA
• 1 x Toslink Optical
Any device with a digital output can be connected to the K3 CD Di and the signal will
be fed to the analogue outputs of the player into the relevant amplication. If the
digital source device you wish to connect has either coaxial, optical (or both) digital
output(s) it can be connected to the K3 CD Di to utilise the player’s circuit for superior
sound performance.
SWITCHING ON
The Mains Power Switch is on the left front underside of the CD player. This switch can
be left on; if however the CD player is likely to be unattended for a long period, switch it
off and unplug the mains lead from the wall.
When switched on, your K3 CD Di display will illuminate.
5K3 CD Di
ENGLISH

USING THE FRONT PANEL CONTROLS
Loading a Disc:
1. Press the Open/ Close Button once to open the disc loading tray (the display will
indicate: open).
2. Carefully load a disc into the tray recess with the label side up. Press the button
again to close the tray.
Note: Never load a disc until the drawer has opened fully, or try to close the
drawer until you are sure that the disc is properly seated in the holder recess.
Warped discs should never be played.
The drawer should only be opened and closed using the front panel control.
Under no circumstances should you attempt to open manually.
If a disc is not inserted or if the disc is damaged or inserted upside down, the CD
player will remain inoperative (Display will indicate: no disc).
Playing a Disc:
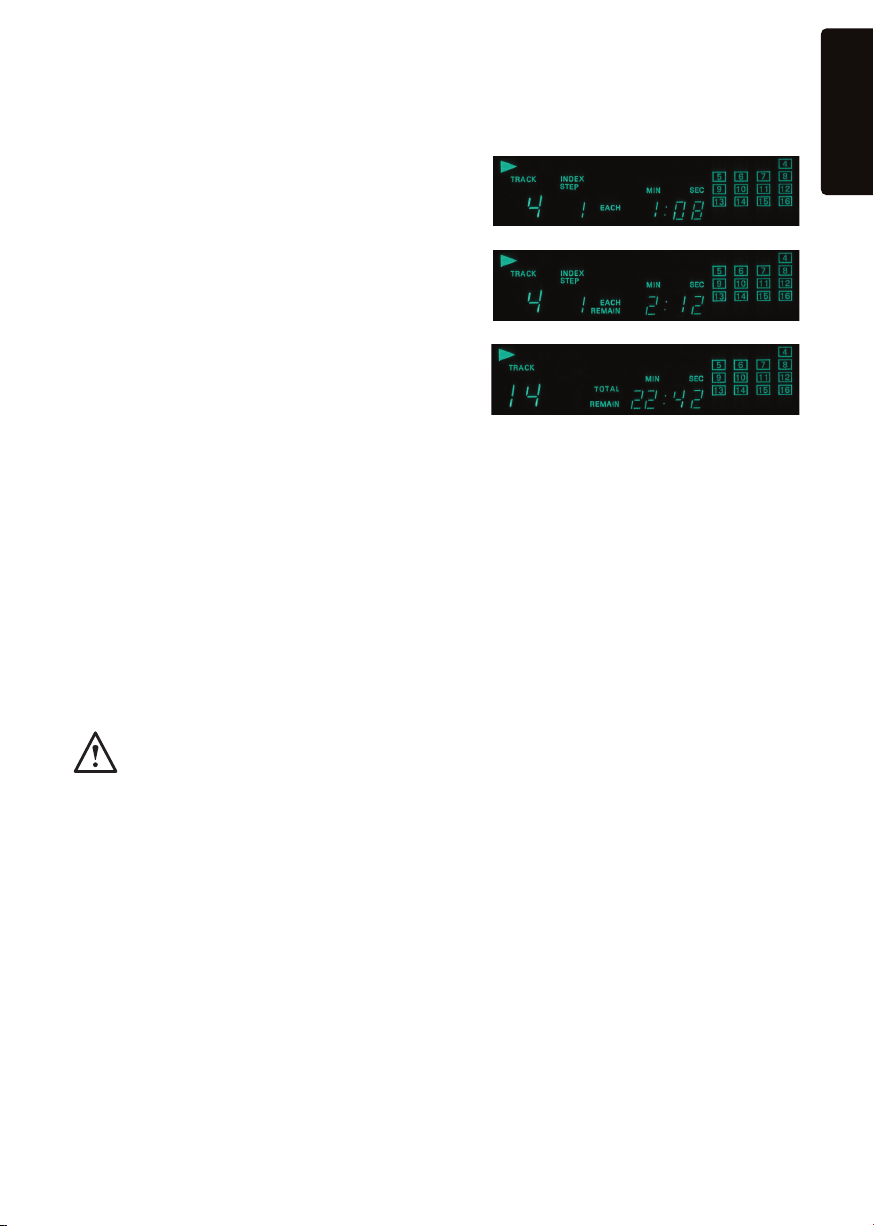
When a disc has been loaded, your CD Player will briey spin the disc while it studies
the data encoded on it. The disc will then stop and the display will indicate the number
of tracks on the disc and the total play time.
• To commence playing a disc, press Play/ Pause Button on the remote control or front
panel once. The disc will play from the beginning.
• Press the Play/ Pause button a second time to pause the disc whilst it is playing.
Pressing the button again will resume playback from the point at which it was
paused. When paused, the disc continues spinning and the laser will still be
operational but locked. Please do not keep the CD Player in Pause mode any longer
than strictly necessary.
• Press the Next Track Button to go forward to the start of the next track on the disc.
Repeated pressing will take you through the tracks on the disc.
• When the disc is playing, press the Previous Track Button once to take you to the
beginning of the current track and immediately a second time to take you to the
start of the previous track.
• When a disc is rst loaded, you can use these buttons to select your desired track.
Having done so, press the Play/ Pause Button and your disc will commence playing
from the selected track.
• You may select a track when Pause is engaged. In this case, the disc will revert to
Pause after the procedure is complete and you will have to press Play/ Pause Button
again to continue playing the disc.
6 roksan.com

Display
Pressing the Display Button on the front panel repeatedly will cycle the display through
the following modes:
Normal - Display indicates track number and how
long it has been playing.
First press - Display indicates track number and
remaining time on the track.
Second press - Display indicates number of
tracks and remaining time on the disc.
OPERATING THE DIGITAL INPUT
If you wish to use an external digital source, it should be connected to the K3 CD Di
by either the coaxial or optical digital input options on the rear of the K3 CD Di. Now
select the correct input via the rocker switch located on the right, underside of the unit.
When either of the digital inputs are selected, the LED indicator located in the centre,
underside of the unit will illuminate on the relevant colour.
Please see below for the correct position for each input:
• CD Middle position, LED not illuminated
• Left position - Optical, LED will illuminate BLUE
• Right position - Coaxial, LED will illuminate WHITE
Note: Return the rocker switch to the central position to continue using the CD
mode.
7K3 CD Di
ENGLISH

WARRANTY
There are no user-serviceable parts inside your K3 CD Di. If a fault should develop, refer
any servicing to your appointed Roksan dealer, distributor or Roksan approved service
agent.
Both the craftsmanship and the performance of this product are covered by the
manufacturer’s warranty against manufacturing defects provided that the product was
supplied by an authorised Roksan retailer under the consumer sale agreement. For the
period of cover please refer to the product page on our website: roksan.com for the
product you have purchased.
When purchasing Roksan products, please keep your receipt of purchase safe, as this
validates your warranty.
This warranty excludes:
1. Damage caused due to accident, misuse, neglect and incorrect installation,
adjustment or repair.
2. Liability for damage or loss during transit from the retailer or purchaser to Roksan
or its authorised distributor for the purposes of repair or inspection.
3. Carriage costs to Roksan that will be borne by the consignor.
All claims under this warranty must be made through an authorised Roksan retailer.
If equipment returned for repair to Roksan is found on inspection to not comply with the
product specication, Roksan reserves the right to make a charge for examination and
return carriage.
NOTE: Unauthorised servicing will void this warranty.
8 roksan.com

TROUBLESHOOTING
If you suspect that your CD Player is not operating properly, you should check all
the connections carefully. RCA plugs should be fully inserted - a frequent cause of
problems is that RCA plug surrounds do not make proper contact. Below are some
commonly encountered problems with suggestions for possible cure. The list is not
exhaustive: If you have any unresolved problems, please consult your appointed Roksan
dealer or distributor.
SYMPTOM LIKELY CAUSE SUGGESTED REMEDY
• No power. • AC Mains lead not inserted
properly
• Unit not switched on.
• Ensure AC mains lead is
fully inserted
• Switch unit on at front left
underside.
• The disc tray
will not close
when a disc is
inserted.
• Disc not placed properly
in tray
• Disc is warped.
• Re-place disc properly
• Discard disc.
• Disc inserts,
display does
not show the
number of
tracks and
playing time.
• Disc inserted upside down
• Disc is dirty or scratched
• Condensation on the laser
lens
• Dirt on the laser lens.
• Re-insert disc
• Clean disc, discard
scratched disc
• Let CD Player warm up
and dry out lens
• Refer to appointed dealer
or service centre
• DO NOT use CD lens
cleaners.
• Skipping &
mistracking.
• Excessive vibration
• Disc is dirty or scratched.
• Ensure player is stable and
vibration-free
• Clean disc, discard
scratched disc.
• Excessive hum • Connection loose, cable
faulty
• Re-connect plugs, change
interconnect
• One channel
inoperative
• Interconnect or amplier
faulty
• Change lead, try another
line input on amplier
• Remote Control
handset
operation
erratic or not
working.
• Batteries weak or wrongly
inserted
• Remote Control signal path
is obstructed
• Remote Control
transmission angle too
wide
• Room lighting/sunlight
excessive.
• Replace battery, observe
polarity
• Remove obstruction, move
handset
• Operate handset in front
of CD Player
• Darken room.
9K3 CD Di
ENGLISH

SPECIFICATIONS
Operating System: CD digital audio system (CD, CD-R, CD-RW)
Frequency Response: 20 Hz – 20 kHz ± 0.2 dB
Harmonic Distortion: < 0.002% @ 0 dB, 1 kHz
< 0.006% @ -30 dB, 1 kHz
< 0.002% @ 0 dB, 20 Hz
< 0.008% @ 0 dB, 20 kHz
Intermodulation Distortion: < 0.0015% @ 0 dB
S/N Ratio (IHF-A Wtd.): < 96 dB L & R
Wow & Flutter: Quartz Precision
Channel Separation: 100 dB @ 1 kHz
80 dB @ 20 kHz
Analogue Voltage: 2.2 V RMS
Analogue Outputs: RCA Gold plated
Digital Outputs: 75 Ω Coaxial (RCA)
110Ω Balanced AES/EBU (XLR)
Optical (Tos-Link)
Digital Inputs: Coaxial (RCA) 75 Ω 24 bit/ 96 kHz
Optical (Tos-Link) 24 bit/ 96 kHz
D/A Conversion: PCM1730E Advance Segment, Audio-Stereo DAC
Resolution/ Sampling: 24 bits / 192 kHz
Oscillation: 3rd Overtone Oscillation
Crystal: Super Precision, Custom Made
Jitter: <150 psec
Idle Pattern: <-107 dB L & R
Stop Band Rejection: <-98 dB
Power Source: 100 - 120 V, 50/60 Hz
220 - 240 V, 50/60 Hz
Maximum Power Consumption: < 30 W
Dimensions (W x D x H): 432 x 380 x 90 mm
432 x 380 x 102 mm (including feet)
Weight: 7 Kg
All specications are liable to change without notice. E&OE
10 roksan.com


Designed and built
in Great Britain.
roksan.com
Version 3.1. 2020
ROK-1219
Roksan
24 Brook Road,
Rayleigh, Essex
SS6 7XJ, UK
+44 (0)1268 798900
Table of contents
Other Roksan Audio CD Player manuals

Roksan Audio
Roksan Audio Caspian User manual

Roksan Audio
Roksan Audio OXYGENE User manual

Roksan Audio
Roksan Audio Caspian INTEGRATED CD PLAYER User manual

Roksan Audio
Roksan Audio Attessa CD Transport User manual

Roksan Audio
Roksan Audio K3 User manual

Roksan Audio
Roksan Audio Caspian M series-1 User manual

Roksan Audio
Roksan Audio Caspian M2 User manual

Roksan Audio
Roksan Audio Kandy MkIII User manual

Roksan Audio
Roksan Audio K3 User manual

Roksan Audio
Roksan Audio Attessa User manual