Roksan Audio TR-5 S2 User manual

TR-5 S2
LOUDSPEAKER
MANUAL

TR-5 S2 Loudspeaker
Manual
2
Congratulations on your purchase of the Roksan TR-5 S2
loudspeaker. This Loudspeaker is designed and
manufactured to the highest specification and rigorously
tested to offer you many years of trouble-free pleasure.
Correct installation, set-up and operation will have a
profound influence on the sonic performance of the entire
hi-fi system. Please read the contents of this manual
thoroughly. It will help you to understand your hi-fi
equipment better and enhance your listening pleasure.

TR-5 S2 Loudspeaker
Manual
3
After unpacking please retain all packing materials. Correct packing is necessary for future
transportation of your TR-5 S2 Loudspeakers.
UNPACKING

TR-5 S2 Loudspeaker
Manual
4
MAINTENANCE AND CAUTIONS
To maintain the appearance of the TR-5 S2 loudspeaker, occasionally wipe the cabinet
surface with a lightly dampened soft cloth or chamois leather.
NOTE: DO NOT wipe, press or pierce either of the drive units as this could cause permanent
damage to them.
Avoid use of abrasives or solvents.
Your TR-5 S2 loudspeakers are high quality audio devices, therefore care must always be
taken to transport, position and operate the units correctly.
DO NOT expose the loudspeakers to extreme climatic conditions such as excessive cold,
heat, sunlight, rain humidity or water etc.
DO NOT attempt to install the loudspeakers until you have read and understood all the
necessary operational parameters and installation instructions regarding your TR-5 S2
loudspeakers.
DO NOT make any connections between the amplifier and the loudspeakers whilst the
amplifier is switched on. (Always refer to the amplifier user manual)
The TR-5 S2 loudspeakers contain no user serviceable parts. Do not remove any drive
units/panels or attempt to service the loudspeakers yourself. Unauthorised servicing will void
the warranty.

TR-5 S2 Loudspeaker
Manual
5
INSTALLATION
TR-5 S2 LOUDSPEAKER FRONT AND REAR VIEW
1. High frequency Ribbon tweeter
2. Low frequency woofer
3. Loudspeaker grille
4. Rear firing bass reflex port
5. Product label
6. Speaker terminal panel
1
2
3
4
5
6
TR-5 S2 LOUDSPEAKER TERMINAL PANEL VIEW
1. Tweeter Input terminal (+)
2. Tweeter Input terminal (-)
3. Woofer Input terminal (+)
4. Woofer Input terminal (-)
5. Tweeter / Woofer ‘Jump-bars’ (removable) HF
LF
1
3
2
5
4

TR-5 S2 Loudspeaker
Manual
6
POSITIONING AND PLACEMENT
The positioning of the loudspeakers is very important to successful installation. The key is to
find the best compromise between room constraints and performance.
See the diagram below for general guidelines on positioning. Note that this is only a
guideline and an ‘ideal’. Every room is different and some experimentation of positioning will
result in the best sonic performance.
Placing one or both of the speakers in a corner or an alcove will result in a decrease of sonic
performance (such as ‘booming’ bass) and is best avoided.
a
b
• Distance of a & b should be equal on both loudspeakers
• Loudspeakers should be approximately 2 m apart
• Speakers should be symmetrical to the listening position
• Speakers should be between 0.5 – 1 m from rear wall
• A small angled ‘toe-in’ of 10-15 degrees (depending on distance from listening
position) will ensure increased sound staging and imaging. ‘Fine tune’ this angle for
optimum performance.

TR-5 S2 Loudspeaker
Manual
7
SETUP
Please refer to earlier speaker terminal panel view
There are two sets of terminals the upper set corresponds to the tweeter (HF) and the lower
to the woofers (LF). There is a small illustration printed on the rear label for your reference.
The TR-5 S2 loudspeaker comes supplied with a set of two removable ‘jump-bars’ already
connected. To connect the loudspeaker conventionally, simply attach your speaker cable to
the lower set of terminals marked ‘woofer’ (LF). Make sure that both loudspeakers are
connected in the correct polarity with respect to the output terminals of your amplifier:
CONNECTING LOUDSPEAKER CABLES - CONVENTIONAL
and
or
RIGHT
RED
+VE
LEFT
BLACK
-VE
RIGHT
RED
+VE
LEFT
BLACK
-VE
and
and
and
IMPORTANT:
Always switch the amplifier(s) off before attempting to connect or disconnect the speaker
cables to/from your loudspeakers. Failure to do this may cause permanent damage to the
amplifier and/or the loudspeakers.
CONVENTIONAL
NOTE: ‘JUMP BARS’ CONNECTED

TR-5 S2 Loudspeaker
Manual
8
CONNECTING LOUDSPEAKER CABLES - BI-WIRING / BI-AMPING
Your TR-5 S2 is bi-wirable. This is achieved by removing the ‘jump-bars’ from the terminals
and using one set of loudspeaker cables for the tweeter connections and another set (of
equal length) for the woofer connections.
BI-AMPING
BI-WIRING
NOTE: ‘JUMP BARS’ REMOVED

TR-5 S2 Loudspeaker
Manual
9
OPERATION
After all the connections to the loudspeakers have been made correctly, you can switch on
your amplifier(s). Always ensure that the volume setting is set at minimum before playing any
music through your loudspeakers.
Check if there is any audible ‘hum’ in the system by listening to the loudspeakers without
playing any music and gradually increase the volume. If there is any ‘hum’ or ‘buzz’ consult
your appointed Roksan retailer or distributor.
FINAL POSITIONING
NOTE: Your loudspeakers will require at least 48 hours of continuous music programme at
reasonable volume to allow the various moving parts of the drive units and other component
to ‘run-in’. Once run-in, the bass will increase in definition, extension and speed and
articulation whilst the treble will sound more smooth and open.
When setting-up or testing your loudspeakers, choose music material that you are familiar
with sit in the central listening position.
Your TR-5 S2 loudspeakers will continue to improve in performance over the first few weeks
of use and you should fine-tune the sound over this period if so desired by altering the
positioning in small increments. The loudspeakers should begin to ‘disappear’ as you
approach the ideal position of the loudspeakers in your room. For best results keep
experimenting. This will increase your understanding of the way the loudspeakers interact
with your room and improve the performance of your entire audio system. A final adjustment
in levelling of the speaker stands/spikes should be carried out after the optimum position/
location of the speakers in the room is established.
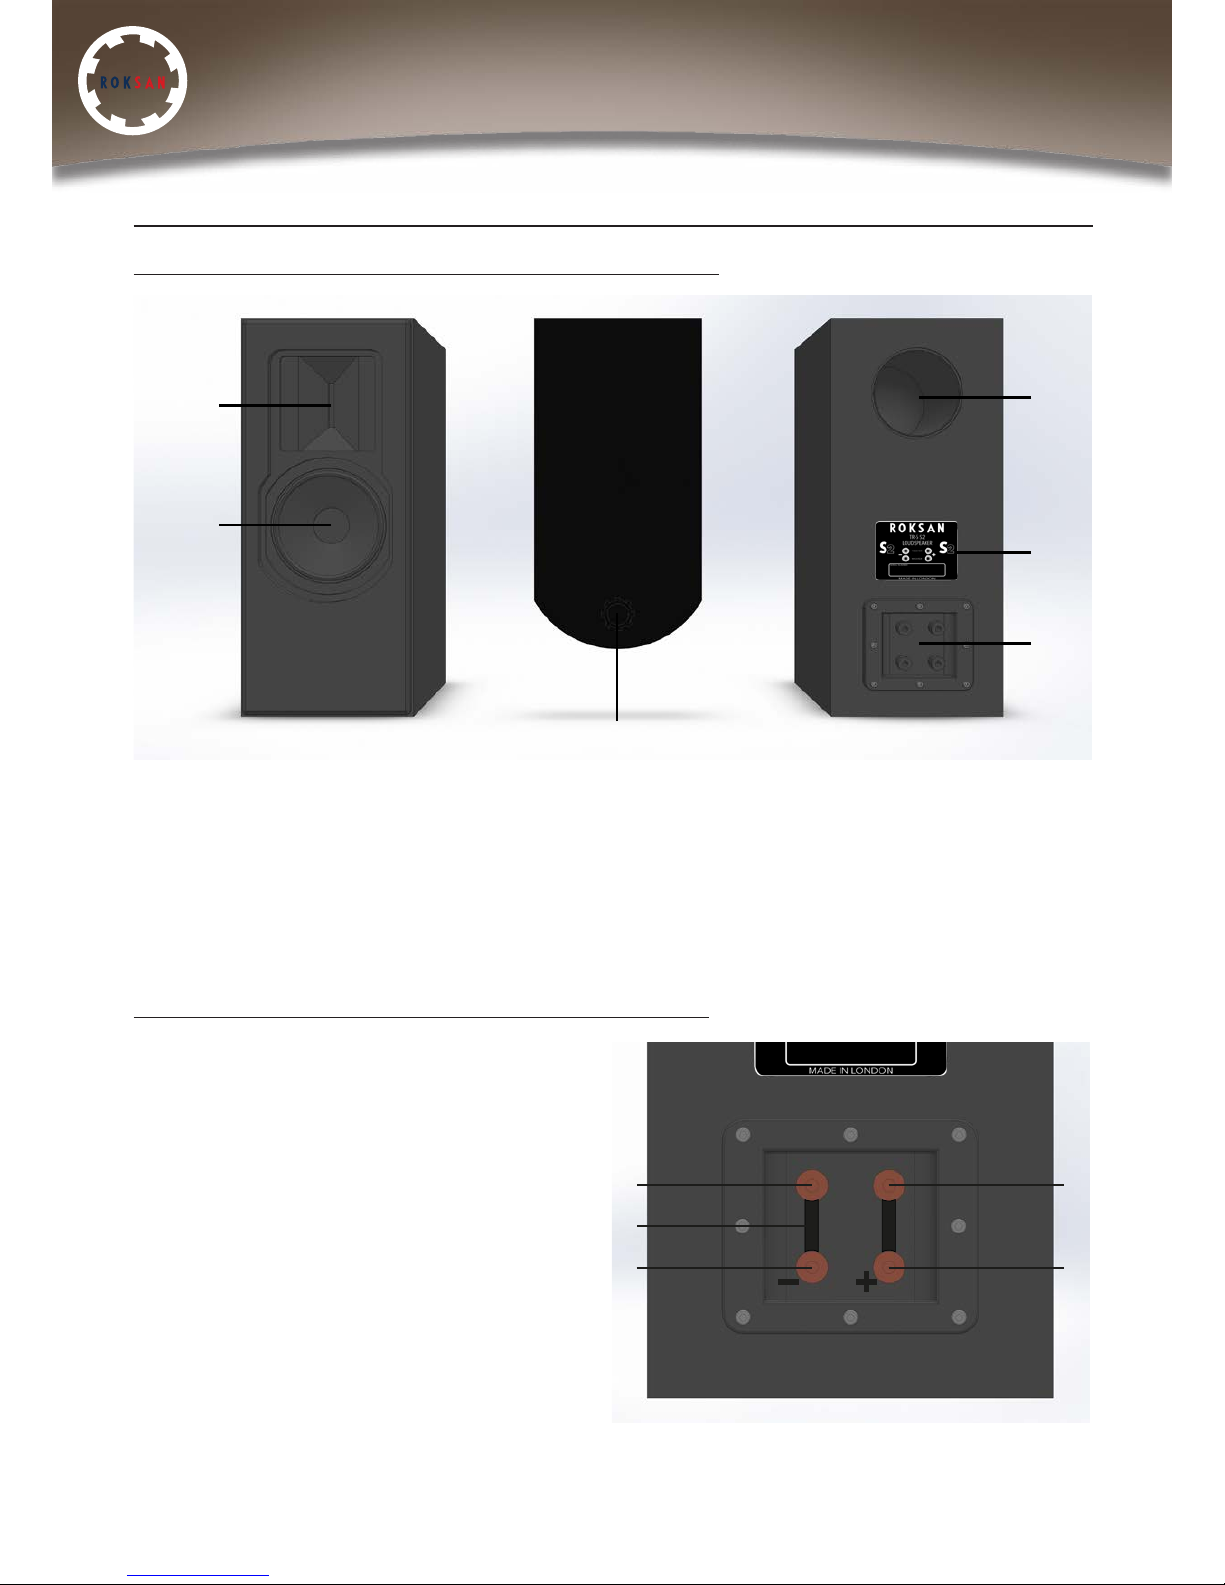
NOTE: For optimum performance it is recommended to use high quality cables such as
Roksan HDC-02S High Definition Speaker Cable (3mm² conductor area). Many speaker
cables such as the Roksan HDC-02S are directional. Please observe this directionality. DO
NOT use speaker cable with conductor size less than 16 AWG (1.3mm²). The binding posts
comfortably accept conductor sizes up to 12 AWG (3mm²).
LOUDSPEAKER STANDS
For optimum sonic performance it is necessary to locate each of the loudspeakers as rigidly
as possible on the speaker stands and the stands on the ground. Refer to the speaker stand
user manual for correct installation.

TR-5 S2 Loudspeaker
Manual
10
TROUBLESHOOTING
If you suspect that your TR-5 S2 loudspeakers are not operating properly, you should check
all the connections carefully. Pay particular attention to speaker phasing (+ & -) and channel
connections. Below are some common problems encountered with suggestions for the
possible remedy. The list is not exhaustive: If you have any unresolved problems, please
consult your appointed Roksan retailer or distributor.
SYMPTOM LIKELY CAUSE SUGGESTED REMEDY
No sound from one or both
speakers
• Speaker cables not
connected properly
• ‘Jump Bars’ not connected
properly
• Amplifier not switched ON
• Volume set at minimum
• Ensure proper
connection of cables
• Check all connections
and tighten the termi-
nal binding posts
• Switch amplifier ON
• Increase volume
Poor stereo image (not
focused/defined) and/or
lack of bass
• Speaker cable connected
out of phase
• ‘Jump Bars’ not connected
properly
• Check speaker and
amplifier speaker ter-
minals are connected
to corresponding cable
(check colours and/or
markings)
• Check all connections
and tighten the termi-
nal binding posts
Hum from speakers • Incorrect Grounding • Check mains polarity
and grounding on all
connected equipment

TR-5 S2 Loudspeaker
Manual
11
GUARANTEE
There are no user-serviceable parts inside your TR-5 S2 loudspeakers. If a fault should
develop, refer any servicing to your appointed Roksan dealer, distributor or Roksan approved
service agent.
Your TR-5 S2 loudspeakers are guaranteed against any defect in materials and workmanship
for a period of two years from the date of purchase.
This guarantee is only effective if the warranty card is validated by the Roksan retailer from
whom the equipment was purchased and returned to Roksan within 28 days of purchase.
This guarantee excludes:
• Damage caused due to accident, misuse, neglect and incorrect installation, adjustment or
repair.
• Liability for damage or loss during transit from the retailer or purchaser to Roksan or its
authorised distributor for the purposes of repair or inspection.
Carriage costs to Roksan shall be borne by the consignor.
All claims under this guarantee must be made through an authorised Roksan retailer. If
equipment returned for repair to Roksan is found on inspection to comply with the product
specification Roksan reserves the right to make a charge for examination and return carriage.
Unauthorised servicing will void this guarantee.
SPECIFICATIONS
Tweeter High tolerance dedicated ribbon
Woofer Custom designed, 130mm coated paper cast chassis with double magnets
Input Sensitivity (1W, 1m) >88 dB
Impedance >6 Ω
Nominally 8 Ω
Frequency response 39 Hz – 20 kHz (in room response)
55 Hz – 20kHz (-6dB)
Nominal Power Handling 60 Watts
Peak Power Handling 100 Watts
Dimensions (H x W x D) 370 x 190 x 280mm
Weight (each cabinet) 8kg

12
Roksan Audio Limited
Jubilee Close
Townsend Lane
London
NW9 8TR
+44 (0)20 8900 6801
info@roksan.co.uk
www.roksan.co.uk
Roksan Audio Ltd TR-5 S2 Loudspeaker User Manual
CLASSIFICATION: General Use Version: 1.10
All specifications are liable to change without notice. E&OE
Table of contents
Other Roksan Audio Speakers manuals