ROLENCE ENTERPRISE ELiTEDENT Q-6 User manual

S-19-01-1133-U0001 V1.4
Rolence LED Curing Light
ELiTEDENT
®Q-6
Instructions For Use
ROLENCE ENTERPRISE INC.
No. 18-3, Lane 231, Pu Chung Rd., Chungli, Taoyuan 32083, Taiwan.
Tel: +886 3 4631999; Fax: +886 3 4631997; www.rolence.com.tw
User Manual

S-19-01-1133-U0001 V1.4
2
Table of Content
No. Content Page
1. Precautions And Safety Notes p. 3
2. Glossary of Symbols p. 4
3. Product Description & Fields of Application p. 5
4. Package Content p. 5
5. Technical Data p. 6
5.1 Charging base
5.2 Hand piece
5.3 Charging base and Handpiece
5.4 Transportation and Storage Environment
6. Installation of the unit p. 7
6.1 Initial Setup
6.2 Keypad And Modes
6.3 Charging Base
6.4 Battery Charging
7. Operation Instruction p. 10
8. Operating Errors / Trouble shooting p. 11
9. Service And Replacement Parts p. 12
10. Cleaning / Disinfecting / Sterilizing p. 13
10.1 Cleaning and Disinfection of Light Guide
10.2 Clean Charging Base, Handpiece, and Anti-Glare Cone
11. Disposal p. 14
12. Disclaimer p. 14
13. Warranty p. 15
13.1 Malfunction
13.2 Repair
13.3 Warranty Exception
Caution: For dental use only.

S-19-01-1133-U0001 V1.4
3
1. PRECAUTIONS AND SAFETY NOTES
PLEASE NOTE!
Prior to installation and start-up of the unit, carefully read the instructions provided herein!
As with all technical devices, the proper function and safe operation of this unit depend on the user’s
compliance with the safety recommendations presented in these operating instructions.
CAUTION: This curing unit produces high curing energy output! A significant increase in curing
energy is possible compared with conventional Halogen equipment you have previously used. Do not
place light directly on or toward unprotected gingiva or skin. Exposure of the soft tissues (gingiva, oral
mucosa and skin) to high-intensity light may cause damage or irritation.
Adjust your curing techniques in accordance with the increase in curing energy. Some examples are;
decrease curing time, increase composite thickness, increase distance between light guide exit and
light cured materials e.g.
CAUTION: Do not look directly into the light emitted from this curing unit. It may be harmful to the
eyes. Exposure must be restricted to the area of the oral cavity in which clinical treatment is intended.
Do not use this device without suitable protective eye shield for the operator, assistant and patient.
Suitable protective eye shield should blocks most energy below 550nm wavelength.
CAUTION: Do not touch the charger and the patient at the same time while operating.
CAUTION: Persons having a history of photosensitive reactions or who are using photosensitizing
drugs should not be exposed to the light from this unit.
CAUTION: Equipment is not suitable for use in the presence of flammable anesthetic mixture with
air, nitrous oxide or environment full of flammable material. Use in well ventilated area.
CAUTION: DO NOT IMMERSE UNIT IN WATER OR DISINFECTANT. Do not spray liquids directly
onto the light. Spray a towel, then wipe the light. Prevent liquids from entering openings on unit,
especially the socket for re-charging. Refer to Section 10, Cleaning / Disinfecting / Sterilizing for
sterilizing instructions.
CAUTION: Always unplug the base/charger before disinfecting.
CAUTION: Don’t dispose of the battery into fire or take battery apart.
CAUTION: The system need a 10 minutes cooling down after 2 minutes of continuous operating.
1. This product is intended to be used only as specifically outlined in these Directions for Use. Any use

S-19-01-1133-U0001 V1.4
4
of this product inconsistent with the Directions for Use is at the discretion and is the sole
responsibility of the practitioner.
2. Keep solvents, flammable liquids, and sources of intense heat away from the unit as they may
damage the plastic housing of the charger, the seals, or the cover on the operating buttons.
3. To protect the light guide, after each curing procedure is completed, the handpiece should always be
placed back into its holder.
4. To obtain a safety operation, we suggest that check your local AC power supply voltage before you
buy and use this product from oversea.
5. The adaptor is served to disconnect the device, not to position the equipment to make it difficult to
operate the disconnection device.
6. Check unit for adequate light output before each procedure. Failure to verify output may allow
inadequate curing.
7. On the applied part, light guide, the temperature may up to 43℃/110℉at the atmosphere
temperature of 40℃/104℉.
8. In order to avoid electric shock do not introduce any objects into the unit with the exception of
replacement parts handled in accordance with the Operating Instructions. Do not attempt to change
the Curing LED, open or alter the unit in any way
9. Use only genuine Rolence parts when replacing defective components as directed in these Operating
Instructions. The product’s warranty does not cover any damage resulting from the use of third-party
replacement parts.
10. A warning that other cables and accessories may negatively affect EMC performance.
11. A warning regarding stacking and location close to other equipment.
12. A warning that use of other accessories results in non-compliance.
2. Glossary of Symbols
Caution, Consult accompanying Documents
Read usage instructions
Alternating Current
Manufacturer
Date of manufacture
Catalogue number
Type BF Applied Part; Type BF Equipment - Protection against electric shock

S-19-01-1133-U0001 V1.4
5
Equipment class: Class II (IEC601-1) - double insulated
The equipment complies with the requirements in the Medical Device
Directive 93/42 EEC.
Icon to identify electric and electronic devices. The unit must be collected and
disposed of separately.
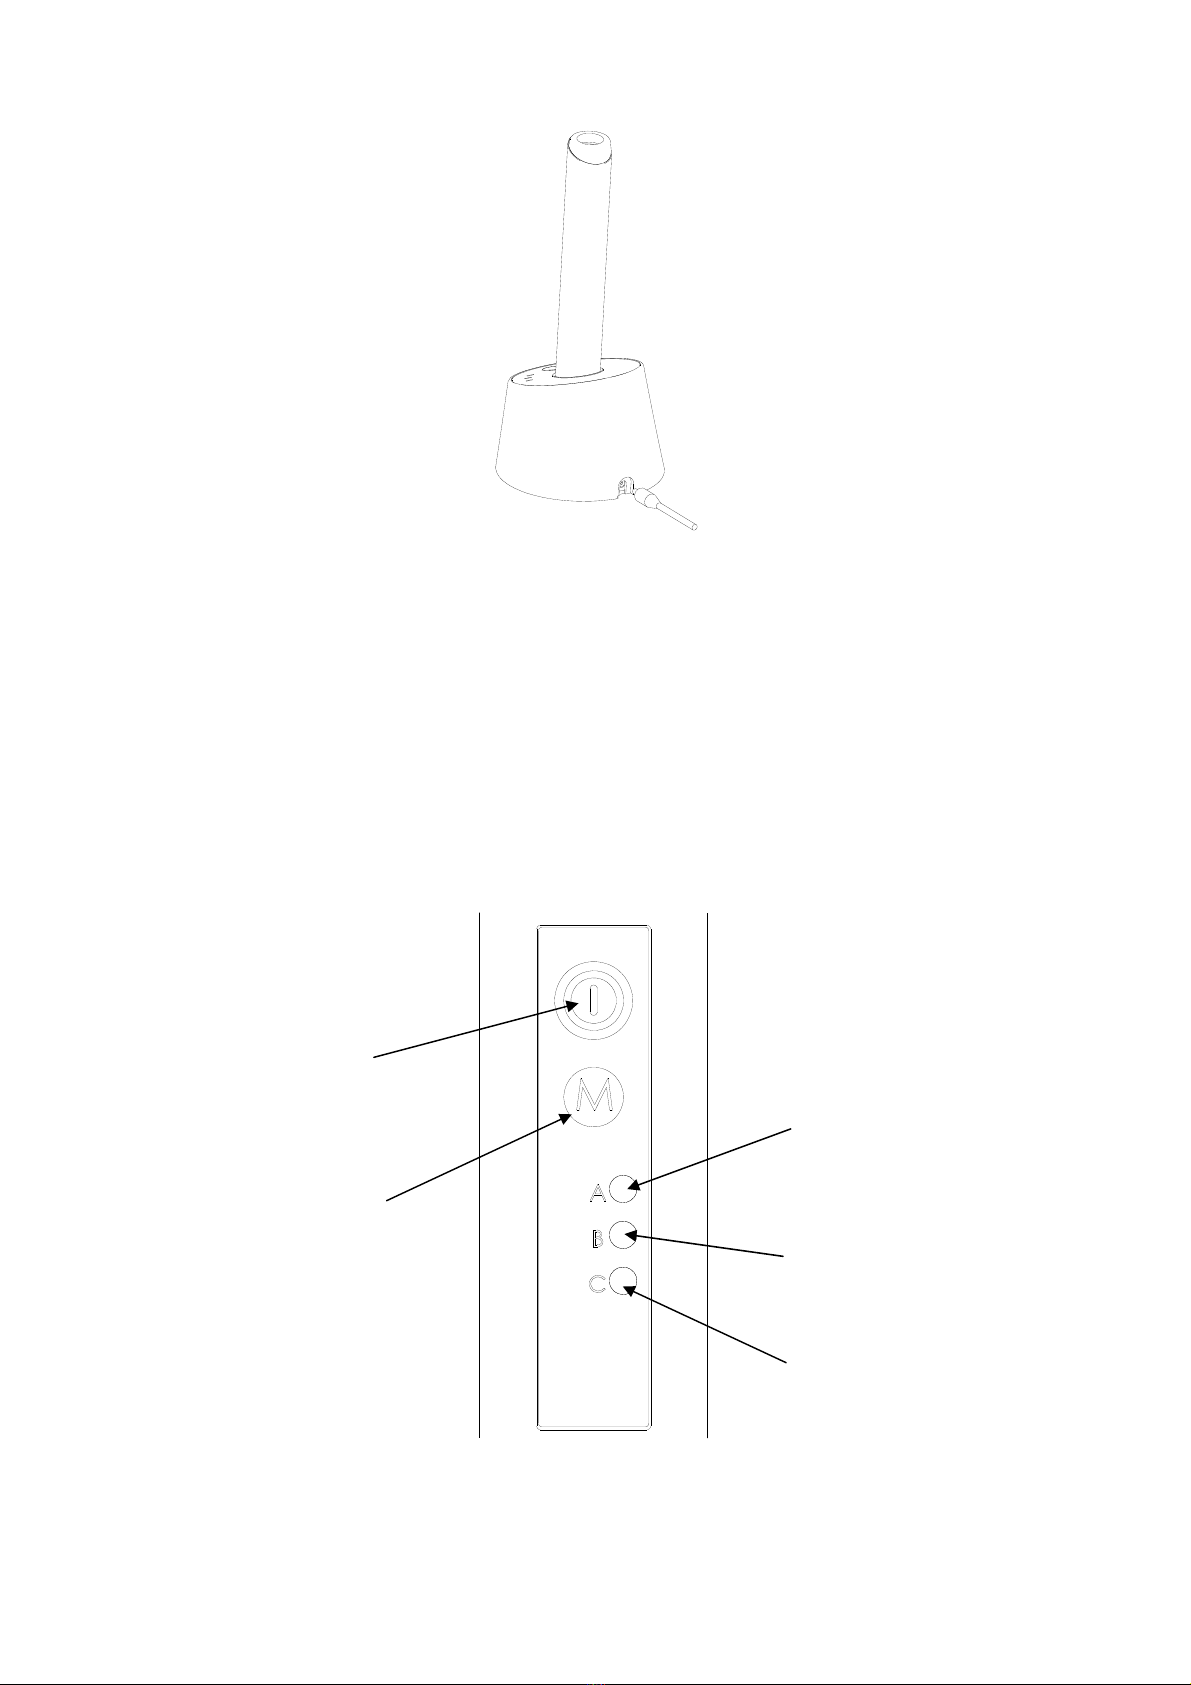
3. PRODUCT DESCRIPTION & FIELDS OF APPLICATION
The ELiTEDENT Q-6 curing light is a pen style, cordless, high-performance LED light source curing unit
intended for polymerization of resin-based light cured dental materials by dental professionals.
ELiTEDENT Q-6 incorporates 5W blue LED to achieve high light energy output with wavelength range of
440 to 480nm to polymerize virtually resin-based composite in the market and a high power mode to
produce super fast curing effect. The relevant range is for camphorquinone (CQ) containing product.
Though the majority of light-curing dental materials are responsive in this range of wavelengths, it is
suggested you should contact the filling material maker to make sure it before use.
The ELiTEDENT Q-6 is a fast-curing LED curing light. It emits typical light energy output at about
1,200~1,400mW/cm². 5 seconds to cure most composite in the market with 2mm thickness. It also
features:
►Multiple mode selection: boost (fast curing) and ramp up,
►All aluminum handpiece housing for improved durability. No more plastic to stain or crack.
►Two button easy operation,
►Quiet operation, fan-free design,
►Can be used both cordless and corded,
►Low battery warning; for urgent use, just insert power cord connector into Handpiece directly,
►Rechargeable lithium battery inside, capable of 200 x 10 sec curing cycles prior to recharging,
►Slim handpiece for most comfortable hand holding, (weight 1g only)
►8mm diameter sterilizable curing tip,
►Curing tip rotates 360∘for curing at any position of mouth,
►Versatile fiber optic curing tip optional,
4. PACKAGE CONTENT
.Charging Base Assembly X 1 PCE
.Hand piece Assembly X 1 PCE
.8 mm Diameter, Sterilizable Fiber Optic Light Guide X 1 PCE
.Anti-Glare Cone X 4 PCE
.Wall Plug-in Power Adaptor, 1850mm X 1 PCE
.Instructions For Use X 1 PCE

S-19-01-1133-U0001 V1.4
6
5. TECHNICAL DATA
5.1 Charging Base
Operating voltage: INPUT: 100~240VAC, 0.5A , 50/60HZ
OUTPUT(Adaptor) : 5V DC , 2A
OUTPUT(Charging Base) : 4.2V DC , 1A
Adaptor Brand: Fuhua Electronic,
Model:UE15WCP1-050200SPA
Dimensions
Diameter: 95 mm
Height: 69 mm
Weight: Roughly 204 g
5.2 Handpiece
Power supply: Lithium battery – 3.7V DC, 2600mAh
Wavelength range: 440-480 nm
Typical light intensity 1,400~1,600 mW/cm²
Total exposure time with new fully charged battery Typically 35 minutes
Dimensions
Diameter: 25 mm
Length (with/without light guide): 244 mm / 184 mm
Weight (with light guide and battery): Roughly 178 g
5.3 Charging Base and Handpiece
Time to charge empty battery: Approximate 3 hours
Protection from electric shock: Type BF (IEC601-1)
Equipment class: Class II (IEC601-1)
Protection from ingress of liquids: None
Operation temperature +10℃~ +35℃
Relative humidity range 30% ~ 75%
Atmospheric pressure 700hPa ~ 1060hPa
5.4 Transportation and Storage Environment
Ambient temperature -10℃~ +70℃
Relative humidity range 10% ~ 90%
Atmospheric pressure 500hPa ~ 1060hPa

S-19-01-1133-U0001 V1.4
7
6. INSTALLATION OF THE UNIT
6.1 Initial set-up
NOTE: Upon receiving the LED Curing Light, check the packaging and parts for any possible damage
that may have occurred in transit. If damage is apparent, please contact your authorized Rolence
distributor from which the light was purchased.
1. Remove the contents from the shipping package. Be careful not to drop or impact the curing light.
Choose a flat, level, sturdy surface to place the charging base on. The light is shipped in a “sleep”
mode, and no timer display. To wake the unit, press the On/Off button.
2. Before using for the first time, the light must be fully charged. For the first charge, this process will
take about 6 hours. Use only the power supply furnished with the light system. Attempting to use
another power supply source may cause injury or damage and will void the warranty.
3. Charging indicator on charging base illuminates orange light during recharging. It will turn off
automatically after battery is fully charged.
NOTE: Power indicator on charge base illuminates blue light, which indicates the charging base is well
connected to power supply. If power indicator is not lit when connecting power plug to charging base,
please check the outlet plug is firmly connected or not.
4. Autoclave the fiber optic light guide prior to first use. Attach the light guide to the hand piece as
shown in Figure 3. Please refer to Chapter 9 to get more information of optional light guides.
5. Plug the connector of the power supply into the back of the charging base as shown in Figure 4. Plug
the other end of the power supply into the appropriate electrical outlet. As mentioned above, wait for
at least 6 hours to completely charge the light before the first use.
Figure 3 Installation of light guide Disconnect light guide

S-19-01-1133-U0001 V1.4
8
Timer selecting button
Select the exposure time
and mode.
NOTE: Verify the line plug of the power supply plug is properly rated for your facility, and that all
connections comply with safe practices and all local requirements. Always use unit in conjunction with
a properly grounded outlet.
6.2 Keypad and modes
There are 2 buttons on the key pad for the mode/timer selection, and the on/off button. (Fig. 5) The
on/off button is used to activate and deactivate the light. Push once to turn on the light and push it
again if you need to turn it off at any time during the curing cycle.
On/off button
Activate and deactivate the
light.
10 second constant
high light energy
exposure.
5 second constant high
light energy exposure.
Figure 4
Figure 5
Ramp up
5 second constant low + 5
second constant high
exposure

S-19-01-1133-U0001 V1.4
9
There are 2 different modes to select from based on the procedure and the requirement. (Fig. 5)
- Select the exposure time by pressing the mode button briefly.
- While exposure is ongoing, the button for selection of the exposure time is inactive.
(5s) – This setting provides high power to the LEDs, helping them generate a higher power output up
to 1,400mW/cm². Since the LEDs function at such high power level, only the 5 second curing cycle is
provided to avoid premature LED failure. You can use multiple boost cycles in succession to obtain
longer Boost curing.
(10s) – Provides high light energy exposure at 10 seconds exposure. Choose this setting for special
lighter or darker shade curing requirement or when light energy declines after long time use.
(Ramp Up) - an initial 35~50% energy of high intensity and then switch to high intensity
1,400mW/cm²constant. Total 10 seconds (5 seconds low intensity + 5 seconds high intensity)
6.3 Charging Base
6.4 Battery Charging
To charge the battery, place the handpiece in the charging base, with the power supply attached to the
charging base. When this is done, the POWER INDICATOR will illuminate. (Figure 6)
The light may be used with the power supply attached to the handpiece handle, even if the battery is
low. When the handle is removed from the charger, or the power disconnected, none of the battery
indicators will illuminate.
Figure 6
Charging indicator
Illuminates during
charging, turn off
after fully charged.
Power Indicator
Illuminates when
charging base is
connected to power
supply.
Light Checker
Place light probe onto
the window and turn on
the light to check light
intensity. (Refer to
Section 9)
Intensity indicator
Illuminates only when
light intensity is over
600mW/cm² (this is
an appropriate read,
for reference only.)

S-19-01-1133-U0001 V1.4
10
7. OPERATION INSTRUCTION
Activating and Deactivating the Light:
►The light will enter “sleep” mode if the unit has not been used for more than 1 minute, the panel
display will turn off to conserve power. If the panel display is not illuminated, simply press on/off
button to bring it out of the sleep mode.
►Activate the light by pressing the on/off button on the keypad.
►Press the on/off button again to turn off (interrupt) the light before the exposure time is over.
Adjust mode and curing time for the Light:
►Always use the settings recommended by the manufacturer of the dental material when selecting
the settings
►Please refer to Chapter 6.2 for more information of mode selection and curing time setting.
►Make sure everyone is wearing the appropriate eye protection.
Position the light guide:
►The probe tip shall be used in close proximity to the material to be cured. Avoid actual contact.
The flat end of probe should be parallel to the surface being treated.
►Rotate the light guide into the optimal position for polymerization.
►Place the light guide as close to the filling material as possible.
Avoid directly contacting the filling material!
►Keep the light guide clean at all times to obtain full light intensity.
►Damaged light guides must be replaced immediately, since damaged light guide may strongly
reduces light intensity or injures the patient.
Warning signal:
►If the temperature on hand piece is over 50oC, the “5s” and “10s” indicator will illuminate at the
same time and buzzer continuously beep 5 tones until the temperature low than 45oC.
►If the battery voltage runs low, the “10s” and “Ramp up” indicator will illuminate at the same
time and buzzer beep continuously 3 tones. Please place handpiece back into charger for
recharging.
Note:
►Follow manufacturer's directions for curing times on various materials. It is better to over cure
rather than insufficient cure. Over curing should not harm the restoration.
►If the LED remains activated for an extended period, a safety thermostat will cut off the LED to
protect curing gun from overheating. Normal usage may then be resumed if the handpiece is idled
for an extended period for cooling.

S-19-01-1133-U0001 V1.4
11
8. OPERATING ERRORS AND TROULE SHOOTING
Problem Cause
►Solution
1. No timer display on handpiece. The unit is in sleep mode.
►Press the on/off button to wake the unit.
2. Can not activate/wake the light. Battery is drained.
►Please recharge battery, and try again.
Handpiece is out of order.
►If not sure what happen, contact the dealer for
further inspection.
3. “5s” and “10s” indicator illuminate at
the same time and buzzer beeps 5 short
tones.
Handpiece is overheat
►Please wait for minutes to have handpiece cooled
down.
►Waiting time can be shortened if handpiece is cooled
by compressor air.
4. “10s” and “Ramp up” indicator
illuminate at the same time and buzzer
beeps 3 short tones.
Low battery voltage
►Battery is drained. Please place handpiece back to
charging base for recharging.
5. Charging indicator on handpiece is not
on when placing handpiece on the
charging base.
Check the power plug connects to power outlet socket
firmly.
►If not sure what happen, contact the dealer.
6. Battery working time is significantly
shortened.
►Battery is exhausted after period use (generally 2
years). Please contact the dealer to replace with a
new battery.
►If not sure what happen, contact the dealer for
further information.
7. Whenever press the on/off button or
mode button on keypad, there is no
response in timer display, nor light.
The light program is crashing.
►Insert adaptor connector (not powered) into the hole
on the back of handpiece to reset the light program.
If the above steps do not solve the problem, contact the dealer or point of purchase.
Note: We and our authorized distributors will make available on request circuit diagram, component
part lists and other information to assist user's appropriate technical personnel to repair the
light cure units which are designated by us as repairable.

S-19-01-1133-U0001 V1.4
12
9. SERVICE AND REPLACEMENT PARTS
For product service please contact your nearest Rolence authorized dealer you purchased product.
Replacement Accessories
Part # Description Contents
1133B80 ELiTEDENT®Q-6 Wall Plug-In Power Supply 1x Power Supply
1133B90 ELiTEDENT®Q-6 Anti-Glare Cone 1x Glare Cone
803 Sterilizable fiber optic light guide 8 mm diameter 1x light guide (8 mm)
1133A10 ELiTEDENT®Q-6 Charging Base Assembly 1x Charging Base
1133A20 ELiTEDENT®Q-6 Handpiece Assembly 1x Handpiece
Optional accessories
Part # Description Contents
LM200 Digital Light Meter 200 1x Light meter 200
LM105 Analog Light Meter 105 1x Light meter 105
809 Sterilizable fiber optic light guide 8>3mm diameter 1x 8>3mm diameter
807 Sterilizable fiber optic light guide 12>8mm diameter 1x 12>8mm diameter
890 Sterilizable fiber optic light guide 8mm diameter, 90 degree 1x 8mm diameter
Check light intensity with light checker on charging base
The Elitedent Q-6 consists of a light intensity checker on charging base. Place the probe of light tip onto
the window (See Figure 7) to ensure sufficient light energy provided for treatment prior to each curing.
Figure 7

S-19-01-1133-U0001 V1.4
13
10. Cleaning / Disinfecting / Sterilizing
10.1 Cleaning and Disinfection of Fiber Optic Light Guide
►Clean and disinfect the light guide before every use. The light guide is not sterile when delivered and
must be sterilized before being used for the first time.
►Please check the manufacturer’s information about the cleaning and disinfecting agents.
►Make sure that the cleaning and disinfectant agents you have chosen do not contain any of the
following materials:
Organic, mineral, and oxidizing acids (minimum acceptable pH value 5.5)
Bases (maximum acceptable pH value 8.5)
Oxidation agents (e. g., hydrogen peroxide)
Halogens (chlorine, iodine, bromide)
Aromatic/halogenized hydrocarbons
►The light guide must not be exposed to temperatures higher than 134 °C (273 °F).
►Use a soft brush or a soft cloth to manually remove gross contaminations. Adhering polymerized
composite should be removed with alcohol, a plastic spatula may help in removing the material. Do
not use any sharp or pointed tools to protect the surface of the light guide from scratching.
►To disinfect, place the cleaned light guide for the specified application time into the solution, making
sure that it is completely covered. Disinfectants containing ophthalaldehyde are recommended.
►Remove the light guide from the solution and rinse thoroughly (at least 10 sec.) in water with low
germ count.
►Dry the light guide with a clean cloth.
Sterilization
Effective cleaning and disinfection are absolutely essential requirements for effective sterilization. Only
steam sterilization is approved as a sterilization procedure:
►Maximum sterilization temperature 134 °C (273 °F)
►Sterilization time (exposure time at sterilization temperature) at least 20 min. at 121°C (250 °F) or
at least 3 min. at 132 °C (270 °F) /134 °C (273 °F)
Check
Before using the light guide again, check it for damaged surfaces, discoloration, and contamination; do
not use damaged light guides. If the light guide is still contaminated, repeat the cleaning and
disinfection.

S-19-01-1133-U0001 V1.4
14
CAUTION: The charging base shall be unplugged before cleaning and disinfection of the
charging base to prevent from electric shock.
CAUTION: To immerse or spray the out surface of charging base and handpiece with water,
cleanser and chemical disinfectant is not allowed as it may result in electric shock and damage of inner
circuit board.
10.2 Clean Charging Base, Handpiece, and Anti-Glare Cone
►To disinfect all components, spray the disinfectant on a towel and use it to disinfect the unit. Do not
spray the disinfectant directly on the handpiece or the charging base.
►Clean the keypad of the handpiece with a soft and fluff-free cloth.
►Dry residual disinfectants on the charger, the handpiece and the anti-glare cone with a soft and
fluff-free cloth, as they damage the plastic components.
►Clean the charging base, the handpiece and the anti-glare cone with a soft cloth and, if required, a
mild cleaning agent.
►Solvents or abrasive cleaners may not be used in any case, as they damage the plastic components!
►Make sure that charge connector remains dry and is not contacted by metallic or greasy parts. Do
not bend the charge connector during drying. Wet charge connector will cause an operating error.
11. Disposal
Follow the national requirement and regulation to dispose of the unit.
As a mean of protection of the environment, your new device is equipped with lithium battery. This kind
of battery is free from toxic heavy metal ions. Dispose of battery and units in accordance with local legal
regulations.
12. Disclaimer
ROLENCE considers itself responsible for the effects on safety, reliability and performance of this
product only if:
►Assembly operations, extensions, re-adjustments, modifications or repairs are carried out by
persons authorized by ROLENCE.
►The electrical installation of the relevant room complies with the requirements.
►The equipment is used in accordance with this instruction for use.

S-19-01-1133-U0001 V1.4
15
13. Warranty
13.1 Malfunction
Rolence hereby warrants that for a period of one year from the delivery date, this device shall be free
from defects in material and workmanship. In case the machine is found malfunctioned under normal
use, Rolence will offer service of free maintenance and parts for replacement.
13.2 Repair
Repairs must be only carried out by an authorized Rolence engineer/dealer. If repairs during warranty
period are not carried out by an authorized engineer/dealer, warranty will expire immediately.
13.3 Warranty Exception
The warranty stated herein is the sole warranty applicable to Rolence products. Rolence expressly
disclaims the liability for warranty even within warranty period, if
(1) Damages caused by natural disaster.
(2) Operator's fault or wrong operation.
(3) Application use other than field specified in this instruction.
(4) A malfunction or damage caused by repair, adjustment, modification which is not carried out by
Rolence authorized technicians/dealers.
(5) A malfunction caused by abnormal power source or voltage.
(6) It is a consumption part.
(This instruction subjects to change without pre-notice.)
The equipment complies with the requirements in the Medical Device Directive 93/42 EEC.
Rolence Enterprise Inc.
No. 18-3, Lane 231, Pu Chung Rd.,
Chungli, Taoyuan 32083, Taiwan.
EU authorized representative name and address
CMC Medical Devices & Drugs S.L
C/ Horacio Lengo n18, C.P 29006, Málaga-Spain
REM: Please contact our authorized dealer if users require user manual in other European language.

S-19-01-1133-U0001 V1.4
16
Table of contents
Other ROLENCE ENTERPRISE Dental Equipment manuals