Romac Transmate TapMate User manual

a division of Romac Industries, Inc.
OPERATING MANUAL
Thank you for your purchase of the TapMate™XL 424 Pipe Drilling Machine.
Please read and understand this operation manual. Our goal is to serve you, our customer.
If you have any questions, complaints or improvement suggestions please call us at 1‑800‑426‑9341.
06/19/2019
TAPMATE™XL 424
Pipe Drilling Machine

TAPMATE™XL 424 OPERATING MANUAL
2
TABLE OF CONTENTS
Specication .......................................................................................................... 3
Machine Overview ................................................................................................. 4
ASSEMBLY
Open the Shipping Crate ...................................................................................... 5
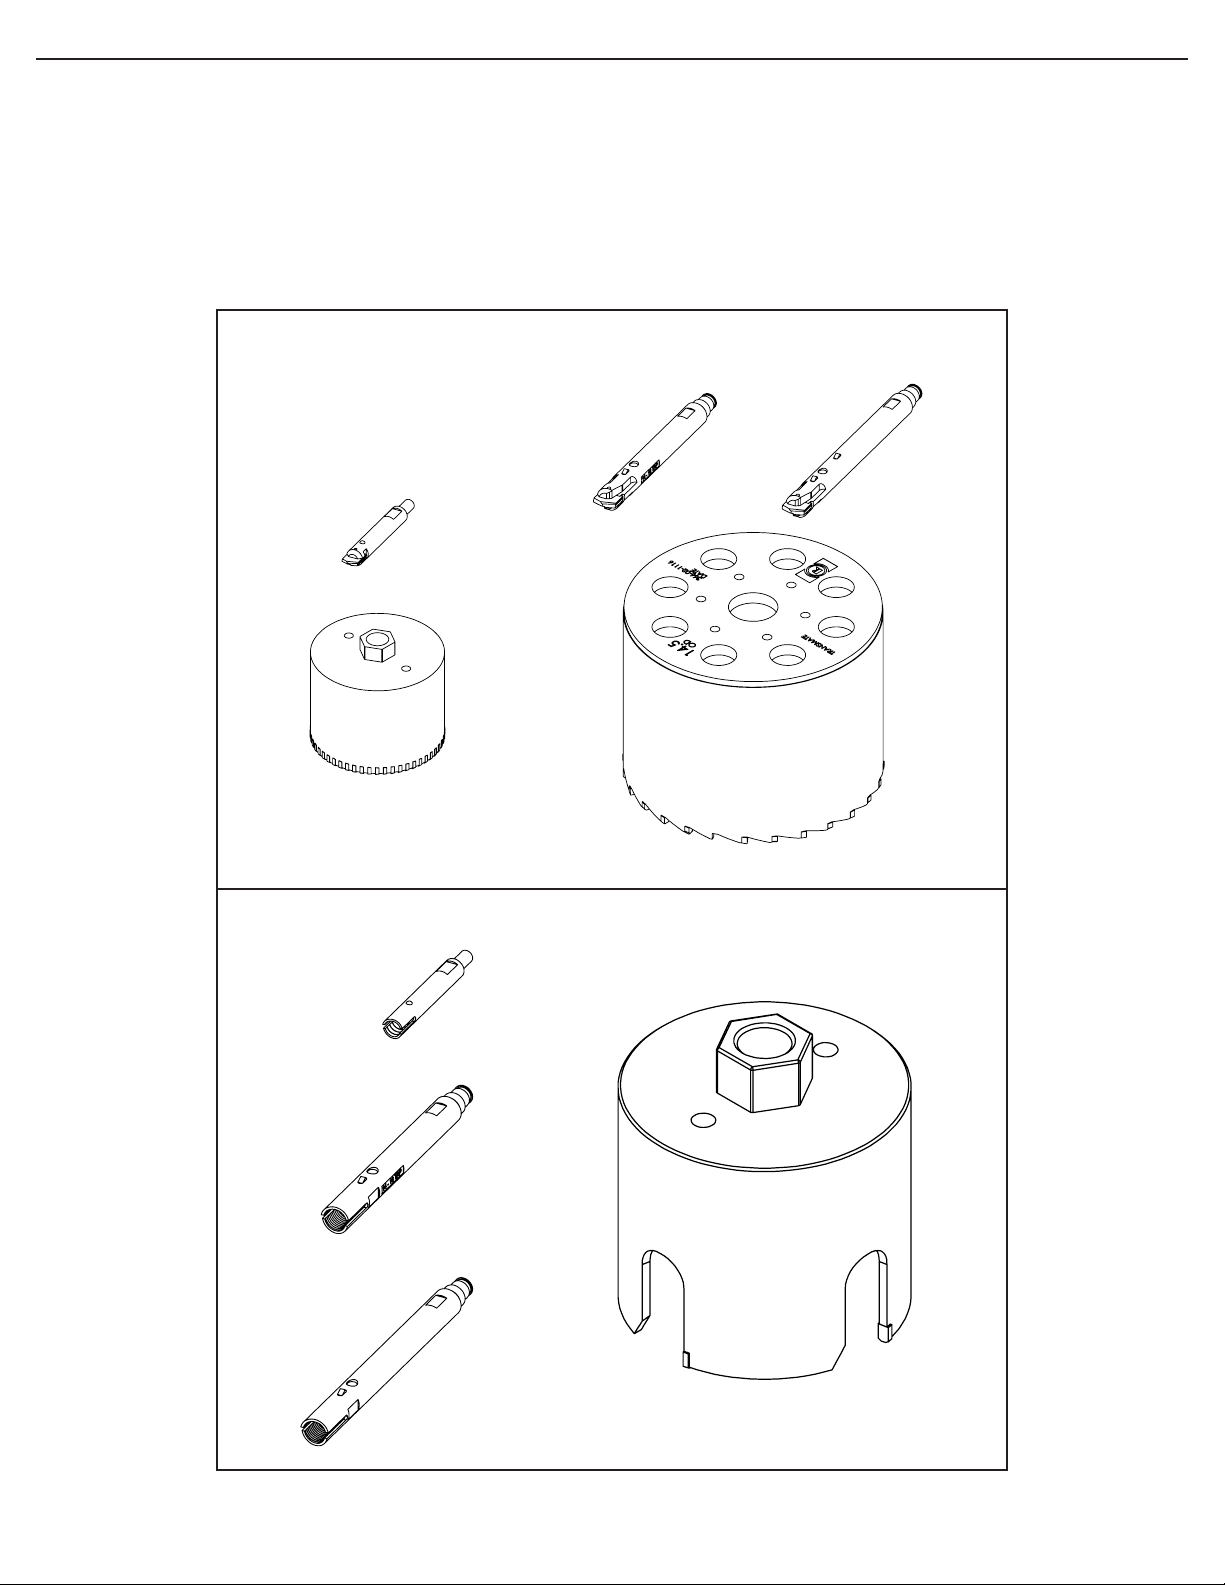
CutterandPilotIdentication................................................................................ 6
About Adapter Hub Sizes ...................................................................................... 7
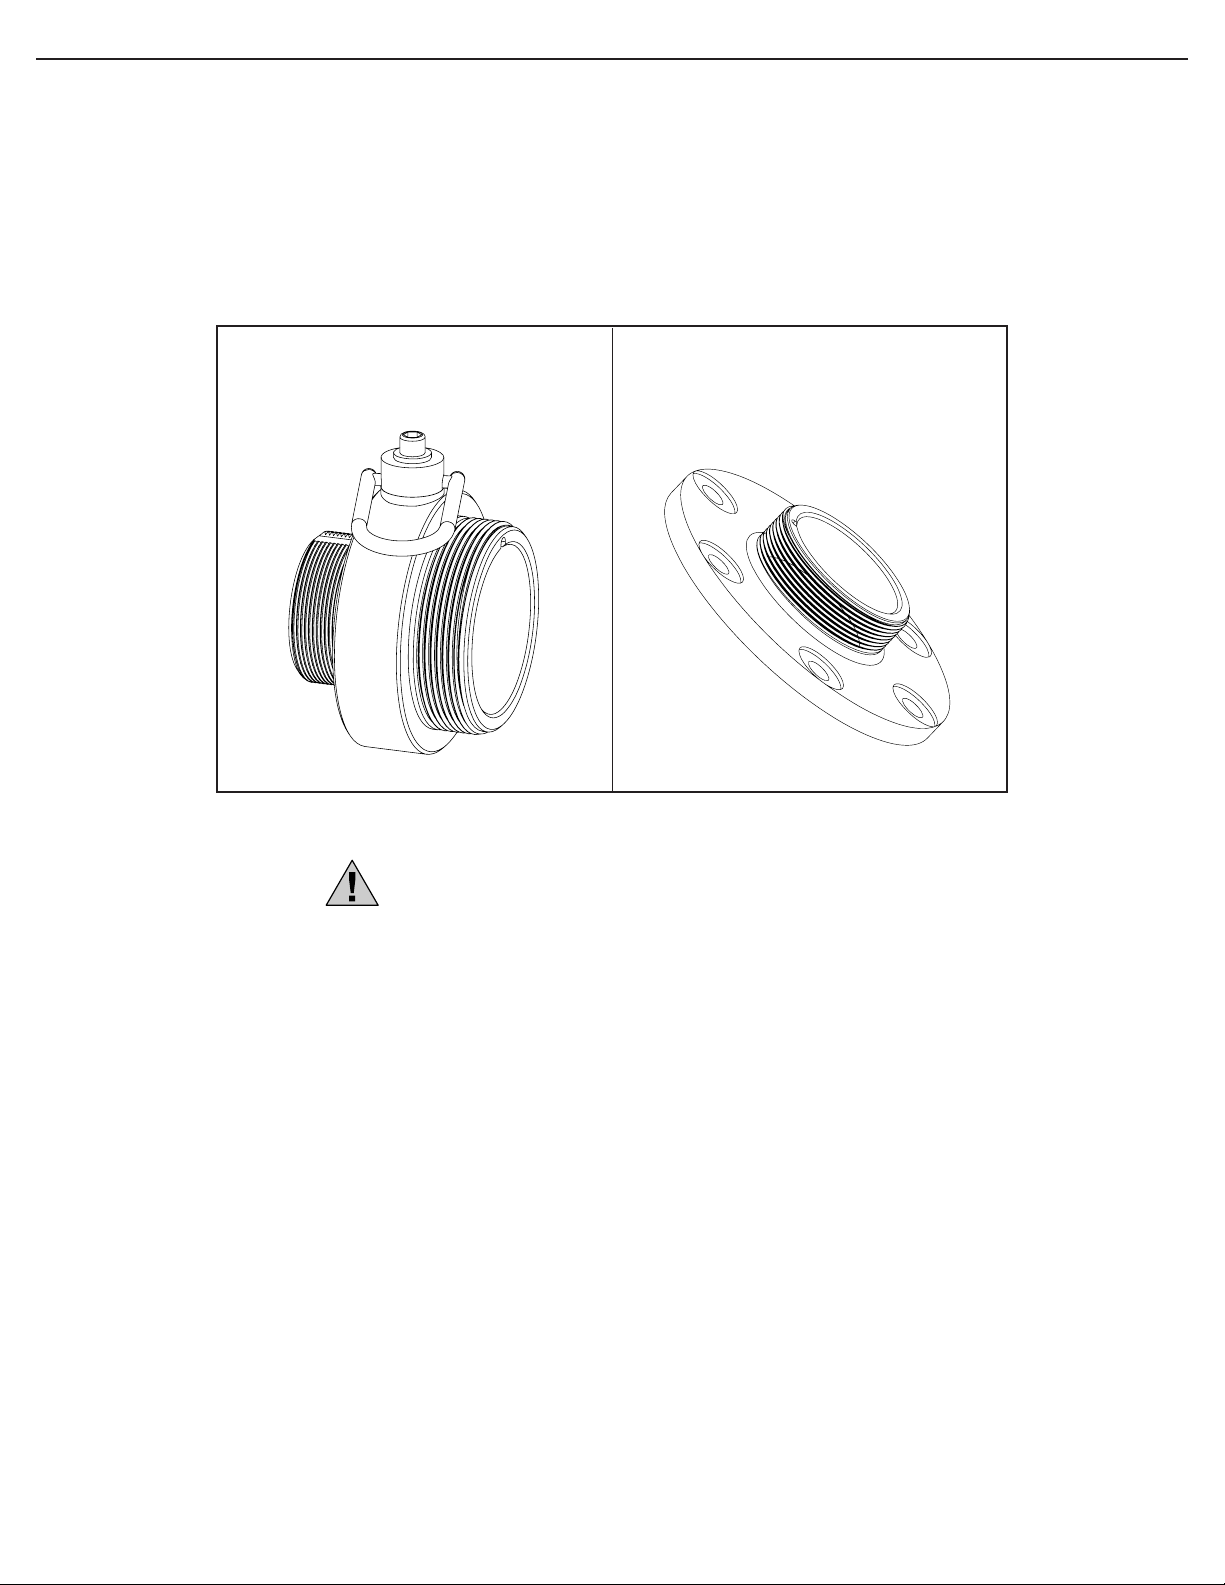
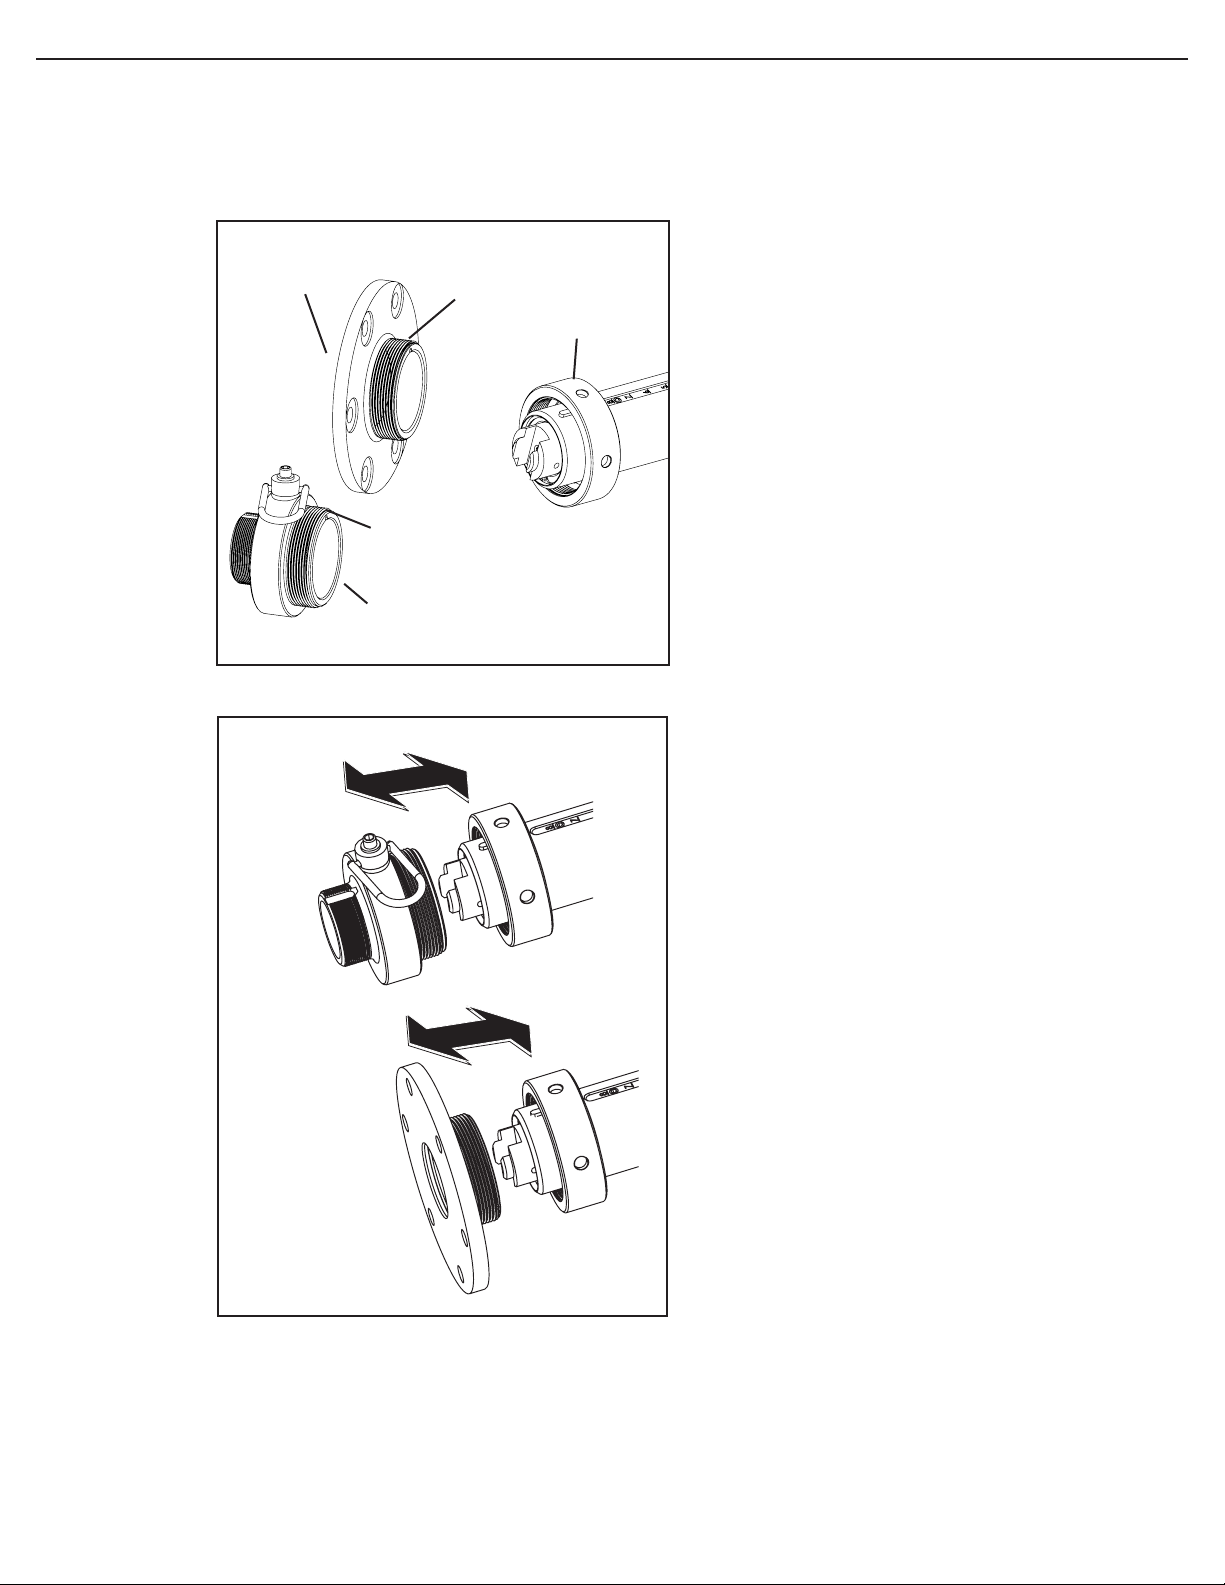
Adapter Hub Installation and Removal.................................................................. 8
TapMate XL‑424 Set‑Up for 4"‑12" Taps ............................................................. 10
TapMate XL‑424 Set‑Up for 14"‑24" Taps ........................................................... 14
Attaching the TapMate XL‑424 to the Valve ........................................................ 18
OPERATION
Performing the Tap .............................................................................................. 21
Disassembly and Removal of the Coupon........................................................... 26
Care and Maintenance......................................................................................... 27
PARTS IDENTIFICATION DRAWINGS
TapMate XL‑424 (included items) ........................................................................ 28
TapMate XL‑424 (base machine).......................................................................... 29
Adapter Bells (4" ‑ 12")........................................................................................ 30
Adapter Bells (14" ‑ 24")...................................................................................... 31
Adapter Hubs ...................................................................................................... 31
Small Shaft Head Assembly ................................................................................. 32
Large Shaft Head Assembly................................................................................. 32
Jam Nut ............................................................................................................... 32
TM‑XL, PVC Pilot.................................................................................................. 33
TM, PVC Pilot....................................................................................................... 33
TM‑XL, Shaft Nose............................................................................................... 34
TM, Shaft Nose .................................................................................................... 34
Hydraulic Motor Assembly................................................................................... 35
Shipping Crate / Workstation .............................................................................. 35

TAPMATE™XL 424 OPERATING MANUAL
3
• Heavy duty steel construction.
• Hydraulic motor integrated to shaft and machine.
• Weight of the TapMate XL‑424 is 285 lbs. (less the Adapter Bell, Pilot Drill and Cutters).
• Maximum length of the TapMate XL‑424 only is 87” (less the Adapter Bell, Pilot Drill and
Cutters).
• Cutter travel distance is 39".
• For use with 4" ‑ 24" cutters on 4" ‑ 24" dry or hot taps.
• Suitable for use on Cast Iron, Ductile Iron, Asbestos/Cement, Steel, PVC and HDPE pipe.
• 300 psi pressure rating.
• Compatible with TapMate and or QuikValve Adapters, Cutters and Shaft Noses and PVC
Pilots.
• External components of the TapMate XL‑424 are QPQ heat treated for protection from
wear and corrosion.
• Manual feed provides control and feedback during the cut.
• Thrust Tube Thread is a #2 Stub Acme Thread for rapid and controlled travel through the
Valve and Tapping Sleeve Neck.
• Thrust Tube features a scale to indicate the amount of travel.
• Indicator Scale on the Lead Tube shows the exact Cutter depth and progress of the cut.
• Input torque limit: Continuous = 3,604 in‑lbs., Intermittent = 4,283 in‑lbs.
• Input RPM: 33.
TAPMATE™ XL-424 MACHINE SPECIFICATION

TAPMATE™XL 424 OPERATING MANUAL
4
MACHINE OVERVIEW
While you may be familiar with the TapMate drilling machine, the TapMate XL‑424 is
larger and has different operating requirements. These include:
• The TapMate XL‑424 has no sliding Tubes or Brakes.
• Fewer turns are required to complete the tap (in most cases).
• TapMate XL‑424 feed rates are slower due to the ACME threads.
The TapMate XL‑424 drilling machine consists of four distinct sections. These sections
are the Shaft, Lead Tube, Thrust Tube and the Brake Tube.
The threaded Thrust Tube is located in the center of the machine and the Brake Tube
is positioned toward the back of the machine. Together, they control travel of the Shell
Cutter and Pilot Drill. Prior to the cut, the Shell Cutter and Pilot Drill are extended
through the valve and tapping sleeve neck to the pipe wall using the Brake Tube Han‑
dles. After the cut is complete, the Shell Cutter and Pilot Drill retract through the valve
to allow the valve to be operated.
After the tap is completed and you are drawing the Cutter away from the Pipe, the Brake
Tube thread prevents water pressure from turning the Brake Tube.
The Lead Tube and Lead Nut are located inside the front end of the Thrust Tube. To‑
gether, they provide the forward pressure necessary for the Pilot Drill and Shell Cutter
during the cutting operation.
The Shaft is a single piece running through the center of the Machine. It is threaded on
the front end to accept the Pilot Drill and Shell Cutter. The other end of the Shaft mates
with the Hydraulic Drive Unit.
Lead Tube
Thrust Tube
Brake Tube
Shaft
Lead Nut
w/Handles
Brake Locking Bolt
Rear Lifting Ring
Locking Collar
Integrated
Hydraulic
Drive
g. 1

TAPMATE™XL 424 OPERATING MANUAL
5
v. 1.3
OPEN THE SHIPPING CRATE/WORKSTATION
3. Lift and remove Cover (see g. 3).
1. Open all (six) of the latches around bottom of the
Crate.
2. Swing open the End (see g. 2).
g. 2
g. 3

TAPMATE™XL 424 OPERATING MANUAL
6
CUTTER AND PILOT IDENTIFICATION
1. Select the proper Cutter and Pilot for the pipe you'll be tapping (see g. 4 & 5).
70;/6+$)7126(
7$36
70;/6+$)7126(
7$36
7<3,&$/&$5%,'(&877(5'(6,*1
7<3,&$/&$5%,'(&877(5'(6,*1
&XWWHUDQG3LORWVVKRZQEHORZDUHIRUXVHRQ'XFWLOH,URQ&DVW,URQDQG$VEHVWRV&HPHQWSLSH
706+$)7126(
7$36
TM-XL, PVC PILOT
(14" - 16" TAPS)
TM-XL, PVC PILOT
(18" - 24" TAPS)
4" - 12"
TYPICAL PVC CUTTER DESIGN
TM, SHAFT NOSE
(4" - 12" TAPS)
g. 4
g. 5
Cutter and Pilots shown below are for use on Ductile Iron, Cast
Iron and Asbestos/Cement pipe.
Cutter and Pilots shown here are for use on PVC pipe.
NOTE: USE CARBIDE CUTTER PER FIG. 4 FOR 14” THRU 24” CUTS

TAPMATE™XL 424 OPERATING MANUAL
7
ABOUT ADAPTER HUB SIZES
1. Ensure that the correct Adapter Hub is securely attached to the Lead Tube.
TodeterminewhichAdapterHubyou'llneed,seeg.6below.
Small Adapter Hub
for use with
4" ‑ 12" TapMate Adapter Bells.
Large Adapter Hub
for use with
14" ‑ 24" TapMate XL‑424
Adapter Bells.
NOTE: The TapMate XL-424 is shipped from the factory
without an Adapter Hub installed.
g. 6

TAPMATE™XL 424 OPERATING MANUAL
8
ADAPTER HUB INSTALLATION AND REMOVAL
Large Adapter
Hub Keyway
Keyway
Lead Tube
Locking Collar
Small Adapter
Hub
Installation:
1. Select the appropriate Adapter Hub for the size
of Adapter Bell to be used (Small Adapter Hub
for 4"‑12" and Large Adapter Hub for 14"‑24").
2. Align the Keyway in the Adapter Hub with the
Key in the top of the Lead Tube (see g. 7).
3. Slide Adapter Hub over the end of the Lead
Tube and engage the threads of the Lead Tube
Locking Hub Collar (see g. 8).
Large Adapter
Hub
Small Adapter
Hub
g. 7
g. 8

TAPMATE™XL 424 OPERATING MANUAL
9
ADAPTER HUB INSTALLATION AND REMOVAL (cont.)
4. Tighten with a Spanner Wrench.
Removal:
1. Unscrew the Adapter Hub from the Lead
Tube Locking Collar with the Spanner
Wrench.
2. Slide the Adapter Hub off the Lead
Tube and store in Shipping Crate / Work
Station.
Large Adapter HubSmall Adapter Hub
g. 9
g. 10

TAPMATE™XL 424 OPERATING MANUAL
10
1. After the Small Adapter Hub has been securely
attached to the Lead Tube, check the neck of the
TapMate Adapter Bell to be sure that the O‑ring is
present.
2. Screw the appropriate size and style Adapter Bell
onto the end of the Adapter Hub. You should feel
theO-ringcompressasyounishthreadingitinto
the Adapter Hub (see g. 11).
5. Remove the Brake Tube Locking Bolt from the Brake
Tube (see g. 13). This will allow the Brake Tube to
rotate separate from the entire machine. Remove the
back Workstation Brace. Leave the Front Workstation
Brace in place.
3. There are four Set Screw Holes around the Neck of
the Adapter Bell. Continue to thread the Adapter on
until the next Hole is over the Flat Slot on the top of
the Hub.
4. Insert one Set Screw into the Hole located above the
Flat and use a 3/16" Allen Wrench to tighten the Set
Screw (see g. 12).
NOTE: The Set Screw must bear ENTIRELY on
the Flat of the Small Adapter Hub. Otherwise, damage
to the threads of the Hub under the Set Screw may oc-
cur, which in turn will make the Adapter Bell very difcult
to remove. Further damage to the threads of the Adapt-
er Bell may also occur as you unscrew it from the Hub.
Small
Adapter
Hub
Adapter Bell
(4" ‑ 12")
Set Screw
Brake Tube
Locking Bolt
Workstation
Rear Brace
TAPMATE XL-424 SET-UP FOR 4"-12" TAPS:
For instructions on attaching the Large Adapter Bell (for 14"-24" taps),
turn to page 14.
g. 11
g. 12
g. 13

TAPMATE™XL 424 OPERATING MANUAL
11
7. Apply Anti‑Galling Lubricant to the Shaft Head Bolt
and start to thread it into the end of the Shaft with the
3/8" Allen Wrench. Align the key up with the Keyway
andnishboltingtheSmallShaftHeadintoplace,
using a torque wrench to install the Shaft Head Bolt
to 95 ft.‑lbs. Apply Anti‑Galling Lubricant to both Set
Screws and thread them into the Shaft using the 1/8"
Allen Wrench. The Set Screws lock the Shaft Head
Bolt in place, preventing it from loosening during the
cutting operations.
6. Thread the Brake Tube down the Thrust Tube by
rotating it in a clockwise direction, as viewed from the
back of the Machine (see g. 14). Do this until the
Shaft extends out of the Adapter Bell. The distance
will vary depending on the type and size of Adapter
Bell being used.
8. The Jam Nut facilitates easy removal the Shell Cut‑
ters. Thread the Jam Nut onto the Shaft. Run it to the
end of the Threads, and then back off one complete
revolution. With a 3/16" Allen Wrench, tighten Jam
Nut Halves so that the gap between them is even
(see g. 16). Secure the Jam Nut halves by torquing
the Jam Nut Bolts to approximately 50 in‑lbs.
9. Take the TM Shaft Nose (or TM PVC Pilot) and exam‑
inetheretentionballsystem.Itshouldrequirerm-
to‑hard pressure to depress the Ball. The Ball should
snap back into place smoothly. If the Ball is sticking,
disassemble, and clean the Hole, Ball and Spring.
Reassemble, and re‑examine to ensure the Ball is
functioning properly.
Check to see that the Spade Bit in the TM Shaft Nose is
sharp and that it is held securely in the slot. If the Spade
Bit is chipped or damaged, it should be replaced. For
PVC Pilots, check that the teeth are sharp. If the teeth
are chipped or damaged, it should be replaced.
TM Shaft Nose
TAPMATE XL-424 SET-UP FOR 4"-12" TAPS (CONT.)
g. 14
g. 15
g. 16
g. 17

TAPMATE™XL 424 OPERATING MANUAL
12
TAPMATE XL-424 SET-UP FOR 4"-12" TAPS (CONT.)
10. Thread the TM Shaft Nose or TM PVC Pilot (depending on the material of pipe you
are tapping) into the end of the Shaft and tighten until the shank of the TM Shaft
NoseortheTMPVCPilotisushagainstthefaceoftheShaft.Duetothelonger
body length of the 10 and 12 inch shell cutters, a Pilot Drill Extension must be at‑
tached between the Shaft and the Shaft Nose (or PVC Pilot) and tightened into place
forthesesizetaps.Seedrawings(below)forShaftNosecongurations.
11. Now slip the Shell Cutter over the TM Shaft Nose or TM PVC Pilot and thread it onto
the Shaft until it is snug against the Jam Nut .
12. Retract the Shell Cutter into the Adapter Bell by rotating the Brake Tube in a count‑
er‑clockwise direction. The Brake Tube will stop rotating when it shows “zero” (or a
little beyond) on the Thrust Tube. Locate the Set Screw hole in the Brake Tube back
over the scale in the Thrust Tube and re‑attach the Brake Tube Locking Handle. The
Brake Tube Locking Handle may damage the Thrust Tube threads if it isn't located
over the scale.
13. Check that the Lead Nut is sitting at “zero” on the Lead Tube.
Shaft Nose conguration for 10" - 12" cuts
TM Shaft Nose
XL Shaft TM Jam Nut
TM Pilot Drill
Extension
Shaft Nose conguration for 4" - 8" cuts
TM Shaft Nose
XL Shaft TM Jam Nut
g. 18 g. 19

TAPMATE™XL 424 OPERATING MANUAL
13
13. Remove the Front Workstation Brace from
the Crate.
14. The TapMate XL‑424 is now ready to be
lifted and attached to the gate valve. When
lifting the Machine, use the Lifting Rings at
the Rear of the Machine and at the Small
Adapter Hub as your lift points. Adjust the
Chain Choker so that the Machine is as level
as possible.
g. 20
g. 21
TAPMATE XL-424 SET-UP FOR 4"-12" TAPS (CONT.)

TAPMATE™XL 424 OPERATING MANUAL
14
1. Remove Front and Rear Braces from Work‑
station.
2. With the Large Adapter Hub properly in‑
stalled on the Lead Tube (see steps on page
8‑9), lift and move the appropriate size and
style TapMate XL‑424 Adapter Bell into place
(see g. 22).
3. Remove the six Nuts and Washers from the
outside of the Adapter. Also make sure that
the Adapter Bell Gasket is in place.
4. Lift the Adapter Bell by the Lifting Eye, and
move it into place. The Shaft goes through
the Center Hole in the Adapter. Carefully
slide the Adapter Bolts through the Mating
Holes in the Large Adapter Hub.
5. Replace the Nuts and Washer back onto the
Adapter and tighten Nuts in a star pattern.
6. Remove the Brake Tube Locking Bolt from the
Brake Tube (see g. 23). This will allow the
Brake Tube to rotate.
TAPMATE XL-424 SET-UP FOR 14"-24" TAPS
For instructions on attaching the Small Adapter Bell (for 4"-12" taps), go to page 8.
g. 21
g. 22
g. 23

TAPMATE™XL 424 OPERATING MANUAL
15
7. Thread the Brake Tube down the Thrust
Tube by rotating it in a clockwise direction,
as viewed from the back of the Machine (see
g. 24). Do this until the Shaft extends out of
the Adapter Bell. The distance will vary de‑
pending on the type and size of the Adapter
Bell.
8. Apply Anti‑Galling Lubricant to the Shaft Head
Bolt and start to thread it into the end of the
Shaft with the 3/8" Allen Wrench. Align the
KeywiththeKeywayandnishboltingthe
Large Shaft Head into place using a torque
wrench to install the Shaft Head Bolt to 95 ft.‑
lbs. Apply Anti‑Galling Lubricant to both Set
Screws and thread them into the Shaft using
the 1/8" Allen Wrench. The Set Screws lock
the Shaft Head Bolt in place preventing it from
loosening during the cutting operation.
TAPMATE XL-424 SET-UP FOR 14"-24" TAPS (cont.)
g. 24
g. 25

TAPMATE™XL 424 OPERATING MANUAL
16
9. Take the TM XL‑Shaft Nose (or TM XL‑PVC
Pilot) and examine the Retention Pin System.
Itshouldrequirermpressuretodepressthe
Pin, and the Pin should snap back into place
smoothly. If the Pin is sticking, disassemble,
and clean the Hole, Pin and Spring. Reas‑
semble, and re‑examine to ensure the Pin is
functioning properly.
Use 14"‑16" or 18"‑24" TM XL‑Shaft Nose (or
TM XL‑PVC Pilot) based on tap size.
Check to see that the Spade Bit is sharp and
that it is held securely in the slot. If the Spade
Bit is chipped or damaged, it should be
replaced. For PVC Pilots, check that the teeth
are sharp. If the teeth are chipped or damaged,
it should be replaced.
10. Notice that the threaded ends on the TM‑
XL Shaft Nose (and the TM‑XL PVC Pilot)
are interrupted by a smooth area. When the
TM‑Shaft Nose (or TM‑XL PVC Pilot) is thread‑
ed all the way onto the Large Shaft Head,
this smooth area will line up with the two Set
Screw Holes located in the Large Shaft Head.
Thread Set Screw into place and tighten with
an 1/8" Allen Wrench (see g. 27) locking the
Shaft Nose or PVC Pilot into place.
TM XL Shaft Nose
TAPMATE XL-424 SET-UP FOR 14"-24" TAPS (cont.)
g. 26
g. 27

TAPMATE™XL 424 OPERATING MANUAL
17
NOTE: Due to the weight of some
Shell Cutters, use a suitable strap and lifting
mechanism when lifting and installing the
Shell Cutter.
11. Move the appropriate size Shell Cutter over
the Shaft Nose (or PVC Pilot) and onto the
front boss of the Large Shaft Head. Align the
through holes of the Large Shaft Head with
the tapped holes in the Cutter. Secure with
the six Cutter Bolts provided. Tighten to a
minimum of 30‑40 ft‑lbs.
12. Retract the Shell Cutter into the Adapter
Bell by rotating the Brake Tube in a count‑
er‑clockwise direction. The Brake Tube will
stop rotating when it shows "zero" on the
Thrust Tube.
Check that the Lead Nut is sitting at "zero" on
the Lead Tube.
TAPMATE XL-424 SET-UP FOR 14"-24" TAPS (cont.)
g. 28
g. 29
g. 30
13. The TapMate XL‑424 is now ready to be lift‑
ed and attached to the Gate Valve. When
lifting the Machine, using the Lifting Loop
at the end of the Machine and the Loop on
the Adapter Bell.
NOTE: Adjust the Chain Choker so that
the Machine is lifted as level as possible.

TAPMATE™XL 424 OPERATING MANUAL
18
1. Install and assemble Tapping Sleeve and Gate
Valve per the manufacturer's instructions.
Pressure test the Tapping Sleeve and Gate
Valve Assembly before beginning the tap.
NOTE: At this point, you'll take some
measurements to determine the neces-
sary depth of your tap. Record these measure-
ments, as you'll use these values in subsequent
steps.
2. With the Valve Gate still closed from the pres‑
sure test, measure the distance from the Valve
Flange Face to the Gate (see g. 32).
3. With the Shell Cutter fully retracted, take the
following measurements (see g. 33).
• Measure the distance the Shaft Nose/PVC
Pilot extends beyond the Adapter Bell Flange.
• Measure the distance that the Shell Cutter
extends beyond the Adapter Bell Flange.
NOTE: These distances are often different de‑
pending on the tap size and the Adapter Bell.
4. Carefully compare the measurements taken in
Steps 2 and 3, to ensure that there will be no
interference between the Shaft Nose / PVC
Pilot or Shell Cutter, and the Gate Valve when
the tap is completed.
Clearance Distance
Pilot Drill
C
L
Valve Body
Centerline of the
Waterway
Valve Gate
Distance
Cutter Clearance
Valve
Flange
Face
Tapping Sleeve Neck
Pipe
Extension Distance
Shaft Nose/PVC Pilot
Extension Distance
Shaft Nose/PVC Pilot
MJ Adapter
(without Gasket)
Distance
Cutter's Extension
Flange Adapter
Distance
Cutter's Extension
ATTACHING THE TAPMATE XL-424 TO THE VALVE:
The illustrations in this section depict a 6” size‑on‑size tap using a Romac FTS420
Fabricated Steel Tapping Sleeve, an MJ by Flange Gate Valve and the TapMate XL‑424
machine with an MJ Adapter Bell.
Regardless of the size tap you're performing, the steps are the same:
g. 31
g. 32
g. 33

TAPMATE™XL 424 OPERATING MANUAL
19
ATTACHING THE TAPMATE XL-424 TO THE VALVE (cont.)
g. 34 Distance to Pipe
Centerline of
the Waterway
Valve Gate
C
L
Pipe OD
Valve
Flange
5. Carefully release the pressure in the Sleeve
and Valve. OPEN the Valve Gate completely.
6. Measure the distance from the Valve Flange
to the Pipe (through the Valve, Sleeve Neck
and any Extensions).
Record this measurement for later use.
Pipe
Distance to Distance of Cut
Travel Chart's
<
=
39 Inches Total Machine
Shaft Travel Distance
C
L
-
+Cutter's Extension
out of Adapter
and into Valve Body
or
BORING SHAFT TRAVEL & DISTANCE OF CUT
7. The TapMate XL‑424 Boring Shaft can travel up to 39 inches, which is more than adequate for most
taps. Before you begin your tap, make sure the total distance to cut is not more than 39 inches.
To determine the distance necessary for your tap, see the drawing below:
NOTE: Conrm that the ID of the pipe is greater than the Cutter's OD.
g. 35

TAPMATE™XL 424 OPERATING MANUAL
20
8. Move the TapMate XL‑424 into position (see
g. 36) and bolt it to the Valve. Care needs to
be taken to properly align the TapMate XL‑
424 Machine to the Valve.
NOTE: Incorrect alignment can result
in damage to the Valve, Tapping Sleeve
and or Pipe.
Adequately support the TapMate XL‑424 so as
not to put stress on the Pipe, Valve or Tapping
Sleeve. Ensure that this support will accommo‑
date the travel distance of the Thrust Tube and
Brake Tube during the tap.
NOTE: Do not support the machine by
the threads.
9. With the TapMate XL‑424 secured to the
Valve and supported, disconnect and remove
the Lifting Chains.
ATTACHING THE TAPMATE XL-424 TO THE VALVE (cont.)
g. 36
This manual suits for next models
1
Table of contents