manuals.online logo
Brands
  1. Home
  2. •
  3. Brands
  4. •
  5. Ronco
  6. •
  7. Fishing Equipment
  8. •
  9. Ronco Pocket Fisherman User manual

Ronco Pocket Fisherman User manual

Handle is a
mini tackle
box for extra
lures and
hooks
Fully loaded with line
and ready to fish
Practice casting plug is included
Wrist strap also
holds the rod
down when it is
folded in half
Automatic anti-reverse
prevents the handle from
turning backwards so it is
always ready for fish to strike
Release button to
open side door
Quiet, smooth action reel
with adjustable star drag
Thumb brake for releasing
line when casting
Get Acquainted with the Original
Pocket Fisherman
®
Spin Casting Outfit
Caution: Always use care when fishing. Use extra care with sharp hooks, lures, the casting plug and
when taking fish off the line. This is not a toy. Children should not use the Pocket Fisherman®without
parental supervision. Always look carefully before you cast to be sure no one could get hooked or hit
with a lure. Also be careful not to hook yourself or hit yourself with a lure or plug.
Copyright © 2014 by Ronco Holdings, Inc. All Rights Reserved.
Designed in the U.S.A. Made in China. 01.14
Notch to carry
it on your belt
Comfort grip
is less likely to slip
through your hand
when fish pull.
Sliding float
Here’s an example of how a sliding float works: Let’s say you wish to
have your bait go down three feet. Simply tie a knot in line three feet
from the hook. Then, with each cast, as sinker carries hook down, the
bobber will "ride" up line to knot, leaving bait three feet below the sur-
face! Every time you cast!
Note: When stringing bobber, cut line on bias and insert in end of
bobber with smaller hole . . . pushing the line through until it comes
out the end with the larger hole.
What to use for bait?
Fish differ greatly in their diet and appetite from time to time.
Before you start fishing, check with bait shops and check with other
fishermen to determine what food or lure fish are biting on and how
deep to fish. The results could be well worth the effort.
What weight of line?
Pocket Fisherman®usually has a 10 lb. test mono line. When you wish
to use heavier test line (up to 20 lb. test) simply remove reel from
Pocket Fisherman as shown inside.
Release to
fold in half
to fit in your
pocket or in
a glove
compartment
SPIN CASTING OUTFIT
®
THE ORIGINAL
Firm pressure on thumb brake
holds the line securely in place.
As rod swings backwards, and
then forward, the thumb main-
tains this firm pressure.
When the rod tip nears the for-
ward limit, remove all pressure
on thumb brake. Practice makes
perfect. You’ll soon know exactly
when to release the line.
Retrieve according to the type of
lure or bait being used. Do not
hold down thumb brake when
reeling in line. It’s a good practice
after every few casts to apply
some tension to the line while
retrieving. This makes the line
tighter on the spool and makes
for better performance.
A properly set drag will save your
catch if you hook a real "fighter".
To tighten the drag, turn the star
drag clockwise. Turn it counter-
clockwise to loosen the drag.
Don’t set the drag too tight. A
fish could break the line when it
hits the bait or the lure.
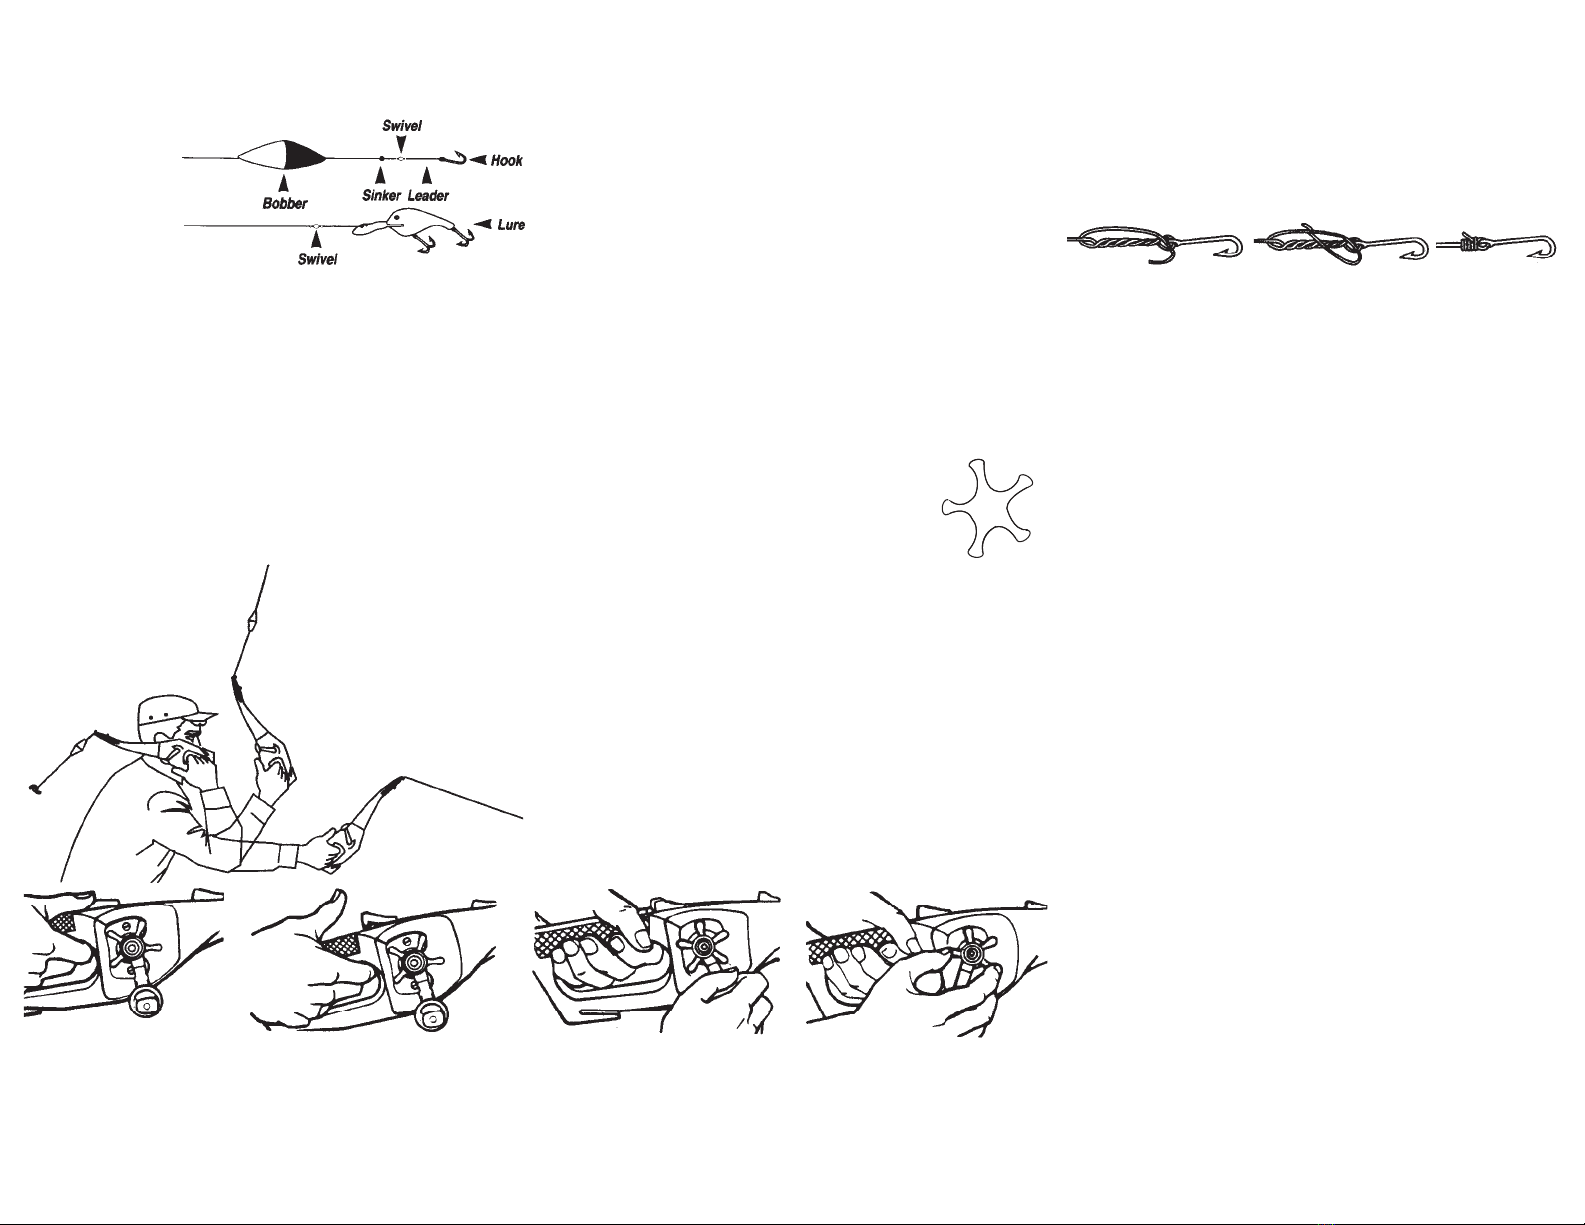
Getting Ready to Fish
Run the line through the rod guides and tie on the bait or lure to the
swivel tackle. Reel in until bait or lure is hanging down a few inches
below the rod tip. Set the drag before each use.
Casting - Practice with the Casting Plug
•Depress and hold the thumb brake down to disengage the line for
casting.
•Hold the thumb brake down firmly during the back cast.
•Point the rod tip slightly above the target, then lift the rod back swift-
ly with the wrist and forearm - allowing the momentum of the lure to
flex the rod.
•Without hesitation, carry the cast back toward the target with a
quick accelerated forward action of the wrist and forearm.
•Release the thumb stop during the forward stroke to cast the line.
If you release the line too soon - It goes too high in the air.
If you release the line too late - The lure ends up right in front
of you and short of the target.
To help control the cast, many experts let the line run between the
thumb and index finger of their left hand to “feather” the line after the
lure is on its way to the target. Feathering allows pinpoint accuracy to
bring the line to a slow, gentle stop.
Line Retrieve
To retrieve, switch the rod to the left hand and turn the reel handle for-
ward with the right hand to engage the line pickup.
Playing the Fish
After a fish has been hooked, always keep a bend in the rod during
the fight by keeping the rod at an angle to the fish. When the fish is
not taking a lunge against the drag, we recommend using the rod to
“pump” the fish. Then quickly reel the line while lowering the rod tip
and prepare to “pump” again. Reel in between pumps. This technique
helps prevent overworking of the reel and it cushions the line against
shock. It also minimizes line tangle and twist caused by reeling in
against the drag or reeling slack line. Most importantly it lets you con-
centrate on catching fish.
Setting the Drag (before you fish)
The drag system allows line to be pulled from the reel
under tension without breaking when a fish strikes or
makes a quick run after being hooked. It also helps
prevent the fish from getting unhooked. The star drag
adjustment is conveniently located on the inside of the reel handle.
Turn the star clockwise to increase the drag tension on the line. Turn
the star counterclockwise to relieve tension. Set the drag by pulling
the line from the reel against a small fish hand scale. Adjust the drag
to one-third to one-half the rated strength of the fishing line.
•When a fish runs, only light tension should be used.
•Too much tension may cause the line to break.
A Few Lines About Line
Apply tension to the line while retrieving. Always maintain tension on
the line. Raise the rod to remove slack from the line. Let the line flow
Continued top of next column
Note: Just press down on
the thumb brake, reach
back as shown in this illus-
tration. Thrust forward
releasing the thumb brake
a moment just before you
finish the forward pitch.
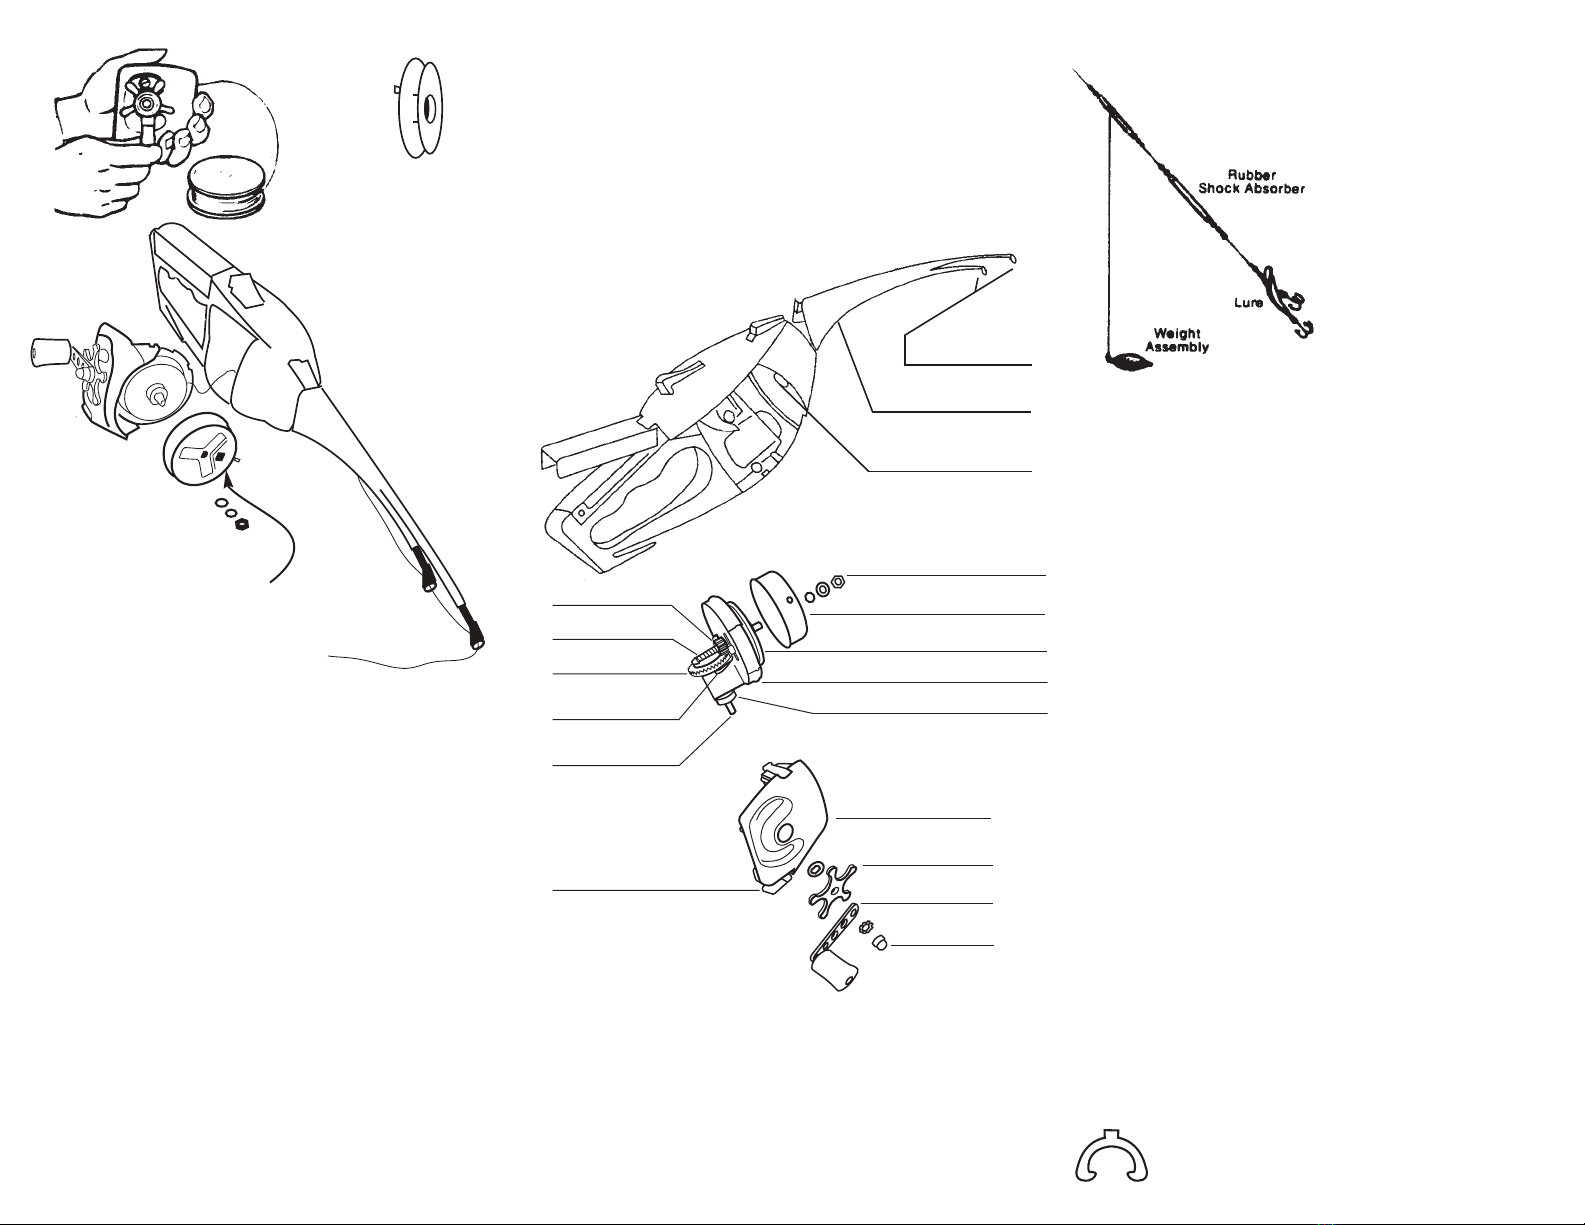
Bait Tackle
Lure on Jig
between the thumb and index finger of the left hand before entering
the reel (during retrieval only). This minimizes line winding problems
and cleans the line for another trouble-free cast. Line wound evenly
onto the spool under tension also casts better.
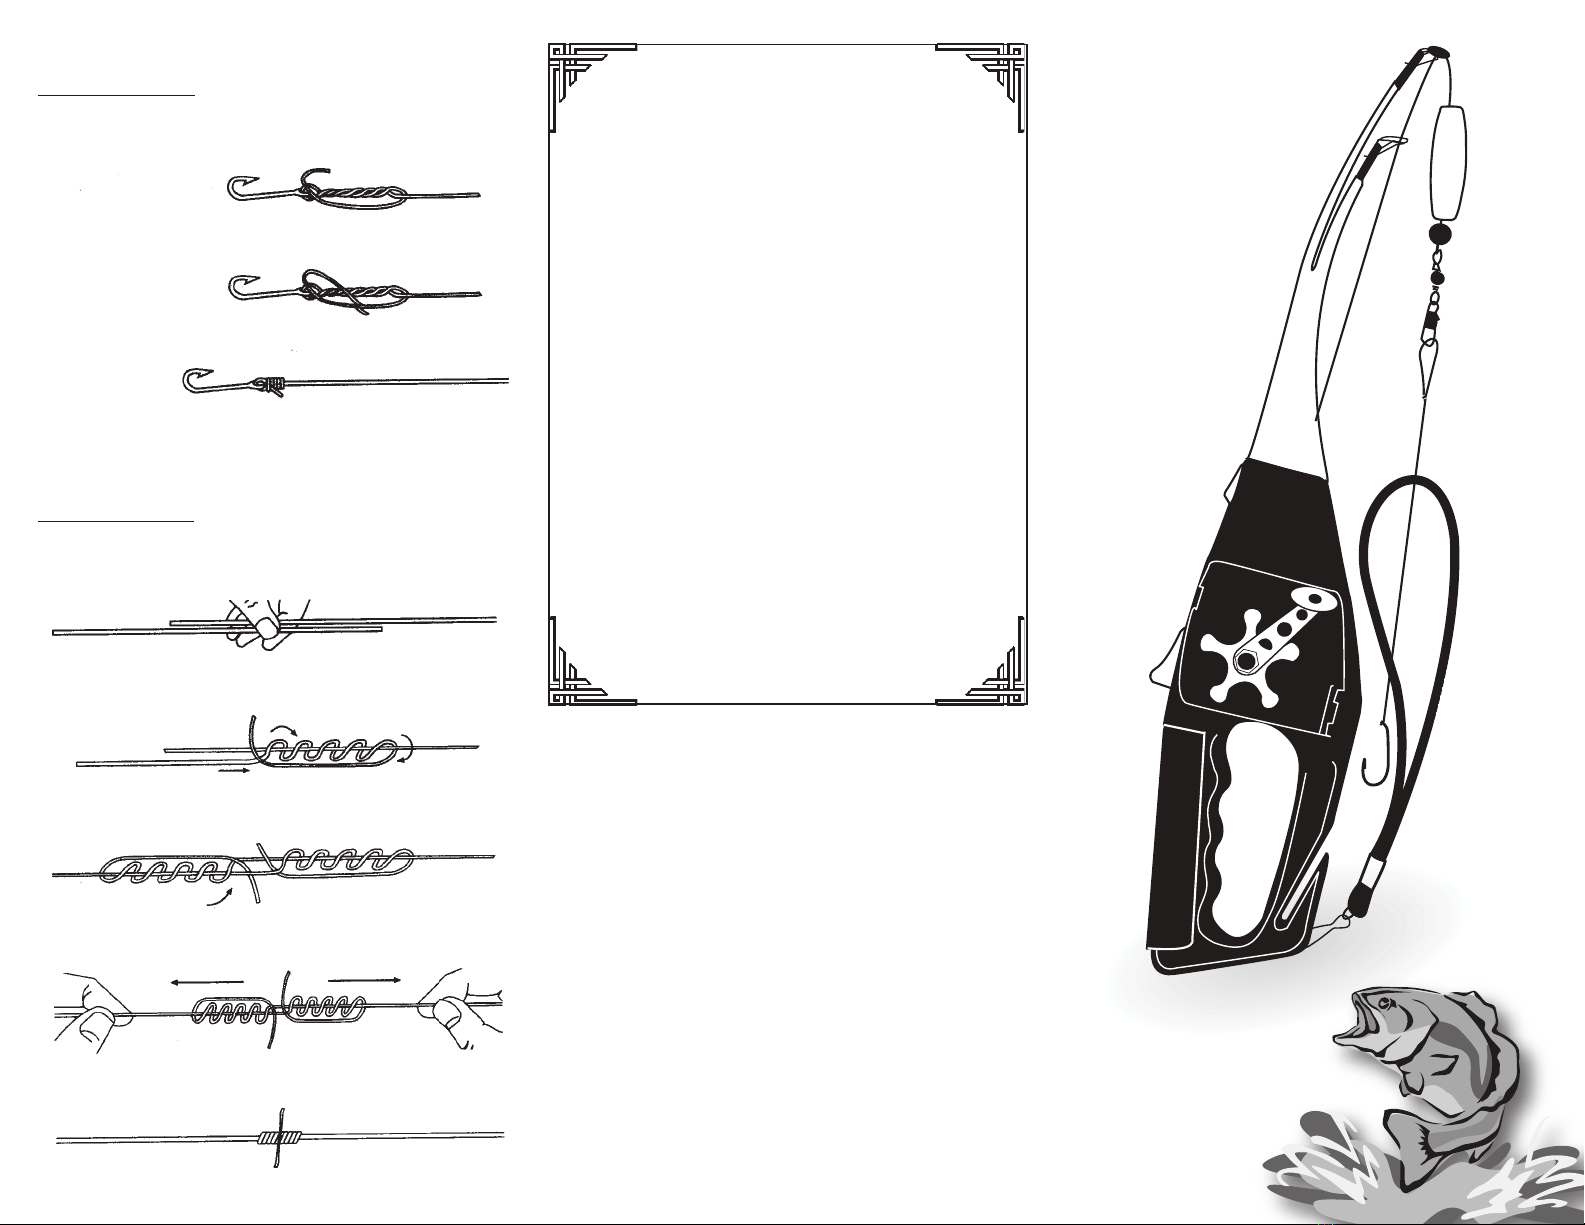
How to Tie the Line
To successfully set the hook and land a fish, it is important that the
line is tied properly. The improved Cinch Knot shown below is an all-
time favorite and widely used knot.
Check Line Condition
The last three feet or so of line should be checked frequently for cuts
or abrasions which may substantially weaken the line and could result
in a broken line and lost fish. Run the line through your fingers to
check for this condition and cut off any bad line and retie to help pre-
vent future line breakage.
Line life is dependent on many factors. Line should be replaced when
it is old and is breaking easily, when it gets noticeably stiff or gives
continuous trouble while casting. It is not a bad idea to change the
line after a year or normal use.
Line Twist
Line twist is usually caused by improperly installed line or from reeling
against a slipping drag. To correct “line twist” troll line behind a boat
or play it out in a river current and rewind it under tension. Never reel
in when you hear the drag slipping. Always use a high quality ball
bearing swivel at the end of your line to prevent twist.
After repeated use or long periods of storage, line should be stretched
to remove the curl that may be set in the line. Reel out approximate-
ly 50 feet of line. Attach the end of the line to a fixed object. Stretch
the line taut 3 or 4 times by hand until curl is removed. To make sure
your outfit stays running as smooth as the day you bought it – give it
periodic attention.
Inside Tangle Tip
Should your line get tangled or caught inside your reel, it can be eas-
ily resolved by removing the side door and the metal spincast cover
and cutting off the damaged line. Run line back through the reel case
and out through the rod guides, reassemble and you are ready to fish.
Reloading Line
If loading or re-loading your old spool with new line, remember to loop
the line around spool with a half hitch to prevent line slippage.
Rewind line onto the spool under tension. Be sure the new line comes
off of the factory spool in clockwise direction, and is wound onto your
spool in a counterclockwise direction.
See illustration below- at far left.
Run end of line through
eye of hook or lure.
Loop around standing
part of line 6 to 8 times.
Thread tag end back
between the eye and
line coils as shown and
then back through loop.
Pull up
tight and
trim off the
tag end.
Notes for Opening the Side Door for
Cleaning or for Changing the Fishing Line
First turn crank handle one full revolution clockwise. Do not depress
the thumb brake during reel removal. Push on the release button to
open the side door. Grasp the crank handle and pull the reel out. Take
off the hex nut, two washers and the metal spincast cover.
With the reel removed, you may replace your line spool with another
spool (either pre-loaded or one you load yourself) containing the
desired test line. Additional spools are available from Ronco.com.
When you start your new line, use a half hitch to keep the line in place
without slipping.
NOTE: When replacing the spool, do not force it. If reel assembly
does not fit back into housing, check to see that the thumb brake is
not depressed.
You don’t need to remove the handle or the star drag to change the
line or clean the reel case.
If you find an extra piece that looks like an arc (17), it
belongs on the shaft below gear B (8) with the tab facing
into the spincast bracket (10). It resides behind the back
of the bracket (10) that holds the spool.
How to Install Line on the Reel
•Remove the snap-fit side door by depressing the snap and pulling
the door away from the reel body.
•Thread the line through the first rod line guide, the second guide and
then through the back of the rod.
•Remove the hex nut, washers and metal spincast cover. You will
need a small nail or screwdriver to gently push the spring pin back
through the window in the spincast cover. Set the spincast cover
aside. Remove any old line from spool. Tie new line onto the spool.
•Replace spincast cover again push (or pull gently with small pliers)
the small pin outward so the metal spincast cover it will go on correct-
ly. Replace the washers and hex nut.
•Prior to winding new line on, rotate the handle of the reel and deter-
mine which way the spinnerhead is rotating. Lay the spool of line on
its side so the line comes off in the same direction the spinnerhead is
turning.
•Replace side door while being careful not to pinch the line.
•Start winding the line under tension from your finger. The correct
amount of line should fill the spool to within 1/8 inch from the top of the
reel spool lip. Gently fill it to full and then pull about 10 yards back out
and cut it off. The plastic spool should be about 1/8” from “full”.
Metal Spincast Cover
To remove or put back on this
cover, use a very small nail or
screwdriver in its view hole to
gently hold the spring pin back.
A Line Spool
Load it no more than
1/8” from outside
edge.
7 to 10 lb test line is
fine for this rod &
reel.
Keep tension on the
line when reeling in
and when loading
new line.
How to Change the Spool
Remove the side door by depressing the snap and pulling the door
away from the reel housing. remove the hex nut while firmly holding
the spinnerhead. Lift off the spincast cover by pulling out on its side
pin with small pliers. If you want to remove the spool, turn it (view from
back to see the two pegs come free). Install new spool. Replace spin-
cast cover, washers and hex nut. Bring line through the line guide in
front and on to the rod tips. Replace side door. Add a good swivel to
end of the line. Set drag to desired setting.
1 Cap Nut
2 Reel Handle
3 Star Drag
4 Side Release Button
5 Side Door
6 Gear A Shaft
7 Gear A
8 Gear B
9 Gear B Shaft
10 Spincast Bracket - Black
11 Spool - Plastic
12 Spincast Cover - Metal
13 Hex Nut
14 Line Exit Hole
15 Line Guides
16 Fishing Rod
17 Brake Arc
18 Spacer Washer - Brass
Rubber Snubbers for Bigger Fish
For larger fish a long rod has one advantage over a short one – it
bends to cushion the strike. That’s why we recommend using a rub-
ber shock absorber and up to 20 lb. test line when you’re after these
"big fish" with the Pocket Fisherman™. Attach the shock absorber to
the line before the hook or lure. It helps set the hook and keep it there
by elastic pressure.
These shock absorbers or "rubber snubbers" are available at many
tackle shops.
13 Hex Nut
12 Spincast Cover - Metal
11 Spool of Line - Plastic
1 Cap Net
2 Reel Handle
3 Star Drag
5 Side Door
10 Spincast Bracket - Black
18 Spacer Washer - Brass
8 Gear B
9 Gear B Shaft
7 Gear A
17 Brake Arc
6 Gear A Shaft
4 Side Release Button
14 Line Exit Hole
15 Line Guides
16 Folding Rod
Caution:
Remember to
always use care
when fishing.
Use extra care
with sharp
hooks, lures,
plugs and when
taking fish off
the line.
Ronco Holdings, Inc.
15505 Long Vista Dr., Ste 250
Austin, TX 78728
Visit us online at
www.Ronco.com
Recommended Maintenance
Now and then, clean any accumulated gunk from visible reel parts
with a small brush. Dry with a soft cloth and lubricate. When lubri-
cating your reel, use a good grade of petroleum lubricant - reel
grease is best. Don’t overdo it, but see that the gears are greased
lightly, and finish the job with a few drops of light oil around the
crank handle and retainer nut.
1. After a day’s fishing the reel should be rinsed inside and out with
fresh water and dried. Then lightly oil and grease the easily acces-
sible parts. This is more important if it has been used for saltwater
fishing.
2. From time to time, remove the side door and lubricate the joint of
the gears - but not too much lubricant to inhibit the gear motion.
3. If dropped in sand or dirt, clean the reel thoroughly before using
or return a portion of it to Ronco Holdings, Inc. under the Warranty
Program.
Copyright © 2014 Ronco Holdings, Inc. All Rights Reserved.
Designed in the U.S.A. Made in China.
THE FAMOUS TEN YEAR
Free Replacement Warranty
1-855-85-RONCO email: support@ronco.com
Visit us online at www.Ronco.com
Two Frequently Used Fishing Knots
The Cinch Knot
The easiest and most often used general purpose knot for
monofilament line. Use it for attaching hooks, lures, swivels,
leaders, etc.
Step 1. Line is wound with 6 or 8 turns around itself and the
end is brought through the “eye”.
Step 2. End is carried through the loop made by the line
itself.
Step 3. Line is cinched down snugly. The harder anything
pulls on the line, the tighter the knot cinches itself.
The Blood Knot
Used for joining lines or leaders of the same diameter.
Excellent for tying monofilament to monofilament
Line is first held in the left hand between thumb and index
finger with 2 or 3 inches of line on either side.
Line is wound 5 or more turns around the other line (clock-
wise) then return back between the lines.
Grip the knot just made with the right hand and make the
left knot go counterclockwise fashion like the right knot.
With both knots tied, grasp at both ends as pictured and
pull. When finished, trim excess material.
A neat knot can go smoothly through the line guides.
Ronco Holdings, Inc. warrants the Pocket
Fisherman®from defects for ten years. If the
product is defective, please return the “Star
Drag” with a check or money order for $8.90
to cover shipping and insurance charges.
(This rate is subject to change without
notice.)
In addition to your $8.90 payment and the
“Star Drag” please include your full name,
address, phone number, email address and
mail to:
Ronco Holdings, Inc.
15505 Long Vista Dr., Stet 250
Austin, TX 78728

Popular Fishing Equipment manuals by other brands

Ocean Guardian BOAT01 user manual

Ocean Guardian

Ocean Guardian BOAT01 user manual

NORDIC LEGEND B33Z08 Care and use manual

NORDIC LEGEND

NORDIC LEGEND B33Z08 Care and use manual

TAIMEN PVM400 user manual

TAIMEN

TAIMEN PVM400 user manual

Smith-Root VVP-15B user manual

Smith-Root

Smith-Root VVP-15B user manual

Sonik Gizmo user manual

Sonik

Sonik Gizmo user manual

Fish-Skull Articulated Shank Getting started

Fish-Skull

Fish-Skull Articulated Shank Getting started

Daiwa TANACOM 500 operating manual

Daiwa

Daiwa TANACOM 500 operating manual

Rippton CatchXBLACKSAMURAI user manual

Rippton

Rippton CatchXBLACKSAMURAI user manual

Bass Pro Shops Johnny Morris CarbonLite JCL500 manual

Bass Pro Shops

Bass Pro Shops Johnny Morris CarbonLite JCL500 manual

Browning Aggressor BAX10HA quick start guide

Browning

Browning Aggressor BAX10HA quick start guide

Rapala VORTEX Operator's manual

Rapala

Rapala VORTEX Operator's manual

Scotty Depthpower 30" Installation, Maintenance, Use and Safety

Scotty

Scotty Depthpower 30" Installation, Maintenance, Use and Safety

ORVIS Battenkill Bar Stock Reel quick start guide

ORVIS

ORVIS Battenkill Bar Stock Reel quick start guide

Powertiki PT-530 operating instructions

Powertiki

Powertiki PT-530 operating instructions

Lewmar Fish 700 product manual

Lewmar

Lewmar Fish 700 product manual

EAGLE CLAW Shappell WIDE HOUSE 5500 instructions

EAGLE CLAW

EAGLE CLAW Shappell WIDE HOUSE 5500 instructions

SuperFish UVC Master 75000 manual

SuperFish

SuperFish UVC Master 75000 manual

STRIKEMASTER CHIPPER LITE owner's manual

STRIKEMASTER

STRIKEMASTER CHIPPER LITE owner's manual

manuals.online logo
manuals.online logoBrands
  • About & Mission
  • Contact us
  • Privacy Policy
  • Terms and Conditions

Copyright 2025 Manuals.Online. All Rights Reserved.