Ronix RWS-XE5DIP3610M-IR User manual

5Mega pixel Motorized Zoom
Network Bullet Camera
Before installing and using this product,
please read the instruction fully and keep it handy for later use.
5MP
Preliminary
Operating Instruction


CAUTION: TO REDUCE THE RISK OF ELECTRIC SHOCK,
DO NOT REMOVE COVER (OR BACK).
NO USER SERVICEABLE PARTS INSIDE.
REFER SERVICING TO QUALIFIED SERVICE PERSONNEL.
To prevent fire or shock hazard, do not expose the unit to rain or moisture.
To prevent electric shocks and risk of fire hazards, do NOT use other than
specific power source.
Warning :
This equipment has been tested and found to comply with the limits for a Class
A digital device, pursuant to part 15 of the FCC Rules. These limits are designed
to provide reasonable protection against harmful interference when the equipment
is operated in a commercial environment. This equipment generates, uses, and
can radiate radio frequency energy and, if not installed and used in accordance with
the instruction manual, may cause harmful interference to radio communications.
Operation of this equipment in a residential area is likely to cause harmful
interference in which case the user will be required to correct the interference at
his own expense.
Caution :
Any changes or modifications in construction of this device which are not expressly
approved by the party responsible for compliance could void the user's authority
to operate the equipment.
Mains power quality should be that of a typical commercial environment. If the user
of the model requires continued operation during power mains interruptions, it is
recommended that the model be powered from an uninterruptible power supply
(UPS) or a battery.
The symbol is intended to alert the user to the presence of important
operating and maintenance(servicing) instructions in the literature
accompanying the unit.
The symbol is intended to alert the user to the presence of uninsulated
"dangerous voltage" within the product's enclosure that may be of
sufficient magnitude to constitute a risk of electric shock to persons.
Safety Precaution
03
MEGA-PIXEL NETWORK CAMERA

Safety Precaution
04
MEGA-PIXEL NETWORK CAMERA
NOTICE
• The image used in this instruction manual are processed to help comprehension
and may differ from actual video of the camera.
• Avoid installing areas where has shock or vibration which results in the problems.
• Pay attention to safety when laying the connection cable and observe that the cable
is not subjected to heavy loads, kinks or damage and no moisture can get in.
• Never open the device such as boards or lens.
The warranty becomes void if repairs are undertaken by unauthorized persons.
• Maintenance and repair have to be carried out only by authorized service centers.
• Use only a mild detergent to clean the housing body only but never for the clear
bubble dome.
• The camera should never be operated beyond the technical specifications.
This can lead to destruction.
• The camera should never be operated in water.

Contents
05
MEGA-PIXEL NETWORK CAMERA
Safety Precaution
p.03~04
Contents
p.05
Features
p.06
Composition
p.07
Dimensions
p.07
Part Names
p.08
Installation Instructions
p.09~11
Operating Instructions
p.12~20
Troubleshooting
p.21~22
Specifications
p.23~24

Features
06
MEGA-PIXEL NETWORK CAMERA
• 5.04Mega Pixel, NETWORK CAMERA, 2592x1944(15p/12.5p)
• ONVIF Conformance
• Zero configuration
• Cross Web Browsing (IE, Edge, Safari, Firefox, Chrome)
• Adaptive web resizing depending on layout & resolution of
display device by RESPONSIVE WEB
• Increased usability for all PC, tablet and mobile
• Simultaneously H.264 & MJPEG (Triple streaming)
• 2 Way Audio & Alarm input/output
• ONVIF Event Mapping
• HTML5 playback
• Slot for Micro SD memory card
• f=3.6~10mm F1.5, 6Mega pixel Motorized Zoom lens
• Dual Filter Switcher
• SNAP Focus by Motorized Zoom lens
• Motorized Zoom & Focus Adjustment
• D-WDR (Digital Wide Dynamic Range)
• Improved noise figure with the enhanced 3DNR
• Motion Detection, Privacy Mask, Tamper, Defog, BLC/HLC, Hue,
D-Zoom(~16x), Mirror/Flip, LDC(Lens Distortion Correction), Contrast,
Brightness, Saturation, Sharpness, Auto-Flickerless, VerticalView
• Circuit protection against faulty connection in power polarity
• Isolated power supply against ground loop problem
• PoE(IEEE Std. 802.3af) & AC24V/DC12V
• Built-in 4pcs High power LED
• Built-in LED Auto/Off Switch
• Built-in Fan & Optimized Cooling system
• Dual Window
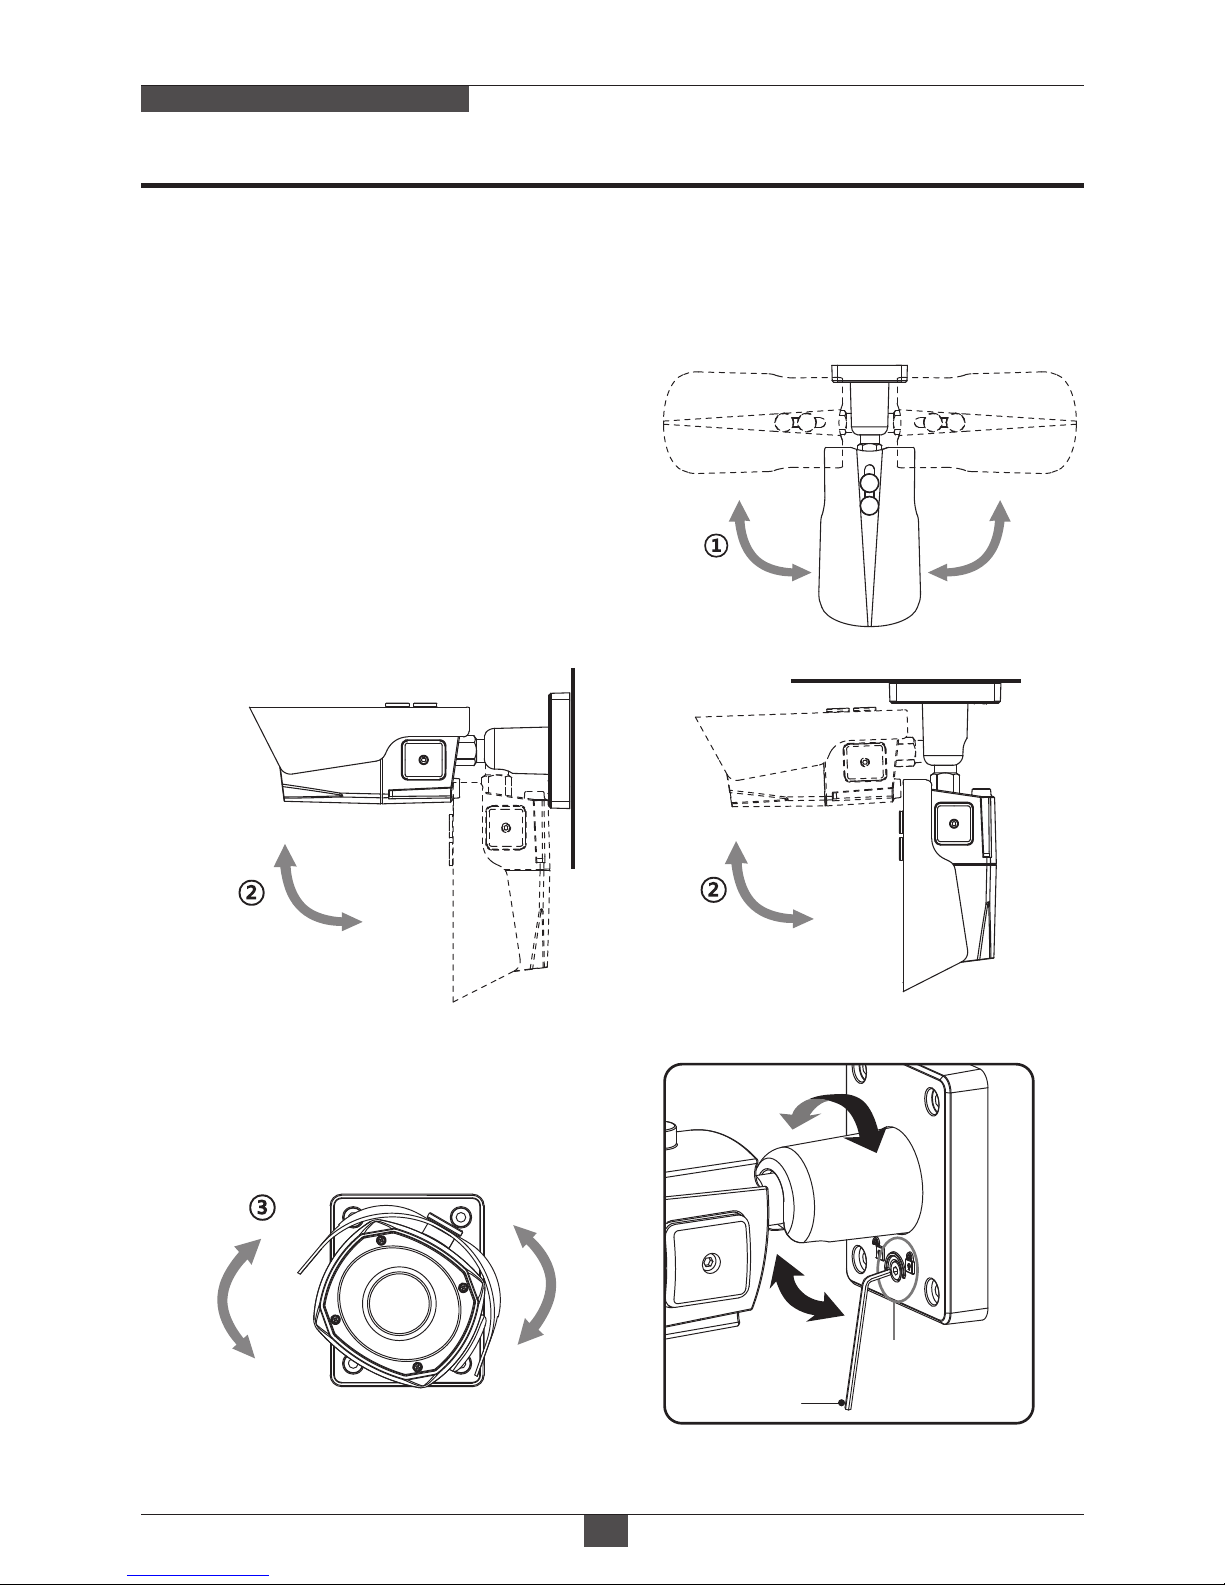
• One touch 3-Axis locking bracket
• IP68 Protection

Composition
07
Dimensions
MEGA-PIXEL NETWORK CAMERA
(unit : mm)
Installation CD
Coupler for
RJ45 Cable (1pc)
Wiring Connector
(1pc)
Cable Signal
Sticker
Torque Wrench:
3mm (1pc)
Mounting Template
Operating Instruction
Camera
Easy
Bracket
267
108
87.30
100
86.40
75.90
80
190
Mounting Screw:
4 x 30mm (4pcs)
Plastic Anchor:
6 x 30mm (4pcs)
Assembly Screw:
4 x 15mm (4pcs)

Part Names
08
MEGA-PIXEL NETWORK CAMERA
• Extreme care should be taken NOT to scratch the surface of window while
the camera installing or adjusting.
• Care should be taken the cable is NOT to be damaged, kinked or exposed in
the hazardous area.
• Do not expose the camera directly to a strong light source such as the sun or
spot light.
CAUTION
Cover Open
Micro
SD Card Slot
Reset Button
LED Control Switch
POWER
CABLE
DUAL WINDOW
SUNSHIELD BOLT
SUNSHIELD
FRONT CASE
EASY
BRACKET
LOCK/UNLOCK
SCREW
BRACKET
REAR CASE

Installation Instructions
09
MEGA-PIXEL NETWORK CAMERA
1. Locate the mounting template at the installation position and drill the ceiling or
wall if needed. ( *The easy bracket can not be installed on the ceiling)
2. Place the easy bracket on pre-drilled position and fix it through using mounting
screws(4x30mm). Skip this step when an easy bracket is not installed.
3. Route the power cable to the connecting place.
Hook up the camera bracket with the easy bracket as illustrated below.
4. Fix the camera bracket through using assembly screws (4x15mm).
5. Set the camera’s viewing angle.
6. Put the sunshield to the camera unit and tighten the sunshield-bolts.
Torque Wrench
Assembly Screw
: 4x15mm
Mounting Screw
: 4x30mm
REAR VIEW
1
2
3
4
Cable exit

Installation Instructions
10
MEGA-PIXEL NETWORK CAMERA
• Unlock the screw on the camera bracket through using the torque wrench supplied
• Set the camera’s viewing angle then lock the screw on the bracket.
Pan & Tilt adjustments
1) Pan limit:
Pan is limited to +/- 90°.
3) Inclination limit
(Horizontal image alignment):
Inclination limited to +/-90° max.
2) Tilt limit:
Tilt is limited to 0°(2°) min ~ 90° max.
for wall(ceiling) installation respectively
with reference to the wall(ceiling) when
the inclination of camera module is 0°,
that is, the image is aligned horizontally.
90° 90°
88°
90°
±90°
• on the wall • on the ceiling
■Adjustment of viewing angle with a bracket
Torque
wrench
Lock/Unlock
Screw

Installation Instructions
11
MEGA-PIXEL NETWORK CAMERA
Installation and commissioning Instructions
• Make sure the power is removed before the installation.
• After all connections are finished properly, follow the order for applying power.
a) Plug the network cable into RJ-45 Ethernet Port.
If PoE is the unique power, there will be no need to connect Power terminal.
b) When DC12V or AC24V Local power is necessary, connect the low voltage
(DC12V or AC24V) first, then plug the AC adapter to AC outlets to avoid an
improper reset from power jitter and a damage from the surge voltage when
no load.
Power Supply Connections
Camera can work with either 24AC or 12VDC, dual voltage power and PoE
(IEEE Std. 802.3af). Primary and secondary grounds are completely isolated
to avoid the possible ground loop problems.
► When PoE and Local dual power are connected at the same time,
Local power has priority.
■ Attach the Signal Assignment Sticker
in a visible spot for wiring reference.
~24V/DC12V (RED)
~24V/GND (BLACK)
ALARM-IN (GREEN)
ALARM-OUT (BLUE)
GND (GRAY)
AUDIO-IN (BROWN)
GND (GRAY)
AUDIO-OUT (ORANGE)
Singnal Assignment
●Attach the sticker in a visible
spot for wiring reference.
~24V/ DC12V
~24V/GND
Alarm-In
Alarm-Out
GND
Audio-In
GND
Audio-Out
RCSS-142901A

Operating Instructions
12
MEGA-PIXEL NETWORK CAMERA
Setup Menu table
Category Menu
Configuration
LIVE VIEW
PLAYBACK
SETUP
Player Control
Video Stream
Protocol
PTZ Contol
Event Search, Timeline Search, Timeline Bar
Information
Video & Image
Audio
Record
Source
General, Open source Information
Stream1/2/3
Image
Display (Window Fit, Full Screen, Custom)
Stream1, Stream2, Stream3
HTTP, TCP, UDP
Zoom, Focus, Push AF
Pause, Snapshot, Speaker, Microphone, Record
Privacy Mask
Digital Zoom
Compression, Sample rate, Bitrate, Input Volume, Output Volume
Basic Brightness, Contrast, Saturation, Hue,
Sharpness, Enable flip image,
Enable mirror image
Mode, Shutter, Min/Max shutter, Gain,
Min/Max gain, Auto iris, Auto flicker-less
Enable text OSD, Enable date&time
OSD, Enable zoom&focus OSD, Mode
Mode, Cb Gain, Cr Gain
Mode, Level, Boundary Line
Mode, Rotation
WDR(Mode, Level), Defog(Mode)
BLC(Mode, Level), HLC(Mode)
2DNR(Mode, Level), 3DNR(Mode, Level)
Mode, Switching time, Threshold(D->N),
Threshold (N->D)
OSD
AE
Mode, Speed, Lens Locking, Locking
Timer, Lens Calibration,
Enable Day&Night sync focus
AF
AWB
Day&Night
WDR
BLC
DNR
LDC
VerticalView
Color, Name
Schedule
Record
Overwrite when storage is full,
Continuous record setting
Storage
Level
Format, Remove, Storage Information
Event
Motion, Tamper, Alarm In, System, Manual, Network
Record, Alarm Out, E-Mail, FTP, Video Boost
Actions
Triggers

Operating Instructions
13
MEGA-PIXEL NETWORK CAMERA
SETUP
Log out
Event
System
Language
User, HTTPS, IP Filter, ONVIF
Current Time, New Time, Time Zone, Date & Time
Display
TCP/IP, DDNS, RTP, UPnP, Zeroconf, Bonjour
English, Korean, Deutsch, French, Polish, Finnish
Maintain(Restart, Reset, Default), Upgrade,
Setup Export, Setup Import
System Log, Event Log, Report
Maintenance
Log & Report
Rules
Event Processing, ONVIF Mapping
Security
Date & Time
Network
Network Control menu Setup
■ SYSTEM Requirements
• OS : Windows 7 or higher / MAC OS
• Web browser :
- MS Internet Explorer
(Ver. 9 or higher)
- Mozilla Firefox : Windows Only
- Google Chrome : Windows Only
- Apple Safari : Mac OS X only
• Supports only officially released version.
The default user name / password
are ‘admin’.
1. After camera is connected with server, install the ‘IP MANAGER’ (enclosed CD),
its control is available via WEB.
2. Make sure the server is connected before accessing IP MANAGER.
3. After installing, double clicking IP MANAGER’s icon to start.
4. The Camera is automatically scanned when IP MANAGER is runnig.
5. If you double-click the model name on IP Manager, it goes to Login page.
6. Install Active-X. according to the instruction at the bottom of browser.
■ Log-in the Web-Viewer

Operating Instructions
14
MEGA-PIXEL NETWORK CAMERA
■ Change IP Address
The default IP address of cameras are 192.168.1.10.
If you want to change IP address, click right button of Mouse and there is
control panel. Type the IP address to change and click OK button.
F
Model Name: Show the connected camera models.
IP Adress: Show the IP adress of connected camera.
Version: Show the camera F/W version.
Chane IP: Available to change IP.
Quick View: Available to have Quick View after Login.
Login: Available to Login(admin/admin) and then Quick View.
Maintenance: Factory default/ Reset/Reboot are available.
Upgrade: Upgrade is available.
Web Browser: Go to Web browser.
A
B
C
D
E
G
H
I
■ IP MANAGER description
※ Change all connected camera’s IP address at once:
1) Click the models on the list with ‘Shift key’ then click right button of Mouse.
2) Open the Change IP control panel.
3) Type the IP address to change and click OK button.
4) Change all the selected camera IP address in serial order.
1
2
3
Stop Discovery Refresh Default Login S/W Version
AB C
D
E
F
G
H
I

Operating Instructions
15
MEGA-PIXEL NETWORK CAMERA
A) Menu button : Click the button to show or hide the setup menu bar.
B) Model name : Show a camera model name connected.
C) Select Language : Set the web viewer language English, Deutsch or French.
D) Main setup menu bar : Set the camera or network functions.
E) Camera monitoring window: Display the currently connected camera view or function.
F) Log out and exit the web viewer
■Web Viewer description
■Player Control
■Display
Pause: Freeze the current video.
Snapshot: Take a picture of the video image
currently on display. Supports the origin image
size view, print, and save feature.
Speaker: Enable or disable the speaker.
Microphone: Enable or Disable the microphone.
Record: Record the current video on display.
Window Fit: Display live view to fit the window size.
Full Screen: Expand the current windows into
maximum monitor size. Clicking ESC button or
right button on mouse to back to the normal view.
Custom: Move the control bar to make preferred
window size.
1 2 3 4 5
1
2
6
7
3
8
4
5
6
7
8
XXX-XXXXXXXXX-XX
A B
C
D
F
E

Operating Instructions
16
MEGA-PIXEL NETWORK CAMERA
■PTZ Control
Used to adjust zoom/focus manually or one-push focus
automatically.
1
2
3Push AF: When Push AF command is sent, camera
becomes Auto Focus mode to adjust focus position
for a while.
Focus: Adjusts camera image focus manually.
Zoom: Adjusts camera image zoom in/out ratio manually.
NOTICE * This option is activated Motorized lens / AF- Zoom lens model only.
* Enable lens locking after completing zoom/focus setting.
[ Setup> Video&Image> Image> AF]
*
Do not adjust zoom/focus at low light condition, night mode.
It might cause erroneous focusing.
*
Please adjust zoom/focus for installation purpose only.
*
Frequent zoom/focus adjustment affect to the lifetime of lens.

Operating Instructions
17
MEGA-PIXEL NETWORK CAMERA
The Information shows the camera basic information such as Model name, MAC
address, IP address, Zeroconf IP address and Firmware version.
1-1. Information
1-2. Users
1-2-1. Add
User accounts can be added or modified or removed. The authority depends upon user
group automatically and shows the permission status to access the menus.
Click the Add, Edit, or Delete button for managing user account.
• Name: Shows the name which registered to access the camera.
• Group: Shows the assigned permission given to users.
• Authority: Shows the permission status to access the menus.
To add a new user:
1. Click the Add tab, and type a new user name. (1 to 14 alphanumeric characters).
• User names are not case sensitive.
Quick Setup
XXX-XXXXXXXXXX
3.2.7.45-XXX

Operating Instructions
18
MEGA-PIXEL NETWORK CAMERA
2. Type a password and retype confirm password. (1 to 8 alphanumeric characters).
• Passwords are case sensitive.
3. Select one of the groups you wish to assign to the user.
4. Click the OK button to save the settings and add a new user
1-2-3. Delete
To delete a user:
1. Select one of the User Names in the User List you want to remove.
2. Click the Delete tab. A dialog box appears with confirmation message.
3. Click the OK button. The user profile is removed from the User List profile.
1-2-2. Edit
To edit a user:
1. Select one of the User Names in the User List you want to modify.
2. Click the Edit tab, then new pop-up window appears.
3. Type a password (1 to 8 alphanumeric characters) and retype confirm password.
• The user name can’t be modified.
4. Select one of the groups you wish to assign to the user.
5. Click the OK button to save the settings and modify a user.
1-3. Date & Time
1-3-1. Current Time
Shows the current date and time.
1-3-2. New Time
Select one of the server time.
• Synchronize with computer time:
Sets the time according to the clock on your computer.
• Set manually: Using this option allows you to manually
enter the date and time.

Operating Instructions
19
MEGA-PIXEL NETWORK CAMERA
1-3-3. Time Zone
Select the time zone where your camera is located. Click the "Automatically adjust
for daylight saving changes" checkbox to automatically update the time changes
caused by daylight saving.
• Time zone: The default setting is GMT.
1-3-4. Day & Time Display
Select one of the Date and Time format.
• Date Format: The default setting is YYYY-MM-DD.
• Time Format: The default setting is 24 hours.
• Synchronize with NTP Server:
This option will obtain the correct time from an NTP server every 60 minutes.
The NTP server's IP address or host name is specified in the time server.

Operating Instructions
20
MEGA-PIXEL NETWORK CAMERA
* For more details, refer to enclosed CD.
1-4. Network
The DHCP (Dynamic Host Configuration Protocol) server has a feature that
automatically assigns an IP address to the device if there is a device on the
network.
> Obtain IP address via DHCP :
Select the choice box if you want to assign the IP address from DHCP server
automatically, and then the remaining setting are read-only text.
> Use the following IP address:
Select the choice box if you want to assign the IP address manually.
- IP address:
The address of the camera connected to the network. Specify a unique IP
address for this network camera.
- Subnet mask:
The address that determines the IP network that the camera is connected to
(relative to its address). Specify the mask for the subnet the network camera
is located on.
- Gateway:
The gateway that accesses other networks. Specify the IP address of the
default router (Gateway) used for connecting devices attached to different
networks and network segments.
Table of contents
Other Ronix Security Camera manuals