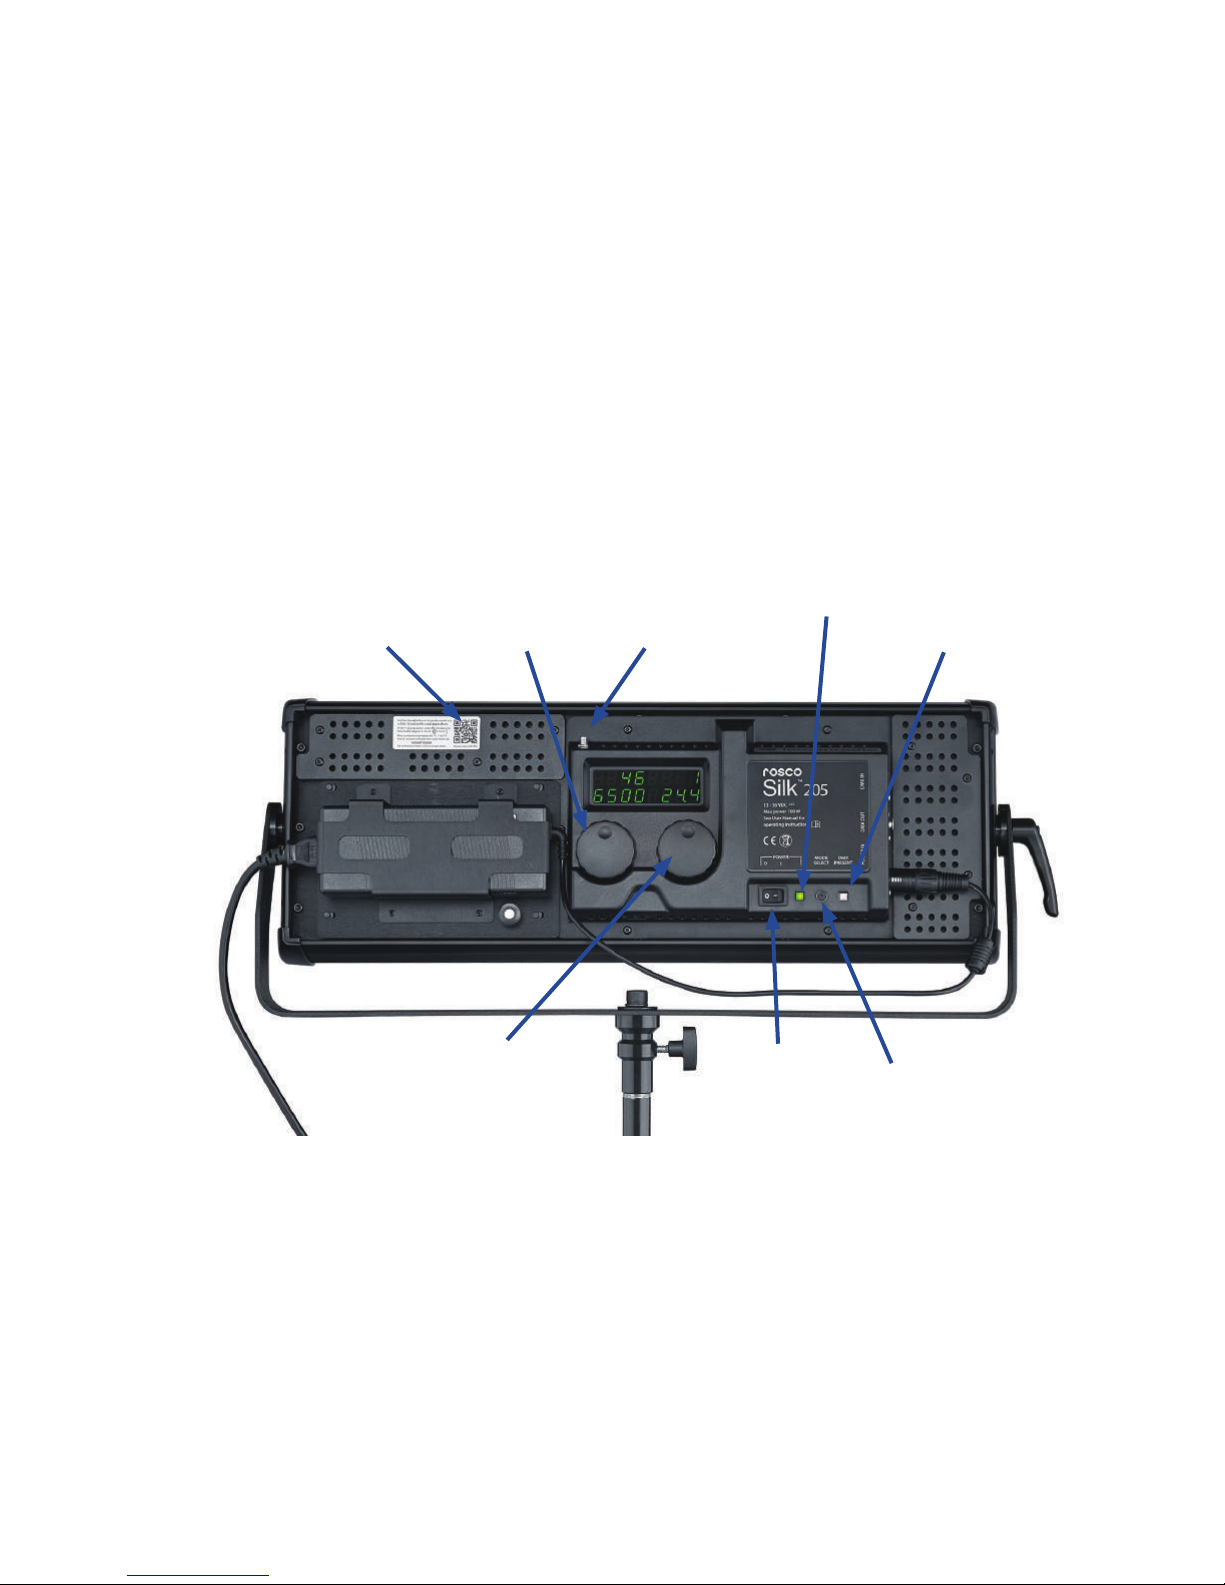
Rosco silk User manual

PLEASE READ & SAVE THESE ORIGINAL INSTRUCTIONS
User Guide
Silk®
www.rosco.com/silk
pure, soft white light

2

3
TABLE OF CONTENTS
Introduction .................................................................................................................................................................4
Important Safeguards..............................................................................................................................................5
Unpacking .....................................................................................................................................................................8
Controls ........................................................................................................................................................................ 9
Operation................................................................................................................................................................... 10
Power On ................................................................................................................................................................... 11
Manual Control........................................................................................................................................................ 12
Menu Summary ....................................................................................................................................................... 13
DMX Control ........................................................................................................................................................... 25
Specifications ................................................................................................................................................... 39-53
Accessory Mounting..............................................................................................................................................54
Updating Firmware ................................................................................................................................................56
Troubleshooting ...................................................................................................................................................... 57
Warranty .................................................................................................................................................................... 62
Silk®User Guide - Copyright ©2017 by Rosco
User Guide
Information and specifications in this document are subject to change without notice. Rosco assumes no responsibility or liability for any errors or inaccuracies that may appear in this
manual. Rosco logo and Silk®are trademarks of Rosco. Other trademarks and trade names may be used in this document to refer to products by other entities. Rosco claims no proprietary
interest in trademarks and trade names owned by others. Rosco provides this manual ‘as is’ without warranty of any kind, either expressed or implied, including but not limited to the
implied warranties or merchantability and fitness for a particular purpose. Rosco may make improvements and/or changes to the product(s) and/or the program(s) described in this
publication at any time without notice.

4
INTRODUCTION
Congratulations on your purchase of a Rosco Silk LED fixture. Engineered to meet the requirements of the
most discerning filmmaker, the Silk series LED lighting system has been specifically developed for film and video
applications that demand extremely color-accurate, high-quality light.
Your new Silk fixture will create a high volume of enticingly soft, broad spectrum white light utilizing
state-of-the-art tungsten and daylight balanced LEDs. Silk LED fixtures feature a non-glare diffuser that provides
uniform, single-source light that gently embraces its subjects, making it the perfect fixture for illuminating feature
films and television productions, on stage or on location.

5
IMPORTANT SAFEGUARDS
The symbols below are used throughout this manual to identify important safety information.
Heed all warnings and safety information.
PREVENTING ELECTRIC SHOCK
•Thisfixtureusesmainselectricalpowerat100-240VAC.Whendirectlycontacted,suchvoltagesare
hazardous to human life. Follow all local electrical codes and take precautions when using this product.
•Thisproductisdesignedtooperatefromthree-wirepowersystems,whereoneofthewiresisasafety
ground. DO NOT disconnect the safety ground, or use extension cords or adapter plugs to connect this
machine to a two-wire system. Operation without a safety ground may result in hazardous electrical shock.
•UseonlyextensioncordsthatareofappropriatelengthandareratedforSilk®specified voltage
and current. If an extension cord shows signs of wear or gets warm to the touch, discontinue its use and
obtain a cord with a higher current rating. Improper extension cords are hazardous and may result in poor
performance due to excessive voltage drop.
•Disconnectfixturefrompowersourcebeforeservicingandwhennotinuse.
SYMBOL MEANING
WARNING, DANGER OR CAUTION
Risk of injury to yourself or the product
RISK OF ELECTRICAL SHOCK
Risk of severe electrical shock

6
IMPORTANT HEALTH & SAFETY INFORMATION
Silk lighting fixtures use high strength magnets on the front face
Do not place within 12” (300mm) of credit cards
Magnets can adversely affect heart pacemakers
MAINTAINING SAFE OPERATION
• UseonlyRoscosparepartsandaccessoriessoastonotvoidthewarranty.
• Allowthefixturetocoolbeforeattemptingtoservice.Silk LED fixtures must only be serviced by a qualified
technician.
• SilkLEDfixturesarenotintendedforresidentialuse.Useonlyinaprofessionalstudioormobilebroadcast
environment by trained personnel under proper training and supervision. Keep out of reach of children.
Children shall be supervised to ensure that they do not play with the fixture.
• SilkLEDfixturesarecapableofreachingamaximumsurfacetemperatureof185°F(85°C).Keepminimum
4” (10cm) distance away from flammable materials/ objects. The top of the unit may become hot to the touch
during operation. Contact during or immediately following operation may result in burns.
• SilkLEDfixturesareIP20rated–forindooruseand/oradryenvironment.Donotoperateoutdoorsin
a wet environment.

7
MAINTAINING SAFE OPERATION
• SilkLEDfixturesarenotcertifiedforuseinhazardouslocations.
• SilkLEDfixturesaredesignedforoperationwithintherangeof32°to95°F(0°to+35°C).
• EnsureSilkLEDfixturesarestoredwithintherangeof-4°to140°F(-20°to+60°C).
• DonotlookdirectlyintoaSilkLEDfixtureforlongperiodsoftime,asprolongedexposuremaybeharmfulto
the eyes.
• Highvoltageandstoredenergymaybepresentinsidethefixture.Onlytrainedservicepersonnelshould
engage in repairs.
• Theuseofasafetycableisstronglyrecommendedwhenhungoverhead.Therearesafetywiremounting
ports in the extruded sides in all four corners.
• Whensuspendedontheyoke,theyokecannotbeusedasmountingpointforsecondarysafetycable.
• Allventilationholesinthebackplatemustremainclearandarenottobeobstructedduringtheoperationof
the fixture.
• Thisfixtureisnotintendedforusebypersons(includingchildren)withreducedphysical,sensoryormental
capabilities, or lack of experience and knowledge, unless they have been given supervision or instruction
concerning use of the appliance by a person responsible for their safety.

8
UNPACKING
Carefully remove the fixture from the box.
If there are any signs of physical damage to the fixture, contact your local Rosco dealer.
Your Rosco Silk LED fixture will arrive with a power supply detached from the fixture in the box.
Safety cables must be securely be attached using the designated slots on the Silk fixture (detailed on page 54)
and be as short as possible to reduce travel distance if primary hanging accessory fails. The combined weight of
fixture and accessories should be considered when choosing a suitable safety cable.
Ensure that the yoke locking handle is correctly tightened after positioning Silk. If the locking handle is not
tightened correctly, the fixture may swing.
Silk 205 and Silk 305 are supplied with a right-angle mini-USB cable for future firmware updates.

9
CONTROLS
SilkLEDxturescanbecontrolledviatheon-board,ControlPanellocatedonthebackofthexture,
or via user-supplied DMX512 data input.
REAR CONTROL PANEL
Right Rotary Knob:
Controls color temperature and accesses
pre-sets with a push button. Also used
during menu and DMX address selection.
Left Rotary Knob:
Controls light
intensity
Green Indicator LED:
Power
Power Switch
DMX/MODE SELECT
Button to select DMX
address and access menus.
The QR code will take you to the
Silk web page on the Rosco web
sitewhereyouwillndthelatest
Mount for external
wireless antenna Blue Indicator LED:
DMX signal present
manual PDF
and application
notes.

10
OPERATION
POWERING ON
1. Silk LED fixtures are supplied with a standard
100-240VACswitchingpowersupply,whichis
mounted in a cradle on the rear of the unit. A lead with
a 4 - pin XLR connector brings DC power from the
power supply to the Silk.
a.SilkLEDfixturescanbepoweredbyV-Mount
batteries. Remove the power
supply and cradle, and then replace it
withanoptionalSilkV-MountCheeseplate
Battery Holder.
b. Silk LED fixtures can be powered by Anton/Bauer
batteries. Remove the power supply and cradle,
and then replace it with an optional Silk Anton/
Bauer Cheeseplate Battery Holder.
2. Make sure the 4-pin XLR connector from the power
supply is plugged into the Silk, and then plug the
powersupplyintomainspower:100–240VAC.
Then switch on the unit with the rocker switch on
the User Interface.
a. The rear display will illuminate.
b. Settings will default to those in use when
the unit was last powered down.
3. If desired connect the Silk LED fixture to a DMX
console using the 5-pin XLR ports on the rear
control panel.
a. The presence of a DMX input signal is
automatically detected.
b. The Blue Indicator LED will illuminate.
DISPLAY
Top Left Dimming percentage
Top Right DMX address
Bottom Left Color temperature
Bottom Right Input DC voltage
NOTE:
If the input voltage drops
below 13.5V, the input voltage will
ash. (Only applies to 110, 210 and
205

11
POWER ON
Attach the power supply to the back of the unit and plug the XLR 4 connector into the fixture. Plug the IEC
connector into the power supply. Turn fixture on using the toggle switch on the Control Panel.
Safety cables must be securely attached to the designated slots on the Silk fixture (detailed on page 54) and be as
short as possible to reduce travel distance if primary hanging accessory fails. The combined weight of fixture and
accessories should be considered when choosing a suitable safety cable.
Ensure that the yoke locking handle is correctly tightened after positioning Silk. If the locking handle is not
tightened correctly, the fixture may swing.
INFORMATION
Silk LED fixutres have a digital serial number and firmware version, which is viewable on the initial LED display
load screen.
This information is also accessible by pressing and holding down the DMX/MODE/SELECT button.
The display will revert to default once the button is released or with momentary push.

12
MANUAL CONTROL
1. Select the output level of the fixture by rotating the left-hand knob until the desired set point has been
achieved. The current set point will be shown in the upper left-hand portion of the display.
2. Select the color temperature of the fixture by rotating the right-hand knob until the desired set point has been
achieved.
a. Silk LED fixtures can be set to color temperatures ranging from 2800K to 6500K.
b. The current set point will be shown in the lower left portion of the LED display.
c. Seven pre-set color temperatures are stored in the fixture’s control logic.
Push the right-hand knob to choose the desired pre-set color temperature:
Preset Chart:
2900K 3200K 3600K 4300K 5000K 5600K 6500K
NOTE: The rear LED display will automatically dim after several seconds if no inputs have been entered. The display will
resume full illumination when the controls are operated.

13
SILK®LED V2 MENUS
Silk LED v2 has a range of additional menu choices to reach additional functionality.
•8or16bitdimming
•Dimmingcurves
•DMXmodes
•Colorprofile
•Outputprofile
•Wirelessantennaselect
•Link/unlinkwireless
To return all settings to default, turn the unit on with the DMX/MODE button pressed
Navigation in the menus uses parameter and choice using 1.1, 1.2, 2.1, 2.2 etc and an ALPHA abbreviation.

14
MENU
DMX Address
8 bit/16 bit dimming
DMX mode
Dimming curve
Color prole
Output prole
Antenna selection
Wireless link
1-511/510
8 bit
16 bit
Linear
Square Law
S curve
Tungsten
Standard
Linear
Standard
Flat
Internal
External
Locked
Unlink
Standard DMX
Wireless DMX
Silk is DMX master
8bit
16bit
StA
rAd
Con
Lin
Squ
S
CCt
StA
Lin
StA
FLA
Int
EtE
Loc
UnL
To return all setting to standard defaults — hold down the MODE SELECT button while switching the unit on.
All defaults will be selected.

15
8 OR 16 BIT DIMMING CONTROL OPTION
DMX dimming is now possible in 8 bit or 16 bit mode. 8 bit dimming uses one channel of DMX and therefore the
only possible resolution is 256 discrete steps. With 16 bits a fixture can have 65536 steps. Whilst it would be
impossible for the human eye or a camera set up to discern all the steps it does provide potential for smoother
dimming. When it 16 bit mode, Silk uses 3 channels of DMX; dimming coarse, dimming fine, CCT.
1.1 8 bit dimming 1.2 16 bit dimming

16
CHOICE OF THREE DMX MODES
•Standard DMX (StA)
In standard DMX mode, Silk uses 2 channels of DMX to control intensity and colour temperature and also
conforms to Last Takes Precedence Protocol so ‘on set’ or ‘desk control’ can modify settings on the fixture. Silks
can be daisy chained with 5 pin XLR connectors.
•Wireless DMX (rAd)
This mode allows the fixture to be controlled via wireless DMX with the Lumen Radio wireless module.
When in wireless DMX mode, Silk can still be daisy chained to other fixtures not in wireless mode.
Note: The Lumen Radio chip offers over-the-air firmware upgrades, as well as a UF.L connector for external antenna. TiMo
is fully compliant with the ETSI EN 300328 (v1.8.1) ‘2015’ revision, as well as fully FCC certified with a modular approval
to 300mW. The chip is fully compatible with all existing CRMX transmitters, as well as transmitters from Wireless Solution
running in G2, G3, G4 or G4S 2.4GHz mode, enabling a single wireless component to maximize compatibility within fixtures.
•Silk is DMX master (Con)
In this mode, a Silk can control other Silk’s on set with common base address. That way in a small wired set up, one
with limited crew, the overall light level or CCT can be adjusted from one master unit.
NOTE: When the Silk is in wireless mode, also behaves as a wired master; other fixtures wired downstream will
receive DMX. So a wireless Silk can act as a hub.

17
2.1 Standard DMX
2.3 Silk is DMX Master (Controlling)
2.2 Wireless DMX

18
CHOICE OF FOUR DIMMING CURVES
•Linear (Lin) In Linear mode an address of 127 = 50% Dim. Because single channel DMX is only 8 bit (0-255),
the lower end of the Dim curve has the same increment as the higher end.
•Square law (Squ) A square law curve applies a multiple derived from the square root of the control level (with
full output equal to 1.00) to increase voltage response at low control levels to compensate for the infrared
loss in a tungsten fixture.
•S curve Greater resolution at low end and high end, compressed in the middle
•Tungsten (CCt) Tungsten emulates the CCT shift seen as traditional tungsten fixtures are dimmed.
Tungsten mode works at all colour temperatures and starts warming up when dimming below 50%. A
“t” will appear on the LED display after the colour temperature as the CCT displayed will no longer be an
accurate reflection of output.
NOTE: SomedesksdesignedforLEDxtureshavecurvesbuiltin.ItisimportanttoensurethatyourSilk
xtureisinlinearmodewhenimposinganadditionalcurvefromadesktoavoidcompoundandconfusingoutput
performance.

19
3.1 Linear
3.3 ‘S’ curve 3.4 Tungsten
3.2 Square law

20
CHOICE OF TWO COLOR PROFILES
Standard has the CCT relate to a percentage on the DMX board in 1% steps, i.e. 100K
0–28% = 2800K
32% = 3200K
50% = 5000K
65% - 100% = 6500K
Linear mode has the CCT divided equally on channel 2 from
0 = 2800K
100 = 6500K
4.1 Standard 4.2 Linear
Table of contents
Other Rosco Camera Accessories manuals