Rosewill RHRC-17001 User manual


2

3
DO NOT DRAPE CORD!
KEEP AWAY
FROM CHILDREN!

4
Inner Cooking Pot
Steam Tray
Measuring
Cup
Serving Spatula
Handle
Condensation
Collector
Lid Release
Button
Lid
Steam Vent
Digital Control
Panel
Digital Display
Digital Controls
Slow Cook
The SLOW COOK button sets for 2-10 hours for perfectlycooked soups and stews.
Sauté-And-Stew
Technology will sauté foods at a high heat and automatically switch over to its stew mode once liquid
is added.
White Rice
The WHITE RICE button cooks restaurant-quality rice automatically.
Quick Rice
The QUICK RICE button is a great time-saving option for rice in a pinch.
The STEAM button is perfect for healthy sides and main
Steam
once time has elapsed.
Power Button/Keep-Warm
The POWER/KEEP-WARM button turns the rice
warm and ready to serve.
Delay Timer
The DELAY TIMER button allows for rice to be ready when it’s needed. Come home to delicious
rice ready to eat!
Brown Rice
The BROWN RICE button is ideal for cooking brown rice and other tough-to-cook whole grains to
perfection.
courses. Set the time food needs to steam
and it will shut off

5
NOTE
The provided rice cooker
cup is the equivalent to
a ¾ standard US cup.
3/4
US cups
HELPFUL
HINTS
41 32
Using the provided measuring cup,
add rice to the inner cooking pot.
Place the inner cooking pot into the
rice cooker.
Fill with water to the line which
matches the number of cups of rice
being cooked.
Rinse rice to remove excess starch.
Drain.
NOTE
HELPFUL
HINTS

6
9 10
The rice cooker will now begin
cooking. The digital display will show
a chasing pattern.
The rice cooker will countdown
the minutes of cook time (12
minutes for white rice and brown
rice).
13
When serving rice, turn
the rice cooker by pressing the
POWER button twice and unplug the
power cord.
1211
For best results, stir the rice with
the serving spatula to distribute any
remaining moisture.
Once rice is the rice cooker
will beep and automatically switch to
Keep-Warm.
Plug the power cord into an available
wall outlet.
7 865
Press the POWER button to turn on
the rice cooker.
Press the WHITE RICE or BROWN
RICE button, depending upon the
type of rice being cooked.
Close the lid securely.
NOTE
NOTE
HELPFUL
HINTS

7
The rice produced by the Quick Rice function will not be to the same quality as
rice made using the White Rice or Brown Rice settings, but it’s an excellent
option for cooked rice in a pinch.
To use the Quick Rice function, follow the steps for To Cook Rice beginning on page 5. Rather than
pressing one of the standard rice function buttons, press the Quick Rice button. The rice cooker will
If cooking brown rice, add an additional 1½ cups water, using the provided measuring cup, to
compensate for the lack of soaking time. The included measuring cup is equal to a standard ¾ US cup.
WHITE RICE
UNCOOKED CUPS*
COOKING TIME WITH
QUICK RICE
FUNCTION
APPROX. TIME SAVINGS
COMPARED TO WHITE
RICE FUNCTION
2 Rice Cooker Cups* 17-22 Min. 15 Min.
4 Rice Cooker Cups* 22-27 Min. 15 Min.
6 Rice Cooker Cups* 27-32 Min. 15 Min.
BROWN RICE
UNCOOKED CUPS*
COOKING TIME WITH
QUICK RICE
FUNCTION
APPROX. TIME SAVINGS
COMPARED TO BROWN
RICE FUNCTION
2 Rice Cooker Cups* 38-43 Min. 25 Min.
4 Rice Cooker Cups* 44-49 Min. 35 Min.
6 Rice Cooker Cups* 46-51 Min. 40 Min.
Cups referrenced are with the included measuring cup. The measuring cup included adheres to rice cooker
industry standards and is not equal to a standard
*
U.S. measuring cup. If cooking brown rice, add an additional 1½ cups water, using the provided measuring
cup, to compensate for the lack of soaking time.
The included measuring cup is equal to a standard ¾ US cup.
NOTE
*1 Rice Cooker Cup = ¾ US Cups
S
HELPFUL
HINT
UNCOOKED RICE RICE WATER LINE INSIDE POT APPROX. COOKED RICE YIELD COOKING TIMES
2 Rice Cooker Cups*4 Rice Cooker Cups* WHITE RICE: 30-35 Min.
BROWN RICE: 65-70 Min.
3 Rice Cooker Cups*6 Rice Cooker Cups* WHITE RICE: 32-37 Min.
BROWN RICE: 75-80 Min.
4 Rice Cooker Cups*8 Rice Cooker Cups* WHITE RICE: 34-39 Min.
BROWN RICE: 80-85 Min.
5 Rice Cooker Cups* 10 Rice Cooker Cups* WHITE RICE: 38-43 Min.
BROWN RICE: 85-90 Min.
6 Rice Cooker Cups* 12 Rice Cooker Cups* WHITE RICE: 40-45 Min.
BROWN RICE: 88-93 Min.
2 Cups
3 Cups
4 Cups
5 Cups
6 Cups
*1 Rice Cooker Cup = ¾ US Cups

8
Open the lid to check food for
doneness. If fully cooked, remove
food for serving.
11
The rice cooker will begin to slow
cook. The digital display will count
down in one hour increments from
the selected time.
9
Once the selected time has passed,
the rice cooker will beep and switch
to “Keep-Warm” mode. The digital
display will show the number of
hours the rice cooker has been on
“Keep-Warm,” beginning with “0.”
10
Once cooking time is selected, the
rice cooker will beep to indicate it is
setting at the displayed time. It will beep
once more and the display will stop
to
indicate
cooking has begun.
8
Each press of the Slow Cook button
will increase the slow cook time by
one hour from 2 to 10 hours.
7
turn the rice
POWER/
When serving,
cooker by pressing the
KEEP-WARM button and unplug the
power cord.
12
NOTE
NOTE
65
Press the Slow Cook button.Press the POWER/KEEP-WARM
button to turn the rice cooker on.
4
Plug the power cord into an
available outlet.
1 32
Add food to be slow cooked to the
inner cooking pot.
Close the lid securely.Place the inner cooking pot into the
slow cooker.

9
For best results, stir the rice with
the serving spatula to distribute any
remaining moisture.
When serving rice, turn
the rice cooker by pressing the
POWER button twice and unplug the
power cord.
87
Once rice is the rice cooker
will beep and automatically switch to
Keep-Warm.
65
The rice cooker will countdown
the minutes of cook time (12
minutes for white rice and brown
rice).
NOTE
HELPFUL
HINTS
NOTE
41 32
Press the DELAY TIMER button.
Each press increases in one hour
increments. It may be set to have
rice ready in 1 to 15 hours.
Once rice begins cooking, the digital
display will show a chasing pattern.
The digital display will countdown
from the time selected.
Once the needed time is selected,
press the WHITE RICE or BROWN
RICE button, depending on the rice
being cooked.

10
cord.
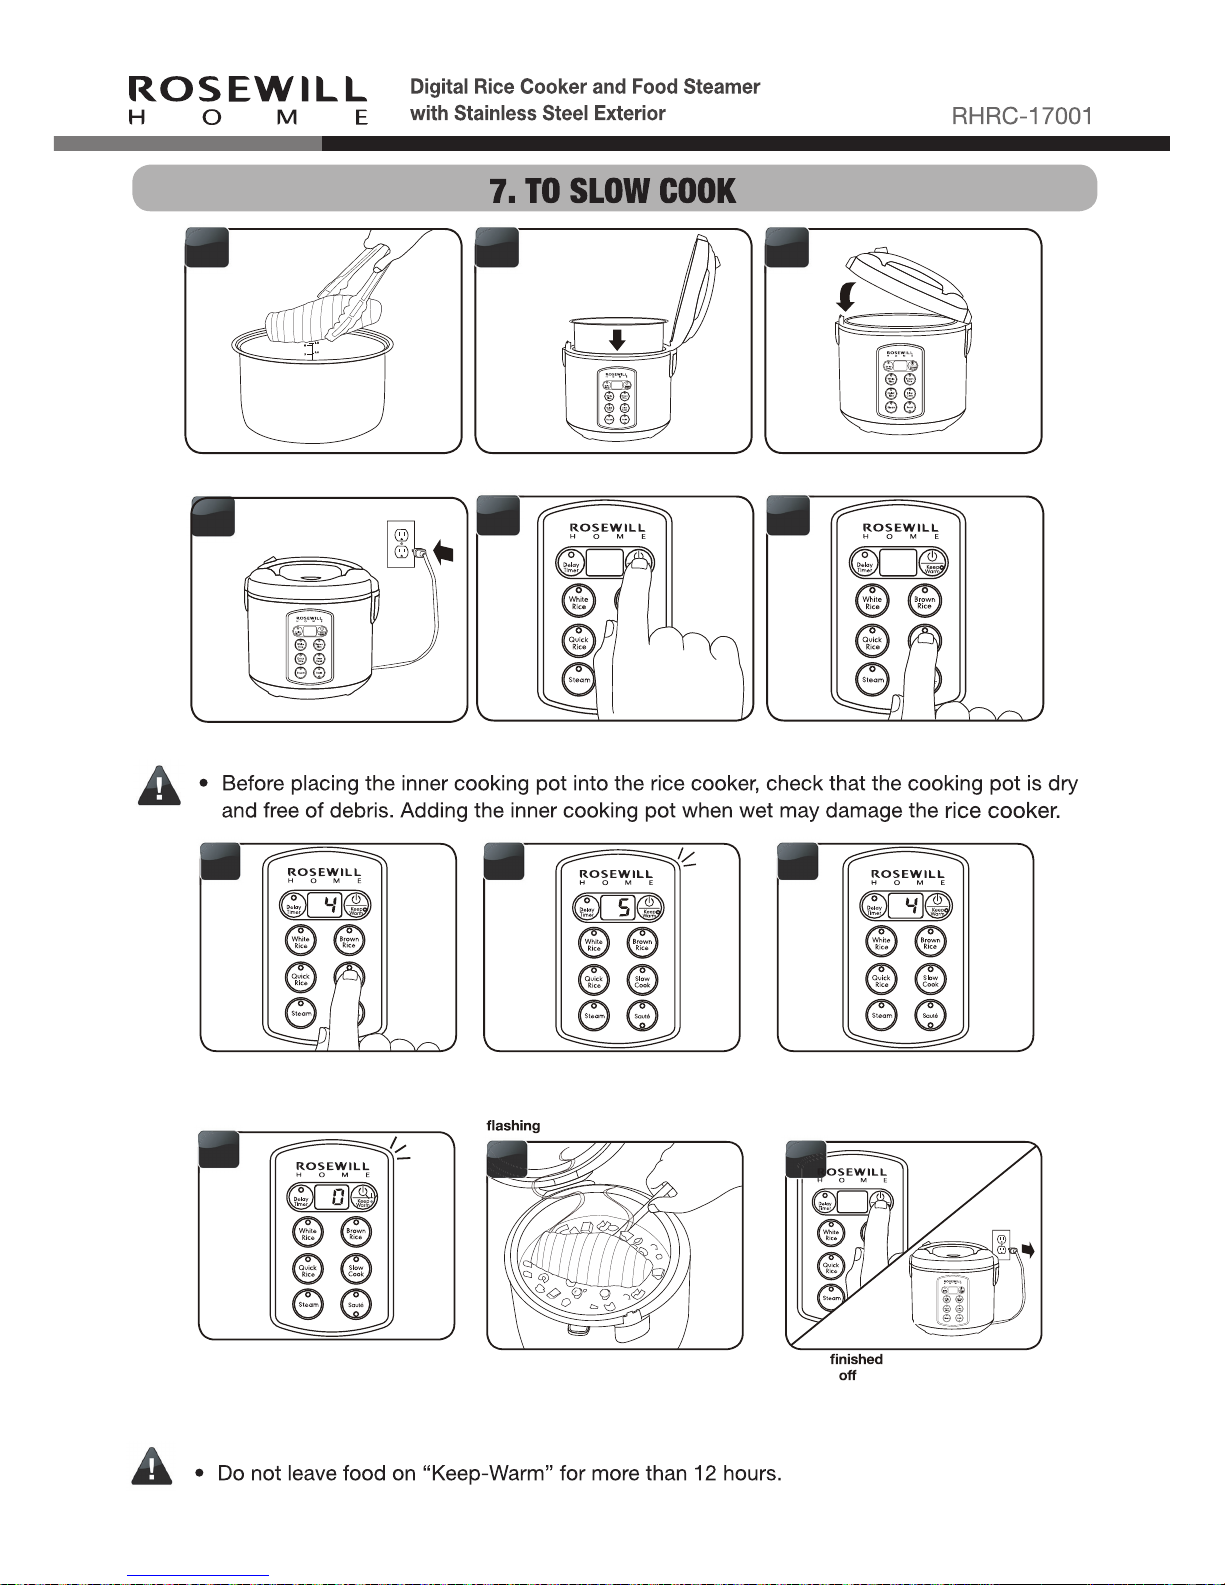
After a few minutes, the rice cooker
will automatically switch to stew.
9
Once the meal has cooked, the rice
cooker will beep and automatically
switch over to Keep-Warm.
10
When serving, turn the rice
cooker by pressing the POWER
button twice and unplug the power
11
Using a long-handled wooden
spoon, stir ingredients until sautéed/
browned to the desired level.
Add other called for ingredients and
liquid to the inner cooking pot.
7
Close the lid securely and allow the
rice cooker to cook.
86
Press the SAUTÉ button to begin
sautéing.
5
CAUTION
X
Add ingredients to be sautéed/
browned to the inner cooking pot.
Press the POWER button to turn on
the rice cooker.
Plug the power cord into an available
outlet.
Place the inner cooking pot into the
rice cooker.
41 32
NOTE

11
Using a long-handled wooden
spoon, stir ingredients until sautéed/
browned to the desired level.
Press the KEEP-WARM button to
switch the rice cooker to Keep-
Warm.
When sautéing, turn the rice
cooker by pressing the POWER
button twice and unplug the power
cord.
786
Press the SAUTÉ button to
begin sautéing.
5
Add ingredients to be sautéed/
browned to the inner cooking pot.
Press the POWER button to turn on
the rice cooker.
Plug the power cord into an available
outlet.
Place the inner cooking pot into the
rice cooker.
41 32
CAUTION
X

12
Using the provided measuring
cup, add 3 cups water to the inner
cooking pot.
Place the steam tray into the rice
cooker.
Place food to be steamed onto the
steam tray.
Place the inner cooking pot into the
rice cooker.
41 32
Plug the cord into an available
outlet.
Press the POWER button to turn on
the rice cooker.
7
Press the STEAM button.
The digital display will show a
5 to represent minutes
of steam time.
86
Close the lid securely.
5
9
Each press of the STEAM button
will increase steaming time by
one minute, up to 30 minutes. After
30 minutes, it will cycle back to
Once the needed time is selected, the
rice cooker will beep to indicate it is
setting at the displayed time. It will
beep once more and the display will
10 11
Once the water reaches a boil, the
digital display will countdown in
one minute decrements from the
selected time.
12
Once the selected time has passed,
the rice cooker will beep and switch
to Keep-Warm.
13
Check steamed food for doneness.
If steaming, remove food
immediately to avoid overcooking.
14
When steaming, turn the
rice cooker by pressing the
POWER button twice and unplug the
power cord.
HELPFUL
HINTS
NOTE

13
If food is steaming, remove
steam tray.
When serving rice, turn
the rice cooker by pressing the
POWER button twice and unplug the
power cord.
Allow the rice cooker to continue
cooking rice.
7
Once rice is the rice cooker
will beep and automatically switch to
Keep-Warm.
8
6
10
Using caution, open the lid to check
food for doneness.
For best results, stir the rice with
the serving spatula to distribute any
remaining moisture.
5
9
Place food to be steamed onto the
steam tray.
Close the lid securely.Place steam tray into the rice
cooker.
Using caution to avoid escaping
steam, open the lid.
41 32
NOTE
NOTE
HELPFUL
HINTS

14
MEAT STEAMING TIME SAFE INTERNAL
TEMPERATURE
Fish 25 Min. 140˚F
Chicken 30 Min. 165˚F
Pork 30 Min. 160˚F
Beef
Medium = 25 Min.
Medium-Well = 30 Min.
Well = 33 Min.
160˚F
Meat SteamingTable
Plug the cord into an available
outlet.
4
Add ingredients to the inner cooking
pot.
Close the lid securely.Place the inner cooking pot into the
rice cooker.
1 32
NOTE
CAUTIO
HELPFUL
HINTS
NOTE
When steaming, recommends using 3 cups of water with the provided measuring cup.
Vegetable Steaming
Ta
ble
VEGETABLE STEAMING TIME
Asparagus 9-11 Minutes
Broccoli6 -8 Minutes
Cabbage 5-7 Minutes
Carrots 11-13 Minutes
7-9 Minutes
Corn on the Cob 12-16 Minutes
Green Beans 9-11 Minutes
Peas 4-6 Minutes
Potatoes 28-33 Minutes
Spinach 2-4 Minutes
Squash 9-11 Minutes
Zucchini 9-11 Minutes

15
NOTE
NOTE
Remove the steam vent.
Wipe rice cooker body clean with a
damp cloth.
Handwash the inner cooking pot and
all accessories or wash them in the
dishwasher.
Remove the condensation collector.
4
132
Thoroughly dry rice cooker body and
all accessories.
Reassemble for next use.
5 6
Press the QUICK RICE button to
begin cooking.
Once cooking is complete, press the
KEEP WARM button to switch the
rice cooker to Keep-Warm.
9
When serving, turn the rice
cooker by pressing the POWER
button twice and unplug the power
cord.
10
The cooker will now begin cooking
and the digital display will show a
chasing pattern.
7
Using caution to avoid escaping
steam, open the lid and stir
occasionally with a long-handled
wooden spoon.
8
6
Press the POWER button to turn on
the rice cooker.
5

16
Rice is too dry/hard after cooking.
If your rice is dry or hard/chewy when the rice cooker switches to Keep-Warm, additional water and cooking time
will soften the rice. Depending on how dry your rice is, add ½ to 1 cup of water and stir through. Close the lid and
press the QUICK RICE button. When rice cooker switches to Keep-Warm, open the lid and stir the rice to check the
consistency. Repeat as necessary until rice is soft and moist.
Rice is too moist/soggy after cooking.
If your rice is still too moist or soggy when the rice cooker switches to Keep-Warm, use the serving spatula to stir
the rice. This will redistribute the bottom (moistest) part of the rice as well as release excess moisture. Close the lid
and allow to remain on Keep-Warm for 10-30 minutes as needed, opening the lid and stirring periodically to release
excess moisture.
The bottom layer of rice is browned/
caramelized.
The bottom layer of cooked rice may become slightly browned and/or caramelized during cooking. To reduce
browning, rice should be rinsed before cooking to remove any excess starch. Stirring rice once it switches to
Keep-Warm will also help to reduce browning/caramelizing.
desired consistency.
Technical Support Information
[email protected] 1-800-575-9885
Thank you for purchasing a quality Rosewill product.
Please register your product at : www.rosewill.com
for complete warranty information and support for
your product.
Table of contents
Other Rosewill Rice Cooker manuals