ROSSO MOTORS E-QUAD Q User manual

ROSSO E-QUAD Q
ELECTRIC ATV
OWNERS MANUAL - EN
PRIOR TO FIRST USE, READ THIS MANUAL COMPLETELY AND ATTENTIVELY! IMPERATIVELY FOLLOW THE SAFETY INSTRUCTIONS!
NONOBSERVANCE CAN LEAD TO PERILOUS INJURIES! CAREFULLY KEEP THIS MANUAL!

PLEASE INSPECT YOUR EQUAD Q UPON ARRIVAL AND REPORT ANY
DAMAGES THAT MAY HAVE OCCURRED DURING SHIPPING
General information:
⚠
WARNING: Riding an electric ATV can be dangerous. Like other electric products, electric
ATVs can and are intended to move, and it is therefore possible to lose control, fall off
and/or get into dangerous situations that no amount of care, instruction or expertise can
eliminate. If such things occur you can be seriously injured or die, even when using safety
equipment and other precautions.
⚠
RIDE AT YOUR OWN RISK AND USE COMMON SENSE.
This manual contains many warnings and cautions concerning the consequences of failing to
maintain, inspect or properly use your electric ATV. Because any incident can result in
serious injury or even death, we do not repeat the warning of possible serious injury or
death each time such a possibility is mentioned.
APPROPRIATE RIDER USE AND PARENTAL SUPERVISION IS REQUIRED
This manual contains important safety information. It is your responsibility to review this
information and make sure that all riders understand all warnings, cautions, instructions and
safety topics and assure that young riders are able to safely and responsibly use this product.
Rosso Motors recommends that you periodically review and reinforce the information in this
manual with younger riders, and that you inspect and maintain your children’s electric ATV
to insure their safety. A parent’s decision to allow his or her child to ride this product should
be based on the child’s maturity, skill and ability to follow rules.
Keep this product away from small children and remember that this product is intended for
use only by persons who are, at a minimum, completely comfortable and competent while
operating the product.
2

⚠
DO NOT EXCEED THE WEIGHT LIMIT OF 120 POUNDS. Rider weight does not necessarily
mean a person’s size is appropriate to fit or maintain control of the electric ATV.
Do not touch the brakes or electric motor on your electric ATV when in use and/or
immediately after riding as they can become very hot.
Always check and obey any local laws or regulations which may affect the locations where
the electric ATV may be used.
Ride defensively. Maintain a hold on the handlebars at all times.
Watch out for potential obstacles that could catch your wheel or force you to swerve
suddenly or lose control.
Be careful to avoid pedestrians, skaters, skateboards, scooters, bikes, children or animals
who may enter your path, and respect the rights and property of others.
This ATV is meant to be used on private property and on closed courses and not on public
streets or sidewalks. Do not ride your electric ATV in any areas where pedestrian or vehicle
traffic is present.
Do not activate the throttle on the hand grip unless you are sitting properly on the electric
ATV and in a safe, outdoor environment suitable for riding.
This ATV was manufactured for performance and durability but is not impervious to damage.
Jumping or other aggressive riding can over-stress and damage the product, The rider
assumes all risks associated with high-stress activity.
Be careful and know your limitations. Risk of injury increases as the degree of riding
difficulty increases, The rider assumes all risk associated with aggressive riding activities.
Never carry passengers or allow more than one person at a time to ride the electric ATV.
Never use near steps or swimming pools.
Keep your fingers and other body parts away from the drive chain, steering system, wheels
and all other moving components.
Never use headphones or a cell phone when riding.
Never hitch a ride with another product.
This ATV has tires designed for off road conditions, riding on concrete, asphalt or pavement
will cause additional wear to tires.
Cont. next page… 3

Do not ride the electric ATV in wet or icy weather and never immerse the electric ATV in
water, as the electrical and drive components could be damaged by water or create other
possible unsafe conditions.
Wet, slick, bumpy, uneven or rough surfaces may increase risks of use. Do not ride the
electric ATV in mud, ice, puddles or water.
Avoid excessive speeds that can be associated with downhill rides.
Never risk damaging surfaces such as carpet or flooring by use of an ATV indoors.
Do not ride at night or when visibility is limited.
PROPER RIDING GEAR
Always wear proper protective equipment such as an approved safety helmet, elbow pads
and knee pads.
A helmet may be legally required by local law or regulation in your area.
A long-sleeved shirt, long pants and gloves are recommended.
Always wear athletic shoes (lace-up shoes with rubber soles), never ride barefooted or in
sandals, and keep shoelaces tied and out of the way of the wheels, motor and drive system.
4

Assembly:
●Your eQuad Q arrives in 2 separate boxes (vehicle & battery) which may arrive separately.
●The eQuad Q requires minimum assembly.
●Please follow instructions below in order to get your eQuad Q assembled properly
●An assemble video can also be found at https://youtu.be/1VEM_AC6uTI
1. Check hardware box contents:
Charger Charging Adapter
(for charging your battery separately from the ATV)
Handlebar Clamp Fuses (x2)
3 Speed Switch Keys Forward/Reverse Shift Knob
Bumper Hardware Tool Kit
5
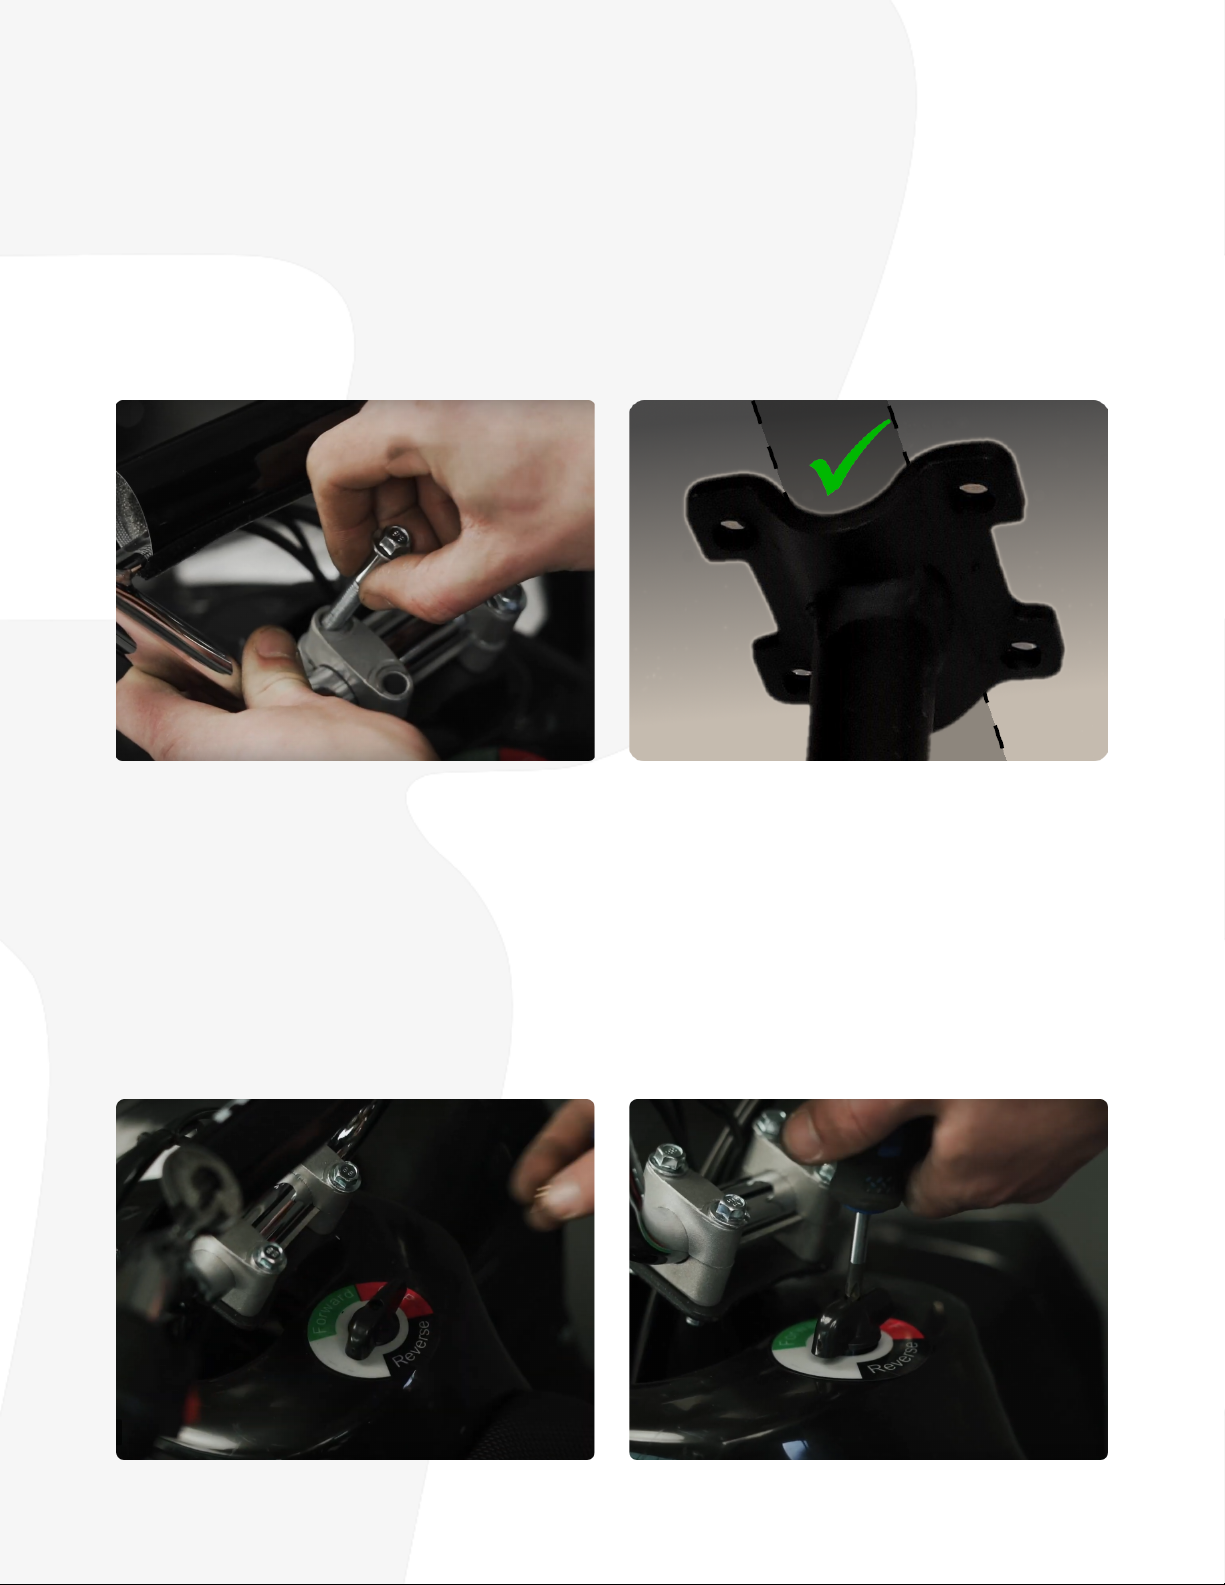
2. Handlebar installation:
⚠
Failure to properly adjust and tighten the bolts can cause loss of control and crash.
Attach handlebar clamps over top of the handlebars with the included bolts, correctly
position the handlebars, tightening the bolts into place in the bracket which is integrated
into the top of the steering column.
NOTE: the handlebar mount has been updated and looks different than in the above left
image and installation video.Your steering column should look like the image on the right
and the handlebars should be bolted directly into it with the 2 small clamps.
3. Forward/Reverse Shift Knob Installation:
Place the shift knob onto the gear shift switch located in the body between the handlebars
and seat and tighten it down with the included screw.
6

4. Battery installation:
Remove the bolts from the 2 brackets that hold the battery pack into place. Slide your
battery into position with the end of the battery with the side with the wires protruding at
the front. Replace the removed brackets and tighten down the bolts.
5. Fuse & battery connections:
Locate the fuse case on the red positive battery wire, insert one of the included fuses,
secure the cap back on the case, locate the black connector within the ATV body and
connect the battery.
7
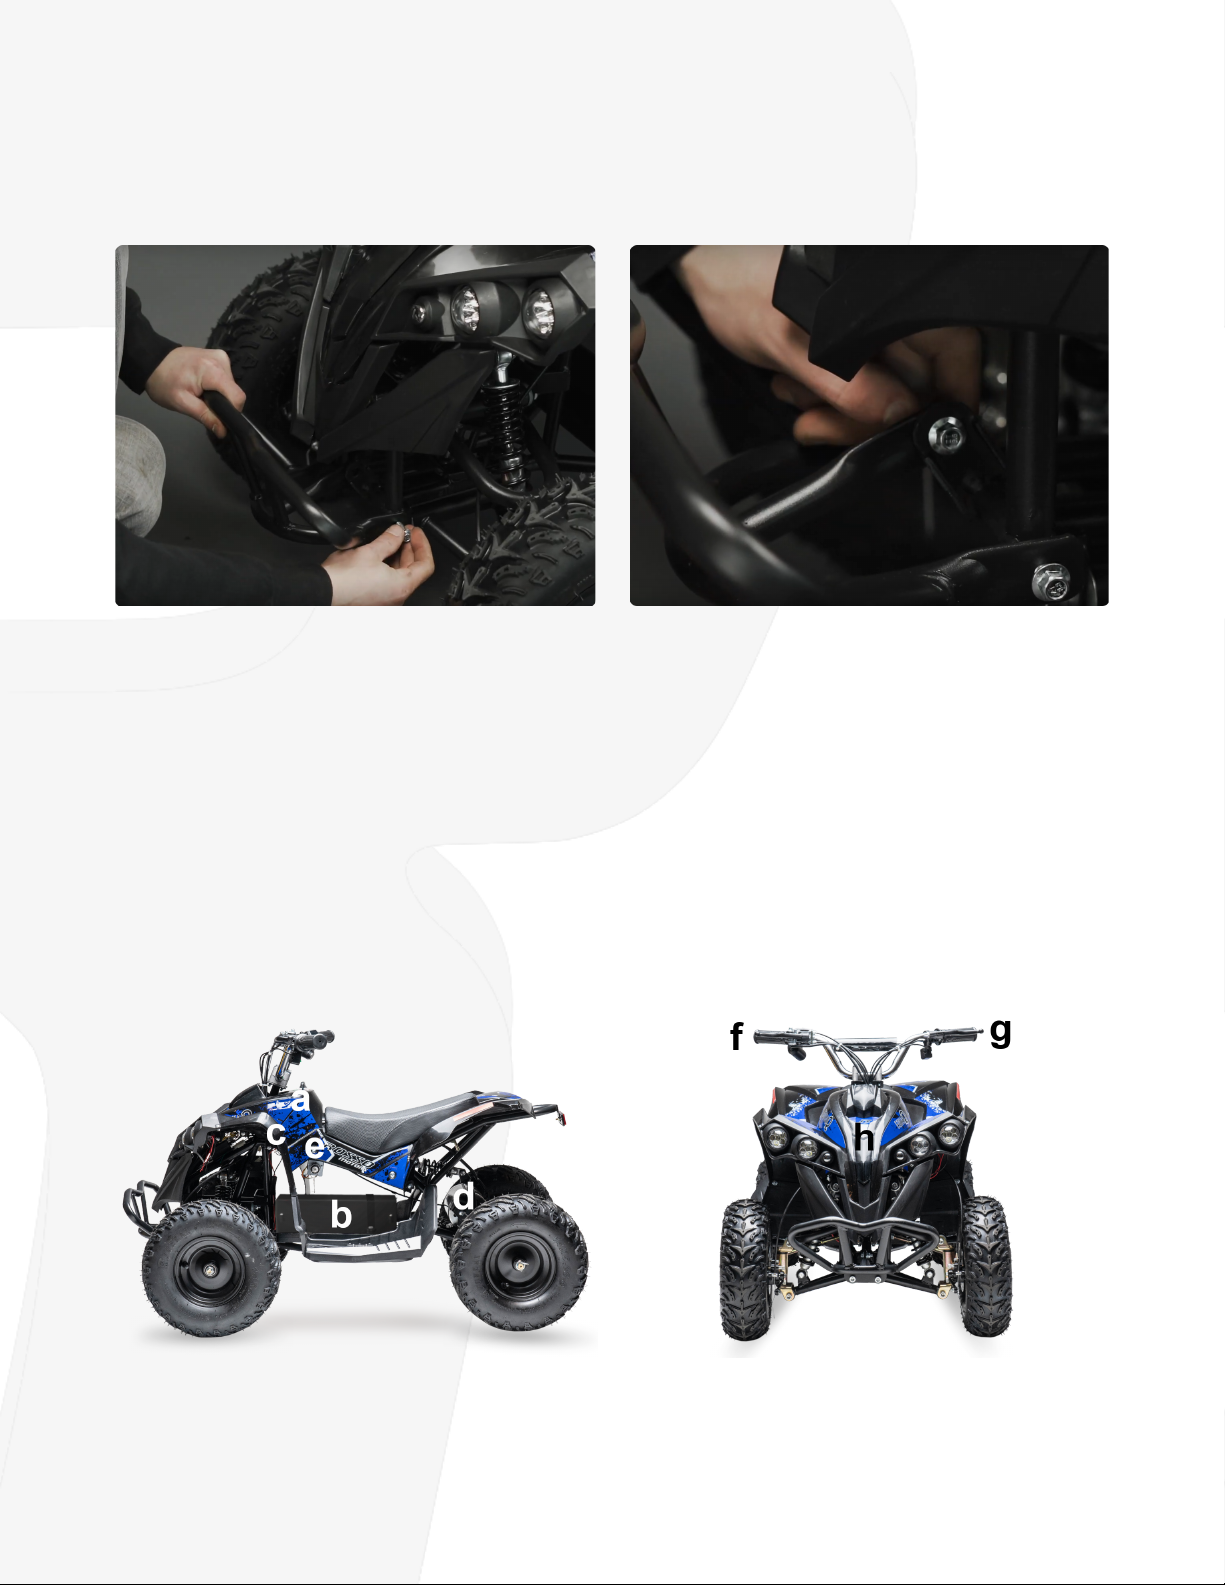
6. Front bumper installation:
Align the 2 bottom holes on the bumper with the corresponding holes on the lower front of
the frame and install the bolts. Then align the 3rd hole with the matching hole on the frame
and install the bolt. Tighten all hardware to secure your bumper.
7. Decals
The eQuad Q comes included with 3 sets of decals for your ATV. (1 each in Red, Blue, & Pink)
Decals can be applied in a single color, mixed or you can leave your ATV without the decals
for plain black. Ensure to clean and dry the body before applying for best results.
Your eQuad Q doesn’t come fully charged and we recommend fully charging
it before your first use. See the operations section for full details on
charging.
eQuad Q Components:
(a) forward / reverse gear switch (f) throttle/battery meter & front brake
(b) battery box (g) rear brake & headlight/horn buttons
(c) charging port / controller (h) headlights
(d) 1000W motor
(e) 3 speed switch (left side) & ignition switch (right side)
8

eQuad Q Operation:
Basic Operation
With the ATV powered on, gently twist the throttle until the desired speed is reached.
Release the throttle and squeeze both brake levers to stop.
Charging
Step 1 - Turn your electric ATV off (see instructions page 10)
Step 2 - Plug the charger into your wall outlet, if the indicator light does not come on double
check your outlet has power.
Step 3 - Plug the charger into the charging port located within the body.
The time for a full recharge is 6-8 hours, the indicator on your charger will turn from red to
green when charging is complete. Always charge the battery immediately after riding.
Fully charge battery before storing for an extended period of time and then every 4-6
weeks. Failure to recharge battery periodically may result in reducing battery life time and
can result in a battery that will not accept a charge.
Do not leave charging overnight unattended. Unplug charger from the wall outlet when not
in use.
Make sure the electric ATV power switch is turned OFF when the unit is not in use.
To ensure long battery life, never store the product in freezing or below freezing
temperatures! Freezing will permanently damage the battery.
Run time is up to 120 minutes of continuous ride time. Run time may vary depending
on riding conditions, rider weight, climate, and/or proper maintenance. Constant stopping
and starting may shorten ride time.
9
⚠
Charge the battery ONLY with the supplied charger.
Batteries are only to be charged under adult supervision.
Always disconnect the charger before wiping down and/or cleaning the ATV.
The charger supplied with the ATV should be regularly examined for damage to the cord,
plug, enclosure and other parts. In the event of such damage, the ATV must not be
charged until it has been repaired or replaced.
Chargers have built-in over-charge protection to prevent the battery from being
overcharged.
Note: If the charger gets warm during regular use, this is a normal response and is no cause
for concern. If your charger does not get warm during use, it does not mean that it is not
working properly.
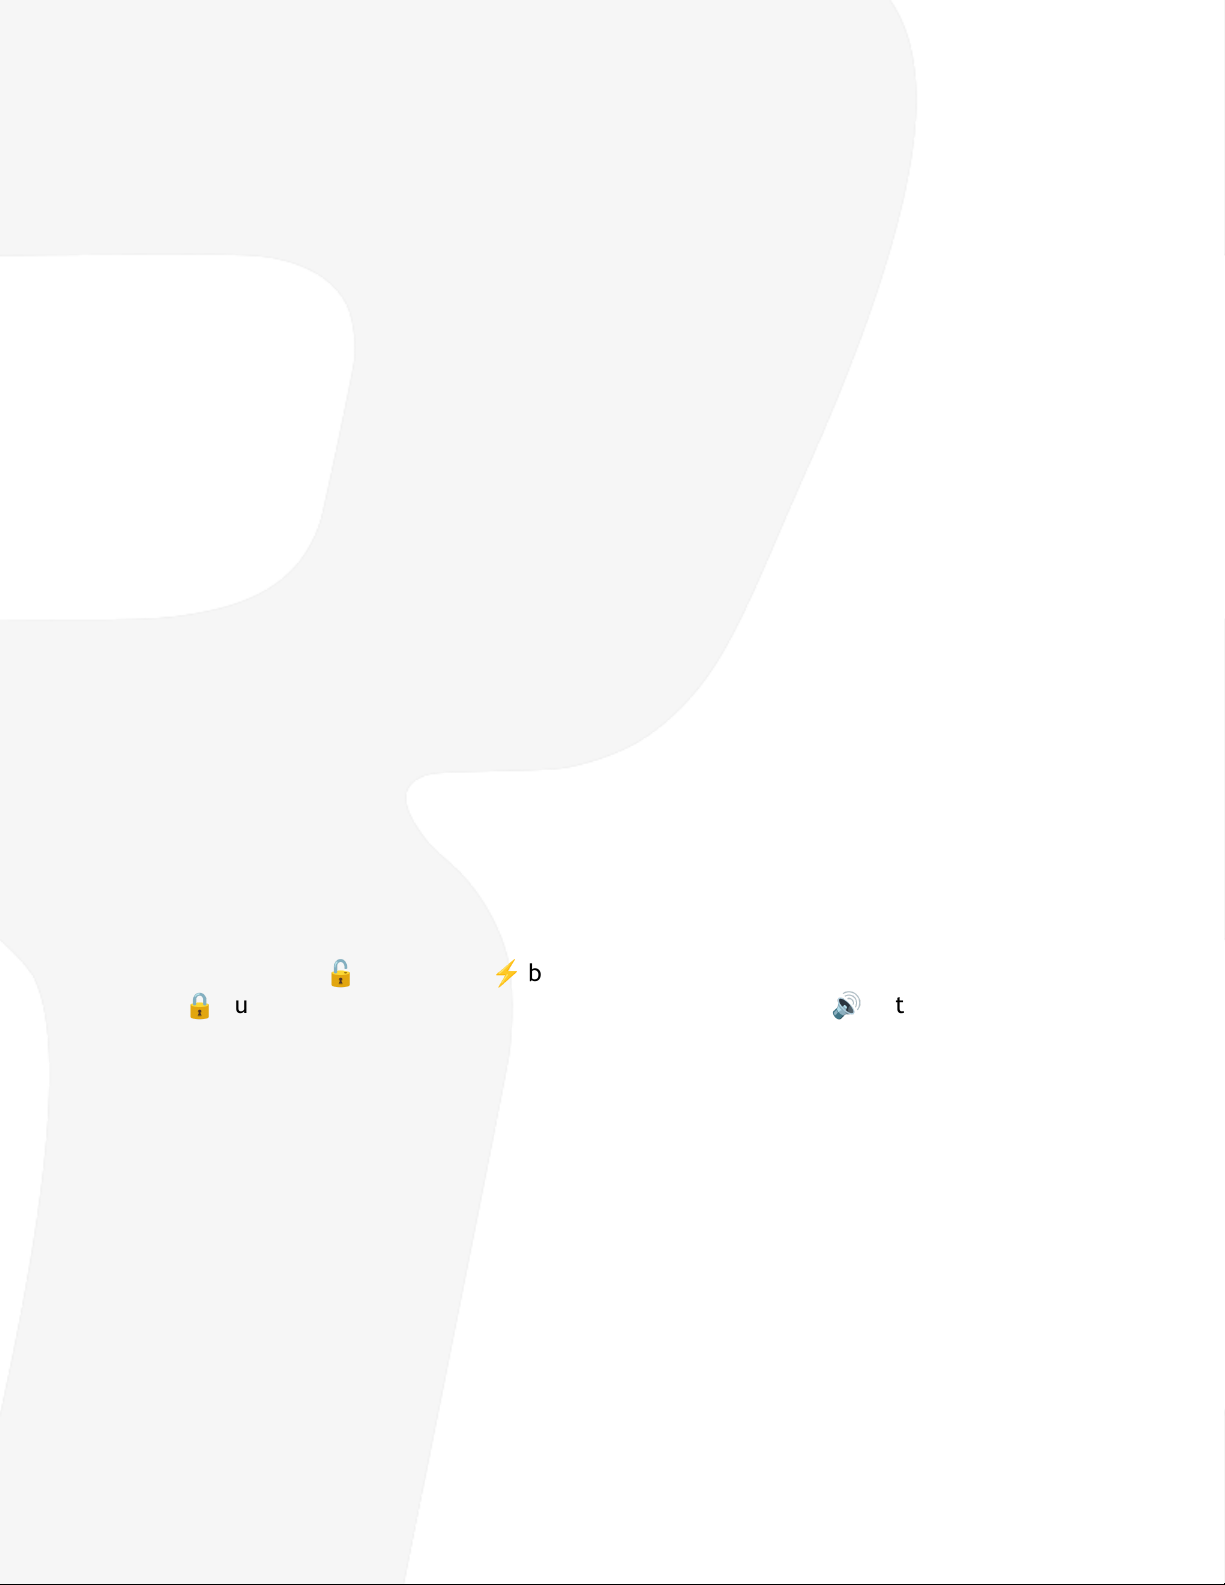
Ignition Switch / Alarm & Key Fob
Your Rosso eQuad Q can be turned on using 2different methods.
The ATV can be turned on manually by placing the key into the ignition switch (located on
the right side of the ATV) and turning it to the on position. Once turned on manually, the ATV
can ONLY be turned off by manually turning the key back to the off position.
The e Quad Q also features remote start/stop via the included fob. Once the ATV has turned
on remotely it can ONLY be turned off with the fob. To turn on the ATV remotely, press
either the “unlock”
🔓
or “power”
⚡
button on your fob. To turn the ATV off, press the
“lock”
🔒
button on the fob. To activate the alarm/horn press the
🔊
button.
Please note: The fob requires 1x CR2032 battery. (pre-installed)
To replace the fob battery first remove the key ring from the fob, then carefully, with a
small screwdriver, pry off the silver side pieces. Once they are removed the 2 halves of the
black fob body can be separated revealing the interior components and battery slot. Once a
new battery is installed, reassemble the fob in the reverse order.
Battery Level Indicator
The battery level indicator is located on the throttle handle on the right handlebar. The
lights indicate the current battery level (Max 100%, Mid 50%, Min 10%-needs charging) and
are also an easy way to tell if your ATV is turned on. If you turn your ATV off and the lights
do not turn off, it may indicate that it was started with the other method of power up.
(Manual keys vs Remote fob)
10
Table of contents
Other ROSSO MOTORS Offroad Vehicle manuals


