Rothewald 10002896 User manual

Operating instructions/ Suggested uses
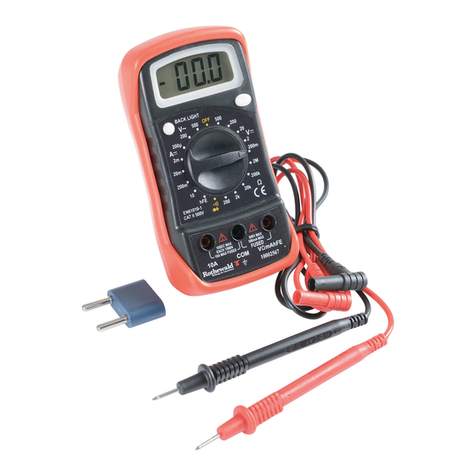
Digital multimeter, Order no. 10002896
Congratulations on purchasing a Rothewald digital multimeter. This is a battery-
powered manual multimeter that can be used for measuring DC and AC
voltages, current strengths and resistances and also for testing diodes.
A protective cover with built-in stand and two test cables are included.
Please follow all the operating and safety instructions to ensure that the unit is
used safely and to keep it in good condition.
Before using this unit with your bike or car, consult your vehicle's repair and
maintenance manual for the requisite measured values and model-specific
measurement instructions.
Improper use of this multimeter may result in damage to the device itself or to
your vehicle!
Control panel
1: 15 mm high LCD display, 3 1/2 digit.
2: Rotary switch for On/Off, and for selecting function and measuring range.
Clockwise rotation selects the following functions / ranges:
Off; AC voltmeter 600 V, 200 V; DC ammeter 20 µA, 200 µA, 2 mA, 20 mA,
200 mA, 10 A; diode testing; ohmmeter 200 Ω, 2 kΩ, 20 kΩ, 200 kΩ, 2 MΩ;
DC voltmeter 200 mV, 2 V, 20 V, 200 V, 600 V.
3: Hold function: if "Hold" is pressed, the display will retain the last measured
value and will indicate this with an "H" symbol until "Hold" is pressed again.
4: 10 A jack, unfused: insert the positive test cable (red) here to measure
currents in the 10 A measuring range.
5: COM jack: insert the negative test cable (black) here.
6: VΩmA jack: insert the positive test cable (red) here to measure voltage,
resistance and DC (up to 200 mA, fused).

- 2 -
Technical specifications
Display accuracy is guaranteed for a period of one year following calibration at
temperatures between 18 and 28°C and at up to 80% humidity.
Fuse: F 200 mA / 250 V
Battery: 9V battery
Display: 3 1/2 digit, 15 mm high LCD
2-3 updates / sec.
"Measuring range exceeded" message: number "1" appears on the display
"Reversed polarity" message: "-" appears on the display
"Low battery" message: battery symbol appears on the display
Operating temperature: 0 to 40°C
Storage temperature: -10 to 50°C
Max. humidity for storage: 80%, non-condensing
Dimensions: 138 x 69 x 31 mm
Weight: approx. 160 g
Mode Measuring range Resolution Accuracy
DC voltage 200 Mv 0.1 mV +/-(0.5% +/-2 dgts)
2 V 1 mV +/-(0.5% +/-2 dgts)
20 V 10 mV +/-(0.5% +/-2 dgts)
200 V 100 mV +/-(0.5% +/-2 dgts)
600 V 1 V +/-(0.8% +/-2 dgts)
AC voltage 200 V 100 mV +/-(1.2% +/-10 dgts)
600 V 1 V +/-(1.2% +/-10 dgts)
AC voltage frequency 40 to 400 Hz

- 3 -
DC current 20 µA 0.01 µA +/-(1% +/-2 dgts)
200 µA 0.1 µA +/-(1% +/-2 dgts)
2 mA 1 µA +/-(1% +/-2 dgts)
20 mA 10 µA +/-(1% +/-2 dgts)
200 mA 100 µA +/-(1.5% +/-2 dgts)
10 A 10 mA +/-(3% +/-2 dgts)
10 A for 10 s, 15 mins cool-down period
Resistance 200 Ω 0.1 Ω +/-(0.8% +/-3 dgts)
2 kΩ 1 Ω +/-(0.8% +/-2 dgts)
20 kΩ 10 Ω +/-(0.8% +/-2 dgts)
200 kΩ 100 Ω +/-(0.8% +/-2 dgts)
2M kΩ 1 kΩ +/-(1.0% +/-2 dgts)
Important safety notes
Important safety notes for users:
- This measuring instrument must not be used if damaged. Check that the test
probes, their connections and insulation are all in good condition. Only use the
test cables that were supplied with the unit. Never work in wet or very humid
conditions, if the air contains dust, flammable gases, vapours or solvents, in
thunderstorms, or near powerful electromagnetic fields.
- If the instrument is moved from a cold into a warm environment condensate
may form inside it. It should not therefore be switched on until it has reached
room temperature.
- Always select the measurement function and range carefully. Never exceed
the measuring range. If there is any doubt regarding the measuring range to
be set, then you should start by choosing the widest range possible.
- Always disconnect test cables before switching between the different
measurement functions of voltage, current and resistance. Likewise, always
disconnect the test cables before switching off.
- In the case of voltage measurements there should never be any components
connected to the hFE jack.

- 4 -
If you switch from one measuring range to another whilst measurement is in
progress, voltage peaks might occur and damage the instrument.
If the voltage exceeds 60 V three-phase or 25 V AC, it is important to take
particular care as there is a risk of electric shock. The test object should
therefore first be de-energised, then the measuring range selected and the
measuring instrument connected to the test object. Only then should voltage be
applied to the test object. Whilst measurement is in progress keep your fingers
behind the shielding on the insulated handle.
Do not use this multimeter for measuring voltage if voltages of above 600 volts
are likely to develop. Do not use this multimeter for measurements in domestic
distribution systems or three-phase networks (380/400 V). Measurements on a
230 V network (e.g. domestic power circuit) are permissible.
- Current strength up to 10 A can be measured. The 10 A range is not fused,
and therefore measurement in this range must only be carried out on circuits
equipped with their own fuses. No voltages of above 250 V are allowed. A
measurement of 10 amps should only continue for 10 s, and must be followed
by a 15 minute cool-down period.
- Never perform resistance measurements on live components.
Maintenance:
If the display is blank, possible causes are:
- the multimeter is not switched on
- the battery is flat ("Battery" indicator may appear on the display)
- the rotary switch may be positioned incorrectly (between two positive
positions)
- If it not possible to measure current, the fuse for the 200 mA range may be
faulty.
Before opening the unit to change the battery or fuse, always unplug the test
cable first and move the rotary switch to "Off". Now, using a suitable Philips
screwdriver, unscrew and remove the Philips screws from the rear side of the
housing and lift off the lower half of the housing.
- Using the wrong fuse can result in fire. You must therefore only ever use a
fuse with the following specification:
F 200 mA / 250 V ("flink")

- 5 -
- Replace the battery with another one of the same type (9V battery). Be careful
to connect the leads the right way round.
Always close up the housing carefully and tighten all the fastening screws
before starting to use the multimeter again.
Use a damp cloth and a mild cleaning agent to clean the device. Never use
abrasives or solvents
Using the multimeter
A. Measuring a DC voltage:
Important: Never exceed the permissible measuring range of 600 V DC!
Never touch a circuit or components in a circuit if the voltage being
measured is above 25 V AC or 35 V DC!
1. Connect the red test cable to the "VΩmA" jack and connect the black one to
the "COM" jack.
2. Set the rotary switch to the relevant measuring range "V –straight line". If
there is any doubt at first regarding the measuring range, start with greatest
measuring range and then reduce it a little at a time until the ideal measuring
range is found. If any measured value appears on the display although the test
probes have not yet been connected to the object, this can be attributed to the
sensitivity of the measurement input and of no importance.
3. Connect the test probes to the measurement object. If an "-" appears on the
display, this indicates that you have reversed the polarity.
4. Now read the measured value off, retaining it if necessary with the "Hold"
button.
B. Measuring an AC voltage
Important: Never exceed the permissible measuring range of 600 V AC!
Never touch a circuit or components in a circuit if the voltage being
measured exceeds 25 V AC!
1. Connect the red test cable to the "VΩmA" jack and connect the black one to
the "COM" jack.
2. Set the rotary switch to the relevant measuring range "V –wavy line". If at
first there is any doubt about the measuring range, start with the highest

- 6 -
measuring range and then reduce it as required. If any measured value appears
on the display although the test probes have not yet been connected to the
object, this can be attributed to the sensitivity of the measurement input and of
no importance.
3. Connect the test probes to the measurement object. If an "-" appears on the
display, this indicates that you have reversed the polarity.
4. Now read the measured value off, retaining it if necessary with the "Hold"
button.
C. Measuring a DC current
Important: Do not measure current in circuits in which voltages greater
than 250 V DC can occur!
Do not attempt to measure currents greater than 10 A –the multimeter
would overheat!
Currents of 10 A must only be measured for 10 s, after which the unit
should be disconnected for approx. 15 minutes (cool-down period)!
1. Connect the black test cable to the "COM" jack. For measurements in the mA
range below 200 mA, the red test cable is connected to the "VΩmA" jack, but
for measurements greater than 200 mA, it is connected to the "10 ADC" jack.
2. Move the rotary switch to the desired measuring range "A". If there is any
doubt regarding the measuring range, start with the largest measuring range
and then reduce it (see A. 2.).
3. Connect test probes to the measurement object as shown in the diagram.
4. Read measured value off, retaining it if required with the "Hold" button.
D. Measuring resistance
Important: It is essential that the measurement object should be de-
energized!
To obtain reliable measured values the object's contact points must be
free from dirt, oil, solder lacquer, etc!
1. Connect the black test cable to the "COM" jack and the red test cable to the
"VΩmA" jack. Move the rotary switch to the desired measuring range "Ohms".

- 7 -
2. Select 200 ohms as the measuring range, hold test probes close together in
order to check the test cable for continuity. The unit should be displaying 0.1 to
0.3 ohms. Now choose the measuring range for the test object (see A. 2.).
3. Hold the test probes near the object and read the measured value off,
retaining it if required with the "Hold" button. If values over 1 ohm are obtained it
may be wise to first wait until the reading has stabilised.
4. If the resistance being measured is connected to a circuit, switch the
instrument off and discharge all capacitors before applying the test probes.
E. Testing diodes
Important: The test object MUST be de-energized, and any connected
capacitors must be discharged!
1. 1. Connect the black test cable to the "COM" jack and the red test cable to
the "VΩmA" jack.
2. Move the rotary switch to the "Arrow Symbol" function.
3. Hold the red test probe against the diode's anode and the black test probe
against its cathode. Now read off the value for the conducting-state voltage
(values between approx. 0.6 V and 3 V depending on diode type). The diode
"blocks" the voltage in one direction –in the "blocked direction" you will obtain
the value "1". If there is again a conducting-state voltage despite reversing the
test probes, this indicates that the diode is faulty.
If you have any questions about these instructions, for prompt assistance
please contact our fax service hotline on +49 40 73419358 before you
assemble or use the product. This is the best way to ensure that your product is
assembled properly and used correctly.
Detlev Louis Motorradvertriebs GmbH 21027 Hamburg, Germany
http://www.louis.de
Suggested uses for the digital multimeter
Some suggested uses for the digital multimeter with your motorcycle can be
found below.

- 8 -
When you perform these procedures yourself, be sure to always follow the
safety instructions for using the unit (see user instructions); model-specific
details and target measurement values can be found in the repair and
maintenance manual for your particular vehicle. While we have carefully
researched all the instructions and reviewed them several times, you will
understand that we accept no liability.
1. Check charging circuit
The charging circuit ensures that there is a power supply to the battery and all
consumers (ignition, lights, etc.) on the bike.
- If there are indications that the alternator is not charging the battery sufficiently
(e.g. the headlight is dimming or the battery charging indicator light is flickering),
start with a visual inspection of all the accessible components of the charging
circuit: plug connections should be secure and clean, cables must not show any
sign of damage, wear or fire, the alternator and regulator/rectifier should not
exhibit any obvious signs of mechanical defect.
- To test the individual components further the battery should be in good
condition and fully charged.
- If you identify a fault in part of the charging circuit, also check all the other
components of the circuit for damage.
1.1 Charging voltage
The charging voltage measurement reveals whether or not the charging circuit
is working correctly. First warm the engine up. Now put the bike on its stand and
make the battery terminals accessible. Allow the engine to idle. Insert the red
test cable in the VΩmA jack and the black cable in the COM jack on the
multimeter. Select 20 V DC measuring range. Hold the red test probe against
the positive and the black test probe against the negative battery terminal. Read
off the value –for a well charged 12 V battery the display should now be
indicating approx. 12.6 volts. Now, depending on the model of bike, increase
the engine speed to around 3000-4000 rpm. With a 12 volt system the reading
should now increase to approx. 13.5 to 15.5 volts; in this case the alternator is
charging correctly. If, on the other hand, the voltage stays the same, then there
is a fault in the charging circuit. If the voltage increases beyond the range 13.5

- 9 -
to 15.5 volts when the engine speed is increased, this indicates that the voltage
regulator/rectifier is not limiting the voltage correctly. Measurable short-term
voltage peaks indicate a fault in the rectifier and/or the alternator.
1.2 Testing a star alternator with a permanent magnet rotor
Star alternators operate with a permanent magnet rotor that induces a voltage
by turning in the windings of the outer stator. They rotate in an oil bath, usually
on the crankpin.
Faults generally occur as a result of persistent overheating or overloading of the
regulator.
Testing non-rectified charging voltage
Stop the engine and switch the ignition off. Disconnect the plug on the cable
harness leading from the alternator to the regulator/rectifier. Insert the red test
cable in the VΩmA jack and the black cable in the COM jack on the multimeter,
select measuring range up to 200 V AC. Use the test probes to connect two of
the alternator's plug contacts. Leave engine running at approx. 3000-4000 rpm.
Measure voltage, stop engine, connect test probes across different contacts,
restart engine, measure voltage again, and so on ... If the measured values are
the same for all the combinations of contacts (as a rule an average motorcycle
alternator delivers approx. 50-70 volts), then the alternator is working correctly.
If some of the measured values are significantly below the others, the alternator
is faulty.
Checking for a short circuit to earth and interturn fault
Stop the engine and switch the ignition off. Insert the red test cable in the
VΩmA jack and the black cable in the COM jack on the multimeter, select
measuring range 200 ohms and hold the test probes close together for the
continuity test until a value of 0.1 to 0.3 ohms is indicated. Now hold the black
test probe against earth and the red one against all the plug contacts one after
the other. There must be no measurable continuity (infinite resistance)
otherwise the stator would have a short circuit to earth. Then use the test
probes to test all possible combinations for connecting the contacts –the
resulting value should always remain slightly less than 1 ohm. If the measured
value is too high, this indicates insufficient continuity between the windings,

- 10 -
while a measured value of 0 would indicate a short circuit. In both cases the
stator would be faulty.
If the AC voltage at the alternator is considerably too low despite the fact that
the alternator windings are undamaged, it can be assumed that the rotor is
demagnetised.
Testing the regulator/rectifier
If a charging voltage of more than 15 V is measured at the battery when the
engine is running at high revs, either the voltage regulator is faulty (see above)
or it needs to be re-adjusted (some older regulators are adjustable). A rectifier
should be disconnected from its circuit before testing. Insert the red test cable in
the VΩmA jack and the black cable in the COM jack on the multimeter, select
measuring range 200 ohms and hold the test probes close together for the
continuity test until a value of 0.1 to 0.3 ohms is indicated.
Now measure the resistance in both directions between the rectifier's earth
cable and all the alternator connections and also between the positive output
cable and all connections (in other words reverse the polarity once in each
case). One direction should produce a lower reading while the other direction
should produce a reading that is at least 10 times as high. If any of these
connections produces the same value in both directions (i.e. despite reversal of
polarity), this indicates that the alternator is faulty and must be replaced.
1.3 Testing a collector alternator
Collector alternators do not use permanent magnets to induce current; instead
they use the electromagnetic energy from an external field winding. This is
picked up by carbon brushes at the rotor collector. This type of alternator
always runs "dry", either on the crankshaft stump with an external regulator or
as a separate unit, in which case it will usually have an integrated regulator.
Faults are generally caused by vibrations, by shaking due to the rotor's
transverse acceleration, or by asymmetrical thermal stresses. The carbon
brushes and collector are subject to long-term wear.

- 11 -
Testing the regulator/rectifier: as described in 1.2
If you intend to test your separate collector alternator thoroughly it is
advisable to remove it from the bike (first disconnect the battery) and then
dismantle it. Then check the contact pressure of the brush springs and the
length of the carbon brushes and replace them if necessary. Clean the collector
with petrol and rub it down with fine sandpaper if necessary. Check depth of
collector grooves (approx. 0.5 - 1 mm), recut them with a sawblade if necessary
or replace the rotor if the slipring has reached its limit of wear.
Insert the red test cable in the VΩmA jack and the black cable in the COM jack
on the multimeter, select measuring range 200 ohms and hold the test probes
close together for the continuity test until a value of 0.1 to 0.3 ohms is indicated.
Now test for continuity at the stator windings, hold one test probe before and
one after a field winding –a small resistance should be measured. A large
resistance indicates a line break while resistance close to zero means that there
is a short circuit. To check for a short circuit to earth select measuring range up
to 2 MOhm. Hold the red test probe against that stator winding and the black
one against the housing (earth). Unless the resistance measured is infinite there
is a short to earth (fault).
Next, measure the resistance between all possible combinations of commutator
bars on the rotor. The measured resistance should always be low; a value close
to zero indicates a short circuit while a high resistance indicates a line break
requiring the rotor to be replaced. Select measuring range up to 2 MOhm on the
multimeter. Hold the red test probe against a commutator bar and the black one
against the axle (earth). Unless the resistance measured in each case is infinite
there is a short to earth (rotor fault).
Alternators mounted on the crankshaft stump do not need to be removed for
testing. You only need to disconnect the battery and remove the alternator
cover in order to check the collector, rotor and stator. The collector does not
have any grooves. There should be no engine oil and no rainwater in the
alternator chamber (replace seals as required). The stator windings are
checked for continuity at the relevant cable connections as described above.
The rotor windings are tested directly between the two copper tracks of the
collector (as described). The measured resistance must be small (approx. 2 –

- 12 -
6 ohms). If it is approaching zero, there is a short circuit, and if it is large there is
a break in the winding. The resistance measured to earth, on the other hand,
must be infinite.
2. Checking the ignition circuit of a battery coil ignition
2.1 Ignition coils
If ignition sparks are either weak or non-existent, start with a visual inspection of
the cable connections and spark plug. If thin, burned looking wires can be seen
on the coil housing, they could be current creepage paths that could be caused
by dirt or material fatigue of the coil body. Old spark plugs should be replaced.
To test the quality of the ignition spark in contact ignition, remove a spark plug
from each ignition cable, hold the cable at a distance of 5 - 7 mm from the
engine earth (wear a glove), switch on the ignition and follow the start
procedure. The spark should jump across this gap (the spark from a really good
coil will jump 10 mm or more). With an electronic ignition unit the test just
described is carried out with the help of a spark tester to avoid the risk of
damage to the black box. A weak ignition spark may (especially with older
vehicles) be due to a voltage drop in the ignition circuit. For safety reasons,
checking the ignition coils in an electronic ignition system should be left to a
professional mechanic to avoid risk of damage to the black box. In the case of
contact ignition, proceed as follows:
Select the measuring range 20 V DC on the multimeter. Undo the positive and
negative cables from the coil, hold the black test probe against minus (lead to
contact, contact position "closed") and the red test probe against plus (from the
kill switch). The measurable voltage must be 12 volts (apart from rare cases in
which there are advance resistances in the ignition circuit). If the measured
value is smaller than this, there is a fault on the feed cables (e.g. verdigris in the
cable core), a plug, the kill switch or ignition lock. In this event damaged cables
should be replaced and plugs and switches tested for contact resistances. To
do this, disconnect the battery, set the multimeter to measuring range
200 ohms, carry out a continuity test (see above), hold test probes against the
cable accesses for the switch or plug. If the measured value is greater than
approximately 0 ohms, this indicates faults, dirt or corrosion damage. Clean

- 13 -
components as far as possible, apply a little contact spray and then measure
again.
The ignition coil itself can be tested with the multimeter for line break and short
circuit but not for interturn faults or disruptive discharges at high voltage. There
is another factor to consider, namely that ignition coils frequently do not start to
malfunction until a certain operating temperature has been reached.
To test a coil, disconnect it from the vehicle electrics. Set the multimeter to
measuring range 200 ohms, perform a continuity test (see above), hold the red
test probe against the positive and the black one against the negative terminal,
then compare the result with the setpoint value for the coil's primary winding as
specified in the workshop manual. Then set the measuring range of the
multimeter to 20 kOhms and test the secondary winding: with a double ignition
coil the test probes are held against the two high-voltage ignition cables, with an
ignition coil with ignition cable hold the red test probe against the positive feed
and the black test probe against the high-voltage ignition cable, then compare
the measured value with the setpoint value from the workshop manual.
2.2 Ignition box
Ignition boxes are extremely sensitive components and should only ever be
tested by a workshop that has the relevant special testing device.
2.3 Pulse generator coils
Electronic ignition systems receive their pulse from a rotor finger that is usually
attached to a crankpin and activates a pulse generator coil. To test this coil set
the multimeter to measuring range 2 KOhms, perform a continuity test (see
above), disconnect the pulse coil, hold the test probe against the connections
and compare the measured value with the workshop manual. A resistance that
is too high points to a line break, while one that is too low points to a short
circuit. Now adjust the multimeter to 2 MOhm and measure the resistance
between the winding and earth –unless it is infinite there is a short to earth and
the coil must be replaced.

- 14 -
3. Testing the starter circuit
3.1 Starter relay
The purpose of the starter relay is to reduce load on the cabling and switches in
the starter circuit. To test it, first disconnect the thick cable leading to the starter.
Insert the red test cable in the VΩmA jack and the black cable in the COM jack
on the multimeter, select measuring range 200 ohms and perform continuity test
(see above). Hold test probes against the relay connections "Minus" and
"Connection to switch". Turn on the ignition, if necessary actuate the safety
switch on the clutch or side stand, then press the starter button. The relay
should now "click" and a resistance of 0 ohms be measured. If the resistance is
greater than 0 ohms, the relay is probably faulty even if it clicks.
Now select the measuring range 20 V DC on the multimeter. Disconnect the
"Minus" cable from the relay, hold the black test probe against it, likewise
disconnect the "Switch connection" cable from the relay and hold the red test
probe against it. The measured voltage should be 12 volts. A measured voltage
that is lower than this indicates a fault on the feed cable, a plug, the starter
button or a safety switch (voltage drop).
The switches can be tested by disconnecting their cable accesses from the
circuit. Set the multimeter to measuring range 200 ohms, perform continuity test
(see above), hold test probes against the cable accesses and actuate the
switch. If the measured value is greater than 0 ohms, this indicates a faulty
switch (clean it if possible, apply a little contact spray and then measure again).
3.2 Starter
Disconnect battery, remove starter from the motorcycle and dismantle it. Check
the contact pressure of the brush springs and the length of the carbon brushes
and replace them if necessary. Clean the collector with petrol and rub it down
with fine sandpaper if necessary. Check depth of collector grooves (approx. 0.5
- 1 mm), recut them with a sawblade if necessary or replace the rotor.
Insert the red test cable in the VΩmA jack and the black cable in the COM jack
on the multimeter, select measuring range 200 ohms and perform continuity test
(see above). Measure the resistance between all possible pairs of commutator
bars on the rotor. The measured resistance should always be low; a value close

- 15 -
to zero indicates a short circuit while too high a resistance indicates a line break
requiring the rotor to be replaced. Now select measuring range up to 2 MOhm
on the multimeter. Hold the red test probe against each commutator bar and the
black one against the axle (earth). Unless the resistance measured in each
case is infinite there is a short to earth and the rotor should be replaced.
If the stator on the starter has field windings instead of permanent magnets,
they should likewise be tested for shorts to earth (if the resistance between
earth and field winding is not infinite, replace winding) and for continuity (the
resistance in the winding should be small, see above).
4. Testing the cable harness, switches, etc.
4.1 Switches, plugs, ignition locks, wiring harnesses
With the passage of time corrosion and dirt can build up large contact
resistance in plugs and switches; cable harnesses that are affected by the
"electrical bug" make poor conductors. In extreme cases, this can result in a
component becoming completely disabled, whilst less serious damage can
more or less noticeably reduce the efficiency of affected consumers such as
lights or ignition.
A simple visual inspection of components is often all that is required: green
connector tongues and scruffy switch contacts must be scraped or sanded
clean and reassembled with a little contact spray. Cables with greenish cores
should be replaced. A cable cross section of 1.5 is generally sufficient on a
motorcycle, although slightly thicker cable is used for the main positive leads
and the cable connecting the battery with the starter relay and the starter cable
itself have specific dimensions.
Exact information on a cable's conductivity is provided by a resistance
measurement. To do this, disconnect the battery, set the multimeter to
measuring range 200 ohms, carry out a continuity test (see above), hold test
probes against the cable accesses for the switch or plug (switch in the ON
position). If a resistance greater than approximately 0 ohms can be measured,
this indicates faults, dirt or corrosion damage.
Measuring the drop in voltage can also provide information on the quality of
power supply to a component. This can be done by selecting the measuring

- 16 -
range 20 V DC on the multimeter. Disconnect positive and negative leads from
the consumer and hold the black test probe against the negative and the red
one against the positive lead. The measurable voltage should be 12 volts –
readings below this suggest energy losses.
4.2 Leakage currents
Leakage currents at the ignition lock, switches, connectors and cables can
"suck" the power from a bike battery until sooner or later it becomes totally flat.
A leakage current can be revealed with a test lamp or by using the multimeter to
measure current. Remember that, to avoid overheating, your multimeter must
never be subjected to loads in excess of 10 A (see safety instructions). The
multimeter must therefore on no account be used to measure current on the
positive lead to the starter, on the thick battery cable to the starter relay or at the
alternator.
In order to detect a leakage current, first turn the ignition off and disconnect the
positive cable from the battery. Select the 10 amp measuring range on the
multimeter, insert the red test cable in the 10 ADC jack and the black one in the
COM jack, then hold the red test probe against the positive cable and the black
test probe against the battery's positive terminal. If a current can be measured,
this indicates that there is a leakage current. The source of the leakage current
can be narrowed down by removing fuses from the bike one by one. The circuit
whose fuse cancels out the reading on the measuring instrument is the source
of the leakage current and must be investigated thoroughly.
Faulty diodes can also cause a leakage current by opening in an uncontrolled
manner. This can be tested using the "Diode test" function on the multimeter.
If you have any questions about these instructions, for prompt assistance
please contact our fax service hotline on +49 40 73419358 before you
assemble or use the product. This is the best way to ensure that your product is
assembled properly and used correctly.
Detlev Louis Motorradvertriebs GmbH 21027 Hamburg, Germany
http://www.louis.de
Other Rothewald Multimeter manuals
Popular Multimeter manuals by other brands

Tool Shed
Tool Shed TSDCM manual

Maxwell Digital Multimeters
Maxwell Digital Multimeters 25303 user manual

Fluke
Fluke 789 Quick reference guide

Fieldpiece
Fieldpiece HB74 Heavy Duty Operator's manual

Shortridge Instruments
Shortridge Instruments Airdata ADM-870 operating instructions

FLIR
FLIR Extech Instruments MultiMaster MM560A user guide