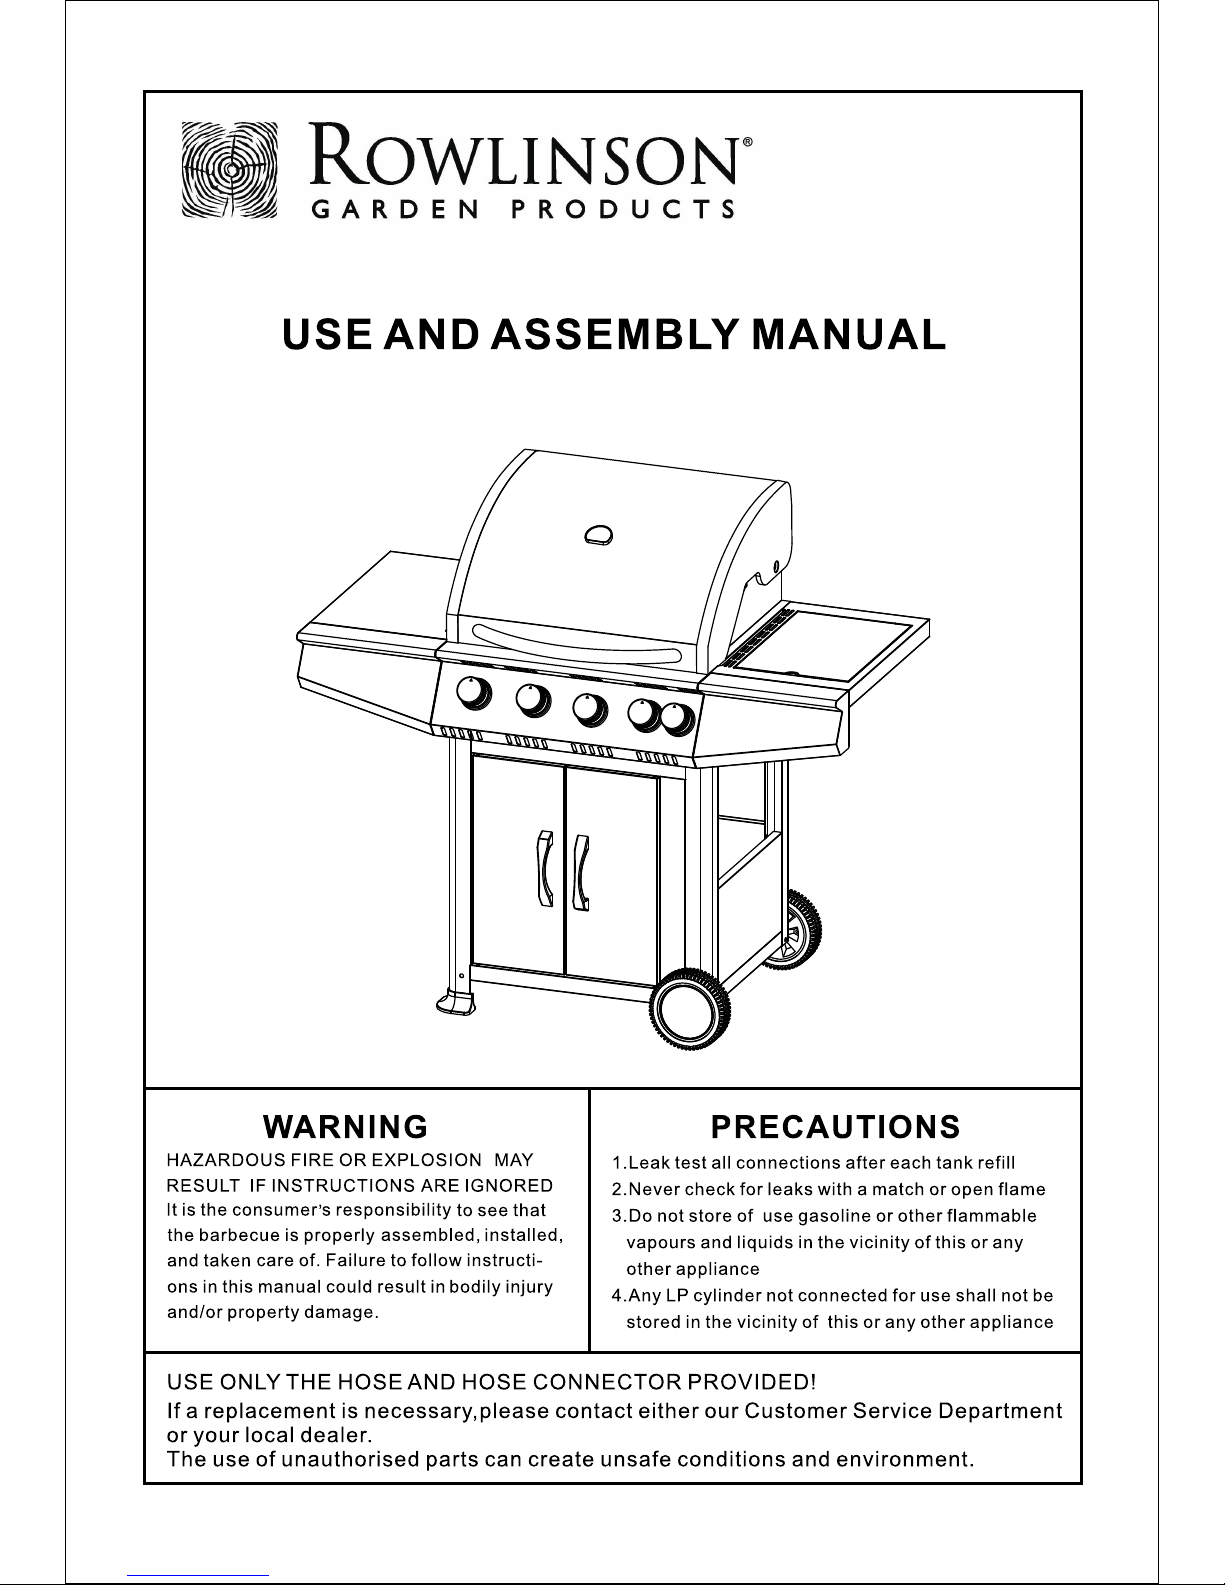
Rowlinson GB7540S User manual

SS350
CALGARY BBQ
EN-GB7540S-1401
MODEL#GB7540S

GB7540S
262 6
11551166
1
188
1
199
202 0
21
2 1
222 2
1177
232 3
242 4
252 5
1
1
2
2
3
3
4
4
55
6
6
77
88
9
9
10
1 0
11
1 1
12
1 2
13
1 3
1
144

BB
Bolt M4x20Bo l t M 4 x 2 0
CC
DD
E
E
F
F
66
AABolt M6x10Bo l t M 6 x 1 0
Nut M6
Nu t M 6
Bolt ST4.2x10
Bo l t S T 4 . 2 x 1 0
Nut M8
Nut M8

(C)
M4x20 2PCS
CC
C
C
AA
AA
AA
AA
AA
AA
(A)
M6x10 6PCS

()B
M8 2PCS
(A)
M6x10 14PCS
BB
B
B
AA
A
A
AA
A
A
AA
A
A
AA
AA
AA
AA
AA
AA
AA
AA

(A)
M6x10 3PCS
(A)
M6x10 4PCS
.ST4 2X10 4PCS(E)
AA
AA
AA
AA
AA
AA
AA
EE
E
E

(A)
M6x10 4PCS
Nut M6 2PCS (D)
(F)
M6x15 3PCS
(A)
M6x10 5PCS
Nut M6 1PCS (D)
AA
A
A
A
A
A
A
DD
D
D
FF
AAAA
AA
AA
FF
FF
A
A
DD

STEP 9
STEP10
M6x10 8PCS
(F)
M6x15 3PCS
()A
M6x10 5PCS
Nut M6 1PCS()D
7
AA
A
A
A
A
F
F
F
F
FF
A
A
A
A
DD

8

IMPORTANT:
NE FPR CONSUMER: Retain for future Reference
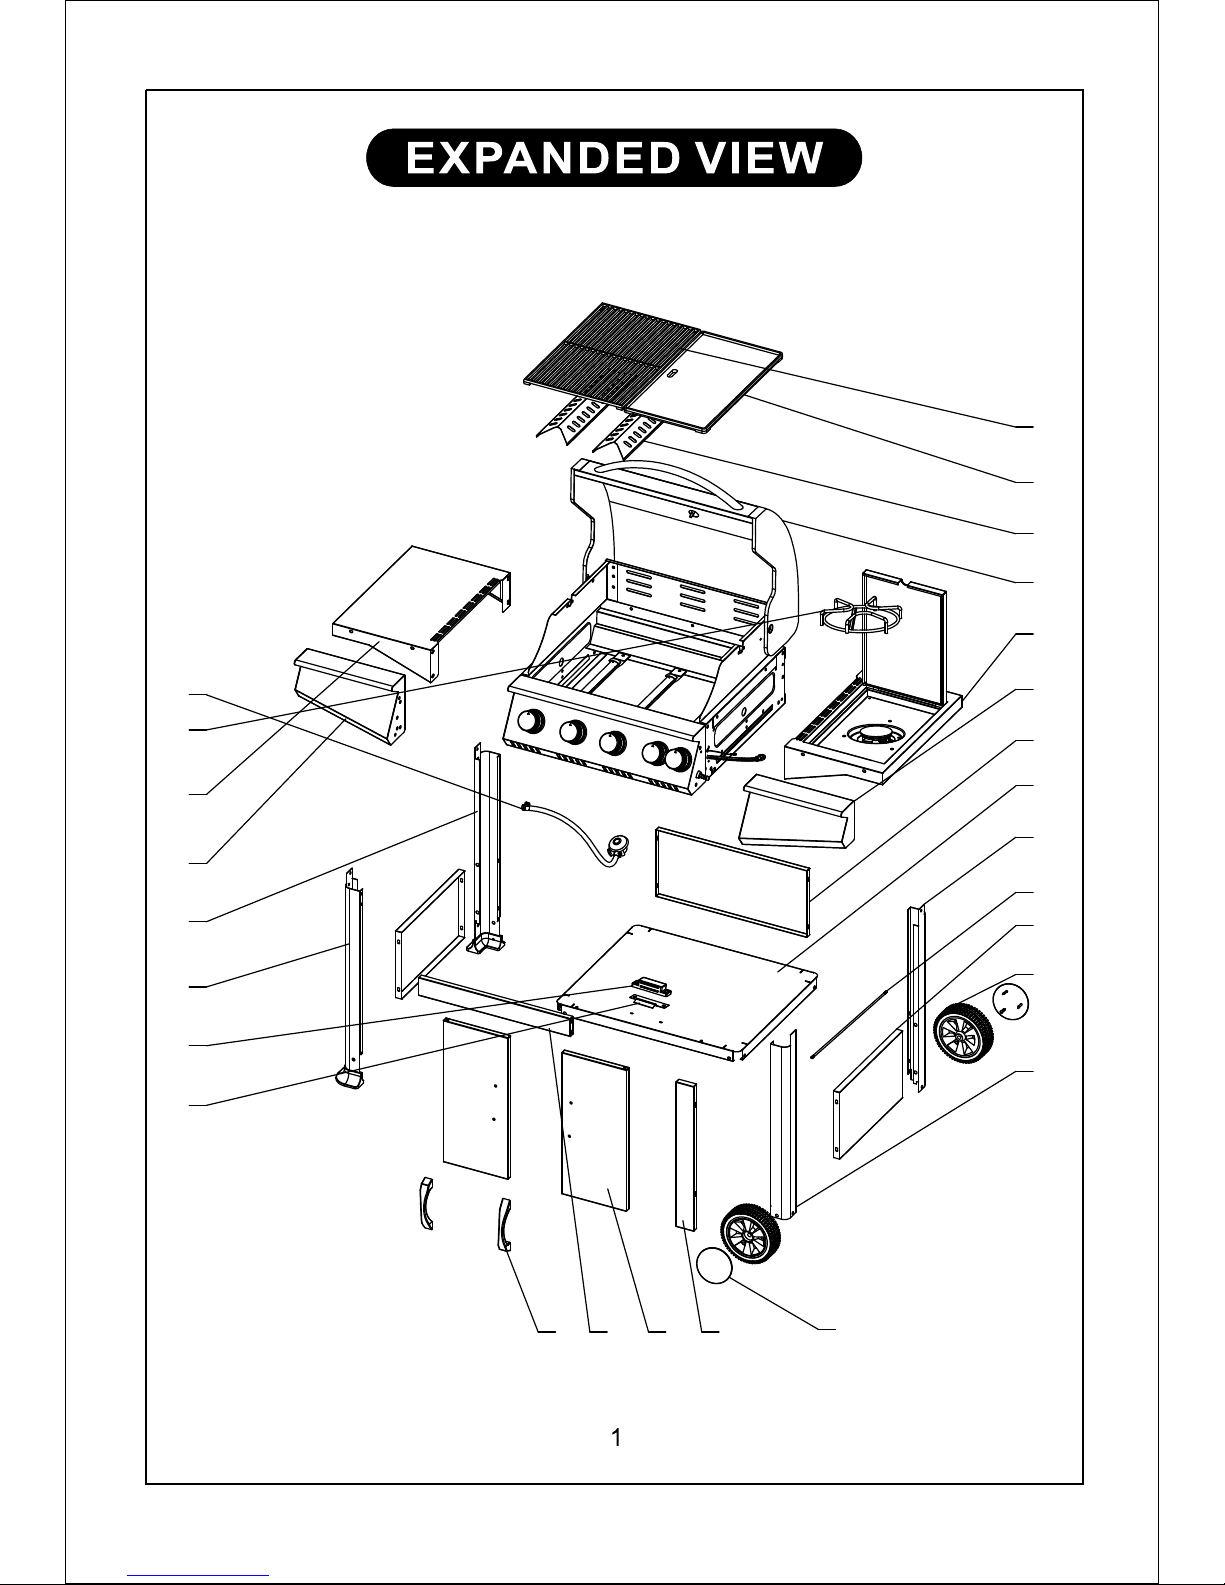
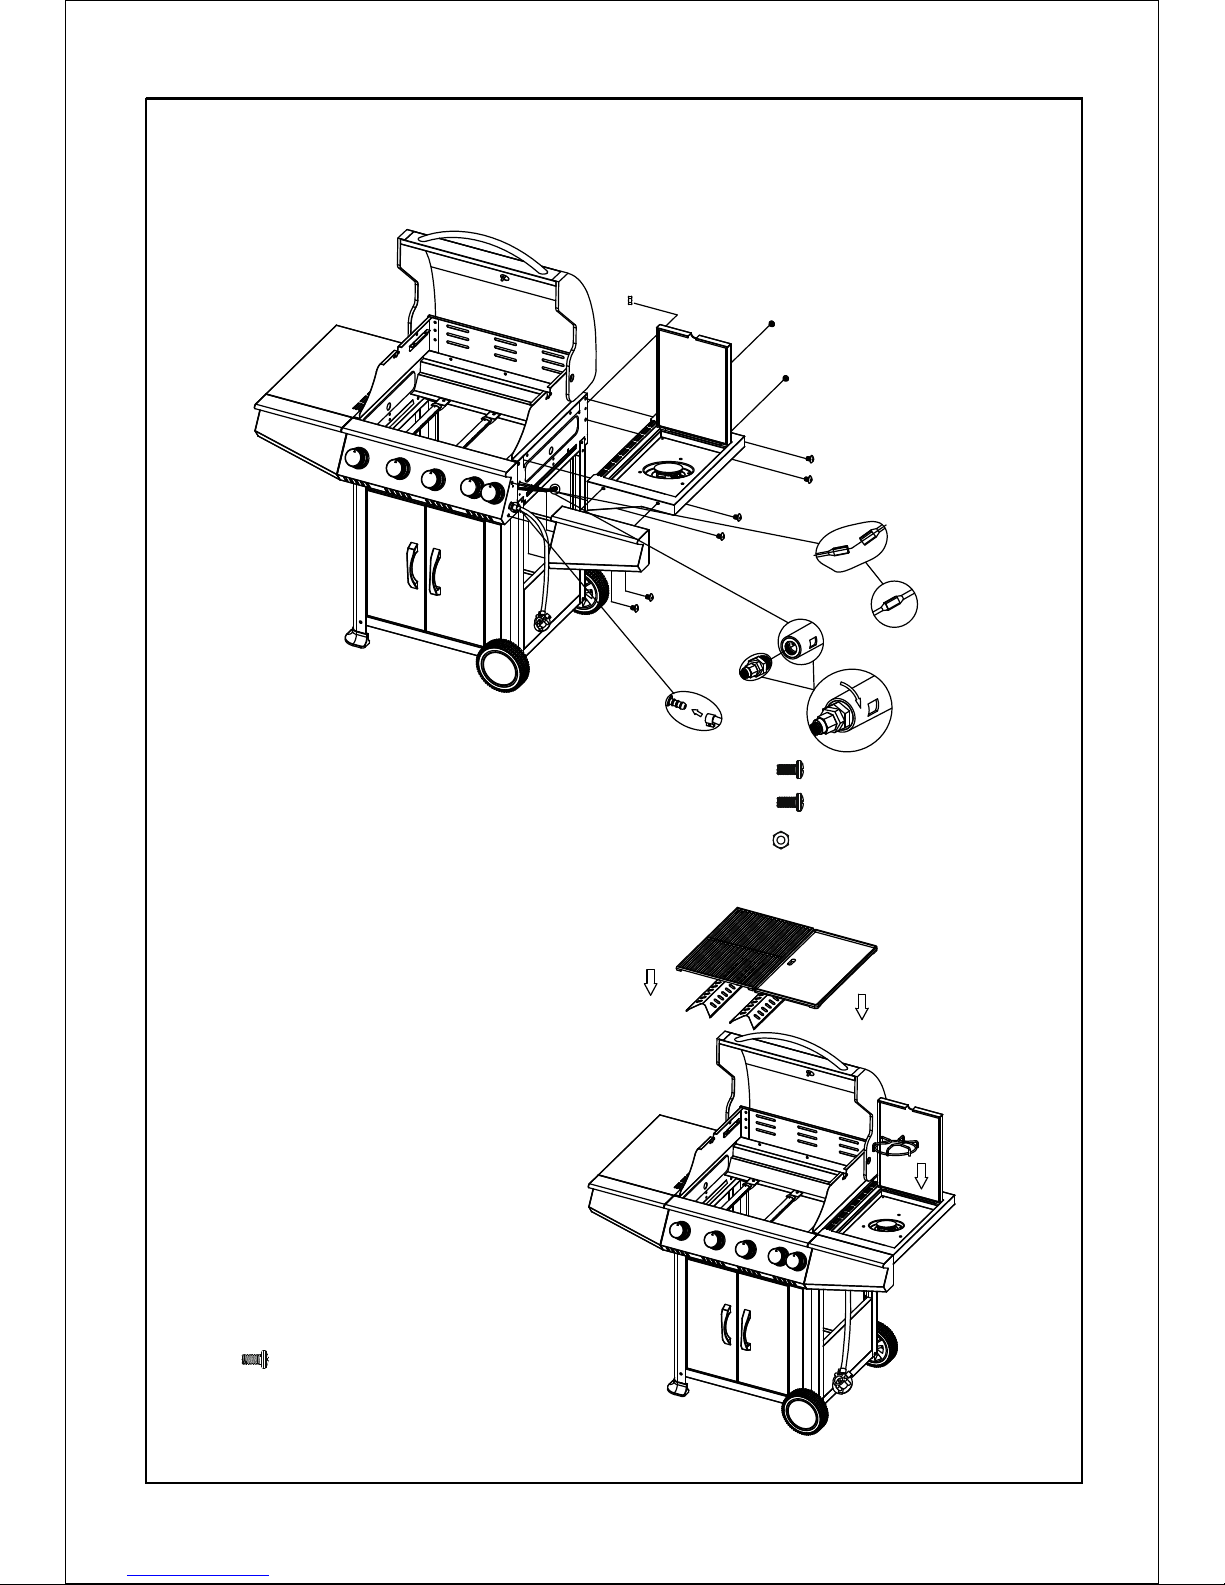
CONNECTING THE GAS CYLINDER TO THE APPLIANCE
Read the following instructions carefully and be sure your barbecue is
properly installed, assembled and cared for. Failure to follow these
instructions may result in serious bodily injury and/or property damage.
If you have any questions concerning assembly or operation, consult your
dealer or LPG Gas Company.
When used on the ground always place the appliance and cylinder on flat
level ground. DO NOT move this product when in use.
Never light the appliance with the lid in the closed position.
Never fits the cylinder under the barbecue in the housing always place the
cylinder under the side shelf at the end of the appliance or at the rear of the
appliance. The cylinder should be sited as far away from the appliance as
possible without straining the hose.
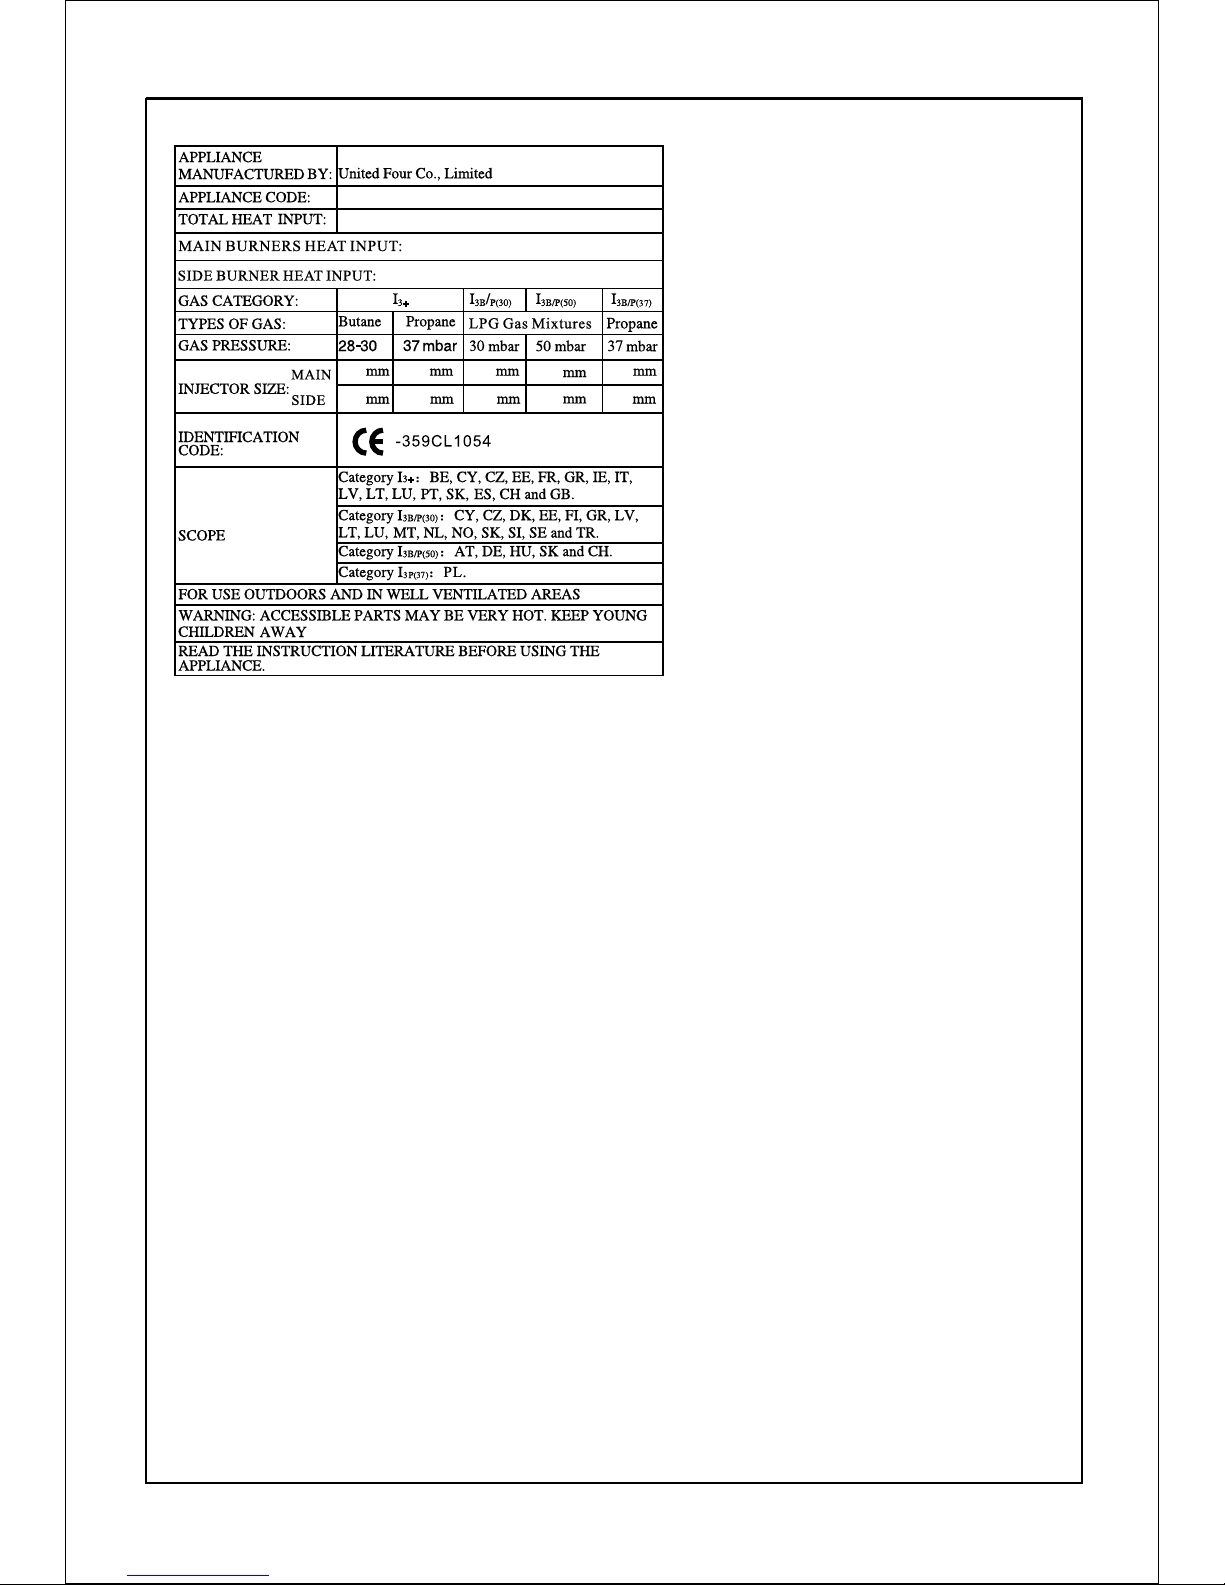
This barbecue is set to operate a 28mbar regulator with butane gas and a
37mbar regulator with propane gas. This appliance is only suitable for use
with low-pressure butane or propane gas, fitted with the appropriate low-
pressure regulator via a flexible hose (Regulator and hose are included.)
Please consult your Local gas dealer for suitable regulator, hose and gas
cylinder.
Technical Information:
1.001.00 0.87
0.87
1.001.00 1.001.00 0.940.94
0.860.86 0.860.86 0.860.86 0.75
0.75 0.810.81
GB7540SGB7540S
20.8kW(1518g/h)
20.8kW(1518g/h)
17.6kW(1285g/h)
17.6kW(1285g/h)
3.2kW(233g/h)
3.2kW(233g/h)
9

BEFORE USE CHECK FOR LEAKS
Never check for leaks with a naked flame, always use a soapy water solution
Gas Cylinder
Connection to Appliance / Change of Gas Cylinder
The gas cylinder should not be dropped or handled roughly! If the appliance
is not in use, the cylinder must be disconnected. Replace the protective cap
on the cylinder after disconnecting the cylinder from the appliance.
Cylinders must be stored outdoors in an upright position an out of the reach
of children. The cylinder must never be stored where temperatures can
reach over 50C. Do not store the cylinder near flames, pilot lights or other
sources of ignition. DO NOT SMOKE.
This barbecue is designed for use outdoors, away from any flammable
materials. It is important that there are no overhead obstructions and that
there is a minimum distance of 1m from the side or rear of the appliance. It
is important that the ventilation openings of the appliance are not
obstructed. The barbecue must be used on a level, stable surface. The
appliance should be protected from direct draughts and shall be positioned
or protected against direct penetration by any trickling water (e. g. rain).
Parts sealed by the manufacturer or his agent must mot be altered by the
user. No modifications should be made to any part of this barbecue and
repairs and maintenance should only be carried out by a registered service
engineer.
Do not obstruct any ventilation openings in the barbecue body. Position the
gas cylinder on level ground next to the barbecue and safely away from any
source of heat. Should you need to change the gas bottle, confirm that the
barbecue is switched off, and that that there are no sources of ignition
(cigarettes, open flame, sparks, etc.) near before proceeding. Before
connection, en sure that there is no debris caught in he head of the gas
cylinder, regulator, burner and burner ports.
Spiders and insects can nest within and clog the burner/venturi tube at the
orifice. A clogged burner can lead to a fire beneath the appliance.
Clean burner holes with a heavy-duty pipe cleaner.
Fit the hose to the appliance using a spanner to tighten it onto the
connection thread. If the hose is replaced it must be secured to the
appliance and regulator connections with hose clips. Disconnect the
regulator from the cylinder (according to the directions supplied with the
regulator) when the barbecue is not in use.
The Barbecue must be used in a well ventilated area. Do not obstruct the
flow of combustion air to the burner when the barbecue is in use. ONLY USE
THIS BARBECUE OUTDOORS.
The gas cylinder should be placed upright on its bottom on level ground and
should NEVER be stood on the trolley base and placed directly under the
barbecue.
10

TO CHECK FOR LEAKS
LIGHTING YOUR BARBECUE
Lighting Instructions
Manual lighting instruction
Make 2-3 fluid ounces of leak detecting solution by mixing one part washing
up liquid with 3 parts water.
Ensure the control valve is “OFF”.
Connect the regulator to the cylinder and ON/OFF valve to the burner,
ensure the connections are secure then turn ON the gas.
Brush the soapy solution onto the hose and all joints. If bubbles appear you
have a leak, which must be rectified before use.
Retest after fixing the fault
Turn OFF the gas at the cylinder after testing.
If leakage is detected and cannot be rectified. Do not attempt to cure
leakage but consult your bas dealer.
1. Turn all the control knobs clockwise to “OFF”position.
2. Connect the regulator to the gas bottle. Turn the gas supply ”ON”at the
regulator or cylinder valve. Check with the use of soapy water for any
gas leakage between the bottle and the regulator
3. Open the hood. Push down the control knob and turn it anti-clockwise to
the “Full rate”position, a click will be heard. The piezo ignition unit will
light the main burner. If not, repeat this process. Once the burner is
alight, release the control knob.
4. If the burner has not lit wait 5 minutes and repeat step 3. If the burner
still fails to light after several attempts, try the manual lighting listed
below.
5. Adjust the heat by turning the knob to the High/Low position.
6. After successfully lighting the first burner, turn next control knob to the
ON position. The gas will ignite from lit burner on left. Follow the same
procedure for each successive burner. Ensure burner is lit before
opening control valve on next burner. Light the remaining burners from
left to right.
7. To turn the barbecue “OFF”turn the cylinder valve or regulator switch to
the “OFF”position and then turn the control knob on the appliance
clockwise to the “OFF”position.
Warning: If the burner fails to ignite, turn the control knob off clockwise
and also turn the cylinder valve off. Wait five minutes before attempting to
relight with ignition sequence.
1. Open the barbecue hood.
2. Slide the grease tray halfway open. Check and make sure all knobs are
in the off position.
3. Light match and from underside of grill reach up and position match
near ports on side of right hand burner.
()
11

4. To light burner, push down the right control knob and turn it anti-
clockwise to “full rate”position, a click sound will be heard. Then remain for
2-3 seconds for ignition. WARNING! Ignition must only be made with the
valve completely open.
5. Once burner is lit, release and turn the knob to low flame position and
carefully replace grease tray.
6. Adjust the heat by turning the knob to the High/Low position.
Remark: The manual lighting should be performed by two peoples.
In case barbecue still does not light, please check:
1. Do you have fuel in fuel bottle?
2. Is venture properly engaged with injector?
3. Are all hoses connected properly?
Clean your barbecue after each USE. DO NOT use abrasive or flammable
cleaners, as it will damage the parts of the product and may start a fire.
Clean in warm soapy water.
WARNING: Accessible parts maybe very hot. Keep young children away
from the hot appliance at all times (even while cooling down!). It is
recommended that protective gloves (eg oven gloves) be used when
handling particularly hot components.
CAUTION: All cleaning and maintenance should be carried out when the
barbecue is cool and with the fuel supply turned OFF at the gas cylinder.
“Burning off”the barbecue after every use (for approx 15 minutes) will keep
excessive food residue to a minimum.
Use mild detergent or baking soda and hot water solution. Non-abrasive
scouring powder can be used on stubborn stains, then rinse with water.
If the inside surface of the barbecue lid has the appearance of pealing
paint, baked on grease build-up has turned to carbon and is flaking off.
Clean thoroughly with strong hot soapy water solution. Rinse with water
and allow to completely dry. NEVER USE OVEN CLEANER.
Remove residue using brush, scraper and/or cleaning pad then wash with a
soapy water solution. Rinse with water and allow to dry.
Use a mild soapy water solution. Non-abrasive scouring power can be used
on stubborn stains then rinse with water.
CLEANING AND CARE
Outside Surface
Interior of Barbecue Bottom
Cooking Grid
12

Cleaning The Burner Assembly
SERVICING
Turn the gas OFF at the control knob and disconnect the cylinder.
Remove cooking grate.
Clean the burner with a soft brush or blow clean with compressed air and
wipe with a cloth.
Clean any clogged ports with a pipe cleaner or stiff wire (such as an opened
paper clip).
Inspect burner for any damage (cracks or holes). If damage is found,
replace with a new burner. Reinstall the burner, check to ensure that the
Gas valve orifices are correctly positioned and secured inside the burner
inlet (venture).
Your gas barbecue should be serviced annually by a competent registered
person.
13

If in doubt of any aspect regarding the assembly, use or safety of your Barbque please contact us:
ROWLINSON GARDEN PRODUCTS LIMITED
Green Lane
Wardle Nr.Nantwich
Cheshire
CW5 6BN
Help Line (Normal Office Hours) 01829 261 121 We constantly improve the quality of our products,
ocasionally the components may differ from the
components shown and are only correct at time of
printing. We reserve the right to change the
specification of our products without prior notice.
2013 © Rowlinson Garden Products Ltd
Table of contents
Popular Grill manuals by other brands

Outsunny
Outsunny 846-085 Assembly instruction

Linea 2000
Linea 2000 DOMO DO1060TP instruction manual

Weber
Weber FIREPLACE owner's manual

TEFAL
TEFAL OptiGrill+ GC712D34 instructions

Jata electro
Jata electro GR205 Instructions for use

Sunshine Lifestyle
Sunshine Lifestyle PATIO MATE Charcoal BARBECUES User guide & accessories