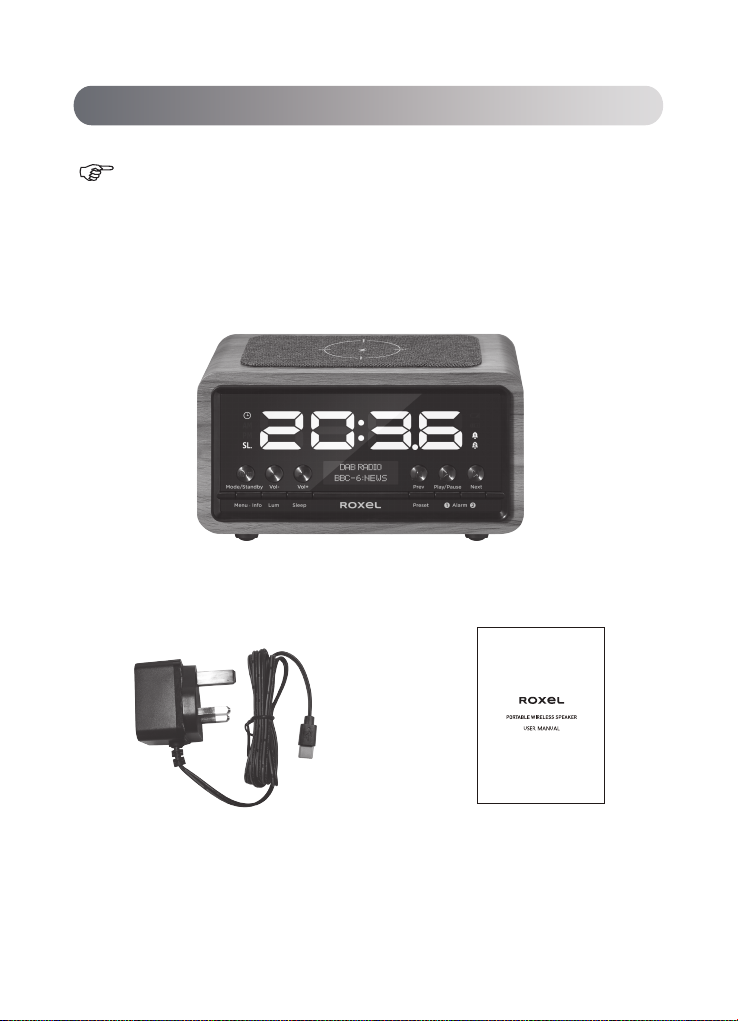
ROXEL DAB RADIO NOD User manual

DAB RADIO NOD

01
English
1. Read these instructions.
2. Retain this manual.
3. Heed all warnings.
4. Follow all instructions.
5. Do not use this device in wet conditions.
6. Clean only with dry cloth.
7. Do not block any ventilation openings. Install in accordance to the manufacturer’s
instructions.
8. Do not use near any heat sources such as radiators, heaters, stoves, or other devices
(including amplifiers) that produce heat.
9. Do not defeat the safety purpose of the polarized or grounding-type plug. A
polarized plug has two blades with one wider than the other. A grounding type
plug has two blades and a third grounding prong. The wide blade or the third prong
are provided for your safety. If the provided plug does not fit into your outlet,
consult an electrician about the replacement.
Thank you for purchasing our product. ROXEL products are conceived and designed
striving to achieve contemporary, well thought out updates on modern classics. We
found that simple, timeless ideas go a long way when you combine them with high
quality materials and determination to remain affordable. Please read the instructions
thoroughly and retain this manual for future reference.
The lightning flash with arrowhead inside the triangle, is intended to
alert the user to the presence of uninsulated dangerous voltage within
the product's enclosure that may be of a sufficient magnitude to
constitute a risk of electric shock.
The exclamation mark inside the triangle is intended to alert the user to
the presence of important operating and maintenance (servicing)
instructions in the manual accompanying the product.
To prevent the risk of electric shock, do not remove the cover
(or back). No user- serviceable Parts inside. Refer servicing to
qualified Service personnel only.
Important safety instructions

02
English
10. Protect the power cord from being walked on or pinched particularly at plugs,
convenience receptacles, and the point connecting to the device.
11. Only use attachments/accessories specified by the manufacturer.
12. Unplug this device during lightning storms or when unused for long periods of
time.
13. Refer all servicing to qualified service personnel.
14. The MAINS plug is used to disconnect the device. The disconnected device will
remain in standby.
Important safety instructions
Note: There is a built-in rechargeable lithium-ion battery in the device. Danger of
explosion if the device is disassembled. The device should not be placed close to
excessive heat source. The battery should not be exposed to excessive heat such as
sunshine, fire or the like. Danger of explosion if the battery is incorrectly replaced.
Replace only with the same or equivalent type of the battery.
Correct disposal of this product. This marking indicates that this product
should not be disposed with other household waste throughout the EU.
To prevent possible harm to the environment, please follow the
government guidelines and recycle responsibly.

03
English
Use supplied AC adaptor (5V/3A) to connect the device Roxel Nod with electrical
socket to supply power.
Charge lnstructions:
Packing List
Unpack the box
DAB Radio
3 Pin Adaptor User Manual
DAB RADIO NOD

04
English
Function description
● This product is a comprehensive digital alarm clock radio device, integrating
DAB, FM, Bluetooth, and Wireless charging.
● Supports Band III DAB/DAB+ digital signal reception
● Supports Band II 87.5-108 MHz FM reception with RDS function
● Supports 5.0 standard Bluetooth version
● With big LED display and small LCD display
● With real-time clock function and automatic time update through DAB
● Two sets of alarm clock function with optional DAB/FM/Buzzer alarm sound
source
● Built-in Wireless Charging pad is compatible with all Qi-enabled phones.
● Supports multi-language (nine languages) system operation
Specications
● Audio output power: RMS 3W
● Signal to noise ratio: ≥70dBA
● Distortion: ≤ 5%
● Frequency response: 100HZ-18KHZ
● Audio input interface: DAB, FM, Bluetooth
● Adjustment form: Button
● Input power: DC 5V/3A
● Wireless charging output: 5W
● DAB receiving input sensitivity: -97dBm
● FM receiving input sensitivity: -105dBm
● Working environment temperature: -10ºC ~ 50 ºC
● Storage temperature: -20ºC ~ 70 ºC
● Product size: 165*95*92 mm
● Product Net weight: about 520g
Instruction

05
English
Product View
Instruction
1
2
3
5
6 7 8 9 10
4
11 12
13
14
15
16
18
17

06
English
Wireless charging pad
LED display
VOL-
Mode / Standby button
Short press -- Switch between DAB/FM/Bluetooth modes.
Long press to enter standby mode, then short press to exit standby mode.
Long press to enter standby mode, then long press again to power off the device.
VOL+
Menu.Info button
Short press -- Show DAB information
Long press -- Enter menu set up
Lum button
Short press -- Adjust the display brightness Level : Low / Medium / High
Sleep button
Long press -- Enter Sleep timer set up interface
Small LCD display
PRESET button
DAB/FM mode: Short press -- Recall preset radio station list.
Long press -- Add current radio station to preset radio list.
Alarm 1 button
Short press -- Turn on/off Alarm 1
Long press -- Enter Alarm 1 set up interface
Alarm 2 button
Short press -- Turn on/off Alarm 2
Long press -- Enter Alarm 2 set up interface
Play/Pause button
DAB/FM mode: Long press -- Automatic searching radio stations.
Bluetooth mode: Short press -- Play/Pause
Menu set up: Short press -- Enter/Confirm
Instruction
01
02
03
04
06
05
07
09
08
10
11
12
13

Next button
Previous button
Antenna
Charging port
Speaker
14
15
16
17
18
07
English
Instruction
Power ON/OFF
Use supplied AC adaptor (5V/3A) to connect the device Roxel Nod with electrical
socket to supply power.
Wireless charging Pad (Power supply by AC adaptor)
Roxel Nod with wireless charging features a Qi charging pad on the top that allows
you to charge Qi enabled phones wirelessly. Just put your phone on the top, it will
give you a full charged phone when you wake up in the morning.
Clock Radio Power ON/OFF
After connecting the power, Roxel Nod is powered on.
Long press the Mode/Standby button to enter Standby mode, then short press the
Mode/Standby button to exit Standby mode.
Long press the Mode/Standby button to enter Standby mode, then long press the
Mode/Standby button again to power off.
DAB Radio
1. Upon being powered on, the device will go to DAB mode automatically and will
start searching for available DAB stations, which will be stored after the search is
completed. (If the device has already searched for radio stations, you can also press
and hold the Play/Pause button to perform automatic searching.)
2. Press the Prev/ Next button to select your desired DAB station(see small screen),
then press the Play/Pause button to play. Press the Vol-/Vol+ button to adjust
volume.
3. Short press the Menu.Info button to view the current station information(see small
screen): text information, signal strength, program type, episode name, channel
number/frequency, signal error rate, bit rate, time and date, etc.
4. Saving stations into preset mode:
(1) Long press Play/Pause button ( if a full scan was previously done please move to
step 2)

08
English
Instruction
(2) Find the radio station by pressing the Prev/Next button.
(3) Select the channel you want to save, and press the Play/Pause button to enter.
(4) Press and hold the Preset button for 3 seconds.
(5) Pick one of the available (Empty) slots from the preset store screen(see small
screen).
(6) Press the Play/Pause button to save the channel.
5. Short press the Preset button to recall preset radio list. Press the Prev/ Next button
to select DAB station, then press the Play/Pause button to play.
Note: Please press the Preset button to access your preset radio stations in DAB mode,
otherwise the stations will display in automatically set order.
FM Radio
1. Press the Mode/Standby button to switch to FM mode.
2. Press and hold the Play/Pause button for 2~3 seconds to start automatic searching
for FM radio channels. Available channels will be stored after the search is
completed.
Scan Setting: Press and hold the Menu.Info button for 2~3 seconds to enter menu
set up(see small screen). Press the Prev/Next button to select “Scan Setting”, press
the Play/Pause button to confirm and enter. Press the Prev/Next button to select All
stations / Strong stations, and press the Play/Pause button to confirm. If select All
stations, all available channels will be stored after the search is completed. If select
Strong stations, only strong signal radio stations will be stored after the search is
completed.
3. Press the Preset button to go to the Radio station list, then press the Prev/Next
button to select the desired station and press the Play/Pause button to play. Press
the Vol-/Vol+ button to adjust volume.
4. Short press the Prev/Next button to adjust radio frequency by 0.05MHz at a time.
Long press the Prev/Next button for 3 seconds to start automatic searching for
previous/next radio station.
5. Long press the Preset button to add current radio station to the radio list, press the
Prev/Next button to select list number you want to use, then press the Play/Pause
button to confirm.

09
English
Instruction
Bluetooth music play
1. Press the Mode/Standby button to switch to BT mode.
2. To use your Bluetooth enabled device, make sure the Bluetooth function is enabled,
then search for “Roxel Nod” on the list and click on it to connect.
3. Play music or any audio files from your Bluetooth enabled device. Press the
Prev/Next button to go to previous/next track, press the Vol+/Vol- button to adjust
volume.
4. Press the Play/Pause button to play/pause music.
5. Long press the Play/Pause button to disconnect Bluetooth.
System Set up
Press and hold the Menu.Info button for 2~3 seconds to enter menu set up(see small
screen). Press the Prev/Next button to select sub-menu items, press the Play/Pause
button to confirm and enter. If there is only one sub-menu, press the Play/Pause
button to confirm and enter. During operation, press the Menu.Info button to return.
Time and Date Set up
A- In DAB radio mode, if DAB signal can be searched, the device will automatically set
the local time.
B- Manual Time Set up : Press and hold the Menu.Info button for 2~3 seconds to enter
menu set up(see small screen). Press the Prev/Next button to select <System>, then
press the Play/Pause button to confirm and enter System set up. Press the Prev/
Next button to select <Time/Date>, Press the Play/Pause button to enter date and
time set up interface, press the Prev/Next button to select <Set Time /Date>/<Set
Hour System>/<Set Date Format>/<Auto Update>.
1. Set Time /Date: Press the Play/Pause button to enter Time/Date set up: Date -
Month - Year - Hour - Minute. ( press the Prev/Next button to select the numbers
and press the Play/Pause button to confirm.)
2. Set Hour System: Press the Play/Pause button to enter 24h/12h set up, press the
Prev/Next button to select, and press the Play/Pause button to confirm.
3. Set Date Format: Press the Play/Pause button to enter Date Format setting, press
the Prev/Next button to select, and press the Play/Pause button to confirm.

10
English
Instruction
Alarm clock Set up
This device can set 2 sets alarms.
1. Press and hold Alarm 1 button to enter Alarm 1 set up interface (see small screen).
Press and hold Alarm 2 button to enter Alarm 2 set up interface (see small screen)
2. Alarm set up: Alarm time - Alarm source - Repeat -Alarm volume - Alarm duration.
( Press the Prev/Next button to select, press the Play/Pause button to confirm and
go to next. )
Alarm sound source: Buzzer / FM / DAB
Repeat: Once / Daily / Weekends / Workday
Alarm volume: Press the Prev/Next button to adjust the alarm volume.
Alarm duration: 15 Minutes / 30 Minutes / ... / 2 Hours
3. Press the Menu.Info button to return/exit Alarm set up.Press Alarm 1 button to turn
on/off Alarm 1. Press Alarm 2 button to turn on/off Alarm 2.
4. When alarm clock rings, press the Play/Pause or Sleep button to activate the snooze
function. After 5 min , the alarm will rings again, press the Mode/Standby or
Aarm1/Alarm2 button to stop alarm.
Display Brightness Adjustment
Press the Lum button to adjust display brightness Level : Low / Medium / High
Sleep Timer
1. Long press the Sleep button to enter sleep timer set up interface (see small screen).
2. Press the Prev/Next button to select Sleep 15 minutes / …/ Sleep 1 Hour 30
minutes/ Sleep OFF. .
3. Press the Play/Pause button to confirm sleep timer setting.
4. The device will goes to standby mode after 15 minutes / 30 minutes/ …/ 2 Hours.
(If select “Sleep OFF” and press ENTER button, Sleep timer will be turned off.)

Table of contents
Other ROXEL Speakers manuals