RS 8802201 User manual

Professionallyapprovedproducts.
User Manual
FULL HD
Video-Blackbox
Article no: 8802201

2
Index
A. Feature Description ................................................................................................ 3
B. Specification ........................................................................................................... 4
C. Accessories ............................................................................................................ 4
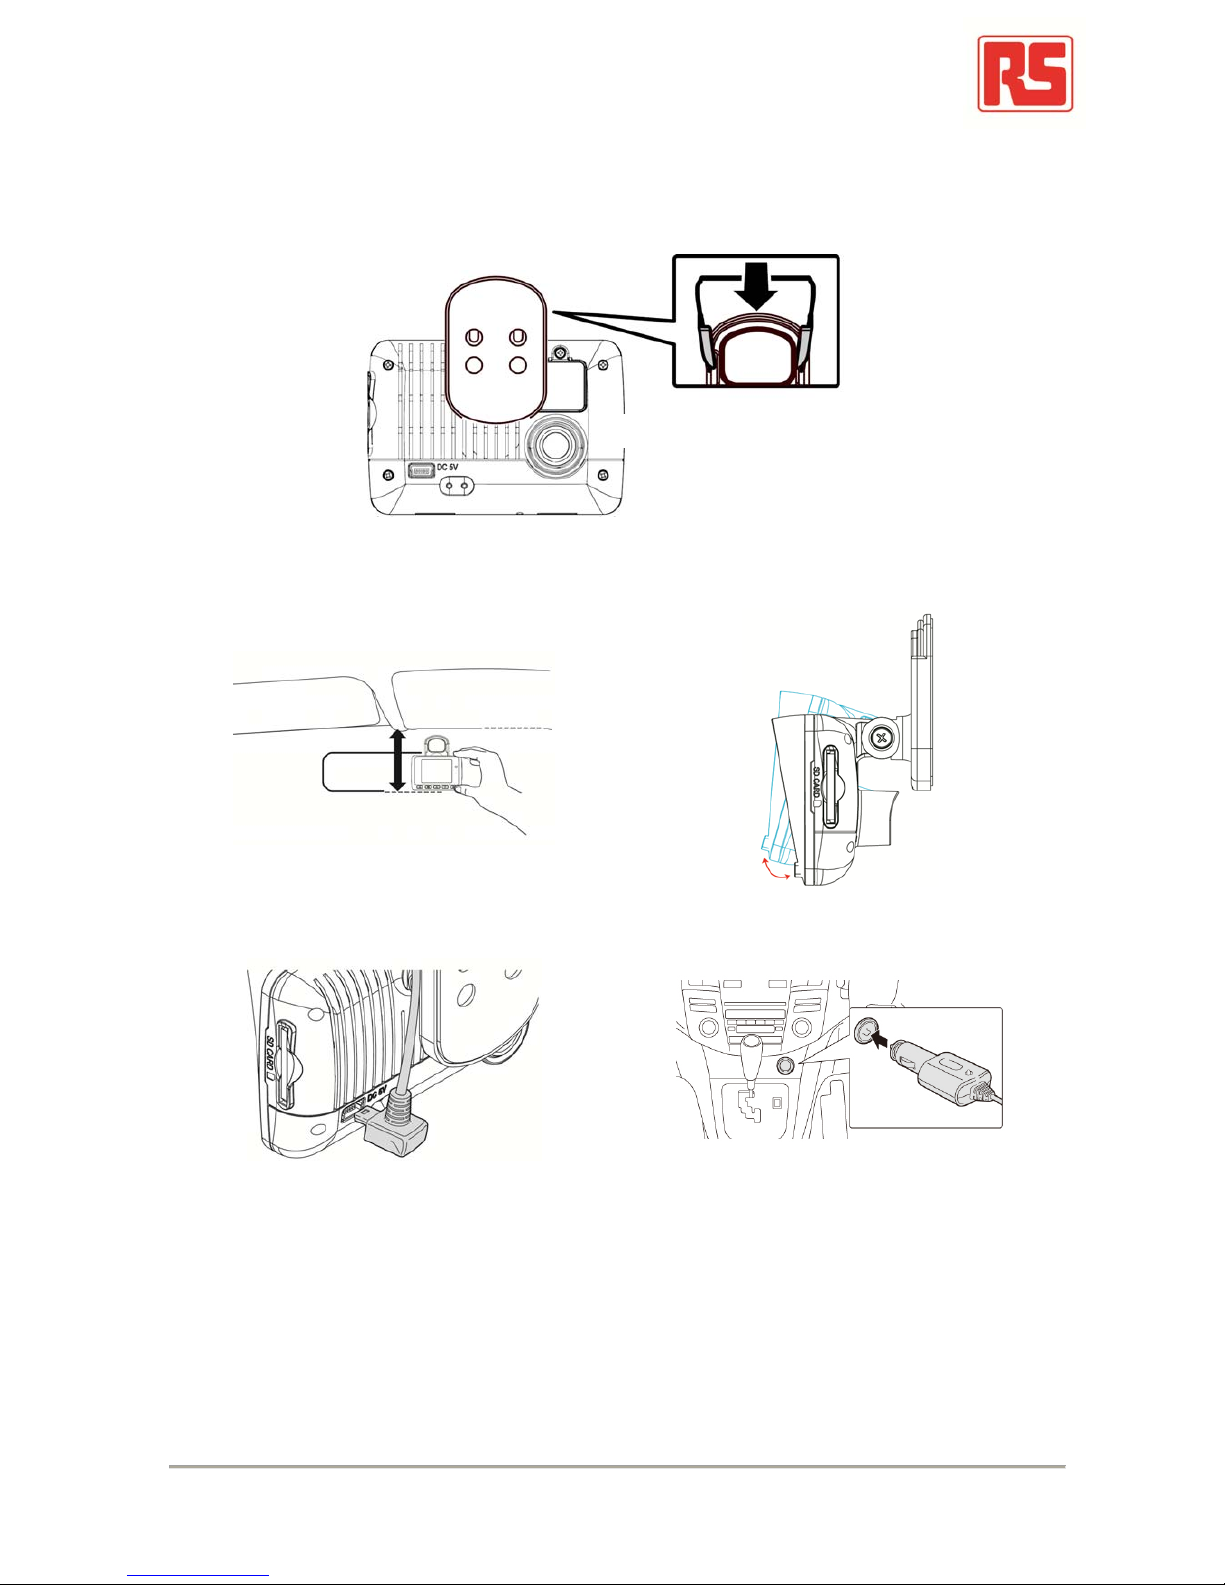
D. Schematic Diagram of The Installation Steps ......................................................... 5
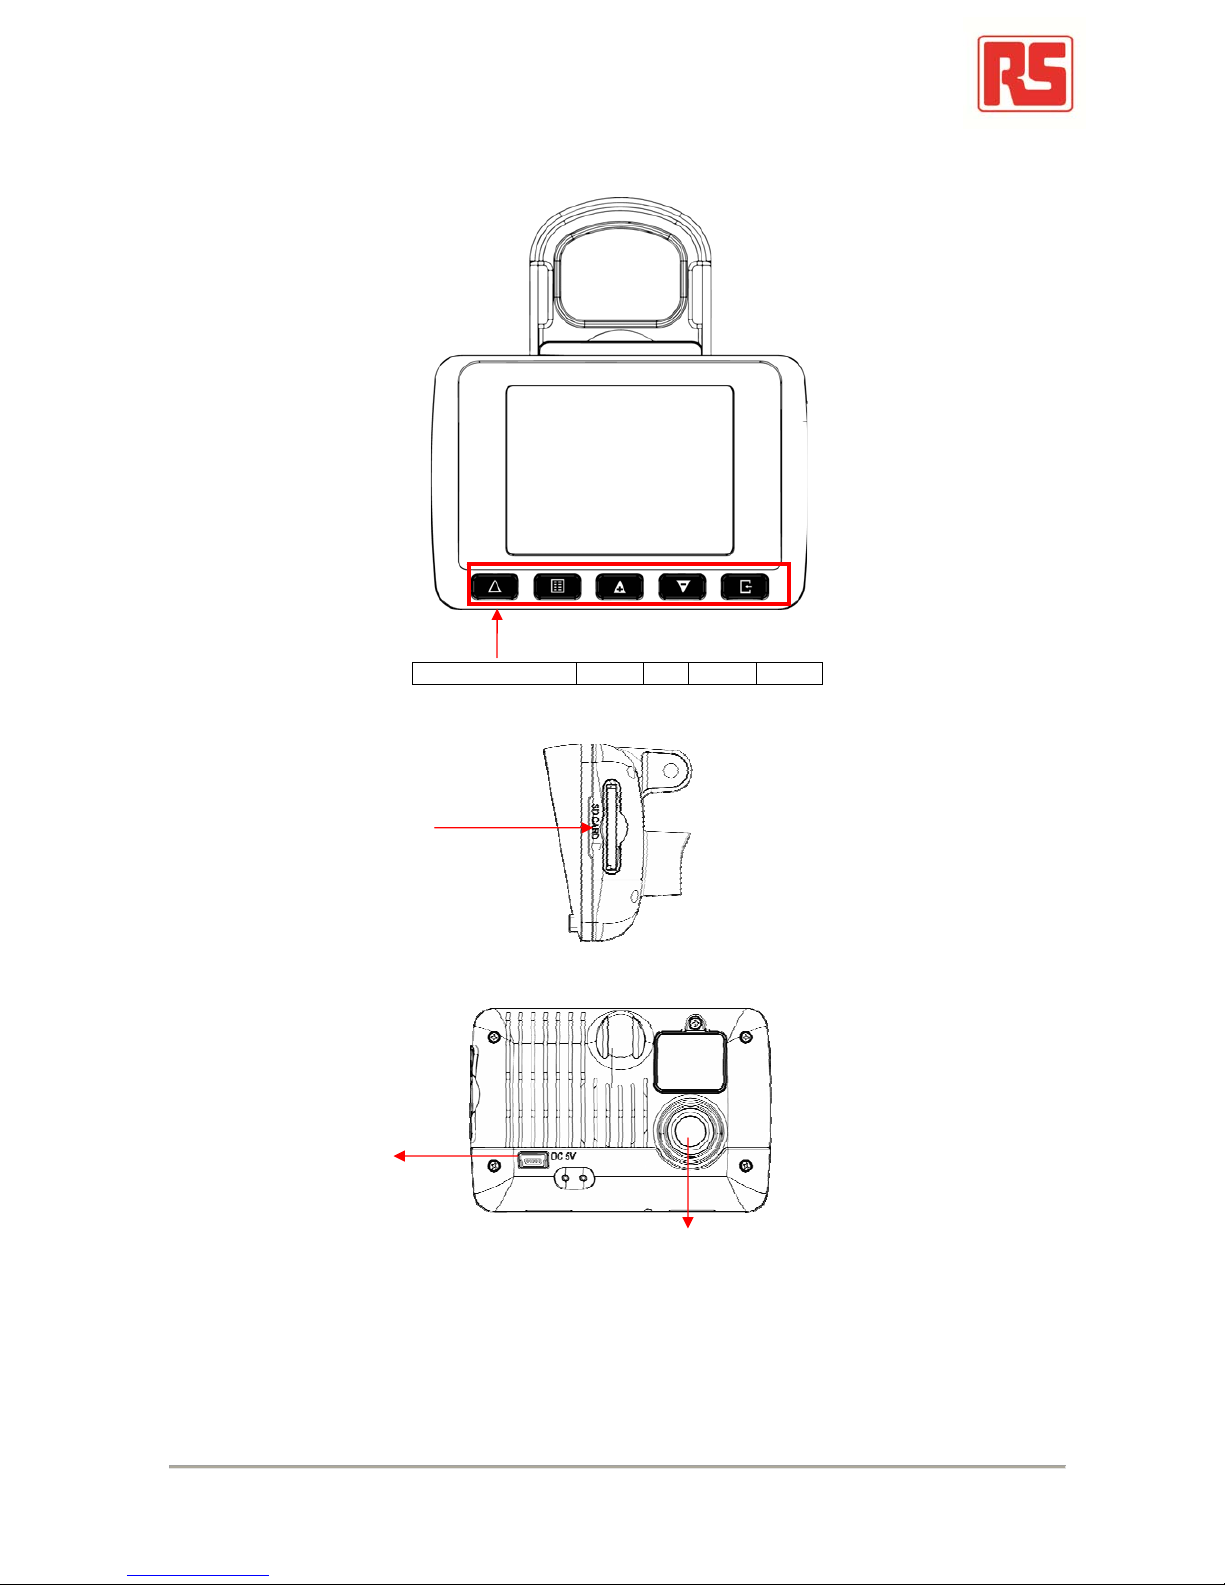
E. Product Function Introduction ................................................................................. 7
F. SD Card Installation ................................................................................................ 8
G. OSD Menu .............................................................................................................. 9
H. Remote Controller Description .............................................................................. 10
I. Recording / Stop Recording .................................................................................. 11
J. The RS component Player .................................................................................... 12
1. Operation icon introduction.............................................................................12
2. Capture...........................................................................................................12
3. Configuration..................................................................................................13
4. File backup.....................................................................................................15
5. Playback.........................................................................................................16
6. Progress bar...................................................................................................16
7. Play speed......................................................................................................17
8. Volume control................................................................................................17
9. G-SENSOR....................................................................................................17
10.Format............................................................................................................17
K. Estimated Recording Time .................................................................................... 19
L. Appendix: Bright and dark spot on the LCD .......................................................... 20

3
A. Feature Description
Full HD real-time recording (with H.264 compression technology)
105° Wide-angle CMOS Lens
2.5”TFT LCD
GPS sensor
Record video with sound inside and outside the car
Compatible with SDHC Card up to 32GB
Automatic loop recording
Emergency recording, file save to separate area to prevent overwritten
Built-in GPS for tracking speed and position
Built-in G-Sensor, to automatically record footage in case of an accident
Made in Taiwan, with a 1 year warrantee – the longest of any dash-camera

4
B. Specification
Items Description
Sensor CMOS
View Angle 105° Wide-angle
Resolution NTSC 30fps / PAL 25fps
V / A DC5V±5% / 1A
Operating tmp. -10ºC ~ +60ºC
Display 2.5” TFT LCD
Storage 4GB - 32 GB SDHC Card ( 『SanDisk』or『Transcend』Class
10 or above is recommended)
Manner of
Recording Automatic recording on power on,
Recording is stopped on power off
Recorded
content Date, Time, Image, Sound,
G-Sensor data, GPS data
Storage Format Proprietary format,
playback on device or bundled software
Audio Input Built-in microphone
Time setting Internal calendar adjustable via GPS,
remote control or bundled software
G-Sensor Built-in 3D G-Sensor
C. Accessories
Adapter / IR remote control / Software CD / Bracket / 3M sticker / 8 GB Class 10 SDHC
Card

5
D. Schematic Diagram of The Installation Steps
1. Install the device on the windshield using bundled 3M or suction cup mount
2. Find the optimal position of device on
the windshield 3. Adjust to the appropriate recording
angle
4. Plug in the DC5V Power Supply 5. Plug in the Cigarette charger
Sticker Adhesive S
p
ot
Stick-Holder

6
6. Diagram of recommended device installation
Notice
(1). This device should be installed within the area of the windshield wipers
(2). Format the SD card before first-time use
(3). Set date and time on the OSD, or auto-calibration via GPS
(4). Set NTSC or PAL through OSD
Best location
Cigarette adapte
r

7
E. Product Function Introduction
Secure recording Menu Up Down Enter
SD card Slot
DC5V
Power input
Lens

8
F. SD Card Installation
(1). To format the memory card; please refer to the other chapter “Formatting the
memory card” for more detail.
Warning
(1). “SanDisk” or “Transcend” Class 10 or above SDHC cards are
recommended (4GB minimum)
(2). If memory card is not formatted using the bundled software, the device
will automatically erase all the data on the memory card and start
recording at default settings
(3). Please don’t use a Micro SD to SD card adapter for recording, to avoid
damage during recording
(4). Fragmentation of the memory card storage during writing is normal.
Regular inspection of the memory card and playback using bundled
software is recommended to ensure good read/write performance

9
G. OSDMenu
Press to open the OSD (On Screen Display) menu shown below:
1. Video standard: Click to choose NTSC / PAL
2. Time setting: Click to adjust clock
3. Display sleep: Click to set delay time of display sleep
4. Firmware Version: to show firmware version
NTSC / PAL
Time setting
Display sleep
Firmware version

10
H. Remote Controller Description
Display On/Off Force Recording
Volume Down
Stop Voice Recording
Menu
Confirm
StopPlay
Pause
Up / Down
Left / Right
Speaker On/Of
f
Volume Up

11
I. Recording / Stop Recording
1. Power On/Recording
The device automatically starts on car power on.
Please allow 30 sec. for recording to start.
2. Power Off/Stop recording
When the car power is off, the device will stop recording video and sound. You can
take out the memory card and insert it in your computer to view the video.
3. Indication
Blinking red light indicates recording.
Fast blinking red light indicates activation of the secure recording feature.

12
J. The RS component Player
This software requires DirectX 9.0 or above installed on your PC.
1. Operation icon introduction
Back to previous file
Previous image
Reward
Pause
Stop
Play
Next image
Next footage
2. Capture: Create a snapshot of current video frame
You can save a frame of your footage during playback of footage.
Click the button to take a snapshot of the current video frame.
The following window is shown, with the image captured shown on the right side. Snapshots are
saved as Bitmap images (*.bmp) in the application directory /Snapshot sub-folder.
(Snapshot file)

13
3. Configuration : configure default settings
Before using the first-time connect the SD Card to your computer to format the SD
card. Configure the desired video format (NTSC or PAL). Afterwards, you can
insert the SD card into the device and start recording.

14
1 Video
Quality Default quality is high
2 Video Frame
Rate 25(PAL) / 30(NTSC)
3 Set
Password
Encrypt the SD card to prevent unauthorized access.
Password must be under 15 characters in length, for
example: 123456789123456
After setup, the password is required for playback,
configuration and formatting of the SD card.
★Note: password is case-sensitive;
Remember the password. Without password
footage cannot be retrieved.
4 Playback
Password You can set a password for playback on the built-in
display of the device.
5 G-sensor
sensitivity
The G-Sensor can detect impact and active the
secure recording function automatically.
Set the sensitivity here. Choose Car or Truck. The
sensitivity has 5 options: Off / Very low / Low /
Normal / High / Very high.
6 Audio
Recording Turn audio recording on/off.

15
4. File backup: click to backup footage.
Step1. Choose the source of the memory card.
Step2. Choose the footage you want to backup.
Step3. Choose the target file format and the start and end points.

16
File format
(1) Proprietary file format
*.sd format
(2) AVI video (*.avi)
AVI format
★Note:
To keep G-Sensor data, use proprietary format.
AVI format doesn’t not contain G-sensor data (only
date/time/image/sound)
Step 4. Set the backup folder: default is C:\BlackBox
Step 5. Start backup
5. Playback: Open file
6. Progress bar:
Use the mouse and drag the car icon to view a particular time of the footage

17
7. Play speed:
Choose 2, 4 or 8 times normal playback
or 1/2, ¼ or 1/8 times normal playback.
8. Volume control:
Click +/- to adjust volume.
9. G-SENSOR
The integrated G-Sensor can detect impact and record 1-3 minutes of footage
automatically. This footage is protected to avoid files being overwritten.
10. Format:
Format memory card/Langue setting
(1)
X:
Detect vehicle horizontal
change.
(2)
Y:
Detect vehicle vertical change.
(3) Z:
Detect vehicle front/back change.

18
Warning
(1). 「Format / Restore」will erase all data on the SD-Card, Please
make sure you have backed up any sensitive data before using
「Format / Restore」.
(2). Before using「Format / Restore」, please ensure the SD-Card
is unlocked.
(3). User Account Control in Windows Vista, 7 and 8 may prevent the
SD-Card from being formatted. In which case, please run the
program as Administrator.
a、「Format」SD-Card
When you use an SD card for the first time, it recommended you format the SD-
Card.
b、「Restore」SD-Card
If you have a back up of your SD-Card, you may restore it’s contents using the
restore function.
c、Language setting
You can change the change the language setting.
*Note: Changes will take effect after rebooting software.
d、Current Version

19
K. Estimated Recording Time
Note: The chart below of estimated recording times is for reference only. The length
of recording may vary according to recording conditions.
Capacity
Video Quality 8G 16G 32G
High 120 Min 240 Min 480 Min

20
L. Appendix: Bright and dark spot on the LCD
Q: What is a bright/dark spot?
A : Bright spot:An abnormal bright spot, against a dark background, is called a “bright
spot”
Dark spot: An abnormal dark spot, against a multi-colored background (excluding
dark backgrounds), is called “dark spot”
Indication of bright and dark spots
(a) No bright spot is allowed in Area A,
only a single dark spot
(b) The maximum amount of bright spots
and dark spots allowed in Area B is
two of each
(c) The maximum total amount of bright
and dark spots in Area A and B are
three or less
Diagram of areas A and B
Notice
(1). There is a 30 day exchange window with the presence of bright and dark
spots.
(2). Please keep the receipt and contact your local dealer to exchange
merchandise.
(3). The maximum time interval is 30 days.
Table of contents