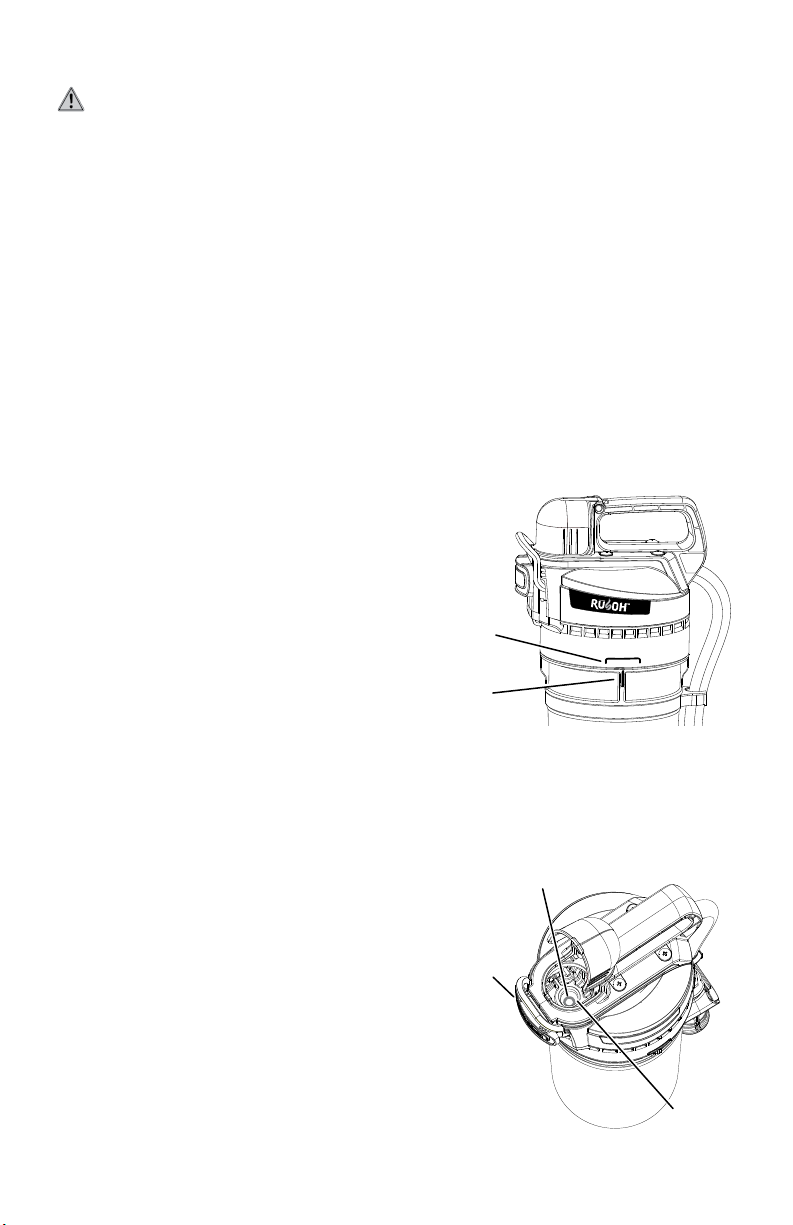
Rusoh Eliminator Instruction manual

ELIMINATOR™
™
Reloading Procedure
Fig. A
Hinged door
Agent
cArtridge
Fig. B
Handle recess
cO2cArtridge
relOAd
kit cAp
White dust
gasket
Yellow tamper seal
Red CO2
cartridge gasket
Hinged door
in open position
©2017 Rusoh, Inc. Printed in China Form 76-379B
• After each use, the Eliminator™reextinguishermustbereloadedwitha
newCO2cartridgeandanewagentcartridge.
• WatchtheReloadingProcedurevideoatwww.rusoh.comandreadthis
procedurebeforereloadingtheextinguisher.
• RefertotheOwner’sManualforinstallation,operation,30-dayinspection,
annualinspection,andwarrantyinformation.
SELF SERVICE, MULTI-PURPOSE, RELOADABLE
DRY CHEMICAL FIRE EXTINGUISHER
ForReloadingModelNumber
SELF SERVICE 0930001
withReloadKit85-994
GETTING ACQUAINTED
Thereloadingkitcontainsareplacementagentcartridgeandaspecialcap
thatholdsthereplacementCO2cartridge(Fig.A).Theagentcartridgeis
fullyloadedwiththedrychemicalextinguishingagent.Awhitedustgasket,a
yellowtamperseal,andaspareredCO2cartridgegasketarelocatedunder
thecap’shingeddoor(Fig.B).
IMPORTANT:Wrenchset,PN81-500,isrequiredforthisprocedure.
Toorder,visitrusoh.com.
SAVE THIS RELOADING PROCEDURE FOR FUTURE REFERENCE.

2
Fig. C CO2cartridge
Agent
cArtridge
VAlVe
Assembly
dischArge
heAd
Valve lever
Valve nozzle
Tamper seal
Hose
Hose clip
Puncture lever
Rusoh™uffing wheel
Instruction label
Cartridge cover
Tag loop
Handle
Alignment rib
Alignment marking
Lock
RELOADING PROCEDURE
CAUTION! Protectiveeyewearisrecommendedwhenperformingthe
reloadingprocedure.
TheReloadingProceduremustbeperformedbyan
individualwhohasreadtheseinstructionsandwatchedtheReloading
Procedurevideoatwww.rusoh.com.
FailuretocomplywiththeEliminator™ReloadingProcedure
willvoidthewarrantyandmayresultinpropertydamageand/orbodily
harm. Reload only with the genuine Eliminator™Reloading Kit for your
Eliminator™model number.
NOTE: The agent cartridge contains 6 pounds of Eliminator™multi-purposedry
chemicalextinguishingagentthatincludesmonoammoniumphosphate,mica,talc,
andamorphoussilica(HMIS1-0-0).Theextinguishingagentisnontoxic.
NOTE: The CO2cartridgeisaremovablecomponentlledwithcompressedliquid
CO2(HMIS1-0-3).
Refertowww.rusoh.comfortheSafetyDataSheets(SDS)forthesecomponents.
DANGER!
•CO2cartridgeisunderhighpressure.DonotpunctureordamageCO2cartridge.
•DonotheatorlocateCO2cartridgenearaheatsource,suchasanengineor
stove.
•DischargefromCO2cartridgeisverycoldandcancausefrostbite.

3
*Alternatively,fastenthecartridgewrenchtoaworkbenchorotheratsurfacewithfourscrews.
Fig. D
Fig. E
Fig. F
Bar
wrench
Textured
footrest
Cartridge
wrench
CO2
cartridge
Cartridge cover
STEP 1 Prepare your work area.
Placedropcloths,orotherprotectivecovering,intheareawhereyouwillbe
performingthereloadprocedure.
STEP 2 Conrm extinguisher is not pressurized.
WARNING!BeforeremovingCO2cartridge,verifythatextinguisheris
notpressurized.Aimnozzleupwardsintoalargegarbagebag.Thenslowly
squeezethehosevalvelever.Valvelevershouldbeeasytosqueezeand
shouldreturntooriginalposition.Replacevalveassemblyifitdoesnot
function as stated.
STEP 3 Remove CO2 cartridge.
1. SqueezetheribbedsidesoftheredCO2cartridge
cover,andliftitopen.RemoveCO2cartridgeby
twistingcartridgeclockwise.Astrapwrenchor
adjustablepliersmaybeneededifthecartridgeis
snug(Fig.D).
NOTE:TheCO2 cartridgehasreversethreads,so
it turns opposite of normal threaded components.
2. DiscardthespentCO2cartridgefollowingtheDisposalProcedureonpage8.
STEP 4 Remove discharge head from agent cartridge.
Use the Eliminator™wrenchset(sold separately) to
loosenthedischargeheadfromtheagentcartridge,as
describedbelow:
1. Pullthehoseoutofthehoseclip(Fig.E).
2. Placethecartridgewrenchonaleveloor*withthe
texturedfootrestfacingup.Setthebottomofthe
extinguisherontothecircularportionofthewrench.
3. Insertthebarwrenchthroughthehandle
openingofthedischargehead(Fig.F).
4.Graspbothendsofthebarwrenchand
place one foot on the footrest. Turn the
barwrenchcounterclockwiseuntilthe
dischargeheadbeginstoloosen.Onceit
turnseasily,thebarwrenchisnolonger
necessary.Continueturningthedischarge
head,byhand,untilitiscompletely
detachedfromtheagentcartridge.
5.Discardthespentagentcartridgefollowing
theDisposalProcedureonpage8.

4
Fig. G
Dust gasket
Inverted discharge head
Sealing
surfaces
Threads
STEP 5 Remove parts from reload kit cap.
1. SlidetheCO2cartridgeoutofthereloadkitcap(seeFig.A,page1)and
setasideforStep10.
2. Openthehingeddooronthereloadcap(seeFig.B,page1)andremove
thereplacementtamperseal,dustgasket,andredCO2cartridgegasket.
Setasideforfutureuse.
STEP 6 Clean discharge head and install new dust gasket.
1. Invertthedischargehead.Removethewhitesiliconedustgasketfromthe
centerofthedischargehead(Fig.G)anddiscard.
2. Clean the threads and inside
sealingsurfaces
(Fig.G)
witha
clothtoremoveanyextinguishing
agentresidue.Thesealing
surfaces include the area
immediatelybelowthethreadsand
thecentercavity.
Inorderfortheunittosealproperly,
theseareasmustbeclean.Ifyou
noticeanycaked-onextinguishing
agentonthesesurfaces,usea
smallbrushtoloosenit.
3. Usingcompressedair,blowoutthe
dischargeheadthoroughly.While
squeezingthevalvelever(Fig.C,page2)tofullyopenthevalve,blow
airfromthecenterofthedischargeheadthroughthehoseandvalveand
theninthereversedirection.RefertotheReloadingProcedurevideoat
www.rusoh.com.
4.Installthenewdustgasketintheinverteddischargehead,asshown
inFig.G.Pressaroundtheouteredgeofthegasketsoitissecurely
positioned.
STEP 7 Inspect unit for damage.
1. Visuallyinspectthedischargehead,hose,andvalveassembly.Ifdamage
isfound,replacecomponentspertheSelfServiceManual.
2. Checktomakesurethepunctureleverisoperatingcorrectly.Withthe
lock(Fig.C,page2)intheunlocked(vertical)position,pressdownonthe
punctureleverafewtimestoensureitmovesfreelyandsnapsbackinto
position.

5
Two smaller
O-rings
Mixing tube
Fig. H
Handle
recess
Fig. I
Reload
kit cap
Replacement
agent cartridge
Replacement
agent cartridge
Outer
threads
Large
O-ring
Mixing tube
cover
Black band
STEP 8
Remove reload kit cap from replacement agent cartridge.
Use the Eliminator™wrenchset(soldseparately)toloosenthereloadkitcap,
perthemethoddescribedbelow.
IMPORTANT:Alwayskeeptheagent
cartridgeonalevelsurfacetoprevent
extinguishingagentfromspilling.
1. Placethecartridgewrenchwiththe
texturedfootrestfacingup.Setthe
bottomofthereplacementagent
cartridgeontothecircularportionof
thewrench.
2. Insertthebarwrenchinthehandle
recessonthereloadkitcap(Fig.H).
3. Graspbothendsofthebarwrench
and place one foot on the footrest.
Turnthebarwrenchcounterclockwise
untilthecapbeginstoloosen.Once
itturnseasily,thebarwrenchisno
longernecessary.Continueturning
thecap,byhand,untilitiscompletely
detachedfromtheagentcartridge.
Discardthecapinaplasticrecycling
receptacle.
4.Oncethereloadkitcapisremoved,
useasmallbrushandcleanoffany
drychemicalonthegraymixingtube
cover(Fig.I).Thencuttheblackband
onthebottomofthecover.Slowly
removethegraycoveranddiscard.
5.VerifythetwosmallerredO-rings
onthemixingtubeandthelargered
O-ringontheouterthreadsonthereplacementagentcartridge(Fig.I)are
clean,welllubricated,andfreeofdrychemical.
6. IftheO-ringshaveanydrychemicalonthem,removeeachoftheO-rings
andwipethemoffwithadrycloth.OncetheO-ringsareremoved,clean
theO-ringgroovesontheagentcartridgeandmixingtubewithadrycloth
orsmallbrush.
7. Ifneeded,relubricatetheO-ringsandO-ringgrooveswithagenerous
amountofpetroleumjelly.ReinstalltheO-ringsintheirgroovesonthe
agentcartridge.IMPORTANT: Toensureaworkingreextinguisher,the
O-ringsmustbeproperlyseatedintheirgrooves.Wipeawayexcess
lubricationontheagentcartridgeandmixingtube.

6
Fig. K
Red CO2
cartridge gasket
Lock
Fig. J
Alignment
rib
Alignment
marking
Cartridge
port
STEP 9 Attach discharge head to new agent cartridge.
WARNING!Donotrellorreusetheagentcartridge.Itisdesignedto
befactorylledandfactorysealedtomeetperformancespecications.
Uninstalling and then reinstalling the same agent cartridge will void the
warranty.
1. Foreasierinstallation,applyasmallamountofpetroleumjellytothe
dischargeheadsealingsurfaces(Fig.G,page4).RefertotheReloading
Procedurevideoatwww.rusoh.com.
2. Placethedischargeheadontheagentcartridge.Whileholdingontothe
dischargeheadhandle,turnthedischargeheadclockwiseuntilsnug.
TheturningresistancewillbecomenoticeablyharderasthelargeO-ring
beginstocontactthesealingsurfaceofthedischargehead(Fig.G,
page4).Usethebarwrench,ifnecessary,tofullytightentheunit.When
correctlyinstalled,theredalignmentribontheagentcartridgewillbe
withintheredalignmentmarkingonthedischargehead(Fig.J).
NOTICE: Thereisastoptabto
preventoverrotation.Ifyoufeelthe
unithitthistab,stopturningthe
dischargehead.
3. Rotate the hose strap so the clip
isalignedwiththehose.Secure
thehosebypushingitintothe
clip until it snaps into position.
Forcompactstorage,graspthe
hosewithonehandandthevalve
withtheotherandrotatethevalve
counterclockwiseuntilthevalve
leverfacesthewall.
STEP 10 Install new CO2 cartridge.
1. Ensurelockisinthelocked(horizontal)
position(Fig.L,page7).
2. LiftupredCO2cartridgecover.Usea
ashlighttoverifytheredCO2cartridge
gasketisinplaceinbottomofthreaded
opening(Fig.K).
Ifitismissing,insertreplacementgasket
fromreloadcap(Fig.B,page1).Use
aneedlenoseplierstogentlypickup

7
Fig. M
Lock in
horizontal
(locked)
position
Fig. L
Lock
openings
Tamper
seal
anddropthegasketintothecartridgeport,makingsurethegasketange
isfacingdown.Usetheeraserendofapencilandpressthegasketinto
place.
IMPORTANT:Itiscrucialforextinguisherfunctionthatthegasketis
correctlypositionedinthecartridgeport.
3. InstallthenewCO2cartridgebyrotatingit8fullturnscounterclockwise
untiltight.Theuseofastrapwrenchisrecommended.
NOTE:TheCO2 cartridgehasreversethreads,soitturnsoppositeof
normal threaded components.
4.IfextinguisherwillbemountedinbracketPN40-393orPN40-404,usea
strapwrenchtoturntheCO2cartridgeanadditional¼turnpasthandtight.
5.Closeredcover.
STEP 11 Install new tamper seal.
Positionthenewtampersealso
thetextisrightsideupandthe
snaphooksalignwiththelock
openings.Usingtwongers,
gentlypressthetamperseal
arrows(Fig.L)untiltheseallocks
intopositiononbothsidesofthe
lock.
STEP 12 Fluff the agent cartridge.
Inverttheextinguisher.TurntheRusoh™
wheel(Fig.M)onthebottomoftheunit
backandforthseveraltimesuntilitturns
freely.Thenturnthewheelaboutthreefull
rotations.Thewheelshouldturnsmoothly.

www.rusoh.com
A product of
8
ELIMINATOR™DISPOSAL PROCEDURE
DANGER! Ifextinguisherisdamagedandhasnotbeendischarged,do
NOTpressurizeunitorpunctureCO2cartridge.
IMPORTANT:Disposalmustbeperformedinstrictcompliancewithstate
andlocalwastedisposalpolicies.Pleasecontactyourlocalwastedisposal
center,recyclingcenter,hazardouswasteauthorities,ortheRusohCustomer
ServiceDepartmentat1-800-318-2944fordetails.Youcanalsosearch
Earth911.comforarecyclingsolutionnearyou.Do not dispose of the
Eliminator™
1. If the Eliminator™hasbeenusedandisundamaged,takeitoutsideto
verifythatithasbeenfullydischarged.FollowtheT-P-A-S-Sinstructions
inyourOwner’sManual,evenifyoubelievethatyouhavepreviously
dischargedtheunit.Aimthedischargeneartreesorbushesthathavea
higherresistancetoacidic-typefertilizer.Avoidowersandgrasses.
2. RemovetheCO2cartridgefromtheEliminator™dischargeheadand
conrmthatitispunctured.Ifitisnot,returncartridgetotheunitand
repeatthedischargeprocedureoutlinedinstep1above.
3. PlacethepuncturedCO2cartridgeinanyrecyclingbinthataccepts
metals.
4.Placeextinguisherinaplasticrecyclingreceptacle.
CUSTOMER SERVICE INFORMATION
IfyouhaveanyquestionsregardingtheoperationofyourEliminator™re
extinguisher,contactusbyanyofthesemethods:
• Call1-800-318-2944weekdays8:00AMto4:00PM(CentralTime)
• Emailusatcontact@rusoh.com
• Write: RUSOH, Inc.
CustomerServiceDepartment
3925NorthHastingsWay
EauClaire,WI54703-3703
See the Self Service Manual for instructions on replacing the hose strap,
Rusoh™wheel, handle assembly, valve assembly, and instruction label.
Other manuals for Eliminator
2
Table of contents
Other Rusoh Fire Extinguisher manuals