Rydia R720 User manual
QUICK START GUIDE
A7
AMBARELLA WI-FI HDR Night Vision150°WIDE ANGEL G-Sensor GPS ASDS

Rydia Vision Camera
3
3
4
5
7
7
9
10
10
11
14
16
19
Installing The Rydia Vision Camera
10 Easy Install Steps
Video Playback (Computer)
How The System Works
How To Use The Rydia Vision App
Limited Warranty Statement
Contents

PRIOR TO USE
CAUTION
3
* Install the device near the rear-view mirror to obtain the best
* Make sure that the lens is within the wiping range of the
may damage the camcorder, cause electric shock and void your
* Strictly observe relevant laws as this product cannot be used
Before you start using the Car Camcorder it is assumed that
you agree to the above statements.

1.2 Package Contents
1.3 Product Overview
1.1 Features
3 4

Note:
Number
Charging
Indicator
Indicator
Name
4
Microphone while recording
-
recording
-
mode when the camcorder is recording
be Blink Blue
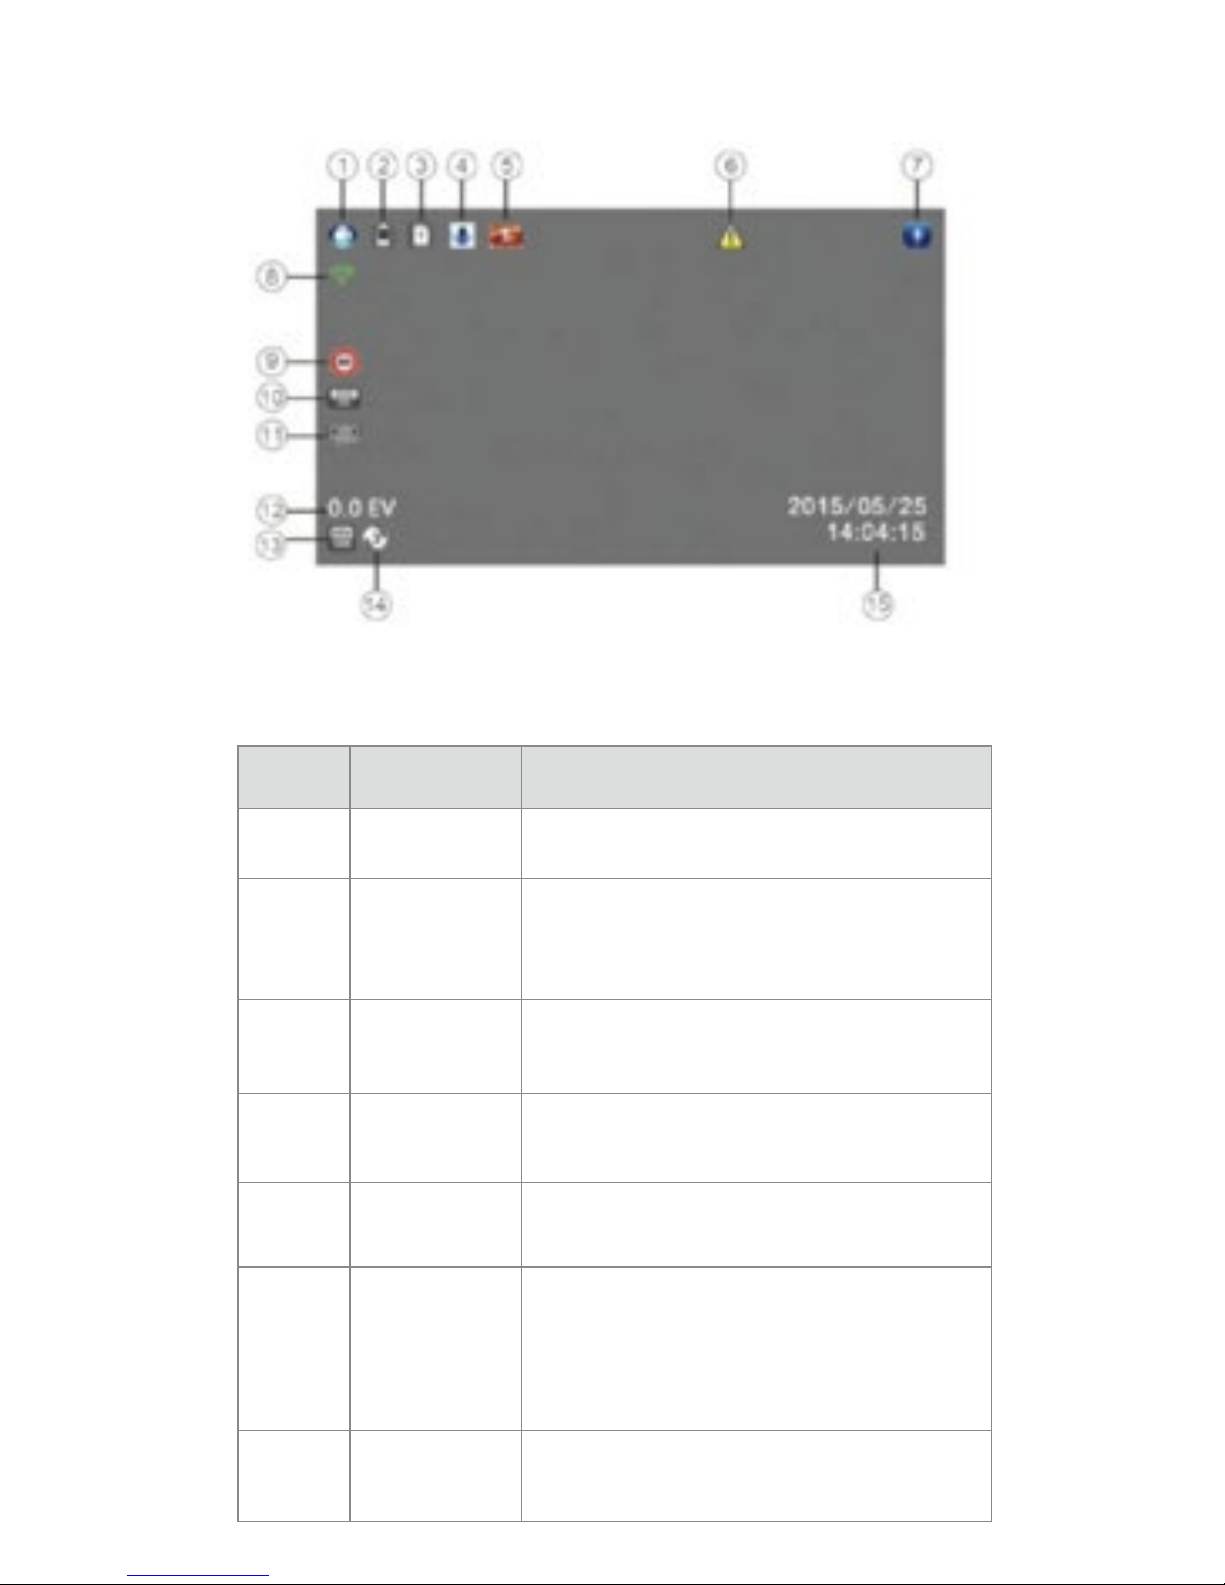
Number
Movie
Camera Icon
Emergency
Microphone
Icon Name
Mode
recognized by the camcorder, this icon
-
enable the emergency recording by

7
Insert the memory card with the gold contacts facing the back of
EV
Video
duly recognized by the camcorder, this
icon will turn green and the camcorder
Stamp
If enabled, the model number/speed/car
the screen, and this info will be saved on
and recognized will the speed info be

To remove the memory card
Note:
1. Do not remove or insert the memory card when the camcorder is
turned on. This may damage the memory card.
2. It is recommended to use a 32GB, Class 10 or above micro SD
card.
3. Please format the micro SD card prior to the inial use.
4. If the screen shows “Low Speed Card” while recording, it means
the wring speed of the memory card is too slow. Please replace it
with a higher-speed memory card.
Use only the supplied car charger to power up the camcorder and

Note:
1. Use the product with the supplied charger only, please do not
use other power chargers to avoid camera burn or cause the
baery explosion.
2. When use this camcorder for the first me, please charging to
baery full.
3. Please be noted that if the ambient temperature reaches 45°C or
above, the car charger may supply power to camcorder, but it will
not charge the Lithium-ion baery.
please press the OK
press ▼

press▲/▼OK
▼ OK
▲or▼
OK
corner of the screen, when camcorder is recording, the red dot
by pressing OK
OK
Note: the cigaree lighter sockets of some vehicles provide
connuous power supply even when the engine stops. If this is the
case, please turn off the device manually or unplug the car charger
from a car cigaree lighter socket.
Note: (1) the device will save recordings every 1,3,5 minute, please
refer to the loop seng.
(2) The recordings will be saved to SD card inserted. If the SD card
is full, the oldest file will be automacally overwrien.
(3) The collision recording or emergency recordings cannot be
overwrien and requires manual deleon.
Table of contents
Other Rydia Dashcam manuals


