Rynan R20 User manual

T H E R M A L I N K J E T P R I N T E R
USER MANUAL

Revise logs
Version
Update information
Staff
Date update
V1.0
User manual
Nguyen, Van Than
Feb 26, 2020
V2.0
Update some information
Nguyen, Van Than
Mar 25, 2020
V3.0
Update the adaptor model
Nong, Thi Hue
Dec 08, 2020
V4.0
Update speed table
Update some incorrect information
Nguyen, Van Than
Jan 06, 2021

Contents
SAFETY INFORMATION..............................................................................................................................................5
EMERGENCY CASE.....................................................................................................................................................6
ENVIRONMENTAL PROTECTION..............................................................................................................................6
PRODUCT WARRANTY ..............................................................................................................................................6
I. ABOUT THE PRINTER..........................................................................................................................................7
1. TECHNICAL SPECIFICATIONS ........................................................................................................................................8
2. PRINTING SPEED TABLE .................................................................................................................................................8
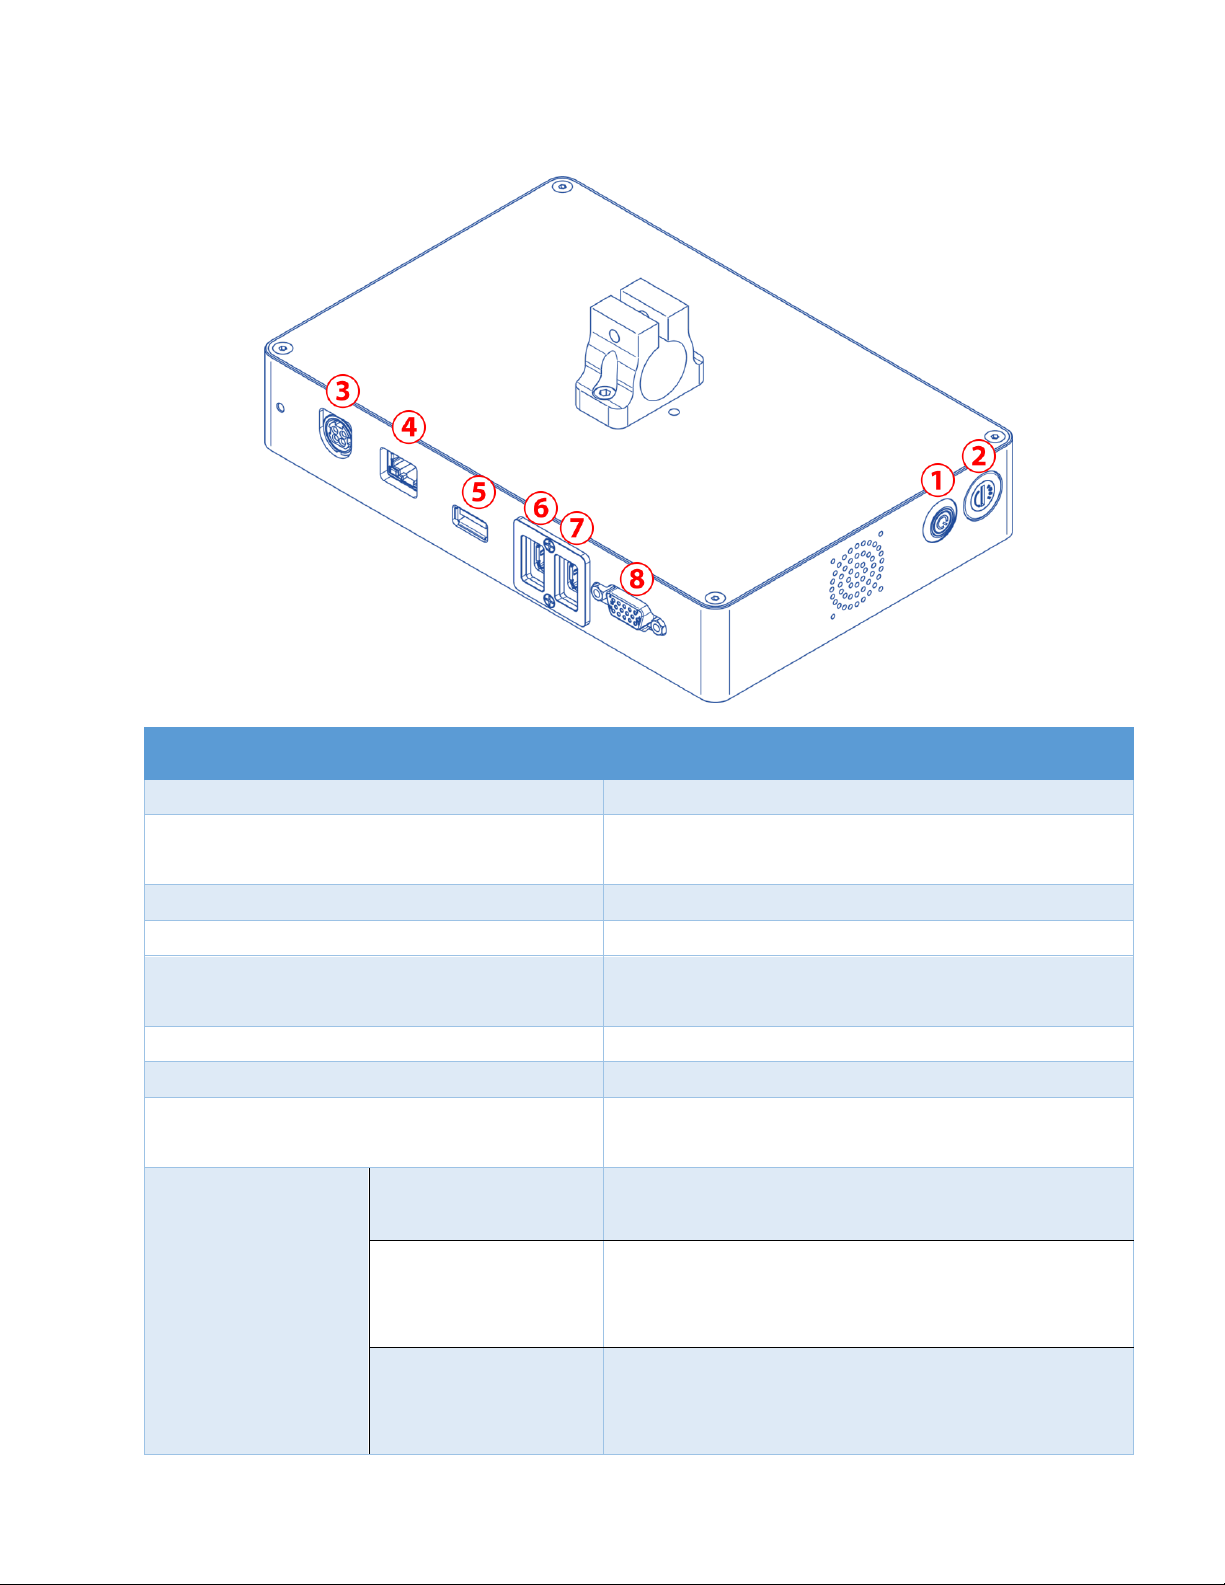
3. PRINTER OVERVIEW......................................................................................................................................................9
3.1. Controller front side .....................................................................................................................................9
3.2. Controller back side ..................................................................................................................................10
3.3. Printhead ......................................................................................................................................................11
II. INSTALLATION...................................................................................................................................................14
1. COMPONENT LIST......................................................................................................................................................14
2. PRINTHEAD SETUP.......................................................................................................................................................15
3. CONTROLLER SETUP...................................................................................................................................................15
4. PRINTHEAD CABLE SETUP............................................................................................................................................16
4.1. Use 1 printhead R20 PRO .........................................................................................................................16
4.2. Use 2 printheads R20 PRO........................................................................................................................16
4.3. Use printhead R20 PRO Stitching ...........................................................................................................17
5. EXTERNAL DEVICES CONNECTIONS ............................................................................................................................18
5.1. External Sensor ............................................................................................................................................18
5.2. External Encoder ........................................................................................................................................18
5.3. Alarm beacon.............................................................................................................................................19
6. SOFTWARE USING ................................................................................................................................................21
6.1. Main interface ............................................................................................................................................21
6.2. DesignJet......................................................................................................................................................24
6.3. Printing parameters ...................................................................................................................................27
6.4. Advanced Settings....................................................................................................................................36
6.5. POD Settings ................................................................................................................................................37
III. GETTING STARTED........................................................................................................................................40
IV. OPERATION...................................................................................................................................................40
1. HOW TO DESIGN A TEMPLATE!...................................................................................................................................40
1.1. New template.............................................................................................................................................40
1.2. Open template...........................................................................................................................................41
1.3. Save template ............................................................................................................................................42
1.4. Delete template.........................................................................................................................................42
1.5. Save As template.......................................................................................................................................43

1.6. Add Text object..........................................................................................................................................43
1.7. Add Counter object..................................................................................................................................44
1.8. Add Database object ..............................................................................................................................45
1.9. Add Barcode object.................................................................................................................................47
1.10. Add Image object ................................................................................................................................49
1.11. Add Datetime object ...........................................................................................................................50
1.12. Add Shift Code object .........................................................................................................................50
1.13. Add Shapes object ...............................................................................................................................51
1.14. Ink Calculate...........................................................................................................................................51
1.15. File Manager ...........................................................................................................................................52
2. HOW TO PRINT?........................................................................................................................................................54
2.1. Step 1: Open template ............................................................................................................................54
2.2. Step 2: Adjust Printing Parameters.........................................................................................................55
3. UPDATING INSTRUCTIONS..................................................................................................................................55
3.1. Update Software / Firmware / Keyboard / Font ...............................................................................55
V. TROUBLE SHOOTING.......................................................................................................................................59

USER MANUAL V4.0 | Updated Jan 06, 2021 5
SAFETY INFORMATION
Ensure the printer is set to STOP before installing or removing a cartridge.
Avoid using printer with high voltage and/or non-compatible power supplies or
external electronic accessories.
Ensure printer is installed and stored in a manner to prevent any strong impacts from
any external objects.
Minimize the use and storage of the printer in high dust environments.
The working temperature of the printer is 5oC –50oC.
Turn off printer before plugging or removing any cable (ENCODER / SENSOR / IO).
Be careful when using other external devices such as: ENCODER / SENSOR / ALARM
BEACON / POWER SUPPLY.
Only use authorized cartridges provided by your authorized supplier.
Ensure you follow all instructions while installing new firmware and software.
Use mask and safety goggles to prevent exposure to any airborne inks.
Use gloves to prevent any cuts while installing the printer with the mounting bracket
as there may be sharp edges.
Do not expose to excessive heat sources, sunshine, fire or the like.
For indoor use only. Printer should not be exposed to water.
The power-outlet shall be installed near the equipment and shall be easily accessible.
No replaceable parts inside, refer servicing to manufacturer specified agency or
qualified service personnel
Only use accessories specified by the manufacturer.
Disposal: all electrical and electronic products including batteries should be disposed
of separately from the municipal waste stream via designated collection facilities
appointed by the government or the local authorities.
Please ensure the printer and your systems are properly grounded.
Use only the power supply listed in the user instructions: power supply adaptor:
manufacturer: MEAN WELL ENTERPRISES CO., LTD., MODEL NO.: GST60A24

USER MANUAL V4.0 | Updated Jan 06, 2021 6
EMERGENCY CASE
FOR EMERGENCY SITUATIONS, E.G. SMOKE COMING OUT
OF PRINTER, UNCONTROLLABLE CONTINUOUS PRINTING,
FIRE, EXPLOSIVE SOUNDS, ETC.,
PLEASE REMOVE THE POWER SUPPLY IMMEDIATELY!
ENVIRONMENTAL PROTECTION
DON'T THROW PRINTER OR INK CARTRIDGES INTO
REGULAR GARBAGE OR RECYCLING BINS. ENSURE PROPER
DISPOSAL (E.G. ELECTRONIC WASTE) IN ACCORDANCE
WITH YOUR LOCAL LAWS.
PRODUCT WARRANTY
Limited warranty. The housing and circuit board for each printer is warranted to be free
from defects in materials and workmanship for a period of twelve (12) months from the
bill of lading date. This limited warranty does not apply to spare parts, authorized inks, or
cartridges, or to housings and circuit boards that experience problems resulting from
misuse, tampering or improper storage.
The warranty is VOID if:
Any non-original parts and unapproved OEM inks are used.
The product has been altered or modified without approval from us.
Printhead damage is a result of improper installation.
Damage occurs from an accident, such as but not limited to, being dropped, being
sprayed with water or other liquids, caused by a natural disaster, caused by stocking
or shipping conditions.
Unapproved, wrong or unstable power supply is used.

USER MANUAL V4.0 | Updated Jan 06, 2021 7
I. ABOUT THE PRINTER
Thank you for purchasing the RYNAN R20 Thermal Inkjet Printer, a product of RYNAN
TECHNOLOGIES (SINGAPORE). This printer is designed for packaging printing
applications powered by Thermal Inkjet (TIJ) Technology.
The RYNAN R20 produces crisp text, logos, variable data and barcodes on porous and
non-porous media by automatically recognizes aqueous and solvent inks and applies the
appropriate printing parameters.

USER MANUAL V4.0 | Updated Jan 06, 2021 8
1. Technical specifications
NO
DESCRIPTION
SPECIFICATIONS
1
Model
RYNAN R20 –R20 PRO
2
Dimensions (L x W x H)
Controller (193 x 130.3 x 34.5 mm)
Printhead max (216.4 x 49.1 x 65 mm)
3
Weight
Controller (888 grams)
Printhead (412.4 grams)
4
Power supply
DC 24V-2.5A
5
Maximum power consumption
60W
6
Maximum printing resolution
600x600 dpi
7
Print speed
76 m/min @ 300x300 dpi
8
Optical density
3 levels
9
Operation
7” Touch Screen
10
Message memory
8GB
11
Ink solution
Aqueous and Solvent
12
Menu language
Multiple / selectable
13
Printable characters
Windows true fonts
14
No. of lines
Unlimited
15
Character height
Maximum 12.7 mm / 0.5 inch
16
Printability
Text, image, barcode, counter, box/lot, shift code,
date, time, expire date, database, POD and Shape
17
Operating temperature
50 C –500 C and 90% air humidity, non-condensing
18
External connections
External sensor, External Encoder and Alarm
beacon
2. Printing speed table
Resolution
Density 1
Speed (m/min)
Density 2
Speed (m/min)
Density 3
Speed (m/min)
300x100
228
114
76
300x120
190
95
63
300x150
152
76
50
300x200
114
57
38
300x300
76
38
25
300x600
38
19
12
600x100
228
114
76

USER MANUAL V4.0 | Updated Jan 06, 2021 9
600x120
190
95
63
600x150
152
76
50
600x200
114
57
38
600x300
76
38
25
600x600
38
19
12
3. Printer overview
3.1. Controller front side

USER MANUAL V4.0 | Updated Jan 06, 2021 10
3.2. Controller back side
ITEMS
DESCRIPTION
(1) POWER button
Take machine ON / OFF
(2) FUSE
External fuse connected to mainboard, check
it if you can not turn on printer
(3) POWER supply port
Machine’s power supply port 24V –2.5A
(4) LAN Port
Connect to other PC for POD transfer data
(5) USB Port
Connect to Keyboard, Mouse, import Template
and Database
(6) PH 2
Machine’s printhead connection port
(7) PH 1
Machine’s printhead connection port
(8) EXTENDED Port
Connect to External Sensor, External Encoder
and Alarm beacon
(9) LEDs status
LED STOP status
STOP: Turn ON after you plug the power supply
and switch button power on controller
LED ALARM status
ALARM: Turn ON if have some errors / warnings
/ issues on the printhead like: no any cartridge
in slots, cartridges invalid, cartridges conflict …
LED RUN status
RUN:Turn ON after you press Print button on
software and print data are send to controller
without any issue

USER MANUAL V4.0 | Updated Jan 06, 2021 11
3.3. Printhead
3.3.1. Printhead 0.5 inch (1 cartridge, single Head R20 PRO)
ITEMS
DESCRIPTION
(1) POWER and Printhead Port
Machine’s printhead connection port
(2) PURGE Button
Use for purge ink
(3) EXTENDED Port
Connect to External Sensor, External Encoder and
Alarm beacon
Coming soon - Do not recommend on this version
(4) LEDs status
LED STOP status
LED ALARM status
LED RUN status
TECHNICAL PARAMETERS
VALUE
Number cartridges support
1
Number head controller support
2
Print height
12.7 mm ~ 0.5 inch
Connection port on controller
Port I, Port II
Sensor hanging ability
YES
Size
L x W x H: 216.4 x 49.1 x 65 mm

USER MANUAL V4.0 | Updated Jan 06, 2021 12
3.3.2. Printhead 1 inches (2 cartridges, stitching Head –2 x R20 PRO)
ITEMS
DESCRIPTION
(1) POWER and Printhead port of PH1
POWER and Data port of PH1
(2) PURGE Button PH1
Use for purge ink PH1
(3) POWER and Printhead port of PH2
POWER and Data port of PH2
(4) PURGE Button PH2
Use for purge ink PH2
(5) EXTENDED Port PH1
Connect to External Sensor, External Encoder
and Alarm beacon of PH1
Coming soon - Do not recommend on this
version
(6) LEDs status PH1
LED STOP status of PH1
LED ALARM status PH1
LED RUN status PH1
(7) EXTENDED Port PH2
Connect to External Sensor, External Encoder
and Alarm beacon of PH2
Coming soon - Do not recommend on this
version
(8) LEDs status PH2
LED STOP status PH2
LED ALARM status PH2
LED RUN status PH2

USER MANUAL V4.0 | Updated Jan 06, 2021 13
TECHNICAL PARAMETERS
VALUE
Number cartridges support
2
Number head controller support
1
Print height
25.4 mm ~ 1 inch
Connection port on controller
Port I, Port II
Sensor hanging ability
YES
Stitching ability
YES
Size
L x W x H: 216.4 x 77.1 x 75.8 mm
NOTE: This printhead is created by combine 2 printheads R20 PRO on a plate.

USER MANUAL V4.0 | Updated Jan 06, 2021 14
II. INSTALLATION
1. Component list

USER MANUAL V4.0 | Updated Jan 06, 2021 15
2. Printhead setup
3. Controller setup

USER MANUAL V4.0 | Updated Jan 06, 2021 16
4. Printhead cable setup
4.1. Use 1 printhead R20 PRO
In this case, you use 1 printhead of R20 PRO only. And it should be connecting the same as
above picture. The printhead will print data which you designed on Template 1 Design Tool
only.
4.2. Use 2 printheads R20 PRO
In this case, you use 2 printheads of R20 PRO. And they should be connecting one by one
follow order on controller ports. The printheads will print data which you designed on Template
1for printhead 1 and Template 2 for printhead 2 on Design Tool.

USER MANUAL V4.0 | Updated Jan 06, 2021 17
4.3. Use printhead R20 PRO Stitching
In this case, you use 2 printheads of R20 PRO. And they should be connecting one by one
follow order on controller ports. The printhead will print data which you designed on template
1 & 2. Printed will be stitched into 1 inch wide bulletin.

USER MANUAL V4.0 | Updated Jan 06, 2021 18
5. External devices connections
NOTES:
Machine is able to operate with External Sensor, Encoder, Alarm at a time. Consult your
supplier for further supports on the settings and connections.
To connect machine with External Sensor, Encoder, Alarm, etc…, additional connector
DB15 (male) will be required.
5.1. External Sensor
Machine supports NPN and PNP types.
Connect sensor using power supply on machine.
Pin diagram of sensor:
5.2. External Encoder
An encoder is recommended to ensure the best print quality regardless the inconsistent speed
of conveyor.
Based on the resolution (R) of the encoder, you can calculate the diameter (D) of the wheel
you should use based on the following formula:
D = R/( x 600) (inches)
Example: Encoder has R = 3600 (PPR)
D= 1.90985 inches ~ 48.5 mm.
Pin diagram of encoder:
PIN
VALUE
12
24V
13
GND (Ground)
2
EN_B (Encoder Signal B)
3
EN_A (Encoder Signal A)
PIN
VALUE
12
24V
13
GND (Ground)
4
EXT_SEN (External Sensor PNP)
8
EXT_SEN (External Sensor NPN)

USER MANUAL V4.0 | Updated Jan 06, 2021 19
5.3. Alarm beacon
Allows users to monitor printer operation from a distance via the light signals from the alarm.
Pin diagram of Alarm beacon:
PIN ON DB15 PORT
VALUE
DESCRIPTION
5
24V
7
RED
STOP_STATUS
The printer will Stop print because some of
reasons below:
1. No cartridge error.
2. Invalid cartridge error.
3. Ink out.
4. Conflict cartridge
5. Speed Limit.
POD / Real time printing speed
Overload (Delay data / Lost data).
9
GREEN
PRINT_STATUS
User click on button Print on software.
The printer in printing status without
any issue.
15
YELLOW
ALARM_STATUS
The printer gets some issue and need to
warning to operator but it still able to print.
1. Ink low
5.3.1. Error Description
ERROR
DESCRIPTION
Stop print (Normal event)
User click stop button on software. Printing will be
Stopped. No light is ON.
Invalid Cartridge
Cartridges are plugged to printers not provide from your
supplier whose selling this printer.
No Cartridge
Have no cartridges are plugged to any Active Head of
printheads.

USER MANUAL V4.0 | Updated Jan 06, 2021 20
Conflict Cartridge
Have more than 1 kind of ink been plugged to printhead.
Make sure at the same times in printhead have Water base
ink or Solvent base ink only.
Ink Low
The value of Ink Level (any Active Head) on software are
lower 5.0 ml.
We had implementing the Smart Card to each cartridge
that allow the printer and software automatic recognize
the Real volume of ink inside each cartridge.
Ink Out
The value of Ink Level on software are lower 0.4 ml.
Speed Limit
Current speed of conveyor received from encoder is over
the printing ability of printhead. See Printing Speed Table
below for more information.
POD/Real Time Printing
Speed overload
In real time printing. After sensor trigged, software
immediately encode template and sending data to
printheads.
If total time Encode + Sending bigger the moving time of
paper from sensor to printheads (that mean printhead
don’t have a chance to print on paper, we get missed
paper). So for this event the software auto stop print and
show a message to operator.
If get this message operator should slow down the speed
of conveyor to make the moving time of paper bigger
Encode + Sending data time to help printhead could
catch up and print on paper.
Or increase the physical distance from sensor to
printheads.
This manual suits for next models
1
Table of contents