Zonerich AB-320M User manual

Mobile Printer
USER'S MANUAL
MANUAL REVISION EN1.1
FEED
POWER
R
G
E
F
A
U
H
L
L
C
P
O
W
E
R
M
O
D
E
E
R
R
O
R

Make sure theprinter power isoff before
plug or unplugthe cable.
Please don`t placethe printer in
humidity or dustyspace, excessive
humidity and dustmay damage it.
Do not putfoods or drinkson the
printer,in case thatsplash into
the printer.
The print headhas a hightemperature
after work. Pleasedon`t touch the
print head ortouch the motorshell
in case scalded.
NOTICE
Do not plugor unplug withyour hands
wet. You may beelectrocuted.
Keep magnetic objects away from
the printer.
Don't make batteryshort circuit orheated.
Otherwise the batterymay be damagedor
cause fire orexplode.

02
INTRODUCTION
WARNING
Some semiconductor devicesare easily damaged by static
electricity. In order toguard the printer against the static electricity ,
you should turnthe printer "OFF",before you connect or remove the
cables on theface side. Ifthe printer is damaged by the static
electricity, you should turnthe printer "OFF".
All specifications aresubjected to change without notice.
Table of Contents
The mobile printerwith excellent performance.It is integratedwith Serial,
USB and Bluetoothinterfaces. It canbe easily usedfor forms orreceipts
printing cooperated withportable equipments, suchas PDA, Laptop, Data
Samplers etc.
The main features of the printer are asfollows:
1. High speedprinting: 60mm persecond max.
2. Low noisethermal printing.
3. RS-232, USB, Bluetooth interfaces integrated.
4. The databuffer allows theunit to receiveprint data even during printing.
5. Bar codeprinting is possibleby using abar code command.
Please do readthe instructions inthis manual carefully before
using your newmobile printer
Table of Contents ..................................................................
Chapter 1 Setting up the Printer ............................................
4.13 Using andrecharging battery ............................................
4.12.2 USB Connection ......................................................
4.12.3 Bluetooth ............................................................
4.12 Interfaces ...............................................................
4.11Cleaning the Print Head .................................................
4.10 Alarmingto lack of paper ...............................................
4.9 Tear paper ................................................................
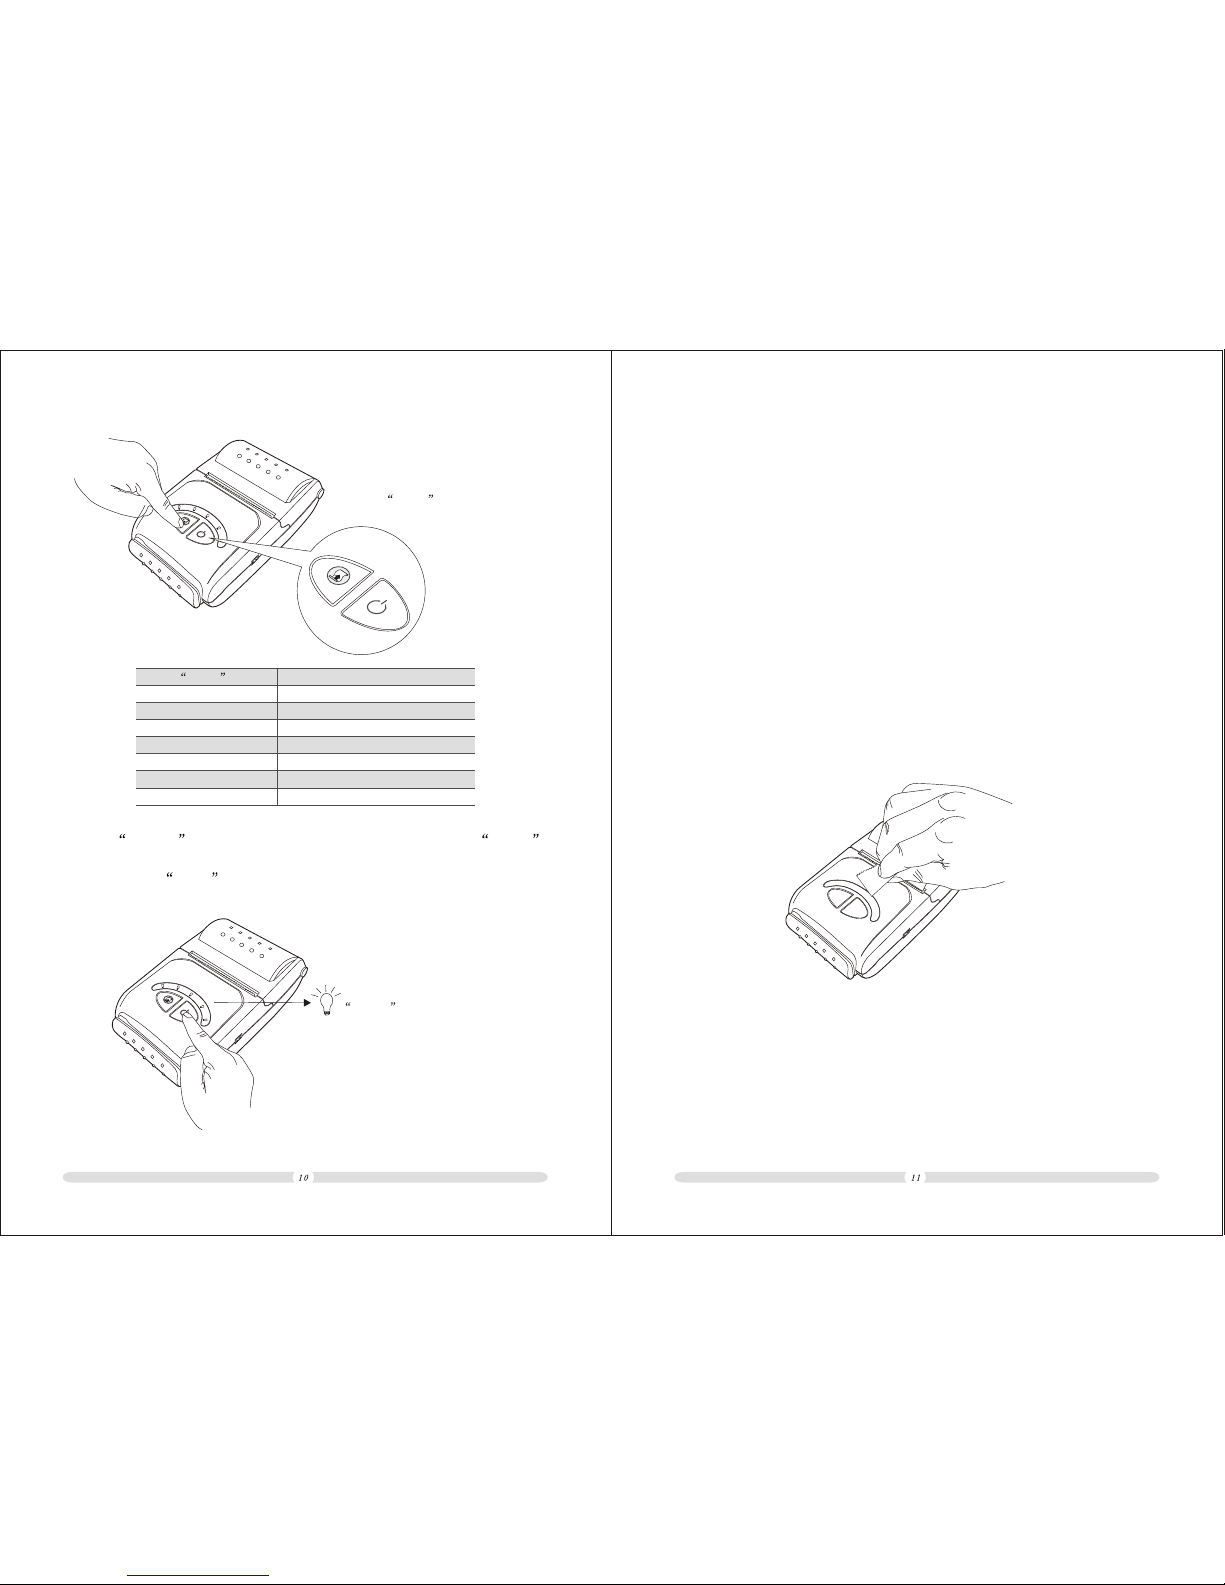
4.7 Power on/off ..............................................................
4.12.1 RS-232C Cable Connection ............................................
4.8 Feed paper ..............................................................
4.6 Baudrate setting ..........................................................
4.5 Self test ..................................................................
4.4 Battery installation ........................................................
4.3 Installing orReplacing the Roll Paper ......................................
4.2 Using thePrinter ...........................................................
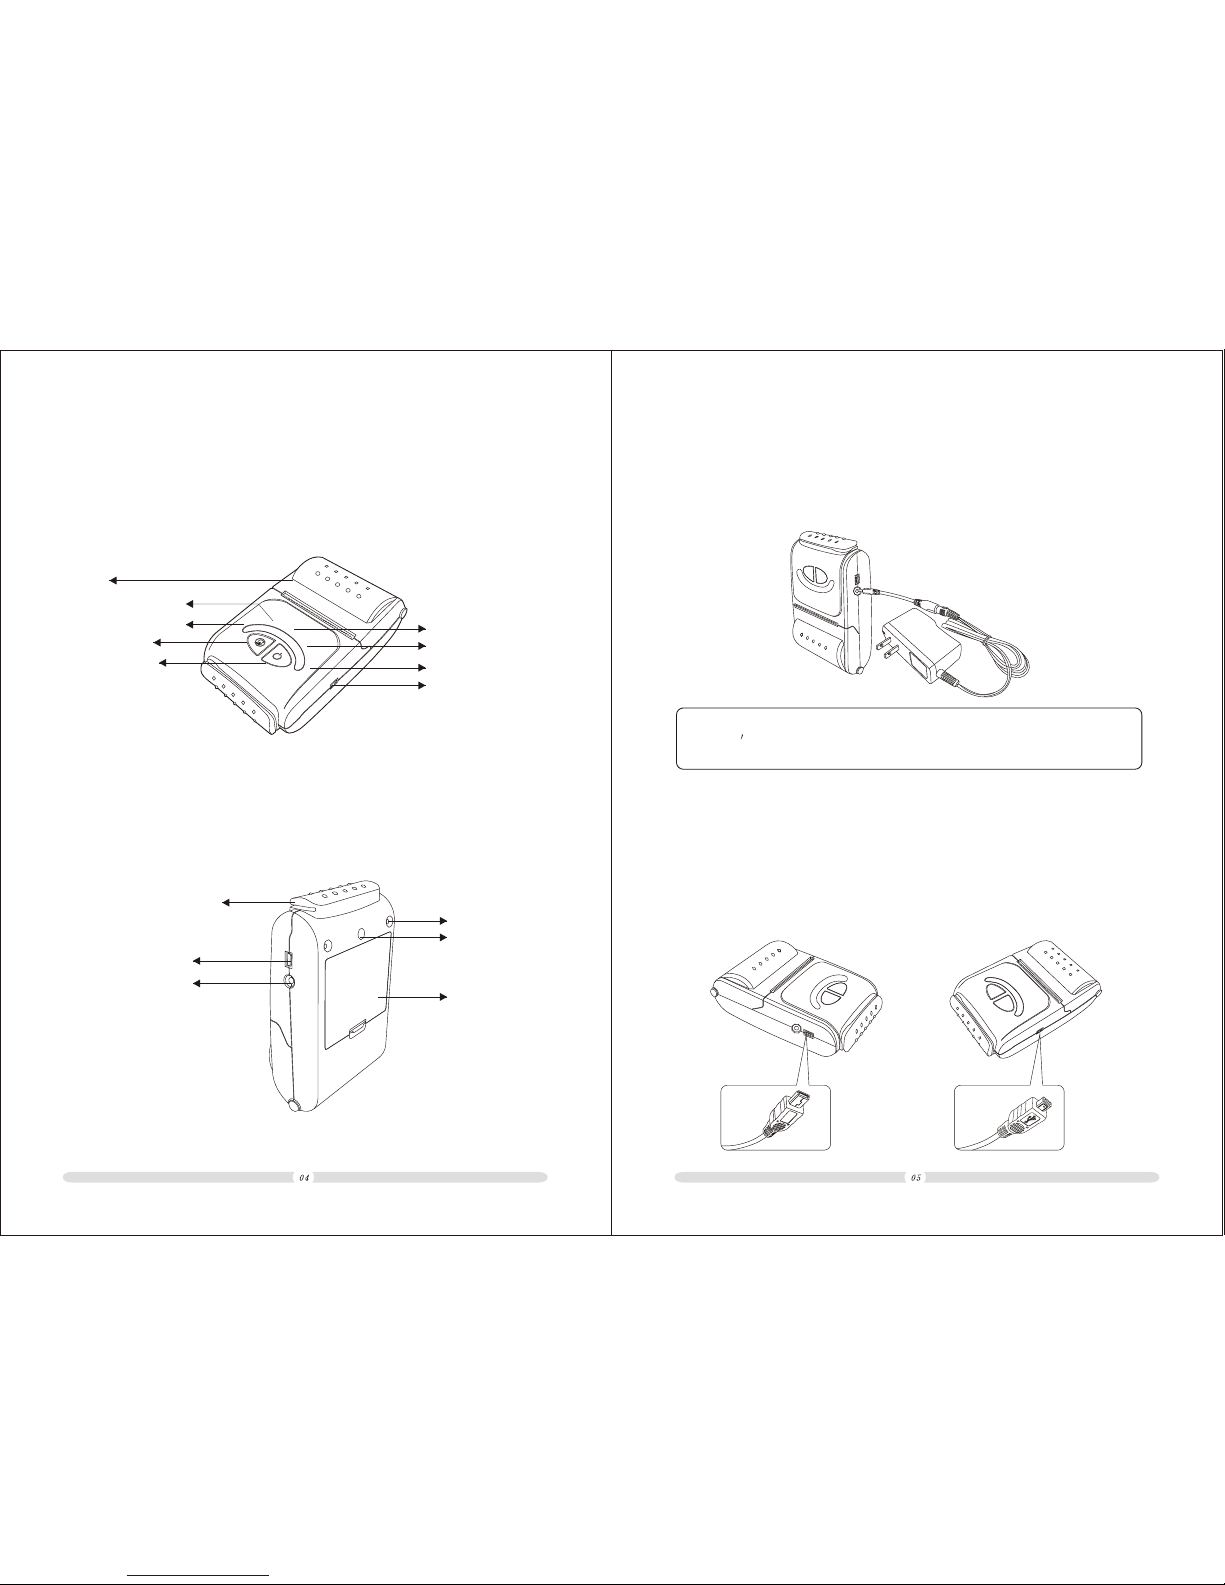
4.1.2 Connect the RS-232 port or USB port .....................................
4.1.1 Connect the AC incharger to the printer to recharge the battery ...............
4.1 Connect the cables ........................................................
Chapter 4 Operations ............................................................
3.2 Interfaces .................................................................
3.1 Printer Parts...............................................................
Chapter 3 Product Overview ..................................................
Chapter 2 Specification .........................................................
15
14
14
13
13
12
11
11
11
11
09
09
08
07
06
05
05
05
05
04
04
03
01
04

Item Discription
Printing Method
Printing Speed
Resolution
Paper Supply Mode
Language
Interface
MSR
Character Size
Character Per Line
Barcodes
Driver
Print width
Receive Buffer Size
Mass(approx.)
WDH
Paper type
Width
Diameter
Printer head
MCBF
Battery Type
Cycle life
Output
Charge Time
Operating
Storage
thermal line printing
60 mm/sec
203 DPI
easy paper loading
user language supported
serial/usb/bluetooth
auto 1/2/3 track(option)
font A:12 24
font B:9 17
font A:32
font B:42
Code 39,Code 128,EAN8,EAN 13
Windows 98/2000/XP/2003 Server/VISTA/7
48mm(1.89 )
2 K Bytes
300(g)
100 121 46 mm(no MSR
100 128 46 mm(with MSR)
Thermal paper
58 0.5 mm(2.28 0.02
Approx. 50 km(printratio:25% or less)
100,000,000 pulses
Lithium-ion
Rechargable up to500 times
Voltage:7.4 VDC(available8.4~6.8 VDC)
Approx.75 minutes (1100 mah)
0 ~50 30~80%RH
-10 ~60 10~90%RH(the paper is not included)
Max. C40 mm 1.57
Printing
Dimensions
Paper
Reliability
Battery
Usage
conditions
Approx.116 minutes
72mm(2.83 )
280(g)
102x126 x 46 mm
102 x132 x46 mm
80 0.5 mm(3.15 0.02
Strap Clasp
Screw Nut
Chapter 1 Setting up the Printer
Yourprinter box should include these items.
Mobile printer
Serial Cable
Roll paper
USB Cable
Operator s Manual
e
r
o
w
M
P
o
d
e
l
l
u
F
E
e
r
g
r
r
o
a
r
h
C
er
ow
M
P
o
d
e
l
l
u
F
E
e
r
g
r
r
o
a
r
h
C
FEED
FEED
POWER
POWER
USB
Charger
Printer Bag
Picture for referenceonly.
e
r
o
w
M
P
o
d
e
l
l
u
F
E
e
r
g
r
r
o
a
r
h
C
er
ow
M
P
o
d
e
l
l
u
F
E
e
r
g
r
r
o
a
r
h
C
FEED
FEED
POWER
POWER
Chapter 2 Specification
font A:48
font B:64
Sensor Out of paper

Card Reader(MSR)
(Option)
Serial Interface
Incharge Port
Screw Hole
Battery
Strap Clasp
Screw Hole
Chapter 3 Product Overview
3.1 Printer Parts
3.2 Interfaces
FEED
POWER
R
G
E
F
A
U
H
L
L
C
P
O
W
E
R
M
O
D
E
E
R
R
O
R
Feed Button
Charge(Red light)
Full(Green light)
Shell
Power(Red light)
Mode(Blue light)
Power Button Error(Yellow light)
USB Interface
Chapter 4 Operations
4.1 Connect the cables
4.1.1 Connect the AC recharger to the printer to recharge the battery
NOTE:To remove the DC cable connector, make sure that the power
supply s power cord is unplugged; then graspthe connector and
pull it outstraightly .
4.1.2 Connect the RS-232 port or USB port
Connect the HostComputer (POS) to the printer using an interface cable
that matches thespecifications of the printer and the Host computer
(POS).
1). Turn off both the printer and the Host computer (POS).
2). Plug the interface cable connector into the printer's interface connector.
3). Plug the other cable head into the Host computer(POS).
4). Turn on the Printer and Host computer(POS).
USBRS-232

4.2 Using the Printer
BUTTON
FEED
Press the FEEDbutton once to advance paper one line. You can also hold
down the FEED button to feed paper continuously.
POWER
Press this button and hold on for a few second, the printer can be powered
on/off.
PANEL LIGHTS
CHARGE
When the printer is connected with the charger, this light turns RED.
FULL
When the battery finished recharging, this light turns Green.
POWER
On-working indicator.
MODE
In mode-setting statue,it turns BLUE.
ERROR
Error appears,the light turns Yellow.
O
W
E
R
P
M
L
L
O
U
D
F
E
E
E
G
R
R
R
A
O
H
R
C
FEED POWER
AB
CD
Incorrect Correct
4.3 Installing or Replacing the Roll Paper
1. Make sure that the printer is not receivingdata; otherwise, data may be
lost.
2. Grasp the two sides of the paper cabin cover and pull till the cover open.
3. Remove the used paper roll core if thereis any.
4. Put in a new paperroll as shown.
5. Be sure the correct direction of the paper comes off the roll.
6. Pull out a small amountof paper, then close the cover. As picture shows.

The mobile printeris battery powersupplied. Battery should be
fully recharged and properly installed in the printer before using.
Follow the picture steps as below:
1. invert theprinter to the back battery cabin.
2. put the battery in the printer battery cabin in right position.
3. press the battery till a voice from thebutton.
AB
C
4.4 Battery installation
Before setting baudrate,makesure the printeris on off Status.
1. Press POWER button and hold on till MODE light turns blue.
FEED
POWER
R
G
E
F
A
U
H
L
L
C
P
O
W
E
R
M
O
D
E
E
R
R
O
R
MODE light turns blue
4.6 BAUDRATE SETTING(For example:Set 9600BPS baudrate)
4.5 Self test
Self test checks whether the printer can perform normallyor not, except to
functions of communication and recharging.
Follow the steps to initial a self test:
1. Make sure paper roll has been installed properly,
2. Press on the FEED button and hold on the POWER button for more than3
seconds, then the self test performs.
3. The printeris ready toreceive data after it fininshed the self test.
2. Press POWER button one time again.the MODE light will flash.
3. Press FEED button to Set baudrate.
Press FEED one time is 2400BPS,Press two times is 4800BPS,Press
three times is 9600BPS.Once press FEED button one more time the
baudrate will be increased as below.

4.Press POWER button again to confirm baudrate setting.The MODE
light will flash one or several times.Flash times is the same as the times
you press the FEED button.
FEED
POWER
R
G
E
F
A
U
H
L
L
C
P
O
W
E
R
M
O
D
E
E
R
R
O
R
MODE light will flash
4.7 Power on/off
Press on the POWER button and hold on formore than 3 seconds. The printer
will be powered on if the pre-statue is off;and the printer will be powered
off if thepre-statue is on.
Be sure theprinter is poweredon before printing.If the printer will not be
used for along time, do please power it off to save battery power.
4.8 Feed paper
This printer canfeed paper manually.
Press the FEED button one time to advance paperone line. Pressthe FEED
button and holdon to feed paper continuously.
4.9 Tear paper
After finish printing every receipt, users need to tear off the receipt by
themselves. There is a sawtooth architecture for tearing. Pay special notice
to tearing angle and force , over force may result roll paperbeing pulled
out from the paper cabin.
FEED
POWER
R
G
E
F
A
U
H
L
L
C
P
O
W
E
R
M
O
D
E
E
R
R
O
R
Press FEED button three times
to Set baudrateto 9600BPS
FEED
POWER
Press FEED button
One time
Two times
Three times
Four times
Five times
Six times
Seven times
Baudrate
2400BPS
4800BPS
9600BPS
19200BPS
38400BPS
57600BPS
115200BPS
This printer candetect paper lacking.
When the printer run out of paper,the ERROR indicator light will turn yellow.
If the paper runs over when printing, the data in the printer buffer won't be
lost. The printing will go on after the paper loaded.
4.10 Alarming to lack of paper

Turn off the printer, open the paperroll cover, and clean the thermal elements
of the print head with a cotton swab moistened with an alcohol solvent
(ethanol, methanol, orIPA).
Recommend to clean the thermal head periodically (generally every three
months) to maintain receipt print quality.
4.11 Cleaning the Print Head
NOTE: After printing,the print headcan be very hot. Be careful not to
touch it and to let it cool before youclean it. Do not damage the print
head by touching it with your fingers or any other hard object.
4.12 Interfaces
This mobile printermodel has three interfaces:
RS232, USB andBluetooth. Below are the specifications.
4.12.1 RS-232C Cable Connection
Interface Connector
Serial Interface (RS-232)
(TXD)
(RXD)
(DSR)
(DTR)
(S.G)
PRINTER
SIDE(9P)
HOST
SIDE(9P)
Pin No
3
2
7
8
6
Signal name
TxD
RxD
RTS
CTS
DSR
Direction
Output
Input
Output
Input
Input
Function
TransmitData
Receive Data
Ready To Send
Clear To Send
Date Set Ready
5SG
-
Signal Ground
4DTR Output Data Terminal Ready
3
2
6
4
5
(TXD)
(RXD)
(RTS)
(CTS)
(DSR)
(DTR)
(S.G)
7
8
6
4
5
3
2

4.12.3 Bluetooth
As a global open standard, Bluetooth is an excellent wireless data
comunication technology. There is no need for bluetooth equipments to
transfer data ofstrict poistion and that differs from IrDA.It supports not
only point to point but also point to multipoints(Seven points for max).
This model iscompatible with Bluetooth2.0 standard and with power level
of Class 2.The original password of this model is 1234 . While printing,
the host andprinter should beof distance less than 10 meters. If there is
any obstacle orEMI between host and printer, distance of less than 5 meters
is required.
4.12.2 USB Connection
Pin No
1
2
3
4
.Signal name
VCC
D-
D+
GND
Direction
+ 5V DC
Data -
Data +
Ground
4.13 Using and recharging battery
The mobile printeris power supplied by rechargeable Lithium-Ion battery.
As the batterycan be easily damaged, the usage of battery affects the
battery's life span.Please use the battery properly under below instructions.
1. If theprinter is not used for a long time (usually more than one week),
do please fetch out the batteryfor separate storage and better to fully
recharge the battery before fetching out the battery.
2. Power off the printer to save battery power after finished using.
3. When battery running over, the power indicator light would flash for
alarming. The printer can still work for an uncertain time, but users should
recharge the battery to ensure that the printer work properly.
Follow the below operations:
1. Plug the recharger into an outlet and plug the other terminal to the printer.
2. While recharging,the indicator light turns red. After recharge, the indicator
light turns green.
3. Please don't use the printer while recharging, otherwise the battery's life
span would bedecreased.
Other manuals for AB-320M
1
Table of contents
Other Zonerich Printer manuals