Ryobi RY43154 User manual

Cette scie à chaîne a été conçue et fabriquée conformément
aux strictes normes de fiabilité, simplicité d’emploi et sécurité
d’utilisation.Correctemententretenue,ellevousdonneradesannées
de fonctionnement robuste et sans problème.
AVERTISSEMENT : Pour réduire les risques de
blessures, l’utilisateur doit lire et veiller à bien comprendre le
manuel d’utilisation avant d’employer ce produit.
Merci de votre achat.
Su motosierra inalámbrica ha sido diseñada y fabrica-
da de conformidad con nuestras estrictas normas para
brindar fiabilidad, facilidad de uso y seguridad para el opera-
dor. Con el debido cuidado, le brindará muchos años de sólido
y eficiente funcionamiento.
ADVERTENCIA: Para reducir el riesgo de lesiones,
el usuario debe leer y comprender el manual del operador antes
de usar este producto.
Le agradecemos su compra.
CONSERVER CE MANUEL POUR
FUTURE RÉFÉRENCE GUARDE ESTE MANUAL PARA
FUTURAS CONSULTAS
SAVE THIS MANUAL FOR FUTURE REFERENCE
Your chain saw has been engineered and manufactured to our high standard for dependability, ease of operation, and
operator safety. When properly cared for, it will give you years of rugged, trouble-free performance.
WARNING: To reduce the risk of injury, the user must read and understand the operator’s manual before using
this product.
Thank you for your purchase.
OPERATOR’S MANUAL
MANUEL D’UTILISATION
MANUAL DEL OPERADOR
16 in. ELECTRIC CHAIN SAW
SCIE À CHAÎNE ÉLECTRIQUE
DE 406 mm (16 po)
MOTOSIERRA ELÉCTRICA
DE 406 mm (16 pulg.)
RY43154

Page / Página 2
Introduction .......................................................................................................................................2
Introduction / Introducción
General Power Tool Safety Warnings............................................................................................ 3-4
Règles de sécurité générales relatives aux outils électriques / Advertencias de seguridad para herramientas eléctrica
Chain Saw Safety Warnings.......................................................................................................... 5-9
Avertissements de sécurité relatifs au scie à chaîne / Advertencias de seguridad de la motosierra................................................ 4-9
Symbols .................................................................................................................................... 10-11
Symboles / Símbolos
Electrical..........................................................................................................................................12
Caractéristiques électriques / Aspectos eléctricos
Glossary of Terms............................................................................................................................13
Glossaire / Glosario de términos
Features..................................................................................................................................... 14-15
Caractéristiques / Características
Assembly.........................................................................................................................................16
Assemblage / Armado
Operation................................................................................................................................... 16-27
Utilisation / Funcionamiento
Maintenance.............................................................................................................................. 27-35
Entretien / Mantenimiento
Bar and Chain Combinations ..........................................................................................................36
Combinaisons de guide et chaîne / Combinaciones de barra y cadena
Troubleshooting...............................................................................................................................36
Dépannage / Corrección de problemas
Warranty ..........................................................................................................................................37
Garantie / Garantía
Parts Ordering and Service............................................................................................... Back Page
Commande de pièces et réparation / Pedidos de piezas y servicio ......................................................... Page arrière / Pág. posterior
TABLE OF CONTENTS
TABLE DES MATIÈRES / ÍNDICE DE CONTENIDO
INTRODUCTION
INTRODUCTION / INTRODUCCIÓN
This product has many features for making its use more pleasant and enjoyable. Safety, performance,
and dependability have been given top priority in the design of this product making it easy to maintain
and operate.
* * *
Ceproduit offredenombreusesfonctionsdestinéesàrendreson utilisation plus plaisante et satisfaisante.
Lors de la conception de ce produit, l’accent a été mis sur la sécurité, les performances et la fiabilité,
afin d’en faire un outil facile à utiliser et à entretenir.
* * *
Este producto ofrece numerosas características para hacer más agradable y placentero su uso. En el
diseño de este producto se ha conferido prioridad a la seguridad, el desempeño y la fiabilidad, por lo
cual se facilita su manejo y mantenimiento.

Page 3 — English
WARNING
Read all safety warnings and all instructions.
Failure to follow the warnings and instructions
may result in electric shock, fire and/or serious
injury.
Save all warnings and instructions for future
reference.The term “power tool” in the warnings
refers to your mains-operated (corded) power tool
or battery-operated (cordless) power tool.
WORK AREA SAFETY
Keep work area clean and well lit. Cluttered
or dark areas invite accidents.
Do not operate power tools in explosive
atmospheres, such as in the presence of
flammable liquids, gases or dust. Power
tools create sparks which may ignite the dust
or fumes.
Keep children and bystanders away while
operating a power tool. Distractions can cause
you to lose control.
ELECTRICAL SAFETY
Power tool plugs must match the outlet.
Never modify the plug in any way. Do not use
any adapter plugs with earthed (grounded)
power tools. Unmodified plugs and matching
outlets will reduce risk of electric shock.
Avoid body contact with earthed or grounded
surfaces such as pipes, radiators, ranges and
refrigerators. There is an increased risk of elec-
tric shock if your body is earthed or grounded.
Do not expose power tools to rain or wet
conditions. Water entering a power tool will
increase the risk of electric shock.
Do not abuse the cord. Never use the cord
for carrying, pulling or unplugging the power
tool. Keep cord away from heat, oil, sharp
edges or moving parts. Damaged or entangled
cords increase the risk of electric shock.
When operating a power tool outdoors, use
an extension cord suitable for outdoor use.
Use of a cord suitable for outdoor use reduces
the risk of electric shock.
If operating a power tool in a damp location
is unavoidable, use a ground fault circuit
interrupter (GFCI) protected supply with a
tripping current of 30 mA or less. Use of a
GFCI reduces the risk of electric shock.
PERSONAL SAFETY
Stay alert, watch what you are doing and
use common sense when operating a power
tool. Do not use a power tool while you are
tired or under the influence of drugs, alcohol
or medication. A moment of inattention while
operating power tools may result in serious
personal injury.
Use personal protective equipment. Always
wear eye protection. Protective equipment
such as dust mask, non-skid safety shoes, hard
hat, or hearing protection used for appropriate
conditions will reduce personal injuries.
Prevent unintentional starting. Ensure the
switch is in the off-position before connect-
ing to power source and/or battery pack,
picking up or carrying the tool. Carrying power
tools with your finger on the switch or energis-
ing power tools that have the switch on invites
accidents.
Remove any adjusting key or wrench before
turning the power tool on. A wrench or a key
left attached to a rotating part of the power tool
may result in personal injury.
Do not overreach. Keep proper footing and
balance at all times. This enables better control
of the power tool in unexpected situations.
Dress properly. Do not wear loose clothing or
jewellery. Keep your hair, clothing and gloves
away from moving parts. Loose clothes, jewel-
lery or long hair can be caught in moving parts.
If devices are provided for the connection
of dust extraction and collection facilities,
ensure these are connected and prop-
erly used. Use of dust collection can reduce
dustrelated hazards.
POWER TOOL USE AND CARE
Do not force the power tool. Use the correct
power tool for your application. The correct
power tool will do the job better and safer at the
rate for which it was designed.
GENERAL POWER TOOL SAFETY WARNINGS

Page 4 — English
Do not use the power tool if the switch does
not turn it on and off. Any power tool that can-
not be controlled with the switch is dangerous
and must be repaired.
Disconnect the plug from the power source
and/or the battery pack from the power tool
before making any adjustments, changing
accessories, or storing power tools. Such
preventive safety measures reduce the risk of
starting the power tool accidentally.
Store idle power tools out of the reach of
children and do not allow persons unfamiliar
with the power tool or these instructions to
operate the power tool. Power tools are dan-
gerous in the hands of untrained users.
Maintain power tools. Check for misalign-
ment or binding of moving parts, breakage of
parts and any other condition that may affect
the power tool’s operation. If damaged, have
the power tool repaired before use. Many
accidents are caused by poorly maintained
power tools.
Keep cutting tools sharp and clean. Prop-
erly maintained cutting tools with sharp cutting
edges are less likely to bind and are easier to
control.
Use the power tool, accessories and tool bits
etc. in accordance with these instructions,
taking into account the working conditions
and the work to be performed. Use of the
power tool for operations different from those
intended could result in a hazardous situation.
SERVICE
Have your power tool serviced by a qualified
repair person using only identical replace-
ment parts. This will ensure that the safety of
the power tool is maintained.
When servicing a power tool, use only iden-
tical replacement parts. Follow instructions
in the Maintenance section of this manual.
Use of unauthorized parts or failure to follow
Maintenance instructions may create a risk of
shock or injury.
GENERAL POWER TOOL SAFETY WARNINGS

Page 5 — English
CHAIN SAW SAFETY WARNINGS
Keep all parts of the body away from the
saw chain when the chain saw is operating.
Before you start the chain saw, make sure
the saw chain is not contacting anything. A
moment of inattention while operating chain
saws may cause entanglement of your clothing
or body with the saw chain.
Always hold the chain saw with your right
hand on the rear handle and your left hand on
the front handle. Holding the chain saw with a
reversed hand configuration increases the risk
of personal injury and should never be done.
Hold the power tool by insulated gripping
surfaces only, because the saw chain may
contact hidden wiring or its own cord. Saw
chains contacting a “live” wire may make
exposed metal parts of the power tool “live”
and could give the operator an electric shock.
Wear safety glasses and hearing protec-
tion. Further protective equipment for head,
hands, legs and feet is recommended. Ade-
quate protective clothing will reduce personal
injury by flying debris or accidental contact with
the saw chain.
Do not operate a chain saw in a tree. Opera-
tion of a chain saw while up in a tree may result
in personal injury.
Always keep proper footing and operate
the chain saw only when standing on fixed,
secure and level surface. Slippery or unstable
surfaces such as ladders may cause a loss of
balance or control of the chain saw.
When cutting a limb that is under tension be
alert for spring back. When the tension in the
wood fibres is released the spring loaded limb
may strike the operator and/or throw the chain
saw out of control.
Use extreme caution when cutting brush and
saplings. The slender material may catch the
saw chain and be whipped toward you or pull
you off balance.
Carry the chain saw by the front handle with
the chain saw switched off and away from
your body. When transporting or storing the
chain saw always fit the guide bar cover.
Proper handling of the chain saw will reduce the
likelihood of accidental contact with the moving
saw chain.
Follow instructions for lubricating, chain ten-
sioning and changing accessories. Improperly
tensioned or lubricated chain may either break
or increase the chance for kickback.
Keep handles dry, clean, and free from oil
and grease. Greasy, oily handles are slippery
causing loss of control.
Cut wood only. Do not use chain saw for
purposes not intended. For example: do not
use chain saw for cutting plastic, masonry
or non-wood building materials. Use of the
chain saw for operations different than intended
could result in a hazardous situation.
CAUSES AND OPERATOR
PREVENTION OF KICKBACK
Kickback may occur when the nose or tip of the
guide bar touches an object, or when the wood
closes in and pinches the saw chain in the cut.
Tip contact in some cases may cause a sudden
reversereaction,kickingtheguidebar up and back
towards the operator.
Pinching the saw chain along the top of the guide
bar may push the guide bar rapidly back towards
the operator.
Either of these reactions may cause you to lose
control of the saw which could result in serious
personal injury. Do not rely exclusively upon the
safety devices built into your saw. As a chain saw
user, you should take several steps to keep your
cutting jobs free from accident or injury.
Kickback is the result of tool misuse and/or incor-
rect operating procedures or conditions and can
be avoided by taking proper precautions as given
below:
Maintain a firm grip, with thumbs and fingers
encircling the chain saw handles, with both
hands on the saw and position your body and
arm to allow you to resist kickback forces.
Kickback forces can be controlled by the opera-
tor, if proper precautions are taken. Do not let
go of the chain saw.

Page 6 — English
CHAIN SAW SAFETY WARNINGS
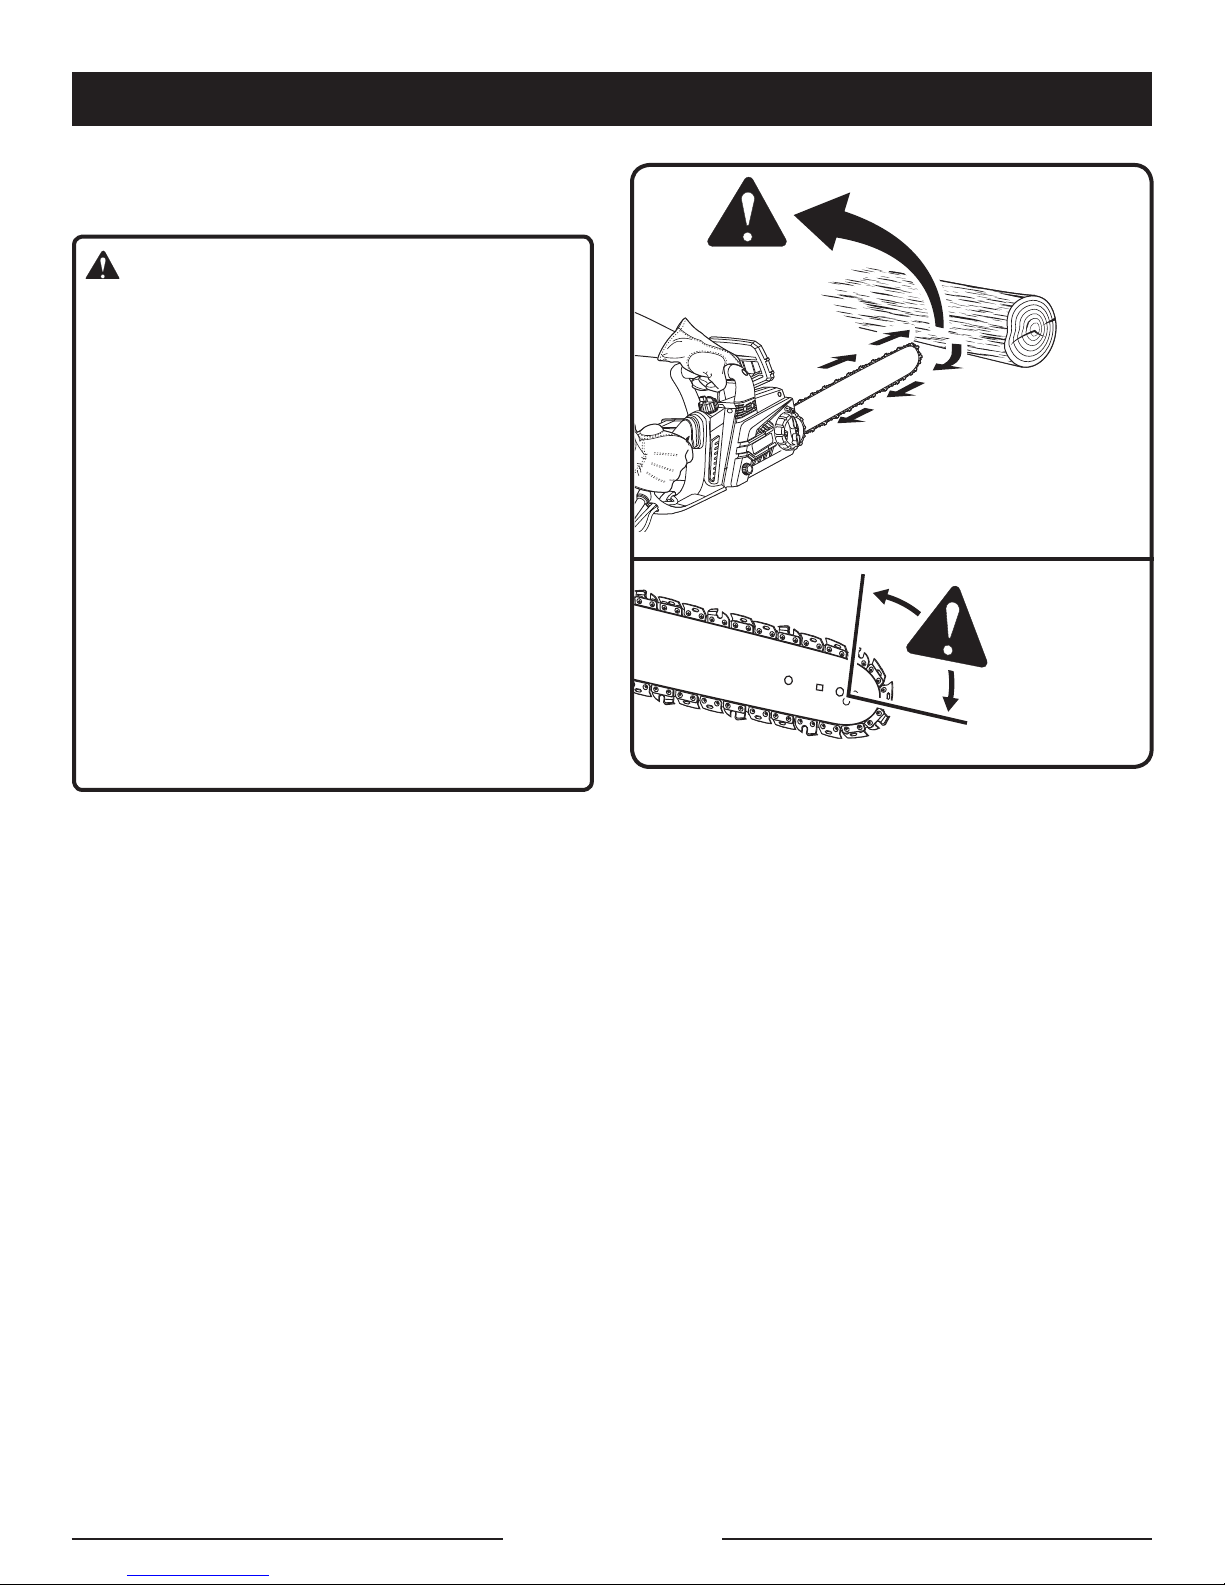
Do not overreach and do not cut above chest
height. This helps prevent unintended tip con-
tact and enables better control of the chain saw
in unexpected situations.
Only use replacement bars and chains speci-
fied by the manufacturer. Incorrect replace-
ment bars and chains may cause chain break-
age and/or kickback.
Follow the manufacturer’s sharpening and
maintenance instructions for the saw chain.
Decreasing the depth gauge height can lead to
increased kickback. Do not start cutting until
you have a clear work area, secure footing,
and a planned retreat path from the falling tree.
Cluttered areas invite accidents.
Keep ALL children, bystanders, visitors, and
animals out of the work area while starting or
cutting with the chain saw. Do not let visitors
contact chain saw or extension cord.
Do not operate chain saw in explosive atmo-
spheres, such as in the presence of flammable
liquids, gases, or dust. Chain saws create
sparks which may ignite the dust or fumes.
WARNING: Use outdoor extension cords
marked SW-A, SOW-A, STW-A, STOW-A, SJW-
A, SJTW-A, or SJTOW-A. These cords are rated
for outdoor use and reduce the risk of electric
shock.
Polarized Plugs. To reduce the risk of electric
shock, this tool has a polarized plug (one blade
is wider than the other). This plug will fit in a
polarized outlet only one way. If the plug does
not fit fully in the outlet, reverse the plug. If it
still does not fit, contact a qualified electrician
to install the proper outlet. Do not change the
plug in any way.
Make sure your extension cord is in good condi-
tion. When using an extension cord, be sure to
use one heavy enough to carry the current your
product will draw. A wire gauge size (A.W.G.) of
at least 14 is recommended for an extension
cord 50 feet or less in length. A cord exceeding
100 feet is not recommended. If in doubt, use
the next heavier gauge. The smaller the gauge
number, the heavier the cord. An undersized
cord will cause a drop in line voltage resulting
in loss of power and overheating.
Inspect extension cords periodically and, if dam-
aged, have repaired by a licensed electrician.
Constantly stay aware of cord location. Follow-
ing this rule will reduce the risk of electric shock
or fire.
Dress Properly — Wear snug fitting clothing.
Always wear heavy, long pants, long sleeves,
overalls, and jeans. We recommend the use of
chaps made of cut resistant material or ones
that contain cut resistant inserts that meet the
ASTM F1897 Standard Specification for Leg
Protection for Chain Saw Users. Wear non-
slip safety footwear. Wear non-slip heavy duty
gloves to improve your grip and to protect your
hands. Do not wear jewelry, short pants, san-
dals, or go barefoot. Do not wear loose fitting
clothing, which could be drawn into the motor
or catch the chain or underbrush. Secure hair
so it is above shoulder level. Wear hearing and
head protection.
Heavy protective clothing may increase operator
fatigue, which could lead to heat stroke. Dur-
ing weather that is hot and humid, heavy work
should be scheduled for early morning or late
afternoon hours when temperatures are cooler.
Always wear eye protection with side shields
marked to comply with ANSI Z87.1 as well as
hearing and head protection when operating
this equipment.
Always be aware of what you are doing when
using the chain saw. Use common sense. Do
not operate the chain saw when you are tired,
ill, or under the influence of alcohol, drugs, or
medication.
Do not expose the chain saw to rain.
Do not use the chain saw in damp or wet loca-
tions.
Always be aware of extension cord while oper-
ating chain saw. Take precautions to avoid
tripping over cord. Keep cord away from chain
and operator at all times. Never carry saw by
the cord or pull it to disconnect from receptacle.
Keep cord from oil and sharp edges.

Page 7 — English
CHAIN SAW SAFETY WARNINGS
Stay alert and pay attention to what you are
doing. Use common sense when using this unit.
Keep all parts of your body away from the saw
chain when the unit is running.
Never let anyone use your chain saw who has
not received adequate instructions in its proper
use. This applies to rentals as well as privately
owned saws.
Before you start the unit, make sure the saw
chain is not contacting any object.
Stop the chain saw before setting it down. As
an additional safety precaution, apply the chain
brake prior to setting down the saw.
To avoid accidental starting, never carry the unit
with your finger on the switch trigger.
Maintain the unit with care. Keep the cutting
edge sharp and clean for best performance and
to reduce the risk of injury. Follow instructions
for lubricating and changing accessories.
Do not operate a chain saw with one hand! Use
a firm grip with thumbs and fingers encircling the
chain saw handles. Serious injury to the opera-
tor, helpers, bystanders, or any combination
of these persons may result from one-handed
operation. A chain saw is intended for two-
handed use.
Guard against electric shock — Avoid body
contact with grounded surfaces such as metal
pipes and wire fences. There is an increased
risk of electric shock if your body is grounded.
Do not operate a chain saw that is damaged,
improperly adjusted, or not completely and
securely assembled. Chain should slow to a
stop when the switch trigger is released. If the
chain continues to turn after the switch trigger
has been released, have the unit serviced by
your nearest RYOBI service dealer.
Check for damaged parts. Check for alignment
of moving parts, binding of moving parts, break-
age of parts, mounting, and any other condi-
tions that may affect its operation. A guard or
other part that is damaged should be properly
repaired or replaced by an authorized service
dealer unless otherwise indicated elsewhere in
this manual.
All chain saw service, other than the items listed
in the operation and maintenance sections,
should be performed by your nearest RYOBI
service dealer.
Always maintain a proper stance.
Do not use chain saw if switch does not turn it
on and off. Have defective switch replaced by
authorized service center.
Do not adapt your powerhead to a bow guide
or use it to power any attachments or devices
not listed for the saw.
Disconnect chain saw from power supply when
not in use, before servicing, and when making
adjustments and changing attachments, such
as saw chain and guard.
Do not cut vines and/or small underbrush.
Do not operate a chain saw in a tree, on a ladder,
rooftop, scaffold, or other unstable support; this
is extremely dangerous.
NOTE: The size of the work area depends on the
job being performed as well as the size tree or
work piece involved. For example, felling a tree
requires a larger work area than making bucking
cuts.
Do not force the chain saw. The job can be per-
formed better and safer at the rate for which it
was intended.
Always use the right product for your applica-
tion. The chain saw should be used for cutting
wood only. Never use the chain saw to cut plas-
tic, masonry or non-wood building materials.
Store chain saw when not in use. Chain saw
should be stored in a dry and high or locked
area out of the reach of children. When storing
chain saw place the scabbard on the bar and
chain and store the chain saw in carrying case.

Page 8 — English
ROTATIONAL
KICKBACK
KICKBACK
DANGER ZONE
Fig. 2
Fig. 1
BAR SHOWN WITHOUT
SAFE-T-TIP NOSE GUARD
FOR ILLUSTRATION
PURPOSES ONLY
KICKBACK
See Figures 1 - 2.
WARNING:
Kickback may occur when the moving chain
contacts an object at the upper portion of the
tip of the guide bar or when the wood closes in
and pinches the saw chain in the cut. Contact at
the upper portion of the tip of the guide bar can
cause the chain to dig into the object and stop
the chain for an instant. The result is a lightning
fast, reverse reaction which kicks the guide bar
up and back toward the operator. If the saw
chain is pinched along the top of the guide bar,
the guide bar can be driven rapidly back toward
the operator. Either of these reactions can cause
loss of saw control which can result in serious
injury. Do not rely exclusively upon the safety
devices built into the saw. As a chain saw user,
you should take several steps to keep your cut-
ting jobs free from accident or injury.
The following precautions should be followed
to minimize kickback:
Always grip the saw firmly with both hands.
Hold the saw firmly with both hands when
the unit is running. Place your right hand on
the rear handle and your left hand on the
front handle with your thumbs and fingers
encircling the chain saw handles. A firm grip
together with a stiff left arm will help you main-
tain control of the saw if kickback occurs.
Make sure that the area in which you are cut-
ting is free from obstructions. Do not let the
nose of the guide bar contact a log, branch,
fence, or any other obstruction that could be
hit while you are operating the saw.
Always cut with the unit running. Fully
squeeze the switch trigger and maintain cut-
ting speed.
Use replacement parts such as low kickback
chain, chain brakes, SAFE-T-TIP anti-kick-
back nose guards and special guide bars that
reduce the risks associated with rotational
kickback. Use only the replacement guide
bars and low kickback chains specified by
the manufacturer for the saw.
With a basic understanding of kickback, you
can reduce or eliminate the element of surprise.
Sudden surprise contributes to accidents.
Do not overreach. Keep proper footing and bal-
ance at all times.
Do not cut above chest height or overreach
when cutting. Do not let nose of guide bar con-
tact log, branch, ground, or other obstruction.
Keep the SAFE-T-TIP anti-kickback nose guard
properly mounted on the guide bar to prevent
rotational kickback.
Follow the sharpening and maintenance instruc-
tions for the saw chain.
Push and Pull — This reaction force is always
opposite to the direction the chain is moving
where wood contact is made. Thus, the operator
must be ready to control the PULL when cutting
on the bottom edge of the bar, and PUSH when
cutting along the top edge. See Figure 3.
CHAIN SAW SAFETY WARNINGS

Page 9 — English
PULL
PUSH
Fig. 3
UNDERSTANDING YOUR CHAIN SAW
SAFETY DEVICES
See Figure 4.
SAFE-T-TIP ANTI-KICKBACK NOSE
GUARD
The SAFE-T-TIP prevents rotational kickback from
happening, because it covers the tip of the bar
where kickback is generated. Never attempt any
kind of cutting where the SAFE-T-TIP would have
to be removed from the bar tip.
LOW KICKBACK SAW CHAIN
The rakers (depth gauges) ahead of each cutter
can minimize the force of a kickback reaction by
preventing the cutters from digging in too deeply
at the kickback zone. Only use replacement chain
that is equivalent to original chain or has been
certified as low kickback chain per ANSI B175.1.
Low kickback/skip tooth saw chain is a chain that
has met the kickback performance requirements
of ANSI B175.1 - 2012 (American National Stan-
dard for Power Tools - Gasoline-Powered Chain
Saws-Safety Requirements) when tested on the
representative sample of chain saws below 3.8
c.i.d. specified in ANSI B175.1 - 2012.
As saw chains are sharpened during their useful
life, they lose some of the low kickback qualities
and extra caution should be used.
GUIDE BARS
Generally, guide bars with small radius tips have
somewhat lower kickback potentials.
When making a replacement, be sure to order
one of the bars listed for the saw in this operator’s
manual. The proper size SAFE-T-TIP nose guard
comes installed on the bar. Use only guide bars
that have a provision for mounting the SAFE-T-TIP.
Fig. 4
SAFE-T-TIP
Save these instructions. Refer to them fre-
quently and use them to instruct others who
may use this product. If you loan someone this
product, loan them these instructions also.
CHAIN SAW SAFETY WARNINGS

Page 10 — English
The following signal words and meanings are intended to explain the levels of risk associated with
this product.
SYMBOL SIGNAL MEANING
DANGER: Indicates a hazardous situation, which, if not avoided, will result
in death or serious injury.
WARNING: Indicates a hazardous situation, which, if not avoided, could
result in death or serious injury.
CAUTION: Indicates a hazardous situation, that, if not avoided, may result
in minor or moderate injury.
NOTICE:
(Without Safety Alert Symbol) Indicates information considered
important, but not related to a potential injury (e.g. messages
relating to property damage).
Some of the following symbols may be used on this product. Please study them and learn their
meaning. Proper interpretation of these symbols will allow you to operate the product better and safer.
SYMBOL NAME DESIGNATION/EXPLANATION
Safety Alert Indicates a potential personal injury hazard.
Read Operator’s Manual To reduce the risk of injury, user must read and
understand operator’s manual before using this product.
Wear Eye, Hearing, and
Head Protection
Wear eye protection with side shields marked to comply
with ANSI Z87.1 as well as hearing and head protection
when operating this equipment.
Wet Conditions Alert Do not expose to rain or use in damp locations.
SAFE-T-TIP Nose Guard The SAFE-T-TIP nose guard on the guide bar helps
prevent kickback.
Operate With Two
Hands Hold and operate the saw properly with both hands.
One Handed Do not operate the saw using only one hand.
Kickback DANGER! BEWARE OF KICKBACK.
Bar Nose Contact
Avoid bar nose contact. Tip contact may cause the
guide bar to move suddenly upward and backward,
which may cause serious injury.
SYMBOLS

Page 11 — English
Some of the following symbols may be used on this product. Please study them and learn their
meaning. Proper interpretation of these symbols will allow you to operate the product better and safer.
SYMBOL NAME DESIGNATION/EXPLANATION
Wear Gloves Wear non-slip, heavy-duty protective gloves when
handling the chain saw.
Wear Safety Footwear Wear non-slip safety footwear when using this
equipment.
Keep Tool Away from
Electrical Lines/Keep
Bystanders Away
DANGER! Risk of electrocution! Keep tool 50 feet away
from electrical lines. Keep all bystanders at least 50 ft.
away or twice the height of the largest trees in the fell-
ing area when felling.
V Volts Voltage
A Amperes Current
Hz Hertz Frequency (cycles per second)
W Watt Power
min Minutes Time
Alternating Current Type of current
Direct Current Type or a characteristic of current
n
o
No Load Speed Rotational speed, at no load
Class II Construction Double-insulated construction
.../min Per Minute Revolutions, strokes, surface speed, orbits etc., per
minute
SYMBOLS

Page 12 — English
Before using any extension cord, inspect it for
loose or exposed wires and cut or worn insulation.
A proper extension cord is available at an autho-
rized service center.
It is possible to tie the extension cord and power
cord in a knot to prevent them from becoming
disconnected during use. Make the knot as shown
in figure 5, then connect the plug end of the power
cord into the receptacle end of the extension cord.
This method can also be used to tie two extension
cords together.
DOUBLE INSULATION
Double insulation is a concept in safety in electric
powertools,whicheliminatestheneed for the usual
three-wiregroundedpowercord.Allexposedmetal
parts are isolated from the internal metal motor
components with protecting insulation. Double
insulated tools do not need to be grounded.
WARNING:
The double insulated system is intended to
protect the user from shock resulting from a
break in the tool’s internal insulation. Observe
all normal safety precautions to avoid electrical
shock.
NOTE: Servicing of a product with double insula-
tion requires extreme care and knowledge of the
system and should be performed only by a quali-
fied service technician. For service, we suggest
you return the product to your nearest authorized
service center for repair. Always use original fac-
tory replacement parts when servicing.
ELECTRICAL CONNECTION
This product has a precision-built electric motor.
It should be connected to a power supply that is
nominal 120V/60Hz AC (typical U.S. household
circuit). Do not operate this product on direct cur-
rent (DC). A substantial voltage drop will cause a
loss of power and the motor will overheat. If the
product does not operate when plugged into an
outlet, double-check the power supply.
EXTENSION CORDS
See Figure 5.
When using a power tool at a considerable
distance from a power source, be sure to use
an extension cord that has the capacity to
handle the current the product will draw. An
undersized cord will cause a drop in line voltage,
resulting in overheating and loss of power. Use the
chart to determine the minimum wire size required
in an extension cord. Only round jacketed cords
listed by Underwriter’s Laboratories (UL) should
be used.
When working outdoors with a product, use an
extension cord that is designed for outside use.
This type of cord is designated with “W-A” or “W”
on the cord’s jacket.
**Ampere rating (on product data plate)
0-2.0 2.1-3.4 3.5-5.0 5.1-7.0 7.1-12.0 12.1-16.0
Cord Length Wire Size (A.W.G.)
25'16 16 16 16 14 14
50'16 16 16 14 14 12
100'16 16 14 12 10 —
**Used on 12 gauge - 20 amp circuit.
NOTE: AWG = American Wire Gauge
WARNING:
Keep the extension cord clear of the working
area. Position the cord so that it will not get
caught on lumber, tools, or other obstruc-
tions while you are working with a power
tool. Failure to do so can result in serious
personal injury.
WARNING:
Check extension cords before each use. If
damaged replace immediately. Never use the
product with a damaged cord since touching
the damaged area could cause electrical shock
resulting in serious injury.
Fig. 5
ELECTRICAL

Page 13 — English
Bucking
The process of cross cutting a felled tree or log into
lengths.
Chain Brake
A device used to stop the saw chain.
Chain Saw Powerhead
A chain saw without the saw chain and guide bar.
Clutch
A mechanism for connecting and disconnecting a
driven member to and from a rotating source of power.
Drive Sprocket or Sprocket
The toothed part that drives the saw chain.
Felling
The process of cutting down a tree.
Felling Back Cut
The final cut in a tree felling operation made on the
opposite side of the tree from the notching undercut.
Front Hand Guard
A structural barrier between the front handle of a chain
sawandtheguidebar, typicallylocatedclosetothehand
position on the front handle, and sometimes employed
as an activating lever for a chain brake.
Front Handle
The support handle located at or toward the front of
the chain saw. This handle is for the left hand.
Guide Bar
A solid railed structure that supports and guides the
saw chain.
Kickback
The backward or upward motion, or both, of the guide
bar occurring when the saw chain near the nose of the
top area of the guide bar contacts any object such as a
log or branch, or when the wood closes in and pinches
the saw chain in the cut.
Kickback (Pinch)
The rapid pushback of the saw which can occur when
the wood closes in and pinches the moving saw chain
in the cut along the top of the guide bar.
Kickback (Rotational)
The rapid upward and backward motion of the saw
which can occur when the moving saw chain near the
upper portion of the tip of the guide bar contacts an
object, such as a log or branch.
Low-Kickback Chain
A chain that complies with the kickback performance
requirements of ANSI B175.1 when tested on a repre-
sentative sample of chain saws.
Normal Cutting Position
Those positions assumed in performing the bucking
and felling cuts.
Notching Undercut
A notch cut in a tree that directs the tree’s fall.
Rear Handle
The support handle located at or toward the rear of the
saw. It normally contains the switch trigger. This handle
is for the right hand.
Reduced Kickback Guide Bar
A guide bar which has been demonstrated to reduce
kickback significantly.
Replacement Saw Chain
A chain that complies with the kickback performance
requirementsofANSI B175.1 when testedwithspecific
chain saws. It may not meet the ANSI performance
requirements when used with other saws.
SAFE-T-TIP Anti-Kickback Nose Guard
An attachment that is provided on the end of the guide
bar to prevent the chain at the end of the guide bar
from contacting the wood.
Saw Chain
A loop of chain having cutting teeth that cut the wood,
and that is driven by the motor and is supported by
the guide bar.
Spiked Bumper (Spike)
The pointed tooth or teeth for use when felling or buck-
ing to pivot the saw and maintain position while sawing.
Springpole
A small tree (sapling) or limb that is bent or trapped
under tension. It may “spring back” rapidly when cut,
causing a dangerous situation.
Switch Trigger
A device that when operated will complete or interrupt
an electrical power circuit to the motor of the chain saw.
Switch Linkage
The mechanism that transmits motion from a trigger
to the switch.
Switch Lock-out
A movable stop that prevents the unintentional opera-
tion of the switch until manually actuated.
GLOSSARY OF TERMS

Page 14 — English
PRODUCT SPECIFICATIONS
Fig. 6
CHAIN BRAKE/FRONT
HAND GUARD
FRONT HANDLE
POWER
CORD
SWITCH
LOCK-OUT
SAFE-T-TIP
CHAIN TENSION
ADJUSTMENT RING
CHAIN COVER
Bar length.......................................................................................................................................16 in.
Chain pitch ................................................................................................................................. .375 in.
Chain gauge ............................................................................................................................... .050 in.
Chain type ...........................................................................................................Low Profile Skip Tooth
Drive sprocket .............................................................................................................................6-tooth
Input ...........................................................................................nominal 120V/60Hz AC only, 12 Amps
Chain oil tank capacity.................................................................................................................6.8 oz.
QUICK VIEW
OIL INDICATOR CHAIN COVER
LOCK KNOB
WOOD CHIP
DEFLECTOR
KNOB
WOOD CHIP
DEFLECTOR
REAR
HANDLE
CORD
RETAINER
SWITCH
TRIGGER
GUIDE
BAR
LOW KICKBACK SAW
CHAIN
FEATURES
OIL RESERVOIR
CAP
SCABBARD

Page 15 — English
KNOW YOUR CHAIN SAW
See Figure 6.
The safe use of this product requires an under-
standing of the information on the tool and in this
operator’s manual as well as a knowledge of the
projectyouareattempting.Beforeuseofthisprod-
uct, familiarize yourself with all operating features
and safety rules.
CHAIN BRAKE/FRONT HAND GUARD
The chain brake is designed to quickly stop the
chain from rotating. When the chain brake/ front
hand guard is manually pushed toward the bar, the
chain should stop immediately. The chain brake
does not prevent kickback.
CHAIN TENSION ADJUSTMENT RING
This feature allows user to adjust the tension of
the chain.
GUIDE BAR
The factory-equipped guide bar has a small radius
tipthatoffersasomewhatlowerkickbackpotential.
LOW KICKBACK SAW CHAIN
The low kickback saw chain helps minimize the
force of a kickback reaction by preventing the cut-
tersfromdiggingintoodeeply at thekickbackzone.
QUICK VIEW OIL INDICATOR
Semi-transparent oil reservoir that allows user to
see when to add oil.
SAFE-T-TIP®ANTI-KICKBACK NOSE
GUARD
The SAFE-T-TIP Anti-Kickback Nose Guard is an
attach-ment provided on the end of the guide bar
to prevent the chain on the end of the guide bar
from contacting the wood.
SWITCH LOCK-OUT
A control feature designed to prevent the motor
from being accidently started.
SWITCH TRIGGER
Squeeze the switch trigger to operate the unit after
switch lock-out has been pushed in. Release the
switch trigger to stop the unit.
WOOD CHIP DEFLECTOR
Extend the wood chip deflector by rotating the
woodchipdeflectorknobtohelpguidewoodchips
away from the operator during chain saw use.
FEATURES

Page 16 — English
UNPACKING
This product has been shipped completely
assembled.
Carefully remove the product and any acces-
sories from the box. Make sure that all items
listed in the packing list are included.
WARNING:
Do not use this product if it is not completely
assembled or if any parts appear to be missing
or damaged. Use of a product that is not prop-
erly and completely assembled could result in
serious personal injury.
Inspect the product carefully to make sure no
breakage or damage occurred during shipping.
Do not discard the packing material until you
have carefully inspected and satisfactorily oper-
ated the product.
If any parts are damaged or missing, please call
1-800-860-4050 for assistance.
PACKING LIST
Chain Saw
Scabbard
Operator’s Manual
WARNING:
If any parts are damaged or missing do not
operate this product until the parts are replaced.
Use of this product with damaged or missing
parts could result in serious personal injury.
WARNING:
Do not attempt to modify this product or create
accessories not recommended for use with this
product. Any such alteration or modification is
misuse and could result in a hazardous condi-
tion leading to possible serious personal injury.
WARNING:
Do not connect to power supply until assembly
is complete. Failure to comply could result in
accidental starting and possible serious per-
sonal injury.
ASSEMBLY
OPERATION
DANGER:
Never cut near power lines, electric cords, or
other electric sources. If bar and chain jams
on any electrical cord or line, DO NOT TOUCH
THE BAR OR CHAIN! THEY CAN BECOME
ELECTRICALLY LIVE AND VERY DANGEROUS.
Continue to hold the chain saw by the insulated
rear handle or lay it down and away from you in
a safe manner. Disconnect the electrical service
to the damaged line or cord before attempting
to free the bar and chain from the line or cord.
Contact with the bar, chain, other conductive
parts of the chain saw, or live electric cords or
lines will result in death by electrocution, electric
shock, or serious personal injury.
WARNING:
Do not allow familiarity with this product to
make you careless. Remember that a careless
fraction of a second is sufficient to inflict seri-
ous injury.
WARNING:
Always wear eye protection with side shields
marked to comply with ANSI Z87.1, along with
hearing and head protection. Failure to do so
could result in objects being thrown into your
eyes resulting in possible serious injury.

Page 17 — English
WARNING:
Do not use any attachments or accessories
not recommended by the manufacturer of this
product. The use of attachments or accessories
not recommended can result in serious personal
injury.
WARNING:
Never fell a tree or cut a log or limb that has a
diameter greater that the length of the guide
bar. Only properly trained professionals should
perform these cuts. Performing these types of
cuts can cause an accident and result in death
or serious personal injury.
NOTICE:
Before each use, inspect the entire product
for damaged, missing, or loose parts such as
screws, nuts, bolts, caps, etc. Tighten securely
all fasteners and caps and do not operate this
product until all missing or damaged parts are
replaced. Please contact customer service or a
qualified service center for assistance.
APPLICATIONS
You may use this product for the purposes listed
below:
Basic limbing, felling, and woodcutting
Removing buttress roots
ADDING BAR AND CHAIN LUBRICANT
See Figure 7.
NOTE: Chain saw comes from the factory with
no bar and chain lubricant added. Level should
also be checked after every 20 minutes of use and
refilled as needed.
Use a bar and chain lubricant designed for lubri-
cating chain saw chains. They are formulated to
extend bar and chain life by protecting against
wear and reducing friction and heat.
NOTE: Do not use dirty, used, or otherwise con-
taminated lubricants. Damage may occur to the
bar or chain.
Remove oil cap.
Carefully pour the bar and chain lubricant into
the tank.
Wipe off excess lubricant.
Check and fill the oil tank when quick view oil
indicator is below the second to last indicator
line.
Repeat as needed.
NOTE: It is normal for lubricant to seep from the
saw when not in use. To prevent seepage, empty
the oil tank after each use then run for one minute.
When storing the unit for a long period of time
(three months or longer) be sure the chain is lightly
lubricated; this will prevent rust on the chain and
bar sprocket.
Fig. 7
QUICK VIEW
OIL INDICATOR
OIL RESERVOIR
CAP
OPERATION
CHAIN
LUBRICANT

Page 18 — English
Fig. 10
EXTENSION
CORD
CORD
RETAINER
OPERATING THE MANUAL CHAIN
BRAKE
See Figures 8 - 9.
Check the operating condition of the chain brake
prior to each use.
Using the back of your left hand, engage the
chain brake by pushing the chain brake/front
hand guard toward the bar while the chain is
rotating rapidly.
Reset the chain brake back into the RUN posi-
tion by grasping the top of the chain brake/front
hand guard and pulling toward the front handle
until you hear a click.
WARNING:
If the chain brake does not stop the chain imme-
diately when manually activated, or if the chain
brake will not stay in the run position without
assistance, take the saw to a qualified service
center for repair prior to use.
CONNECTING TO POWER SUPPLY
See Figure 10.
This chain saw is designed with a cord retainer
that prevents the extension cord from being pulled
loose while using.
NOTICE:
Always secure extension cord to unit by using
cord retainer. Failure to use cord retainer may
result in damage to the unit and/or extension
cord.
Form a loop with the end of the extension cord.
Insert loop portion of extension cord through
the opening in the side of the rear handle and
place over cord hitch.
Slowly pull loop against cord retainer until the
slack is removed.
Plug chain saw into extension cord.
NOTE: Failure to remove all excess cord slack
from extension cord retainer could result in plug
loosening from receptacle.
OPERATION
Fig. 8
Fig. 9
RUN
POSITION
BRAKE
POSITION
WARNING:
Always make sure the tool is unplugged from
the power supply when you are assembling
parts, making adjustments, cleaning, carrying,
transporting or when not in use. Disconnect-
ing the power supply from the tool will prevent
accidental starting that could cause serious
personal injury.

Page 19 — English
Fig. 11
SWITCH
LOCK-OUT
SWITCH
TRIGGER
STARTING AND STOPPING THE CHAIN
SAW
See Figure 11.
WARNING:
Keep body to the left of the chain line. Never
straddle the saw or chain, or lean over past the
chain line.
Starting the chain saw:
Make sure chain tension is at desired setting.
Refer to Adjusting the Chain Tension in the
Maintenance section of this manual.
Make sure the chain cover lock knob is tight to
the chain cover.
Make sure no objects or obstructions are in
immediate vicinity which could come in contact
with the bar and chain.
Press and hold the switch lock-out. This makes
the switch trigger operational.
Press and hold the switch trigger, release the
switch lock-out and continue to squeeze the
switch trigger for continued operation.
Stopping the chain saw:
NOTE: It is normal for the chain to coast to a stop
once the trigger switch is released.
Release the switch trigger to stop the chain saw.
Upon release of the switch trigger, the switch
lock-out will be automatically reset to the lock
position.
USING THE WOOD CHIP DEFLECTOR
See Figure 12 - 13.
The wood chip deflector allows the wood chips to
be deflected away from the operator during chain
saw use. Rotate the wood chip deflector knob
clockwise to extend the deflector and counter-
clockwise to retract.
OPERATION
Fig. 12
Fig. 13
WOOD CHIP
DEFLECTOR KNOB
WOOD CHIP
DEFLECTOR

Page 20 — English
PREPARING FOR CUTTING
PROPER GRIP ON HANDLES
See Figure 14.
See General Power Tool Safety Warnings for appro-
priate safety equipment.
Wear non-slip gloves for maximum grip and
protection.
Hold the saw firmly with both hands. Always
keep your left hand on the front handle and your
right hand on the rear handle so that your body
is to the left of the chain line.
WARNING:
Never use a left-handed (cross-handed) grip or
any stance that would place your body or arm
across the chain line.
Maintain a proper grip on the saw whenever the
motor is running. The fingers should encircle
the handle and the thumb is wrapped under the
handlebar. This grip is least likely to be broken
by a kickback or other sudden reaction of the
saw. Any grip in which the thumb and fingers
are on the same side of the handle is dangerous
because a slight kick of the saw can cause loss
of control.
WARNING:
DO NOT operate the switch
trigger with your left hand
and hold the front handle
with your right hand. Never
allow any part of your body
to be in the chain line while
operating a saw. Improper
operation of the chain saw could result in seri-
ous personal injury.
CHAIN
LINE
OPERATION
PROPER GRIP
Fig. 14
IMPROPER GRIP
PROPER HAND
GRIP POSITION
PROPER CUTTING STANCE
See Figure 15.
WARNING:
Always use the proper cutting stance described
in this section. Never kneel when using the
chain saw, except when felling a tree as illus-
trated in figure 20. Kneeling could result in loss
of stability and control of the chain saw, result-
ing in serious personal injury.
Table of contents
Languages:
Other Ryobi Chainsaw manuals

Ryobi
Ryobi RY40505 User manual

Ryobi
Ryobi RCS1935 User manual

Ryobi
Ryobi P542 Application guide

Ryobi
Ryobi RY10518 User manual

Ryobi
Ryobi RCS18X3050 User manual

Ryobi
Ryobi OCS1830BL User manual

Ryobi
Ryobi RY18CS20A User manual

Ryobi
Ryobi RCS4235B Type III Operation instructions

Ryobi
Ryobi RY3714VNM User manual

Ryobi
Ryobi RY10521B User manual

Ryobi
Ryobi RY40507 User manual

Ryobi
Ryobi RCS-3540C User manual

Ryobi
Ryobi RCS-3540C User manual

Ryobi
Ryobi RY40503 User manual

Ryobi
Ryobi RY3714 User manual

Ryobi
Ryobi RY40509 User manual

Ryobi
Ryobi RCS36X4 User manual

Ryobi
Ryobi PCN3840-RY74005D, PCN4545-RY74 User manual

Ryobi
Ryobi RCS5133CB User manual

Ryobi
Ryobi CS-1840 Operation manual