Saab 95 2010 User manual

Quick Reference Guide
QG_9-5_RoW_MY11 USA-varianten med poslista.fm Page 1 Friday, August 27, 2010 9:46 AM

2
Safety Belts
Safety belts are the single most effective
safety devices in your vehicle. DO NOT let
anybody, including rear seat passengers,
ride in the vehicle without buckling their
safety belts, or child safety seats.
To wear the safety belt properly (for adults
only):
1 Close and lock the door.
2 Adjusttheseatsoyoucansitupstraight.
3 Pick up the latch plate and pull the belt
across you.
4 Push the latch plate into the buckle until
it clicks.
5 Check that the belt fits snugly. The lap
part of the belt should be worn low and
snug on the hips, just touching the
thighs.Theshoulderbeltshouldgo over
the shoulder and across the chest. To
make the lap part tight, pull up on the
shoulder belt.
Adjust the safety belt so that it is as high as
possible. The belt should be well in on the
shoulder.
Note: The following is an overview of
your vehicle safety features and is not
intended to replace the specific instruc-
tions found in your vehicle Owner Man-
ual. Please read your Owner Manual for
complete details about your vehicle
safety features.
SAFETY BELTS
This Quick Reference Guide provides an overview of some important features and func-
tions in your 2011 model year Saab 9-5. More detailed operating information as well as
important safety informationassociated with the proper careand useofthe vehicle canbe
found in your Owner´s Manual. Carefully review theOwner´s Manual before operating the
vehicle.
Some optional equipment 3 described in this guide may not be included in your vehicle.
For easy reference, keep this guide with your Owner Manual in your glove box.
3denotes optional equipment
QG_9-5_RoW_MY11 USA-varianten med poslista.fm Page 2 Friday, August 27, 2010 9:46 AM

3
INSTRUMENT PANEL
Note: Refer to your Owner´s Manual to learn about the information being relayed by the
lightsand gaugesof theinstrumentcluster,aswellas whatto dotohelpensure safetyand
prevent damage to your vehicle.
See Instruments and Controls in your Owner ´s Manual.
1 Light switch
2 Head-Up display operation switch 3
3 Side air vents
4 Turn and lane-change signals, headlight
flash, low beam and high beam
5 Steering wheel shifter for automatic
transmission *
6 Tachometer
7Horn
8 Speedometer, odometer, Driver Information
Center
9 Fuelgauge,boostgauge,enginecoolanttem-
perature gauge
10 Head-Up display 3
11 Windscreen wiper, windscreen washer sys-
tem, headlight washer system
12 Center air vents
13 Night panel
14 Anti-theft alarm system status LED
15 Info-Display
16 Hazard warning flashers, child locks, central
locking system
17 Infotainment system
18 Front passenger airbag
19 Glovebox
20 Climate control system
21 Selector lever
22 Start/Stop button
23 Parking brake
24 Universalparkingassist 3,Advancedparking
aid 3, Lane departure warning 3
25 Traction Control system, Electronic Stability
Program
26 Accelerator pedal
27 Brake pedal
28 Clutch pedal
29 Audio/Phone controls
30 Steering wheel adjustment
31 Cruise control
32 Storage compartment,fuse box
33 Hood release lever
QG_9-5_RoW_MY11 USA-varianten med poslista.fm Page 3 Friday, August 27, 2010 9:46 AM

4
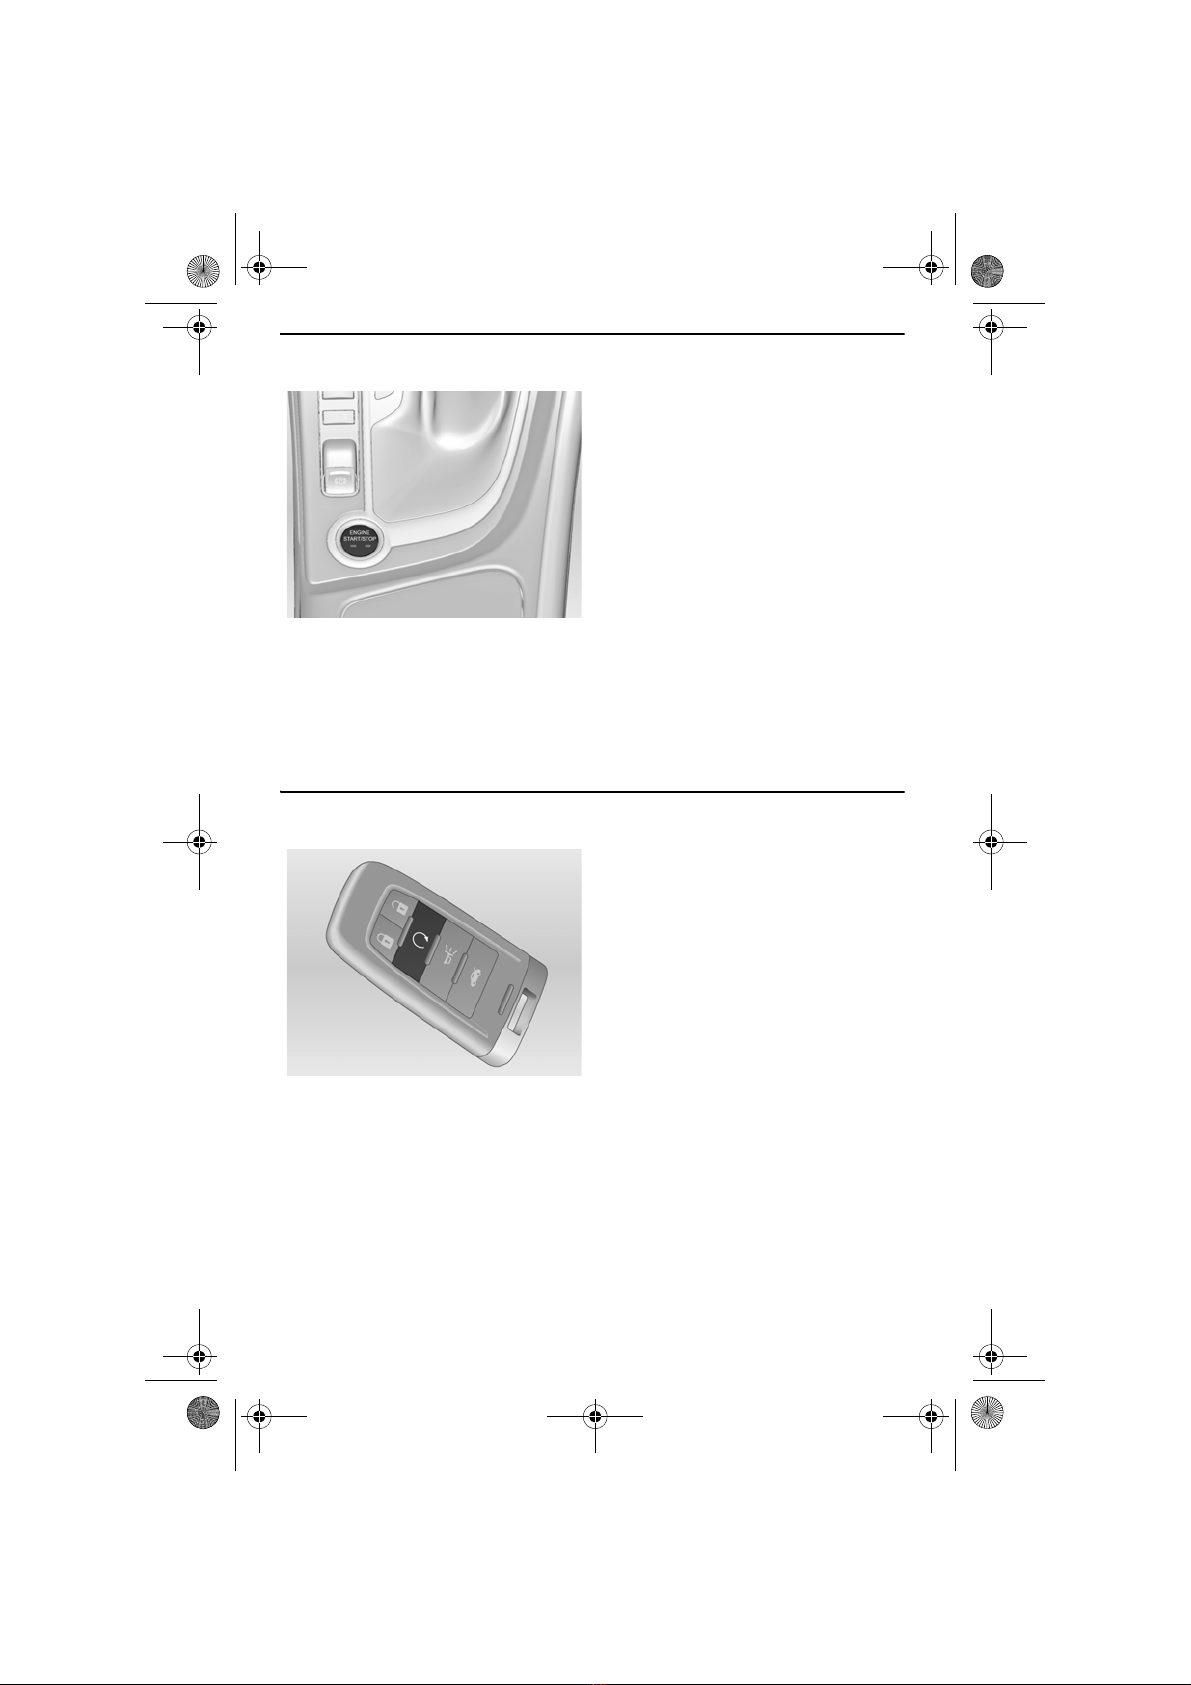
KEYLESS REMOTE CONTROL
eLock
Pressto lockalldoors,the trunkandthe fuel
fillerdoor.Thedriver’sdoorwillnotlockifthe
door is open.
Passive Entry 3
Touch the sensor field of the exterior door
handle on one of the front doors. All doors,
load compartment and fuel filler flap are
locked.
Ifthedriver'sdooris notclosedproperly,the
central locking system will not work.
3seconds must pass beforethe vehicle can
beunlocked.Withinthis time,itispossibleto
check whether the vehicle is locked.
Note: The passive entry system does not
lock the vehicle automatically.
The sensor fields in the door handles must
be kept clean to ensure unrestricted func-
tionality.
cUnlock
Press to unlock the driver’s door only or all
doors, the trunk and the fuel filler door.
The unlock setting can be changed in the
Vehicle Settings menu by using the audio
system controls.
sTrunk
Press to unlock and open the trunk. The
trunkalsocanbeopenedmanuallybypress-
ing the button above the license plate if the
vehicle is unlocked.
BPanic Alarm
Pressand hold forthreeseconds toactivate
the alarm. The turn signal lamps will flash
and the horn will sound for 30 seconds, or
until the button is pressed again or the igni-
tion is turned on.
See Keys, Doors and Windows in your
Owner´s Manual.
Symbols
XSafety Belt Reminder
ZCheck Engine
ALow Tire Pressure
RBrake System Warning
uAntilock Brake System
Warning
pCharging System
IOil Pressure
vAirbag Readiness
oSecurity
Foglamps
mCruise Control Set
kTraction Control Off
Electronic Stability Pro-
gram/Traction Control
Off
bElectronic Stability Pro-
gram/Traction Control
Warning
Lights On
QG_9-5_RoW_MY11 USA-varianten med poslista.fm Page 4 Friday, August 27, 2010 9:46 AM
5
START/STOP BUTTON
Starting the Engine
With the remote control in the vehicle and
the vehicle in Park or Neutral, press the
brake pedal and then press the START/
STOP button to start the engine.
Note: If the remote control battery is weak,
place the remote control in the pocket near
the cupholder in the center console to
enable the engine to start.
Stopping the Engine
With the vehicle stopped, press the brake
pedal, shift to Park and then press the
START/STOP button to turn off the engine.
Accessory Power Mode
Withthe engine off and withoutpressing the
brakepedal,presstheSTART/STOPbutton
once to operate some accessories.
Ignition On Power Mode
Withthe engine off and withoutpressing the
brake pedal, press and hold the START/
STOP button for 3 to 5 seconds to operate
all electrical functions.
See Driving and Operating in your
Owner´s Manual.
REMOTE ENGINE START3
If available, this feature allowsthe engine to
be started from outside the vehicle with the
remote control.
The button Owill be on the remote control
if the vehicle has remote engine start.
Starting the Engine
• The selector lever has to be in Pand the
vehicle has to be locked .
• Press and hold Ountil the turn signal
lamps flash. This confirms the request to
remote start the vehicle has been
received. Once the engine is started, the
parking lamps will turn on and remain on
as long as the engine is running.
• Unlock the vehicle by pressing cbefore
entering.
• Press button Start/Stop once, press
brake pedal and and move selector lever
out of Pto drive the vehicle.
Theremoteenginestarthasanapproximate
range of up to 50 ft (15 metres). It can be
restricted by external influences.
To switch off the engine after a
Remote Engine Start
• Pressand holdOuntiltheparkinglamps
turn off.
• Turn on the hazard warning flashers.
• Turn the ignition on and then back off.
See Driving and Operating in your
Owner´s Manual.
QG_9-5_RoW_MY11 USA-varianten med poslista.fm Page 5 Friday, August 27, 2010 9:46 AM

6
POWERDOOR LOCKS/CHILD SAFETY LOCKS
• Press the FRear Door Child Lock
button on the center of the instrument
panelto preventa reardoor fromopening
from the inside.
• Press the power door c Unlock/ e Lock
button on the center of the instrument
panel to unlock or lock all doors.
See Keys, Doors and Windows in your
Owner´s Manual.
QG_9-5_RoW_MY11 USA-varianten med poslista.fm Page 6 Friday, August 27, 2010 9:46 AM

7
DRIVER INFORMATION CENTER
TheDriverInformationCenterontheinstrumentclusterdisplaysavarietyofvehiclesystem
information and warning messages.
•MENU
Press to display the:
-Trip menu/Fuel Information menu
(digital speedometer, trip odometers,
fuel range, average fuel consumption,
instantaneous fuel consumption, aver-
agevehiclespeed,distance,estimated
time of arrival, and navigation 3).
- Vehicle Information menu (units,
speed warning, battery voltage,
remaining oil life, tire pressure, and
compass).
• Rotate the switch to scroll through the
items of each menu.
•SET/CLR
Press to set or clear the displayed
menu item or warning message.
See Instruments and Controls in your
Owner´s Manual
POWER SEATS
Power Seat Adjustment 1. Length and height
2. Seatback angle
See Driving and Operating in your
Owner´s Manual.
QG_9-5_RoW_MY11 USA-varianten med poslista.fm Page 7 Friday, August 27, 2010 9:46 AM

8
HEAD-UP DISPLAY 3
The Head-Up Display (HUD) projects a range of vehicle information on the windshield,
reducing the need to look away from the road.
OFF
Turn fully counterclockwise to turn off the
display.
Brightness
Rotate to brighten or dim the display.
PAGE
Press to select one of three display formats.
Up/Down
Press to adjust the up/down position of the
display.
See Instruments and Controls in your
Owner´s Manual
QG_9-5_RoW_MY11 USA-varianten med poslista.fm Page 8 Friday, August 27, 2010 9:46 AM
9
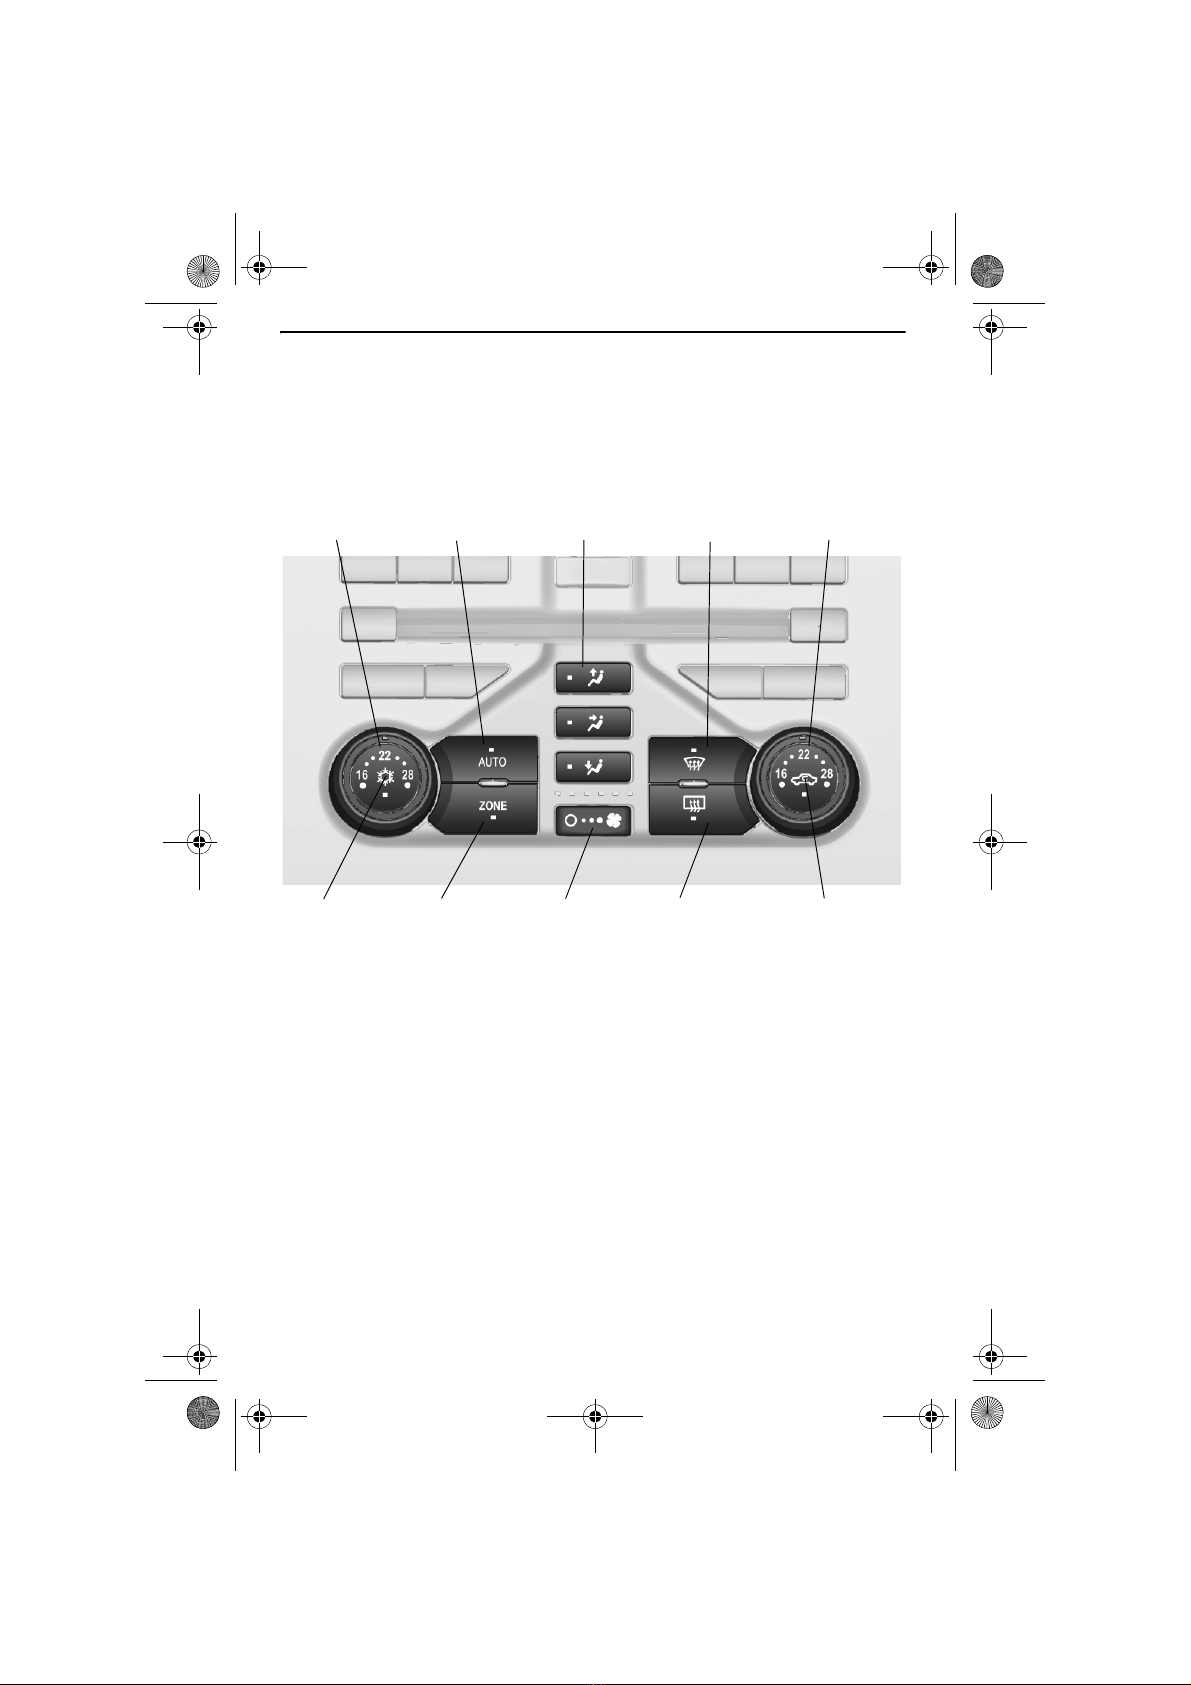
CLIMATE CONTROLS
Driver’s tem-
perature con-
trol
AUTO
Automatic oper-
ation Air delivery
modes Defrost mode
Passenger’s
temperature
control
Air conditioning
control ZONE
Link all zones
to driver’s set-
tings
Off/Fan control Rear window
defogger con-
trol
Recirculation
mode
Automatic Operation
1. Press AUTO.
2. Set desired temperature. Allow time for the system to automatically reach the desired
temperature. The fan speed and air distribution automatically regulate the airflow.
Note: The recirculation mode can help to quickly cool the air inside the vehicle or prevent
outside odors from entering the vehicle. When the recirculation mode is used without air
conditioning, the air humidity increases and the windows may fog.
See Climate Controls in your Owner´s Manual.
QG_9-5_RoW_MY11 USA-varianten med poslista.fm Page 9 Friday, August 27, 2010 9:46 AM

10
AUDIO SYSTEM
Audio system with HDD/DVD/CD and Navigation shown
See Infotainment System in your Owner´s Manual.
1Power/Volumev
2 RADIO BAND: FM, AM, XM
3 Play an audio file, DVD or portable
audio device 3
4 Open or select menus
5 SEEK:Previousradiostation,track or
file
6 SEEK: Next radio station, track or file
7 Tune radio stations or play/pause
audio or video
8 Auto Store list
9 Phone menu or mute the speakers
10 Display pages of favorite radio sta-
tions or stored favorites list
11 LED, disc inserted
12 Open the Settings menu
13 Open the Sound menu
14 Time setting
15 Move back in a menu
16 Disc slot
17 Song information
18 Delete current file 3
19 Record content 3
20 Eject disc
21 Repeat voice guidance 3
22 Navigation map screen 3
23 Destination screen 3
QG_9-5_RoW_MY11 USA-varianten med poslista.fm Page 10 Friday, August 27, 2010 9:46 AM
Table of contents
Other Saab Automobile manuals

Saab
Saab V4 User manual

Saab
Saab 2001 9-3 User manual

Saab
Saab 900 Convertible User manual

Saab
Saab 95 Estate Instruction manual

Saab
Saab 96 User manual

Saab
Saab 99 User manual

Saab
Saab 9000 User manual

Saab
Saab 2005 9-7X User manual

Saab
Saab 9000 M 1998 User manual

Saab
Saab 2000 9-5 2.3 Turbo Ecopower User manual


