Salini SCI-4052B User manual


-1-
CONTENTS
Important safety information
2-4
Description of the appliance
5
Control panel
6
Installation
7-10
Cleaning and Maintenance
11-12
Technical data
13
Declaration of conformity
14
IMPORTANT:
This User Instruction Manual contains important information, including safety &
installation points, which will enable you to get the most out of your appliance.
Please keep it in a safe place so that it is easily available for future reference; for you
or any person not familiar with the operation of the appliance.

-2-
IMPORTANT SAFETY INFORMATION
WARNING: Do not use or attempt to install this appliance until you
have read this instruction manual. This appliance is intended for
household use only.
General Information
This appliance is designed for domestic household use and designed be built into a standard
kitchen cabinet or housing unit.
IMPORTANT: Your product warranty will be void if the installation is not in accordance with
the instructions. The installation must be carried out by a suitably qualified person, in
accordance with the manufacturer’s instructions, and must be connected in accordance with
all local electrical rules specification.
The use of this appliance for any other purpose or in any other environment will void
warranty.
Your new appliance is guaranteed against electrical or mechanical defects, subject to certain
exclusions, the foregoing does not affect your statutory rights.
Repairs may only be carried out by Service Engineers or an authorised service agent.
Check the appliance for damage after unpacking it. Do not connect or install the appliance if
it has been damaged in transport as this will void the warranty.
Warning and safety instructions
CAUTION: The appliance and its accessible parts become hot during use.
Care should be taken to avoid touching heating elements. While in
operation, direct contact with the hob may cause burns.
This appliance complies with all current Australian and European safety legislation, and
designed to operate safely in normal use, however the appliance surfaces will become hot
during use and retain heat after operation.
This appliance is not intended for use by persons (including children) with reduced physical,
sensory or mental capabilities, or lack of experience and knowledge, unless they have been
given supervision or instruction concerning use of the appliance by a person responsible for
their safety.
During use the appliance becomes hot. Care should be taken to avoid touching the ceramic
hobs.
The first few times the hob top is used, it may give off an acrid, burning smell. This smell
will disappear completely with repeated use.
Do not switch on the hob until a pan has been placed on it.

-3-
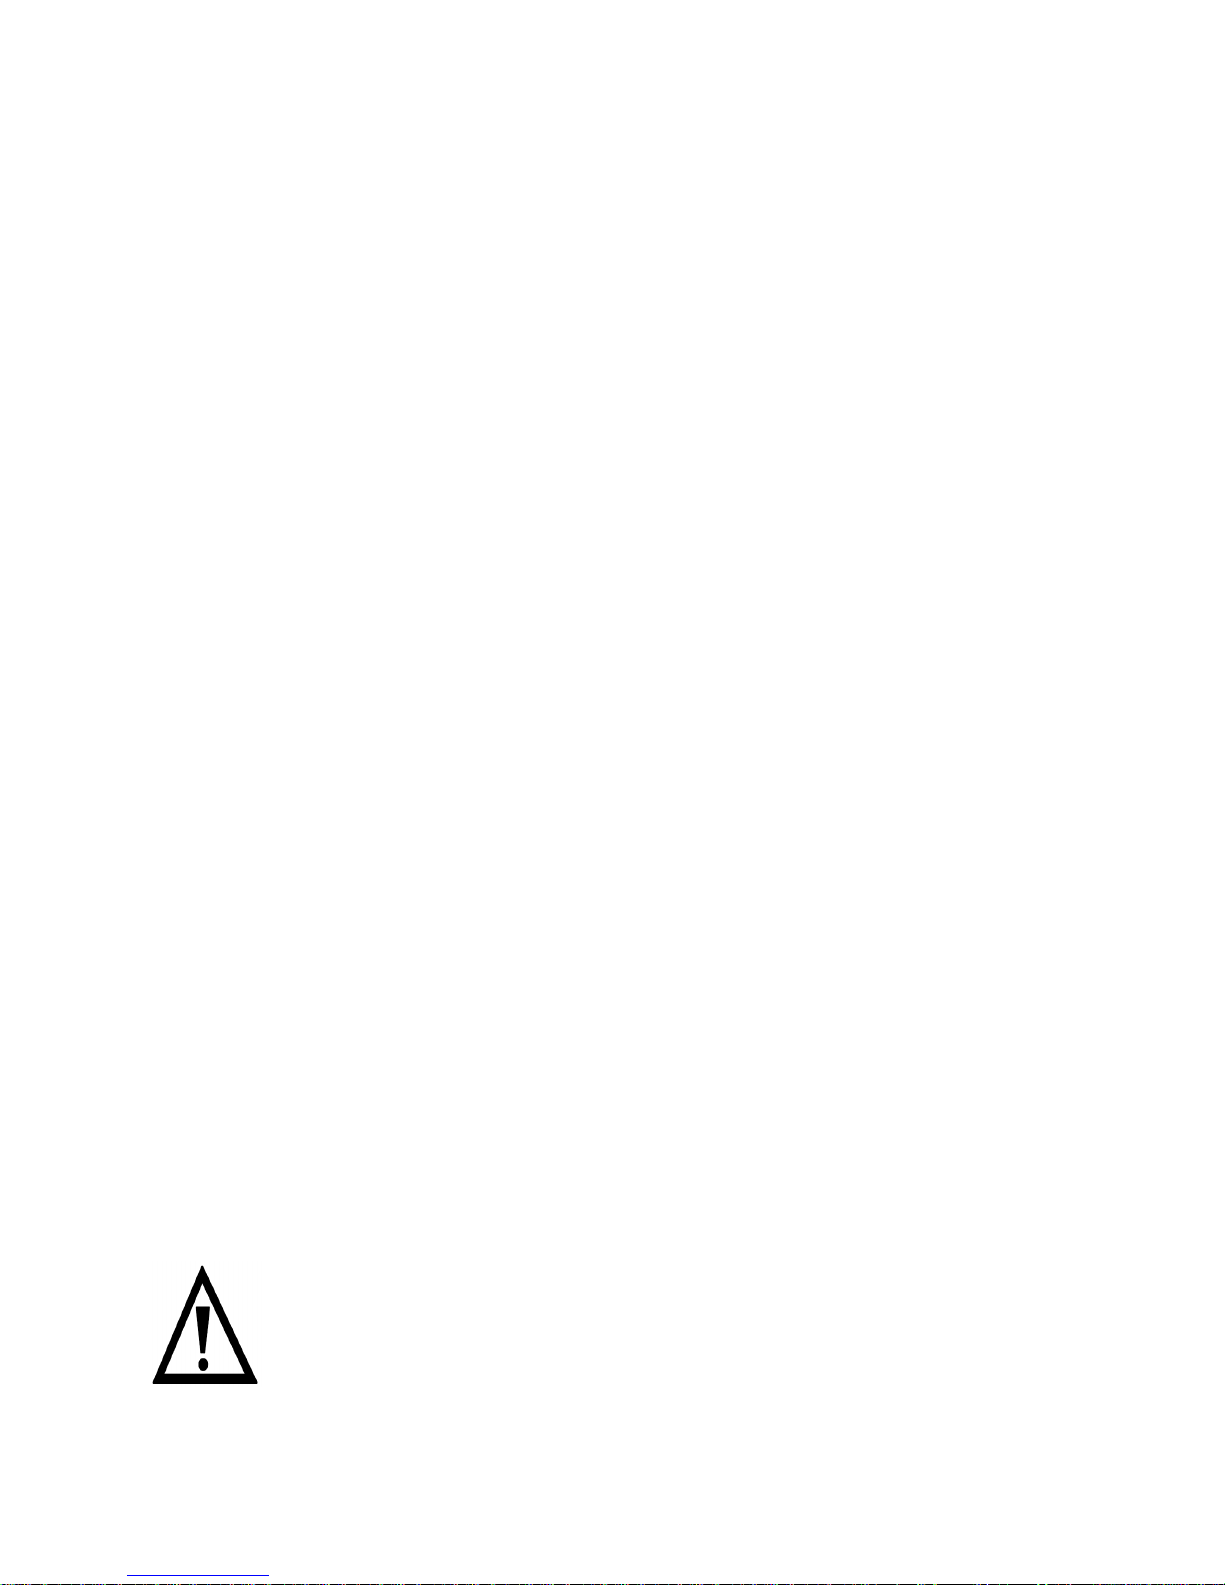
The positions where the heat will radiate from are clearly marked on the hob top. The
saucepans must be positioned exactly on these zones for efficient heating to occur. Pans
should have the same diameter as the cooking zone that they are being used on.
You should not use saucepans with rough bottoms, as this can scratch the ceramic surface.
Before use, make sure that the bottoms of the saucepans are clean and dry.
Do not put pans weighing over 25kg on the hob.
The best thickness for the bottom of the pans is 2 –3 mm of enamelled steel and 4 –6 mm
for stainless steel with sandwich type bottoms.
If these rules are not followed, then there will be a great loss of heat and energy. Heat not
absorbed by the saucepan, will spread to the hob, frame and surrounding cabinets.
Food or liquid that has high sugar content may damage the hob top if it comes into contact
with the ceramic hob surface. Any spillages should be wiped up immediately, however this
may not prevent the hob surface from becoming damaged.
Do not leave ceramic hob unattended when frying. Oils and fats may catch fire due to
overheating or boiling over.
Do not use the hob if the surface becomes broken or cracked. You should switch off the
appliance to avoid the possibility of electric shock; contact the dealer customer care
department immediately.
Do not use the ceramic hob in the event of a technical fault. Any faults must be fixed by an
appropriately qualified and authorized person.
In the event of any incident caused by a technical fault, disconnect the power and report
the fault to the service centre to be repaired.
Ensure that small items of household equipment, including connection leads, do not touch
the hob as the insulation material of this equipment is usually not resistant to high
temperatures.
Never try to extinguish a fire with water, but switch off the appliance and then cover flame
e.g. with a lid or a fire blanket.
The appliance is not intended to be operated by means of an external timer or separate
remote-control system.
Cleaning should be carried out in accordance with the “Cleaning and Maintenance” section
to avoid possible hazards
Use only hob guards designed by the manufacturer of the cooking appliance or indicated by
the manufacturer of the appliance in the instructions for use as suitable or hob guards
incorporated in the appliance. The use of inappropriate guards can cause accidents.
IMPORTANT: The ceramic hob surface is designed to be tough; however can be damaged.
Especially if pointed or hard objects are allowed to fall on it with some force.
CAUTION: Do not use the hob if the surface becomes broken or
cracked. You should switch off the appliance to avoid the possibility of
electric shock; contact the dealer customer care department
immediately.

-4-
Electrical Caution
CAUTION! Cleaning operations must only be carried out when the oven is cool and
disconnected from the power supply.
Any work on electric equipment and systems may only be carried out by authorized
qualified persons.
In case of any damage, switch off the appliance and disconnect it from the power supply
If the supply cord is damaged, it must be replaced by the manufacturer, its service agent or
similarly qualified persons in order to avoid a hazard.
WARNING: Ensure that the appliance is switched off before replacing the lamp to avoid the
possibility of electric shock.
Child Safety
WARNING: Accessible parts may become hot during use.
We strongly recommend that babies and young children are prevented from being near to
the appliance and not allowed to touch the appliance at any time.
If it is necessary for younger family members to be in the kitchen, please ensure that they
are kept under close supervision at all times.
When the door is open, do not allow children to sit or lean onto it. It may overturn causing
harm and the door hinges may get damaged.
Cleaning and user maintenance shall not be carried out by children without supervision.
The packaging materials will be dangerous for children. Keep the packaging materials away
from children. Please dispose of all parts of the packaging according to environmental
obligation.

-5-
DESCRIPTION OF THE APPLIANCE
Induction hob 4 zone schematic diagram

-6-
Induction hob control panel
ON/OFF: Turn the machine on or off
CHILD LOCK: Press button once to lock the appliance. Other buttons will not operate
while appliance is locked. Hold the button down to unlock.
PLUS: Increase the power level or add the time.
MINUS: Reduce the power level or reduce the time.
DISPLAY: Shows power level and error code.
DISPLAY: Shows time.
LEFT REAR BURNER: Selects left rear burner.
RIGHT REAR BURNER: Selects right rear burner.
LEFT FRONT BURNER: Selects left front burner.
RIGHT FRONT BURNER: Selects right front burner.
TIMER: Set the time as required.

-7-
INSTALLATION
The installation must be carried out by a suitably qualified person, in
compliance with local electrical and building rules and specifications,
and the instructions outlined in this manual.
IMPORTANT:
Ensure that the appliance is installed in a suitable position, in consideration to adjacent
walls, cupboards and protection for combustible materials in accordance with local rules.
The kitchen units that are in direct contact with the appliance must be heat proof (min. 80°C).
The appliance can be installed on a work surface with a thickness of between 30mm and
40mm, as well as near to walls which are higher than the work surface, maintaining a
minimum distance of 100mm.
Carry out all cutting of the unit and work surface then carefully remove shavings or sawdust
before inserting the appliances.
To ensure a correct ventilation of the hob, please comply with the dimensions shown.
The electric hob must be installed into the cabinet before use and testing.
Make sure the surface is level and square and that no part interferes with the space required
for installation.
Prepare the cut-out as indicated (see installation dimensions)
1. Drill holes on the bench surface according
to the size shown in the drawing. For the
purpose of installation and use, a
minimum of 50mm space must be
preserved around the hole.
Ensure the thickness of the bench surface
is at least 30mm. Please select heat
resistant material to avoid deformation or
damage caused by heat radiation from the
stovetop.

-8-
2. Due to the high temperatures reached inside the Induction Cooker, you must ensure
adequate ventilation is provided to assure the appliance will operate correctly. Follow the
guidelines below for correct ventilation.

-9-
3. If the hob is installed on top of a drawer, put a shelf in between as shown below (50mm)
4. If shelves are put in between, ensure that they allow air to flow (30mm)
IMPORTANT: In the case of units with base plinths, a front grill is necessary which
allows an input section of at least 100 sq. cm.
WARNING: Do not install the hob on top of a refrigerator or dishwasher.

-10-
Installing the Induction Cooktop
WARNING: Be careful of cutting edges. End parts are in foamed plastic.
During unpacking these components could cause slight injuries or cuts.
Step 1: Put a towel or cloth on the work surface. Place the hob face down on the protected
surface.
Step 2: Apply the strip seal, supplied with the hob, which is for sealing it onto the work surface.
Do not use silicone. Apply the seal to the edge of the bottom of the hob, about 3mm from the
edge of the glass. Apply the seal all around the circumference. Cut any excess and bring the two
ends of the seal together so they match.
Step 3: Use the screws to fasten the four brackets, centre the hob in the space cut out of the
work surface.

-11-
CLEANING AND MAINTENANCE
CAUTION!
Cleaning operations must only be carried out when the hob is cool. The
appliance should be disconnected from the power supply before
commencing any cleaning process.
Cleaning the ceramic hob top
Any residues that are left on the hob top surface from cleaning agents will damage
it. You should remove any residues with warm water mixed with a little washing up
liquid.
Abrasive cleaners or sharp objects will damage the hob surface; you should clean it
using warm water mixed with a little washing up liquid.
You may find it easier to clean some deposits whilst the hob surface is still warm.
However you should take care not to burn yourself if cleaning the hob surface when
it is still warm.
Do not pour water directly on the appliance, if water gets inside the appliance it may
cause a malfunction. Instead use a moistened cloth.
Ensure the crystal glass plate and the cooking pan are clean and clear of any foreign
particles. An unclean surface may cause charring which may result in discolouration
or start a fire.
A toothbrush with a gentle dishwashing detergent can be used to remove oil based
or charred spillages.
After each use
Wipe the appliance over with a damp cloth.
Dry the appliance by rubbing the surface with a clean cloth.
Important!
DO NOT use any corrosive cleaning products or abrasive cleaners. Only clean with warm
water and a small amount of washing-up liquid.
CAUTION!
Ensure the heating plate is clean. A soiled zone does not transfer all of
the heat. Protect the hob against corrosion. Switch off the hob when not
in use. Do not leave pans with prepared dishes based on fats and oils
unattended on the switched on plate; hot fat can spontaneously catch
fire.

-12-
IMPORTANT:
If your appliance appears not to be operating correctly, please make contact
with the dealer.
DO NOT ATTEMPT TO REPAIR THE APPLIANCE YOURSELF!
Please note that if an engineer is asked to attend whilst the product is under guarantee and
finds that the problem is not the result of an appliance fault, then you may be liable for the
cost of the call out charge.
The appliance must be accessible for the engineer to perform any necessary repair. If your
appliance is installed in such a way that an engineer is concerned that damage will be
caused to the appliance or your kitchen, then they will not complete the repair.

-13-
TECHNICAL DATA
Specifications
Model
Rated Voltage:
Max Rated
Inputs:
Dimensions
(mm)
Net Weight
(kg)
SCI-4052B
220-240V ~ 50Hz
7000W
580x510x65
12.6

-14-
DECLARATION OF CONFORMITY
Australian Standards
This product has been designed and manufactured to comply with all relevant Australian
and New Zealand Standards.
AS/NZS 60335.1 General Requirements for Domestic Electrical Appliances
AS/NZS 60335.2.6 Specific Requirements for Domestic Electrical Cooking Appliances
This appliance is SAA certified
Installation of the appliance must be only be undertaken by a licenced electrician who can
provide a compliance certificate.
This appliance is intended for domestic use only.
European Standards
oCE: Appliance conforming to the European 2004/108/EC EMC Directive.
oThe manufacturer declares that the oven is built using certified materials and
requires the appliance to be installed in accordance with the standards currently in
force. This appliance must be used by a trained person for domestic purposes only.
*The RoHS directive stands for “the restriction of the use of certain hazardous
substances in electrical and electronic equipment”. This directive bans the placing on
the EU market of new electrical and electronic equipment containing more than the
agreed levels of lead, cadmium, mercury, hexavalent chromium, polybrominated
biphenyl (PBB) and polybrominated diphenyl ether (PBDE) flame retardants.
European directive 2002/96/EC on Waste Electrical and Electronic Equipment (WEEE) (for
European Union countries only)
This appliance is marked according to the European directive 2002/96/EC on Waste
Electrical and Electronic Equipment (WEEE). By ensuring this product is disposed of
correctly, you will help prevent potential negative consequences for the environment and
human health, which could otherwise be caused by inappropriate waste handling of this
product.
The symbol on the product, or on the documents accompanying the product, indicates that
this appliance may not be treated as household waste. Instead it shall be handed over to
the applicable collection point for the recycling of electrical and electronic equipment.
Disposal must be carried out in accordance with local environmental regulations for waste
disposal.
For more detailed information about treatment, recovery and recycling of this product,
please contact your local city office or your household waste disposal service.

Table of contents
Other Salini Cooktop manuals
Popular Cooktop manuals by other brands

Bompani
Bompani BO219MA/N Instructions for the installation and use

MBM
MBM EFTA477 operating instructions

Whirlpool
Whirlpool 30" (76.2 cm) Cooktop Use & care guide

NuWave
NuWave PIC Gold Owner's manual & complete recipe book

Jenn-Air
Jenn-Air JEC8430 installation instructions

Electrolux
Electrolux EW30IC60LB Product specifications

Bertazzoni
Bertazzoni P24400X Installation, service and user instructions

Hartmann
Hartmann CTCS 3 Instruction & installation manual

Dacor
Dacor Millennia ETT304-1 installation instructions

KitchenAid
KitchenAid KCGD500GSS Use and care guide

Frigidaire
Frigidaire FED367ASF Wiring diagram

Amana
Amana AEZ8581 installation instructions